Table of Contents Show
Overcome crisis and the unrelenting pressure of a frozen ocean. Flee or fight alien lifeforms, explore a strange new world in Jupiter’s orbit, command your crew and craft equipment in a tense 2D experience.
Content
1. Submarine Editor Basics
2. Crafting Recipes
3. Console Commands (Server Commands)
4. The Medical Doctor’s Guide
5. Official Submarine Builder’s Manual
#1 Submarine Editor Basics
Whilst I’m not a professional sub builder and I haven’t uploaded anything to the workshop yet, I’d like to help out the community by providing a basic guide to the sub editor so people can, at the very least, make easy modifications to other subs or make basic structures.
Any suggestions, questions, comments, or mistakes I made, please tell me. I’m open to any and all feedback relevant to this.
Warnings and disclaimers: I am by no means a professional, and everything in this guide is subject to change as the game is still in early access. In addition, making a submarine is very taxing & is often times not the most enjoyable or fun thing to do. Lastly, I highly suggest you don’t make cheat submarines in order to remove the fun & challenge of the game.
The Easy Parts
The Barotrauma submarine editor isn’t very user friendly, and even most workshop uploaders haven’t offered or provided much insight on how to use it. It’s certainly something you need to experiment with & figure out on your own.
Controls
The controls are pretty simple and much like the normal game, it’s mostly just figuring out where to put what and how to make things work together. The DEL key on your keyboard is used to delete objects, and you can use WASD and the mouse to zoom in & out and navigate the area. Not sure what else to put here, so I’ll conclude it here.
Once you enter the sub editor, all you see is a blue backdrop and some menus around the borders of the game. At the top, you have your file controls & the submarine placer. The submarine placer allows you to place the outline of a submarine into the editor – AND WHEN YOU LOAD THE SUB IN-GAME, IT WILL SPAWN THE ACTUAL SUB – And also connect it to a docking hatch aboard the actual sub. Then you have the Back button, the Open button, and the Save button. Using open, you can access all your current .sub files and load them in. Editing a submarine you’ve opened does not change the sub file, unless you save it over the original sub file. If you accidentally overwrite a vanilla sub, you can back it up using the file verification system under Properties. You can easily make a modified version of a vanilla sub if you open the .sub file, make your modifications, and then save it under a different name. This preserves the default sub that comes with the game or the original file, but also makes a new .sub file for you to use.
There is also wiring mode. You need to know how to wire stuff & how wiring works. I’m not sure if there’s a tutorial on this, but it’s just like if you wire something on a sub-ingame. Except you are just a floating screwdriver with infinite wires. I’m not going to add anything else here since I don’t know what else to add.
Character mode
You can use this mode to store items in containers. If you aren’t in character mode, you have your editor box at the bottom. You can search for & place down an item in the editor, enter character mode, pick it up in character mode, and then put the item in a container or in a weapon. Character mode allows you to interact with stuff as if you were a character, it does not spawn an actual character or entity into the game. You can also wire stuff in this mode. You can probably repair stuff, but I haven’t tried that yet.
Visibility
The visibility tab is on the left side by default. You can toggle lighting, walls, structures, items, waypoints, spawnpoints, links, hulls, and gaps. Lighting is for any lights you have on-board and also makes the background darker & more like the actual game. Items is for things like fabricators and storage. Waypoints are only used for AI, so it’s optional but will make your ship incompatible for AI. Spawnpoints are where you & your crew spawn – if you have none, you spawn next to the colony and die almost instantly from the pressure. Having multiple is recommended. Links are wires & other links, like a weapon periscope to a weapon or a junction box to a reactor.
Walls are the backgrounds. They have no collision and aren’t even necessary to prevent water from coming in, but highly recommended for the interior of a sub. Structures are things like the floor, ceiling, doors, and the shell of the submarine/shuttle. Hulls are what mark the interior of the shuttle – If there is a hull, water will not be there. Hulls are also for individual rooms, you do not want one hull for the whole sub, as this will mean one little leak floods the whole thing. Gaps are for separating hulls & allow air & water to go through. Most doors and hatches automatically generate gaps, though. I’m not exactly sure how the game handles water going through a gap, but having a hatch usually stops it.
The complicated part
This is the hard part, and where I can’t explain everything. Most of the stuff here is on you and up to you to figure out.
Shells
Shells are the exterior of the ship. They have collision and players can’t go through them. Hulls aren’t needed in the space between a room and a shell. The game has multiple shells available, but currently only 2 variants are available – Shuttle shells and Shell A. Each variant has multiple & varying degrees. The most helpful advice I can offer for placing shells is mirroring them. By this, I mean if you click on the shell, you will see a bunch of options & data come up. Near the bottom of the interface are some buttons, labeled “Mirror X”, “Mirror Y”, and some others. “Mirror Y” will be the most helpful for creating the underside of the ship. Finally, most shells or shell-objects (such as chains or tailfins) have been designed for specific vanilla ships. However, the Shell-A is used for all ships and should be able to create most things. Just don’t try to make any 90 degree angles, it won’t work out well.
Walls
Walls are slightly difficult to place and their scaling is a bit weird. You can edit the texture scaling by clicking on them, though, if you want to make some adjustments. I can’t explain how to place walls correctly as it’s a bit confusing & wonky, but not hard to figure out. Walls have no effect on gameplay, but they are pretty much essential if you want your sub to look like a sub.
Inside walls
Inside walls are walls that have collision and players can walk on (and, if you have a plasma cutter, cut through.) These are how you make rooms. There aren’t very many variations of wall, but you’ll manage. There isn’t very much to them.
That’s it from me. I’m not entirely sure what else to add, so leave me some suggestions if you have any. If you have any questions, feel free to ask, and I’ll answer them to the best of my ability.
Overcome crisis and the unrelenting pressure of a frozen ocean. Flee or fight alien lifeforms, explore a strange new world in Jupiter’s orbit, command your crew and craft equipment in a tense 2D experience.
Other Barotrauma Guides:
#2 Crafting Recipes
List of all craftable and deconstructable items in Barotrauma.
Use CTRL-F to find what you want or just browse through using the categories.
Fabricator

The Fabricator is used to craft different types of items, equipment, weapons and so on.
It currently allows crafting of 75 different items.
- 47 require no skill to be crafted
- 14 need the mechanical skill to be crafted
- 12 need the weapons skill to be crafted
- 2 need the medical skill to be crafted
Tools
| Item | Materials | Time | Skill |
| Plasma Cutter | Steel Bar, Plastic | 20s | Mechanical 30 |
| Welding Tool | Steel Bar, Plastic | 20s | Mechanical 30 |
| Crowbar | Iron | 20s | Mechanical 30 |
| Screwdriver | Iron | 20s | |
| Wrench | Iron | 20s |
Equipment
| Item | Materials | Time | Skill |
| Underwater Scooter | 2x Aluminium | 30s | |
| Diving Mask | 2x Rubber, Plastic | 20s | Mechanical 25 |
| Diving Suit | 2x Rubber, Titanium-Aluminium Alloy | 30s | Mechanical 40 |
| Flashlight | Aluminium, Light Component | 10s | |
| Handheld Sonar | FPGA Circuit, Plastic | 10s | |
| Sonar Beacon | FPGA Circuit, Plastic | 10s | |
| Ballistic Helmet | Ballistic Fiber | 20s | |
| Body Armor | 2x Ballistic Fiber | 30s | |
| Handcuffs | Steel Bar | 10s | Mechanical 20 |
| Riot Shield | Titanium-Aluminium Alloy | 10s | Mechanical 50 |
| Health Scanner HUD | FPGA Circuit, Plastic | 10s | Medical 50 |
| Headset | FPGA Circuit, Plastic | 10s |
Supplies
| Item | Materials | Time |
| Battery Cell | Zinc, Lithium | 10s |
| Fulgurium Battery Cell | Zinc, Fulgurium Bar | 15s |
| Oxygen Tank (Empty) | Aluminium | 0s |
| Oxygenite Tank | Aluminium, 2x Liquid Oxygenite | 5s |
| Welding Fuel Tank | Aluminium, Ethanol | 10s |
| Welding Fuel Tank (Empty) | Aluminium | 0s |
| Incendium Fuel Tank | Aluminium, Incendium | 0s |
| Fire Extinguisher | Aluminium, Sodium | 10s |
| Flare | Flash Powder (25%), Plastic (25%) | 10s |
| Fuel Rod | Steel Bar, Uranium | 10s |
| Fulgurium Fuel Rod | Steel Bar, Fulgurium Bar | 0s |
Weapons
| Item | Materials | Time | Skill |
| Harpoon Gun | Steel Bar, Plastic | 20s | Weapons 30 |
| Diving Knife | Iron | 10s | Weapons 30 |
| Stun Baton | Steel Bar, Button | 10s | Weapons 30 |
| Syringe Gun | Aluminium, Plastic | 10s | Medical 50 |
| Spear | Steel Bar | 10s | |
| Explosive Spear | Spear, C-4 Block | 10s | |
| Stun Grenade | Iron, Phosphorus, Flash Powder | 20s | Weapons 30 |
| Incendium Grenade | Iron, Incendium | 20s | Weapons 40 |
| EMP Grenade | Iron, Copper, UEX | 20s | Weapons 50 |
| Frag Grenade | Iron, UEX | 20s | Weapons 60 |
| UEX | Sodium, Phosphorus | 20s | Weapons 60 |
| C-4 Block | UEX, Plastic | 20s | Weapons 70 |
| IC-4 Block | C-4 Block, Incendium | 20s | Weapons 50 |
| Coilgun Ammunition Box | Steel Bar, 2x Aluminium | 20s | Mechanical 25 |
| Railgun Shell | Steel Bar | 20s | Mechanical 25 |
| Nuclear Shell | Steel Bar, Uranium, UEX | 30s | Mechanical 40 |
| Depth Charge Shell | Steel Bar, Aluminium | 20s | Mechanical 25 |
| Nuclear Depth Charge | Steel Bar, Uranium, UEX | 30s | Mechanical 40 |
| Depth Decoy Shell | Steel Bar, Aluminium, Sonar Beacon | 20s | Mechanical 25 |
| Nuclear Depth Decoy | Steel Bar, Uranium, UEX, Sonar Beacon | 30s | Mechanical 40 |
| Alien Spear | Physicorium Bar | 20s |
Materials
| Item | Materials | Time |
| Steel Bar | Carbon, Iron | 5s |
| Titanium-Aluminium Alloy | Titanium, Aluminium | 5s |
| Plastic | Silicon, Carbon | 5s |
| Ballistic Fiber | Plastic, Titanium | 5s |
| Flash Powder | Magnesium, Potassium | 5s |
Electrical Items
| Item | Materials | Time |
| Blue Wire | Copper (20%), Rubber (20%) | 5s |
| Red Wire | Copper (20%), Rubber (20%) | 5s |
| Orange Wire | Copper (20%), Rubber (20%) | 5s |
| FPGA Circuit | Plastic, Copper | 5s |
| Button | FPGA Circuit, Plastic | 10s |
| Switch | FPGA Circuit, Plastic | 10s |
| And Component | FPGA Circuit, Tin | 10s |
| Or Component | FPGA Circuit, Tin | 10s |
| Not Component | FPGA Circuit, Tin | 10s |
| Relay Component | FPGA Circuit, Tin | 10s |
| Delay Component | FPGA Circuit, Tin | 10s |
| Signal Check Component | FPGA Circuit, Tin | 10s |
| RegEx Find Component | FPGA Circuit, Tin | 10s |
| Oscillator | FPGA Circuit, Tin | 10s |
| Wifi Component | FPGA Circuit, Tin | 10s |
| Light Component | FPGA Circuit, Phosphorus | 10s |
| Oxygen Detector | FPGA Circuit, Silicon | 10s |
| Water Detector | FPGA Circuit, Silicon | 10s |
| Motion Detector | FPGA Circuit, Silicon | 10s |
| Smoke Detector | FPGA Circuit, Tin | 10s |
| Emergency Siren | FPGA Circuit, Steel Bar | 10s |
| Alarm Buzzer | FPGA Circuit, Tin | 10s |
Medical Fabricator
The Medical Fabricator is used to craft different types of healing, poisonous or sedative chemicals.
It currently allows crafting of 26 different chemicals.
- 1 chemical requires no skill to be crafted
- 25 need the medical skill to be crafted
Chemicals
| Chemical | Materials | Time | Skill |
| Chloral Hydrate | Chlorine, Ethanol | 20s | Medical 30 |
| Compound N | Aluminium, Potassium, Sulphuric Acid | 20s | Medical 60 |
| Volatile Compound N | Compound N, Flash Powder | 20s | Medical 40 |
| Morphine | 2x Opium | 10s | Medical 50 |
| Fentanyl | Morphine, Adrenaline, Ethanol | 20s | Medical 60 |
| Saline | Sodium, Chlorine | 10s | Medical 30 |
| Blood Pack | Alien Blood, Saline, Stabilozine | 10s | Medical 60 |
| Bandage | Organic Fiber | 10s | Medical 30 |
| Plastiseal | Bandage, Elastin | 20s | Medical 50 |
| Antibiotic Glue | Stabilozine, Broad-spectrum Antibiotics, Elastin | 20s | Medical 70 |
| Flash Powder | Magnesium, Potassium | 5s | |
| Deusizine | Antibiotic Glue, Fentanyl, Stabilozine, Liquid Oxygenite | 25s | Medical 70 |
| Calyxanide | Velonaceps Calyx Eggs (25%), Broad-spectrum Antibiotics, Stabilozine | 10s | Medical 60 |
| Naloxone | Morphine, Stabilozine | 10s | Medical 50 |
| Haloperidol | Lithium, Carbon, Chlorine | 20s | Medical 40 |
| Tonic Liquid | Calcium, Zinc, Potassium | 5s | Medical 30 |
| Liquid Oxygenite | Tonic Liquid, Stabilozine, Oxygenite Shard | 10s | Medical 60 |
| Anabolic Steroids | Tonic Liquid, Fentanyl | 20s | Medical 60 |
| Methamphetamine | Phosphorus, Chlorine, Carbon | 20s | Medical 60 |
| Hyperzine | Methamphetamine, Anabolic Steroids | 25s | Medical 60 |
| Morbusine | Sulphuric Acid, 2x Deusizine | 30s | Medical 60 |
| Morbusine Antidote (25%) | Morbusine (25%), Stabilozine (25%) | 10s | Medical 60 |
| Sufforin | Sulphuric Acid, Flash Powder | 30s | Medical 60 |
| Deliriumine | Dementonite Bar | 30s | Medical 60 |
| Cyanide | Chloral Hydrate, Sodium | 30s | Medical 60 |
| Radiotoxin | Thorium, Uranium | 30s | Medical 80 |
Deconstructor

The Deconstructor is used to deconstruct any item into its raw components, however not all items give their components once deconstructed, those that aren’t “deconstructible” will be used up without giving any materials.
Currently 123 items can be deconstructed into their components.
Tools
| Item | Components | Time |
| Welding Tool | Steel Bar, Plastic | 10s |
| Plasma Cutter | Steel Bar, Plastic | 10s |
| Screwdriver | Iron | 10s |
| Wrench | Iron | 10s |
| Crowbar | Iron | 10s |
Equipment
| Item | Components | Time |
| Underwater Scooter | 2x Aluminium | 20s |
| Diving Mask | Plastic, Rubber | 10s |
| Diving Suit | Aluminium, Titanium, Rubber | 30s |
| Flashlight | Aluminium, Light Component | 15s |
| Handheld Sonar | FPGA Crcuit, Plastic | 15s |
| Sonar Beacon | FPGA Crcuit, Plastic | 15s |
| Ballistic Helmet | Ballistic Fiber | 10s |
| Body Armor | 2x Ballistic Fiber | 40s |
| Handcuffs | Steel Bar | 10s |
| Riot Shield | Titanium-Aluminium Alloy | 10s |
| Health Scanner HUD | FPGA Circuit, Plastic | 20s |
| Headset | FPGA Circuit, Plastic | 10s |
Supplies
| Item | Components | Time |
| Battery Cell | Zinc (Minimum 50%)* | 10s |
| Fulgurium Battery Cell | Zinc (Minimum 50%)*, Fulgurium Bar(Minimum 50%)* | 10s |
| Oxygen Tank | Aluminium | 10s |
| Oxygenite Tank | Aluminium, Liquid Oxygenite (1x at 10%/2x at 50%/3x at 90%)** | 10s |
| Welding Fuel Tank | Aluminium | 10s |
| Incendium Fuel Tank | Aluminium | 10s |
| Fire Extinguisher | Aluminium, Sodium | 10s |
| Flare | Flash Powder (25%, Minimum 90%)***, Plastic (25%, Minimum 90%)*** | 10s |
| Alien Flare | Flash Powder (25%, Minimum 90%)***, Plastic (25%, Minimum 90%)*** | 10s |
*Material is given out if the deconstructed item (eg. battery) has the minimum condition.
**A number of the same materials are given out depending on the items current condition (eg. at 50% you will get 2 Liquid Oxygenite).
***Material is given out at the set condition (eg. 25%) if the deconstructed item (eg. flare) has the minimum condition.
Weapons
| Item | Components | Time |
| Spear | Steel Bar | 5s |
| Explosive Spear | Steel Bar | 5s |
| Harpoon Gun | Steel Bar, Plastic | 10s |
| Syringe Gun | Aluminium, Plastic | 10s |
| Revolver | Steel Bar, Plastic | 10s |
| Stun Grenade | Iron, Phosphorus (Minimum 90%)*, Flash Powder (Minimum 90%)* | 10s |
| EMP Grenade | Iron, Copper (Minimum 90%)*, UEX (Minimum 90%)* | 10s |
| Frag Grenade | Iron, UEX (Minimum 90%)* | 10s |
| Incendium Grenade | Iron, Incendium Bar (Minimum 90%)* | 10s |
| Stun Baton | Steel Bar, Button | 10s |
| Diving Knife | Iron | 10s |
| Railgun Shell | Steel Bar | 10s |
| Nuclear Shell | Steel Bar, Uranium, UEX | 10s |
| Depth Charge Shell | Steel Bar, Aluminium | 10s |
| Nuclear Depth Charge | Steel Bar, Uranium, UEX | 20s |
| Depth Decoy Shell | Steel Bar, Aluminium | 10s |
| Nuclear Depth Decoy | Steel Bar, Uranium, UEX | 20s |
*Material is given out if the deconstructed item (eg. grenade) has the minimum condition.
Materials
| Item | Components | Time |
| Steel Bar | Carbon, Iron | 5s |
| Titanium-Aluminium Alloy | Aluminium, Titanium | 5s |
Minerals
| Item | Components | Time |
| Titanite | 3x Titanium, Iron | 5s |
| Brockite | Phosphorus, Thorium | 5s |
| Thorianite | 2x Thorium | 5s |
| Amblygonite | Lithium, Aluminium, Sodium | 5s |
| Sphalerite | 3x Zinc | 5s |
| Pyromorphite | 2x Chlorine | 5s |
| Quartz | 2x Silicon | 5s |
| Diamond | 3x Carbon | 5s |
| Hydroxyapatite | Calcium, 2x Phosphorus | 5s |
| Uranium Ore | 3x Uranium | 5s |
| Ilmenite | Titanium | 5s |
| Stannite | Copper, Iron, Tin | 5s |
| Chalcopyrite | Copper | 5s |
| Esperite | 2x Zinc, Lead | 5s |
| Galena | 3x Lead | 5s |
| Triphylite | Lithium | 5s |
| Langbeinite | Potassium, 2x Magnesium | 5s |
| Chamosite | 2x Iron, 2x Aluminium | 5s |
| Iron Ore | 4x Iron | 5s |
| Polyhalite | Potassium, Calcium | 5s |
| Graphite | 2x Carbon | 5s |
| Sylvite | Sodium 2x Potassium | 5s |
| Lazulite | Phosphorus, Iron | 5s |
| Bornite | Copper | 5s |
| Cassiterite | 3x Tin | 5s |
| Cryolite | Sodium | 5s |
| Aragonite | Calcium | 5s |
| Chrysoprase | Silicon | 5s |
Medical Materials (Plants n such)
| Item | Components | Time |
| Fiber Plant | 3x Organic Fiber | 5s |
| Elastin Plant | 3x Elastin | 5s |
| Aquatic Poppy | 3x Opium | 5s |
| Sea Yeast Shroom | 3x Ethanol | 5s |
| Slime Bacteria | 3x Broad-spectrum Antibiotics | 5s |
Electrical Items
| Item | Components | Time |
| Wire | Copper, Rubber | 5s |
| Red Wire | Copper, Rubber | 5s |
| Blue Wire | Copper, Rubber | 5s |
| Orange Wire | Copper, Rubber | 5s |
| Green Wire | Copper, Rubber | 5s |
| Black Wire | Copper, Rubber | 5s |
| Brown Wire | Copper, Rubber | 5s |
| FPGA Circuit | Plastic, Copper | 5s |
| And Component | FPGA Circuit, Tin | 10s |
| Adder Component | FPGA Circuit, Tin | 10s |
| Or Component | FPGA Circuit, Tin | 10s |
| Not Component | FPGA Circuit, Tin | 10s |
| Relay Component | FPGA Circuit, Tin | 10s |
| Delay Component | FPGA Circuit, Tin | 10s |
| Signal Check Component | FPGA Circuit, Tin | 10s |
| RegEx Find Component | FPGA Circuit, Tin | 10s |
| Oscillator | FPGA Circuit, Tin | 10s |
| Wifi Component | FPGA Circuit, Tin | 10s |
| Light Component | FPGA Circuit, Phosphorus | 10s |
| Oxygen Detector | FPGA Circuit, Silicon | 10s |
| Water Detector | FPGA Circuit, Silicon | 10s |
| Smoke Detector | FPGA Circuit, Silicon | 10s |
| Motion Detector | FPGA Circuit, Silicon | 10s |
| Emergency Siren | FPGA Circuit, Steel Bar | 10s |
| Alarm Buzzer | FPGA Circuit, Tin | 10s |
| Button | FPGA Circuit, Plastic | 10s |
| Switch | FPGA Circuit, Plastic | 10s |
Alien Items
| Item | Components | Time |
| Alien Artifact (Skyholder Artifact) | Steel Bar, 3x Oxygenite Shard | 30s |
| Alien Artifact (Thermal Artifact) | Steel Bar, 3x Incendium Bar | 30s |
| Alien Artifact (Faraday Artifact) | Steel Bar, 3x Fulgurium Bar | 30s |
| Alien Artifact (Nasonov Artifact) | Steel Bar, 3x Physicorium Bar | 30s |
| Alien Artifact (“Psychosis Artifact”) | Steel Bar, 3x Dementonite Bar | 30s |
| Alien Trinket | Oxygenite Shard | 30s |
| Alien Curio | Sulphurite Shard | 30s |
| Alien Ornament | Physicorium Bar | 30s |
| Oxygenite Shard | 3x Liquid Oxygenite (1x at 10%/2x at 50%/3x at 90%)* | 20s |
| Sulphurite Shard | 3x Sulphuric Acid (1x at 10%/2x at 50%/3x at 90%)* | 20s |
| Ancient Weapon | 2x Steel Bar, Fulgurium Bar | 20s |
| Alien Spear | Steel Bar | 5s |
| Physicorium Railgun Shell | Physicorium Bar | 20s |
*A number of the same materials are given out depending on the items current condition (eg. at 50% you will get 2 Sulphuric Acid).
Other
Creature Loot
| Item | Components | Time |
| Swim Bladder | 2x Stabilozine, 3x Saline | 10s |
| Adrenaline Gland | 4x Adrenaline | 10s |
Fuel Rods
| Item | Components | Time |
| Fuel Rod | Steel Bar, Uranium | 10s |
| Fulgurium Fuel Rod | Steel Bar, Fulgurium Bar | 10s |
| Thorium Fuel Rod | Steel Bar, Thorium | 10s |
Clown
| Item | Components | Time |
| Clown Mask | Bike Horn | 10s |
| Clown Costume | 3x Bike Horn | 40s |
Containers
| Item | Components | Time |
| Metal Crate | 3x Steel Bar | 20s |
| Secure Metal Crate | 3x Steel Bar | 20s |
| Explosive Crate | 2x Steel Bar | 20s |
| Chemical Crate | 2x Steel Bar | 20s |
#3 Console Commands
The console is a debugging window usable to alter content while in-game; it can be opened or closed by pressing F3. While its main use is to get around bugs, it can also be used to cheat or set up interesting situations.
In multiplayer, only the person hosting the game can use the console.
The console only recognize specific inputs called console commands, which are listed hereafter. Note that the console is not case-sensitive: it doesn’t matter if any letter (or all, or any) is in uppercase.
| Command | Description |
|---|---|
| control [name] | Assume control of a character/creature. The name must be the same as the name of the folder where the characters configuration file is located (“human”/”tigerthresher”/”moloch” etc). Some creatures can attack by pressing the R key. Additionally, the Husk has a fully usable inventory and can interact with the Submarine as if it were a player. |
| debugdraw | Toggles the “debug draw” mode. |
| disablecrewai | Deactivates the crew AI in single player, making the crew inactive unless directly controlled. See “enablecrewai”. |
| editmap, edit | Switches to map editing mode. |
| enablecrewai | Activates or reactivates the crew AI in single player. See “disablecrewai”. |
| editwater, water | Allows adding water into rooms or removing it by holding the left or right mouse buttons. |
| fixitems | Sets the condition of all items in the map to 100.0. |
| fixwalls | Fixes all damaged or broken walls. |
| fire | Allows creation of fires by left clicking. |
| freecamera, freecam | Stops the camera from being locked to the controlled character and allows it to be moved freely. |
| gamescreen, game | Switches to the game screen. |
| godmode | Makes the submarine invulnerable. |
| heal | Fully restores the specified character (or the controlled character if none is specified) to full health. |
| killcreatures | Instantly kills all creatures in the map. |
| lightingenabled, lights, light | Toggles lighting effects on/off. |
| loadmap [name] | Loads the specified map. |
| losenabled, los | Toggles the line of sight effect on/off. This can be used to reduce lag. |
| mainmenu, menu | Switches to main menu. |
| oxygen | Replenishes oxygen in all rooms to 100.0. |
| revive [name] | Resurrect the specified character (or the controlled character if none is specified), bringing them back from the dead. |
| savemap [name] | Saves the map that is currently loaded with the specified filename. |
| spawnitem [itemname] [cursor/inventory] | Spawns an item at either the cursor or the inventory, or at a random spawnpoint if parameter 2 is blank. |
| spawn [creaturename] [near/inside/outside/cursor] | Spawns a character/creature near, inside or outside the sub (or at a random spawnpoint if parameter 2 is blank). The name must be the same as the name of the folder where the characters configuration file is located (“human”/”tigerthresher”/”moloch” etc). |
| teleport [charactername] | Teleports the specified character (or the currently controlled character if parameter 1 is blank) to the position of the cursor. |
#4 The Medical Doctor’s Guide
A first-timer’s guide to probably one of the harder classes to play in Barotrauma, exploring the basics, tips and tricks, and in-depth details.
Preamble
So you want to be a doctor on board a submarine? Well, unfortunately, there’s not enough time to send you off to med school (not to mention a residency), so this guide will have to suffice for now.
For starters, please realize I am by no means a professional medical doctor in Barotrauma (yet…) and am using this guide creation as a means to get myself into the role more. With that in mind, if you come across something that is wrong or could be improved, please tell me in the comments. As of writing, there hasn’t been a whole lot (any, even) of documentation done on the revamped medical system, so I’ll be figuring things out in-game as I write this. That being said, let’s get down to business.
I’ll be going over the duties of the role, the diseases and injuries you’ll come across, the treatments and medicines you’ll need to master, and the crafting you’ll need to be doing. Feel free to use the sidebar to skip around if you want.
Duties / The Bare Basics
(This section is for those that are completely new to the role, so if this isn’t your first time, you can probably skip this.)
Obviously enough, you’re on that submarine to make sure that people don’t die when they are killed. This can come about from a number of things, such as the natives of Europa, or accidents/murderous bastards on-board. Hopefully, this hasn’t happened yet, so don’t get all flustered.
While others may be able to perform medical techniques or give treatments too, your higher medical skill allows you to be more efficient (e.g. using less of a medicine or CPR generally being more effective) in what you do. Therefore, you are essential to a submarine’s well-being.
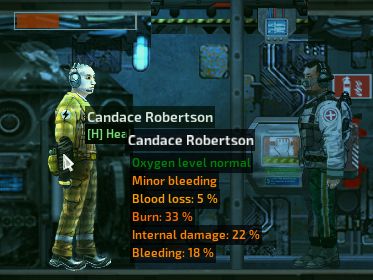
When you spawn in, all you’ll have on you is your uniform, your ID, a headset, and a health scanner HUD. That HUD is one of, if not the most important tool at your disposal, so don’t lose it. It allows you to get a quick read-out on the vitality, oxygen level and condition of a crew member within sight. It doesn’t need a battery to power it unlike the headset.
Using this HUD, you can perform triage in emergency situations, deciding who needs your attention the most according to their injuries. Of course, you should try and help everyone if you can, but life and death situations call for decisions to be made.
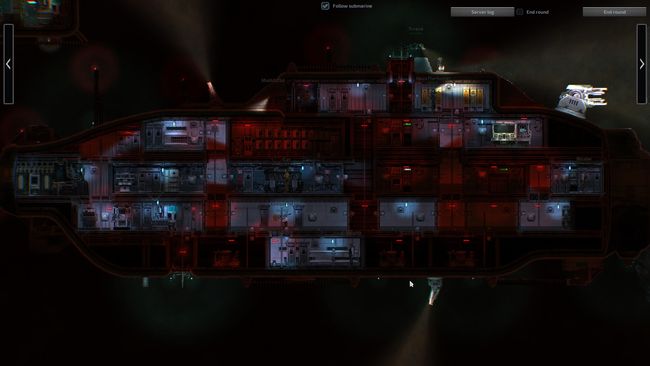
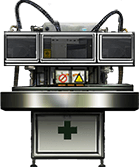
You should spawn in the med-bay on the submarine, where all the delicious drugs are kept (and probably your fabricator.) Here is the Typhon’s for example:

Take note of what you start off with in the lockers, as you’ll need to see if you need to fabricate more (or stronger) medicine. It’s usually a good idea to keep some of the most commonly used ones with you so you can quickly respond to any injuries, such as: Blood packs, bandages, morphine/fentanyl/stabilozine (if you have them.)
With the mission underway, you should make yourself useful and patrol the sub. While there may not be any enemies attacking yet, your crew mates are just as dangerous to themselves and each other. They may accidentally create burns with welders or fall from a tremendous height because they decided not to use a ladder, just for example. It’ll keep you busy until something interesting happens, anyway.
And when that interesting thing does happen, make sure that you keep yourself alive too. A dead doctor isn’t any use to a crew. If people require attention, make sure that there isn’t any immediate danger around (e.g. if you have been boarded, or if something is on fire) before you rush to them. Get people to utilize the call-outs (on the upper right) as well as the radio/voice chat to pin-point their location, and get a sense of what the injuries are. Don’t let only them make their way to you, as time is precious to saving their life. If need be, have other crew members perform CPR to keep them alive until you can make your way to them. They may be down, but they’re not out yet.
If all goes well after all that, you should arrive at your destination with your mission a resounding success. Take note that, if you are playing a singular mission and not a campaign, you don’t need to worry about re-stocking anything as the submarine (and your character) will not have saved. If you’re in a campaign, make sure to jot down what medicine or crafting materials were used up during the mission, and request what you need at the next outpost.
There’s a lot more to learn with being a doctor, so please read on to truly become an expert.
Healing / CPR
So how does one heal anyway? Well, if you’ve played the legacy version, it’s gotten a bit more advanced than just jabbing someone in the face with a needle. You can still do that, but it’s…well, unknown to me if it’s more or less effective right now, so let’s not do that. Instead, we have a nifty new context menu to use. When you approach someone, you can press [H] to bring up the healing menu. This will give a more advanced display of the person’s vitals than the HUD can, as well as any injuries they have.
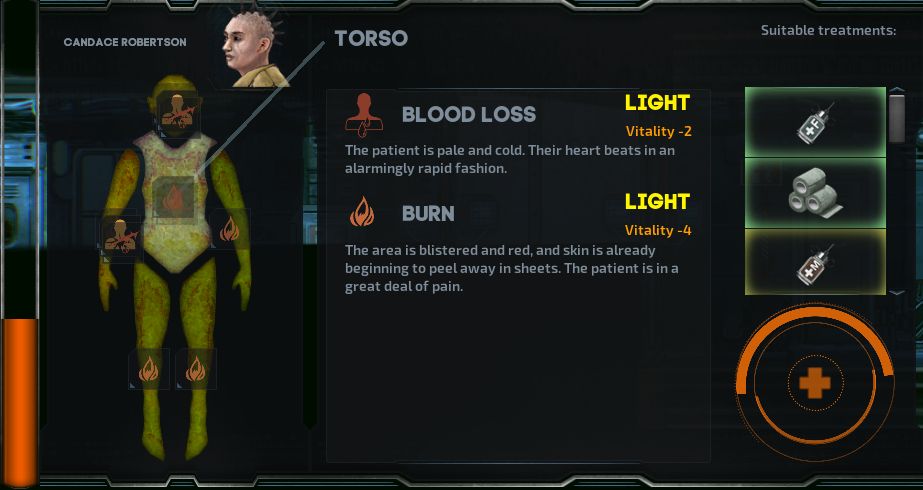
From left to right is the overall health, the body’s separate limbs, any injuries on that limb, and suggested treatment options.
In order to heal, you must know that injuries can be spread out (and differ in severity) across the limbs of the player. Select a limb to get a list of what injuries it has (icons will be displayed on limbs to quickly show you) and to see how much vitality is being affected. You should treat the limbs with the highest vitality damage over the others (on-going injuries such as blood loss or poisoning will take priority, as to prevent death.)
If you don’t have a handle yet on what the best treatment options are for injuries, the game will show you (based on your medical skill) a list of treatments on the right, with the top one being the most effective choice. The higher your skill, the more accurate this list will be. As a doctor, you can (hopefully) rest assured that these options will not be incorrect. As for non-doctors…let’s just leave it at you shouldn’t let other players do any guesswork if they don’t know what they’re doing.
To actually heal, just drag the treatment onto the circle below the suggestions. Usually, one usage will use up half of the item, but other items can recover more vitality in that half of a usage than others if they’re meant for the same injury type. On that topic, you should try and conserve your supplies for situations that really call for it. If someone has only -5 vitality from a burn or internal injury, it’s not really worth healing. Even if that injury is that small amount, it will still end up using half of the item like it would if the injury was -40 vitality. Therefore, you should try and heal injuries when a player’s total vitality is at about 75% or so. Joe in engineering might have a fractured skull, but it’s only -10 vitality, so he’ll have to live with it.
CPR is useful for keeping someone that has fallen unconscious alive (and can also revive) until you arrive at the scene. Just like administering treatment, you’re better at CPR than others. In fact, others can injure someone if they aren’t skilled enough, so it’s not always good for someone to perform it. Lifted from the game files, CPR has a revive chance per skill of 0.01, while stabilization is 0.02. The game lists the equation it uses for calculating this, but just know that the person with the highest medical skill should be administering CPR. In the vanilla game, the damage threshold is set at 20, so just as long as the medical skill level is above that, it should be fine.
Afflictions
| Affliction | In-game Description | Treatment |
| Internal Damage | The area is an ugly shade of purple, and apparently very painful to touch. You suspect a bone might be broken. | Morphine/fentanyl. |
| Bleeding | Blood pours freely from this ragged and particularly nasty open wound. | Plastiseal/bandage. |
| Oxygen low | The skin is pale and clammy, and the lips turning blue. | Either bring them into a room with air or put a breathing mask with oxygen on them if not dire, otherwise use liquid oxygenite. |
| Bloodloss | The patient is pale and cold. Their heart beats in an alarmingly rapid fashion. | Blood pack, saline. |
| Stun | The patient is dazed and unresponsive. | Still researching, probably just wait it out. |
| Barotrauma | There is obvious massive organ damage and the blood vessels of the eye have burst, creating an unnerving red gaze. | Still researching, but you’re probably screwed. |
| Husk infection | Something dark and unpleasant moves in the mouth. They are rendered completely mute, save for occasional clicking sounds apparently emanating from deep within the throat. | Calyxanide if early enough, otherwise a bullet. |
#5 Official Submarine Builder’s Manual
The Barotrauma dev team’s official manual for building your own fleets. It’s the first, quick version, and a more in-depth guide coupled with a proper video tutorial is planned. This edition will hopefully help you get a handle on the most important aspects of sub building by introducing the key concepts and functions of the submarine editor.
Submarine structures
Different kinds of walls and platforms are used to keep oxygen inside and monsters outside, and to divide the interior space into smaller rooms and compartments.
When making a new submarine, it’s always a good idea to have a general idea of its shape and layout before building the outer hull. It’s a lot easier to add room inside for that oxygen generator you forgot to include, at first, if you don’t have to move all those carefully placed shell pieces, fins and lights just to create a bit more space. So starting with the outside hull is not necessarily the best course of action.
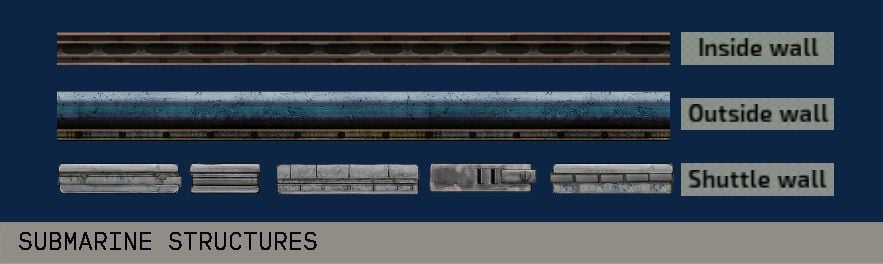
Outside walls are sturdier than inside walls, shuttle wall pieces are somewhere in between. We suggest using the walls as labeled for a more balanced experience, but of course it’s not mandatory. Best results often come when experimenting with different options.
After a piece of a wall (or most things in the editor, really) is placed, it can be flipped by it’s x- or y-axis by selecting it and pressing ‘Mirror X’ and ‘Mirror Y’ -buttons or CTRL+N or CTRL+M. Nudge it via the arrow keys.
TIP: If you’re feeling lost or need inspiration, open one of the ready-made submarines in the editor and take a look at how they’re built.
TIP: Tall subs tend to be less usable than long subs, and can look a little weird and off balance when in play. Crew should probably not need to climb up 5 stories of ladders to get to a leak or a fire.
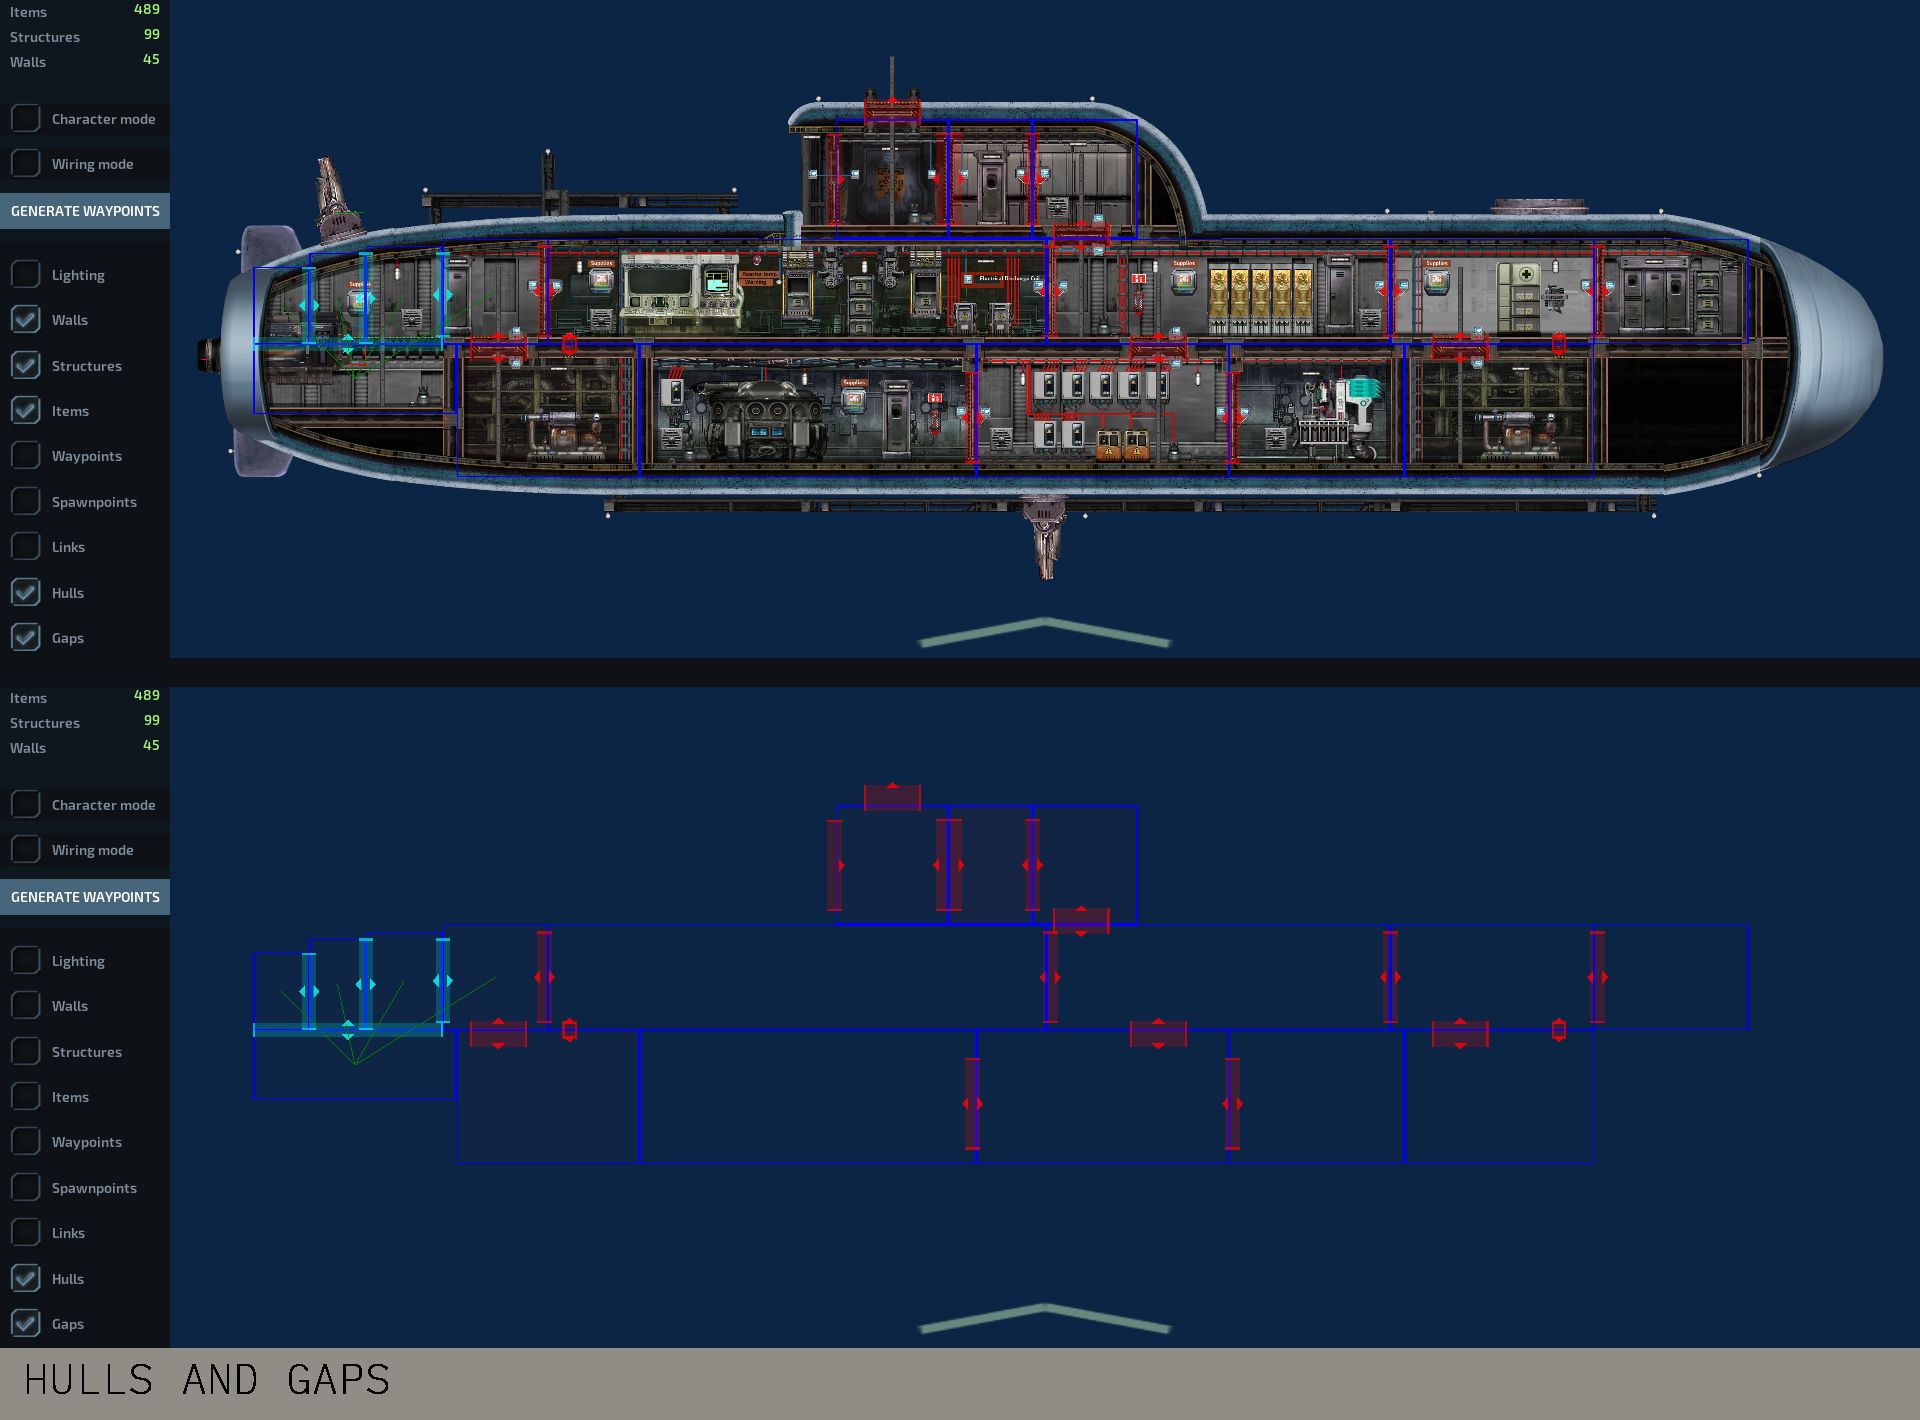
Hulls and gaps
Rooms inside subs in Barotrauma are defined by hull objects. If there are no hulls in the sub, there is nothing separating the sub from the water outside. Hulls also determine the overall size (= volume and mass) of the sub.
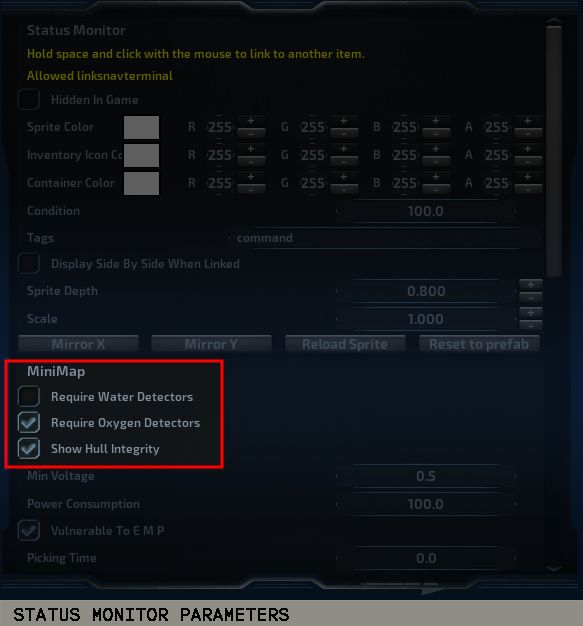
Hulls are displayed in the sub’s status monitor. Along with a room’s name, the monitor is capable of displaying the water level and quality of oxygen in a room. You can change what information is shown and if any sensors are required by modifying the status monitor.
In non-rectangular rooms, it’s often necessary to use multiple hull objects to cover the whole area. Link hulls together by selecting one hull, then holding space and clicking on another. This way linked hulls are displayed as a one, larger set.
Where hulls separate spaces, gaps connect them, allowing water and oxygen to flow from hull to another. Gap objects are placed between hulls where there would be a door, hatch or a space that allows for water flow. In the editor, red color means that a gap is currently closed, while blue means it is open. Doors and hatches are the most usual things that create gaps between hulls. When you place a door or a hatch in the editor, a gap is created for them automatically.
Wiring
A good number of devices in a submarine have to be wired into a power source to be powered, while others rely on specific signals, also delivered via wiring, to work in the way they’re intended. Entering the wiring mode in the sub editor allows you to run wires between devices like you would in-game. When wiring mode is toggled on, a selection of differently colored wires appears on the left hand side. Color differences are purely cosmetic, but there is a tradition of using red wires for power and blue for signals.
After selecting a wire, it is added to your inventory and equipped, along with a screwdriver. From here, wiring works like it does in-game. Please refer to the in-game Engineer training for more details.
When a wire is placed, it can be selected by clicking on it in wiring mode. Add a node by CTRL+clicking on the length of a wire. Move points by left-clicking and dragging.
Nuclear reactor and power grid
The nuclear reactor is the source of almost all the power on board the submarine. It is the engineers’ responsibility to keep reactors running, so each reactor in the sub should be assigned an engineer. In most cases, having one is enough. They have a tendency to overheat and eventually explode if not operated correctly, so place them a safe distance away from other vital devices.
Power is distributed through the sub via junction boxes, as devices cannot draw power straight from the reactor. Power wires need to be connected to junction boxes to calculate the grid’s power load correctly.
There are two major ways to wire power in a sub.
- Place junction boxes in each room, close to devices they’re providing power to, or
- Group all junction boxes in a separate electrical room, where they can all be easily accessed.
The first solution makes troubleshooting easier, because problems can usually be traced to the closest junction box. On the other hand, grouping all junction boxes together makes them easier to maintain.
TIP: In most cases, it’s smart to keep everything in the same grid because the reactor always outputs the same amount of power to each grid. If there are two power grids with different loads, the one with the lower load will be overloaded and its junction boxes damaged. If you want to use multiple power grids, make sure their power requirements are balanced.
TIP: Install wires along walls and ceilings and use cable holders. It looks neater and more organized.
Engines, ballast and navigation
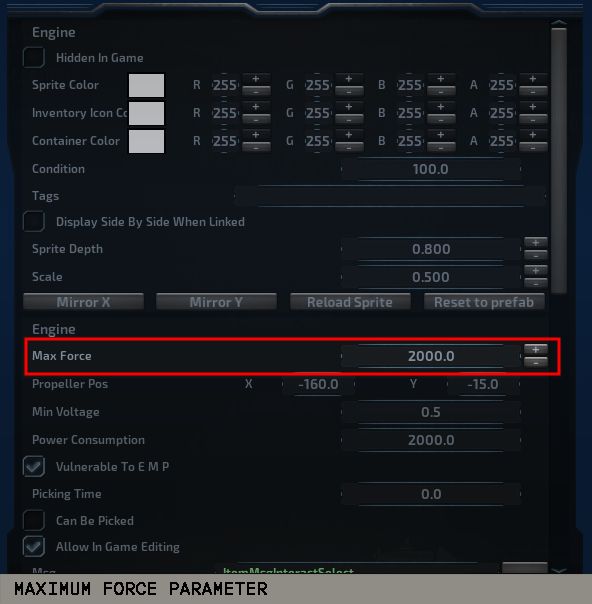
Engines provide thrust. You must place the engine so that its back half is in water and the front half inside the sub, or it will be damaged by water. You can use multiple engines to apply more force, but keep in mind their power consumption, which can be high and fluctuate when changing direction sharply.
An engine’s maximum force can be adjusted in the editor. This is useful if the sub’s horizontal movement can’t keep up with its ascent/descent speed or vice versa, which makes steering very difficult (and can and will result from the engines and ballasts being out of balance).
Where engines provide horizontal movement, ballast tanks are responsible for vertical movement. In their simplest state, they are empty rooms that contain a water pump. The pump is programmed to let water in to make the sub heavier or pump it out to make it lighter. This results in the sub either ascending or descending.
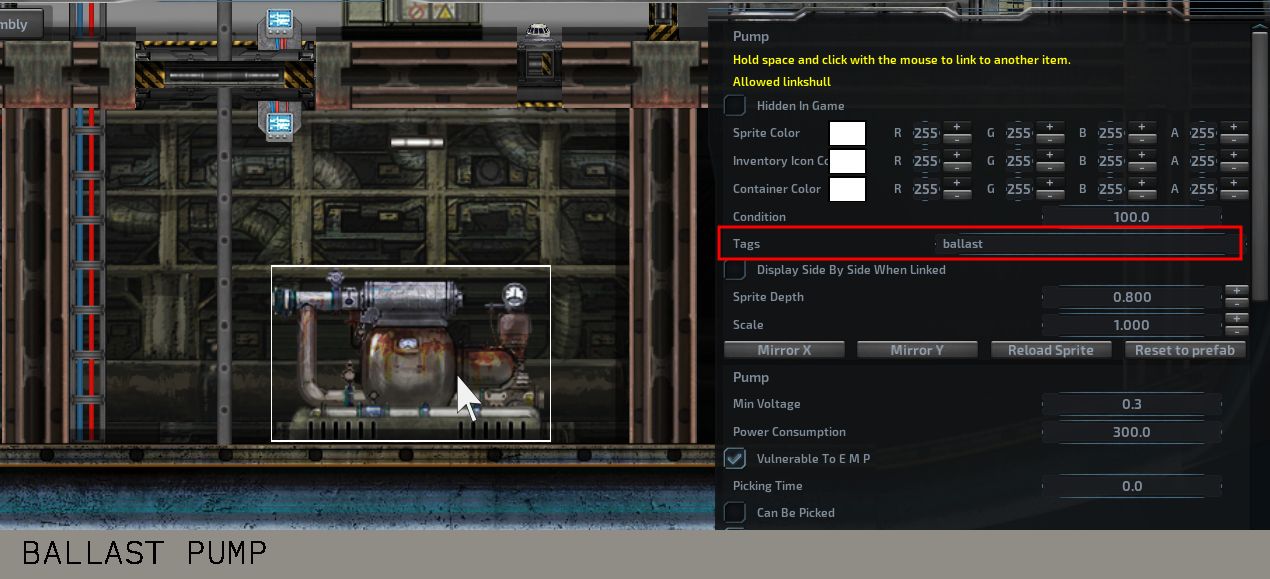
TIP: There can be any number of ballast tanks, although an optimal number is two or even three. One ballast can be fine, but then you run the risk of the sub being completely immobile if it gets punctured.
TIP: A natural place for a ballast tank would be on the bottom. Otherwise you will run into all kinds of issues ranging from leaks to maintenance problems.

The size of a ballast tank is an important factor in a sub’s handling. If it’s too small, the sub may not be able to descend; too big, and it may sink too easily. Aim for a combined neutral ballast level of .5 for optimal size. The size of a hull is shown in the upper left corner of the viewport when a hull is selected. Selecting multiple hulls will give their combined optimal neutral ballast level.
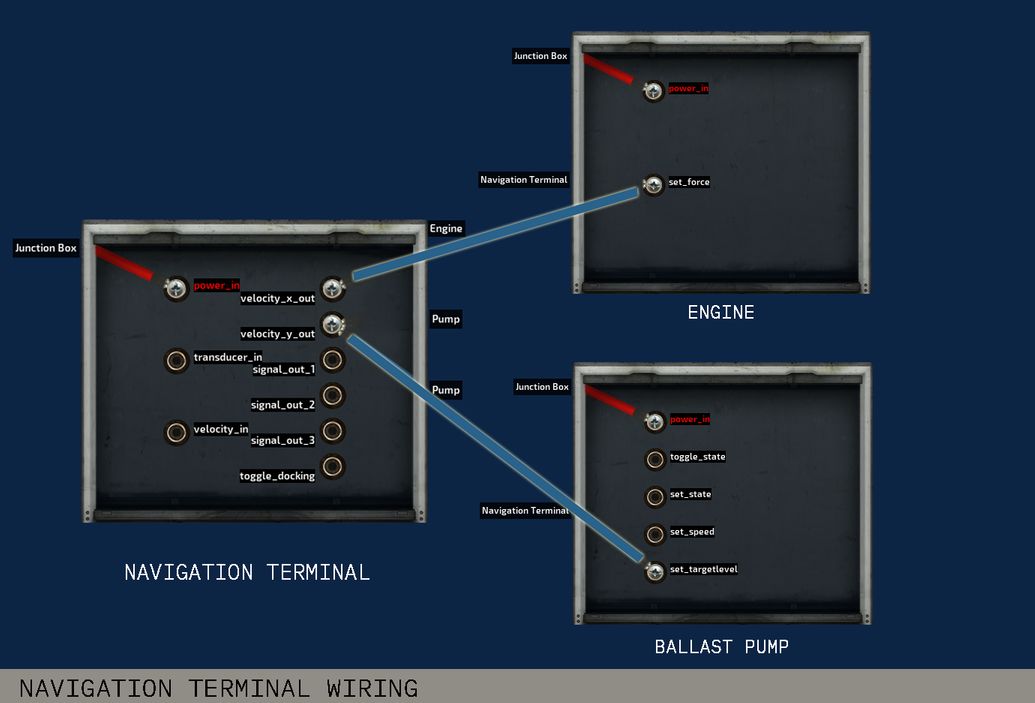
Engines and ballast levels are controlled via the navigation terminal. The terminal parses the direction given by the navigator in the sonar display and sends a signal to the engine (‘velocity_x_out’ to ‘set_force’) and ballast pumps (‘velocity_y_out’ to ‘set_targetlevel’).
Weapons systems
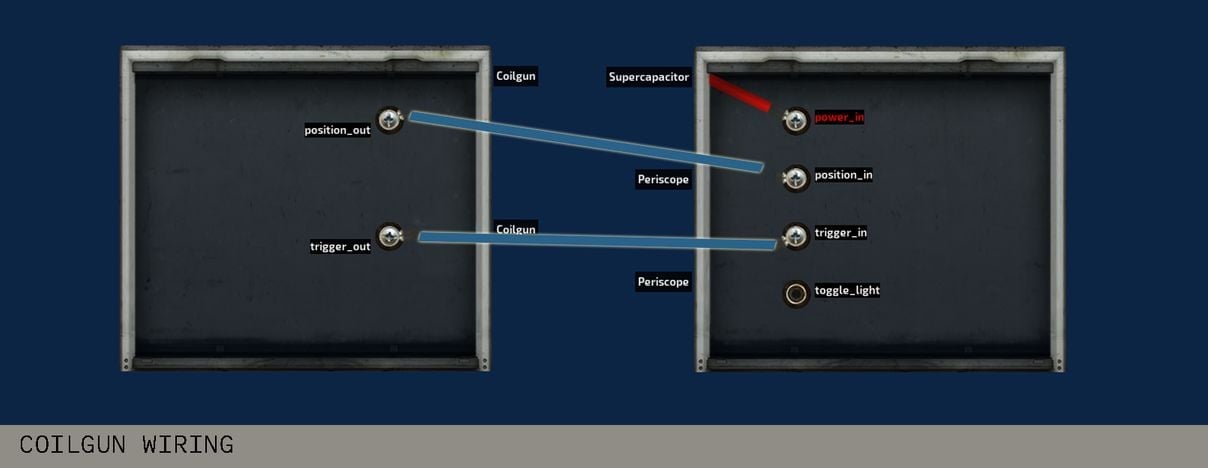
Coilguns and railguns are a basic defense measure any standard sub should have. They both consist of a turret, a loader and a periscope.
Both coil- and railguns use a lot of power, more than regular batteries can provide, in short bursts when firing. This causes the power grid to fluctuate wildly, so it’s best to use supercapacitors to power the sub’s guns. Their capacity is low and the output high.
For either type of gun to work, their loaders must be linked to the gun (by selecting one, then holding space and clicking on the other) and a periscope must be placed somewhere to control them. Periscopes output a ‘position_out’ and a ‘trigger_out’ signals, which should be connected to ‘position_in’ and ‘trigger_in’ inputs in the turret itself.

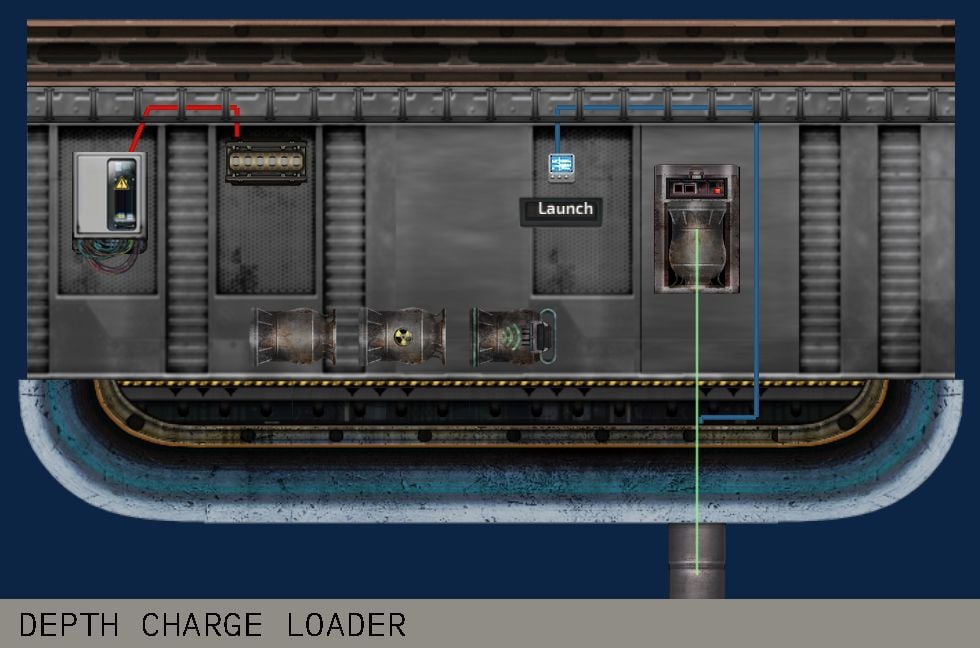
Depth charges require a depth charge loader and a tube. Depth charge loaders should be linked to depth charge tubes on the outer hull. Charges are launched by giving the tube an activation signal, usually via a button.
Electric discharge coils work similarly to depth charges. They need to be wired into the power grid and given an activation signal. The actual coil is placed on the outer hull. The range of the electric shock created is set in the discharge coil item in the editor along with a multiplier when traveling along walls.

Oxygen
Oxygen generators generate oxygen and thus breathable air for the entire sub. Like everything else on board, they require power to function, and they must be linked to an oxygen vent in any hull that is supposed to have breathable air. To link the generator to a vent, select the oxygen generator, then hold space and click the vent. You should see a green line between the items. If not, check if you have ‘Links’ displayed on the left hand side of the screen.
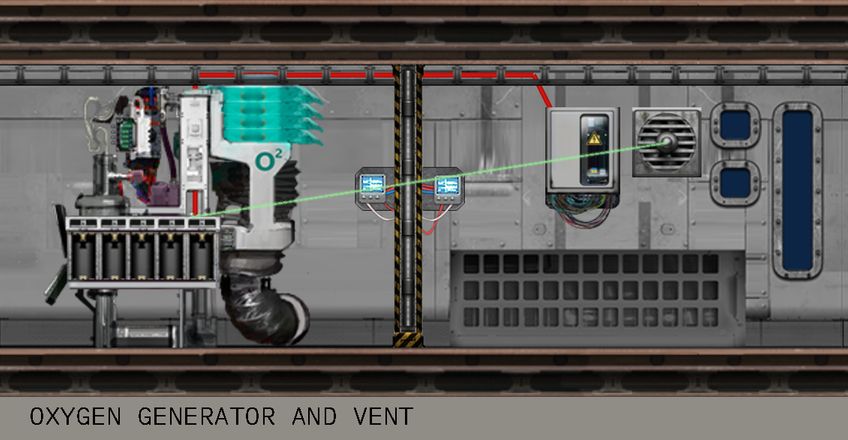
The amount of oxygen needed is based on the hull volume and the size of the crew. Oxygen levels are hull specific, which means the more crew members in a hull, the more quickly its oxygen level is depleted. Oxygen moves between hulls via gaps.
Airlock, docking and cargo bay
Any submarine worth its salt has a way for a person to enter and exit it without excessive flooding. A standard airlock has a setup of multiple doors that stop the water before it gets further inside and a water pump to get rid of it once the airlock is closed.
Docking ports are devices that clamp two structures (submarines, shuttles, outposts etc.) together, making it possible to walk from one to the other without getting your feet wet. Docking ports act independently from hatches and doors, so remember to also place a hatch wherever a port is to control passage.
TIP: A good way to wire a docking port is to link it to its hatch. When the port is engaged, the hatch opens. Find a working example in the sub editor’s Item assemblies category.
Equipment and security
To prevent traitors and other undesirables from causing too much damage, it may be smart to lock weapons and explosives somewhere where only authorized personnel can reach them. To do this, add a tag to the ‘picked required’ field of a door. For example: to only allow security officers to open a door, add a tag ‘id_security’ to the door and to the security officer’s spawn point.
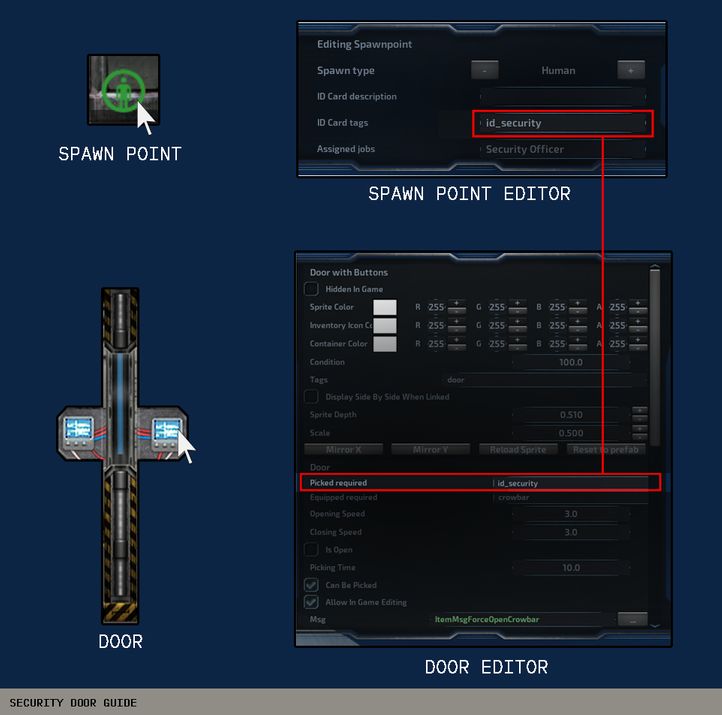
Now anyone who spawns at this spawn point has a tag ‘id_security’ on their ID Card, allowing them to open the door.
TIP: To place items in containers in sub editor, toggle on ‘Character mode’. Now you have a temporary inventory and can grab and move items like you would in-game.
Waterproofing
There are a few ways to combat flooding inside a submarine.
Pumps are the primary way of getting rid of water, but they consume relatively high amounts of power. Having too many pumps turn on simultaneously causes unnecessary power fluctuations. Instead of placing pumps in every room, duct blocks can be used to let water flow into designated bilge compartments. There doesn’t need to be a separate bilge space, usually it is enough to place a pump on the bottom-most room and route the water there.
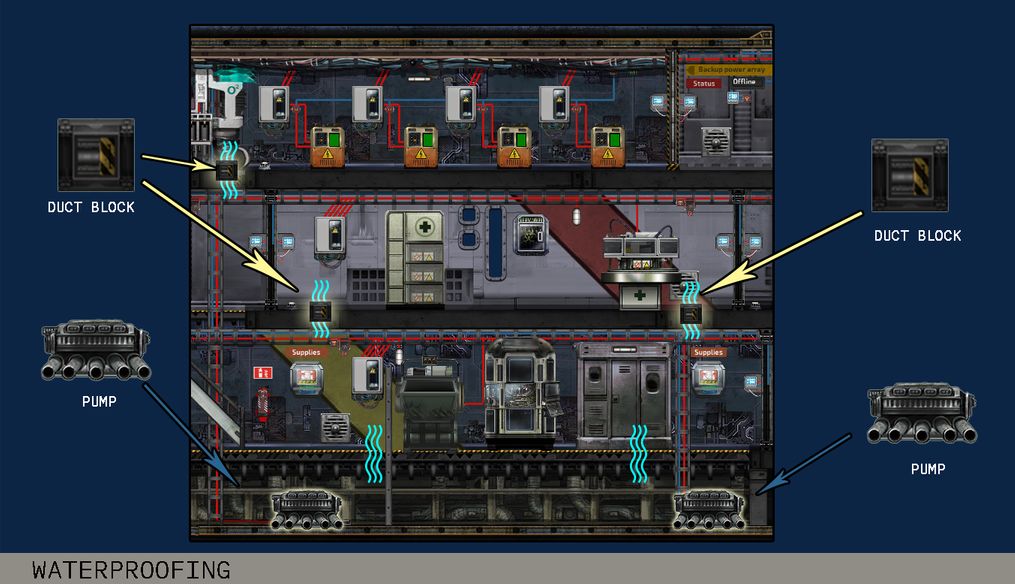
Compartmentalizing the space is a good way to make sure a small leak doesn’t turn into a catastrophe. The larger the rooms on a sub, the further water can advance without obstacles. Remember to close doors behind you, otherwise they’re useless. A good move would be to use doors that close automatically, which is why the game’s vanilla subs come with auto-closing doors. Hate them or love them, they’re for your own protection!
That is a well constructed guide. Good job