
Table of Contents Show
Bloodstained: Ritual of the Night is an exploration-focused, side-scroller action RPG by Koji Igarashi. Play as Miriam, an orphan scarred by an alchemist’s curse that slowly crystallizes her body. Battle through a demon-infested castle and defeat its master to save yourself, and all of humanity!
Other Bloodstained Ritual of the Night Guides:
- Bloodstained Ritual of the Night: Enemy Drop Chart
- Bloodstained Ritual of the Night: List of All Demons
- Bloodstained Ritual of the Night: Controls & Hotkeys
- Bloodstained Ritual of the Night: Cheat Codes
- Bloodstained Ritual of the Night: Missed Item Locations
Bloodstained Ritual of the Night List of All Techniques
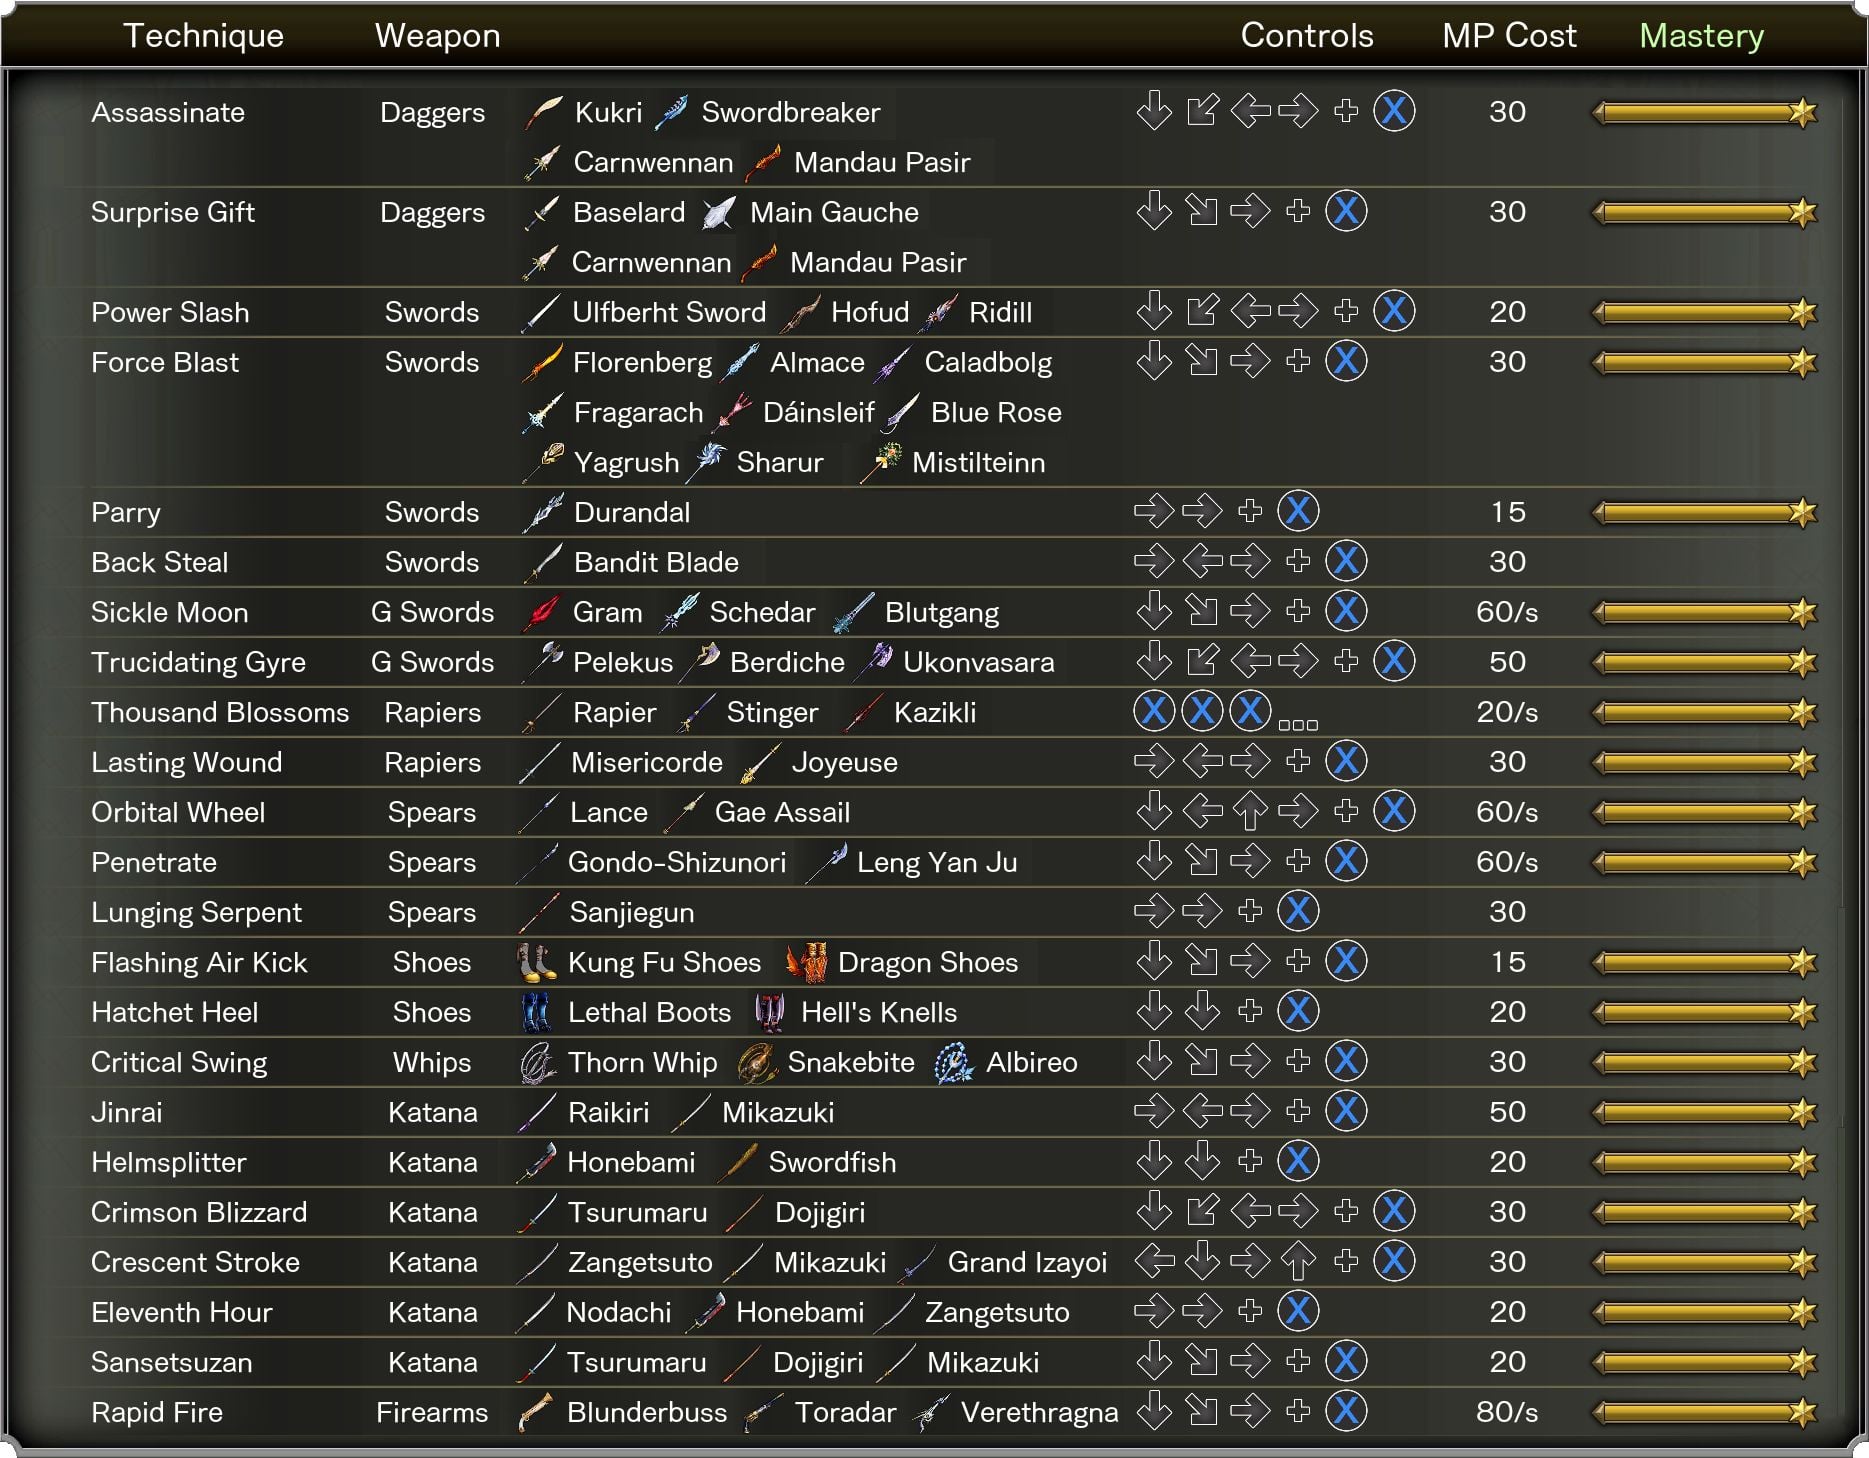
List with all techniques, and which weapons unlock them.
Introduction
As you start playing, techniques are only usable when you are wielding specific weapons. But even then, you need to discover their base commands before they appear on the list. Fortunately, there are various diaries around the game that will tell you those commands, and which weapons carry those techniques. Most of them appear long after you have those weapons available.
As you execute the technique on enemies, you start to “learn” them, and once they are mastered, you gain that technique as a permanent move to all weapons from the same category.
It do not matter the level of the enemy you are hitting, nor the damage dealt by the technique. The only requirement is that you successful hit someone with them. So, repeating the maneuver in a safe zone will not give you any progress towards mastery, but nothing prevent you to going back into the galleon to fight easy enemies until you master them. Anyway, it’s your call how you prefer to master the techniques.
There are two exceptions to this rule, which are techniques that are linked to a specific weapon and don’t have a mastery bar on the archives. I’ll point them out below. Those two techniques can’t be permanently learned, and can only be used when you are wielding the respective weapon that carry them.
As an advanced technique, remember that you can combo-cancel a standard attack at any time with a technique. You also skip recovery animation while landing from an aerial attack. So once you get the timing down, you can easily do a small hop, a standard attack, and cancel with a technique to deal 3 hits in a bit under the time you would to two standard attacks.
Daggers
Assassinate
You vanish from your position, appear behind an enemy at your front, deal a backstab attack (with increased damage), and teleport back to your initial position.
Command: ↓ ↙ ← → + Attack
MP Cost: 30
Learned first from Kukri
Surprise Gift
You throw your dagger at the enemy. It deals the same damage as your standard attack, and pierce through all the enemies in line. Be aware that the animation is large, but the actual hitbox is as small as a standard bullet.
This attack can be performed in the air.
Command: ↓ ↘ → + Attack
MP Cost: 30
Learned first from Baselard
Swords and Clubs
Yes, swords and clubs share their movesets.
Power Slash
You swing your weapon behind you and do an overhead attack. It can hit enemies behind you while it executes the backswing.
Command: ↓ ↙ ← → + Attack
MP Cost: 20
Learned first from Morgenstern or Ulfberht Sword
Force Blast
You do a little hop, and unleash elemental energy from your weapon. Once mastered, it still executes the same move even if your weapon don’t have elemental atributes, but it will be only the slash. You can’t shoot lightning from a normal weapon.
Command: ↓ ↘ → + Attack
MP Cost: 30
Learned first from Red Umbrella (although you can get an elemental weapon before that, if you go deep into crafting early)
Parry
You make a brief defensive stance, and if any enemy hit you with a physical attack while the stance is active, you’ll stop time and deliver a counter-attack that might even hit other enemies in the area.
Command: → → + Attack
MP Cost: 15
Learned only from Blutgang
Back Steal
This skill can’t be permanently learned. You must be wielding the Bandit Blade to execute this maneuver. When you do it the first time, however, it will stay listed in your technique list.
Command: → ← → + Attack
MP Cost: 30
Greatswords
Sickle Moon
As long as you keep the attack button pressed, you’ll start dashing and grinding your sword on the ground. At the release of the button, you’ll slide for a certain distance, while delivering a strong slash to any enemy on its path. The longer you run, stronger the blow will be.
Command: ↓ ↘ → + Attack (hold)
MP Cost: 60 per second
Learned first from Gram
Trucidating Gyre
You jump into the air while spinning your weapon, and then land a heavy overhead hit. This attack deal tremendous amounts of damage, but it can be interrupted easily. Use only in safe situations.
Command: ↓ ↙ ← → + Attack
MP Cost: 50
Learned first from Pelekus
Rapiers
Thousand Blossoms
You stand in place and repeatedly attack the enemy while you are mashing the button. Once you stop mashing, you’ll deliver a final lunge attack.
Command: Press the Attack button repeatedly
MP Cost: 20 per second
Learned first from Rapier
Lasting Wound
You do a “Zorro” cut in the air, dealing up to three hits in the time of a single slash.
Command: → ← → + Attack
MP Cost: 30
Learned first from Misericorde
Spears
Orbital Wheel
You start spinning your spear around you, dealing damage to any enemy that comes nearby. You keep spinning while you keep the attack button pressed. Once you release it, you’ll spin once more and deal a final blow to all enemies neaby, front and back.
Command: ↓ ← ↑ → + Attack (hold)
MP Cost: 60 per second
Learned first from Lance
Penetrate
You lunge forward at an incredible speed, dealing damage to everything on your path while you hold the attack button. If you hit an enemy that is not killed by the attack, you’ll bounce back and attack again. This is, by far, the fastest way to travel through the castle.
Command: ↓ ↘ → + Attack (hold)
MP Cost: 60 per second
Learned first from Gondo-Shizunori
Lunging Serpent
This skill can’t be permanently learned. You must be wielding the Sanjiegun to execute this maneuver. When you do it the first time, however, it will stay listed in your technique list.
Extend your spear in front of you, to deal a ranged attack to all enemies in a straight line. Sometimes it can hit multiple times with a single command.
Command: → → + Attack
MP Cost: 30
Shoes
Both Shoe attacks can be performed in the air.
Flashing Air Kick
You lunge forward and attack with an spinning kick. You can repeat this maneuver up to three times in rapid succession to make a combo. Each hit will deal more damage than the previous one. Before you get means to access certain areas, it can be chained in the air to “fake dash”.
Command: ↓ ↘ → + Attack
MP Cost: 15
Learned first from Kung Fu Shoes
Hatchet Heel
You perform an spinning overhead kick to the target, and then spin on the ground while getting up. It deal a single heavy damage followed by a series of light pokes to all enemies around where you landed.
Command: ↓ ↓ + Attack
MP Cost: 20
Learned first from Lethal Boots
Whips
Critical Swing
You create a small whirlwind that deal increased damage to an enemy. Despite the lingering animation, the attack don’t hit more than once, and can’t damage an enemy that move into the space while the animation is happening.
Command: ↓ ↘ → + Attack
MP Cost: 30
Learned first from Thorn Whip
Katanas
Eleventh Hour
You enter a guard position for a brief period. If during this guard, any enemy hit you with a physical attack, you’ll freeze time and counterattack in a straight line. The counter can hit multiple enemies if they are in line. You can miss the counter on the original attacker if the attack originated from above.
Command: → → + Attack
MP Cost: 20
Learned first from Nodachi
Sansetsuzan
You lunge a bit forward and slash the enemy. You can repeat this command up to three times to execute a combo attack. Each successive attack deal more damage than the previous one.
Command: ↓ ↘ → + Attack
MP Cost: 20
Learned first from Tsurumaru
Crimsom Blizzard
You concentrate energy on your blade, and release it as a magic projectile in front of you. The projectile is slower than a bullet, but have a very large hitbox. Unless the enemy jump over it, you will not miss.
Command: ↓ ↙ ← → + Attack
MP Cost: 30
Learned first from Tsurumaru
Helmsplitter
You leap forward and deal an overhead attack on the enemy. The enemy get a debuff on their CON value for some time, making them take extra damage from any physical source (ie, no spells).
Command: ↓ ↓ + Attack
MP Cost: 20
Learned first from Honebami
Jinrai
You freeze time, then do a very long dash through the whole enemy line, damaging everyone in the process. You are invincible during the maneuver. Learn to love this maneuver. It will save you many time from being cornered by a large mob of enemies.
Command: → ← → + Attack
MP Cost: 50
Learned first from Raikiri
Crescent Stroke
You do a large circular cut around you. This move deal increased damage, and hit all enemies near you, be it front, back or above.
Command: ← ↓ → ↑ + Attack
MP Cost: 30
Learned first from Zangetsuto
Guns
Rapid Fire
You stand in place and start shooting repeatedly, with reduced interval between shoots the longer you stay holding the attack button.
Command: ↓ ↘ → + Attack (hold)
MP Cost: 80 per second
Learned first from Blunderbuss
It’s end. I hope “Bloodstained Ritual of the Night: List of All Techniques” helps you. Feel free to contribute the topic. If you have also comments or suggestions, comment us.
On picture said Parry (Sword) must be with Durandai, that wrong; must be Blutgang.
On text is Right: Learned only from Blutgang