Table of Contents Show
Greetings, Wizards and Witches of Ignus! Behold the One True Guide to Farming in Citadel: Forged With Fire.
In this guide, you’ll learn all there is to know about farming in Citadel and the techniques to use for farming as efficiently as possible while minimizing the waste of your precious resources!
Farming Efficiency Guide
So you need some help with your farmin’, huh? Well you came to the right place. This guide will cover all the basics of farming, from how much the various farming items cost to craft, to optimal setups, plant growth times, fertilizer usage, and the likes.
This guide should be up to date with the latest patch as of Feb 1st, 2020. Any changes to farming mechanics altered in patches after the time of publishing may not be reflected in this guide. I’ll do my damnedest to keep it updated though!
Well with that said, let’s get started!
Prerequisites and Recipes
Farming is fairly accessible from the get-go when you create a new character in Citadel. Below, I outline all the level requirements and required materials for the items you’ll need for crafting and maintaining your farms:
Hobart’s Growth Solution – Level 1 (Used for fertilizing farm plots from a sprinkler)
- 22 Rune Crystals
- 6 Mushrooms
- 1 Faery Dust
- 1 Nature’s Essence
Mulch – Level 1 (Used in crafting Farm Plots, or fertilizing but don’t use it for fertilizing)
- 4 Yellow Pine
- 1 Bones
- 3 Mushroom
Mana Generator – Level 1 (Used to power Sprinklers)
- 20 Enchanted Stone
- 20 Flawless Rune Gem
Forge – Level 5 (Used for creating Enchanted Stone and Flawless Rune Gem, needed when making Farm Plots, Sprinklers, and Mana Generators)
- 15 Rune Crystal
- 30 Stone
Workbench – Level 5 (Used for making mulch, needed when making Farm Plots)
- 15 Rune Crystal
- 30 Wood
Conjuring Cauldron – Level 5 (Used for making Hobart’s)
- 15 Rune Crystal
- 15 Iron Ingot
Deconstructor – Level 15 (Used for deconstructing plants into seeds that can be replanted)
- 20 Flawless Rune Gem
- 40 Enchanted Stone
Farm Plot – Level 20 (Used for planting seeds, DUH!)
- 8 Mulch
- 20 Enchanted Stone
- 20 Flawless Rune Gem
Sprinkler – Level 20 (Used for watering/fertilizing Farm Plots, DUH!)
- 30 Flawless Rune Gem
- 30 Enchanted Stone
Rare(r) Ingredient Locations
Yeah, welcome to the club, pal.
But seriously, here are some good places to grind for ingredients:
Under Level 40
There is a lake north of the center starting spawn that has a decent amount of Faeries, Undead, and Skeletons in various camps/caves around it. Use these spots until you hit at least level 40.
Level 40+
Faery Dust – The best place to grind for this is Caves of Plavno (4.92N 3.58E on your in-game map). There’s a buttload of Faerys here that will drop anywhere from 1-4 dust each depending on how lucky you are. There’s also 4 more Faerys at the Camp directly West of the cave you should hit while your at it. Keep in mind that the Faerys are level 40+.
Bones – Tazrouk Labrynthe (4.30N 5.10E) is the best place to grind for bones on the map. Other than that, any cave or camp with lots of undead or skeletons will drop bones as well.
Pro Tip: Since mobs respawn at 6am and 6pm every in-game day (by the way, there’s a clock above the compass on your HUD if you didn’t know already), if you time it right, you can do a double-run in one outing. As an example, hit the faery camp next to Caves of Plavno at 4:30. Then enter and start the cave at 5:00. Kill all the mobs and reach the end of the cave by 6:00. Then, presto! The mobs respawn and you can kill them all again on your way back to the entrance. And don’t forget to hit the camp again too!
Farm Layout
So you’ve leveled up, gathered all your resources and ingredients, and you’re ready to start building a farm! Great, but I can almost guarantee you’re probably going to run out of supplies quicker than you think. But we’ll talk more about that later. For now, let’s talk about layout.
There is exactly one 100% optimal layout for farm plots and sprinklers, and you’re probably already familiar with it:
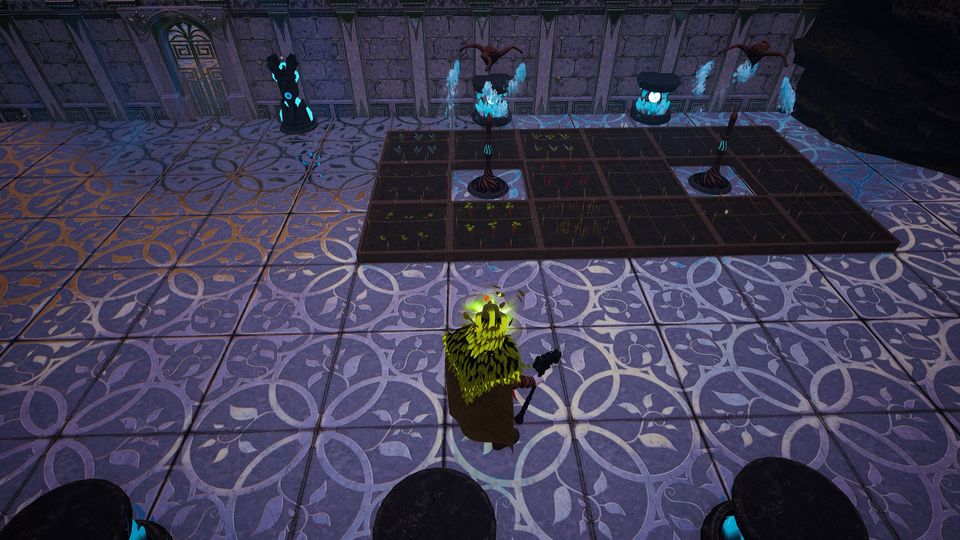
Simply put, this design is a 3×3 grid with a sprinkler in the middle, with 8 farm plots surrounding it in a ring. Since sprinklers can water and fertilize the 8 tiles either directly adjacent to it or diagonally from it, this will get you full sprinkler coverage and full utilization of your fertilizer.
Now, with this design, you can tile it however you want – you can make one huge grid/blob, or you can make nice, pretty, and neat rows with room for mana generators. Here’s an example of my current large-farm setup:

Whatever design you choose, I suggest leaving at least enough room to fit in some way to power your sprinklers, whether that be mana generators, or a Mana Node (basically a range extender for generators).
Now that we have the layout covered, let’s break down the cost of this tileable farm layout:
| Quantity | Item | Mulch | Enchanted Stone | Flawless Rune Gem |
| 8 | Farm Plot | 8 each / 64 total | 20 each / 160 total | 20 each / 160 total |
| 1 | Sprinkler | 0 each / 0 total | 30 each / 30 total | 30 each / 30 total |
| 1 | Mana Generator | 0 each / 0 total | 20 each / 20 total | 20 each / 20 total |
| Empty | Total: | 64 Mulch | 210 Enchanted Stone | 210 Flawless Rune Gem |
Long story short, it’s not cheap to set up your farming. My biggest suggestion is to save up all your bones from the very start of the game so you’ll have to grind less for them later on.
Fertilizer Demystified
Now that we’ve discussed the layout of your farm, let’s talk a bit about the fertilizing mechanic in this game. It’s one of the least intuitive to figure out, and it’s not really well explained by the game at all.
There are 2 ways to fertilize in Citadel: Fertilize each plot by hand using Mulch, or putting some Hobart’s Growth Solution into a Sprinkler and letting it do its thing. I’ll go ahead and make this clear as day for you: NEVER USE MULCH TO FERTILIZE, IT IS INEFFICIENT AND WASTES RESOURCES. There, I said it.
“Why?”, you ask? Well first, you have to do it by hand on each plot, which is a pain. Second, each plot takes 3 Mulch to fully fertilize, which is INSANE. And third, because Hobart’s + Sprinkler is so strong you’ll never consider Mulch after I explain it to you.
If we read the description for Hobart’s Growth Solution, it says:
- Place in a sprinkler to provide +2700 fertilizer and hydration to your plants for longer durations.
So that means one Hobart’s equals 2700 fertilizer, right? So then by that logic, since each farm plot can hold 2700 fertilizer, that means we need to put 8 Hobart’s in each sprinkler, right?
WRONG! If you place just one Hobart’s into a sprinkler, it will provide 2700 fertilizer to ALL plots in the sprinkler’s range. This makes Hobart’s much more effective since it’s relatively easy to craft and it’s very hands-off after placing it in the sprinkler.
Long story short, use Hobart’s as soon as you are able to!
Plants
There are lots of naturally occurring plants in the wilderness of Ignus that can be harvested directly, but if you’re going to be doing any large scale building or crafting, you’re going to need to plant these in farms for maximum efficiency.
There are also plants that cannot be found anywhere on the map and can only be acquired by crafting their specific seeds. I’ll refer to these as Tier 2 plants, while the naturally occurring plants will be called Tier 1.
Tier 1 Plants
The map of Ignus can be broken down into 3 “biomes”, shown in the picture below:
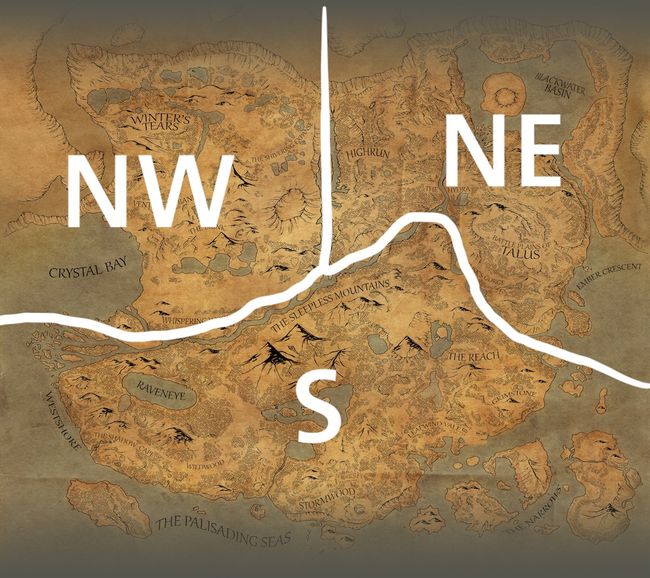
The drawn borders are rough approximations and not exact.
Each biome is home to 3 of our different Tier 1 Plants, for a total of 9. Here are the plants you can find in each region:
| Biome | Naturally Occurring Plants |
| Southern | Yellow Pine, Crowberries, Ghost Orchid |
| Northeastern | Corpse Flower, Buskas Leaves, Buffalo Felt Leaves |
| Northwestern (Snow) | Snowdonia Hawkweed, Kaltbitur Herb, Kylma Flower |
Getting Seeds
To farm Tier 1 plants, you’ll need to collect some from the wild in order to break them down into seeds with the Deconstructor – the seeds are then what can be planted into your farm plots. Obviously, you’re going to want to collect enough seeds to plant in all your farm plots, so here’s a handy breakdown for estimating the number of seeds you’ll get from X plants:
- (# seeds) = (# plants) * 2 * 0.3
What this means is, on average, you can expect a 60% yield from your plants to seeds. So if you break down 100 plants, expect 60 seeds (give or take depending on RNG).
Tier 2 Plants
As stated before, Tier 2 plants can only be had by crafting their seeds from the seeds of Tier 1 plants and planting them into your farm. There are 7 Tier 2 plants in total. Below, I outline each one, how to craft it, and common uses of each:
| Plant | Seed Recipe | Common Uses |
| Wheat | 2x Yellow Pine Seeds | Creating various foods. |
| Snapdragon | 2x Snowdonia Seeds | Creating Ornate Marble, the strongest building material in game. |
| Black Hellebore | 2x Corpse Flower Seeds | Creating Blackened Iron Ingots, which are used in various armor pieces as well as Ornate roofing. |
| Mandrake | 2x Buffalo Felt Seeds | Adding leech damage to spells, as well as building/upgrading some warding structures in bases. |
| Cultist Leaf | 2x Buskas Seeds | Used to craft items that add siege damage to spells for PVP base raiding. |
| Rowan Berries | 2x Crowberry Seeds | At the moment, the most useful purpose is making Crowberry Wine |
| Frostwood | 2x Kylma Flower Seeds | Used for crafting higher level weapons and brooms. |
That’s It!
And that’s all there is to know about farming in Citadel: Forged With Fire! If you see anything you think should be added, or there’s out of date information, please leave a comment and I’ll work on updating the guide!
Happy farming!
This was very helpful. Thank you!
You forgot to show that when you build your farm place a ceiling directly above the sprinkler and you can place another 9 crop plots on-top of the sprinkler. Total of 17 crop plots for 1 sprinkler and the growth solution will do the same and spread to all of them. I have a farm with 6 sprinklers and 102 crop plots. I can plant 612 seeds in 1 cycle