Table of Contents Show
This guide aims to help you understand basic strategies to make your cities prosper and make your civilizations last through the ages.
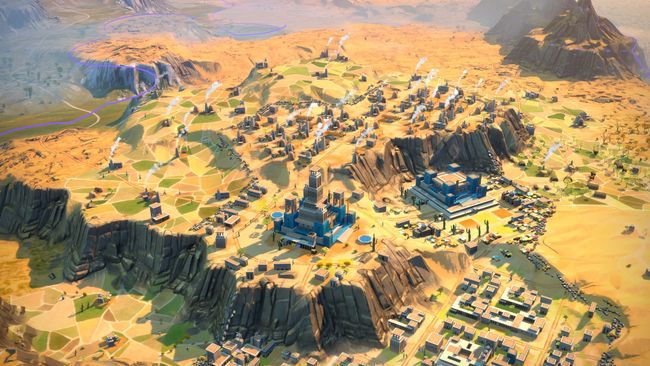
City Management in Humankind
I- Resource prioritization
1/ The different resources:
In Humankind you produce different types of resources: Food, Industry, Science, Influence, Money.
- Food allows you to grow your population. The more population you have, the more workers you have that can work in your districts. In addition military units cost population to produce. Therefore food is extremely important for any military endeavor, both defensive and offense.
- Industry allows you to build districts, units and improvements. It is an extremely important resource that will allow your population to be more effective at what they do; produce resources.
- Science allows you to research new technologies. The technologies will allow you to discover new improvements to build as well as new units and new game play mechanics (i.e. more city cap, more laws, etc.).
- Influence allows you to create new cities, build outposts and attach existing outposts to your cities. It is difficult to scale it early game as only a few improvements and unique districts produce influence.
- Money allows you to rush production and pay the upkeep cost of your units. You can also buy luxury and strategic resources from your neighbors.
2/ Basic order of importance
In the early game you can build different districts that improve your output in these types of resources. In addition they unlock slots where your population can work for even more output.
Yet what is the most efficient strategy to outboom your opponents? Here’s a rundown of what I would consider the best prioritization by order of importance:
1/ Influence
Influence is a valuable resource early on as it allows you to expand your borders and build new cities. It is however difficult to scale your production of it as there are very few improvements and district that produce it. Invest in influence quite early without neglecting your other resources.
2/ Industry
As industry allows you to build districts and infrastructure that can and will improve all resources I consider it top priority.
3/ Food
Food is not to be neglected as you need it for more than simply boosting your output. As military units cost pop to produce and as food is needed to have more pop in your cities, you must have a heavily populated city in your empire. This city will allow you to churn out fodder for your military machine both for defense and offense. Also population can be used to slot workers in your city that will boost your resource production. It is usually less effective than districts but it is more versatile as you can instantly switch your production to where it’s needed. I usually aim to always have a food positive balance; meaning my cities will eventually grow their population. Every time you see one of your cities starting to have their population decline then it is time to invest in a new food district.
4/ Science
Science is important to give you more tools to build your cities how you see fit. New technologies will help you discover new improvements, new district types as well as new overall bonuses for your empire. Research centers are not unlocked right off the bat though. Before that you would need population working as scientists in order to boost your research capabilities. I usually invest in a research center when my industry allows me to build a district in less than 4 turns (in Endless mode).
5/ Money
Money is quite limited in terms of use and needs in the early game. Rushing production is too expensive to be relied on consistently and unit upkeep is very cheap early on. It does allow you to buy luxury and strategic resources but beware as your trade routes can be plundered. Only trade with close pacifist neighbors (aka no one in higher difficulties) or if you have a huge cash influx.
I only start investing in money in the medieval era as unit upkeep starts to become hefty.
II- What to Build?
Your cities can use industry to produce different types of districts, infrastructure, units, projects and repeatables.
Worst: Repeatables
First off repeatables are quite useless. Avoid them. They are expensive and provide only measly, though permanents, benefits. The only time I consider them is when I’m in desperate need of influence (but even then your industry is better spent elsewhere).To give you an example: the feast repeatable will give you 5 food flat while building a district will usually give you 10+ food that will improve with tech. A new pop will give you +6 early game that will scale to more than 10 late game.
Best: Districts
Districts can provide huge benefits to your cities. They give you very good yield depending on the type of district you build.
Second best: Infrastructure
Infrastructure can provide huge boost to your cities that already have a few districts by improving all the tiles worked on by your city. For example Irrigation canals will give you +2 Food to all your tiles that contain a river and are worked on by your city. It can potentially drastically improve your resource output. It is however difficult to know exactly how beneficial one of those infrastructures will be as the game does not tell you how many resources it will give you at the time of construction. You will have to manually calculate it by looking at the topography of your city to see if it’s worth it.
Honorable mention: Luxury and Strategic resources
Strategic resources are resources such as Iron, Horses or Oil. They allow you to build units and infrastructure that require those resources. Their benefits scales as the more of the resource you have the more it will improve your output. One example are Horses in the early game. As soon as you have unlocked domestication you will be able to build Barns. Barns give you a boost to your farmers as well as +5 Food for every source of Horses exploited in your empire or traded with neighbors. It is potentially a very good source of food in the early game.
Luxury resources are resources such as Sage, Silver or Ebony. They provide a boost to one of your basic resources output to ALL of your cities as well as a stability boost. It is quite valuable as it scales, can be bought by your neighbors (without you losing access to it, win/win) and boost all your cities.
Those two can be built in only 1 or 2 turns or early and can be quite valuable to have.
What about units?
III- Stability and How to Deal with It
1- What is Stability?
Stability is a measure of how supportive your cities are of your rule. It is measured from 0 to 100%.
It is important to regulate your stability and keep it high in order to benefit from it.
Here’s a rundown of the different stages of stability and how they can affect your city:
- 0% and below: Your city will revolt. Armies will spawn and if they take your city it will secede from your empire.
- 0-30%: Construction in this city will be impossible except for districts and infrastructure that would add stability.
- 30-90%: Neutral stability. You can use the city as needed.
- 90-100%: Good stability. Positive events are more likely.
- 100%+: It is possible to have more than 100% stability as a buffer of sort but your city will still display 100% and you won’t have any added benefits.
2- Stability and Events
You might have noticed that your cities get events from time to time that allow you to make certain choices. Some of these events are positive while others are negative. These events are tied to your stability. The less stable your cities are, the more likely you are to encounter a negative event and the other way around also holds true.
Note however that, even at max stability, negative events can still happen, they just have a lower chance to pop.
3- What affects Stability?
Most districts you build will give you a penalty to your stability (usually -10%). Therefore the more you city grows, the less stable it will become. Attaching outposts will also negatively impact your stability.
On the other hand some districts and infrastructure allow you improve the stability such as the Garrison (District) or Public Fountains (Infrastructure).
Furthermore, units garrisoning in your Main Plaza (the center of your cities) will have a positive effect of +5 stability per unit that can be improved by some infrastructure.
Moreover, events can also have a positive or negative effect on your cities. Some events can reduce it by up to 50% while other can improve it by 20%.
Finally some cultures have a temporary stability boost when you build certain districts. Ancient Egyptians for example have a +10 stability temporary boost when they build a Maker’s District which temporarily offsets the -10% stability debuff from build this district. It allows you to take measure before stability becomes too bad.
4- When to deal with Stability?
I always aim to have my stability as high as possible, therefore 100% is my mark for when I stop building Stability related stuff. Sometimes however, events dictate your strategy. For instance, it might be better to quickly build a unit to defend your city that will soon be attacked.
At the beginning of the game you don’t have a lot to help you deal with stability and therefore you should be careful when building new districts. Garrisons however are unlocked quite early and can frankly be a life saver in this area. Public Fountains and other types of hygiene infrastructure are also a good thing as it will boost by 15 or 20% your stability. It is only in the late classical era/early medieval era that you unlock the Commons Quarters that can boost your stability depending on the number of districts surrounding it.
5- Strategy
I build districts as I need and when I see my stability starting to go down then I invest by order of priority in new units, stability infrastructure, commons quarters (if unlocked) and finally garrisons.
In some rare cases, I would build a garrison first to defend a strategic choke point against an aggressive neighbor.
IV- Expanding Peacefully
1- Humble Beginnings
Everything starts at the Neolithic Age. During this era you have to grow your tribe as much as possible. Here’s a basic rundown of what I do:
- Chase down any and all curiosities of food and science.
- Every time I got an event for the first 10 turns or so I choose to spawn a new unit.
- Split your units to cover more ground.
- Once you reach 5-6 units (depending on the ground you covered) let them grow in size. Never let them reach 4 units though.
- Hunt Deers every time you see them as long as you have one unit full health. Always manual fights and simply defend and let the deer kill itself. If you manage to get the high ground then attack.
- You can kill Mammoths with 2 units. Same strategy as for the Deers. It’s better to hunt them with 3 units and avoid choke points where you can’t surround it.
2- Choosing a good territory
As soon as you have a good size in the Neolithic era (around 10-15 units) then you can think about capturing some outposts.
Usually territories come in different flavor: those with luxury and/or strategic resources and those without.
Usually if there isn’t any strategic or luxury resources then you can find a good spot with a bit more yields. I aim to settle in those spots as long as there are neighboring territories that have strategic and luxury resources and that I can grab easily when in the Ancient Era.
If you manage to find a territory with a Natural wonder then outpost it asap. It will give you more influence early on and you will need it. It might not be the territory you choose as your first city though.
In the end, my goal is to find a territory with a yield over 20 (Industry+Food) to be my first city. If I can find one above 30 then it’s better (but it’s not always possible).
Tip: Staying in the Neolithic era can actually be a great boon for your economy.
First of all you shouldn’t leave the Neolithic era before the event that let you choose between 3 permanent bonus (+1 Food, Industry or Science per pop). Then if you rush Ancient early you might gain a few turns of production, however you will not grow your population as fast. Remember that units can dismissed and transformed into a population in your cities. I do that when I reach the Ancient Era and I instantly get a city with a pop of 5+. With that you can easily catch up and then take over people who advanced too early.
3- What are the uses of an outpost
Outposts are your way to claim new territory to either turn into a city or to add to a city in order to boost its production.
When you attach an outpost to a city, you give this city the yield of the Administrative Center of the territory you attached (the yield it showed when you built the outpost and that you can check at the top of your screen by clicking on it).
Early on, it can almost double your production and should be done ASAP as the first territory attached is cheap. The cost of attaching outposts to one particular city goes up the more territories that city contain. Don’t overdo it as after 2 territories attached it is often better to build a new city.
Furthermore, attaching outposts will have an impact on your cities stability (-20 Stability per territory attached to your city).
Sometimes you might want to claim a territory with an outpost without attaching it to your city. It has some pros and cons.
The pros is it allows you to claim the luxury and strategic resources within and those can give you a nice boost to your economy and stability. It’s also good to create a buffer between you and your enemies and to prevent from claiming the territory first.
The cons is that contrary to your cities, enemies can go freely inside those unattached territories without having to declare war. Thus, the outpost is being at risk of being destroyed and your units within can be attacked. Also, if you claimed a territory that was neighboring another civilization, then they will get a grievance on you and may ask you to give it to them. If you refuse they might go to war against you over this.
This last mechanic can be turned to your advantage when the AI claims territories neighboring you. Often times at the difficulty level that I play (Civilization for now but I will switch to Humanity) the AI does not have a lot of military and might relinquish the territory. If they don’t they are usually quite passive with their troops and you can go and ransack the annoying territory as well as others until they yield.
Finally outposts can be turned into cities. I don’t think I have to explain how cities work and how they can be advantageous for your fledgling civilization. One question you may have however is when to transform an outpost into a city.
The answer is simple; the best time to improve your outpost is when you still have room for more cities. I usually insure than this new city has good yields, is not too close and not too far from my other cities (unless building on another continent) and is not at risk from being destroyed (almost never the case). Be careful though as the influence cost to turn an outpost into a city is steep and you might have to limit your extension for a while in order to save up.
Dealing with your city cap
At the beginning of the Ancient Era when you start building cities, you are limited to 2 cities. Usually it won’t be an issue as creating new cities is taxing on your influence and you probably won’t have enough to build more than 1 during this era. However you might get in trouble if you’ve conquered enemy cities or assimilated neutral tribes. And thus you are looking for ways to extend your city cap.
Here are how you can do it:
- New technologies: technologies like Theology, can allow you to have more city cap and are always a good addition to your techs.
- Laws/Civics: when you reach for the first time your city cap you will unlock a law/civic that gives you the choice between +1 City Cap or +50 Stability in your capital. The +1 City Cap is infinitely more valuable as Stability is quite easy to deal with especially during the later stages of the game. You might choose the +50 Stability if you are in trouble, have no way to expand and knowing full well that you will be able to change this civic later on.
- Culture: One culture in the game gives you a wonderful bonus of +2 City Cap. It is especially valuable on Huge Maps with the New World activated. This culture is the Classical Era, Achaemenid Persians. Their other bonuses are meh but the +2 City Cap can be amazing.
- Event: A late event that happens during the Early Modern Era and that gives you three choices. One of them is +1 City Cap (take it!).
Now sometimes it is not that bad to go above your city cap. It is not a hard cap and you can and will go over it. Here are the maluses provided by extending beyond your city cap:
- +1 City Over: -10 Influence/turn
- +2 Cities over: -120 Influence/turn
- +3 Cities over: -360 Influence/turn
- +4 Cities over: More -Influence/turn and so on and so forth.
Early on the -10 Influence penalty can be harshed but by the Classical Era it can usually be safely ignored.
My rule of thumb is that if the penalty is less than 10% of all your influence produced then it might be a good investment to go beyond your city cap.
Now another way to deal with your city cap is Absorbing cities.
Once you’ve unlocked the Medieval era technology Military Architecture, you will gain the ability to fuse two cities together. The investment poured into the absorbed city infrastructure will be lost (therefore make sure to absorb the city that is less developed) while the absorbing city infrastructure will be kept intact, as well as both cities district. It can be a good way to integrate newly conquered cities from enemy civilizations and tribes. The cost of Absorbing cities is usually quite high, in the order of 10s of thousands. So it’s not a mechanic that you can use quite often though it can be a potent one.
V- Expanding Militarily
In this chapter we will deal with expansion through military means. You will learn about the War Support system and how to use it to your advantage, to wage war and win over territories and prevent the expansion of competitors.
1- War Support System
In Humankind, you cannot attack your neighbors willy-nilly. You need to have the support of your population to do so and you need to have a reason to attack less you want to be branded as a traitor empire.
The War Support System is a mechanic to show how supportive is your population of potential and current wars. When engaging in diplomacy, you will see that represented in a 2 line axis; one for your empire and the other for the other empire. The War Support is represented as a number from 0 to 100, 0 being a population against the war and 100 extremely supportive of the war. In an ongoing war, the first empire to reach 0 will lose the war and have terms enforced on him by his opponent.
Most of the time the equilibrium is at 50 and you need 80 in order to declare a just war. You may generate War Support by winning battles, occupying cities and grievances.
Grievances are a system that influences the war support. If one of the other empires claim a territory right at your borders, you will receive a grievance against them. Your people are unhappy that they did that and so your war support will improve. You can decide to act on the grievance by demanding the territory. They can then accept, in which case you gain the territory or they can refuse. If they refuse and you have enough support to declare war, you can decide to declare right away or let your demand go. It is called pressing a demand and when you do that, even if you don’t have enough war support, it will cease trade between your empires.
Managing the War Support System is an important aspect to master in order to be a militarist empire. You can literally bully out the other empires of their territories.
2- Skirmishes
What I call skirmishes are battles and military actions that take place without having to declare war on your enemies. Skirmishes, with one exception mentioned below, can thus only happen in neutral territories or territories that are not attached to a city. Indeed when a territory is attached to a city then it is fully controlled and you will have to declare war in order to be able to trespass on this territory. You might want to use that mechanic to your advantage to deny access to certain portions of the map to your opponents without heavy use of troops.
a/ Battles
It will happen that during your travels your scouts will get attacked by other empires and you might attack them in return and preemptively. In order to attack you need to have one of your army in contact with another empire army in a neutral or lightly controlled territory (outposts not attached to a city). It will then enter into a battle. Winning battles that way will allow you to generate war support. Losing battles and retreating will have the opposite effect.
It might be a good idea to skirmish against other empire’s scouts with better armies to quickly generate grievances and then prepare for war. If you are attacked you might also ask for reparation which will add a grievance that the AI or another empire may be willing to pay.
b/ Ransacking
Another way of skirmishing and generating war support is ransacking. You can ransack districts and outposts for gold and war support. If you ransack an outpost, it will destroy it and it might be useful to do so in order to deprive your enemy of an important territory. It will take some time and the enemy might have a chance to send some reinforcements so prepare for battle or prepare to retreat. I tend to annoy the AI by ransacking their outposts that are a bit too far from their cities. They usually don’t have time to respond and it’s not a huge investment of resources on my part as I can ransack with only a Scout unit.
Ransacking districts works the same and it wil lgive you gold but more often than not, you cannot ransack regular districts without having conquered city or at the very least declared war. Districts that are commonly ransacked during skirmishes however are Extractors of Strategic and Luxury resources.
c/ Expansionist Cultures
Note that Expansionist cultures have a special ability that allows them to trespass, that is to say enter another empire’s controlled territories, without having to declare war. It can be a potent ability to skirmish beyond what a normal empire could achieve.
3- Wars
Sometimes the time has come for the drums of war to resonate on the battlefield. When diplomacy has failed and when the AI has refused your demands then it might be time to stomp on them with the full strength of your military forces.
In order to do that, open up the Diplomacy screen and press Declare War. You need at least 80 War Support to do so but it will declare a formal war with clear goals defined.
In order to win, you need to make your enemy war support decline to 0 while avoiding yours to do the same. Thus you need to:
- win battles (flat bonus for you and malus for your opponent)
- capture outposts (flat bonus for you and malus for your opponent)
- ransack (flat bonus for you and malus for your opponent)
- capture cities (a per turn malus for your opponent)
The length of the war will also eventually play a role.
The faster you hit them, the less time they will have to recover.
Once you’ve won, you can then enforce your terms. You can only enforce some terms depending on how badly you beat your opponent. Moreover the terms you’ve went to war for (your grievances) will instantly be added to your demands at a very low cost.
Don’t expect to completely wipe out or to vassalize your opponent in only one war. It will take repeated efforts to transform his empire into rubble.
During the war, I recommend you ransack as much as you can from the districts of the cities you’ve conquered but don’t plan on keeping. It’s free money.
4- Aftermath
Congratulations, you’ve won the war and forced the surrender terms to your opponent. But now what? You’ve conquered 5 cities and it’s more than your city cap can handle and you’re bleeding influence every turn.
A few options open before you:
a/ Keep the cities
And probably lose all your influence unless you can merge them.
b/ Ransack and destroy
If you ransack the Main Plaza of a city, it will destroy it. If it’s yours it will only take one turn. The territory will become neutral again and free for the taking for the first empire to build an outpost on it. You can destroy the plaza and ransack all the surrounding districts afterwards. Or you could claim it with an outpost and attach it to one of your city. I’ll have to check but I think that by doing so you can get the districts for a much lower cost.
c/ Liberate
Another option is to liberate the territory that will turn into an Independent people indebted to you. The debt part only means that you have a head start on your relations with this independent territory. It is a good option if you’re going to lose all your influence because of holding too much cities as liberating is an instant action.