Table of Contents Show
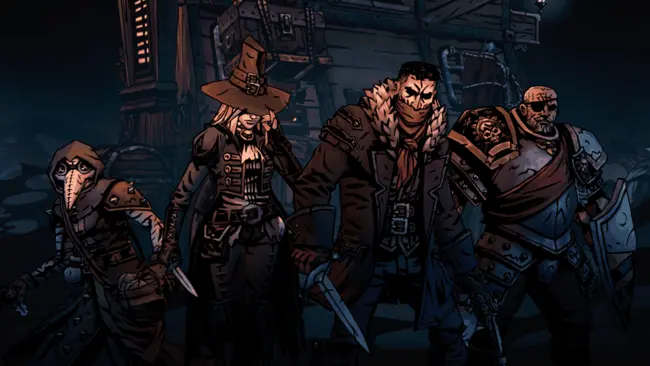
Highwayman is a direct damage dealer that is entirely self sufficient damage-wise and mostly no nonsense. Outside of maybe point blank shot there are no frills here. You hit things in the face, you use take aim to hit things in the face even harder, and you use the straightforward utility from moves like Open vein and highway robbery to do valuable things. This doesn’t mean he hates having friends to set him up: He has a very reliable stun in pistol shot that needs combo, and having a vuln setter or a strength giver to boost his damage further never hurts. He simply doesn’t need those things to function, as in most fights he will be just fine critting things in the face with moves like double tap or wicked slice.
Darkest Dungeon 2 Highwayman Guide
Stats:
- 35 HP
- 5 Speed
- 40 bleed resist, 30 blight resist, 30 burn resist
- 40 Disease resist, 20 debuff resist, 30 move resist, 40 stun resist
- Movement: 2 Back, 2 Up
Paths
Rogue: More damage in rank 1, less in rank 3 and 4. Point black shot gives 1 riposte token. The main cost is that you’re forced to run him up front, which means he competes with some other heroes for that spot and loses the flexible targeting his ranged options would give him.
Sharpshot: Higher damage on ranged skills and 3 speed. Grapeshot blast grants a strength token on use. Weaker melee skills.
Yellowhand: Slightly more HP, all melee skills attempt to debuff the enemy with a debuff that reduces bleed resist by 10, a more powerful highway robbery and a double cross that removes block tokens (before applying vuln), and all this at the cost of your ranged skills basically doing no damage.
Moveset
Wicked Slice: Used in 3-2-1, targets 1-2. Deals 4-8/6-9 damage, with 15/20 crit. Ignores 20/30% of enemy DBR.
This move has what was once probably the most common damage range in the game, though the moves that it had it in common with were slightly changed since then. The 15/20 crit rate is surprisingly high for a standard attack move, though as we will see later, Dismas’s real crit rate is often a little less important than other characters. This move is solid. The biggest limiting factor to it is probably the targeting range: It can only hit 1 and 2, which means it doesn’t reach squishy targets the way some of his other moves might. You’ll most typically run this with a rank 1 rogue highwayman or a Yellowhand highwayman. The ability to ignore some DBR is nice for very certain enemies, though it’s usually better to deal with DBR in ways other than ‘hit them again’ for most enemies. It does decent damage to rank 1 or 2 whenever you want to, and it can be used all the way back to rank 3, making it flexible in availability.
Pistol Shot: Used in 4-3-2, hits 2-3-4. Deals 3-6/4-8 damage at 10/15 crit, Dazes/Stuns on combo.
Pistol shot has two important things going for it. One, it’s Dismas’s only option for attacking rank 4, which can be a pretty big deal in certain fights, and it deals decent enough damage to be notable in that niche. It allows him to combine well with moves and strategies that target the backline, especially iron swan+ in particular due to the second use of this move, which is the fact that it is, for some reason, a stun. This is probably one of the most flexible combo stuns in the game, as it can target all the way back to rank 4. This allows Dismas to fit in well with comps that have some access to combo, and the fact that Pistol shot is not his main move for dealing ranged damage means that you only have to use the combo token this way if you want to. It’s not like a move like Noxious Blast or Firefly where it sucks to avoid using them to save a combo token; just hit wicked slice or double tap or take aim instead. A fairly common choice outside of Rogue and Yellowhand, and universally used on Sharpshot Dismas. This move also does allow you to build Dismas as a dedicated stunner if you want to build a comp that does that, and he’ll have plenty of other things he can do when you don’t want to use this to stun. The + speed from sharpshot, it’s worth noting, can complicate using the stun a little, as it means he’s more likely to go before a combo setter. But hey, it does more damage with sharpshot.
Duelist’s Advance: Used in 4-3-2, Targets 1-2-3. Deals 3-5/4-6 damage with 5/10 crit. On use, he moves forward 1 rank and gains 2 riposte/3 riposte and 1 dodge. Riposte attacks deal 4-6 damage, have 10 crit, and have a 33% chance to apply combo
Duelist’s Advance is a move that can be used in a few ways. It can be used to cycle Dismas back to rank 1 for another point blank shot while providing riposte and some survivability. It can be used in dance teams where you expect Dismas to be upfront a lot, ensuring he tends to get hit and has some extra survivability. It is, for example, one option for a double lunge comp. It can be used to correct his position. All of that being said, it’s mostly just okay outside of these scenarios. You don’t use Duelist’s Advance just to use it, it’s a move that he has to get hit 2 or 3 times to take full advantage of, and that advantage is spread out among multiple enemies. It fills a niche, but with versions of Dismas that focus on ranged damage or situations outside of its niche, you don’t tend to need to use it that often. Not bad within those scenarios, it’s just not as generalist as a fair amount of the rest of his kit. It is also worth pointing out that you might have other means to cycle him back up for PBS in most cases, which means that this move isn’t strictly necessary on Rogue builds. Decent pinger, since he always gets the riposte and dodge whether he misses or does less damage. If you know he’s going to get hit for the riposte, and especially if that means he’s going to get hit by the same enemy repeatedly (like a boss with cleaves), this move can do a fairly large amount of damage effectively.
Tracking Shot: Used anywhere, target 2-3-4. Ignores and removes all dodge and stealth, applies combo/applies combo and a debuff that keeps that character from gaining dodge (for 2 rounds).
This move counters two specific niches. One of these niches, countering dodge, is countered by another one of his moves, albeit not to the same degree. The other is stealth, which is a nice thing to counter, especially within the sluice and act 1. One of the major problems with this move is that there aren’t really many enemies that are both tanky enough and produce enough dodge to make the upgrade of this move all that worth it, much less in comparison to highway robbery. Sure, it applies a combo token, but that’s the only other thing it does. However, when you do fight one of those enemies, the 2 round debuff can shut their mitigation strategy down very hard.
This move also touches on a problem with a couple of moves in Dismas’s kit. Dismas Wants to be set up, he doesn’t want to set other characters up as much. Yellowhand breaks the mold on this idea somewhat, but even yellowhand dismas can access the high output of a dismas when he wants to. All that aside, as a setup move this thing isn’t all that great, but as an anti stealth tool and occasionally an anti-dodge one, it is. It is genuinely quite nice against those stealth pigs, but it never really evolves past something that you pick for specific fights.
Highwayman (II)
Take Aim: Used anywhere, target self. Clear your own blind, gain a dodge token and 1/2 crit tokens, and 0/1 speed tokens. Cooldown of 1 turn
Take aim is the best self buff in DD2, bar none, and there are a few reasons for this. One, crit tokens are just worth more than other offensive tokens. A crit usually comes close to doubling your damage, and so the value of a crit token is 100% of a turn minus the move’s crit (as the crit is the chance it would crit anyway). So for wicked Slice+, this move is about 1.6 turns of damage, for double tap it’s 1.9 turns, and so on. Any tempo loss for this move is mitigated by the speed token, and you even gain a dodge token for some extra mitigation. Hell, it clears blind too, the most annoying offensive debuff in the game, because why not?
This move not only provides a ton of value, it also provides that value in a very consistent way. You know whether or not the attack is going to kill that enemy, and what HP it will set it to if it doesn’t. The multiplicative nature of crits also means this plays nice with other offensive buffs, both personal modifiers and enemy ones. You will run this move, especially upgraded, on any Dismas kit that wants to do damage at all, and you will use it all the time in all kinds of fights. Just realize when it’s better to do something else, usually meaning either stunning or helping to bring an enemy down before it can move. The cooldown is mainly relevant if you get blinded after using it, as otherwise there’s no real reason to spam it.
Remember though that using combat items that heal or try to affect or damage enemies will use up a crit token. So don’t do that without good reason; even though the move is a lot of value, you still shouldn’t waste it. The unupgraded version of take aim is also a bit more mediocre, though certainly not bad.
Point Blank Shot: Used in 1, targets 1 (hence the ‘point-blank’). Deals 6-12/10-13 damage at 10/15 crit, applies combo, attempts to push the enemy back 1 rank, and moves Dismas back 1 rank.
Point blank shot does what it says in its name. It puts a bullet into someone 3 inches away from the gun. Given Dismas is using a flintlock pistol I suppose that would probably hurt a lot. Anyway, this move naturally does a lot of damage, and in fact the upgraded version’s damage range decides to be consistent instead of just higher. 10-13 is a very strong base level of damage, and with a not at all bad 15 crit on top of it. The problem with this move is that it’s the definition of inflexible. It can only target rank 1, and it can only be used from rank 1. The second of these can be mitigated through certain comps: a dragonfly using Bonnie (for a comp that’s so glass cannon it brings a tear to the eye), a strategic retreat using barristan, a pirouette from Audrey, or a fade to black from jester are all some examples of moves that can set Dismas up for another.
You can also, of course, use that same tangle trophy that nightsworn audrey loves so much. The fact that it can only hit rank 1 means that you have no options when it comes to your target. This can be a big deal, because having even some flexibility in who you kill or attack is important. What if rank 1 has dodge, or block? What if the really important enemy is sitting in 2? What if, god forbid, there’s a corpse sitting in 1? The knockback helps avoid this last problem if Dismas is the guy making that corpse, but the point is that there are a lot of reasons you want at least some flexibility in target. The rogue version of this move gives you 1 riposte, which is a nice bit of extra value, especially if you are just spamming the daylights out of it. The combo application can empower more damage from characters like Audrey and Boudica, or allow someone to follow up with a stun. You know, if they aren’t already dead. Overall, this is a move you do have to be a little conscious of building around, and it can provide a strong return if you do, albeit a very inflexible strong return.
Grapeshot Blast: Used in 4-3-2, Targets 1+2. Deals 2-4/4-6 damage, at 5/10 crit. The sharpshot version of this also gives Dismas 1 strength token.
A pretty good no nonsense frontline cleave. Pings off tokens on what are often the targets that are trying to tank you, and does decent damage to boot. The sharpshot version of this giving you strength does push this into quite powerful territory, along with the fact that it’s the only move other than PBS you’d consider using with SharpShot that hits 1. This move generally feels pretty good, coming in handy for the aforementioned token pinging, and also for finishing off a weak enemy while making sure his friend eats a handful of bullet as well. A definite include with the sharpshot path, it’s just really good there, but it still performs okay enough on a wanderer. There’s not all that much reason to run this on Rogue or Yellowhand; Rogue will often if not always be unable to use it and will have other options for hitting 1, and Yellowhand will make it deal tickle-tier damage. It’s not uncommon that you can use this to finish off something after using take aim+, and then carry that strength into the next crit, delivering some pretty insane damage to whoever hasn’t been reduced to a fine mist.
Open Vein: Used in 3-2-1, targets 1-2. Deals 3-5/4-6 damage and 2/3 bleed at 5/10 crit. Double the base bleed with combo (4/6, doesn’t double other added bleed).
One of Dismas’s utility melee moves, this move actually fits in that utility along with good damage into one nice little package. The actual output of this move is good, about equaling wicked slice on the very first turn if we assume the bleed sticks (though that’s a big assumption), and surpassing it over time. The bleed portion means this move is good for hitting targets with block, and for putting enemies onto death’s door. The combo effect means this move accesses DoT levels otherwise reserved for bleed out and noxious blast, though the application will be hit or miss, and it’s a little bit of a worse use of combo compared to others. The biggest downside is that it won’t scale very well with damage boosts in the way that Slice, PBS, and Double Tap would. It’s another solid, no nonsense move that allows Dismas to access damage that isn’t just direct damage. Dismas’s kit is full of solid, no nonsense moves.
Double Tap: Used in 3-2, targets 2-3, Deals 4-8/6-9 damage at 5 crit, Deals +30% damage if used on an enemy with less than 30/50% HP remaining, ignores 10/20 DBR
This is the ranged version of wicked slice, with a few key differences. One, its targeting is very weird. It can only hit 2 or 3, and not 4 or 1. Two, it trades most of its raw crit and some of the DBR ignorance for the damage bonus against lower HP targets, which because take aim exists is a very good trade. This is Sharpshot Dismas’s staple damage move, and you will use it like a staple damage move. Meaning you’ll either smack stuff with it, or you’ll use take aim and then smack stuff with it. The damage bonus is naturally very good against bosses in particular, because you’ll realize a lot of value off of it given their high HP. There’s not a whole lot else to say about it, it’s another no frills damage option that excels with a Sharpshot dismas.
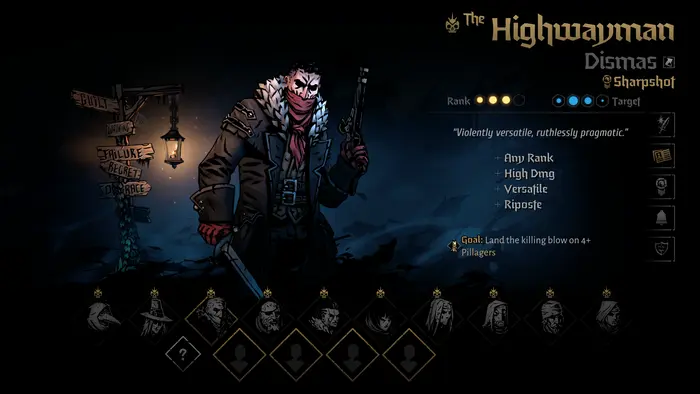
Highwayman (III)
Highway Robbery: Used in 4-3-2, Targets 1-2-3. Ignores dodge and destroys/steals 2 positive tokens from the enemy. It can only target enemies with positive tokens. With yellowhand Dismas, it will always steal 1 additional token, regardless of whether the skill is upgraded or not.
Enemy tokens are annoying. Cultist swordies give themselves block and crit, worms eat themselves up some crit and block, altars hand out block and sometimes strength like it’s going out of style. Wouldn’t it be great if you could just… make it go away, or better yet, use it for yourself. That’s what Highway robbery does. Dodge annoying you? Yoink it. About to be slammed by a crit token? Yoink it. Don’t want to claw through 3 instances of block+? Yoink them. This move naturally produces decent value when it’s used on an enemy with 2 good positive tokens, and that goes up to ‘a lot’ of value if he’s stealing them. The fact it can’t be used in 1 limits this for a rogue highwayman specifically, but in other circumstances it’s a piece of utility that universally counters positive tokens. You shouldn’t always use it, however. If an enemy has 2 block+ tokens, and PD is up next, why not just use open vein and then noxious blast instead?
If an enemy has a couple of dodge tokens and is next to someone you also want to kill, why not grapeshot and maybe even pick up a strength token from it? This move isn’t always the best option, but it is often a good option, especially when dealing with specifically enemy offensive tokens, and doubly so if you know that enemy won’t die any time soon. Stealing those tokens can also mean that it produces a lot of value for Dismas himself. Steal a crit and dodge token? Congratulations on gaining the value of a normal take aim while taking it from the enemy. Really, the biggest problem with this move is that there are quite a few enemies that aren’t generating those tokens. But when you need it on any build that can use it it’s quite useful, and it’s usually good enough to be used over Tracking-Shot outside of Stealth or dodge heavy fights.
Double Cross: used in 2-1, Targets 1-2. Deals 2-4/3-5 damage at 5 crit, applies 1/2 vuln tokens, and Dismas gains 1 block token. Yellowhand makes this remove all block tokens from the enemy before it tries to apply vuln tokens.
Double Cross is a move that is statistically very good that is mainly held back by the fact that it’s on Dismas. 2 vuln is a fantastic amount of damage to transfer to others, and this move even does a little damage and puts up some mitigation to boot. Applying it to 1-2 isn’t that bad at all, as a lot of hard hitters have to focus on those ranks with many of their moves. The big problem is that Dismas’s damage is already really good on its own, so applying vuln to get more damage from other heavy hitters is a bit of a raw deal, especially compared to using a move like Take Aim.
Dismas usually wants to be set up, he wants someone like Bonnie or Alhazred to apply the vuln for him to hit for truckloads of damage. Using double cross to set himself up is slow and inferior to take aim, and using take aim means one of those other characters can boost his damage. However, if you decide to use a more support oriented Dismas (such as Yellowhand Dismas, which tends to feel generalist) while only occasionally tapping into his damage, then this move is obviously quite strong statistically. Great for attacking into block even when not using Yellowhand, or for enabling characters like Hellion, leper, and Audrey. It’s worth noting that the rank limitation on this means you can’t run it alongside a duo of hard hitting frontliners, which makes it a bit of a harder sell than something like Vulnerability Hex.
Highwayman Analysis and Sample Comp
Highwayman is a direct damage dealer that is entirely self sufficient damage-wise and mostly no nonsense. Outside of maybe point blank shot there are no frills here. You hit things in the face, you use take aim to hit things in the face even harder, and you use the straightforward utility from moves like Open vein and highway robbery to do valuable things. This doesn’t mean he hates having friends to set him up: He has a very reliable stun in pistol shot that needs combo, and having a vuln setter or a strength giver to boost his damage further never hurts.
He simply doesn’t need those things to function, as in most fights he will be just fine critting things in the face with moves like double tap or wicked slice. Now this generalism feels like it comes at the cost of a moveset that does not offer as much utility as some others, and he doesn’t ever come off as much of a high roller on his own. He has very little self sufficiency, only giving himself the occasional dodge or block token. He has decent HP, and he can be built to take hits with moves like Advance and Rogue’s PBS, but he doesn’t have enough mitigation to do it in the same way a tank would, nor the redirection.
His utility moves are good but not necessarily great; you get a decent cleave to play with, a damage transfer move that he usually doesn’t need, highway robbery which is good, and tracking shot which is niche. Dismas is built to be a damage dealer and occasional stunner in most cases, and it’s very easy to build him this way, slot him into a comp that just needs some nice direct damage, and see results. He tends to hit for reliable and good damage, sometimes great damage with enough modifiers, but other than point blank shot his default ranges never get high enough to hit some of the heights you might see from an Audrey, or a Leper. He therefore excels at picking off key targets and doing good reliable damage constantly, but not as much at high rolling. That’s a very strong niche to exist within, and every team in DD2 needs damage, so if you don’t know who else to bring, Dismas always has your back, slotting in perfectly fine in ranks 1 through 3, and dealing plenty of reliable and no nonsense.
Sample Comp
Vestal (Seraph) – Dismas (Sharpshot) – Jester (Virtuoso) – Man-At-Arms (Bulwark)
You know what we haven’t had yet? A strong as hell mitigation focused comp. Here you go, this comp carries enough mitigation to make even the scariest boss blush. Upgrade Rampart and Consecration of Fortitude at the first inn, and enjoy producing stuns and mitigation tokens up the wazoo.
How this comp works is simple. Vestal goes as soon as she is able (speed trinkets on Vestal are very strong in this comp), and she casts Fortitude on Jester’s rank. Jester uses Razor’s wit and marks a target, and Barristan uses rampart and stuns it. If he can’t stun it he still uses rampart to rotate back up, and Dismas uses pistol shot to stun it. Jester and Barristan produce either block or dodge + every turn from the consecration, and this gives Vestal tokens which she uses to fire 10-14 damage judgments wherever she wants every turn. If she has time, she drops a consecration of light on Dismas (don’t upgrade it), helping him hit even harder.
Dismas for his part just kind of shoots things when he’s not stunning. The strong mitigation here lets him make full and easy use of take aim, only rarely worrying about finishing something off before he can use it. The best part of this mitigation setup is that it doesn’t sacrifice much on damage. Judgment hits hard, Rampart hits hard, Dismas hits hard, only jester doesn’t usually hit that hard, and he can access finale if you need him to. Worried about this comp taking some stress due to being a bit slower? Well with all the crits from Dismas and access to the great stress heal that is Bolster, there’s no need to worry. And between the endless supply of mitigation and Vestal’s two big heals, you’re more than covered on HP. Feel free to break the jester-barristan stun loop the moment you need him to taunt up with stand fast too. This team has enough mitigation to do great things in every act, though acts with act bosses that are somewhat vulnerable to stun will be much weaker to this composition in particular.