
Table of Contents Show
Take control of a settlement of the first modern humans, guide them through the ages in their struggle for survival. Dawn of Man is a survival/city-builder from the creators of Planetbase.
The game starts in the Stone Age, and takes you up to the Iron Age, spanning more than 10,000 years of human prehistory. You will have to get your people to survive, expand and evolve, just like our ancestors, facing the challenges that the environment will throw at you.
How to Survive
- Gather berries and fruits during summer and save longer lasting resources such as cured meat, dry fish and grain for winter.
- Avoid targetinh healthy adult animals when hunting in the early game, as they are hard to kill and might fight back.
- Use work areas in conjunction with resource limits to automate your settlement as much as possible.
- Do not expand too fast if you do not have the infrastructure to feed your people.
- Domestic animals need to be fed and given water in winter. Avoid having too many if you can not maintain them.
- In paleolithic hunter-gatherer socities, conflict was rare as the human populations were sparse. From the neolithic onward, though, you really need to be prepared for battle.
- It’s hard to achieve large populations in early eras. Only with farming and other technologies you will be able to sustain a large settlement.
- Make sure that when winter comes you have plenty of non-perishable, food in storage, otherwise starvation will be a serious problem.
- Getting someone to go to rivers, lakes, or wells to collect and store water is way more efficient than having your people go drink away from town everytime.
- Double-right click on the terrain to get a selected human to sprint to the location.
- Pivot the camera around a poiny by pressing both pand and rotate keys at the same time.
- In standard difficulty, raider technology will match your current era, so be careful before advancing too quickly.
- In hardcore difficulty, attackers will advance their technology at their own pace, so you should not take too long to progress through the eras.
- You can tell your people to go rest or shelter by selecting them and clicking on a structure.
- When people get hurt there is a chance they might catch an infection, which could be fatal.
- You can give commands to your people by selecting them and right clicking on the terrain or on an object.
- You can command your people to sprint to a location by selecting them and double right-clicking on the terrain.
- You can quicksave the game by pressing F9.
- Double click on a plant, being or building to select all nearby entities.
- You can press the return key to move the camera back to town.
- You can hold the H and I keys while dragging the mouse to select people with hunting or fighting tools only.
The Beginning
After the game finished generating the map, pause immediately (space) and look around your starting area. It’s important to find flint and sticks, and get an overview about available building space.
Resources are best discovered with the primal vision. Flint has a dark gray color, edible plants glowing green and sticks are white (actually a very bright mint green). Place work areas as near at the sarting point as possible. At bodies of water the work area should include two banks.
- If there aren’t any, build wood piles and rock piles.
- Now the children should start gathering sticks and flint.
If necessary, place tents, crafter, hearth and skin dryer. Unfortunately children can’t deliver materials to buliding grounds.
Earning knowledge points
When done all of the above (it isn’t necessary to start building), it’s time to gather points. Hunting diffrent animals is the fastest way. Hold the key “h”, hold the mouse button, drag the selection over your settlers. This should select everyone with a hunting weapon.
Switch to primal vision, search for game nearby. Rightclick on the desired animal. Now every selected hunter should start hunting. This way the animal dies faster and you hunters doesn`t ahve to run across the map to finally kill it.
Let your hunting party go after different animals (boar, deer, ibex and mouflon are a good choice) to get the “first hunt” knowledge points.
Now you should have enough points to unlock your first tech. This should be, in any new game, the food dryer. With this built in your settlement, raw food will be delivered to it instead of your people walking to the butcher place one at a time.
Expand your settlement
Build at least one food dryer and let your people start expand the settlement. High priorize the crafter (building and crafting) to craft some bifaces, spears and skins outfits for migrants and settlers.
Leather outfits aren’t that crucial at the beginning, you need tannin for tanning. And this is only gatherable in the spring anyway, but doable if you are fast enough gathering knowledge points to unlock the tech.
Foods
There are different types of food that your people can consume, it is important to understand the differences between them.
Raw Fish, Available all year long, every river or lake bank contains a certain amount of fish, once you exhaust it you need to wait for it to replenish. You can use the food dryer to convert raw fish to dry fish, which lasts a lot longer.
Raw Meat, Tou can hunt animals for their meat all year long, but in winter there will be a lot less of them around. You can use the food dryer to convert raw meat to cured meat, which lasts a lot longer.
Berrries, Fruit and Nuts, available mostly in summer only, but some also in autumn. They do not last for long, but they are a good food to eat seasonaily, so you can save non-perishable foods for the winter.
Pulses, available in summer, they require the right harvesting tools and technology to be processed. They last for a reasonable amount of time.
Crain. It lasts for an extremely long timei but reuires processing to be eaten: First needs to be converted intro flour, then into bread. This makes it quite labor intensive.
People will try to eat the foods that are about to perish first.
Resource Limits
Resource limits are a powerful way to automate work in your settlement.
You can set a resource limit, then mark a recipe for continuous production or place a work are: your people will keep on collecting or producing that resource until the limit is reached.
When resources are consumed and the amounts fall below the limit again, your people will go back to work.
You can set any limit to 3 types of values;
- Infinity: There is no limit to production, it will continue as long as there are materials available.
- Fixed Amount: Sets a limit defined by specific number of units. Production stops once the number of the units of that particular resource reaches the value.
- Population Percentage: Sets a limit defined by a percentage of the current population. Setting a percentage limit is useful to avoid having to constantly adjust the limits as the population changes.
Note that limits only affect work areas and automatic crafting, if you explicity give an order, the limit is ignored.
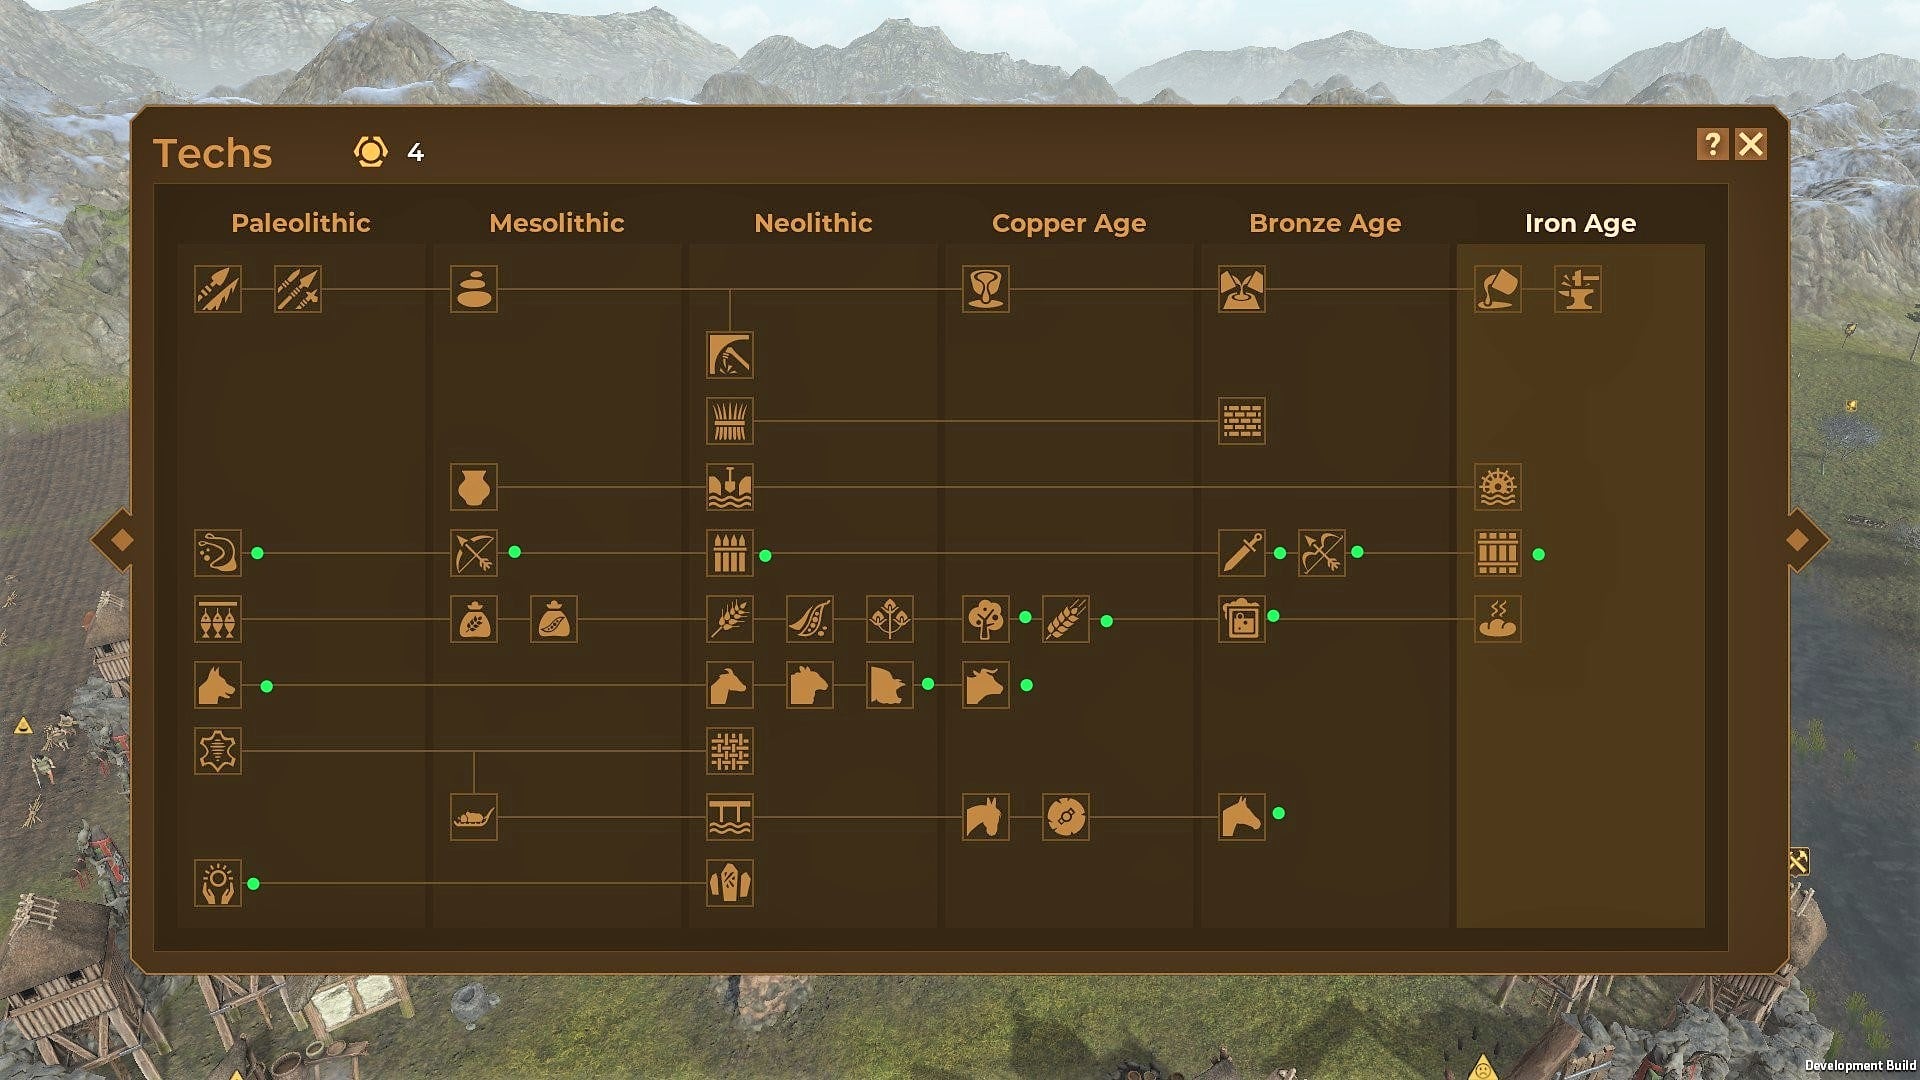
Techs
Techs allow you to produce more goods, build new structures, and move forward through the ages.
To research and unlock new techs, you need to spend knowledge pointsin the tech panel.
You earn knowledge points when doing actions such as hunting animals, gathering resources, or achieeving highter populations.
You can only unlock a tech if you have previously unlocked it’s prerequisite techs and the era it belongs to.
To unlock a new Era you need to unlock it’s Era Tech, which requires twice as many Knowledge points to unlock.
Cereal Domestication
It allows you to plant and harvest cereals, unlocking the Neolithic Era.
It and dramatically increases the amount of people you can reliably feed every year.
This is one of the most important techs in the history of mankind.
Clothing
Clothing offers your people projection from cold, increases welfare and reduces damaged sustained in combat.
Skins and wool outfits protect people up to freezing temperatures. It is critical that you have one of these per inhabitant.
When it is warmyour people will prefer to wear leather or linen outfitsi these increase welfare levels and offer slight projection in combat.
A typical way to ensure you have enough clothing is to set outfits to countinous production in the crafter or outfitter structures and having a resource limit set of %100.
When the temperature drops below the level of projection clothing offers, the temperature of the person will start to dropi at this point they will have to seek shelter or they will die of hypothermia.
Crafter
The crafter is the main production structure in the Stone age.
Here you can create all the tools and clothing your people will need in the early era.
It is a good idea to use automated production (by right clicking on an item) and resource limits in order to avoid to have to manually craft tools every time you need them.
Costs
2 Dry Skin, 4 Sticks
Resource Decay
Most resources and tools decay over time, decay is also accelerated when tools are used.
Resources stored inside a structure, decay slowly. This is especially important for food, as it can mean the difference between having a good winter or massive starvation.
Some foods decay very quickly like; Fruit, Berries or Raw meat and Raw fish.
Some foods fast a longer like; Grain, Cured meat and Dry fish.
Your people will try to eat the food that is going to decay sooner in order to preserve more durable food for later.
Defense
One of the keys to survival is to defend your settlement against hostile animals and raiders.
During the stone age, the main threats are wild animals and sporadic bands of raiders. Make sure you have enough weapons and people to defend the settlement against them.
In the metal age things will get more serious, and large bands of attackers will try to destroy your settlement. It is highly recommended that you build fortifications and defensive.
At any time you can trigger an alert in the defense panel, your people then will run back to town, get the best weapons available and man the towers.
Work Areas
Setting work areas allows you to automate many of the collection and mining tasks in your settlement.
After you place an area for a given resource, people will keep collecting the resource within that area until the resource limit is reached.
By default only one person at a time will work in a particular area, but you can increase their number in the selection panel.
Human Roles
Depending on the age of your population they are able to perform different tasks;
- Children: They can carry light resources around, one at a time, and do basic tasks do not involve the usage of tools.
- Adults: They are the most efficient of your people, they can carry a larger number of resources and perform any task.
- Elderly: They can perform the same tasks as adults, but have less health and can carry less resources.
Animals
Animals are the source of many key goods, such as meat, bones, or pelts.
You can leave animals to their own thing, organize hunts, or even scavenge carcasses left in the fields.
Eventually, you will be able to tame and bring animals to your settlement.
Domestic Animals
Domestic animals provide your settlement with a reliable source of food and resources.
Keeping domestic animals is essential to sustaining large populations, but it is also a challenge, as you have to ensure that they are well kept and maintained.
Wild Animals
Wild animals roam the land doing their own thing.
Most wild animals why away from humans and avoid settlements, but stray predators might pose a threat.
As eras come and go, so do animal species.
Domestic Animals
Domestic animals provide your settlement with a reliable source of food and resources.
Keeping domestic animals is essential to sustaining large populations, but it is also a challenge, as you have to ensure that they are well kept and maintained.
Dogs
Dogs are the first domestic animals to show up in your settlement. They are excellent guards and will help you fight any intruders.
Once the dog domestication tech is researched, dogs will keep on coming to the village at a steady rate, depending on your population.
They eat the leftovers from the humans, so they do not require to be fed or given shelter.
Resources Produced
- 1 Raw Meat
Goat
Domestic animals can be brought to the settlement by capturing their equivalent wild counterpart, or by purchasing them from traders.
They can be slaughtered for meat or kept alive to collect the resources they produce. During winter they have to be kept in stables and be given water and food: straw or frain.
Before you can domesticate or purchase the you have to research the appropicate taming tech.
Recurrent Production
- 1 Milk
Resources Produced
- 1 Raw Skin, 4 Raw Meat, 1 Bone
Sheep
Domestic animals can be brought to the settlement by capturing their equivalent wild counterpart, or by purchasing them from traders.
They can be slaughtered for meat or kept alive to collect the resources they produce. During winter they have to be kept in stables and be given water and food: straw or frain.
Before you can domesticate or purchase the you have to research the appropicate taming tech.
Recurrent Production
- 1 Wool
Resources Produced
- 1 Raw Skin, 4 Raw Meat, 1 Bone
Pig
Domestic animals can be brought to the settlement by capturing their equivalent wild counterpart, or by purchasing them from traders.
They can be slaughtered for meat or kept alive to collect the resources they produce. During winter they have to be kept in stables and be given water and food: straw or frain.
Before you can domesticate or purchase the you have to research the appropicate taming tech.
- Resources Produced
1 Raw Skin, 4 Raw Meat, 1 Bone
Cattle
Domestic animals can be brought to the settlement by capturing their equivalent wild counterpart, or by purchasing them from traders.
They can be slaughtered for meat or kept alive to collect the resources they produce. During winter they have to be kept in stables and be given water and food: straw or frain.
Before you can domesticate or purchase the you have to research the appropicate taming tech.
Recurrent Production
- 2 Milk
Resources Produced
- 2 Raw Skin, 6 Raw Meat, 2 Bone
Donkey
Domestic animals can be brought to the settlement by capturing their equivalent wild counterpart, or by purchasing them from traders.
They can be slaughtered for meat or kept alive to collect the resources they produce. During winter they have to be kept in stables and be given water and food: straw or frain.
Before you can domesticate or purchase the you have to research the appropicate taming tech.
Resources Produced
- 2 Raw Skin, 4 Raw Meat, 2 Bone
Horse
Domestic animals can be brought to the settlement by capturing their equivalent wild counterpart, or by purchasing them from traders.
They can be slaughtered for meat or kept alive to collect the resources they produce. During winter they have to be kept in stables and be given water and food: straw or frain.
Before you can domesticate or purchase the you have to research the appropicate taming tech.
Resources Produced
- 2 Raw Skin, 4 Raw Meat, 1 Bone
Wild Animals
Coming soon.
Grain
Grain is used to make flour, which in turn can be transformed into bread. It is also a key ingredient in beer, which boosts morale.
Grain is the most durable type of the food available, and the best resource to feed large amounts of people. It can also serve as fodder if required, but it is better to use straw instead.
Farming
Farming allows you automate the production of food, and sustain more people in your settlement.
You can plant a variety of crops then harvest and process them to feed your people. Crops are usually planted in winter or spring and collected in summer or autumn.
It is important to plant a variety of crops as diseases can easily wipe out all the individuals of a single species.
In order to maximize the effiency of the harvest make sure you have enough sickies around.
Hunting
Using specialized tools, your people can hunt animals in order to obtain food and resources from them.
To start a hunt, select an animal in the environment and then click on the hunt button. Depending on the diffuculty of the prey, and the availability of tools, a certain number of people will go after the animal.
Animals will react in different ways when being hunted: some will try to escape, others will protect their offspring or will try to retailate.
You can control the hunt in more detail by selecting one or more adults and right clicking on a target animal.
Crafting
Your people can craft a variety of resources in settlement’s structures.
To craft a resource, select a crafting structure and click on a recipe. If the resources are available, one of your people will craft it.
You can also right click on a recipe to toggle continous production. When enabled your people will automatically produce the resource until the resource limit is reached.
Workload
The workload of your settlement is the ratio between the amount of tasks your people are trying to do, and the total amount of people.
If you ask your people to do too many things at once, they will be overworked, and will have trouble prioritizing the right tasks.
It is your job do make sure the amount of work to do is reasonable and proportional to the manpower available.
You can use the tasks and activity panels to see what your people are up to and how many of them are available to work.
Transportation
Transports will greatly increase the efficiency of your settlement.
Some resources like Logs, Stone, Copper Ore, Tin Ore or Iron Ore are heavy and diffucult to carry around.
Only adults can transport these, at a very slow speed, one at a time, and with a penalty to morale.
Sledges and Carts solve this problem, they allow you to transport several heavy resources at a time a lot more efficiently.
Trading
After building a hearth (which will also define your settlement center – jump to it with “Return”), Traders will visit your settlements regularly. There are three types of traders: Low, average, high. This will define the exchange rate, the amount and tier of items.
With time you will learn intricacies of trading. Buying low and selling high is standard approach of course. But here are some tips:
Observe the prices; some of them have invisible decimal digits, e.g. adding a second unit of straw will seemingly double the price of one. No such thing vice versa.
Buying raw materials rather than the end product is better, of course. Buying, for example, bones then selling them bone harpoons will make you “rich” fast. Same with slings and the early outfits (two out of one skin/leather). Shouldn’t sell flint tools, because flint is finite (but tradeable)
Prices fluctuate depending on your era progress. Bifaces won’t be much of worth in the Iron Ages.
If the conditions of items are too low, traders won’t buy it.
Only things that are stored in buildings will be tradeable. So, don’t hesitate building them. TIP: It’s a good way to sell them soon to be spoiled stuff in exchange of “fresh” one, with a price of course. Doesn’t work for stuff which is too decayed.
Traders will progress alongside of you.
Time Progression
Each year will be 5 years for your people’s age. How fast it takes you to get to the Iron Age is dependent on your play style. The Ages are getting reached by unlocking them in the tech tree.
To speed trough it, you have to actively hunt down the knowledge requirements – figuratively and literally speaking. Press “8” to jump right to the progress view.
And if there is enough game content to keep to interested – thats up to you. In my opinion, it hits 95% of it. You won’t play this game forever, but long enough.
Limiting Production
Under Manage > Limits (or Press F4) you can set limits to all resources.
It goes from 0 to 1,2,3,4,5,10,15,20,25,30,40,50,100 then 25%, 50%, 75%, 100%, 125%, 150%.
The first row of numbers stand for the exact amount.
The second is the percentage of people in total. That means,
If you have 100 settlers, they will accumulate 25, 50, 75, 100, 125, 150 of this particular item.
The AI-Director
After I mentioned it a few times now, let’s get to the AI-Director:
This is actually the processing code which handles every task the player (may) give. Every game has one. Progressing the day/night cycle correctly, making that zombie stalking you, slamming NPC cars into yours to prevent you from winning the race or assign crafting task to your settlers – those are just a few things AI-Directors are handling.
The AI-Director of Dawn of Man works normally very good. But with time and progress it will fail to work properly. This will happen in every game, no matter how well it’s programmed. The AI-Director is limited by your platform specs (the hardware and software) and the game engine including program language etc.
What I want to say is: Don’t be taken aback if I blame the AI-Director for not working properly. And it’s not blaming the developers for every little thing going wrong with the game. You can only do so much.
If I recommend to:
- cancel task trough the workload viewer (Press “7”)
- or raising the alarm to let every settler and animal drop what they are doing and running towards the settlement
- or manually assign settlers to do something different
it is just a method to get the AI-Director out of a rut.
And I have to give probs to the dev team: it’s working pretty good so far – if you ignore the hauling system.
Manual hunting party and transporting the prey
I explained how to build a hunting party earlier on. Now some words about bringing home the prey:
I night have noticed that after the butcher task will immediately be set. Now, if you rightclick on the dead animal, you can order your selected hunters to start butcher it right away – if they have butchering tools like biface or any other type of knife in their inventory. The butcher icon will turn green, if even one has one.
What type of tool your manual selected hunters have equipped is random. Because how the game works, you can’t assign them manually what type of tool they have.
BUT: If you order them to pick up the desired tool they will have them in their inventory (and took up a slot), but they can use them from there. This is admittedly extreme mircomanaging, but reasonable for early game play. Or desperated times.
AND: After you assigned your hunters a target, everyone without a hunting weapon (if you haven’t hold the key “H” during selection, for example) will fetch one. This means of course, some parts of your hunting party will have to run back and forth to catch up.
Basically the same applies for the butchering part. If you assigned your hunting party to butcher, the ones without knifes will go fetch one – if the AI-director is working correctly.
And yes, all that means that there can be more than one butchering an animal. But having to manually pick up tools means that there will be less space for transporting the prey back to the settlement.
Setting work areas for hunting and increasing the maximum amount of workers resolves in multiple hunted animals, with one hunter after them each (haven’t seen any other behaviour myself. Please correct me if I’m wrong).
Butchering killed game will be a lot easier after unlocking the sledge. Then the AI-director will assign such work (and hauling in general) a lot better (for now).
Task priority over Welfare?
If you noticed floating red icons above their heads, you can manually order them to run back to the settlement. Select them and double rightclick on the ground (for best results near the desired building like hearth or tent). This should clear their work load and they should look around stuff to satisfy their needs.
If they are too far away, you have to monitor them, because they have only that much stamina to run.
Yes, it’s more of an early game tip. Once the settlement is big enough, this shouldn’t be much of a problem anymore. And you can place wells, hearths, food dryers and totems further away from the settlements, so your people can satisfy their needs there.
You should find out why your people ignoring their needs:
- Is/was the work load too high?
- Were there too far away for longer periods of time?
- Do they have the right equipment (clothing)?
- Did the AI-director acted in a weird way?
The fastest way last point can be fixed is activating the alert. Every settler will stop their current work and rushes as fast as possible to the settlement. With a bit of testing you should find out how long you have to raise the alarm until the AI-director assigns the work load in a reasonable fashion.
Leather not getting tanned?
You need two ingredients to tan leather: Raw skins and tannin.
You get tannin trough gathering it from certain trees. After you unlock the tanning tech, a new work area got unlocked, too. Oak trees and fir trees can be harvested for this, but only in spring. Children can harvested is, at least.
Manual orders
You can order any human settler to do any task they ought to be able to do (children will only be able to do hauling and non-toolrequiring gathering). If your adult settlers need a tool for a task, they go and get one. Normally.
By right-clicking on the ground they move there (double clicking makes them run).
With the same method you can make them pick up items (children won’t haul logs or stone).
A successful assignment will be highlight the task icon or building outline in green. Task, that can’t be assigned – or the right tools aren’t carried with them – will highlight in red. See further behaviour above.
Fuel
In order to cook food and stay warm you need to fuel your Hearths, Huts, Roundhouses and Ovens.
You can use sticks or Logs for this purpose. Your people will automatically refuel all structures unless you disable it in each structure.
Hearth
The hearth is an essential structure in the early stages of the game, as it provides settlers with the means to cook meals; it is also the first structure from which settlers can produce bread.
Costs:
- 2 Stones, 6 Sticks
Stats:
- Raw food can be cooked and eaten here, also provides heat
Hut
Huts are made of mud with a thatched roof, they lodge some people, who can also cook inside.
Huts are more durable than tents, but they still need repairing from time to time.
Costs
- 1 Log, 4 Sticks, 2 Straw, 4 mud
Stats
- Structure lasts for 5 years
- Resources will last 2 times longer when stored in this structure
- Raw food can be cooked and eaten here, also provides heat
- Prestige: 2
- This structure can house 4 people
Roundhouse
A durable house made of stone, a few people can rest and cook inside.
Settlers can build roundhouses once they research the masonry tech.
Costs
- 4 Stone, 2 Log, 4 Sticks, 3 Straw
Stats
- Structure last for 8 years
- Resources will last 2.5 times longer when stored in this structure
- Raw food can be cooked and eaten here, also provides heat
- Prestige: 3
- This structure can house 5 people
Oven
The oven is an enclosed chamber built for the purpose of baking bread.
Being a shared facility, ovens are focal points for the community, where people gather and socialize
Costs
- 2 Stone, 6 Mud
Stats
- Raw food can be cooked and eaten here, also provides heat
Sticks
Used as crafting or construction materials or as fuel in hearths, huts, ovens or roundhouses.
Stats
- Resource lasts for 1 years
Log
Logs can be used in construction or as fuel in hearths, huts, ovens, or roundhouses.
Stats
- Resource lasts for 2 years
Tools
Tools are requires to perform certain tasks such as hunting, butchering, mninig, fishing or harvesting. Your people will automatically fecth the right tool for the job before doing it.
Each tool’s attributes indicate how good they for doing certain tasks;
- Fighting – Hand to hand combat.
- Hunting – Killing animals or ranged combat.
- Butchering – Butchering dead animals and extracting their resources.
- Fishing – Extracting fish from rivers or lakes.
- Harvesting – Harvesting cereals or pulses.
- Mining – Extracting ores from deposits or mines.
- Woodcutting – Cut down trees.
Fighting and hunting attributes affect damage dealt in combat, other attributes affect the speed at which the task is done.
Dawn of Man FAQ
How can I change or upgrade the tools already equipped?
Each time that they’re command to perform a task they get the best tool available for it so you just take care that there is new tools on the village and as the characters rotate the tasks/tools they will use the good ones if they’re available.
Even if a character is doing the same task always (so use the same tool), the tools decay with use so when the old tool is broken he will replace it with the best equivalent tool available.
A good practice is to give the old tech tools to the traders in exchange of new ones or other items, by this way you force your characters to create new tools to replace the old ones until reach the limits stablished for each one (you also can recycle the old tools directly, but by this way you get nothing from it).
How to Create a Fishing Rod?
You have to unlock the Copper Age and build a Workshop where you then order crafting fishing rod.
Advanced Tips and Tricks
Tips and tricks to optimise your playthrough.
Natural Resources/Hunting
- Don’t worry about running out of ores or flint. Once you have underground mining, you will struggle to exhaust your natural flint supply.
- Once you unlock farming, you will begin to chop down a *lot* of trees. Make sure you have plenty of wood storage areas to stockpile the resource for later eras, when your upgraded houses will demand logs for fuel.
- Find a wooded area without food trees, and an area that you don’t use for tannins, and set a massive wood cutting work order on the whole area. Trees will grow back naturally and are completely renewable.
- Avoid sending out huge hunting parties just before Winter. On the way back, the season will have advanced and your people will freeze to death.
- At the start/middle of the game, raw skins are a bottleneck. You will need to micromanage hunting parties (also useful for knowledge). Remember that you can double right click to get people to run.
- Sticks are your starting bottlebecks. Set a limit of say 30 (make sure you have plenty of storage space – remember you start with storage hut available to build) with two people gathering from a large and abundant area.
- Tannins are easy to gather by children and worth 1 value in all eras. Set a limit of 30 for a useful tradeable item.
- Humans moving into forested areas seems to disrupt and discourage animals from being/spawning there. Try to focus your deforestation, tannins and gathering in one big section, and leave another area for hunting.
Building
- With the no-walls and sell-everything-for-tech strat, your people will often die from starvation, exposure, and Iron-age raiders (don’t worry, its worth it for optimisation). Make sure you have plenty of houses available to stockpile humans in case this happens. Always try to have at least 4 housing slots available.
- With that said, monitor your food levels using the food UI. If you’re consistently in surplus each season, you have plenty of food to expand your population. If you’re often running out during Winter, expand your food production first.
- If you do build walls, make sure your stables are inside them. Raiders can target animals inside stables, and will kill them.
Farming
- Select a starting map position which offers the broadest, flattest land around your village center. The limiting factor for your farm production is usually availability of flat land.
- If you want to have animals, they will eat a *lot* of straw. Your humans have no benefit from a diverse diet, and plant diseases are rare, so focus at least 70% of your farms on straw-producing crops. Abundance of straw also seems to increase animal birth rates.
- With this strategy you will often over-produce straw at the start eras of farming. Straw doesn’t deteriorate but you might need a lot of haystacks.
- Avoid hitting 40 population until you have good farms setup. You NEED farms. With that said. you can easily turtle in the first two eras, where raider attacks are minor and animals plentiful.
- Flax linen is hugely valuable, and with a stick, can be turned into valuable fishing lines. Build at least two flax fields at the start and later three, and you will have plenty to trade for.
Animals
- Animals ranked in order of value: 1. Sheep (gives wool and meat/skins) 2. Donkeys (pulls cart) 3. Goats (gives wool and meat/skins) 4. Pigs+Cattle+Horses (tech comes too late, outputs not useful enough). Focusing on just a few species allows you to build a self-sustaining population more easily.
- Its entirely reasonable to skip Pig, Cattle, Horse domestication, since sheep, goats and donkeys can do all the same tasks better.
- The following limits in the limits menu will keep your animals reproducing but avoid excess population levels and straw consumption: Small animals: x10 Large animals: x5.
- Capturing Mouflon (Sheep), Ibex (Goats) and Donkeys (Donkeys) is not hard – just find a baby animal on the map and select ‘capture’. Its only worth trading with traders for them if you are lazy.
Production/Storage
- Make sure you have plenty of wood and stone stockpiles all around your village. This will minimise walking distances. They cost nothing to build.
- Copper tools provide no stat upgrades compared to earlier versions. Consider building 10 of each just for the knowledge points, and beelining to Bronze tools which are actually better.
- Once you have a lot of farms setup, you will need at least 75% sickles. When you get Bronze and Steel, build sickles first. You often can’t harvest all of your crops until the season finishes with earlier sickle versions.
- Set all crafting, leather, skins production to high priority. Tools are fundamental to your whole operation.
- As you grow, gradually decrease the % of tools your produce. Set things like axes and picks to x10, 15, 20 depending on your population. You will have the majority of your population doing nothing except farming. The exception are goods like fishing lines which are great for trading.
- Bones spears and bone hooks have the same core stats as their flint versions, and you usually have plenty of bones from hunting. Produce them until you can produce bows and fishing lines.
- A single item will take up a whole storage slot (eg. a single biface). In later eras, sell off your obsolete items to free space, even if you only get 1 value.
- Once you have beer, it will usually displace the need to visit spirituality buildings, and works quicker than those buildings. If you have enough food, set production of beer to unlimited. Its also valuable to trade.
Knowledge + Technology
- The most useful early techs are those that enable better tools, and sledges. Prioritise these.
- Make sure you look at the milestones for each of the main campaign levels. They provide a huge amount of knowledge and are not too difficult to achive.
- Before advancing to the 4th age, where Reindeer, Cave Lion, Cave Bear, Wooly Rhino, Mammoth, Megalocerous, Ancient Bison will go extinct, hunt these animals to at least the x10 level (Rhinos are usually solitary though, and hard to get). Getting these early knowledge points makes tech advancements much easier
- Knowledge is the ultimate finite resource. Trade for techs as much as possible, even if you have to starve or freeze your humans. ‘Saving’ knowledge points particularly in the early game makes late game research much easier.
- Usually any building x5 gives a knowledge point. You can build and then demolish structures to reach this. Also spam spirituality totems to at least the x5 level.
Tech Tree Order
- Focus in the early eras on anything that provides food, anything that provides better storage, and anything that provides better tools.
- A lot of technologies are not critical, and I normally wait until traders provide them. Everything marked in Green I normally wait for traders to provide, or only research if I have excess knowledge points or need them as a prerequisite (edit: with the exception of Bows, they are very useful for hunting).
Combat/Defense
- Despite what the game says, animal attacks on your village will usually just result in the quick death of the animal and some conveniently located meat. Don’t bother going into Alarm mode, just select some nearby villagers and order them to hunt the animal.
- Walls are not necessary. Just pause the game and hit the ‘alarm’ button as soon as Raiders appear, to arm your citizens and send them to attack proactively.
- Raiders will pathfind using bridges you have built, funnelling themselves into chokepoints. Exploit this by grouping watchtowers near the bridge exits.
- You will get plenty of weapons from killing Raiders. Don’t bother building late-era spears or swords, you can pick them off dead corpses. Bows – which can be used for hunting – are good enough to be your main ‘weapon’ being produced.
General/UI
- I recommend using the following UI panels: People, Grouped Resources, Transports, Food, Straw, Domestic Animals. Just pause and switch to defense when raiders appear. Grouped resources makes it much easier to track resources since they are usually in a consistent place on the UI.
Dawn of Man Controls
Every control option for Dawn of Man.
- Move Camera Forward – W or Up Arrow Key
- Move Camera Backwards – S or Down Arrow Key
- Move Camera Left – A or Left Arrow Key
- Move Camera Right – D or Right Arrow Key
- Rotate Camera Left – Q
- Rotate Camera Right – E
- Zoom in – R
- Zoom out – F
- Center Camera in Town – Return
- Rotate Left/Smaller – Z
- Rotate Right/Bigger – C
- Primal Vision – TAB
- Help Panel – F1
- Stats Panel – F2
- Resources Panel – F3
- Limits Panel – F4
- Charts Panel – F4
- Defense Panel – F5
- Techs Panel – F6
- Knowledge Progress Panel – F7
- Milesstones Panel – 5
- Activity Panel – 6
- Tasks Panel – 7
- Pause – Space
- Normal Speed – 1
- Speed x2 – 2
- Speed x4 – 3
- Speed x8 – 4
- Previous Work Area – [
- Next Work Area – ]
- Remove – Delete
- Hunter Selection – H
- Worker Selection – I