The Gladiator, man if you thought the Doom Hunter(s) were hard, you have no idea what’s about to unfold here in this arena. The Gladiator fight comes in two phases, so let’s focus on the first one for now because both phases are SOO different.
DOOM Eternal Gladiator Boss Fight
Phase 1
Phase 1 consists of the Gladiator with his shield up. While in this phase he takes a more defensive stance, but don’t let that fool you because he can still use that giant shield to make your life miserable. He also has a giant flail on his right hand that he’ll use to smack you. Similar to when you were fighting the Marauder in the previous mission, the Gladiator’s eyes will glow green when he attacks. To be precise, the eyes on his shield glow green. When this happens he moves his shield out of the way and swings his flail towards you. This is a very quick move and it’s the move that allows you to do significant damage to him. For his next move, he hits the ground with the shield and creates a little shockwave around him. He usually does this if you’re too close to him.
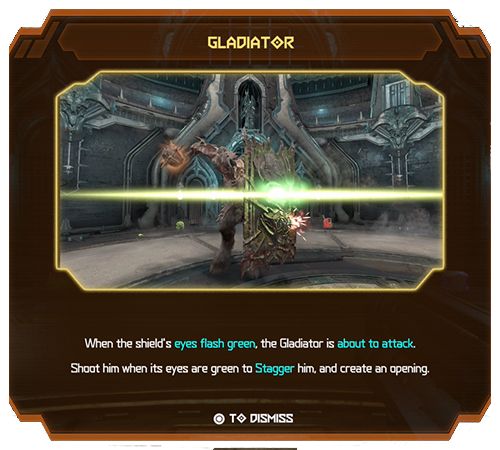
If you’re normally close to him he mostly alternates between these 2 attacks so you can expect which attack is coming. He has a third attack in which he swings his flail over his head and smashes it on the ground in front of him. This is mostly done when you’re at a distance. Having said that, there will be fodder enemies appears at all times (as per usual) so don’t let them distract you from the big daddy. Having said that, you’ll want to stand in front of him at all times trying to keep your camera focused on him while dodging the fodder attacks. It’s hard but very doable. You want to do this because you want him to move his shield. When he does and his eyes glow green, whip out your Super Shotgun and shoot him. You don’t even need to dodge his flail. If you hit him correctly, every time you do so will allow you to “Glory Kill” him, basically meaning that you can do a ton of damage to him.
As his health goes does, the number of attacks he has goes up, as well as the number of fodder enemies that appear (you’ll even have Prowlers lurking about). This new attack he gains, you’ll see him hitting the shield with his flail. This starts glowing red and he’ll shoot at you a beam in the shape of the shield. This is a strong attack so keep your finger on that Circle to dodge the attack. His second new attack, if you’re at a distance and his eyes glow green he’ll jump forward and slam his flail on the floor. This attack staggers him a little bit so shoot him as much as you can if you didn’t shoot him before (and activated the “Glory Kill” sequence).
That’s about it for this Phase. You may have to fight a Hell Knight or two near the end, but the Gladiator’s attacks also hurt them. Now onto Phase 2!
Phase 2
You’ll obviously know when this Phase begins when the shield breaks in a million pieces and he takes out another flail.
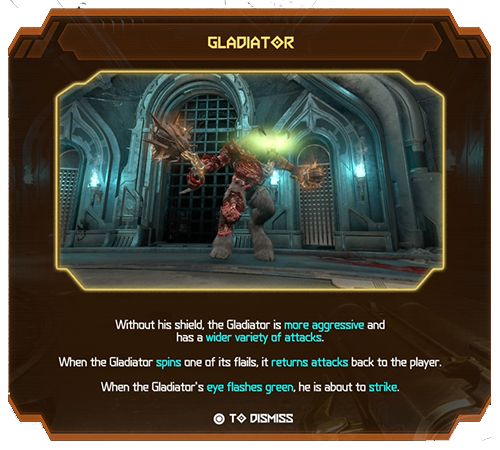
Just like the image says, he’s much more aggresive in this phase and has different attacks. Also, they make it very clear, DON’T ATTACK the Gladiator when he’s spinning the flail in front of him. He’ll counterattack you immediately so stop when you see it. He still flashes his eyes green when he’s about to attack so keep an eye out for that. This is where the real fight begins. I’ll list the attacks below so keep on reading!
Swing-swing: If he gets too close to you he’ll swing his flails at you, first he’ll do a horizontal swing with the left flail and finish with an overhead slam with the right flail. Keep him away from you as much as you can.
Double Punch: He throws forward his flails, one at a time. This attack is hard to evade, but remember that he always throws his left flail first, then the right as soon as he hold the left flail. The best way to dodge this attack is to dash once to the left and immediately dash to the right to avoid both attacks. Very hard to do, but doable.
Big Slam: He jumps forward (not necessarily towards you) and slams both of his flails on the ground. Double dash to either side (if you’re directly in front of him) and you’ll be fine.
Beam: He throws his flails and traps you. While this is going on, a beam that looks like a wave will be shot from the walls he just created and you’ll have to either stand right underneath it or jump over it. This is very hard to do because the waves are really fast, but there’s a way to cheese this.
If you watch my video up above, you’ll see that while you look at him you hold R1 to open up your weapon wheel, time slows down a lot. You can still move around, but you cannot move the camera. Use this slow down to safely dodge all the beams. Will make the fight last a little longer, but it’s the safest way to completely avoid this attack. Once his attack is done, the barriers will go down, his eyes will glow green and he’ll charge right in front of you. Whip out your Super Shotgun, dash to a side and shoot him.
Watch the little scene after the fight and the Mission will come to an end!