Table of Contents Show
Other Elite Dangerous Guides:
- Elite Dangerous – Material Farming in 3.3
- Elite Dangerous – Fast and Easy Obelisk Data
- Elite Dangerous – High Grade Emission 3.3
Tired of endlessly roaming through planetary rings in the hopes of finding the fabled fissure asteroids?
Hopefully, this visual guide will help you reduce the time spent looking for fissure asteroids in planetary rings by a fair amount.
Keep in mind that this guide is meant for asteroid visual reference (for the most part), I’m assuming that you already know how to mine in E.D.
Foreword
My first mining foray in 3.3 was rather depressing.
I spent ~9 hours looking for the elusive fissure asteroids, only to find a mere handful.
I didn’t know how the Pulse Wave Analyser worked.
More importantly, I didn’t even know what fissure asteroids looked like!
As a consequence, I wasted a lot of time checking asteroids that should’ve been ignored, roaming through pristine metallic rings that were actually “dry”, etc.
Icy is the new Metallic
If anyone had told me this before the 3.3 update, I wouldn’t have believed it.
Some commanders might take a look at commodity prices and conclude that metals sell for higher prices than the typical minerals found in icy rings… therefore, metallic rings must be more profitable.
While it’s true that metals are more expensive than most minerals found in icy rings, there’s one exception called “low temperature diamonds” , which actually makes all the difference.
With the introduction of the new mining mechanics in 3.3, now all types of rings have hotspots, where the most expensive minerals can be found.
Thanks to these hotspots, metallic rings offer access to both metals and expensive minerals alike.
The problem is that the price of metals, although higher than most common minerals, is still rather low.
A single icy asteroid loaded with low temperature diamonds is worth several times more than a bunch of metallic asteroids put together.
Now, some might say “but you can find painite asteroids in metallic rings, which are almost as valuable as low temperature diamond ones”.
While that’s true, in my experience, finding painite is simply a pain (…I couldn’t resist, sorry).
Low temperature diamond asteroids seem to be more common, in my experience, which makes icy rings a better choice (unless you know of places that are bursting with painite asteroids, ofc)
Anyway, the white color of icy asteroids also helps, since it makes fissure asteroids easier to identify.
That’s why, in my experience, mining in icy rings actually pays more at the end of the day.
The Hunt for Ast’ Cracks
Forget about blindingly hopping from one asteroid to the next, never knowing what you’ll get. If you carry a Pulse Wave Analyser and follow this visual guide, you’ll never waste another prospector limpet and you’ll keep your sanity (I hope)
First off, you’ll need to find a proper mining location. Look for scarcely populated remote star systems with planets / moons that have pristine icy rings.
If you see other commanders around, it’s bad news, you don’t want the hotspots to be spoiled, so find an alternative star system.
You can check commander traffic in specific systems by using https://www.edsm.net/
Introduce the name of the system you plan to mine in and run the search. Under “traffic report” you’ll see the number of commanders that have been there (in total, in the last week and in the last 24 hours).
Also it’ll list the ships they were flying (last 24 hours only), which can also be an indicator of possible mining activity.
Once you’ve found a proper candidate, travel to the planet / moon in question and map its icy ring using probes in order to find hotspots. Any 3.3 mineral hotspot will work, but, ofc, always go for the most expensive minerals.
When you finally drop in the hotspot, deploy your hardpoints, select your Pulse Wave Analyser and let the hunt begin!
Remember, we’ll focus on fissure asteroids, we’ll ignore the rest (unless low temperature diamonds are involved).
The Good, the Bad and the Ugly
Now we’ll learn how to sort out asteroids, based on Pulse Wave Analyser readings.
(Remember, you’ll need to use a Pulse Wave Analyser in order to get these “glow” readings.)
I’ll classify asteroids in three different groups, based on the intensity of their glow.
1# ‘Don’t even bother’ asteroids
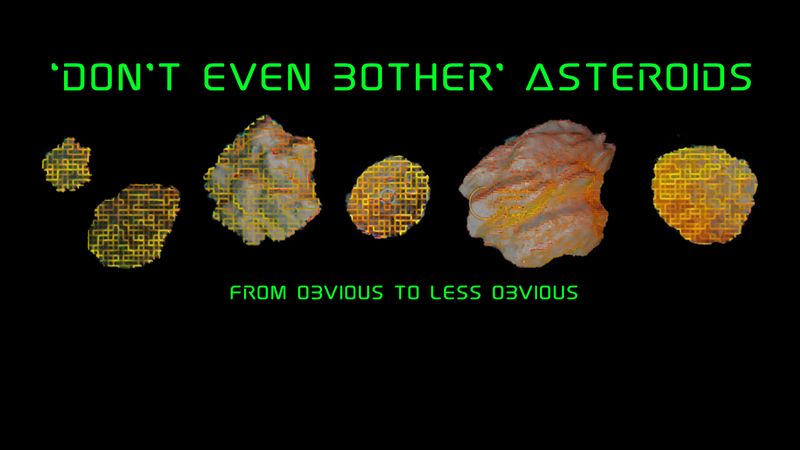
This type of asteroids is the most common of the three.
Asteroids of this kind are characterized by a comparatively dim (or non-existant) glow.
The color of their “squares” is typically yellow (although they can also be orange / reddish).
They typically contain surface deposits.
2# Evil asteroids
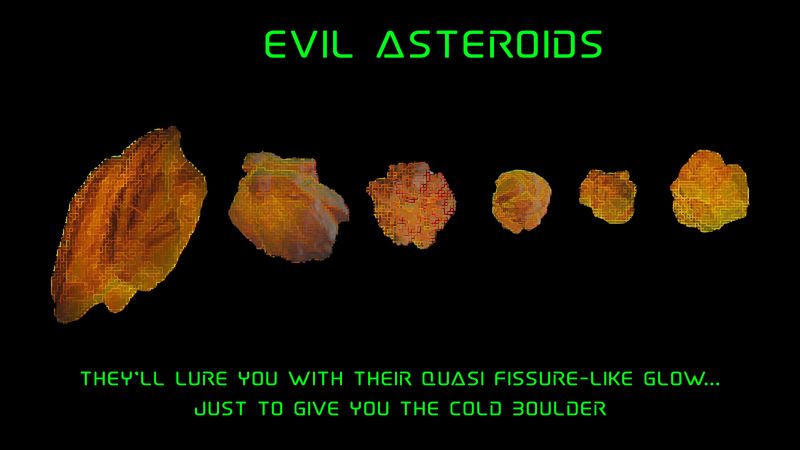
This is the most annoying kind of asteroids.
They typically contain surface and/or subsurface deposits.
Asteroids of this type are characterized by a misleading glow, which can be easily confused with “fissure type glow”.
If you pay attention, you’ll see that the glow from these asteroids is comparatively intense, but not as intense as in fissure type asteroids.
When mining in planetary rings, you’ll be slave to the color/glow references from the asteroids around.
Since you’ll be surrounded by “Don’t Even Bother” asteroids most of the time (which barely glow), Evil asteroids will tend to look like fissure asteroids, since they glow considerably more.
Be mindful of this, don’t let these Evil asteroids lead you astray!
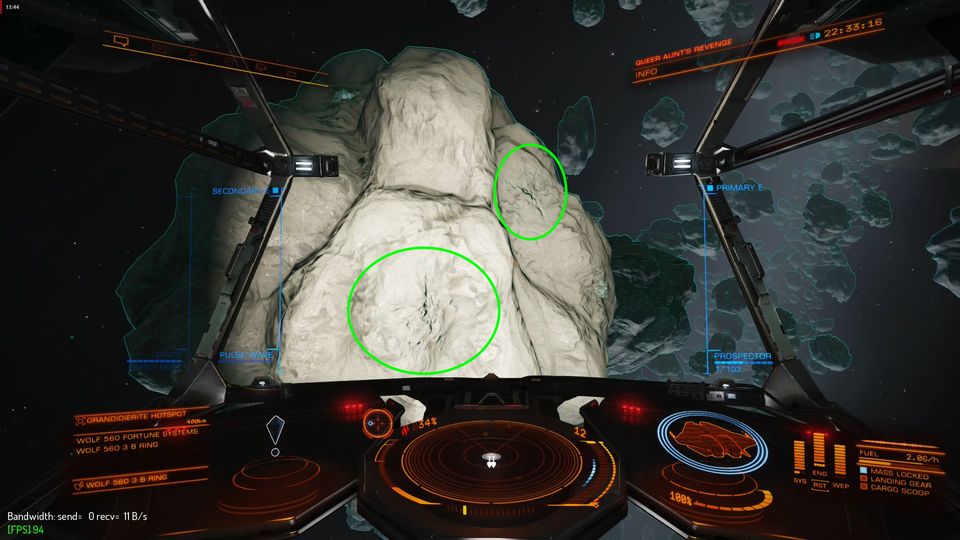
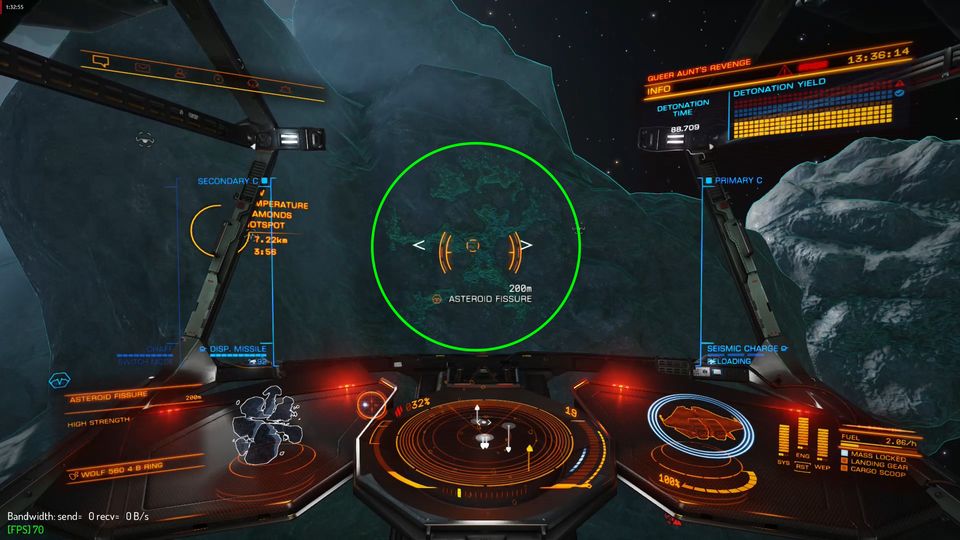
3# Fissure Asteroids
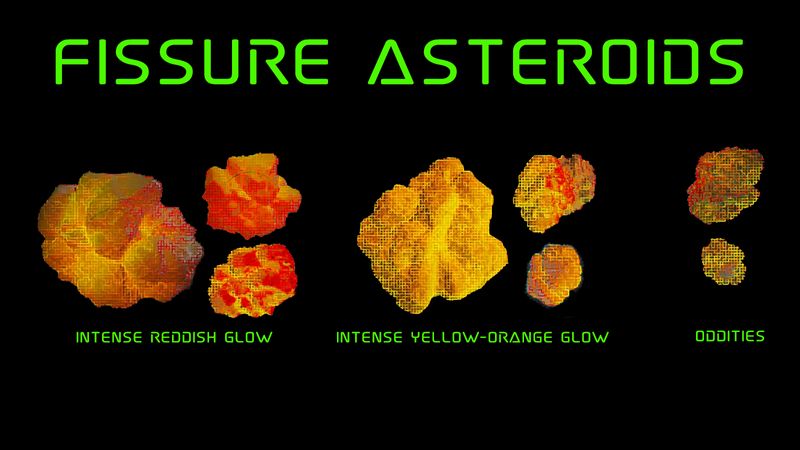
Finally! The asteroids we’re all after!
This type of asteroids tend to have the most intense glow (you’ll likely find a few odd ones, which don’t glow as intensely).
They can either have a very intense reddish glow or a very intense yellow-orange glow (with some reddish tones, perhaps).
Their color doesn’t matter, they’ll make you rich regardless!
They always contain deep core deposits and, typically, surface and/or subsurface deposits as well.
Important Note: The smallest asteroids may display fissure-like glow without actually having fissures. As far as I can tell, surface and subsurface deposits are enough to make them glow like there’s no tomorrow. As a rule of thumb, ignore tiny asteroids (unless you want to check them for low temperature diamonds, ofc!)
Knowing your Ast’ Cracks
Keep in mind that sorting asteroid signals from a distance is only half of the equation.
The other half is knowing how to spot fissures without the need to waste a limpet (potentially).
Here you have a few fissure pics, so you know what to look for:
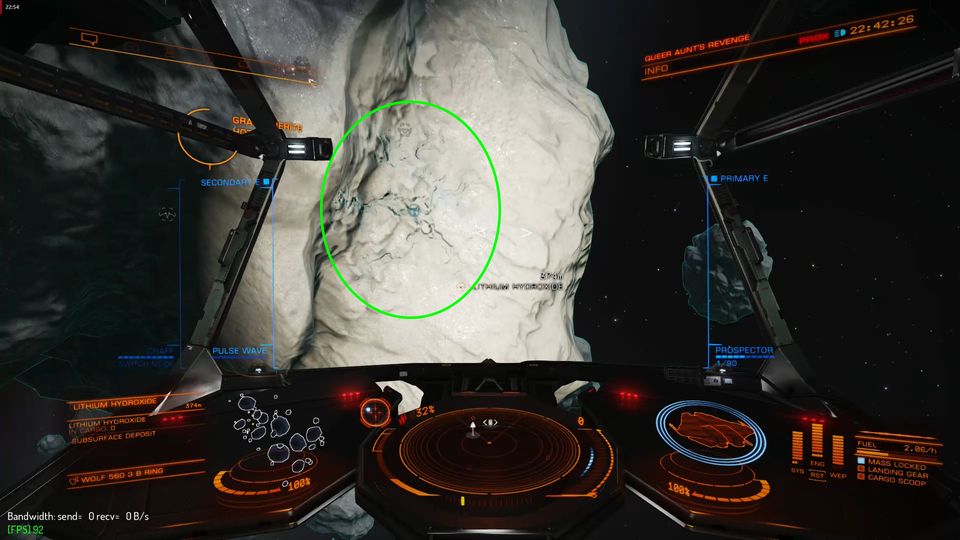
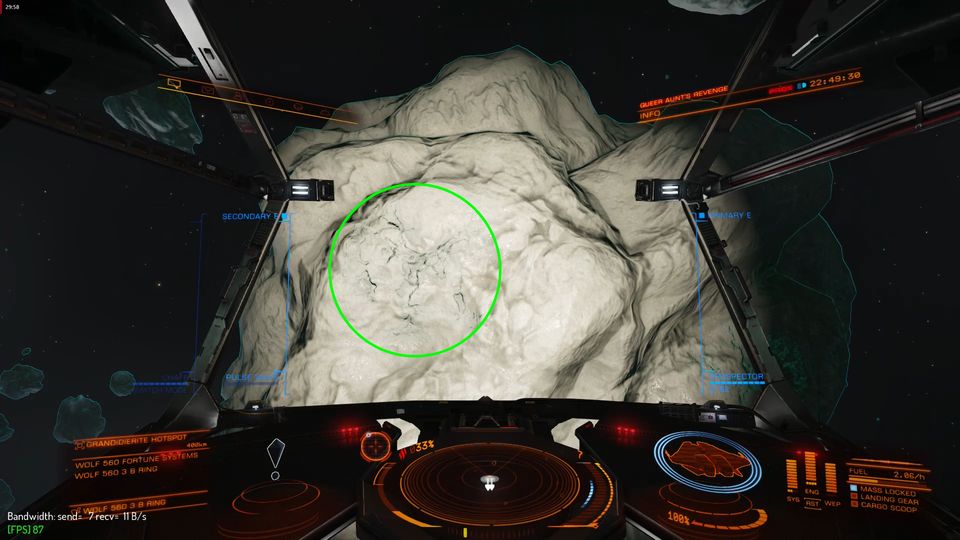
Tip! In order to spot asteroid fissures more easily from up close, you can try enabling night vision. Here are a couple more fissure pics (night vision only):
Blowing Ast’ Cracks
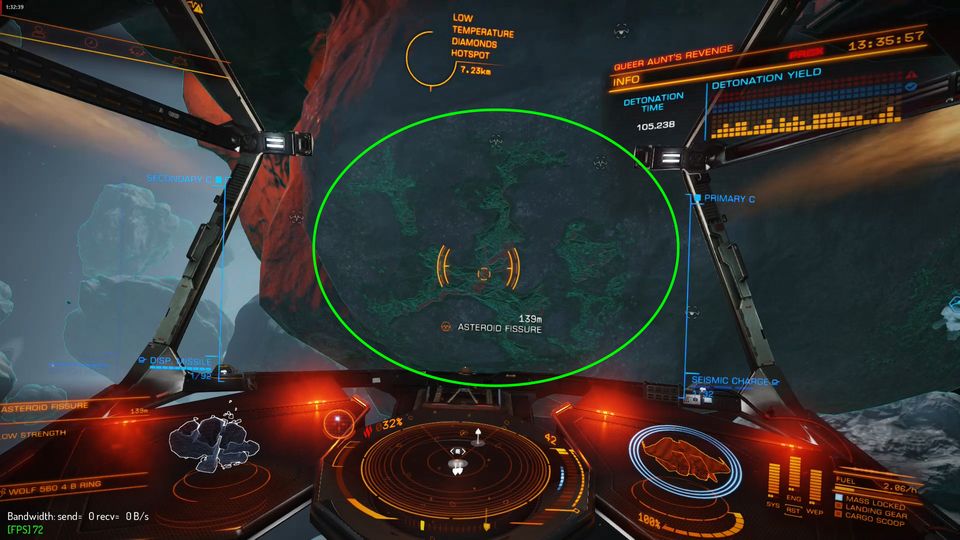
Now that you know how to spot fissures, you need to learn how to blow them up for optimal yield.
First, target one of the fissures, its strength will be indicated in the lower left corner
(Fissure strength can be either “low”, “average” or “high”, this basically indicates the optimal explosive yield for that fissure.)
Then select your Seismic Charge Launcher.
(when you do, six vertical markers will appear on the HUD.)
Those HUD markers indicate the explosive yield of your seismic charges.
In order to increase their explosive yield, you need to hold down the fire button until the indicator reaches the desired yield level, then release.
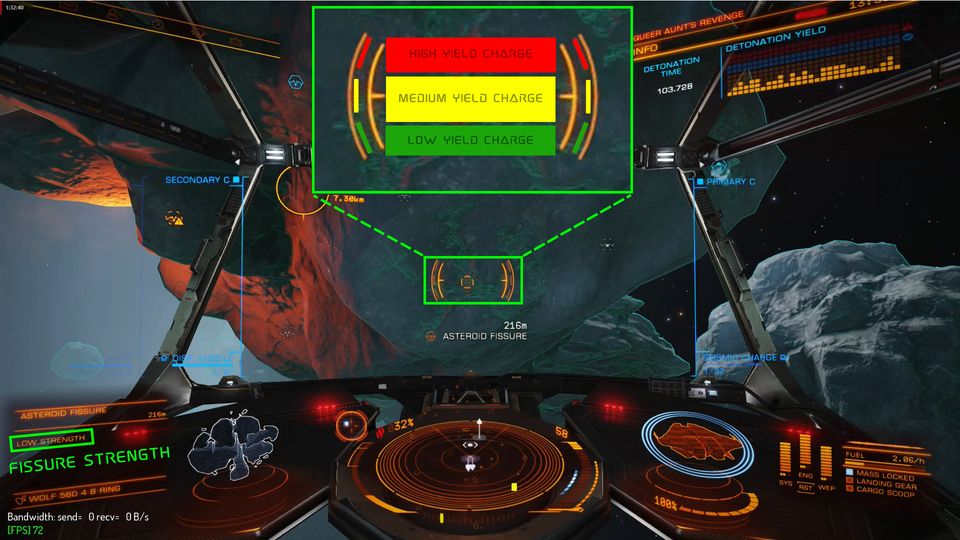
Needless to say that charge explosive yield should match fissure strength, for optimal results.
The overall asteroid detonation yield will be displayed on the upper right corner.
Keep it within the “blue range” for optimal results.
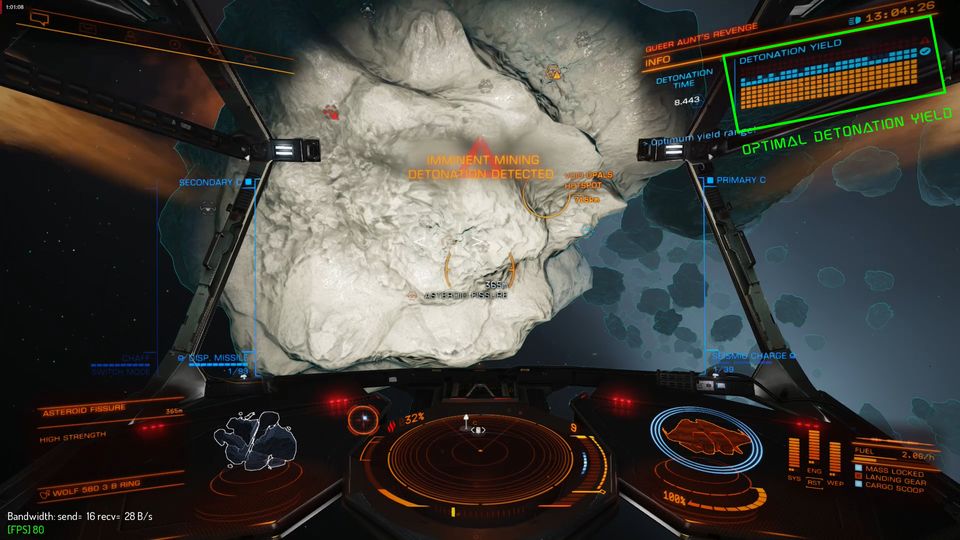
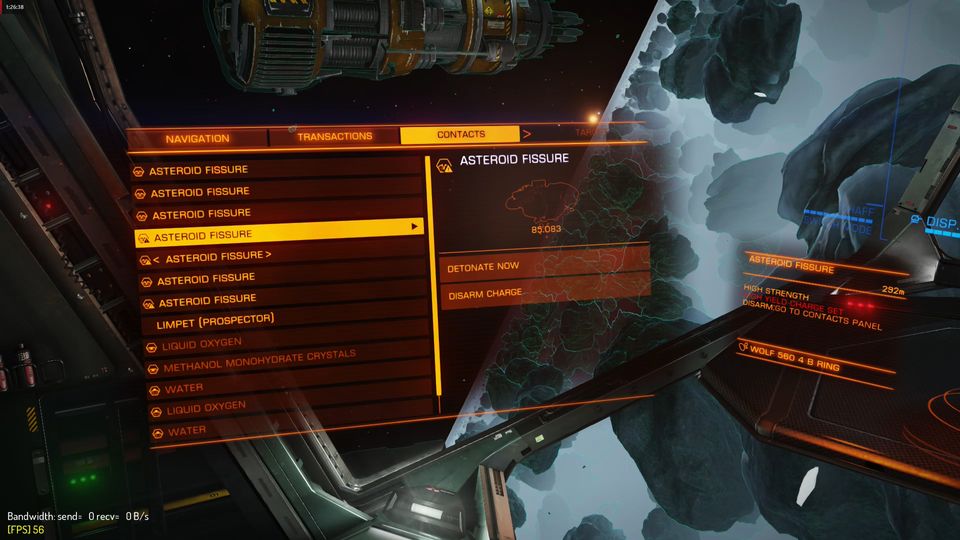
If you get carried away and exceed optimal detonation yield, don’t worry, you can still correct the situation by disabling one of the seismic charges.
(Left panel > contacts > asteroid fissure > disarm charge)
Keep in mind, though, that the countdown won’t be stopped, so you’ll need to do this fast.
Once you’ve mastered this, you’ll be getting ~20 chunks of rare minerals per asteroid.
Don’t sell yourself cheap!
Congratulations!
You’ve finally become an ast’ crack ace, fissure asteroids can’t hide from you!
However, all your efforts will have been for nothing if you end up selling your valuable cargo cheap!
Always sell to stations that desperately need the resources you carry.
When you’re done mining, check commodity price charts like this one
Select the commodity you’re interested in selling, then click on the “BEST SELL” tab in order to get a list of the best station choices.
This will seriously maximize your profits, so do it!
Very good guide, but you got one thing wrong. Fissure strength does not have to be identical to the charge strength. Fissure strength is just the asteroid’s defense against your missiles. Low defense fissures are good to start with, put two high damage explosives in them, then use the medium and high def fissures to do the fine-tuning with medium and weak charges.
Is this verified? I had a suspicion but can’t say I 100% believe it.
Yes.
Yes! Why do ppl keep propagating the mistake of “match yield with fissure strength”? I wonder who started such a ludicrous proposition? Anyway, old post, but ppl still do videos and such, talking about matching… Wonder how much harder this is to crack, or how poor the results? Whatever, I’ll keep getting max chunks doing it the easy way. And, here in the future, they have fried the PWA (FD claims it is fixed, but not, messed up over a year now), so Cores are much harder to find, and prices for VO/LTD are forced ridiculously low, with low demands and unpredictable prices when you go to sell!
Basically, FD REALLY screwed up Mining, in a weak attempt to make murder (bounty hunting), space trucking, and passenger missions more profitable. All they did was kill interest in ED – WHILE they are pushing Odyssey (on-foot fighting, if you hadn’t already heard). So, mining is nerfed to death, But FD wants us to invest in a new murder game. So much for a peaceful future…
I agree Kal, fissured rocks are becioming increasingly difficult to find. You find 3 in the first 1/2 hr then …. nothing, even in prisitne overlaps. Ridiculous situation. Are FDev trying to kill off core mining? It certainly seems that way.
Thank you so much for the pictures for the PWA, that helps so much!
The ones you want are the yellow glowing ones, and you know the yellow because it is so strong that i looks painted, almost! Furthermore you can spot them easily from a far distance…. only yellow AND for a short second a grid-type appears in black and then dissapears and it goes back to yellow! There are 2 types of grid-type-flashes… if the grid is not over the whole stone you can leave it… it needs to be over the whole stone and a bit thicker/stronger than just simple lines in a grid!
Thats the stone you want, it has fissures guaranteed!
/cheers
I’ve found that with night vision on, look for the flat spot on the bottom (usually). If there is no fissure, move on. This saves time circling around looking for less to find fissures.
10/10
“Give you the cold boulder” alone was worth the read.
Excellent guide!
Just like to add that if you’re mining with a type 9 or 10 and the seismic charge launcher is on the left or right hardpoint that you need to aim to the left or right of the fissure respectively for them to stick and not bounce off the asteroid.
Awesome guide. I love the provided visuals, really helps me save a lot of time. I mined Low Temperature asteroids for 45 minutes tonight and made 60 million!