Table of Contents Show
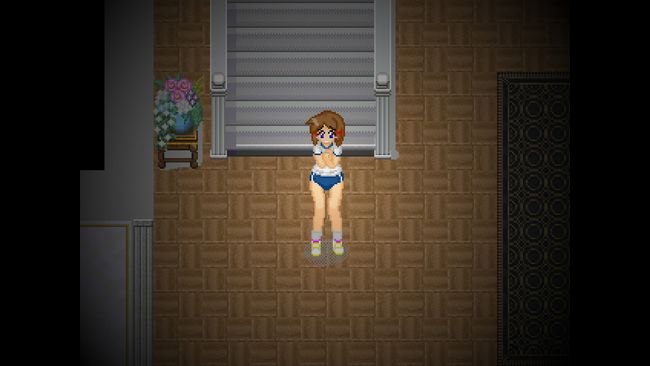
A university student named Sae finds herself lost in the mountains. While searching for help, she comes across an old looking mansion and decides to enter it. However, there was more to this mansion than meets the eye. What will become of Sae? Find out in this Puzzle-Escape RPG!
Alternate DiMansion Diary: Walkthrough
A simple walkthrough of the game.
Main Story Part #1
Starting from when you first enter the mansion:
Go left into the hallway, and look at the leftmost painting. You will react and note that it’s different from the others. This is a map of the main hall, and indicates a hidden item.
Once you’ve done this, continue to the left and enter the room at the end, the Statue room. Interact with the shiny spot on the far upper left to obtain the Blue Key. Once you’ve done this, head back to the main hall.
Go to the spot indicated that was indicated on the Hallway Painting – the upper left corner of the carpet in the main hall. Interact with it to obtain the Dining Room Key. While you’re here, walk underneath the right-hand flight of stairs to find a hidden passage, at the end of which is the Turtle Medal.
Head back to the left hallway and interact with the first door, which you can now unlock with the Dining Room Key. Enter and head through to the Kitchen, and interact with the Lever in the upper-left corner of the room. This activates the main hall stairs, so now you’re able to reach the 2nd floor. Note that there’s a Screwdriver on top of one of the fridges; you can’t obtain it yet but remember it’s here.
Head back out to the main hall and head up the left stairs, and walk left to see a figure walk off. Continue left to find a shiny spot on the ground. Interact with it to obtain the Guest Room 1 Key.
Turn around then head down the balcony to the bottom left door and enter, unlocking it with the Guest Room 1 Key.
This is a floor puzzle; you have to highlight all the tiles without walking off them. Start from either the left or right stuck-out tile. Once you highlight them all successfully, the small cabinet in the upper-right of the room will unlock. Open it to obtain the Guest Room 2 Key.
Head back out and up to the room next door, which you can now unlock with the Guest Room 2 Key. Enter the room for an h-scene.
Once it’s over, look at the painting on the wall. The Snake Painting is a clue to solve the puzzle in the Stage Room, which will be done later. Check the Eyeless Mask then leave the room.
Head back down the stairs and enter the door in the middle of the main hall to reach the Stage Room. The puzzle in this room is solved by walking around the room in the pattern shown by the Snake Painting, from its tail to its head (Rotated once clockwise to fit the room).
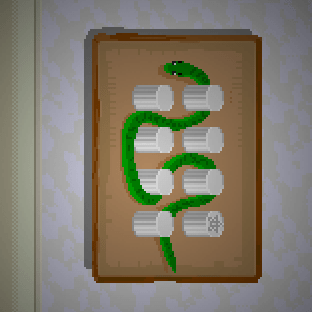
If you walk the path correctly, an object will fall from the ceiling and land on the stage. Interact with it to obtain the Guest Room 3 Key.
Head back out and back up to the 2nd floor. This time go right and down to the bottom-right doorway, which will unlock using the Guest Room 3 Key.
The puzzle in this room is solved by placing the four objects on the floor back in their rightful places. The Rose goes in the flowerstand, the Doll goes on the doll stand in the middle, the Teacup goes on the table with the teapot, and the Toy Bird goes in the cage in the bottom-right.
Once everything is done correctly, the wardrobe will unlock. Interact with it to trigger a scene which sends you back into the hall. Head to the front door and interact with it to continue the scene.
Once the scene is over, head to the right-most door in the main hall, to find a clotheshorse over a gap. Interact with it to cross over and enter the next hallway.
Enter the first door to find a Bath Room. Interact with the white object on the right to obtain a Dustcloth, then enter the sliding door, and interact with the tub.
Head back to the outer part of the room, and interact with the basket to strip, then enter the sliding door again for a scene, during which you will obtain the Fish Medal.
Leave the Bath Room, and head right to the next door. This room has a puzzle based on balancing out coloured balls. To work it, walk over the appropriate tile – Red, Blue, Green, in that order – to add one to that side. The solution is 1 Red, 2 Green = 2 Blue, 1 Green. Doing so will unlock the door in the upper-left, but you can’t enter that room yet (too dark).
Head back out to the hallway, and look at the right painting (the green person one). This unlocks the secondary puzzle in Guest Room 1, where an object is hidden where the red spot indicates.
Head back to the clotheshorse and cross back to the main hall. Head to the Dining Room and interact with the food on the table for a scene. Once the scene is over, interact with the plate to gain a hint for the next puzzle in the Statue Room.
Main Story Part #2
Head to the Statue Room in the far left. The puzzle hint is “Earth loves Grass, Grass loves Water. Fire and Water love each other.” The solution is to rotate the statues so that Brown looks at Green, Green looks at Blue, Red looks at Blue and Blue looks at Red.
This unlocks the upper door (though there is no indication of when you solve the puzzle), allowing you to enter the next room.
Enter to find a shiny spot on one of the shelves, granting a Red Key, and a Folding Ladder on the right.
Once you’ve grabbed these, head back to the main hall, then head upstairs. Go to the left and interact with the Mirror (this unlocks an extra action in the Kitchen later), then head to Guest Room 1. Interact with the spot indicated by the previous painting, the rightmost clear spot in the puzzle, to obtain the Green Key.
Go back out and head to Guest Room 3. There is a shiny spot in the wardrobe where the black blob came out of. Interact with it to obtain the Yellow Key.
After this, go back out and enter the upper-right door to the Library.
Each coloured Key unlocks the same-coloured bookshelf. Each one gives a hint as to where each of the four Medals are found (though you’ve found two already). Unlock each of them and read their hints and head back out the door.
Head over to the giant Birth of Venus paining in the middle of the 2nd floor, and interact with it to obtain the Bird Medal (you can’t get it unless you read the Red Hint in the Library first), then head back downstairs to the Kitchen.
Interact with the sink to get a Wet Dustcloth, and interact with the fridge to obtain the Screwdriver.
Head to the Statue Room and use the Screwdriver to pry out the Red statue’s eyes to obtain Red Stones. With these, head to Guest Room 2. Interact with the mask on the wall to use the Red Stones and obtain the Flashlight.
Once you’ve done this, head to the Mirror and interact with it to clean it using the Wet Dustcloth. Once it’s clean, interact again to open a passage into a secret area.
This area has mirrors that warp you around. The first goal is to find a Hammer; this can be found by using the leftmost mirror, then using the first mirror you come across (not the one you come out of), then running through the hallway until you find a mirror right at the end. Use this then go left and you will find the hammer almost immediately.
The next part is a little trickier. You want to head to the far end of the hallway you’re in when you obtain the hammer and use the mirror there. This will drop you back at the entrance to this area, but you can’t leave yet (or you lose the Hammer). Turn around and enter the mirror you just came out of (the far right one) and run down the hallway and enter the left mirror of the two. When you pop out, interact with the mirror to your left. This is a fake mirror which you will break with the Hammer.
Go through and interact with the mirror at the end of the hallway for a scene.
Once the scene is over, grab the Blue Ball on the ground next to you and head to the Puzzle Room on the far right of the 1st floor.
Use the Screwdriver on the wall grate to reveal a ball slot, then interact again to insert the Blue Ball (Note that you can’t do so unless you’ve already solved the puzzle). Solve the ball puzzle again with the new addition – the solution is 1 Red, 1 Blue = 2 Blue, 3 Green – to cause the mask at the far right of the room to fall down, exposing the Battery. Obtain it and you can now enter the dark room.
Head all the way through the room and interact with the cabinet on the left to obtain the Extinguishing Agent, then leave the room…
Once the scene is over, head to the Dining Room, and use the Extinguishing Agent on the hearth. Once the fire is out, interact with the hearth again to obtain the Mansion Key, the key to the front door.
If you choose to go to the front door and leave now, you’ll achieve Ending 1.
Otherwise, the story will continue.
Main Story Part #3
Do as suggested, and go to the Bath Room. As soon as you enter, a scene will trigger.
Once it’s over, check the basket to see your clothes are missing, and head back to the main hall, via a scene with the clotheshorse.
Once you’re back in the main hall, you’ll find the doors to the Stage Room are open once again with candles arrayed at the entrance. Enter to continue the story, but if you do so you can no longer reach Ending 1.
Once the scene in the Stage Room is over, head over to the front door and exit outside.
If you exit the front gate of the mansion, you will achieve Ending 2.
Otherwise, look around and find the dog statue lying on the ground to the right. Walk to the section of the wall directly above it (in the direction it’s looking), and interact with it to find the Dog Medal, the last of the four.
Once you have it, go back to the front door and interact with it. A short comment about the medals should occur, and you’ll turn away from the door. Keep interacting with it until you enter back inside. Once you do so you can no longer achieve Ending 2.
Once you’re inside, there are four optional h-scenes you can go find: One in the Stage Room, one in the Bath Room, one in the Mirror, and one in Guest Room 2.
Otherwise, head left from the main hall and enter the second door to the Medal Room. Insert the four medals to unlock the door, then progress through the hallway until you reach the final room which results in the Ending.