There are 4 Shackles. Each Shackles Has: 90 HP, 4 Speed, and Two Special Attacks.
Each Shackle gives a different buff to its allies when it is killed. The Individual Shackles and their on-death Buffs Are:
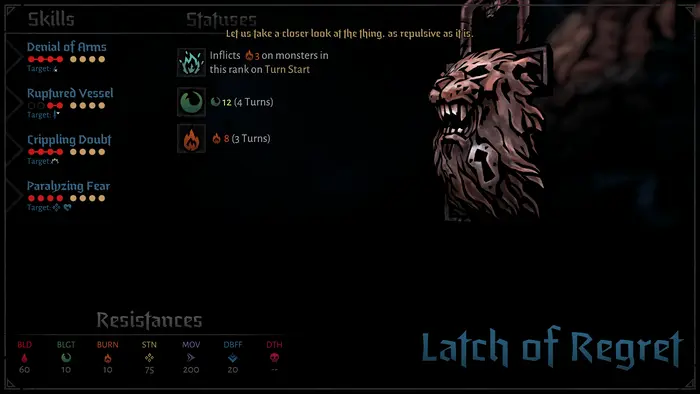
- The Latch of Regret: Grants its allies 20% more damage permanently.
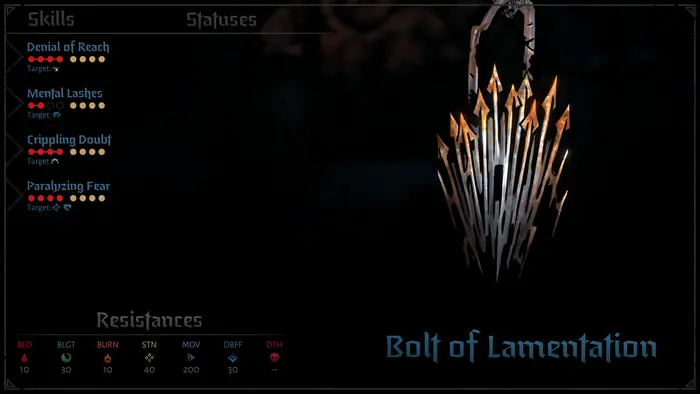
- The Bolt of Lamentation: Grants its allies 10 crit permanently.
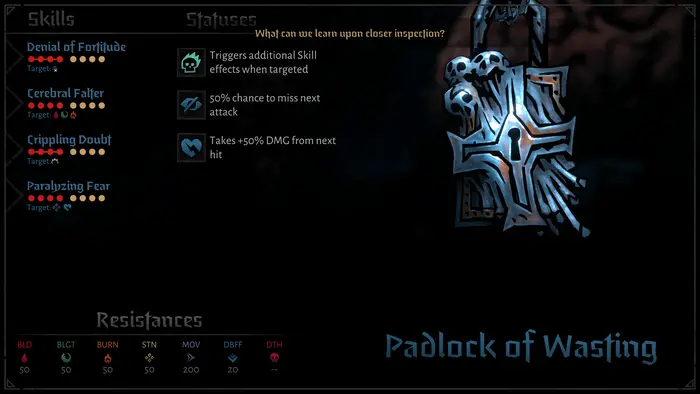
- The Padlock of Wasting: Heals its Allies by 33% (it will heal for 30 if they aren’t HP boosted)
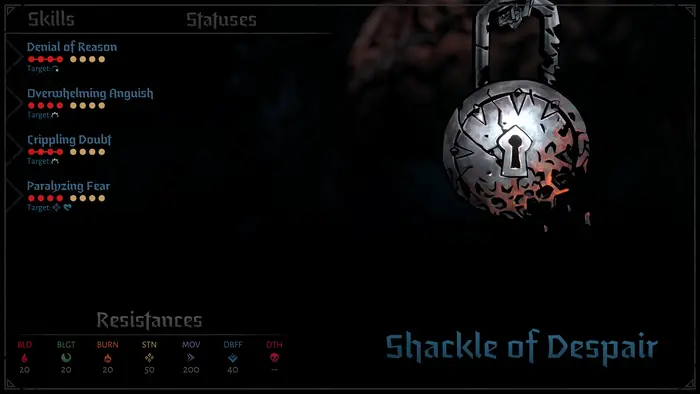
- The Shackle of Despair: Its Allies will inflict blind or weak 10% of the time on hit.
The Shackles of Denial
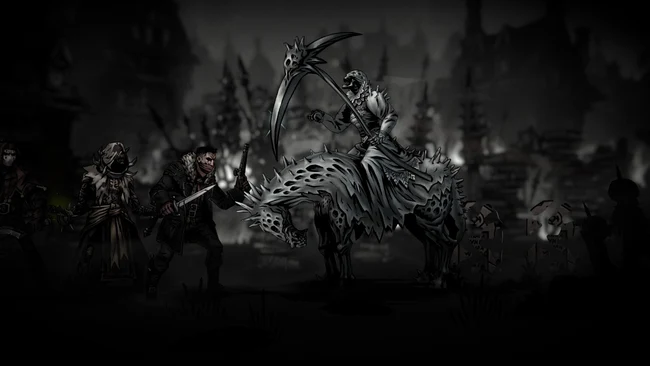
Darkest Dungeon 2 Act 1 Boss Guide
Generic Moveset
All the locks have these moves.
Crippling Doubt: Hits up to 2 random targets for 4-6 damage at 5 crit and 1-2 stress.
Paralyzing Fear: Targets any hero, deals 3-6 damage at 5 crit, applies vuln and has a 75% chance to apply stun. Can’t apply stun if less than 3 heroes alive.
Lock Specific Moves
Each Lock has a Denial Attack and one special damaging attack. The special Damaging attack will be used by whichever lock used its denial that turn. I.E. If regret uses its denial to lock you out of melee attacks, it will use Ruptured Vessel on its turn. Everyone else will use one of the two generic moves.
The Denial Attack: Each turn, one Lock will lock you out from using certain kinds of moves. Regret will lock you from melee attacks, Lamentation from ranged attacks, Wasting from Heals, and Despair from stress heals. They won’t be able to use the same one twice in a row until there are two or less locks left, at which point it’s random. The last lock will use its denial every turn.
Ruptured Vessel: Targets both front rank heroes with 10-13 damage at 5 crit. Applies weak. Regret’s Skill.
Mental Lashes: Targets both Back ranks with 6-10 damage and 5 crit. Applies blind. Lamentation’s Skill
Cerebral Falter: Targets any hero. Deals 8-11 damage at 5 crit, and applies 4 of a random DoT type. Wasting’s Skill.
Overwhelming Anguish: Targets 1-2 heroes randomly. Deals 8-11 damage at 5 crit, and inflicts 3-4 stress. Despair’s Skill.
The Shackles of Denial is a reasonably approachable fight for any team composition, but not one to be underestimated. The Locks have a total aggregate HP of 360, and have to be killed one at a time. Whenever a lock dies it will buff all of its allies.
The way the fight works is fairly easy to understand. Every turn a lock will lock you out of one kind of skills. These can be all your melee attacks, all your ranged attacks, all your healing moves, and all your stress healing moves. For the most part, the most impactful denial is whichever damage type your team specializes in, followed by the healing denial, followed by the other damage type denial, and then the stress denial.
So managing this fight comes down to a few things. One, kill order. You should kill the locks in an order that benefits your team. If your team only deals ranged damage, and the last lock alive is the ranged denial lock, then congratulations, you can no longer kill the boss. So in that case, you should kill that one first.
The locks spawn in a somewhat random order, so if you have a specific damage plan that may affect the order in which you kill the locks, but my general recommended order is this one:
If your damage is primarily melee or ranged: Kill the lock that locks that one down first, then Wasting (his buff doesn’t do anything, since it’s just a heal), then the other damage lock, and then Despair. If your damage is well split, you can opt to kill Wasting first instead.
We always kill Despair last because his denial is very rarely impactful, and because his buff is the worst of them all. We kill the damage locks first so that we aren’t locked out of damage, and we kill Wasting second because his buff is very impactful and because his ability to lock out healing can get someone killed.
Now that we understand our kill order, let’s talk about the moves. Crippling Doubt adds up over time, mainly in terms of stress, but is generally the least dangerous attack. It exists to check that you are killing the locks, as if you allow them to live and do this several times a turn you will eventually get smacked with meltdowns, which can quickly end the run. The more dangerous move is Paralyzing Fear, which can stun people and set them up for more damage. Using stun resist poultices at the last inn before the mountain makes this move a lot more manageable, as do debuff cures and moves like ministrations/items like smelling salts on your team.
The special moves are the hardest hitting moves in the arsenal, and often come with debuffs. This communicates something very important about the fight. You should use your enemy targeted mitigation on the locks that you expect to use their special move. If Regret opens up with denial of arms, he’s a great smoke bomb target, as you know he’s about to use his big move. Moves like blinding gas and Hand of Light (Confessor) are great on turns where you will cleave debuff the lock that will use its big move, and this strategy generally works best on the locks that have lower debuff resist (Regret and Wasting).
The most important aspect of this fight, in any case, is that you start killing locks as quickly as you can. Having good heals and strong mitigation is great, but the faster you kill locks, the less damage, stress, and stuns you have to worry about. Killing key locks will also mean that their denials can’t disrupt you anymore, often speeding up your damage for the rest of the fight. Do not be scared of those buffs. Even Despair’s buff isn’t as bad as Despair being alive, they exist to keep the fight from becoming too easy as you kill locks. Giving the other locks 20% damage because you killed regret, or 10 crit because you killed lamentation is nowhere near as impactful as the kill on said lock is.
The locks are fairly straightforward and are designed to be approachable, but not easy, with any comp. Killing them quickly and in the right order (or at least close to the right order, depending on how they’re arranged) is the biggest key to this fight. Once you’ve smacked down the first couple of locks, Victory tends to be within your grasp.
All of the heroes perform well in this fight, though the faster damage dealers specifically tend to do the best due to the fight’s nature. DoT is a little worse in this fight since the locks only get 1 turn per round and there are 4 of them, but it’s still far from worthless. Characters that can remove debuffs, like PD and Vestal, can perform well here, as will tanks that can soak damage, stuns, and protect low heroes. The key isn’t in any one hero selection, but in your ability to remove the locks that threaten whichever specific comp you have.
Many combat items do well here. Dazzlers and smoke bombs can mitigate the special lock attacks very well. Smelling Salts cure stun and offer dodge, which is very useful in this fight, and holy water will counter any of the debuffs. Healing items let you keep tempo and save someone from death, and remain generally useful for that. Mineral spring water in particular is often helpful as it wipes a lot of stress and heals for a bit, though it is stopped by 2 different denials and should probably be used early as a result. Finally, direct damage boosting items like War Horn are especially great here, as they allow you to snipe down a lock very quickly.