Table of Contents Show
The Interface
The interface is split into three sections.
The Left MenuThe bar on the left side of the screen is a menu filled with a list of buttons. There are buttons for every skill, a couple of information pages, your Bank, and a Settings page. Clicking the eye icon next to Combat or Skills will hide/show the list. Please take note of the fact that you can scroll in this window.
The Top BarIn the top bar, you can see what page you are currently on. The potion and helmet icon on the right side can be selected to view your currently selected potions or equipment. You can also see if you are currently logged into Melvor Cloud on the top right. If you see a letter C in a green oblong you are logged in. If the oblong is red, you are not logged in. You can find a login button in the Settings window or by clicking on your user name in the top right.
The Main SectionThe main section of the screen can be filled with a plethora of content. It can be filled with the Bank, Settings, a Skill, or one of the information pages.
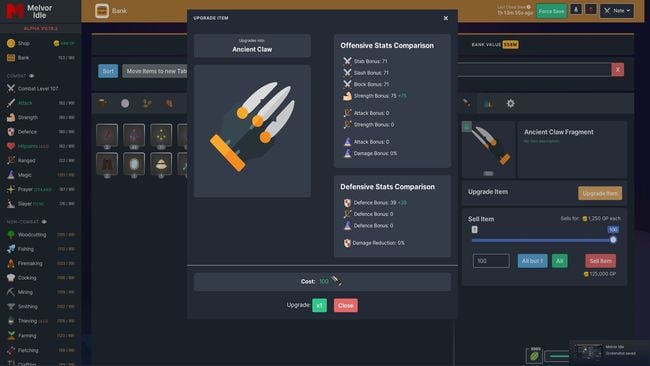
The BankThe Bank is where your items are stored. You can upgrade, sell, or equip your items by selecting them from the Bank screen. Weapons and armour have stats that can be viewed by first selecting them in the Bank, then selecting View Item Stats in the menu that appears. The item stats screen will show information about the item and a comparison of its stats to whatever item is currently equipped in the same slot. For example, if you had a pair of ![]() Bronze Gloves equipped and you Viewed Item Stats for
Bronze Gloves equipped and you Viewed Item Stats for ![]() Iron Gloves in your Bank, there would be a green (+1) next to the Iron Gloves attack stats, showing that the Iron Gloves offer a higher attack when compared to the Bronze Gloves. Bank slots can be bought in the shop. You can sell your items with the menu opened by clicking on the item in your inventory.
Iron Gloves in your Bank, there would be a green (+1) next to the Iron Gloves attack stats, showing that the Iron Gloves offer a higher attack when compared to the Bronze Gloves. Bank slots can be bought in the shop. You can sell your items with the menu opened by clicking on the item in your inventory.
The ShopThe shop is where you can spend your hard-earned GP. Here you can buy things like better pickaxes and axes, more bank slots, some ingredients for various skills, and more.
SettingsThe settings page is where players can change various options for the game, including notifications, auto restart dungeons, dark mode, and save management. These options can be accessed from the left menu, towards the bottom. Within the settings area, there are four categories of settings. You can hover over the settings for a more detailed description of their effects.
Basic Skill Usage
One of the main aspects of the game is gathering resources with the various gathering skills and then processing those resources into more refined products with various other skills.
One of the most simple production lines is with ![]() Fishing and
Fishing and ![]() Cooking. To begin select Fishing from the left menu to open the fishing skill page. To start fishing, select the fish you want to catch, then select ‘Start Fishing’. At fishing
Cooking. To begin select Fishing from the left menu to open the fishing skill page. To start fishing, select the fish you want to catch, then select ‘Start Fishing’. At fishing ![]() Level 1 you only have access to
Level 1 you only have access to ![]() Raw Shrimp, so start with catching them.
Raw Shrimp, so start with catching them.
Now that you have started fishing, the fishing window has changed slightly. Near the top of the window you will notice that the experience bar is slowly making its way across the window indicating that you are gaining ![]() Fishing experience. The selected fish will have information about it displayed within the Shallow Shores tile. The tile displays the name of the fish selected, the experience you earn for successfully catching the fish, the Mastery level of the fish, and the progress towards the next Mastery level. Successfully completing a skill action will award you experience towards the skill used in addition to Mastery experience awarded towards the specific skill action used. When fishing for
Fishing experience. The selected fish will have information about it displayed within the Shallow Shores tile. The tile displays the name of the fish selected, the experience you earn for successfully catching the fish, the Mastery level of the fish, and the progress towards the next Mastery level. Successfully completing a skill action will award you experience towards the skill used in addition to Mastery experience awarded towards the specific skill action used. When fishing for ![]() Raw Shrimp you will earn +5 XP towards your Fishing skill level and +1 XP towards your Raw Shrimp Mastery level. In the left menu, you will also notice that Fishing is now shown in green indicating that this skill is active.
Raw Shrimp you will earn +5 XP towards your Fishing skill level and +1 XP towards your Raw Shrimp Mastery level. In the left menu, you will also notice that Fishing is now shown in green indicating that this skill is active.
Now that you have caught some fish it’s time to cook them with the ![]() Cooking skill. When you have opened the cooking window you will notice the cooking page is in three parts. The left tile has a drop-down menu for selecting the food you want to cook, only uncooked food in your bank will be displayed here. The right tile displays your available Cooking Fire. Once a fish has been selected and the Cooking Fire has been lit, you can select ‘Cook’ from the middle tile to begin cooking. Please note that you need logs gathered with the
Cooking skill. When you have opened the cooking window you will notice the cooking page is in three parts. The left tile has a drop-down menu for selecting the food you want to cook, only uncooked food in your bank will be displayed here. The right tile displays your available Cooking Fire. Once a fish has been selected and the Cooking Fire has been lit, you can select ‘Cook’ from the middle tile to begin cooking. Please note that you need logs gathered with the ![]() Woodcutting skill to light a cooking fire.
Woodcutting skill to light a cooking fire.
Offline Progression
Offline progression allows your game to progress while closed for up to 12 hours. If the game is closed while performing an action, eg. mining ![]() Copper Ore, upon returning the game will calculate how long you were gone for and provide you with the XP, Items, Mastery XP, and other various things that you would have received if the game was left running. When you open the game again a popup menu will provide a summary of what you earned while away. The skill that was being used will then continue progressing as normal.
Copper Ore, upon returning the game will calculate how long you were gone for and provide you with the XP, Items, Mastery XP, and other various things that you would have received if the game was left running. When you open the game again a popup menu will provide a summary of what you earned while away. The skill that was being used will then continue progressing as normal.
Basic Combat
To fight monsters navigate to the combat page by selecting any combat skill from the left menu. The combat page contains three tabs containing the locations where monsters can be fought, above a section for equipment and combat stats. Select browse combat areas, slayer areas, or dungeons to reveal a menu containing all the relevant locations. Selecting a location will display the enemies which can be repurchased from the Shop.
Combat Skills
Attack![]() Attack increases your accuracy rating with melee weapons which affects your chance to hit. Higher tiers of melee require higher Attack to be equipped.
Attack increases your accuracy rating with melee weapons which affects your chance to hit. Higher tiers of melee require higher Attack to be equipped.
Strength![]() Strength increases your Max Hit with melee weapons. Max Hit determines your maximum potential damage on a successful hit.
Strength increases your Max Hit with melee weapons. Max Hit determines your maximum potential damage on a successful hit.
Defence![]() Defence increases your Melee, Ranged, and Magic Evasion Rating, which decreases the likelihood you will be hit by melee, ranged, and magic attacks. Higher tiers of some armours require higher Defence to be equipped.
Defence increases your Melee, Ranged, and Magic Evasion Rating, which decreases the likelihood you will be hit by melee, ranged, and magic attacks. Higher tiers of some armours require higher Defence to be equipped.
Hitpoints![]() Hitpoints affect your maximum life total and your passive regeneration rate. After receiving damage you will heal slowly over time, the speed at which you heal is based on your Hitpoints level. In addition to passive regeneration, your hitpoints can be replenished by consuming any food you have equipped. Hitpoints experience is earned by damaging enemies with weapons or spells.
Hitpoints affect your maximum life total and your passive regeneration rate. After receiving damage you will heal slowly over time, the speed at which you heal is based on your Hitpoints level. In addition to passive regeneration, your hitpoints can be replenished by consuming any food you have equipped. Hitpoints experience is earned by damaging enemies with weapons or spells.
Ranged![]() Ranged increases your Accuracy Rating and Max Hit with ranged weapons, which affects your chance to hit and damage respectively. Higher tiers of ranged weapons, arrows, and some armours require higher Ranged to be equipped.
Ranged increases your Accuracy Rating and Max Hit with ranged weapons, which affects your chance to hit and damage respectively. Higher tiers of ranged weapons, arrows, and some armours require higher Ranged to be equipped.
Magic![]() Magic allows you to cast Spells from your Spellbook provided you have the required Runes in your Bank and a magic weapon equipped. Magic increases your Accuracy Rating with Spells, which increases your chance to hit while using them. Your Magic skill level increases your damage with Spells. Magic also increases your Magic Evasion Rating, which decreases the likelihood you will be hit by magic-wielding enemies. Higher tiers of magic weapons, and some armours require higher Magic to be equipped.
Magic allows you to cast Spells from your Spellbook provided you have the required Runes in your Bank and a magic weapon equipped. Magic increases your Accuracy Rating with Spells, which increases your chance to hit while using them. Your Magic skill level increases your damage with Spells. Magic also increases your Magic Evasion Rating, which decreases the likelihood you will be hit by magic-wielding enemies. Higher tiers of magic weapons, and some armours require higher Magic to be equipped.
Prayer![]() Prayers are passive bonuses that expend Prayer Points to remain in effect. You gain Prayer Points by burying Bones, which are dropped by Monsters upon death. Prayer experience is earned by damaging enemies and is further increased by having prayers active at the time damage is dealt.
Prayers are passive bonuses that expend Prayer Points to remain in effect. You gain Prayer Points by burying Bones, which are dropped by Monsters upon death. Prayer experience is earned by damaging enemies and is further increased by having prayers active at the time damage is dealt.
Slayer![]() Slayer experience is earned by killing enemies in slayer areas or by completing Slayer Tasks. Slayer Tasks also earn you
Slayer experience is earned by killing enemies in slayer areas or by completing Slayer Tasks. Slayer Tasks also earn you ![]() Slayer Coins which are used to purchase Slayer Equipment from the Shop. Slayer areas are unlocked by raising your Slayer level.
Slayer Coins which are used to purchase Slayer Equipment from the Shop. Slayer areas are unlocked by raising your Slayer level.
Skills
Woodcutting![]() Woodcutting is the best way to obtain Wood for
Woodcutting is the best way to obtain Wood for ![]() Firemaking and
Firemaking and ![]() Fletching. You can cut two trees simultaneously by purchasing the
Fletching. You can cut two trees simultaneously by purchasing the ![]() Multi-Tree upgrade from the Shop for
Multi-Tree upgrade from the Shop for ![]() 1,000,000.
1,000,000.
Cutting Logs from ![]() Yew and
Yew and ![]() Magic Trees to sell for GP is a decent early game Money Making strategy. This will earn you between
Magic Trees to sell for GP is a decent early game Money Making strategy. This will earn you between ![]() 150,000 and
150,000 and ![]() 220,000 per hour with a
220,000 per hour with a ![]() Dragon Axe depending on your Tree Mastery Levels. At
Dragon Axe depending on your Tree Mastery Levels. At ![]() Level 99 Woodcutting you can purchase a
Level 99 Woodcutting you can purchase a ![]() Woodcutting Skillcape from the Shop to increase your Woodcutting speed, further increasing your profits.
Woodcutting Skillcape from the Shop to increase your Woodcutting speed, further increasing your profits.
Fishing![]() Fishing is a strong choice as a first skill to level first and allows you to catch raw fish which can be
Fishing is a strong choice as a first skill to level first and allows you to catch raw fish which can be ![]() Cooked for food. Treasure Chests are special items found randomly through Fishing,
Cooked for food. Treasure Chests are special items found randomly through Fishing, ![]() Thieving
Thieving ![]() Fisherman, or killing
Fisherman, or killing ![]() Giant Crabs. The
Giant Crabs. The ![]() Treasure Chest will contain an
Treasure Chest will contain an ![]() Amulet of Fishing 1% of the time, which increases your base fishing speed by +20%. Fishing is also the only way to obtain the
Amulet of Fishing 1% of the time, which increases your base fishing speed by +20%. Fishing is also the only way to obtain the ![]() Ancient Ring of Skills, which provides a +8% XP bonus to non-combat skills. Fishing for
Ancient Ring of Skills, which provides a +8% XP bonus to non-combat skills. Fishing for ![]() Raw Whales (Fishing Level 95 Fishing requirement) is one of the most profitable Money Making strategies.
Raw Whales (Fishing Level 95 Fishing requirement) is one of the most profitable Money Making strategies.
Firemaking![]() Firemaking is leveled to unlock higher tier Cooking Fires and create
Firemaking is leveled to unlock higher tier Cooking Fires and create ![]() Coal Ore. Cooking Fires are Skill Upgrades purchased from the Shop and are used in
Coal Ore. Cooking Fires are Skill Upgrades purchased from the Shop and are used in ![]() Cooking to obtain a Cooking Experience Bonus. You will only receive Coal Ore 40% of the time from burning Logs and other methods – such as
Cooking to obtain a Cooking Experience Bonus. You will only receive Coal Ore 40% of the time from burning Logs and other methods – such as ![]() Mining – are more efficient for gathering coal. The
Mining – are more efficient for gathering coal. The ![]() Firemaking Skillcape provides a +5% global XP bonus, which is unlocked for purchase at Firemaking Level 99 Firemaking.
Firemaking Skillcape provides a +5% global XP bonus, which is unlocked for purchase at Firemaking Level 99 Firemaking.
Lighting Bonfires will only give an Experience Bonus to Firemaking while active.
Cooking![]() Cooking is used to turn your raw fish into edible food. Cooking Fires can be purchased from the Shop and are unlocked by raising your Firemaking skill. Cooking Fires let you cook without manually lighting a fire and grant an Experience Bonus to Cooking.
Cooking is used to turn your raw fish into edible food. Cooking Fires can be purchased from the Shop and are unlocked by raising your Firemaking skill. Cooking Fires let you cook without manually lighting a fire and grant an Experience Bonus to Cooking.
Food burns 30% of the time until 50 Mastery Level when food will burn 1% of the time. Burnt food is inedible and can be sold from the Bank. ![]() Cooking Gloves can be purchased from the Shop will prevent food from burning when worn.
Cooking Gloves can be purchased from the Shop will prevent food from burning when worn.
Mining![]() Mining is another strong option to level first. Mining is used for mining ore, rune essence, and gems. The Mastery Level of each ore affects how many times you can mine it before it’s depleted and needs to respawn. The more valuable the ore is the longer the respawn time will be, with durations ranging from 1 to 120 seconds. Every time you mine there’s a 1% chance you will find a random Gem in addition to your ore.
Mining is another strong option to level first. Mining is used for mining ore, rune essence, and gems. The Mastery Level of each ore affects how many times you can mine it before it’s depleted and needs to respawn. The more valuable the ore is the longer the respawn time will be, with durations ranging from 1 to 120 seconds. Every time you mine there’s a 1% chance you will find a random Gem in addition to your ore.
Mining with ![]() Gem Gloves is one of the most effective Money Making strategies available in the early game. Gem Gloves will not work when mining
Gem Gloves is one of the most effective Money Making strategies available in the early game. Gem Gloves will not work when mining ![]() Rune Essence. At Mining Level 99 Mining with Gem Gloves and a
Rune Essence. At Mining Level 99 Mining with Gem Gloves and a ![]() Mining Skillcape you can earn up to
Mining Skillcape you can earn up to ![]() 500,000 an hour while idle mining. Purchasing multiple Gem Gloves will stack the charges.
500,000 an hour while idle mining. Purchasing multiple Gem Gloves will stack the charges.
Smithing![]() Smithing is used to turn ore into weapons, armour, headless bolts, arrowtips, and throwing weapons.
Smithing is used to turn ore into weapons, armour, headless bolts, arrowtips, and throwing weapons.
Armour made with Smithing is powerful although the best armour in the game can only be obtained using ![]() Slayer Coins at the Shop or by killing enemies.
Slayer Coins at the Shop or by killing enemies.
Thieving![]() Thieving lets you Pickpocket for GP and items.
Thieving lets you Pickpocket for GP and items. ![]() Thieving Gloves sold at the Shop give you +10% to your Thieving success rate when equipped. Thieving is the only way to find the
Thieving Gloves sold at the Shop give you +10% to your Thieving success rate when equipped. Thieving is the only way to find the ![]() Chapeau Noir hat and is arguably the best way to obtain Seeds. At Thieving Level 30 Thieving the
Chapeau Noir hat and is arguably the best way to obtain Seeds. At Thieving Level 30 Thieving the ![]() Farmer will be unlocked and is a prime target for acquiring seeds early on. You will only earn experience and on successful Pickpocket attempts.
Farmer will be unlocked and is a prime target for acquiring seeds early on. You will only earn experience and on successful Pickpocket attempts.
Skills (cont.)
FarmingYou can ![]() Farm and complete other tasks simultaneously, Fertilizing, Planting, and Harvesting does not interrupt other skills. Farming is one of the most time-efficient ways to obtain food, which is used for healing in
Farm and complete other tasks simultaneously, Fertilizing, Planting, and Harvesting does not interrupt other skills. Farming is one of the most time-efficient ways to obtain food, which is used for healing in ![]() Combat. Farming is also the only way to obtain the Herbs used in potion brewing with
Combat. Farming is also the only way to obtain the Herbs used in potion brewing with ![]() Herblore.
Herblore.
Seeds planted without fertiliser have a 50% chance to yield crops after growing. To increase the chance above 50% you must fertilise the Seeds using ![]() Compost. Each Compost used on a Seed will increase its survival chance by 10%, raising your Compost Level to 5 will guarantee your crops survive. Compost must be used every time a Seed is planted to have an effect. Any crop that reaches Mastery Level 50 will always survive without Compost, and any crop that reaches Mastery Level 70, or herb that reaches 50 Mastery Level will yield enough Seeds on average to be replanted perpetually.
Compost. Each Compost used on a Seed will increase its survival chance by 10%, raising your Compost Level to 5 will guarantee your crops survive. Compost must be used every time a Seed is planted to have an effect. Any crop that reaches Mastery Level 50 will always survive without Compost, and any crop that reaches Mastery Level 70, or herb that reaches 50 Mastery Level will yield enough Seeds on average to be replanted perpetually.
To start Farming you will need Seeds, 3 of which are needed for a single crop allotment, 2 for herbs, and 1 for trees. The most efficient way to gather Seeds early on is to get to Thieving Level 30 Thieving and Pickpocket the ![]() Farmer. Seeds can also be found by killing enemies like the
Farmer. Seeds can also be found by killing enemies like the ![]() Junior,
Junior, ![]() Adult, and
Adult, and ![]() Master Farmer, in the Farmlands, from
Master Farmer, in the Farmlands, from ![]() Bird Nests found during
Bird Nests found during ![]() Woodcutting, and from Chests acquired in Dungeons. It is recommended that you start leveling Farming early on as the leveling process is fairly active and lengthy.
Woodcutting, and from Chests acquired in Dungeons. It is recommended that you start leveling Farming early on as the leveling process is fairly active and lengthy.
Fletching![]() Fletching is used to make bows, bolts and arrows.
Fletching is used to make bows, bolts and arrows.
Fletching ![]() Magic Longbows using
Magic Longbows using ![]() Magic Logs and
Magic Logs and ![]() Bowstring is one of the most profitable Money Making Strategies, although this method requires
Bowstring is one of the most profitable Money Making Strategies, although this method requires ![]() Level 99 Woodcutting and Fletching to be the most efficient.
Level 99 Woodcutting and Fletching to be the most efficient.
Crafting![]() Crafting is used to make Leather/Hide Armour, Rings, and Necklaces. Leather and Hide Armour is used to boost the power of
Crafting is used to make Leather/Hide Armour, Rings, and Necklaces. Leather and Hide Armour is used to boost the power of ![]() Ranged attacks. Using
Ranged attacks. Using ![]() Crafting to turn Bars and Gems into Rings and Amulets is less profitable than just selling the raw materials.
Crafting to turn Bars and Gems into Rings and Amulets is less profitable than just selling the raw materials.
Runecrafting![]() Runecrafting uses
Runecrafting uses ![]() Rune Essence to create Runes which are used to cast Magic Spells with
Rune Essence to create Runes which are used to cast Magic Spells with ![]() Magic or make Elemental Potions with
Magic or make Elemental Potions with ![]() Herblore. It is also used to make Staves and Magic Armour.
Herblore. It is also used to make Staves and Magic Armour.
Herblore![]() Herblore is used to Brew Potions. A single Potion has many Charges and can be equipped to the Potion slot available for each Skill, which is accessed from the top right of your screen. Once the Charges from a single Potion have been consumed, a new one can be used automatically if “Auto re-use potion” has been enabled in the Settings Menu. Bird Nest Potions are a good example of how useful potions can be in the early game when leveling
Herblore is used to Brew Potions. A single Potion has many Charges and can be equipped to the Potion slot available for each Skill, which is accessed from the top right of your screen. Once the Charges from a single Potion have been consumed, a new one can be used automatically if “Auto re-use potion” has been enabled in the Settings Menu. Bird Nest Potions are a good example of how useful potions can be in the early game when leveling ![]() Woodcutting for extra Seeds or GP.
Woodcutting for extra Seeds or GP.
Mastery
When you perform a Skill Action, you earn two types of experience; ‘Skill Experience’ which increases your Skill Level, and ‘Mastery Experience’ which increases the ![]() Mastery level of the specific Skill Action being used. Mastery Levels will only give bonuses to the specific action they were earned on and can be viewed by selecting Mastery from the left menu. Each successful Skill Action typically earns 1 experience point towards that action’s Mastery Level. For example, making an
Mastery level of the specific Skill Action being used. Mastery Levels will only give bonuses to the specific action they were earned on and can be viewed by selecting Mastery from the left menu. Each successful Skill Action typically earns 1 experience point towards that action’s Mastery Level. For example, making an ![]() Iron Dagger with
Iron Dagger with ![]() Smithing would earn 1 experience point towards Iron Dagger Mastery Level.
Smithing would earn 1 experience point towards Iron Dagger Mastery Level.
Early Game Items and Equipment
Mastery TokensMastery Tokens randomly drop while earning experience for non-combat skills other than ![]() Alt. Magic and can be used by claiming them in the Bank. When a Mastery Token the Mastery Pool for that skill will be filled by 0.1% of the max pool xp.
Alt. Magic and can be used by claiming them in the Bank. When a Mastery Token the Mastery Pool for that skill will be filled by 0.1% of the max pool xp.
Skill UpgradesShop Skill Upgrades increase the speed at which you can Cut Wood, Fish, and Mine Ore. Higher tier Skill Upgrades are unlocked by raising the associated skill and purchasing any lower tier upgrades already available.
SkillcapesWhen any skill reaches the maximum level of 99 a Skillcape will become available for purchase from the Shop for Coins.svg 1,000,000. Skillcapes often have very powerful effects, like giving you bonus Coal Ore for every mining action or doubling your potion production.
Chapeau Noir![]() Chapeau Noir has a 1 in 10000 chance to be found when performing a successful Pickpocket with
Chapeau Noir has a 1 in 10000 chance to be found when performing a successful Pickpocket with ![]() Thieving. Chapeau Noir gives you a 10% chance to receive double loot from Thieving or
Thieving. Chapeau Noir gives you a 10% chance to receive double loot from Thieving or ![]() Combat.
Combat.
Gold Topaz RingThe ![]() Gold Topaz Ring gives +15% gold when defeating monsters. However, this ring has another special effect: every monster you defeat and every skilling action you do has a very small chance of giving you one half of
Gold Topaz Ring gives +15% gold when defeating monsters. However, this ring has another special effect: every monster you defeat and every skilling action you do has a very small chance of giving you one half of ![]() Aorpheats Signet Ring.
Aorpheats Signet Ring.
Gold Emerald Ring![]() Gold Emerald Ring gives you +7%
Gold Emerald Ring gives you +7% ![]() Combat Experience. You can craft one with
Combat Experience. You can craft one with ![]() Level 50 Crafting or find one by killing
Level 50 Crafting or find one by killing ![]() Mummys – Combat Level 29 – in the
Mummys – Combat Level 29 – in the ![]() Penumbra.
Penumbra.
Amulet of Looting![]() Amulet of Looting has a 4.55% drop rate from
Amulet of Looting has a 4.55% drop rate from ![]() Spider Chests, which are earned from completing the
Spider Chests, which are earned from completing the ![]() Spider Forest dungeon. This amulet allows you to Autoloot, although you likely won’t be able to grind the
Spider Forest dungeon. This amulet allows you to Autoloot, although you likely won’t be able to grind the ![]() boss that drops it until the mid-game when you are fairly strong.
boss that drops it until the mid-game when you are fairly strong.
Gem Gloves![]() Gem Gloves are a Money Making staple, costing
Gem Gloves are a Money Making staple, costing ![]() 500,000 from the Shop and coming with 2000 charges. Once all the charges have been used by Mining Ore and the Gems found are sold you are expected to receive around
500,000 from the Shop and coming with 2000 charges. Once all the charges have been used by Mining Ore and the Gems found are sold you are expected to receive around ![]() 762,000, which is a
762,000, which is a ![]() 262,000 profit on your
262,000 profit on your ![]() 500,000 purchase.
500,000 purchase.
Upgrading Armour
Certain types of armour can be upgraded using ![]() Silver Bars,
Silver Bars, ![]() Gold Bars, and GP. An armour piece must first be upgraded to (S) using Silver Bars and GP, before it can be upgraded to (G) using Gold Bars and GP. Once armour has the (G) prefix it has been fully upgraded and cannot be upgraded again. Low tier armour pieces are relatively cheap to upgrade, so there is little downside to doing so.
Gold Bars, and GP. An armour piece must first be upgraded to (S) using Silver Bars and GP, before it can be upgraded to (G) using Gold Bars and GP. Once armour has the (G) prefix it has been fully upgraded and cannot be upgraded again. Low tier armour pieces are relatively cheap to upgrade, so there is little downside to doing so.
Early Game Goal
Skills in Melvor Idle often follow a natural progression order, you need ![]() Mining to get ore for
Mining to get ore for ![]() Smithing, which allows you to make armour and weapons for
Smithing, which allows you to make armour and weapons for ![]() Combat. Deciding which skill to level first becomes a more intuitive choice once you understand which items are needed for your chosen goal. Typically players will choose to level
Combat. Deciding which skill to level first becomes a more intuitive choice once you understand which items are needed for your chosen goal. Typically players will choose to level ![]() Woodcutting,
Woodcutting, ![]() Mining, or
Mining, or ![]() Fishing first, because they are a great starting point for several progression routes and also have efficient Money Making strategies associated with them.
Fishing first, because they are a great starting point for several progression routes and also have efficient Money Making strategies associated with them.
If your goal is to prepare yourself for ![]() Combat you’ll probably want some Equipment and food. You can find equipment while fighting monsters, however it’s slow going to begin Combat without any weapons or armour. First, you’ll need to do some Mining to collect ore, once you have some ore you can move onto Smithing, using the ore you just collected to make weapons and armour. Now that you have some basic armour and weapons, you can equip them from the Bank and start fighting Monsters.
Combat you’ll probably want some Equipment and food. You can find equipment while fighting monsters, however it’s slow going to begin Combat without any weapons or armour. First, you’ll need to do some Mining to collect ore, once you have some ore you can move onto Smithing, using the ore you just collected to make weapons and armour. Now that you have some basic armour and weapons, you can equip them from the Bank and start fighting Monsters.
Without food you’ll only be able to fight for short periods, before having to wait for your health to regenerate naturally. Food allows you to heal during Combat, so you can keep fighting without the need to take breaks. You can get food through ![]() Cooking, which requires
Cooking, which requires ![]() Fishing and some
Fishing and some ![]() Woodcutting, or through
Woodcutting, or through ![]() Farming, which requires Seeds found through
Farming, which requires Seeds found through ![]() Thieving in the early game. To use Cooking for food, you’ll need to do some Fishing to catch raw fish, then cut a few logs with Woodcutting to light a fire with Cooking to turn the raw fish into edible food.
Thieving in the early game. To use Cooking for food, you’ll need to do some Fishing to catch raw fish, then cut a few logs with Woodcutting to light a fire with Cooking to turn the raw fish into edible food.
Now you have some food which you can equip from the Bank and along with your other equipment, you’re properly prepared for Combat.
So, I’ve followed the guide up until choosing between auto eat or agility, and one thing it seems the guide might be missing or I just missed is that you need 500 mind runes to get the 4th agility course. Again, not sure if I missed something but it seems that the only way to get them through combat is master wizards and they drain food really fast. If there is another way to get the mind runes, it would be nice to know
Hi Tom, You can gain mind runes by runecrafting 🙂