Table of Contents Show
This guide is all about switches! To run a successful railway empire, you really want to familiarize yourself with how switches can impact your railway. This guide will help you understand:
– Why switches are so important.
– How switches should be used around stations.
– Some good switching solutions for different purposes.
– How to plan and build ahead from the very beginning.
Switches and signalling
Historically, switches has been an integral part of railway signalling, interlocking and traffic management for a long time. To ensure a proper flow of goods, passengers to and from your cities, switches need to be put in place to make your railway network flexible.
Basically, you should consider putting a proper switching solution around all your city stations, since these are part of the main track. This is exactly how things are done in real life as well. So from now on, when you think of a city station, you should always think of the switching arrangement on both sides as an integral part of the station itself.
This also means that you should plan way ahead, and be prepared for your station upgrades from the very beginning. This is important, since you need to build part of your switching solution in advance, as the game will only allow you to build advanced switches when the track geometry is almost straight.
Rural stations for raw goods often don’t need the same type of flexibility as city stations, so these can work very well when just connected with simple switches etc. Therefore, this guide will have its main focus on city stations and the switching solutions around those.
Why switches are important (and why you need many of them)
Switches are absolutely essential to make sure trains can come in from one track at your station, and depart to another track. This is because the trains can’t magically jump between tracks (in stark contrast to the locomotive “magically” changing direction at stations, but that’s another story!).
As long as your stations has only 1 track, it’s manageable, but as soon as you upgrade to 2- or 4-track stations, the situation get much more complicated. This is further complicated by the way Railway Empire allows (or rather does not allow) you to build advanced switches, so to build a proper switching solution, you need to plan ahead and “reserve” some space for future switches.
When you think about a railway switch, you might think of a single switch, or maybe a crossover switch such as this one:

The single crossover is what I call a “1-2 switching solution”, as 1 track from either side (top from left, and bottom from right) can go into either of the 2 tracks, but if you’re coming from top right or bottom left, you cannot change track.
These are good for a number of purposes, but to really get things going, we’re going to focus on the most effective switch you can build in Railway Empire and how to use it: The double crossover switch. The double crossover (or diamond transversal) switch is shown below, and this type of switch is very space conserving and effective (in a railway context).
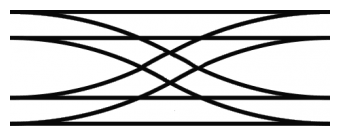
This double crossover switch is a “2-2 switching solution”, because it allows total interchangeability between the 2 tracks from either side. And the brilliant thing is that it doesn’t take any more space than a single crossover switch. You could have used two single crossovers to get the same result, but these would take up twice as much space.
The double crossover is really what you want to start using right from the beginning, and you should plan ahead to use these at every city station you have. And when done in the right way, these switches can be built quite easily, but there are some pitfalls you want to avoid – I’ll come back to that.
Going from a 2-2 to a 4-4 switching solution
Before we go any further, it’s important to understand exactly why this type of switch is so good – and why you should learn to use it. For this, we’ll use the example of a 4-track station – the largest station in Railway Empire, and the ones you ultimately want in your cities.
As mentioned above, the double crossover is a 2-2 solution that will allow trains to come from and depart to any of the two tracks in either direction. But how is this done when we have four tracks and want a full 4-4 switching solution?
Since we can’t switch between more than 2 tracks at a time, we have to arrange a series of double crossovers to form a full 4-4 switching solution. As a matter of fact, we need five of them in the pattern pictured here:
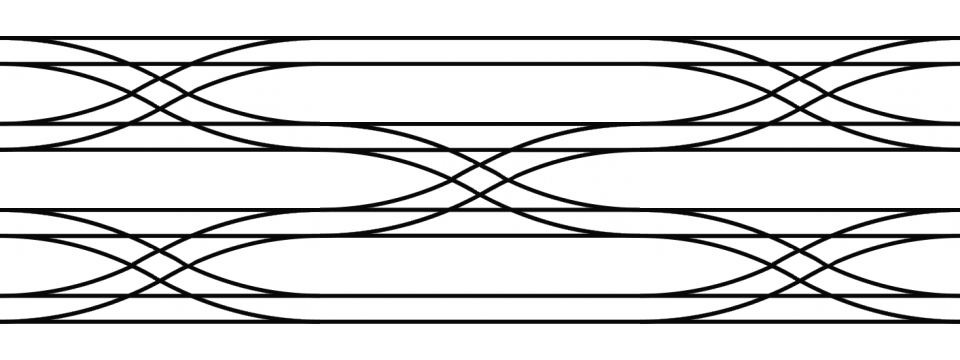
That’s it! Now you should start to see why a proper switching arrangement requires proper planning as well, since it can take up quite some space, even when using the most effective solution available.
But are all these switches really necessary you might ask? Yes, in fact they are. The next picture shows each of the four tracks in a different color, and their path out of the station. As you can see, all 5 double switches are used, and remember: This illustration only shows the way out of the station, you need the same possibilities when coming in as well.
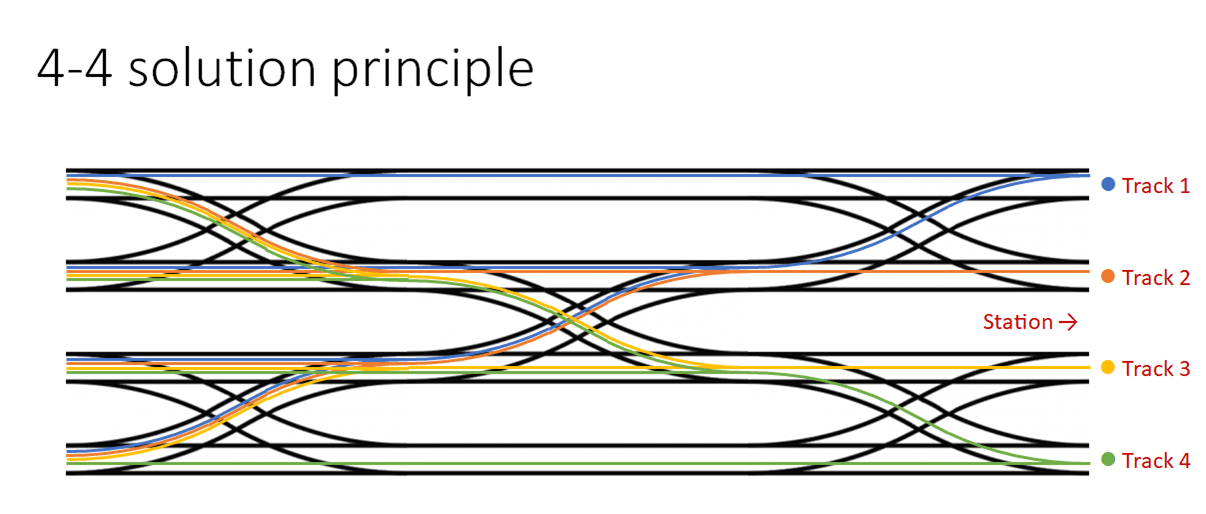
The 4-4 switching solution is the most space consuming, but also the most flexible switching arrangement. In fact, it’s also part of the game itself – if you choose Buildings and scroll down you can see for instance “Large station + Signalling” and “Terminal station + Signalling”. These both have the above 4-4 switching solution laid out as part of the building.
But there are also situations where you can do with less than a full 4-4 solution, and the next part will focus on these alternate solutions, how to build them, and how to set up proper signals as well.
A bit about logistics
As mentioned in the beginning, the main focus of this guide is city stations where the main tracks are running. Here I will define the terminology used.
Main tracks – the main railway lines that connects your cities. Should primarily transport passengers, mail and consumer goods. Main lines should always be double tracked with directional signalling.
Side tracks – side tracks are used for transporting raw goods from farms and raw material sites into the cities. Side tracks can often be single tracked, but occasionally double tracks should be used for holding areas so that trains can pass each other.
Directional signals – these should be used when you have double track, and want trains to be able to run in both directions at the same time (which is what you normally want). All your main lines should have directional signals, and also when you create a side track for train passage on single tracked lines. Remember that any switch terminates a directional signal, so be sure to place directional signals at both sides of the switch if necessary.
Line Blocks – when you divide a long section of track with stop signals, you have effectively created several line blocks. This means that more than one train can enter the same line at one time. I’d recommend you put line blocks on your double tracked main lines. It’s quite easy with a Ctrl+Click (insert multi-signal).
Some good switching (and signalling) solutions
So now it’s time to give some examples of good switching solutions that I use often. These are just examples, they can be varied quite a bit, and possibly expanded even further if you like. I’ve also indicated the recommended signalling, so that your railway will be running smoothly.
1-2 / 2-4 / 1-2 solution (3 double crossovers)

This is a really flexible solution that allows raw goods to be delivered from both sides without interfering with the main track running in the middle. If you’re unsure about the connections you want to make to the city, but doesn’t fancy the full 4-4 solution, this is a really good option.
- Recommended for: Raw goods delivered from both sides (track 1 and 4), mainline running in the middle (track 2 and 3).
- Limitations: Trains can’t go between track 1/side track A and track 4/side track B from either direction.
1-2 / 1-4 / 2-4 solution (4 double crossovers)
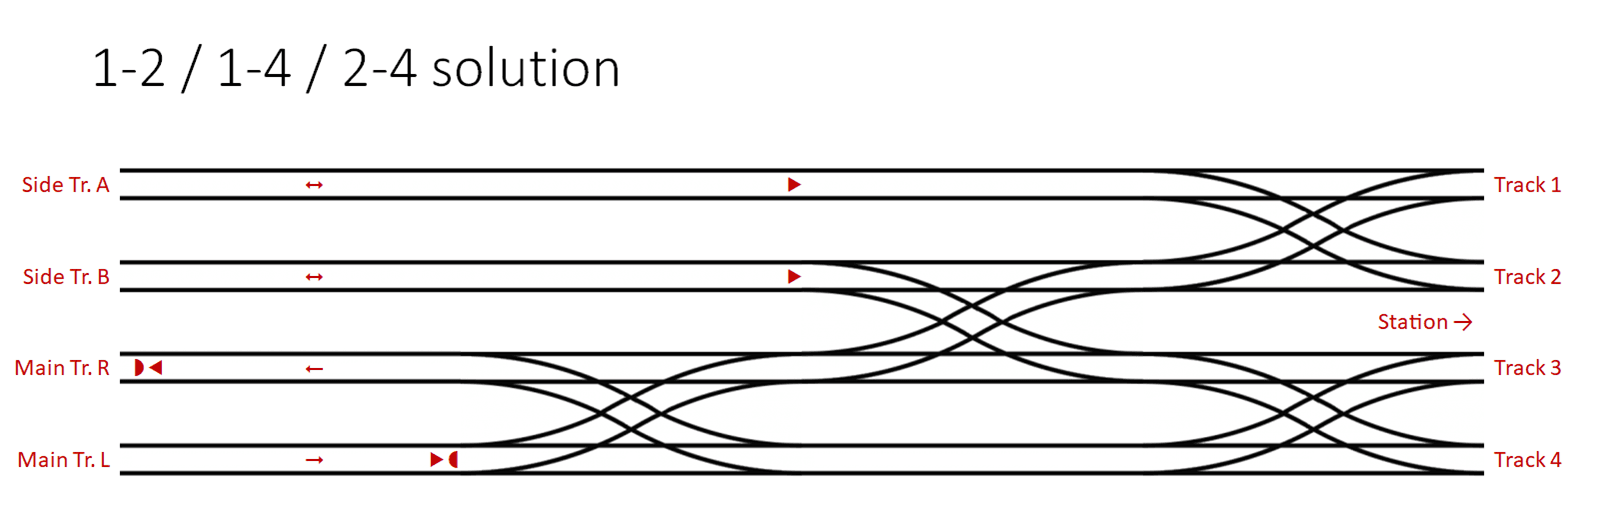
This solution is recommended when you have a city where you know that all raw goods will come from only one side. The layout can also be mirrored, so that track 1 and 2 on the station goes to main track, and track 3 and 4 goes to side tracks.
- Recommended for: Raw goods delivered from one side (track 1 and 2), mainline running on the other side (track 3 and 4).
- Limitations: Trains from side track A can only go to track 1 and 2 on the station.
4-4 solution (5 double crossovers)
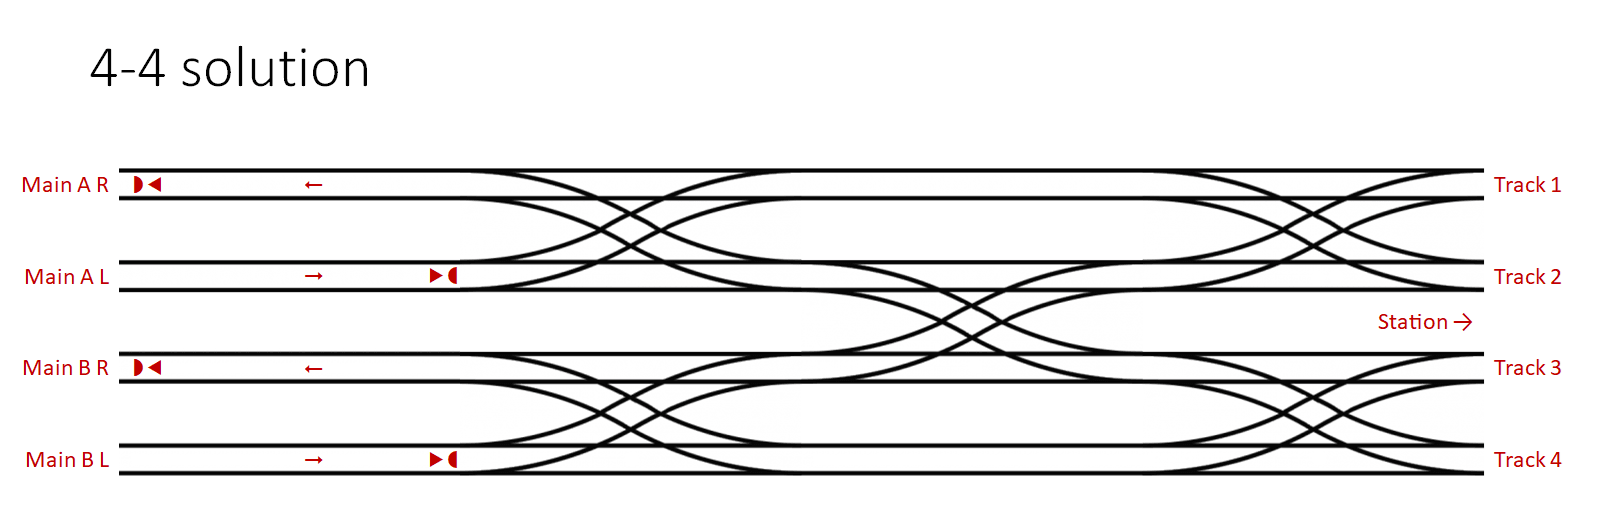
The full 4-4 solution absolutely has its uses. I recommend to use this when you have a 4-track station that you want to split into 2 main tracks (for instance to go to 2 different cities). If you know that raw goods are coming into you city, I’d recommend one of the other 2 solutions on the other side of the station.
- Recommended for: Splitting into 2 (or more) mainlines.
- Limitations: Geared for raw goods coming from the other side. Requires a decent amount of space.
Constructing and upgrading along the way
Now the above switching solutions are all shown with a fully upgraded 4-track station. But the solutions are equally viable using only 2-track and even 1-track stations.
When you build a new station, it’s perfectly fine to build a 1-track station, but as mentioned you need to consider which switching solution you want to use on either side. Build it so that the station building is next to track 1, because then tracks are added in the right direction when you upgrade the station.
If you’re going for the “1-2 / 2-4 / 1-2 solution”, you can create a temporary smaller version first, and upgrade it later. Basically, you’ll want to create this “1-2 / 2-3” solution as shown:
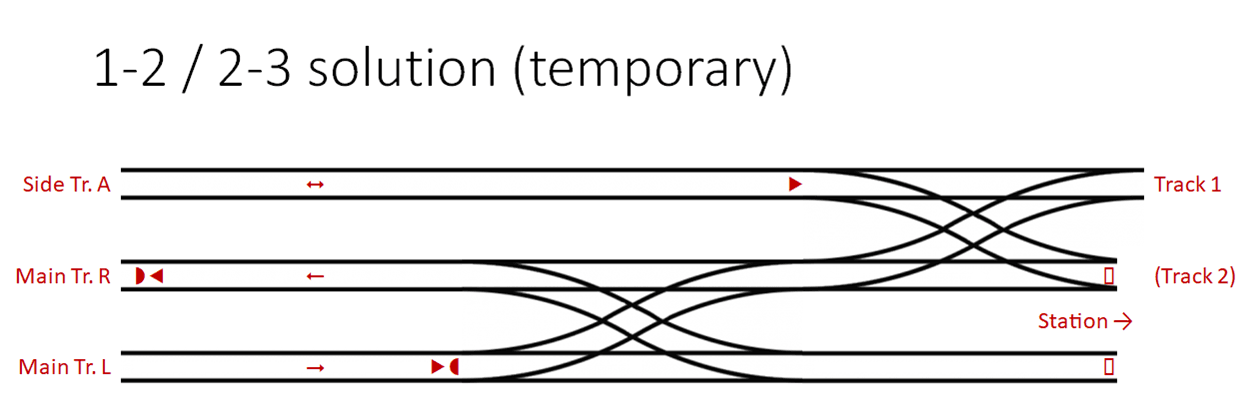
To create this, first create your rail line from track 1 with a straight section long enough for the 2 double switches (or 3 if you plan on using a larger solution like the 4-4). Now create parallel tracks that are the same length, but be aware of one thing.
You must stop the tracks a little bit before they would connect the tracks of an upgraded station.
This is because when you upgrade the station to 2 or 4 tracks, you need a little bit of space between the buffer stops to connect them. If they’re too close, you’ll have a problem connecting them later when you upgrade, so be sure to make a little gap.
Now, to make the switches, start on track 1 close to the station, but right where track 2 also starts (in the “upper right corner” of the crossover). Make the first crossover from track 1 to track 2, and make it as short as possible. Now after you have created a single crossover, there will be some switch marks that easily makes you create the inverse crossover for a full double crossover.
Next, create the second double crossover between track 2 and 3. Again start in the “upper right corner” and first make a single crossover from track 2 to 3, then the inverse for a full double crossover.
Now there will be buffer stops terminating track 2 and 3 into the station (for a 1-track station) or only at track 3 (for a 2-track station). This is no problem at all, since trains can go to all tracks from track 1 and 2, because of the switching solution you made.
And it makes is easy to upgrade to all 4 tracks later, because you have the straight track of rail outside, and can easily make a 4th parallel track and create the remaining crossovers, depending on the final switching solution you want to make.