Table of Contents Show
A collection of strategies I used to get every achievement via solo queue.
SMITE 100% Achievement Guide
Yo! In this guide I’ll go over every achievement and describe each one in as much detail as needed.
I’ll also make sure to keep this guide updated. Feedback is always welcome.
Main Strategy
The easiest way to get achievements ‘solo’ boils down to grinding Co-op Arena (Medium Bots).
Achievements become unlockable in Co-op if:
- The Game Mode is specifically Arena (it’s the only one that worked consistently for me)
- The Bot Difficulty is at least Medium
- The Game Lobby contains at least 3 Players in total (so at least 2 other randoms)
Whenever I mention ‘do this in Co-op’ in the guide, I mean this setup here.
Another, Easier Strategy
Solo queue is NOT the easiest way to go.
With 5-9 other people, you can queue against each other for anything that’s not casual Arena or Conquest on a ‘dead’ server (like Southeast Asia or Australia) and get literally any achievement you want in a controlled environment (if you can handle the lag).
General – Playing
Most of the general achievements are very straightforward and don’t really need guidance.
Most of these will be unlocked by just playing the game.
For the sake of 100%, here they are anyway:
All About the Conquest / Blood and Sand / Valiant Jouster / Master Assailant / Siege Breaker


Play 25 Matches of Conquest / Arena / Joust / Assault / Slash.
Omnitheist
Play a God of every Pantheon at least once.
- Arthurian (e.g. King Arthur, Merlin)
- Babylonian (e.g. Gilgamesh, Tiamat)
- Celtic (e.g. Cernunnos, The Morrigan)
- Chinese (e.g. Guan Yu, Hou Yi)
- Egyptian (e.g. Ra, Anubis)
- Great Old Ones (Cthulhu)
- Greek (e.g. Achilles, Zeus)
- Hindu (e.g. Agni, Shiva)
- Japanese (e.g. Amaterasu, Raijin)
- Maya (e.g. Hun Batz, Kukulkan)
- Norse (e.g. Odin, Fenrir)
- Polynesian (Pele, Maui)
- Roman (e.g. Bellona, Cupid)
- Slavic (Chernobog, Baba Yaga)
- Voodoo (Baron Samedi)
- Yoruba (Olorun, Yemoja)
Maxed Out
Reach Level 30.
This was the Max Level at first, but that was increased twice since then.
Fatality / Helping Hand

Get 100 Kills / Assists.
Perfect
Kill an enemy god without taking damage from them.
‘Securing’ a Kill counts.
Double Tap / Hat Trick / Quadra Kill / Penta Kill


Get 10 Double / 5 Triple / 1 Quadra / 1 Penta Kill.
Multikills are enemy god kills where each kill occurs within 10 seconds after the previous.
Can be unlocked in Co-op – A Hunter with some Crit items can easily get these there.
Can’t Stop This / Rampage

Get 50 Killing Sprees / Tower Kills.
Killing Spree = at least 3 Kills in one lifetime.
Bloodthirster / Combo Breaker

Get 10 First Blood / Shutdown Accolades.
First Blood = First Kill in a match; Shutdown = Kill a Player who has a Killing Spree.
Fast Blood
Kill an enemy god before the in-game timer hits 00:00.
Can be done in Co-op, but requires some Experience with Bot Aggro.
Survivor + Last Man Standing

Survive 50 battles with less than 10% Health (and be the only one to survive at least once).
Minion Mayhem + Last Hit

Kill 100 Minions, and 20 of them with basic attacks.
I Will Find Them! / Objective Killer + Objective Stealer


Destroy 25 Wards / Objectives (and steal 1 of them).
Objective Steal = Kill a Gold Fury / Bull Demon King etc. that was weakened by the enemy team.
Double Edged Sword
Win a game while your team has more than double the kills as the enemy team.
Should happen naturally.
Come Back + Reborn

Fall 4000 Gold behind, lose a Phoenix and still win.
Come Back is easiest in Conquest or Slash; Reborn is easiest in Joust.
Destructible
Conquest, Joust and Slash only. Destroy a tower within the first 8 minutes.
Easiest in Joust.
Hard Carry
Conquest only. Get 20 Kills in a single match and win.
Don’t pick the Support or Fill roles and inform yourself about the current Conquest Meta.
As you learn the game mode and improve, you will eventually have one good match.
Questions Later
Arena only. Hit every enemy god with basic attacks before getting hit yourself.
Should happen naturally when playing hunters.
Down to the Wire / Super Cheer

Arena only. Win with less than 20 / more than 100 tickets.
Should happen naturally, but can also be done in Co-op.
Beast Master + Beast Slayer

Slash only. Clear 20 Juggernaut Camps and kill 1 enemy Juggernaut.
General – Fighting
There are many fighting related achievements that aren’t directly related to playing specific gods.
Most of them will unlock naturally, and all of the these can be unlocked in Coop.
Good Game / 20 to 1

End matches with Kills/Deaths/Assists of 5/2/10 and 20/1/x.
Usually, these are easier to get using Hunters or Mages.
Line Them Up / Cleanup Crew

Hit / Kill 3 different enemy gods with 1 ability.
Easiest with an ult that covers a big area and deals lots of damage, like Poseiden’s Kraken.
Feel the Fury
Reach the maximum attack speed of 2.5.
Easiest with Hunters like Rama & Martichoras who can boost their attack speed with abilities or passives; just build all kinds of attack speed items.
Use your Fists
Kill an enemy god with the damage of a Guardian’s basic attack.
Going for a full damage build should make this easier.
Precise Shot
Get a double kill with the damage from ranged basic attacks.
Easiest with any hunter and some Crit items.
Heals for Days
Heal 10,000 Health in one match. Self-Heal doesn’t count.
Realistically doable with the following gods. The Meditation relic helps, too.
- Ra
- Aphrodite
- Hel
- Chang’e
- Sylvanus
- Terra
- Guan Yu
After Effect
Kill an enemy god after they killed you.
Usually occurs via DoTs, delayed damage or AoEs that don’t disappear on death.
Projectiles work too, but are a lot more difficult to do this with.
Deployed turrets or minions usually disappear on death and won’t work.
DoT options:
- Ah Muzen Cab (Bees)
- Aphrodite (Birds)
- Arachne (Venom Bite)
- Camazotz (Mini Bats)
- Charon (Spectral Surge)
- Kukulkan (Whirlwind)
- Medusa (Viper Shot)
- Nox (Ult)
- Raijin (Raiju)
- Zhong Kui (Expose Evil)
Delayed damage options:
- Cliodhna (Ult Traps)
- Cupid (Heart Bomb)
- Discordia (Ult)
- Ne Zha (Ring Toss)
- Scylla (Crush)
- Susano (Ult)
AoE options (that deal decent damage):
- Anubis (Hands)
- Hou Yi (Ult)
- Nox (Bubble)
- Poseidon (Whirlpool)
- Zeus (Ult)
Fooled You
Kill an enemy god with reflected damage.
Doable with Kuzenbo’s Shell, Nemesis’ Bubble and any god using the Thorns Relic.
Limit Them
Disarm or Silence 10 enemy gods.
Disarm = can’t use basic attacks; Silence = can’t use abilities.
Gods who can disarm:
- Bellona (Whip)
- Fafnir (Dwarf Jump)
- Nike (3-Hit Rend)
- Tsukuyomi (Swipes)
Gods who can silence:
- Amaterasu (Dash)
- Chaac (Ult)
- Charon (Spectral Surge)
- Eset (Dispel)
- Ganesha (Ohm)
- Hades (Shroud)
- Izanami (Ult)
- Nox (Bubble)
- Thanatos (Swipe)
That’s Far Enough!
Root or Cripple 15 enemy gods.
Root = can’t move; Cripple = can’t use jump or dash abilities.
Gods who can root:
- Artemis (Trap)
- Awilix (2nd ability)
- Baron Samedi (3rd ability)
- Cernunnos (2nd ability)
- Charon (3rd ability)
- Chernobog (1st ability)
- Cthulu (2nd ability)
- Cu Chulainn (Enraged 1st ability)
- Discordia (2nd ability)
- Erlang Shen (2nd ability)
- Gilgamesh (Ult)
- Kephri (3rd ability)
- Kumbhakarna (2nd ability)
- Martichoras (2nd ability)
- Neith (1st ability)
- Nox (1st ability)
- Osiris (Ult)
- Persephone (Ult)
- Ravana (3rd ability)
- Scylla (1st ability)
- Sylvanus (1st ability)
- Terra (Dashing through monolith)
- Thoth (1st basic attack after dash)
- Xing Tian (2nd ability)
Gods who can cripple:
- Ares (Chains)
- Artio (Vines)
- Awilix (2nd ability)
- Bakasura (Ult)
- Cupid (Ult)
- Discordia (Ult)
- King Arthur (Yellow Swipe)
- Loki (Ult)
- Persephone (Ult)
- Poseidon (Whirlpool)
- Rama (First basic attack after dash)
Up You Go!
Knock up 15 enemy gods.
Doable with:
- Ao Kuang (Ult)
- Atlas (2nd ability)
- Awilix (3rd ability + hit from behind)
- Bacchus (2nd ability)
- Cerberus (Ult)
- Chaac (Ult)
- Charybdis (3rd ability + passive)
- Cthulhu (Ult, 2nd ability)
- Cu Chulainn (Ult)
- Erlang Shen (Turtle)
- Ganesha (Dash)
- Geb (Shockwave)
- He Bo (3rd ability)
- Hercules (2nd ability)
- Horus (1st ability)
- Ix Chel (2nd ability)
- Jing Wei (1st ability)
- Jormungandr (3rd ability)
- King Arthur (Yellow 2nd ability)
- Maui (Ult)
- Morgan Le Fay (2nd ability)
- Mulan (Ult)
- Nike (3rd ability)
- Pele (2nd ability)
- Ratatoskr (Ult)
- Shiva (2nd ability)
- Sobek (1st and 2nd ability)
- Surtr (Ult)
- Susano (Ult)
- Sylvanus (Ult)
- Tiamat (Whirlwind-type Ult)
- Vamana (Dash)
- Vulcan (Meatball)
- Xing Tian (2nd ability)
Freeze
Stun 15 enemy gods.
Doable with:
- Achilles (1st ability)
- Agni (1st ability + any other ability)
- Amaterasu (3-Hit Ult)
- Anhur (2nd ability into wall)
- Anubis (2nd ability)
- Arachne (2nd ability)
- Ares (Ult)
- Artemis (Ult)
- Artio (Bear Roar)
- Bacchus (3rd ability)
- Baron Samedi (Ult)
- Bellona (Ult)
- Cabrakan (1st and 2nd ability)
- Cerberus (4-Hit Spit)
- Chang’e (Ult)
- Charybdis (Ult)
- Chronos (3rd ability)
- Cupid (Fully-charged Heart Bomb)
- Danzaburou (Ult)
- Eset (2nd ability)
- Fafnir (Dwarf Hammer, Dragon Spit, Dragon Jump)
- Fenrir (Fully-charged Jump)
- Geb (Ult)
- Gilgamesh (2nd ability)
- Guan Yu (Ult)
- Hachiman (Dash)
- Hercules (1st ability)
- Horus (2nd ability)
- Hou Yi (1st ability on marked)
- Ishtar (2-Hit 2nd ability)
- Kali (3rd ability)
- King Arthur (Blue Ult)
- Loki (Ult)
- Medusa (Ult)
- Mercury (Ult)
- Mulan (3rd ability)
- Ne Zha (3rd ability)
- Neith (Ult)
- Odin (3rd ability)
- Osiris (3rd ability)
- Ratatoskr (3rd ability)
- Serqet (Ult)
- Sun Wukong (Tiger Dash)
- Surtr (2nd ability)
- Terra (2nd ability)
- Thor (2nd ability and Ult)
- Tiamat (2nd ability)
- Tyr (Ult in Defensive Stance)
- Ullr (Axe Throw)
- Yemoja (2-Hit Pillars)
- Ymir (Freeze)
Jump! Jump! + Death From Above

Use 100 leap abilities and land 25 Kills with them.
Doable with:
- Anhur
- Awilix
- Baba Yaga
- Bacchus
- Bakasura
- Bastet
- Bellona
- Camazotz
- Cerberus
- Cu Chulainn
- Discordia
- Fafnir
- Fenrir
- Gilgamesh
- Hou Yi
- Hun Batz
- Kali
- Neith
- Nike
- Odin
- Osiris
- Ratatoskr
- Ravana
- Serqet
- Sun Wukong
- Thor
- Tiamat
- Tyr
- Ullr
- Xbalanque
- Xing Tian
General – Mastering
I split the mastery achievements into this section so that I can add some esoteric knowledge.
Basics
God Mastery only depends on Worshippers. It is not directly related to skill.
You get Worshippers after a match.
The longer the match took, the more Worshippers you get.
If you lose the match, you only get half (rounded down).
Time Thresholds
Based on my experience, you get +1 Worshipper every ~115 seconds of match time.
Some thresholds I try to keep in mind are:
- < 5:40 = 3 Worshippers
- 5:40 = 4
- 7:35 = 5
- 9:30 = 6
Boosting
Any Event’s bonus is applied first, Worshipper boosters second, Account boosters extra.
Events will always multiply the base amount of Worshippers you would normally get.
If you use a Worshipper-Booster, it will multiply the amount again.
If you have an Account-Booster active, it adds a ~20% bonus based on the base amount.
Mastering in Co-op
You can grind any God up to Mastery 4 in any Co-op mode.
Keeping the thresholds in mind, you can get 5 Worshippers every 10 minutes by farming bots in Arena (including queue and pick time). That’s 30 Worshippers per hour, without boosters.
Thus, you can casually reach Mastery 1 (which requires 50 Worshippers) within 2 hours.
This is both the easiest and fastest way to grind mastery.
How to speedrun God Mastery
- Wait for a 3x Worshipper event
- Grind Co-op Arena (easy) until you’re close to 4
- Queue for a solo Co-op Joust lobby (either play at early hours OR switch to a dead server)
- Draw the match out for as long as possible (make sure to attack a bot every ~2 minutes to avoid getting kicked) –> this lets you skip Mastery 4 after you finish.
- Queue for Normal Arena matches and try to stay sane (maybe listen to some music).
If every match gets boosted as much as possible, you can go from 0 to Mastery 10 within 7-10 hours. I’d recommend not using Worshipper boosters when you’re not close to Mastery 4.
With that knowledge in mind, these achievements await:
Love to Guard / Join the Hunt / Mage for Life / Assassin for Hire / Art of War


Master 5 Guardians / Hunters / Mages / Assassins / Warriors to Mastery 1.
Adept of Mastery
Master 40 Gods to Mastery 1.
Diamonds Are Forever
Master 1 God to Mastery 10.
Gods – Intro
Every God comes with 2 achievements.
One is usually easy, the other one is supposed to be challenging.
I’ll describe the strategies I used for them, but if you find better ones let me know.
Most of these can be done in Co-op. Any that can’t will get a note saying so.
Some of the strategies are very similar or repeat very often.
Still, to have everything in the right place, I’ll describe them again and again anyway.
Each God gets a section here, sorted alphabetically.
I’ll also give every achievement a difficulty rating, based on the easiest solo strategy.
- Very Easy = EZ first try
- Easy = Probably not first try
- Medium = Will take a few tries
- Hard = Requires some practice and luck
- Very Hard = Requires lots of practice, luck and patience
Achilles
The Crowd Cheers! Difficulty: Easy
“As Achilles, heal 12 times in a single use of Radiant Glory.”
Radiant Glory is Achilles’ 2nd ability.
For 6 seconds, every time another ability deals damage, Achilles gets some healing.
The amount of healing instances depends on the amount of enemies hit BUT there’s a limit.
If Radiant Glory is maxed, it can heal 4 times per ability use.
Thus, the idea is to hit 4 targets 3 times within 6 seconds:
- Max out Radiant Glory (can be done by LV 9)
- Wait for a minion wave to spawn
- Activate Radiant Glory
- Use every ability including the Ult on the minion wave (within 6 seconds)
Fatally Struck! Difficulty: Easy
“As Achilles get 2 or more executes with a single use of his Fatal Strike Ability.”
Fatal Strike is Achilles’ Ult.
Whenever an enemy falls below 30% Health, the Ult will execute that enemy on hit.
If the execution is successful, the Ult can be used again within 10 seconds.
Thus, just go for a double kill:
- Weaken two enemies to ~40% health
- Deal damage to target #1 until the execute mark appears
- Execute
- Repeat for target #2 (within 10 seconds)
Agni
The Heat! Difficulty: Easy
“As Agni, stun three or more enemy gods with Noxious Fumes.”
Noxious Fumes is Agni’s 1st ability.
After placing the ability, the resulting gas field can be detonated by using any other ability.
That detonation stuns, and needs to hit 3 enemy gods.
The easiest way to get this is at the start of a Co-op match:
- As the Co-op match starts, go to the enemy bots who should be waiting for their blue buff
- Place the fumes
- Detonate the fumes right away by using either remaining ability
Those Fumes Difficulty: Easy
“As Agni, get the killing blow with the damage from Combustion.”
Combustion is Agni’s Passive.
After hitting an enemy god with 2 basic attacks (or 4 on minions), the next use of Agni’s 2nd ability or Ult will deal additional DoT damage (for 3 seconds).
The idea is to get a kill with that DoT damage:
- Charge the passive by hitting basics (and keep it charged)
- Weaken a squishy enemy to ~30% health
- Use the 2nd ability to barely not kill the target
- If the enemy isn’t close to death, use basic attacks to push your chances
- Wait and hope for the best
Ah Muzen Cab
Disarm (aka Buzzkill) Difficulty: Very Easy
“As Ah Muzen Cab, use your abilities to keep bees on a single opponent for over 4s.”
This is about AMC’s passive.
Basically:
- Place a Hive (1st ability)
- Hit an enemy god with Honey (3rd ability) within the nest’s range
- Hit the same enemy again with Swarm (2nd ability)
How Sweet Difficulty: Very Easy
“As Ah Muzen Cab, pick up 5 stingers in a single match.”
Stinger is AMC’s Ult.
When it hits an enemy god, it will eventually be dropped and can be picked up again, which also significantly reduces the Cooldown of the Ult.
So:
- Hit the Ult on an enemy god
- After 4 seconds (or enemy death), pick up the Stinger
- Repeat
Ah Puch
Corpses aka Landmines Difficulty: Easy
“As Ah Puch, blow up and hit an enemy with 6 corpses in one cast of Corpse Explosion.”
Corpse Explosion is Puch’s 2nd ability.
It is a ground AoE that lets all corpses spawned by other abilities explode, dealing damage.
So, just put 6 corpses in one spot, wait for an enemy god, and press 2.
This is even easier in Co-op, since bots can be lured into said spot.
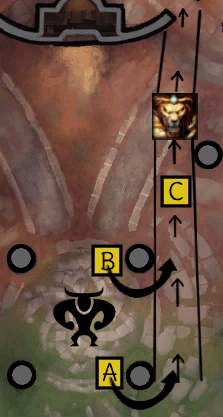
One fast strategy for Coop: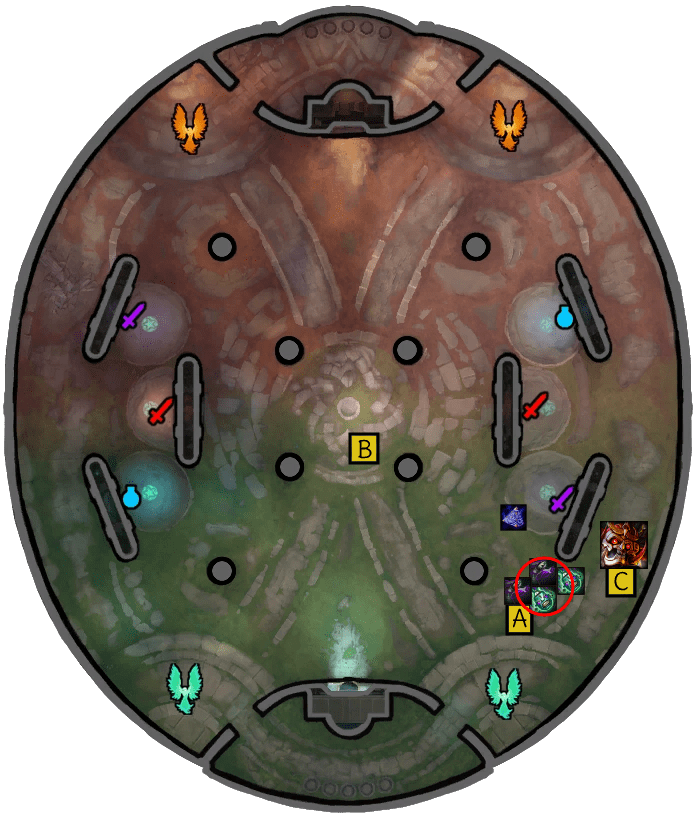
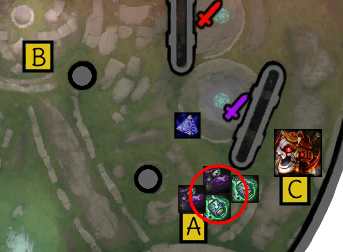
- As the match starts, prioritize placing 6 corpses at A
- After the buffs are cleared, aggro some bot at B
- Move past A towards C (bonus points for placing a ward on the way)
- Wait for the bot to be in range and blow up all 6 corpses
Rise my Pretties Difficulty: Very Easy
“As Ah Puch, release 100 Zombies in one match.”
Zombies are released via the 1st and 3rd ability.
Go for a build that reduces your cooldowns and just spam 1 and 3 for a few minutes.
Amaterasu
Reflect the Heavens Difficulty: Very Easy
“As Amaterasu, fully charge her mirror in one second.”
Amy’s Mirror starts charging after activating her 2nd ability.
You can charge the mirror by dealing & taking damage.
So, you can either…
- … clear a minion wave with Golden Blade and some attack speed
- … get attacked by all enemy gods at once (easiest when invading the blue buff in arena)
My Offense is Dazzling Difficulty: Medium
“As Amaterasu, hit three or more enemies with the final strike of your ultimate.”
Dazzling Offense is Amy’s Ult.
It’s a relatively short-range cone-shaped cleave that hits 3 times.
If you hit an enemy god with each hit, the final hit will stun.
The tricky part here is to hit three or more enemies.
In Co-op, bots almost never group up – except for 3 situations:
- At the very start, the entire team will go for the blue buff
- The entire bot team got wiped, just respawned and are leaving their base
- Your minotaur has spawned and bots are healthy (they will prioritize the objective)
The blue buff isn’t an option, since you can’t use the Ult before LV 5.
The other 2 options are possible, though.
So, you can try to…
- … go for a power-crit build, wipe all bots and then ult them as they leave their base
- … wait for a Juggernaut to spawn, then wait for bots to attack it, then ult them there
Anhur
Fury of the Desert Difficulty: Very Hard
“As Anhur, kill three enemies with a single Desert Fury.”
Desert Fury is Anhur’s Ult.
Basically, Anhur throws 8 spears in a line area (that goes through walls).
For this achievement, you need to finish off 3 enemy gods with the Ult.
The idea here is to line up the squishiest enemies, pressing 4, and praying.
With a pure power build, a full 8-hit Ult can easily hit for 50% of a squishy god’s health.
However, in Arena, you’ll rarely get a full build.
So instead, I’d recommend going for a quick crit build instead that can weaken the bots to low health with as few basic attacks as possible (1 power & 2 crit items worked for me).
The strategy I used for this is to carefully weaken bots and to line them up in their fleeing path.
When a bot falls below ~20% health, it will start to flee along a certain path.
There are a few paths the bot can follow to flee back to base; usually the closest one is picked.
If the bot is weakened in the center of the map near a pillar, their closest path takes them around the pillar, which buys you some time.
When the minotaur spawns, bots will usually aggro to it.
This is a good opportunity to setup the line-up, since bots often group up for this.
Once the minotaur is close to the center, you can start weakening the next-best bot near a low pillar, sending them on a long route during which you can weaken the next bot – which when repeated, enables a line-up.
So, step by step:
- Get power- or mobility-enhancing relics (Belt of Frenzy, Spear of Sunder / Blink)
- Build and fully stack Transcendence (or any other high power stack item)
- Build for maximum crit chance
- Get as many early kills as possible (to afford items and to keep bots weak)
- When the Juggernaut spawns, wait for Bots to attack it near the center of the map
- Weaken enemy #1 near A (lower pillar) until it starts fleeing
- Weaken enemy #2 and #3 near B (upper pillar) until the next one starts fleeing
- Jump forward to C while luring enemy #3 into the fleeing line
- Place a Pillar where needed (it can slow down and block out of line bots)
- Activate Frenzy
- Press 4
- Pray
Keep in mind, at the end of the day you just need a line-up of weakened bots.
That is a lot easier if you get certain gods into your team.
Good helpers are: Ares, Athena, Cerberus, Hades, Xing Tian.
Up Against the Wall Difficulty: Easy
“As Anhur, stun 10 opponents by impaling them into your Pillar.”
Shifting Sands is Anhur’s 1st ability: it places a Pillar on the targeted location.
Impale is Anhur’s 2nd ability: it knocks enemy gods back (and stuns them if they land in a wall).
The idea here is to place a pillar and impale an enemy into it, 10 times.
So: press 1, press 2, repeat.
Anubis
Mummified Difficulty: Very Easy
“As Anubis, stun 15 enemy gods using mummify in a single match.”
Mummify is Goobis’ 2nd ability.
It’s a projectile that stuns an enemy god on hit.
Simply put: get in range, press 2, repeat.
Where Am I? Difficulty: Easy
“As Anubis, kill an enemy with Death Gaze from Behind a Wall”
Death Gaze is Goobis’ Ult. It’s his famous laser.
As this achievement implies, this goes through walls.
I’m not sure if the pillars in Arena count as walls for this. Stick to the side-jungle if you want to go for this in Arena. I recommend going for this in Joust, where players often retreat behind walls, unlocking this achievement somewhat naturally.
So:
- wait until an enemy god is low health
- have a (non-player-made) wall between you and your target
- press 4
Ao Kuang
Water Illusionist Difficulty: Easy
“As Ao Kuang, kill an enemy with your water illusion.”
Water Illusion is Ao’s 1st ability.
It’s a short range teleport into stealth that leaves an illusion behind.
That illusion can be detonated by pressing 1 again. If nothing is pressed, the illusion detonates itself after some time.
The idea is to use that detonation to kill:
Just weaken a bot as much as possible, press 1, and quickly press 1 again.
A Mighty Sword Difficulty: Hard
“As Ao Kuang, execute an enemy God who’s been saved by Khepri’s Ultimate.”
Can NOT be done in Co-op
King of the Eastern Seas is Ao’s Ult.
It executes enemy gods that have less than 30% health.
Khepri’s Ult applies an obvious aura to a god, rendering them immune to death.
Executes still work, though, and the idea of this achievement is to prove that.
This is hard because you need to hope someone in the enemy team actually picks Khepri.
Also, that enemy Khepri needs to be able to use his Ult at the right time (which luckily happens more often if the Khepri is on the enemy team).
So, the solo approach here is just to grind Ao and hope for the best.
However, this can be boosted with the help of a friend:
- Both of you switch to a low-population server (South-East Asia, Australia)
- Both of you, separately, queue for Ranked 1v1 at the same time (similar divisions are necessary)
- Get into the same lobby against each other (check with weird bans – NOT Ao or Khepri, tho)
- Have your friend pick Khepri
- Pick Ao
- Get to LV 5
- Ult Khepri after he ults himself under 30% health
Aphrodite
Kiss Me! Difficulty: Easy
“As Aphrodite, apply your kiss to every God in the match. This includes allies and enemies.”
Kiss is Afro’s 1st ability.
It links her to other player gods or stuns enemy gods.
The quickest way to get the achievement is pick Aphro in a Ranked 1v1 match.
However, this is easily doable in any game mode.
Just make sure to hit everyone with this ability at least once.
My Lovely Lady Birds Difficulty: Very Easy
“As Aphrodite, get the killing blow with the damage from your birds.”
Love Birds is Afro’s 3rd ability.
It heals whoever is currently linked with Afro and deals DoT damage to anything in its AoE.
The damage output of this ability isn’t bad, so this will most likely unlock naturally.
Just use the ability in close range, so it doesn’t miss.
Apollo
My Chariot Awaits Difficulty: Medium
“As Apollo, hit an enemy with every tick from Across The Sky.”
Across The Sky is Apollo’s Ult.
After a short wind-up, Apollo goes up into the air, flying around until a target location is confirmed (or until Apollo runs out of mana, which is depleting constantly). After the target is confirmed, Apollo descends, dealing 4 ticks of damage over 0.8 seconds.
The goal is to hit each of those ticks on the same enemy god.
With some practice, you can reliably get this on any target.
This is a lot easier on targets that are stuck in place, though.
Allied gods with setups are helpful for this (Athena, Ares, Persephone…).
Enemy gods with stuck-in-place-ults are helpful, too (Ymir, Anubis, Hades).
Guaranteed success:
- Have an Ymir bot on the enemy team
- Reach LV 5 (preferably, build for Mana)
- When an Ymir bot hasn’t ulted in a while, use your ult
- Wait for an Ymir bot to use his ult
- Use the Ult on Ymir
Serenade Difficulty: Very Easy
“As Apollo, serenade at least three enemy Gods at once.”
Serenade is Apollo’s 2nd ability.
It mesmerizes enemies in a small area around Apollo.
So, just get close to some enemy gods and press 2.
The easiest way to go:
- As soon as the Co-op match starts, get beads and run towards the enemy team’s blue buff
- Walk into the crowd of bots (prepare to use beads)
- Press 2
Arachne
Arachnophobia Difficulty: Easy
“As Arachne, have your broodlings deliver the killing blow to an enemy.”
Web is Arachne’s 3rd ability.
It places a spider web wall that spawns 2 mini spiders when any enemy touches the wall.
Upon spawning, spiders will attack whoever touched the wall.
The goal is to have those spiders get a kill.
Walls can be stacked on top of each other, spawning more spiders.
Using the knowledge about the fleeing path from the Anhur section, this achievement is easily unlocked by:
- setting up multiple walls in the Arena’s side jungle (near the northern buff)
- luring any squishy bot to that side jungle’s southern buff
- weakening the bot with basic attacks (don’t use the 1st ability; building attack speed helps)
- watching the bot run into the walls, getting finished off by the spiders.
________________________________________________________________
Wrapped Up Difficulty: Very Easy
“As Arachne, successfully stun 3 or more enemy gods in a match with cocoon.”
Cocoon is Arachne’s 2nd ability.
It buffs the next 3 basic attacks, and if all 3 are hit on the same target it will stun that target.
So, get close enough to an enemy, press 2, hold left click, repeat.
Ares
Two Chains? Nah, Five. Difficulty: Hard
“As Ares, hit and pull five enemy gods at once with no escape.”
No Escape is Ares’ Ult.
It chains any enemy gods in an area around Ares and pulls them to him after 2.5 seconds.
There’s 3 problems with this one.
First, any targets hit must not be able to use beads.
Second, you need to survive until the pull happens.
Third, actually hitting 5 targets.
#1 isn’t too bad in Co-op, since bots will always use beads when you hit them with a chain.
#2 is (somewhat) solved by only building defensive items (preferably, Aura items).
#3 requires some luck and preferably a minotaur. Bots will always aggro onto that objective, so it’s your best chance to go for multi-target achievements like this one.
Step by step:
- Build defensively
- Force beads using the chains from Ares’ 1st ability
- Wait for the minotaur to spawn (while all 5 bots are alive)
- Wait until most bots started to attack the minotaur
- Aggro the melee bots using the chains (they should switch aggro to you after some ticks)
- Lure the melee bots towards the ranged bots
- Once all are close, press 4
- Don’t die
________________________________________________________________
Meltmaster Difficulty: Very Easy
“As Ares, incinerate two gods in one match with Searing Flesh.”
Searing Flesh is Ares’ 3rd ability.
Ares throws some flames, dealing tick damage to enemies in a cone before him.
The ability deals max-health relative damage on top of the usual magical damage, meaning it will pretty much always finish off enemies, no matter the build. So, just press 3 and ‘secure’ some kills.
Artemis
Stunville Difficulty: Very Easy
“As Artemis, stun three or more enemy gods with Calydonian Boar in one deployment.”
Calydonian Boar is Arte’s Ult.
It spawns the boar Tusky at Arte’s location, from where the boar starts to charge into enemy gods.
So:
- wait until 3 enemies are grouped up
- get in charge range
- press 4
________________________________________________________________
It’s a Trap! Difficulty: Easy
“As Artemis, cripple twenty five enemy gods with Transgressors Fate.”
Transgressor’s Fate is Arte’s 1st ability.
It places a trap on the ground, crippling, rooting and damaging any enemy god that steps on it.
Enemy players will usually disarm traps that are placed in relatively safe locations.
Enemy bots can be lured into any trap.
You can also place a trap right below a target, triggering it instantly.
25 triggered traps can be done in 1 match, just keep the ability on cooldown and you’ll be fine.
It’s probably cumulative (or glitched), since some players seem to get it somewhat randomly.
Artio
Invigorate! Difficulty: Easy
“As Artio, reach full stacks on her Invigorate, the passive effect of her Shapeshift ability.”
Shapeshift is Artio’s “Ult”. It’s a stance switch.
The ability adds a passive stack, which can be increased by hitting gods or minions with abilities.
You get 1 stack per ability (the bear roar counts, the vines don’t), and you need 8.
The ability needs to be levelled in order to obtain stacks.
You can easily get this by throwing abilities on a tanky bot.
Wait about 2 seconds after the first few abilities, because stacks may fall off before you can use another ability if you spam them too fast:
- Build cooldown reduction items (for shorter waiting times)
- Reach LV 5, put a point into the stance switch
- Aggro any tanky bot
- Go into bear stance
- Press 1
- Wait a bit
- Press 2
- Wait a bit
- Press 3
- Switch to human stance
- Press 1
- Wait a bit
- Press 3
- Switch to bear stance
- Press 1, 2, 3
________________________________________________________________
Mauled to Death Difficulty: Very Easy
“As Artio, kill an enemy God in her bear form with Maul Prey.”
Maul Prey is Artio’s 1st ability while in Bear stance.
It’s her hardest hitting ability.
Build some power items and this basically unlocks itself.
Athena
Defend Olympus Difficulty: Medium
“As Athena, get a kill with the damage from Defender of Olympus”
Defender of Olympus is Athena’s Ult.
After selecting an allied god, Athena winds up for 3.6 seconds, and then leaps to the targeted allied god, dealing damage in the landing zone.
With a full power build, this ability hits very hard, so at least damage shouldn’t be a problem.
This achievement is mostly about getting lucky, whether you go against enemies or players.
There’s 2 Co-op strategies I’d recommend trying for this:
A – The Minotaur way
- Build only power items
- Wait for a minotaur to spawn
- When bots start fighting each other, use the Ult on your favorite melee bot
- Hope for the best
B – The Buddy way
- Build some power, some defense items
- Once ready to Ult, stick to your assassin bot (= buddy)
- Get into a fight with the enemy assassin bot
- Make sure to get that bot’s aggro (press 2 + 3)
- Ult your buddy
- Hope for the best
________________________________________________________________
Face Me Difficulty: Very Easy
“As Athena, Taunt three ore more enemies with one confound.”
Confound is Athena’s 2nd ability.
It taunts enemy gods in a cone in front of Athena.
The easiest way to get this is to invade the enemy blue buff at the start of a Co-op match:
- As soon as the match starts, run towards the enemy team’s blue buff
- Dash close to the crowd of bots by pressing 1
- Press 2
Atlas
Orbital Cannon Difficulty: Easy
“As Atlas, damage 3 enemy gods with the travel portion of Gamma-Ray Burst with a single ultimate cast. This does not include gods in the initial damage area when it begins.”
Gamma-Ray Burst is Atlas’ Ult.
Atlas focuses a laser on a large circle area, which can be fired into a direction by pressing 4 again or by waiting for 5 seconds.
As the achievement description tries its hardest to explain, the laser needs to hit 3 enemy gods as it is fired along a direction. It goes across the entire map, so you could get this by randomly firing the laser at the start of an Assault match.
However, in Co-op, there are 2 more reliable strategies:
A) – The Minotaur way
- Wait for your minotaur to spawn
- Wait until enemies group up around it
- Fire your laser towards the enemies by the minotaur
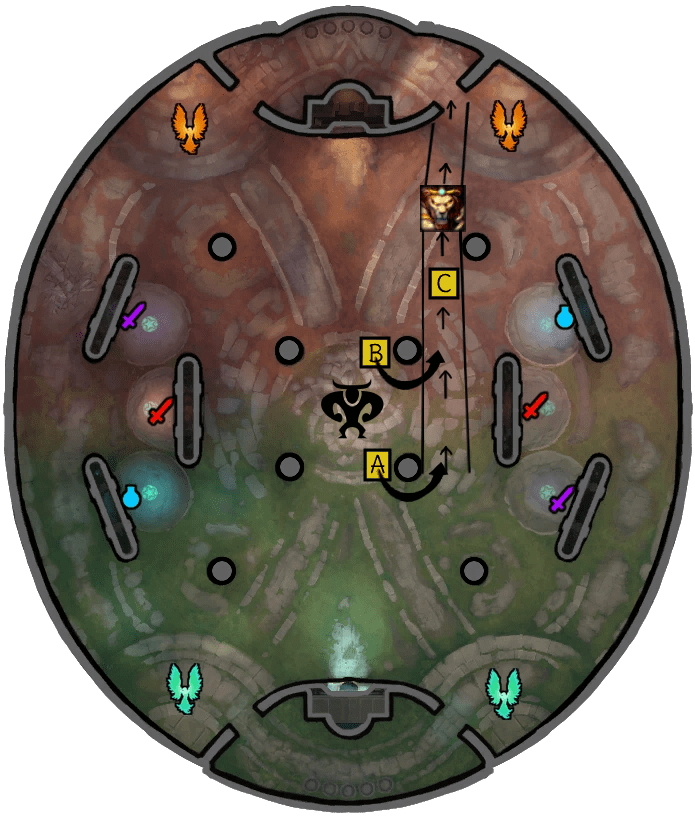
B) – The Spawnkill way
- Wait until all (or at least 3) bots are dead at the same time
- Near their base, wait for them to respawn
- Prepare your laser
- Fire your laser towards the exit the respawned bots are exiting from
________________________________________________________________
Are you burdened? Difficulty: Easy
“As Atlas, remove the burdens of 3 allied gods and hit an enemy god in the same Kinetic Charge.”
Kinetic Charge is Atlas’ 3rd ability.
He dashes forward, buffing allies in his way and stopping upon hitting an enemy god.
The dash goes relatively far, so this boils down to having allies around.
So:
- Wait for a team fight
- Dash through as many allies as possible
- Finish your dash by colliding into an enemy god
Awilix
Pretty Kitty Difficulty: Easy
“As Awilix, kill an enemy God with the damage when you jump from Suku.”
Summon Suku is Awilix’s 1st ability.
Awilix mounts her panther, and when pressing 1 again, jumps forward, dealing decent damage in the landing zone. Getting a kill with this mostly boils down to timing.
Step by step:
- Build power items
- Prioritize levelling the 1st ability (but have 1 point in the other ones first)
- Weaken a squishy bot until it starts fleeing
- Press 1, twice
________________________________________________________________
Get Over Here Difficulty: Very Easy
“As Awilix, pull a knocked up enemy god to you using Gravity Surge.”
Gravity Surge is Awilix’s Ult.
Whenever an enemy god is knocked up within a certain range, they are marked.
Pressing 4 in that moment pulls them.
Simply use the Ult correctly, once.
If you use Awilix’s 3rd ability and hit an enemy god from behind with it, that god will be knocked up.
Using that, you can pull this off as soon as you reach LV 5.
Baba Yaga
The Cabin Difficulty: Easy
“As Baba Yaga, gain 50 stacks on your items in a single game, utilizing the power from your Cabin.”
Creeping Cabin is Baba’s Passive.
As Baba’s house runs around, it generates energy, which can be turned into stacks for any stack items you may build. Simply get close enough to the house, and any energy will be consumed.
This one takes a few minutes:
- Build Warlock’s Staff and/or Book of Thoth
- Go for some walks around the map
- Check by your house to consume its energy
- Repeat
________________________________________________________________
The Perfect Brew Difficulty: Easy
“As Baba Yaga, successfully hit an enemy god with a brewed potion that uses 5 of the same type of ingredient.”
Baba’s Brew is Baba’s 2nd ability.
Baba creates a potion that can be thrown to deal damage.
For this, she picks a number of random ingredients that will influence the potion’s impact.
The number of ingredients depends on the ability’s level – you’ll get 5 if it’s maxed out.
This boils down to getting a bit lucky:
- Prioritize levelling the 2nd ability (should be maxed by LV 9)
- Always keep 1 consumable slot free
- Create potions whenever possible
- If you don’t get the same ingredient 5 times, throw it away
- If you get it, store the potion by cancelling the ability
- Get close to some enemy
- Don’t miss the throw
Bacchus
Everybody Getting Tipsy Difficulty: Easy
“As Bacchus, intoxicate three or more enemy Gods at once.”
Intoxicate is Bacchus’ Ult.
It deals damage to enemies in a circle around Bacchus, intoxicating them in the process.
The idea is to hit 3 enemy gods with this Ult, which luckily has a decent range.
- Wait for your minotaur to spawn
- Wait until enough enemies group up around the minotaur
- Get in range
- Press 4
________________________________________________________________
Bottoms Up Difficulty: Easy
“As Bacchus, keep your Drunk-o-meter in smashed for Five minutes.”
Chug is Bacchus’ 1st ability.
It buffs Bacchus and fills his Drunk-O-Meter passive, making him tankier.
The idea here is to spam 1 for 5 minutes.
Waiting too long or dying resets the timer.
Bakasura
My Minion Difficulty: Very Easy
“As Bakasura, eat twenty five minions using Eat Minion in a single match.”
Eat Minion is Baka’s 2nd ability.
This consumes a lane minion or low health buff camp monster.
Each consumed minion will stack Baka’s Ult.
While the Ult stacks cannot go over 6, you can still consume minions.
Thus, this achievement should be unlockable by spamming 2 near minions.
________________________________________________________________
The Butcher Difficulty: Very Easy
“As Bakasura, get three kills on enemy Gods with the damage from Butcher Blades.”
Butcher Blades is Baka’s 3rd ability.
It buffs Baka’s damage output.
With an attack speed build, it should be easy to finish off any enemy god using this buff.
The three kills do not need to be consecutive, they just need to happen in the same match.
Baron Samedi
Spread The Fun Difficulty: Easy
“As Baron Samedi, cause 3 enemy gods to be above 30 Hysteria at the same time.”
Hysteria is Samedi’s Passive.
Enemy gods hit by Samedi get ‘stacks’ of a Hysteria debuff, which basically makes them more vulnerable against Samedi and his abilities. You can see the amount of Hysteria you applied in the indicator bar that shows up next to the god’s health bar.
A single basic attack applies about 5 Hysteria.
The 1st ability applies 15 per line that was hit (= 30 if both hit).
The 2nd ability applies 20.
The 3rd ability applies 25 (5 per tick).
The Ult applies 5 per tick, but 100 on collision.
If done right, the Ult alone can unlock this achievement.
The debuff falls off over time; it takes ~12 seconds to fall from 30 to 0.
In Co-op, this achievement can be done quickly:
- Run towards the enemy team’s blue buff when the match starts
- Hit at least 3 bots with your 2nd ability
- Hit the same 3 bots with your 1st ability (the closer, the easier)
- Use your 3rd ability and/or basic attacks to make up for any misses
________________________________________________________________
Brush With Death Difficulty: Medium
“As Baron Samedi, heal yourself or an ally with Consign Spirits while they are below 5% of their HP.”
Consign Spirits is Samedi’s 2nd ability.
It’s a ground target AoE that deals damage and heals Samedi and any allied gods near him, if it hits. There is a ~0.5 second delay, so it may take some practice to hit this consistently.
The idea here is to almost die, finding a target, pressing 2, and not missing.
So, it’s mostly about finding a way to weaken yourself in a safe manner.
Keep in mind: HP5 may regenerate your health above the threshold if you’re too slow to find a target, so to play it safe, you’d need to go as low as possible.
I recommend to let the jungle monsters do the job for you (at the start of the match):
- After the buff camps spawn, attack your side’s red buff
- Don’t actually kill the monster, get as low on health as possible instead
- Bots should start fighting in the center of the arena
- As soon as you’re low enough, quickly move towards the center
- Search for a target
- Press 2
Bastet
Cat Scratch Difficulty: Easy
“As Bastet, deliver the killing blow to an enemy God in a single match with the damage from your Cats.”
Ensnaring Claw is Bastet’s 3rd ability.
It spawns a cat and sends it forward, damaging and rooting an enemy god on hit.
While the cat’s basic attacks are very weak, the initial on-contact-hit should be able to finish off a weakened enemy god.
So:
- Get close to a squishy bot
- Weaken the bot your 1st and 2nd abilities (+ some basic attacks)
- When the bot starts running away, press 3
________________________________________________________________
Where’s My Kitties? Difficulty: Very Easy
“As Bastet, release 45 cats in a single match.”
The (old) steam description says to use the Ult for this, but that’s not true (anymore).
You get this by spamming 3. No need to hit anything, just keep it on cooldown.
Having some cooldown reduction items in your build will help for this achievement.
Hitting your Ult probably also counts as +1, but the 3rd ability is a safe bet.
Bellona
Master At Arms Difficulty: Easy
“As Bellona, kill an enemy after having hit them with each of your weapon stances.”
Shield Bash is Bellona’s 1st ability. Bellona goes Sword & Shield mode.
Bludgeon is Bellona’s 2nd ability. Bellona goes Hammer mode.
Scourge is Bellona’s 3rd ability. Bellona goes Whip mode.
All abilities have some other effects too, but only the weapons matter for this.
Hammer mode deals the most damage, so I recommend this combo:
- Hit a basic attack with Bellona’s default sword mode
- Press 3 and hit a basic attack in whip mode
- Press 1 and hit a basic attack in sword & shield mode
- Press 2 and finish off the enemy in hammer mode
________________________________________________________________
Rally Here! Difficulty: Easy
“As Bellona, kill 10 enemy Gods with the damage from Eagle’s Rally.”
Eagle’s Rally is Bellona’s Ult.
Bellona leaps to a targeted location, dealing damage in a small area and creating a buffing area.
It has a nice range to finish off fleeing targets.
This does not need to be done in 1 match.
This achievement seems to be glitched and already unlocks after a single Ult kill, not 10.
If it isn’t glitched for you, just keep going until it unlocks.
Cabrakan
Tremors Difficulty: Easy
“As Cabrakan, keep an enemy stuck in a single Tremor for six seconds.”
Tremors is Cabroken’s 3rd ability.
Cabroken slams the ground for up to 10 seconds, causing an earthquake circle that makes enemies in range tremble. The effect stops when the ability is cancelled or when Cabroken gets CC’d. It’s a nice follow-up action after catching someone with Cabroken’s Ult.
Against bots, any melee bot makes a perfect target for this.
Just get close to the enemy assassin, warrior or guardian bot, press 3, and hope they won’t use CC.
________________________________________________________________
Shield Smash Difficulty: Very Easy
“As Cabrakan, get max stacks on your Refraction Shield and stun an enemy God with it.”
Refraction Shield is Cabroken’s 2nd ability.
It has a passive that converts instances of damage taken into protection stacks.
You can see how many stacks you have on the gem-like passive meter.
If the gem looks complete, the next use of Cabroken’s 2nd ability will stun.
In Co-op, you can get this at the start of the match:
- As the match starts, run towards the enemy blue buff
- Run into the crowd of bots
- Take damage until the passive meter is full
- Press 2
Camazotz
Vampirism Difficulty: Medium
“As Camazotz, obtain the Vampirism Buff from his Vampire Bats Ability 6 times in a single match.”
Vampire Bats is Camazotz’ 2nd ability.
It shoots some bats forward, damaging and debuffing the first target hit.
After 3 seconds, the bats return and heal Camazotz.
If the target had a any type of jungle buff, Camazotz gets a stack of ‘Vampirism’.
This achievement is easier outside of Co-op.
Bots usually don’t take buffs. They only take a buff if you lure them on top of one (and that’s only possible if they cleared them in the first place). So, to avoid extra effort and RNG, I recommend sticking to Normal Arena or Joust for this.
Just make sure to focus Buff holders and hit them with your bats.
________________________________________________________________
Bat out of Hell Difficulty: Medium
“As Camazotz, hit 3 gods with a single swoop of his Bat Out of Hell Ability.”
Bat Out of Hell is Camazotz’ Ult.
Camazotz flies into the air and may swoop forward, dealing damage, up to 3 times.
The AoE range of a single swoop isn’t very big.
You need a situation in which enemy gods are grouped up.
With the right ally god on your side, this can be very easy.
Especially useful are gods with taunts (Athena, Erlang Shen) or mass-displacement (Ares, Cerberus, Xing Tian, Hades).
If you don’t want to rely on other gods, there’s 2 ways to do this In Co-op:
- wait for your minotaur to spawn, and use your Ult on bots that group up for that objective
- kill at least 3 bots, wait for them to respawn, and use your Ult as they try to leave their base
Cerberus
Stygian torment Difficulty: Medium
“As Cerberus, hit every member of the enemy team with a single cast of your Stygian Torment Ability.”
Stygian Torment is Cerb’s Ult.
It knocks nearby enemy gods up into the air and throws them to a targeted point in front of Cerb.
For this achievement, the entire enemy team only needs to be hit by the initial circle AoE.
In Co-op, there’s 2 strategies you can go for:
A) The Minotaur way
- Wait for your minotaur to spawn (while all bots are alive)
- Wait for the bots to aggro the minotaur
- Get the aggro of any melee bots (by pressing 1 & 2)
- Lure the melee bots closer to the ranged bots
- Press 4
B) The Base way
- Get the Blink relic (Beads are helpful, too)
- Wait until all bots are dead at the same time
- Near their base, wait for them to respawn
- As they group up while leaving, blink into their tower
- After getting aggro’d, adjust your position until everyone’s in range
- Press 4
________________________________________________________________
Soul Expulsion Difficulty: Easy
“As Cerberus, consume the soul of every enemy God in the game with the use of his Soul Expulsion Ability.”
Soul Expulsion is Cerb’s 3rd ability.
Cerb leaps forward, deals some damage in the landing zone and severs the souls of hit enemies.
The souls can be consumed by attacking them with ~4 basic attacks.
I recommend going for each enemy god individually, since the souls will disappear after some time.
The quickest way to get this achievement is by picking Cerb in Ranked 1v1. However, if you value your rank, stick to other game modes.
Cernunnos
Pigging Out Difficulty: Easy
“As Cernunnos, kill 1 enemy God who is currently polymorphed from your Wild Hunt Ability.”
The Wild Hunt is Cern’s Ult.
It’s a big circle AoE that deals damage to all enemy gods hit and polymorphs them for 1.5 seconds. The polymorph can be beads’d.
Easiest way to go:
- Build attack speed and crit items
- Target a squishy bot
- Force their beads by pressing 2
- Press 4
- Hold left click
________________________________________________________________
Seasons Shift Difficulty: Easy
“As Cernunnos, kill 1 enemy God who is currently afflicted by Autumn Decay Debuff while Cernunnos is in a different stance from the Shifter of Seasons Ability.”
Shifter of Seasons is Cern’s 1st ability.
Cern’s basic attacks obtain a passive bonus effect based on the Season given by this ability.
Spring Season (Green) adds extra life steal.
Summer Season (Yellow) adds some bonus damage.
Autumn Season (Brown) adds a protection-reducing debuff.
Winter Season (Blue) adds a slowing debuff.
Pressing 1 progresses the passive effect to the next season.
Easiest way to go:
- Build attack speed and crit items
- Target a squishy bot
- Be in Autumn Season
- Weaken bot with basic attacks
- Press 1
- Finish off the bot within 10 seconds
Chaac
Hello, is this Storm? Difficulty: Easy
“As Chaac, hit three or more enemy Gods at once with Storm Call.”
Storm Call is Chaac’s Ult.
Chaac charges up his axe and slams it into the ground, dealing damage to all enemies in a big circle around him (+ knock up & silence).
To hit 3 targets, you can either use your Ult on bots as they…
- … group around your minotaur.
- … respawn as a group and leave their base.
________________________________________________________________
The Slow Dance Difficulty: Very Easy
“As Chaac, slow three or more enemy gods with Rain Dance.”
Thunder Strike is Chaac’s 1st ability. He throws his axe, leaving a silhouette.
Rain Dance is Chaac’s 3rd ability. It creates some rain around him, healing him and slowing enemies. If there is an axe silhouette when activating the 3rd ability, a rainstorm will spawn there.
The rainstorm is the best way to slow enemies in a larger area.
The easiest way to get this is to invade some bots:
- As the Co-op match starts, run towards the enemy blue buff
- Press 1
- Press 3
Chang’e
My Hips Don’t Lie Difficulty: Medium
“As Chang’e, evade an enemy ability using Moonlit Waltz that would have hit you for 500 damage or more.”
Moonlit Waltz is Chang’e’s 2nd ability.
Chang’e performs an evasive spin, making her invulnerable and immune to CC.
In Co-op, the only ability that’s easy to invuln and deals 500 damage is Ymir’s Ult.
So,
- Keep playing matches until there’s an Ymir on the enemy team
- Wait for Ymir to Ult when he hits LV 9 (LV 5 might be too weak)
- Press 2 right before Ymir’s Ult circle is completely charged
This might be easier outside of Co-op.
Janus, Kukulkan, Poseidon, Scylla, Thoth and Vulcan all have hard-hitting but slow Ults, making them good candidates for this achievement.
________________________________________________________________
Jade, Go Difficulty: Very Easy
“As Chang’e, send Jade to buy 10 Items in a single match.”
Jade Rabbit is Chang’e’s Passive.
She can send her pet rabbit to the base to buy any item.
You can probably just walk right outside your base and buy 10 potions to get this quickly.
If it needs to be non-consumable items, just keep your items in focus. When any icon blinks, you can afford an upgrade.
Simply make sure to buy and upgrade items outside of your base.
Charon
The Underworld Calls Difficulty: Hard
“As Charon, hit 5 enemies from at least 500 units away with Summon Styx in one game.”
Summon Styx is Charon’s Ult.
After a short wind-up, Charon sends a wide wave forward, which travels across the entire map.
Only God hits count for this.
You don’t need to hit 5 gods with 1 Ult; Using 5 Ults that hit 1 god each works, too.
This is either an absolute guessing game if done solo or really easy if done with a friend.
In Arena, you can reach a distance of 500 by using the Ult from the back wall in your base.
From there, you need to hit enemies in their base.
The Ult’s wave travels for ~12 seconds.
Via Co-op solo queue, the strategy that worked for me is:
- Build cooldown reduction items
- Whenever your Ult is ready, position yourself at the back wall of your base
- As soon as a bot dies, aim your ult either slightly left or slightly right
- Press 4
- Guess the exit the respawned bot will move towards, aim there and fire the Ult
- Watch as your wave hits or misses
- Repeat
If there is an enemy who is AFK, you can aim for that one, making this really easy.
In Co-op, a bot will always leave if someone in your team leaves, so:
- Queue for Co-op with a friend
- Once the match starts, have that friend leave the match
- Ult the AFK bot from the back of your base, 5 times
________________________________________________________________
Tough Customer Difficulty: Medium
“As Charon, gain 250 or more Max Health from Ferryman of Souls in one game.”
Ferryman of Souls is Charon’s Passive.
Whenever a minion or friendly jungle camp dies, they drop a coin.
Charon can collect up to 20 coins, which are turned into extra health once he enters his base.
Each coin gives 2 health; this effect goes up to 350 bonus health.
250 health means you need to collect 125 coins, which isn’t too bad in casual game modes.
In Co-op, it’s a bit more challenging, since matches are usually not very long and your minions don’t always die.
This should unlock naturally within a few casual games.
If you focus on coins, this takes ~10 minutes.
Still, here’s some advice for doing this in Co-op:
- Stick to your minions, let them die, make sure to collect as many coins as possible
- Turn coins into health when you have more than 10
- Avoid fights to drag out the game as long as possible
- Go for jungle monsters when possible
- Also kill the treasure chests + treasure chests mobs when possible
Charybdis
Drown your Sorrows Difficulty: Easy
“As Charybdis, hit 3 enemy gods with a fully charged Capsize in the same fire.”
Raging Tides is Charybdis’ Passive. Hitting basic attacks fills a Tide meter.
Capsize is Charybdis’ 2nd ability. It’s a far reaching cone AoE that deals damage and slows.
The 2nd ability can be charged depending on the current Tide.
If you have at least 40% Tide, the ability’s cone gets wider and deals more damage.
In Co-op, there are 3 ways to do this:
A) – The Invade way
- At the start of the match, run towards the enemy blue buff
- Carefully aggro 1 bot
- Fill your passive to about half the meter using basic attacks
- Get closer to the blue buff again, while charging the cone
- Hit as many bots as possible
B) – The Minotaur way
- Fill your passive
- Wait for your minotaur
- Wait for bots to group up around it
- Charge and hit the 2nd ability
C) – The Base way
- Kill at least 3 bots to have them respawn at the same time
- Make sure your passive is filled
- Wait for bots to respawn and exit their base
- Charge and hit the 2nd ability
________________________________________________________________
The Monster Inside Difficulty: Hard
“As Charybdis, reset your Ultimate two or more times in a single use.”
The Maw Hungers is Charybdis’ Ult.
It’s a push into cone AoE bite that can be used again if the bite kills a hit enemy god.
This ability is slow, hard to hit, and the damage is often not enough to secure a kill.
For this achievement, it is necessary to get a double kill with this.
In Co-op, this can be done at any point as soon as 2 low-health enemies are around.
To get the resets, the bots need to be killed individually.
I recommend to wait for a team fight and letting your team help you for this:
- When a fight breaks out, lure 1 bot away from your team
- Weaken that bot
- Press 4 and finish off the bot
- Hope there’s a weakened double-kill target by now
- Find and ‘secure’ that target
Chernobog
True Nightmare Difficulty: Medium
“As Chernobog, kill 2 gods after landing and buffed by Living Nightmare.”
Living Nightmare is Chernobog’s Ult.
Chernobog goes up into the air and can then choose an enemy god to fly to.
Upon landing, his cooldowns reset and he gets some buffs that last for 6 seconds.
The goal is to get a double kill within those 6 seconds.
In Co-op, the most reliable way to go is the good old minotaur:
- Build crit and attack speed items
- Wait for your minotaur
- Wait for bot to fight around the minotaur
- Press 4
- When bots are losing health, target any bot that’s close to another
- Hold left click
________________________________________________________________
Fear of the Night Difficulty: Very Easy
“As Chernobog, utilize your Crystallized Curses and Vicious Barrage combo to root 3 enemy Gods at once.”
Crystallized Curses is Chernobog’s 1st ability. It throws a crystal on the ground.
Vicious Barrage is Chernobog’s 2nd ability. It shoots a piercing projectile.
If the projectile pierces the crystal, the crystal explodes, rooting everyone in range.
In Co-op, you can perform this combo very early:
- As the match starts, run to the enemy team’s blue buff
- Get in ability range to the crowd of bots
- Press 1
- Press 2
Chiron
Marks for Everyone! Difficulty: Very Easy
“As Chiron, hit three or more enemy gods with Masterful Shot.”
Masterful Shot is Chiron’s 2nd ability.
Basic attacks and Chiron’s 1st ability apply a mark on hit enemies that lasts for 3.5 seconds.
Pressing 2 within that time fires seeking arrows, which will deal some damage.
In Co-op, you can get this achievement very quickly:
- At the start of the match, run towards the enemy team’s blue buff
- Get in range for your 1st ability
- Press 1
- Press 2
________________________________________________________________
3 for 3 Difficulty: Very Hard
“As Chiron, get a triple kill while in your Ultimate, Centaurus.”
Centaurus is Chiron’s Ult.
Chiron may shoots up to 3 slow, long-range, piercing projectiles.
The idea is to get a kill with each shot.
The main problem is that each shot doesn’t deal much damage.
In Co-op, there are 2 strategies for this:
A) The fleeing path way –> see Anhur
Just like Anhur’s triple kill achievement, you can get this one by lining up bots in their fleeing path.
B) The team-player way
The idea here is to go for a simple double kill by yourself while hoping that the 3rd kill becomes ‘securable’ before the Ult runs out:
- Build power items and get a damage boosting relic (like Frenzy)
- Look for 2 somewhat close, squishy bots
- Weaken bot #1 until it starts fleeing
- Quickly weaken bot #2 until it starts fleeing
- Activate Frenzy
- Snipe bot #1 (should still be in range if you’re quick enough)
- Finish off bot #2
- Pray that your team is currently fighting, and ‘secure’ bot #3
Both strategies require practice and luck.
Try to get a feeling for how much damage you need to weaken, and try different builds.
For me, bloodforge -> asi -> jottun’s wrath did the job in the end, but crit is probably also viable.
Chronos
The Hands of Time Difficulty: Easy
“As Chronos, get a kill during the passive buff from each quadrant of Accelerate.”
Accelerate is Chronos’ 2nd ability.
It comes with a passive Wheel of Time, which acts as a 4-quadrant-clock with a spinning handle.
Upon pressing 2, the handle stops spinning, buffing Chronos based on the quadrant it stopped in.
Quadrant #1: +1% Max Health Heal per second
Quadrant #2: Mana costs become 0
Quadrant #3: +35% Magical Power
Quadrant #4: +35% Magical Power for Basic Attacks
The buff lasts 7 seconds.
The idea here is to get 4 kills in a single match, where each kill happened in those 7 seconds of each quadrant. The timing for this may take some practice, especially when you’re dealing with lag.
I recommend to weaken your target a bit first before pressing 2.
________________________________________________________________
Re-Rewind Difficulty: Hard
“As Chronos, use your Rewind Ability while you’re below 15% Health and return back to full health.”
Rewind is Chronos’ Ult.
Chronos rewinds back 8 seconds, restoring his health and mana to as it was back then.
The challenge here is to fall below 15% within a few seconds.
Usually, the fastest way to take damage is to be in the center of a team fight. However, since Chronos isn’t particularly tanky, that’s not a reliable way to get this achievement.
In Co-op, you can weaken yourself quickly by diving into the enemy team’s base:
- When you’re full health, wait until there are no bots near their base
- Walk through the tower area into the base (the tower will shoot once)
- Take a few steps in the enemy base
- Walk back through the tower area to where you started (the tower will shoot once, again)
- After surviving the second tower shot, press 4
Cliodhna
You Cannot Hide Difficulty: Easy
“As Cliodhna, slay two enemy gods while inside a wall with either Banshee’s Wail or Tearing the Veil in a single match.”
Banshee’s Wail is Cliodhna’s 1st ability. It’s a cone AoE scream that deals damage and deafens.
Tearing the Veil is Cliodhna’s Ult. It’s a rift deals initial damage and some follow up tick damage.
Phantasmal is Cliodhna’s Passive. It lets Cliodhna enter walls.
Inside a wall, Cliodhna’s 1st ability becomes a half-circle AoE and her Ult can be set up as a trap.
The easiest way to do this:
- Weaken a squishy bot until it starts to run away
- Quickly move forward and enter a close wall or pillar (Blink helps)
- Press 4
- Repeat
________________________________________________________________
Jump Scare Difficulty: Easy
“As Cliodhna, damage an enemy god within 3s of leaving a wall 10 times in a single match.”
Lurching Claw is Cliodhna’s 3rd ability.
Cliodhna dashes forward and does a claw swipe at max range (or when pressing 3 again).
This can be used inside walls – which leaves the wall.
Simply keep entering walls and make sure to dash out of them.
Cthulhu
Shattered Mind Difficulty: Hard
“As Cthulhu, reach full stacks of Sanity Break in a single match.”
Sanity Break is Cthulhu’s 1st ability.
It’s a short-range cone AoE that deals damage.
If a hit enemy god is insane, Cthulhu receives a permanent stack that increases his defense.
It takes 20 stacks to reach the limit.
The main problem here are random players, who might end the match before you’re done stacking.
Stacks are easy to farm on tanky bots:
- Build attack speed (and maybe lifesteal) items
- Approach a tanky bot (preferably with your dash)
- Hold left click until you see an aura around the bot
- Press 1
- Repeat
________________________________________________________________
Whisper of the Old Gods Difficulty: Easy
“As Cthulhu, drive each enemy god insane at least once during a single match.”
Prey on Fear is Cthulhu’s Passive.
Hitting enemy gods afflicts them with stacks of Torment, which last 5 seconds.
When reaching 4 stacks, Torment turns into Insanity.
The final hit of a basic attack chain applies 1 stack of Torment.
The 1st ability applies 2 stacks when hit from the front, or 1 when hit from the flank or rear.
The 2nd ability applies 1 stack per hit (max 2).
The 3rd ability applies 1 stack when the dash hits and 1 more stack if the dash projectile hits.
The Ult applies stacks over time.
The goal is to have every god on the enemy team reach 4 stacks.
Simply spam your abilities and this should happen naturally.
Cu Chulainn
Berserker Difficulty: Easy
“As Cu Chulainn, transform into Berserk mode by hitting at least 2 gods with the Spear of Mortal Pain Ability.”
Berserk is Cu Chulainn’s Passive.
Instead of Mana, he utilizes Rage, which builds up by dealing and taking damage.
If Cu Chullain or an ally takes damage, it adds 0.5 Rage.
Basic attack hits add 1 Rage.
The 1st ability and 3rd ability each add 5 per hit minion, 8 per hit god (max 18).
The Ult adds 10 per hit minion and 26 per hit god (max 36).
After reaching 85 Rage, he transforms into Berserk mode.
Spear of Mortal Pain is Cu Chulainn’s Ult (outside of Berserk mode).
He swings his spear in a big circle, dealing damage and knocking up enemies.
Logically, you get this achievement by:
- being at 50 Rage
- finding 2 enemy gods that are near each other
- pressing 4
________________________________________________________________
Strategist Difficulty: Easy
“As Cu Chulainn, kill an enemy within 2 seconds of firing the Barbed Spear Ability and live.”
Barbed Spear is Cu Chulainn’s 1st ability (outside of Berserk mode).
It’s a spear thrust that hits a short area in front of Cu Chulainn.
In Co-op, you can do this as often as you want once you have some items:
- Build attack speed and crit items
- Weaken a squishy bot to ~40% health
- Press 1
- Finish the bot off by holding left click
Cupid
Spread the Love Difficulty: Very Easy
“As Cupid, heal each of your teammates by using Share the Love.”
Share the Love is Cupid’s 2nd ability.
It spawns 3 floating hearts that heal any ally that picks it up.
The easiest way to get this is by playing a normal match of Joust.
Just throw some hearts and hope your teammates don’t purposely avoid your pickups.
________________________________________________________________
The Power of the Heart Difficulty: Very Hard
“As Cupid, Kill three or more gods with the damage from Heart Bomb.”
Heart Bomb is Cupid’s 1st ability.
It fires a sticky bomb arrow that detonates after 3 seconds, dealing damage in a small circle area.
When the ability is maxed, it deals 170 damage when it hits, and another 170 when it explodes.
This is the maximum output, a god’s natural defense usually reduces that by ~50 each.
It doesn’t scale, so building power items doesn’t make it stronger.
The achievement description doesn’t say it specifically, but this needs to be a triple kill.
So, the challenge here is to have 3 almost dead enemy gods group up in a small area.
This, to nobody’s surprise, never happens.
There’s 3 strategies that proved somewhat successful to me:
A) – The fleeing path way –> see Anhur
Weakening bots near pillars sets them up for a long fleeing route.
You can setup 2 bots and lure the third one onto the same route, lining them up in the process.
With some body-blocking, you can create the scenario you need.
However, it’s very hard to pull off and requires a minotaur.
B) – The spawnkill way
In Arena, everyone respawns at the same time. So, if you get a penta kill, all bots will naturally group up as they try to leave their base after respawning.
Weakening them as they leave their base is surprisingly effective and is how I got the achievement.
C) – The friend way
Have a friend play Ares, Athena, Cerberus, Hades or Xing Tian.
Having a god in your team who can forcibly group bots together is extremely useful for this.
No matter which strategy you go for, the general idea is the same everytime:
- Weaken enemies as low as possible
- Have them group up through A, B or C (or a different strat, whatever works for you)
- Press 1 (aim for the healthiest)
- Hope for the best
Don’t get discouraged about close attempts.
Getting even a single kill with a heart bomb requires precision, timing and practice.
After you get comfortable with single kills, aim to strategically get double kills.
Every successfully aimed double kill gets you closer to that triple.
This achievement can happen in every match.
Just keep at it.
Da Ji
Paolao Difficulty: Easy
“As Daji, pull 2 or more enemies into your Paolao with a single use of your Paolao Ability.”
Paolao is Da Ji’s Ult.
Da Ji summons and jumps on her pillar, enabling her to to chain up to 3 enemy gods.
When done, Da Ji jumps back on the ground and any hit enemies are pulled to the pillar.
In Co-op, the enemy gods’ way of movement is very predictable. So:
- Get in range
- Press 4
- Hit at least 2 bots with your chains
- Finish the Ult by cancelling it or by waiting
________________________________________________________________
Murderous Nature Difficulty: Easy
“As Daji, kill an enemy with your Trickster Spirit Ability.”
Trickster Spirit is Da Ji’s 3rd ability.
It teleports Da Ji to any selected target and deals some damage if the target is an enemy.
The ability doesn’t hit very hard and is usually used as a gap closer rather than a finishing move.
However, for this achievement it needs to become just that.
Da Ji’s kit is very DoT heavy, making it very likely for enemies to bleed out.
I recommend to use the 1st and 2nd ability only if your target is at full health.
Then, just weaken most of their health with basic attacks and then, press 3.
Or, if you get the chance, ‘secure’ a kill that another ally unfortunately couldn’t get.
Danzaburou
The Best Sake Merchant! Difficulty: Medium
“As Danzaburou, have 3 enemies taunted at the same time by Alluring Spirits.”
Alluring Spirits is Danza’s 2nd ability.
It places a bottle of sake which taunts any enemy god that stands near it for too long.
If you invade the bots at their blue buff right away, they will use beads.
However, utilizing stealth from Danza’s 3rd ability, this is still doable:
- Press 2, forcing their beads
- Press 3, entering stealth, losing the bots’ aggro
- Wait for the 2nd ability’s cooldown
- Press 2, again
Another alternative, less reliable strategy:
- Get a triple kill
- Wait for the bots to respawn
- Throw some sake at their base’s exit
- Watch them get taunted as they leave (they might use beads)
________________________________________________________________
Fortuitous Investment Difficulty: Easy
“As Danzaburou, fill up 4 Dubious Savings money pouches in a single match.”
Dubious Savings is Danza’s Passive.
Anytime Danza gets gold, he stores 10% of it.
At certain store thresholds, Danza gets bonus gold and some bonus power.
The easiest way to get gold is by killing enemy gods.
In Co-op, it takes ~25 kills to completely fill this passive (if you never go for minions).
Build crit and attack speed items and you should be fine.
Alternatively, you can farm minions, camps and get gold from assists, too.
Discordia
Curse of Discord Difficulty: Easy
“As Discordia, use your Golden Apple of Discord ability to throw the apple to an enemy and have it spread automatically to 2 other enemies in a single cast.”
Golden Apple of Discord is Discordia’s Ult.
It’s throws a big wall-bouncing apple that acts as a big heart bomb with extra effects.
This apple bomb sticks to whoever was hit, and after 2 seconds, the bomb explodes, spreading the apple’s effects to close enemy gods.
The throw goes relatively far and the explosion range is nice, too.
So, all you need is a situation where enemies are somewhat close to each other.
In Co-op, your best chances are:
- Bots that group around your minotaur
- Bots that just respawned and are about to leave their base
________________________________________________________________
Spreading Strife Difficulty: Easy
“As Discordia, use the Strife ability to turn 2 enemy Gods against each other 3 times in a single match.”
Strife is Discordia’s 2nd ability.
It’s a rectangular ground-target AoE that roots anything it hits.
If it hits 2 or more enemy gods, it makes them attack each other.
Just keep spamming 2.
You’ll hit multiple gods fairly often.
Erlang Shen
Tortoise Power! Difficulty: Very Easy
“As Erlang Shen, hit 3 or more enemies using the turtle form of 72 Transformations.”
72 Transformations is Erlang’s 3rd ability.
Erlang can transform into a turtle or mink and dashes forward.
The transformation will be a turtle is Erlang is facing down enough (you can see the transformation threshold while targeting).
In Co-op, you can get this quickly:
- As the match starts, run towards the enemy team’s blue buff
- Become a turtle by pressing 3 while looking on the ground
________________________________________________________________
Undefeated! Difficulty: Easy
“As Erlang Shen, use 9 Turns Blessing to heal yourself while below 10% health.”
9 Turns Blessing is Erlang’s Ult.
Erlang buffs his defense and taunts all enemy gods in a cone area in front of him.
After 4 seconds, Erlang heals himself.
With a some defense items, you can safely fight against bots and lose health that way.
If that’s not safe enough for you, tank a minion wave at LV 5.
Tower shots can quickly lower your health, too.
As soon as you’re below 10% health, press 4 and wait.
Eset
Stay in the Circle Difficulty: Medium
“As Eset, heal three or more teammates and kill an enemy God using a single Circle of Protection.”
Circle of Protection is Eset’s Ult.
It places a big circle, which can be detonated by pressing 4 again.
The detonation deals decent damage to enemies, and heals allies.
The idea here is to have 3 other teammates gank an enemy, while you wait to ‘secure’ the kill:
- Wait until 3 allies fight 1 bot (and all of them fit in a circle)
- Wait until the bot has ~30% health remaining
- Press 4
- Quickly press 4 again
________________________________________________________________
Silenced Difficulty: Very Easy
“As Eset, silence fifteen enemy Gods in a single match using Dispel Magic.”
Dispel Magic is Eset’s 3rd ability.
It slows and silences targets in a small circle area.
Just spam 3 and this will unlock naturally.
Fafnir
Get to Work Difficulty: Very Easy
“As Fafnir, boost all of your allies Attack Speed in a single match using Coerce.”
Can NOT be done in Co-op
Coerce is Fafnir’s 2nd ability.
It’s a attack speed buff for a selected allied god (also, it heals Fafnir).
Just make sure to buff each teammate at least once.
________________________________________________________________
Take That Difficulty: Very Easy
“As Fafnir, slow or kill three or more enemy gods at a single time using Cursed Strength.”
Cursed Strength is Fafnir’s 1st ability.
Fafnir throws his hammer, stunning whoever got hit and slowing other enemies around them.
In Co-op, you can get this quickly:
- As the match starts, run towards the enemy team’s blue buff
- Get into throw range
- Press 1
Fenrir
End of Days Difficulty: Medium
“As Fenrir, have an ally kill an enemy God that you have grabbed using Ragnarok.”
Ragnarok is Fenrir’s Ult.
Fenrir grows in size, can grab an enemy god and then drag that god to a better spot.
The grab deals some damage, and can therefore also kill enemies.
The idea here is to grab a ~40% health target and then drag it close to either your assassin ally bot or a random player. The assassin bot is usually the most reliable option.
The enemy god needs to die while grabbed, setting a rather tight time limit.
Still, if the enemy just barely survives the grab, anyone can finish the job.
________________________________________________________________
Unleash the Beast Difficulty: Medium
“As Fenrir, stun or kill at least three enemies with a single use of Unchained.”
Unbound Runes is Fenrir’s Passive. After hitting 5 basic attacks, it buffs Fenrir’s abilities.
Unchained is Fenrir’s 1st ability. It’s a jump that deals damage in a small landing circle.
If Fenrir’s Passive is charged, the 1st ability also stuns.
In Co-op, it’s possible to get this achievement early:
- Get Beads (and maybe buy a defensive item)
- As the match starts, run towards the enemy blue buff
- Hit 5 basic attacks in the crowd of bots (get ready to use Beads to avoid CC)
- After the 5th hit, press 1 and hit 3 melee bots
Freya
That Was Close Difficulty: Medium
“As Freya, kill an enemy God using Valkyrie’s Discretion while you are at 15% health or less.”
Valkyrie’s Discretion is Freya’s Ult.
Freya starts flying, becomes untargetable and may shoot down from her position up to 4 times.
The Ult deals decent damage and can finish off most low-health targets.
In Co-op, this should be doable relatively safely:
- Build attack speed and magic power items
- Aggro any single squishy bot
- Weaken the bot to about ~40% health
- Let the bot weaken you as low as possible
- Press 4
- Finish off the bot
________________________________________________________________
Banished! Difficulty: Very Easy
“As Freya, banish three or more enemy Gods with a single use of Banish.”
Banish is Freya’s 3rd ability.
It lifts up enemy gods into the air and makes them untargetable.
In Co-op, you can get this at the start of the match:
- As the match starts, run towards the enemy blue buff
- Get into banish range
- Press 3
Ganesha
Ohm! Difficulty: Very Easy
“As Ganesha, silence 3 or more enemy Gods with a single cast of his Ohm Ability.”
Ohm is Ganesha’s 2nd ability.
It silences enemy gods in a cone in front of Ganesha as long as they are in the cone.
In Co-op, you can get this early:
- As the match starts, run towards the enemy blue buff
- Get close to the crowd of bots
- Press 2
________________________________________________________________
Pacifist Difficulty: Very Easy
“As Ganesha, give 1 or more kills to an allied God.”
Good Fortune is Ganesha’s Passive.
It gives any kills you get to nearby allies.
Get the last hit of a kill while someone is near you.
Build power items to make this even easier.
Geb
I’ll Protect You Difficulty: Medium
“As Geb, cleanse a teammate using Stone Shield on an ally that is below 20% health.”
Stone Shield is Geb’s 3rd ability.
It puts a shield on a selected allied god, giving them extra health and cleansing them from any CC.
You need to shield someone is low on health and just got CC’d.
Bots will usually retreat when they fall below 20% health, so they may only be CC’d if you body-block long enough. And even then, it’s more likely they die before any CC comes their way.
The key here is to watch out for your random player teammates, especially when they are low-health and not backing. In other words, this basically boils down to RNG.
However, get CC’d on low health isn’t particularly rare, so this shouldn’t take that many attempts.
________________________________________________________________
Cataclyzed Difficulty: Medium
“As Geb, hit three or more enemy Gods with Cataclysm.”
Cataclysm is Geb’s Ult.
It damages and stuns enemy gods in a large circle area around Geb.
In Co-op, there are 2 consistent ways to do this:
A) – The minotaur way
- Get Blink
- Wait for your minotaur to spawn
- Wait for bots to group up around the minotaur
- Use Blink to get into position
- Press 4
B) – The base way
- Get Blink
- Wait for at least bots to be dead at the same time
- Near their base, wait until they respawn
- If possible, use Blink to get to their exit as they leave
- Press 4
Gilgamesh
Dropkick Adventure Difficulty: Easy
“As Gilgamesh, drop kick the same god into a minion, a god, a wall, and the Winds of Shamash wall in a single match.”
Winds of Shamash is Gilgamesh’s Ult. It places a big circle AoE sandstorm.
Drop Kick is Gilgamesh’s 2nd ability. Gilgamesh sends any enemy target flying.
If they collide with another god, minion or wall, they’re stunned.
If they’re kicked inside the Ult, it knocks them into the AoE’s center.
The idea here is to drop kick one enemy god of your choice into all of the above mentioned options. The best target for this is usually a guardian or warrior, since they’ll always be in kick range and rarely use beads (if they aren’t bots).
________________________________________________________________
Quick Turn-In Difficulty: Very Easy
“As Gilgamesh, complete the quest obtained at Level 5 while still Level 5.”
Epic of Gilgamesh is Gilgamesh’s Passive.
He gets quests at LV 5 and LV 10.
To finish the LV 5 quest, all you need to do is walking to a highlighted point on the map.
So, as soon as you reach LV 5, check the minimap and walk to the unique marker.
Guan Yu
The Warriors Will Difficulty: Easy
“As Guan Yu, heal three or more of your teammates at once while your passive is fully charged.”
Conviction is Guan’s 1st ability. It’s heals Guan and allies in a circle around him.
Painless is Guan’s Passive. It’s a meter that fills up as Guan deals and takes damage.
Once the meter is full, all of Guan’s abilities gain boosts.
This lasts until you’ve been out of combat for 5 seconds.
The passive meter usually fills up naturally.
Once it’s full, search for some allies and press 1.
________________________________________________________________
Charge! Difficulty: Medium
“As Guan Yu, stun three or more gods at once with your Ultimate, Cavalry Charge.”
Cavalry Charge is Guan’s Ult.
Guan charges forward on his horse for 4 seconds.
After 4 seconds, he jumps off his horse, stunning enemies in a small area.
You can also jump off sooner by cancelling the Ult (right click).
In Co-op, there are 2 consistent ways to stun 3 bots with this:
A) – The minotaur way
- Wait for your minotaur to spawn
- Wait for bots to group up around it
- Press 4
- Get close to 3 bots
- Cancel the Ult
B) – The base way
- Wait for at least bots to be dead at the same time
- Near their base, wait until they respawn
- Press 4
- Tower dive, aim for their exit
- Cancel the Ult
Hachiman
Mounted Archery Difficulty: Medium
“As Hachiman, hit 5 enemy Gods with one use of his Ultimate, Mounted Archery.”
Mounted Archery is Hachiman’s Ult.
Hachiman jumps on his horse and may shoot enemy gods in a large cone area in front of him. While aiming, his moving horse can be controlled separately to get into a better aiming position.
The cone area is very large, so the main problem is to find 5 grouped up enemies.
The easiest Co-op strategy for this is ‘the base way’:
- Wipe all bots
- Near their base, wait for them to respawn
- Stall them near their exit until they are all outside of their base
- Press 4
- Find the correct angle
- Shoot
________________________________________________________________
Number 1 Stunnah Difficulty: Easy
“As Hachiman, stun 2 enemy Gods with one use of his Iaijutsu Ability.”
Iaijutsu is Hachiman’s 3rd ability.
It’s a dash followed by a small circle AoE.
If both the dash and the swing hit an enemy god, it stuns them.
In Co-op you can stun 2 bots right away:
- As the match starts, run towards the enemy team’s blue buff
- Get into dash range (make sure that there’s 2 targets near the end of the targeter)
- Press 3
Hades
Blighted Difficulty: Very Easy
“As Hades, apply Blight on your enemies to augment all four of your abilities in one game.”
Blight is Hades’ Passive.
It’s a debuff that’s applied to enemies through Hades’ 1st ability and basic attacks.
It reduces the enemy’s power and gives Hades’ abilities extra effects.
There’s a lot of time for this. Just hit a basic attack followed up by any other ability.
Alternatively, you can do this in 1 combo (on a tanky enemy):
- Hit a basic attack
- Press 1
- Press 2
- Hit a basic attack
- Press 3
- Hit a basic attack
- Press 4
________________________________________________________________
Oh the Agony! Difficulty: Easy
“As Hades, land a single Pillar of Agony on 3 enemy Gods affected with Blight.”
Pillar of Agony is Hades’ Ult.
Hades creates a vortex around him, pulling close enemies closer to him.
The easiest way to do this is ‘the minotaur way’:
- Wait for your minotaur to spawn
- Wait for bots to group up around it
- Press 1 to close the gap and apply blight
- If you didn’t hit 3 bots, use basic attacks to fulfill the Blight requirement
- Get into position
- Press 4
He Bo
Killer Wave Difficulty: Hard
“As He Bo, kill three or more enemy Gods with a single crushing wave.”
Crushing Wave is He Bo’s Ult.
He Bo becomes a large wave, moving forward, dealing a lot of damage to enemies in his way.
The main challenge with this achievement is to find a scenario where enemies are grouped up.
The damage of this Ult is usually very high, so with a few power items a 3-1-4 combo will always kill a squishy target.
Your best bet is either the minotaur or a friend (or preferably, both):
A) – The minotaur way
- Wait for your minotaur to spawn
- Wait until enemies group up near the minotaur
- Weaken as many bots as possible to ~40% health
- While having aggro of melee bots, get close to a ranged bots
- Press 4 as they line up
B) – The friend way
- Have a friend play Ares, Athena, Cerberus, Hades or Xing Tian.
- Poke enemies whenever possible (but keep their health above 20%)
- On the next best chance (e.g. minotaur), have your friend group up enemies
- If their health is still above 50% health, weaken them by pressing 1
- Press 4
________________________________________________________________
So Steady Difficulty: Very Easy
“As He Bo, have full stacks on Steady Flow for over 30 seconds.”
Steady Flow is He Bo’s Passive.
It’s a buff he gets when using abilities. There’s no need to hit an ability. It stacks up to 3 times.
If you stop using abilities, the buff will fall off after 5 seconds.
The 1st ability has a very low cooldown, so just spam 1 until the achievement unlocks.
Heimdallr
Far Seeing Sight Difficulty: Easy
“As Heimdallr, hit an enemy with Piercing Sight after it has traveled more than 200 ft.”
Piercing Sight is Heimdallr’s 1st ability.
It throws a sword into the sky, revealing enemies in a radius around it.
If you press 1 again within the next 10 seconds, it shoots the sword to a targeted ground location.
The Bifrost is Heimdallr’s 3rd ability.
It places up to 2 crystals, which can be used to teleport between them.
It’s a very good way to travel far distances, making it useful for this achievement.
You can get this quickly in Co-op:
- As the match starts, press 3, and start running towards the enemy teams blue buff
- Once you are near the upper pillar in the center, press 3 again, setting up a teleport
- Return to base by pressing B
- Press 1 to throw the sword into the air
- Teleport from your base to the pillar
- Get closer to the bots
- Press 1, again
You can also do this at any other point in the match (and there is no need for Co-op here, either).
________________________________________________________________
Journey Through the Realms Difficulty: Easy
“As Heimdallr, kill 3 enemy gods by sending them through Muspelheim and Niflheim.”
Through The Realms is Heimdallr’s Ult.
Heimdallr dashes forward and yeets the first hit enemy god through a portal.
There, the enemy will take some extra damage, but most of the damage comes from the initial hit.
Just make sure to finish off enemies with your Ult.
With cooldown reduction items, you’ll easily have enough chances to get some kills that way.
Hel
Cleansed Your Soul Difficulty: Hard
“As Hel, cleanse three of your teammates from being stunned.”
Cleanse is Hel’s 2nd ability in Light Stance.
It removes all CC effects from allies in a circle area.
There is no consistent way to have other people get stunned.
Your best bet is probably to:
- Have an Ymir bot on the enemy team
- Feed, so that an enemy minotaur spawns
- Have all of your bots and at least some random players group up for the minotaur
- Hope that the Ymir bot freezes them
- Press 2 (in Light Stance)
This requires luck and is very likely to happen randomly.
Just be ready to cleanse whenever some of your allies are grouped up.
________________________________________________________________
Which Side are you On? Difficulty: Very Easy
“As Hel, kill the same enemy twice with one kill coming from light stance and one coming from dark stance.”
Restoration is Hel’s 1st ability in Light Stance. It’s the only Light Stance ability that deals damage.
Repulse is Hel’s 3rd ability in Dark Stance. It’s the most reliable way to deal damage.
Also, basic attacks work fine for this, too.
This doesn’t need much thinking:
- Choose an enemy to bully
- Weaken them in Dark Stance
- Finish them off in either Stance
- Repeat for the other Stance
Hera
Argus to the Rescue! Difficulty: Hard
“As Hera, have Argus get 2 kills in a single lifetime.”
Argus, the Defender is Hera’s Ult.
It summons Argus, who drops onto a targeted circle area, dealing damage.
After the initial damage, Argus targets the closest enemy god, runs at them and punches them.
By pressing 4 again, Hera can manually select a different target (when there’s no current target).
The current target is always highlighted by a marker above its health bar.
Argus hangs around for 40 seconds, but he usually dies long before that.
For this achievement, you need to have Argus kill 2 enemies. If the initial drop kills, it counts too.
A relatively safe Co-op strategy is to:
- Get a slowing relic (i.e. Horrific emblem)
- Weaken bot #1 (any will do) to ~10% health
- Press 4, kill bot #1 with the drop
- Search and find bot #2 (preferably, squishy)
- Weaken bot #2 as far as possible using Hera’s abilities and basic attacks
- When bot #2 tries to flee (at ~20% health), use the slowing relic
- Target bot #2 with Argus
- Have Argus kill the slowed bot #2
________________________________________________________________
Royal Assault Difficulty: Very Easy
“As Hera, hit an enemy god will all 3 hits of Royal Assault.”
Royal Assault is Hera’s 1st ability.
She damages enemies in a half circle in front of her, followed up by Argus’ fists slamming at a targeted rectangular area, dealing more damage.
For me, this unlocked while using the ability against a jungle buff monster.
If this was fixed since then, simply make sure to use this ability in close range.
Hercules
Ricochet Difficulty: Medium
“As Hercules, use Excavate to hit an enemy God twice, in one use, and kill them on the second hit.”
Excavate is Herc’s Ult.
Herc throws a boulder in front of him, which keeps rolling around for a bit, bouncing off of walls.
In Co-op, this is doable with some practice.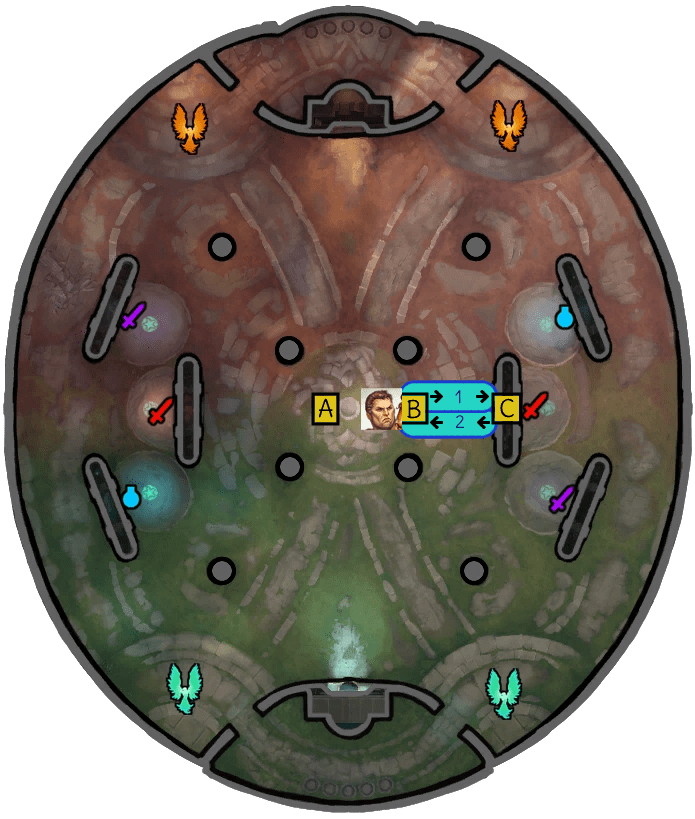
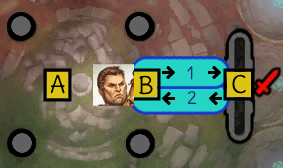
- At A, weaken a squishy enemy to ~50% health (with power items, this could be more)
- Press 1 and push the bot to B
- Press 4 while facing C
________________________________________________________________
Earthbreaker Difficulty: Very Easy
“As Hercules, knock an enemy up five times in a single match using Earthbreaker.”
Earthbreaker is Herc’s 2nd ability.
Herc smashes the ground, sending a shockwave forward.
Enemies at the end of that shockwave are thrown towards Herc.
Keep spamming 2 when fighting. This will unlock naturally.
Horus
Where we dropping? Difficulty: Medium
“As Horus, use ‘To The Skies!’ and take at least 3 allied gods with you.”
To the Skies! is Horus’ Ult.
He sends a mirror image into the sky, which is used to select a target location.
Upon confirmation, Horus starts charging.
After 2 seconds, Horus and allies near him are teleported to the target location.
It also buffs protections of allies and deals some damage to enemies.
Bots will never join your Ult on purpose. It’s technically possible, but highly unlikely.
I recommend to go for a casual Arena or Slash match instead.
Just announce that you’re ulting, call VVVG (Group Up) and hope that at least 3 teammates actually listen. You can’t expect anyone to stand still for 2 seconds, especially random players, so this approach might not work right away.
If you keep trying it will happen eventually.
Your chances are better if you and your team are currently at your base.
I’d recommend not landing in the enemy base, though. (Even if it’s REALLY funny)
Alternatively, in Assault, you could technically Ult right away:
- As the match starts, position yourself in the middle of 3 allies
- Immediately target and confirm your Ult
- The teleport should go off while they are still buying items
However, there’s 2 drawbacks here.
1) it doesn’t work when you spawn in the center (Range issue)
2) it will definitely lose you the early game, your teammates’ enthusiasm and some karma
________________________________________________________________
The Protector King Difficulty: Very Easy
“As Horus, heal an Allied God below 15% health with Protector’s Surge.”
Protector’s Surge is Horus’ 3rd ability.
After selecting any allied target, Horus flies to them, healing in a small area when arriving.
Watch out for your bots.
If they are currently fleeing, they should be valid targets for this achievement.
Hou Yi
The Crow’s Mark Difficulty: Easy
“As Hou Yi, utilize Mark of the Crow to Knock-back, Stun, and Slow an enemy god in 5s.”
Mark of the Golden Crow is Hou Yi’s 2nd ability.
It marks an enemy god, tracking them for 10 seconds.
The marked enemy will also suffer from extra effects if hit by Hou Yi’s abilities.
For this, you need to:
- Press 2 and mark an enemy god of your choice (preferably, healthy or tanky)
- Press 3 and hit the marked enemy, which knocks them back
- Press 1 and hit the marked enemy, which stuns them
- Press 4 in the general direction of the marked enemy, which slows them
Note that bots will use beads if you hit your knockback, so wait before you try to stun.
________________________________________________________________
Trick Shot Difficulty: Medium
“As Hou Yi, hit a different enemy God on all three bounces of one Ricochet.”
Ricochet is Hou Yi’s 1st ability.
Hou Yi shoots a special arrow that ricochets off walls up to 2 times.
It can hit a target up to 3 times.
The description sounds really difficult, but there is a relatively easy Co-op setup for this: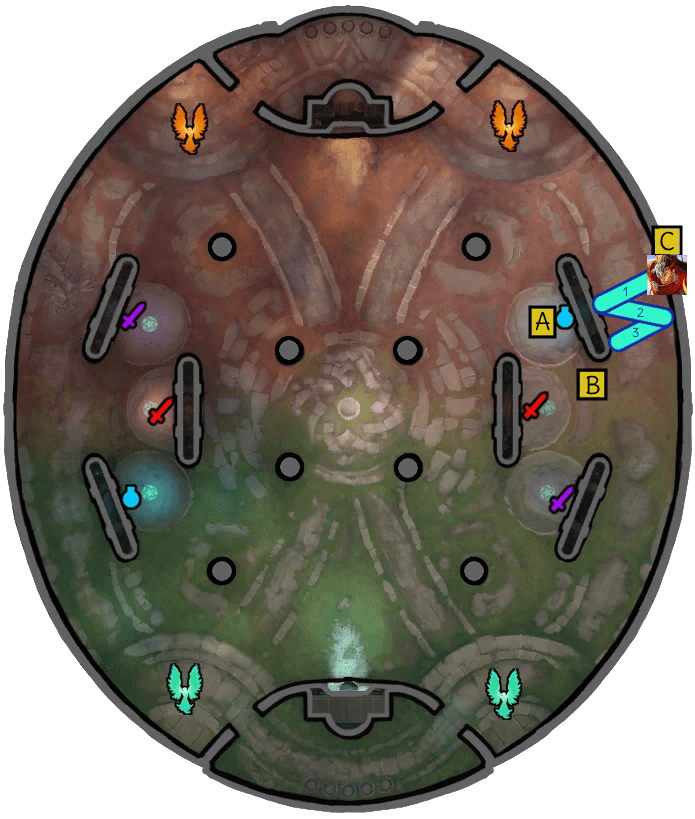
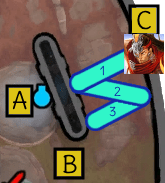
- Get Beads
- As the match starts, run towards A (the enemy team’s blue buff)
- Press 3 and jump into the crowd to draw the bots’ aggro
- Use Beads to avoid CC
- Flee over B to the wall by C
- Aim your ricochet so that you cover a lot a decent area per shot
- Wait until any bot enters the area of your first shot
- Shoot
Hun Batz
Fear My Evil Difficulty: Easy
“As Hun Batz, use Fear No Evil to fear three or more enemy Gods.”
Fear No Evil is Hun Batz’ Ult.
It’s a big circle AoE that fears any enemy gods in range (and deals some tick damage).
The most consistent way to do this is the minotaur way:
- Wait for your minotaur to spawn
- Wait for 3 bots to group up around it
- Press 4
________________________________________________________________
Monkey Business Difficulty: Very Easy
“As Hun Batz, teleport to an enemy God on the fourth bounce of Sacred Monkey.”
Sacred Monkey is Hun Batz’ 3rd ability.
He throws a monkey that bounces between grouped up enemy targets, up to 4 times.
It will only bounce once on gods, but can bounce multiple times on minions.
After throwing the monkey, Hun Batz can teleport to the monkey anytime by pressing 3 again.
This can be be achieved at any point in a game, but it’s easiest at the start of an Arena game:
- As the match starts, run towards the enemy blue buff
- Get in throw range
- Press 3
- Once the monkey stops bouncing, press 3 again
Ishtar
Agile Archery Difficulty: Easy
“As Ishtar, kill an enemy God with each variation of Imbue Arrows in one match.”
Imbue Arrows is Ishtar’s 1st ability.
It gives Ishtar’s basic attacks an extra effect for 6 seconds.
The effect can be chosen after pressing 1 once.
In Co-op, it’s not too difficult to get kills as a hunter.
Build crit and attack speed items and you’ll be good to go.
Just make sure to have the 1st ability ready when your target is low health.
________________________________________________________________
Stunning Swordplay Difficulty: Easy
“As Ishtar, stun 3 enemy Gods in one cast of Blades of Retribution.”
Blades of Retribution is Ishtar’s Ult.
Ishtar fires 5 swords forward in a large cone. When pressing 4 again, the swords move back to Ishtar. If enemy gods are hit by both actions, it stuns them.
For this, I recommend to stun bots as they leave their base:
- Kill at least 3 enemy gods
- Near their base, wait for them to respawn
- As they leave their base, press 4 and hit 3 of them
- Quickly press 4 again
Ix Chel
Greatest End Difficulty: Medium
“As Ix Chel, empower Great End to it’s maximum duration.”
Great End is Ishl’s Ult.
Ishl channels a beam that deals tick damage to enemies and heals allies.
If it hits an enemy and ally god at the same time, it lasts longer.
This needs to last as long as possible (= 6 seconds).
Your best bet is to stick to a tanky ally bot and have them fight a tanky enemy bot.
Then, position yourself so you can hit both of them in a line and press 4.
Preferably, avoid building for too much damage, as the enemy shouldn’t actually die too fast.
________________________________________________________________
Blinding Brilliance Difficulty: Very Easy
“As Ix Chel, blind enemy gods 5 times with Threads of Light in a single match.”
Gleaming Blast is Ishl’s 1st ability.
It shoots a projectile. If it hits an enemy god, the ability changes.
Threads of Light is Ishl’s changed 1st ability.
It’s a triangle-shaped AoE (inverse cone), which blinds enemy gods if they are hit by the tip.
So, step by step:
- Find a target
- Press 1
- Distance yourself a bit
- Press 1 again
- Repeat
Izanami
Death’s Call Difficulty: Easy
“As Izanami, kill an enemy God while at or below 25% health.”
Fade Away is Iza’s 3rd ability.
Iza decends into the ground, becomes invisible and leaps away. This stealth lasts up to 5 seconds.
Going into stealth removes all aggro from bots. You can use it whenever something gets too close.
While not strictly necessary for this achievement, it sure is helpful.
There are multiple ways to do this (and it will probably happen randomly anyways), but try this:
- Don’t build life steal items
- Pick a fight against the enemy assassin bot (they’ll usually ambush you at their jungle)
- Weaken the bot to ~40% health
- Let the bot weaken you to ~20% health
- Finish off the bot (it should stop attacking at ~20% health)
Alternatively, you can wait in stealth for any ally to weaken a bot for you and then ‘secure’ that kill.
________________________________________________________________
Where You Going? Difficulty: Very Easy
“As Izanami, max out Spectral Projection by getting a kill or assist on 2 enemies while they are slowed by it.”
Spectral Projection is Iza’s 2nd ability.
It shoots a projectile forward in a line, damaging and slowing enemies. The slow lasts 3 seonds.
If a hit enemy dies while slowed, the slow effect will be stronger for the rest of the match.
In Co-op, this will usually unlock naturally:
- Fight a bot
- As it starts to flee at ~20% health, press 2
- Finish off the bot
- Repeat
Janus
Watch Your Step Difficulty: Very Easy
“As Janus, make your opponents fall through fifteen different portals in one match.”
Portal is Janus’ 1st ability.
It spawns a portal at a target ground or wall location.
If placed on the ground, enemies that step on it fall through, dealing damage (Janus himself can also fall through, but doesn’t take damage). If placed on the wall, allies can step into it to move through the wall.
The idea here is to let enemy gods fall through ground portals 15 times.
So, just spam 1.
________________________________________________________________
No Scope Difficulty: Hard
“As Janus, hit at least two enemy Gods with your Ultimate at max distance.”
Through Space and Time is Janus’ Ult.
He charges a big portal projectile and shoots it across the map, creating wall portals on the way (but it stops creating them at a distance of 500). If an enemy is hit, it deals damage based on the shot’s travel-distance. The max scaling is reached at a distance of 800.
Distance units are kind of a mystery in this game. It CAN be measured, but I could not find a concrete overview about how far abilities go or how big maps are. However, it’s also not really necessary; players have unlocked this in Arena and that’s all we need to know.
The Arena map isn’t 800 units big, that’s for sure, so the max distance we need to aim for is 500.
We can see if we can reach that far by sniping the enemy base from our base.
If there’s a wall portal on the enemy base, it was too close.
Usually, if you snipe from where you spawn, you’ll be fine.
Also, to make this clear: you do not need to hit 2 enemy gods with a single Ult.
You can also hit 1 enemy god, twice, with 2 or more Ults.
This mostly boils down to luck.
You can increase your chances by sniping bots as they respawn and leave their base.
I recommend to keep spamming 4 until it unlocks:
- Build cooldown reduction items
- Wait until the Ult is ready
- Return to base
- Press 4
- Repeat
Jing Wei
Heads Up! Difficulty: Easy
“As Jing Wei, kill an enemy God within 5 seconds after using your Passive.”
Rapid Reincarnation is Jing Wei’s Passive.
Whenever Jing Wei leaves her base, she takes off into the sky and flies around a good distance.
In Co-op, you can:
- Build crit and attack speed items
- Weaken any bot to ~40% health near your base
- Walk back to base
- Fly back to the weakened bot
- Finish off the bot within 5 seconds (just keep basic attacking)
________________________________________________________________
Wave Dash Difficulty: Very Easy
“As Jing Wei, use Agility after being knocked into the air by an enemy God.”
Agility is Jing Wei’s 3rd ability
It’s a short dash, which can be used while knocked up to fly away.
So, get knocked up and press 3.
This is easiest when playing against Bacchus, Hercules, Sobek or Tyr.
Jormungandr
Toxic Veins Difficulty: Medium
“As Jormungandr, fully charge Consuming Bellow and kill 2 enemies with it.”
Consuming Bellow is Jorm’s 2nd ability.
Jorm channels up a roar for 1.2 seconds and then damages enemies in a circle area around him.
If any toxic clouds are around, the range of the area increases and the ability deals more damage.
3 clouds will maximize this ability’s damage.
There are 2 ways to create 3 clouds:
A) – Spit + Stealth
- Place the 1st cloud by pressing 1
- Press 3, entering stealth
- Emerge in the 1st cloud, creating 2 more
b) – Triangle Ult
- Press 4, preparing to jump
- Do a minimum distance jump right in front of you
- Do another minimum distance jump to right from where you started
- Jump to where you started
Apparently, the achievement is a bit glitched.
You need to kill 1 enemy god and only hit 1 other enemy god.
Building magical power items helps for this.
In Co-op, enemies pair up often.
The goal is to have 1 bot on low health and 1 more bot to be close:
- Locate a pair of bots
- Setup 3 clouds using the above mentioned methods
- Weaken the squishiest bot around
- Get into the right position
- Press 2
________________________________________________________________
The Destroyer Difficulty: Easy
“As Jormungandr, kill an enemy with your ultimate The World Serpent.”
The World Serpent is Jorm’s Ult.
Jorm descends into the ground, from where he’ll jump out and dive into another spot, 3 times.
Every dive deals damage in a circle AoE.
This is a very good chase ability, so:
- Weaken a bot until it flees
- Press 4
- Jump onto the fleeing bot, again and again.
Kali
You Thought You Had Me? Difficulty: Medium
“As Kali, get two kills in a single match while using Destruction when you’re under 10% health.”
Destruction is Kali’s Ult.
It makes her immortal for at least 3.5 seconds (and deals some tick damage to close enemies).
This is a bit tricky, but there is a consistent Co-op strategy for this:
- Get Blink
- Weaken a bot until it flees
- Jump or blink into the enemy base before the bot gets there
- When close to death, press 4
- Leave the enemy base
- Quickly kill the weakened bot while the Ult is active (should be close to the base by now)
- Repeat
________________________________________________________________
Bounty Hunter Difficulty: Very Easy
“As Kali, kill five Gods in one match that are marked for death by your Passive.”
Marked for Death is Kali’s Passive.
When spawning, you can select any enemy god as a target.
Killing the target significantly heals Kali, and the closest enemy becomes the next target.
In Co-op, this will unlock naturally.
Make sure to build attack speed items and focus on whoever you target.
Khepri
Let’s Hug Difficulty: Very Easy
“As Khepri, abduct an enemy that is affected by Solar Flare five times in a single match.”
Solar Flare is Khepri’s 3rd ability. It roots enemies in a ground target area.
Abduct is Khepri’s 1st ability. Khepris dashes forward and pulls the 1st enemy god hit.
So:
- Locate a target
- Press 3
- Press 1
- Repeat
________________________________________________________________
Never Fear, Khepri’s Here Difficulty: Easy
“As Khepri, save everyone on your team, including yourself, in one game.”
Scarab’s Blessing is Khepri’s Ult.
You can select any allied god or yourself and give them a blessing that lasts 5 seconds.
If that ally dies within while the blessing is active, they are instead resurrected at Khepri’s position.
Does not work against executes.
This is easiest in Ranked 1v1:
- Reach LV 5
- Tower Dive
- Ult yourself before you die to the tower’s shots
- Get revived
King Arthur
True Strike Difficulty: Very Easy
“As King Arthur, hit an enemy with any damaging ability while their protections are reduced by Twin Cleave.”
Twin Cleave is Arthur’s 3rd ability.
He dashes forward in a spinning motion, dealing damage and reducing protections.
Simply hit this and and use any other ability.
Pressing 3 twice should be enough.
________________________________________________________________
The Legend of Excalibur Difficulty: Easy
“As King Arthur, cast Excalibur’s Wrath and Sundering Strike within 10 seconds of each other.”
Arthur’s Ult requires built up energy to use. He gets energy by damaging enemies.
Sundering Strike is Arthur’s Ult. It stuns enemy gods in a line. It costs 35 energy.
The Ult transforms at 80 energy, becoming:
Excalibur’s Wrath is Arthur’s Ult. It launches an enemy into the air and deals damage.
This combo should do the trick:
- Have Arthur’s Ult completely charged
- Press 4
- Basic Attack
- Quickly press 2
- Basic Attack
- Quickly press 2
- Press 4
Kukulkan
Whirlwind Difficulty: Very Hard
“As Kukulkan, kill three or more enemy Gods with one Whirlwind.”
Whirlwind is Kuku’s 3rd ability.
It places a tornado circle on the ground, applying a DoT to any enemy who stands in it.
If the enemy leaves right away, the DoT lasts for 5 ticks.
If the enemy sticks around, the DoT lasts up to 12 ticks.
With a decent power build, each tick may deal ~100 damage per tick, so it’s definitely strong enough to finish off most bots. However, the tornado’s circle isn’t very large, so grouping up weakened targets is the main issue here (aside from random players).
There’s 2 strategies that proved somewhat successful to me:
A) – The fleeing path way –> see Anhur
Weakening bots near pillars sets them up for a long fleeing route.
The minotaur causes bots to group up, putting them into the perfect position.
With Kuku, you can weaken gods by ulting them, setting them on their fleeing path quickly.
The 1st ability and items like Polynomicon also help for the weakening process.
Once 3 bots are fleeing, place a tornado in their fleeing path, and wait.
Alternatively, you can place a tornado early when they’re at ~50% health, and try to keep them in the circle for as long as possible. You can still weaken them as the tick damage is active, all that matters is that a tick gets you the kill. It’s risky, but it worked for me.
B) – The friend way
Have a friend play Ares, Athena, Cerberus, Hades or Xing Tian.
Having a god in your team who can forcibly group bots together is extremely useful for this.
No matter which strategy you go for, the general idea is the same:
- Weaken enemies as low as possible
- Have them group up through whatever strat works for you
- Press 3
- Hope for the best
________________________________________________________________
Dragon’s Wrath Difficulty: Very Hard
“As Kukulkan, kill an enemy at full health using only Spirit of the Nine Winds.”
Spirit of the Nine Winds is Kuku’s Ult.
It summons a spirit that flies forward, breathing down some wind, dealing damage.
I’ve only seen 1 reliable strategy for this so far:
- Have 1 (preferably squishy) enemy that’s AFK
- Get Frenzy and build as much power as possible (power potions may help, too)
- As soon as your Ult is ready, get close to the enemy base
- Activate Frenzy
- Press 4 on the AFK target
If someone leaves in Co-op, a bot will leave as well.
That does happen naturally from time to time.
Your best bet is to have a friend pick Discordia, who will then leave the game once it starts.
This usually causes the enemy warrior bot to go AFK.
Also, you’ll get more power thanks to Discordia’s Passive (given that you’re top damage).
Kumbhakarna
Down, Set, Gut Difficulty: Easy
“As Kumbhakarna, kill an enemy God by bouncing a minion into them using Throw Back.”
Throw Back is Kumbha’s 1st ability.
Kumbha does a short forward dash, dealing damage to the first enemy god hit.
If it hits a minion, it launches them away and they effectively become a piercing projectile.
The flying minion deals more damage than the default dash.
Even though minions aren’t always around, you should be able to kill a bot relatively quickly while fighting in the Arena’s center:
- Build magical power items
- Wait until a low-health bot flees while minions are nearby
- Press 1
________________________________________________________________
Stay There Difficulty: Very Easy
“As Kumbhakarna, root three or more enemy Gods with one Groggy Strike.”
Groggy Strike is Kumbha’s 2nd ability.
Kumbha charges up for a second, and then smashes his weapon on the ground in front of him. Besides some damage, it also roots and cripples enemies for 2 seconds.
This can be unlocked quickly in Co-op:
- As the match starts, run towards the enemy blue buff
- Press 2
- Get in smashing range during the wind-up
Kuzenbo
Shell Reflect Difficulty: Easy
“As Kuzenbo, reflect back 280 damage in a single use of your Shell Spikes Ability.”
Shell Spikes is Kuzenbo’s 2nd ability.
It buffs Kuzenbo with damage reflection.
For the next 3 seconds, up to 35% of any damage is reflected back to the attacker.
Make sure to max the 2nd ability.
In any normal match, this unlocks naturally if you’re in range of any enemy hunter.
In Co-op, try to aggro as many bots as possible, and then press 2.
________________________________________________________________
Triple Treble Difficulty: Very Easy
“As Kuzenbo, knock up an enemy god 3 times in a single use of your Watery Grave Ability.”
Watery Grave is Kuzenbo’s Ult.
Kuzenbo spins around while moving, knocking back enemies in his path.
It lasts 2.1 seconds and can hit multiple times.
Reach LV 5, select a target (without active beads) and press 4.
You can force a bot’s beads with either your 1st or 3rd ability.
Lancelot
The Knight’s Bond Difficulty: Easy
“As Lancelot, reach max stacks of Camelot’s Quest during a single match.”
Camelot’s Quest is Lancelot’s Passive.
It’s a stacking buff that makes the horse faster and Lancelot tankier against frontal basic attacks.
For every god kill or assist, Lancelot receives 1 stack.
For every 5 minions killed, Lancelot also receives 1 stack.
The maximum is 60 stacks.
This should unlock naturally.
Make sure to be around when enemy gods die and farm some minions.
This is easiest in Arena or Slash.
________________________________________________________________
Jousting Champion Difficulty: Easy
“As Lancelot, hit 3 enemy gods while charging during a single use of The Grand Joust.”
The Grand Joust is Lancelot’s Ult.
Lancelot gets on his horse and charges forward, creating a wide area that cripples enemies.
This Ult has a great range and you can also adjust the charge direction quite a bit.
You need to get into a situation in which 3 enemy gods are somewhat close to each other.
Since the Ult’s range is very generous, there will be many opportunities to get this.
One consistent Co-op strategy is your good old minotaur:
- Wait for your minotaur to spawn
- Wait for bots to group up around it
- Get close to bot #1
- Press 4, instantly hitting bot #1
- Charge through bot #2
- Adjust the charge direction to hit bot #3
Loki
Made You Look Difficulty: Medium
“As Loki, get the killing blow on an enemy God with Agonizing Visions.”
Agonizing Visions is Loki’s 2nd ability.
Loki summons a decoy at a large circle target location.
Every enemy in the circle takes low tick damage.
When maxed out, a single tick deals ~30 damage.
In Co-op, this can be done with some precise weakening:
- Build as much power as possible (and optionally, the Belt of Frenzy relic)
- Find an isolated, squishy bot
- Weaken the bot to as low health as possible
- Activate Frenzy
- While the bot is fleeing, put a decoy into the bot’s fleeing path
- Hope for the best
________________________________________________________________
Assassinate Difficulty: Very Easy
“As Loki, kill three or more enemy Gods from behind using Loki’s Ultimate.”
Assassinate is Loki’s Ult.
Loki teleports forward and immediately deals some crippling damage.
Right after that, he winds up for a heavier strike, which deals stunning damage.
The Ult is usually used to finish off enemies anyway, so this should unlock naturally.
In Co-op, just press 4 whenever a bot is currently retreating to their base.
With enough power, the damage should always be high enough to secure a kill.
Also, make sure to place yourself to the target’s rear for the heavy strike after teleporting.
Martichoras
Monstrous Mayhem Difficulty: Hard
“As Martichoras, reach maximum stacks of Monstrosity in a single game.”
Can NOT be done in Co-op
Monstrosity is Marti’s Passive.
It’s a stacking buff that increases Marti’s lifesteal.
You get 1 stack for maxing out Marti’s Ferocity meter, which is filled by hitting any enemy with basic attacks or abilities, getting kills or assisting in kills.
The stack maximum of Monstrosity is 30.
It takes a long time to stack this.
In a casual Arena game, you’d need a good match to get close to 20.
This is not doable in short game modes.
So, learn how to play the Carry or Solo roles in Conquest.
Conquest takes the longest and has the most opportunities to just farm.
I recommend to stick to minions and jungle camps for this one.
Fighting enemies is a risk, since you’ll need time to farm.
If you kill too many enemies, they might F6.
If you get killed too many times, your team might F6.
The best strategy here is to just farm and to avoid unnecessary fights (poking is always fine, tho).
It took me a 45 minute match to max out the stacks this way.
________________________________________________________________
Don’t Look Up Difficulty: Easy
“As Martichoras, hit 3 enemy Gods in a single cast of Death from Above.”
Death from Above is Marti’s Ult.
He flies up into the air and starts to auto-fire 12 ground target shots.
This Ult has a decent range, and hitting multiple targets often happens accidentally.
This should unlock naturally in casual or Co-op Arena.
Just press 4 when you see 3 enemies standing somewhat grouped up.
Maui
Lifeguard Difficulty: Easy
“As Maui use Mystical Ulua to successfully bring 5 allies to you in a single match.”
Mystical Ulua is Maui’s 2nd ability.
Maui creates a pillar that teleports allies to him if they stand in it for 1 second.
Simply put, you’ll need to create as many pillars as possible and hope that your teammates do the rest for you. Bots rarely stand still for 1 second, so you’re usually luckier with actual players.
Should unlock naturally if you keep spamming 2.
________________________________________________________________
All in a Day’s Work Difficulty: Easy
“As Maui, successfully knock up 3 gods with a single Landfall.”
Landfall is Maui’s Ult.
After selecting an area, Maui jumps into the air and pulls up an island from that area.
Enemies standing in the area are knocked up towards Maui.
The Ult’s range is large enough to easily hit 3 targets.
In Co-op, the easiest way to get enemies grouped up for this is either:
A) – the minotaur way:
- Wait for your minotaur to spawn
- Wait for enemies to group up around it
- Press 4
B) – the base way:
- Wait for at least 3 bots to be dead at the same time
- Near their base, wait for them to respawn
- At their exit, press 4
Medusa
Look at Me! Difficulty: Easy
“As Medusa, stun or kill three or more enemy Gods using Petrify.”
Petrify is Dusa’s Ult.
After a short wind-up, Dusa stuns enemies in a large cone in front of her.
Thanks to the longe range, it’s not too bad to hit 3 enemies with this.
Still, here’s the 2 best situations to get this in Co-op:
A) – the minotaur way:
- Wait for your minotaur to spawn
- Wait for enemies to group up around it
- Press 4
B) – the base way:
- Wait for at least 3 bots to be dead at the same time
- Near their base, wait for them to respawn
- At their exit, press 4
________________________________________________________________
So Slippery Difficulty: Easy
“As Medusa, deliver the killing blow to an enemy God using Lacerate.”
Lacerate is Dusa’s 3rd ability.
Dusa dashes forward, rooting the first enemy hit.
The damage is ok; however, using a dash offensively often makes you an easy target.
In Co-op, simply weaken a bot until it flees and, when its health is low enough, press 3.
Mercury
Speed Demon Difficulty: Medium
“As Mercury, reach 600 Movement Speed.”
Maximum Velocity is Mercury’s 2nd ability.
When activated, he gets an attack speed buff. Also, the ability passively increases Movement speed.
Movement speed can be increased by leveling up, buying items, and some passive effects.
So, the easiest way to reach 600 Movement Speed is:
- Reach LV 20
- Buy movement speed items (i.e. Katana tree, Ancient Blade tree, Arondight, Dawnbringer…)
- Get a movement speed boosting relic (i.e. Heavenly Wings)
- Get buffed (e.g. Amy’s speed aura, Atlas’ dash, He Bo’s scroll, Janus’ portals, Maui’s Ulua)
- As Mercury, max out the second ability
________________________________________________________________
Around the World Difficulty: Easy
“As Mercury, travel 75,000 feet in a single game.”
Fastest God Alive is Mercury’s Passive.
The more Mercury travels, the stronger he gets.
Just keep moving.
Can be done in Arena.
Achievement unlocks after the match.
Merlin
Infused with Power Difficulty: Easy
“As Merlin, successfully hit Enemy gods 15 times with a basic attack while Overload is active.”
Overload is Merlin’s Passive.
After casting 3 spells, Merlin’s next basic attack deals more damage.
So:
- Use any 3 abilities
- Get close to an enemy god
- Hit a basic attack
- Repeat
________________________________________________________________
Elemental Mastery Difficulty: Easy
“As Merlin, kill an enemy god in each stance: Arcane, Fire, and Ice.”
Elemental Mastery is Merlin’s Ult.
Merlin switches his elemental stance (and deals some damage).
His abilities change depending on his current stance.
While you’re animation-locked, you can select the exact stance you want to switch to.
Fire deals the most damage and usually gets the most kills.
Frost is mostly used for poking, but can be used to finish off enemies.
Arcane is mostly used for CC, but deals decent damage if everything hits.
Just make sure to switch your stance after all abilities in your current stance are on cooldown.
This should unlock naturally after a few matches.
Morgan Le Fay
Strength Drawn From Pain Difficulty: Easy
“As Morgan Le Fay, gain all five Empowered Blade Symbols to reach an empowered state five times in a single match”
Empowered Blade is Morgan Le Fay’s Passive.
Hitting an ability applies a mark on an enemy and grants a symbol.
Since the first ability has 3 forms, there are 5 abilities in total; so there’s also 5 symbols in total.
Once all 5 symbols are active, they grant a buff for 10 seconds.
This can be combined with Morgan Le Fay’s other achievement:
- Build cooldown reduction items
- Spam every ability
- Get every individual symbol until you have all 5
- If you got all symbols quickly, use your Ult for the other achievement
- Use the buff in whatever way fits until it falls off
- Repeat
________________________________________________________________
Power Devoured Difficulty: Medium
“As Morgan Le Fay, consume all five Empowered Blade Marks with a single cast of Consuming Power”
Consuming Power is Morgan Le Fay’s Ult.
First, it consumes marks applied by abilities from enemy gods in a large cone.
Then, it shoots 3 piercing projectiles.
You need to apply every mark on enemy gods and them consume them off of them.
Marks last 30 seconds and you need to hit your 1st ability 3 times, so cooldown reduction helps.
So, the simplest combo to do this is:
- Build as many cooldown reduction items as possible
- Press 1 -> 1
- Press 1 -> 2
- Press 1 -> 3
- Press 2
- Press 3
- Press 4
Mulan
Two for One Difficulty: Easy
“As Mulan, hit 2 enemies with all three strikes of Divine Mastery in a single ability use”
Divine Mastery is Mulan’s Ult.
First she dashes forward, rooting enemy gods hit in a wide area around the dash.
Then she thrusts the ground, knocking up enemy gods in an equally wide area in front of her.
Finally she shoots a piercing projectile, dealing damage to enemy gods in a line.
The first 2 hits are very wide, and will easily hit multiple targets.
The final shot, however, requires enemies to be lined up, which doesn’t always happen.
The best ways to get this are when bots are either respawning or grouping around your minotaur.
However, the range on this Ult is very generous, so just press 4 when you see 2 grouped up bots.
________________________________________________________________
Weapon Mastery S Difficulty: Medium
“As Mulan, win a match with all weapons fully mastered”
Training Arc is Mulan’s Passive.
Mulan’s abilities become stronger as she deals damage to enemy gods with them.
To max every ability, you need to deal…
- 5000 damage with the 1st ability (~35 uses)
- 5000 damage with the 2nd ability (~20 uses)
- 1200 damage with the 3rd ability (~10 uses)
Building cooldown reduction and power items is the best way to go.
Keep spamming every ability throughout the match.
The achievement unlocks when you win.
Ne Zha
Two’s a Crowd Difficulty: Easy
“As Ne Zha, bounce Universe Ring Toss between two enemy Gods, hitting each at least twice.”
Ring Toss is Ne Zha’s 1st ability.
Ne Zha throws a ring that deals damage and bounces between enemies, up to 8 times.
Just keep spamming 1.
Should unlock naturally once the ability is maxed.
________________________________________________________________
Watch This Difficulty: Easy
“As Ne Zha, stun an enemy using Armillary Sash and then use the Wind Fire Wheels Ability on them.”
Armillary Sash is Ne Zha’s 3rd ability. He throws a sash, stuns a god and pulls himself to them.
Wind Fire Wheels is Ne Zha’s Ult. He dashes forward and launches a god up in the air.
Both the stun and the launch can be beads’d.
Simply put:
- Find a target
- Get in sash range
- Press 3
- Press 4
Neith
Gymnast Difficulty: Easy
“As Neith, kill an enemy god with the damage from backflip.”
Backflip is Neith’s 3rd ability.
Neith does a backflip that slows and deals damage as she goes up into the air.
The easiest way to get this is:
- Build power items
- Weaken a squishy bot as low as possible
- As they flee, press 3
________________________________________________________________
Arrow to the Knee Difficulty: Medium
“As Neith, root three or more enemy gods with one Spirit Arrow.”
Broken Weave is Neith’s Passive. When enemy gods die OR when you press 3, weaves spawn.
Spirit Arrow is Neith’s 1st ability. It’s a piercing projectile.
If the spirit arrow collides with a weave, all enemies near the weave take damage and are rooted.
There can only be 1 weave set by pressing 3.
More specifically, the weave placed by your 1st backflip will disappear if you do a 2nd backflip.
This makes getting this achievement early in Co-op a bit tricky:
- Get Beads
- As the match starts, run towards the enemy blue buff
- Get in range so that you can hit all bots with 1 backflip
- Press 3 -> bots will use Beads against the slow
- Wait for the bots’ beads to fall off (~1.5 seconds)
- Aim for the weave
- Press 1
Alternatively, you can try to setup a trap weave in the center of the map, lure bots on top of it, and root them there. I found the first approach more consistent, though.
Nemesis
Back at Ya Difficulty: Hard
“As Nemesis, kill an enemy using the damage reflect from Retribution.”
Retribution is Nemesis’ 3rd ability.
It’s a temporary shield that reflects 50% of any damage received back to the attacker.
Getting hit by hard CC (= push, pull, stun, silence, taunt, disarm) removes the shield.
This is very difficult to do in Co-op, since bots will always prioritize fleeing when they’re at low health. They won’t attack and therefore don’t give you a chance to reflect damage.
So, I recommend grinding some casual Arena matches.
Make sure to have your shield ready for the point when an enemy is at low health.
They’ll either flee or fight – if you notice them fleeing, you can try to chase them with your 1st ability and try to force a fight. Being at low health yourself may also help to keep them fighting.
Alternatively, you can ask a friend to fight you in a Ranked 1v1 on a dead server.
One of the easiest gods to get this against would be Scylla:
- Play on South-East Asia or Australia Server
- Queue for Ranked 1v1 with a friend at the same time (similar division required)
- Get into the same lobby (check with specific bans)
- Setup a Nemesis vs Scylla match
- Weaken Scylla to low health
- Have Scylla place her 2nd ability
- Before the ability explodes, press 3
Note that similar damage reflection effects (e.g. Thorns relic) should be avoided, since they can deny you this achievement. The kill MUST happen using this shield specifically.
________________________________________________________________
Those are my Protections Difficulty: Very Easy
“As Nemesis, steal away 500 protections using Divine Judgement during a single match.”
Divine Judgement is Nemesis’ Ult.
Nemesis chooses an enemy god who then has their health and movement speed reduced.
Also, it steals away 25% of the enemy’s protections.
In Co-op, the guardian bots will always build tanky.
So, whenever your Ult is ready, make sure to use it on them.
The achievement should unlock after 5-8 Ults.
Building cooldown reduction items is helpful, but not necessary.
Nike
Path To Victory Difficulty: Medium
“As Nike, complete all three goals of Nike’s Passive “To Victory” within the first 20 minutes of a match.”
Can NOT be done in Co-op
To Victory! is Nike’s Passive.
Upon reaching 3 specific goals, Nike’s team gains increased power and movement speed.
Goal #1 is to kill 10 enemy gods as a team.
Goal #2 is to kill 250 minions as a team.
Goal #3 is to have 2 ally gods on LV 20.
Kills are rarely the issue here, so that goal is free.
Minion kills can be an issue if you’re playing a game mode that only has 1 lane.
Having 2 ally gods on LV 20 can be an issue if you’re playing Joust.
Since there is also a time limit here, you’d better avoid Conquest for this.
Therefore, stick to Slash, and hope for a decent match.
________________________________________________________________
Rend Away! Difficulty: Easy
“As Nike, disarm 2 or more enemy Gods at the same time using her Rend.”
Rend is Nike’s 1st ability.
Nike slams the ground 3 times, dealing damage in a line AoE in front of here.
If all 3 slams hit the same enemy god, it disarms them.
Nike can be stunned while slamming, stopping the ability prematurely.
The goal is to hit 2 enemy gods 3 times using this ability.
In Co-op, this can be done quickly:
- Get Beads
- As the match starts, run towards the enemy blue buff
- Get in range
- Press 1
- After the 1st slam, use Beads (you might get stunned here)
- Hit the other slams
Nox
Embrace the Darkness Difficulty: Easy
“As Nox, use Siphon Dark and Shadowlock to deliver the killing blow to at least 3 enemies in one match.”
Siphon Dark is Nox’s 2nd ability. It’s a silencing circle AoE that deals damage after 2 seconds.
Shadow Lock is Nox’s 1st ability. It’s a crippling and rooting grab that deals tick damage.
Placing a bubble and holding an enemy god inside it is Nox’s signature combo.
Step by step for Co-op:
- Build power items
- Find a squishy bot
- Weaken the bot using everything you have until they flee
- Chase the bot until your abilities are ready
- Press 2 and place the bubble into the bot’s fleeing path
- Press 1 to grab the bot while they’re running through the bubble
- Repeat
________________________________________________________________
Where Did I Go? Difficulty: Very Easy
“As Nox, remain inside an ally for 8 Seconds.”
Shadow Step is Nox’s 3rd ability.
Nox dashes forward, piercing through enemies and going inside ally gods.
Press 3 to go into any teammate who’s not close to death and wait.
Nu Wa
Skill Shot Difficulty: Very Hard
“As Nu Wa, get 100 kills with Fire Shards.”
Fire Shards is Nu Wa’s Ult.
Nu Wa flies up into the sky and fires 1 shard on every alive enemy god.
The Ult will always hit and is a good way to finish off low-health enemies.
So, whenever you notice that someone’s low, press 4.
You need to get 100 kills in total, over multiple matches.
This takes a lot of patience. Just keep at it.
________________________________________________________________
Clay Explosion Difficulty: Easy
“As Nu Wa, kill an enemy God by exploding Clay Soldiers with Shining Metal.”
Clay Soldiers is Nu Wa’s 2nd ability. She summons up to 3 minions that attack enemy gods.
Shining Metal is Nu Wa’s 3rd ability. It’s a piercing projectile.
If the projectile collides with soldiers, they explode, dealing extra damage per soldier hit.
In Co-op, it’s easily enough damage to finish off a fleeing bot:
- Build power items
- Find a squishy bot
- Weaken the bot
- As they run away, press 2 (in the best case, the soldiers body-block the bot)
- Press 3 and make sure to hit at least 1 of your soldiers
It’s the explosion that must get you the kill, not the projectile triggering it.
So, if your target is very low on health, try to only hit your soldiers.
Odin
Cage Match Difficulty: Easy
“As Odin, kill four enemy Gods inside of your Ultimate, Ring of Spears.”
Ring of Spears is Odin’s Ult.
Odin creates a ring around him, consisting of 8 breakable walls of spears.
Enemy gods can jump out of the ring, but will take damage for that.
The ring lasts for 5 seconds.
This achievement can be combined with Odin’s other achievement.
Simply put:
- Weaken any bot
- Press 4 while they’re still close
- Finish them off within 5 seconds (preferably, using a bird bomb)
- Repeat
________________________________________________________________
Bird Bomb Difficulty: Medium
“As Odin, kill fifteen enemies in a single match using Ravenshout and Lunge together.”
Ravenshout is Odin’s 2nd ability. It gives a shield.
Lunge is Odin’s 1st ability. Odin leaps forward, dealing damage in a circle area where he lands.
If the Ravenshout shield is active, the Lunge consumes it to deal more damage.
15 kills in 1 match is a lot. in a casual match, it’s extremely difficult to do.
However, you don’t have to be the best Odin player to get this in Co-op (still takes some practice):
- Build power and crit items
- Weaken enemy bots using your 3rd ability and basic attacks until they flee
- Press 2
- Press 1
- Repeat
Olorun
Eternal Ruler Difficulty: Medium
“As Olorun, with a single ability use, kill two enemies within Sanctified Field”
Sanctified Field is Olorun’s Ult.
Olorun creates a wide rectangular field that speeds down all enemies inside it.
It lasts 5 seconds.
The achievement description is a bit vague.
I got multiple double kills with a single Ult use, but never got this.
Eventually, this unlocked after I got a double kill while being buffed from the 2nd ability.
So I’m assuming the ‘single ability use’ actually refers to Olorun’s 2nd ability.
Overflowing Divinity is Olorun’s 2nd ability.
For up to 6 seconds, Olorun’s attack speed is increased by 40%.
He also deals some extra damage.
So, step by step:
- Build attack speed and magical power items
- Find a pair of bots
- Weaken them to ~40% health
- Press 4
- Press 2
- Hold left click
________________________________________________________________
Fabricated Destiny Difficulty: Easy
“As Olorun, reach the maximum critical hit chance possible with Touch of Fate”
Touch of Fate is Olorun’s Passive.
Olorun gains 1% crit chance per 10 magical power from items.
The limit for this is at 70%, or 700 power.
You’ll need a full build, which is difficult to get in Co-op.
So, I recommend to stick to casual Arena for this.
All you need are high-power items (as of Charon patch):
- Vampiric Shroud -> Sacrificial Shroud (available at LV 20)
- Book of Thoth and Warlock’s Staff (must be fully stacked for max effect)
- Rod of Tahuti
- Doom Orb (gives more power after killing a minion wave)
- Bancroft’s Talon (gives more power when your health is low)
Osiris
The Afterlife Awaits You Difficulty: Medium
“As Osiris, land the Ability Lord of the Afterlife on three or more enemy Gods.”
Lord of the Afterlife is Osiris’ Ult.
Osiris leaps forward, dealing rooting damage to enemies in a small landing circle.
This needs to be done in a single use of the Ult.
In Co-op, the best times to attempt this is:
- When bots group up for your minotaur
- When bots got wiped, respawned and are exiting their base
The easiest way to get this achievement is by having gods like Ares, Athena, Hades or Xing Tian in your team. Have someone pick one of those and wait for them to group up some bots for you.
________________________________________________________________
Simply Stunning Difficulty: Very Easy
“As Osiris, stun 3 different enemy Gods with his tether in a single game.”
Judgement Tether is Osiris’ 3rd ability.
Upon activation, Osiris creates tethers between himself and all nearby enemy gods.
After 4 seconds, all tethered enemies will be stunned.
If they get too far away from Osiris, the tether breaks and stun will be avoided.
This does not have to be done in a single tether use, so it will unlock naturally.
Still, you can get this quickly in Co-op:
- Get Aegis
- As the match starts, run towards the enemy blue buff
- Run into the crowd
- Press 3
- Keep bots close for 4 seconds (use Aegis for safety)
Pele
Everlasting Flame Difficulty: Easy
“As Pele, trigger Everlasting Flame and survive 3 separate times in one match.”
Everlasting Flame is Pele’s Passive.
When Pele falls below 50% health, she gets a power and lifesteal buff that lasts for 4 seconds.
Can only happen once every 30 seconds.
All you have to do is:
- Fall below 50% health by whatever means
- As you get the buff, run away
- Get out of combat
- Repeat after 30 seconds
________________________________________________________________
Get Erupted! Difficulty: Medium
“As Pele, hit at least one enemy god with each ring of Eruption in a single ability use.”
Eruption is Pele’s 2nd ability.
Pele makes a area around her erupt, knocking up enemies.
As the ability is leveled up, it ends up with 3 knock up rings.
You need to max this ability to do this, which can be done by LV 9.
Then, you need to find at least 3 grouped up enemy gods that are spaced in just the right way.
This will take a lot of luck.
There are 2 scenarios in the middle of a Co-op Arena match in which bots are usually grouping up.
You can always try to get this achievement in:
A) – the minotaur way
- Wait for your minotaur to spawn
- Wait for bots to group up around him
- Get into position
- Press 2
B) – the base way
- Have at least 3 bots respawn at the same time
- As they leave their base, get into position
- Press 2
Persephone
Grasping Vines Difficulty: Medium
“As Persephone, trap the entire enemy team with one use of her Grasp of Death ability.”
Grasp of Death is Persephone’s Ult.
Persephone shoots a projectile that keeps going forward until it hits either a wall or an enemy god.
Then, it creates a breakable cage where it collided and a big entrapping circle area around it.
This area lasts until the cage breaks or for 5 seconds.
Since the area is very large, it’s not too difficult to hit multiple targets.
In Co-op, the easiest way to get this is to:
- Wait until the entire enemy team is dead
- Shortly before they respawn, aim for the center of their base’s back wall
- Before they spawn, Press 4
The shot should go through one of the exits, hit the back wall and create the entrapment area.
The area is large enough to catch all bots as they spawn, if placed correctly.
The description says ‘the entire enemy team’, which means that this achievement may be easier to unlock in Ranked 1v1.
________________________________________________________________
Master Harvester Difficulty: Easy
“As Persephone, accumulate 150 Pomegranate Seeds over the course of a single match.”
Pomegranate Seeds is Persephone’s Passive.
Anytime one of her plants is activated, Persephone gets a seed (max 100).
When entering the fountain, these seeds are sold for 3 gold each.
Harvest is Persephone’s 2nd ability.
It places a harvestable skull that turns into a explodable flower after 4 seconds.
The skull can be activated by hitting it with a basic attack or her 3rd ability.
Spam 2 and make sure to activate your skulls and flowers.
Building cooldown reduction items helps for this.
Poseidon
Water Rises Difficulty: Very Easy
“As Poseidon, keep your tide meter above 50% for more than a minute.”
Changing Tides is Poseidon’s Passive.
It’s a movement speed and ability damage buff that depends on a Tide meter.
Hitting basic attacks increases the meter, using abilities decreases it.
Simply put, only use basic attacks until this unlocks.
To reach 50% faster, you can use your 2nd ability and use its buff to hit 3 basics at once.
________________________________________________________________
Release the Kraken Difficulty: Easy
“As Poseidon, hit three or more enemy Gods with your Ultimate.”
Release the Kraken! is Poseidon’s Ult.
Poseidon summons the Kraken at a ground target location, dealing damage in a big circle area.
Enemies in the center of the circle take more damage, are knocked up and stunned.
In Co-op, you can hit 3 bots at once when they…
- … group up to attack your minotaur.
- … just respawned at leave their base.
Just make sure to have your Ult ready for these situations and you’ll be fine.
Ra
Searing Steal Difficulty: Very Hard
“As Ra, use your ultimate, searing pain, to steal the Fire Giant from your opponents.”
Can NOT be done in Co-op
Searing Pain is Ra’s Ult.
Ra fires a laser in front of him, dealing massive damage to all enemies in its line.
For this achievement, you need to specifically steal the Fire Giant in the Conquest map.
Ra is a decent pick for the Mid role, but can also be played in Solo.
I recommend learning both roles and finding role-specific builds that work for you.
I usually went full damage in Mid, but included some health boosting rods for Solo.
Ra’s Ult scales well with magical power, and it usually reaches ~1,300 damage per hit.
The Fire Giant spawns at the 10 minute mark with ~12,000 health.
Every minute, its health increases by ~500.
A fight around the Fire Giant usually happens after all T1 and some T2 towers have fallen, which usually is ~25 minutes into a match. At that point, his health can surpass 20,000 health.
This means that a average Ra Ult hits for ~5% of the Fire Giant’s health.
The timing for this is very precise.
To put it into a picture – You need to use your Ult when the health bar looks like this:

(Max Health of this Fire Giant was at ~11,000)
Now for the actual strategies.
There are 2 possible scenarios for this:
A) – Steal by opportunity
- Place a ward near the Fire Giant
- Survive a lost team fight in late game
- Hope that the enemy team starts to fight the Fire Giant
- Sneak into Ult range (place sentry wards in your jungle beforehand to avoid detection)
- Using the ward, wait until the health bar reaches ~5%
- Press 4
B) – Steal by definition
- With a few teammates and most enemies around, start the Fire Giant with your team
- As enemies approach, fall back and hope they take over
- Have the enemy team get most of the Fire Giant kill (they need to deal >50% of the damage)
- With your team, attack the enemy team and take over the rest of the Fire Giant
- Wait until the health bar reaches ~5%
- Press 4
If the enemy team randomly starts the Fire Giant, you can also try the second approach here.
Both strategies require long matches, patience and luck.
Funnily enough, you will get more opportunities for this if your team performs poorly.
________________________________________________________________
Solar Blessing Difficulty: Hard
“As Ra, end a game with over 30,000 player healing.”
Can NOT be done in Co-op
Solar Blessing is Ra’s 3rd ability.
Ra puts a circle area on the ground which heals allies and deals tick damage to enemies.
On top of that, the area also buffs protections and power.
The healing ticks every second at a rate of rank * 12 (so 12 at rank 1, 60 at rank 5).
The area lasts for 6 seconds, so a maxed heal can amount up to 60 * 6 ticks * 5 allies = 1800.
To get to 30K healing, you’ll need ~17 optimal uses.
Since that never happens, and you’re more likely to only heal 2 people (including yourself), you’ll probably need ~42 uses.
Heals can be (and usually is) decreased by anti-healing, but can also be increased with items.
Rod of Asclepius is basically a must have for this achievement.
Having healing dealt increased by 30% reduces the optimal calculation down to ~13 uses and the realistic one to ~32 uses.
You’ll need to play a longer game mode for this, where your team often groups up.
I recommend sticking to Assault or Slash.
Just make sure to build Rod of Asclepius + cooldown reduction items, and spam 3 for 20 minutes.
Raijin
Drums in the Distance Difficulty: Easy
“As Raijin, hit an enemy at the max range in your Taiko Drums Ability.”
Taiko Drums is Raijin’s Ult.
He shoots up to 4 projectiles, which can have 3 different effects; Raijin’s abilities change.
The 1st ability shoots a projectile that deals full damage.
The 2nd ability shoots a projectile that taunts enemies and deals some damage.
The 3rd ability shoots a projectile that fears enemies and deals some damage.
The Ult has a similar range to Ra’s Ult, but each projectile shot travels slowly.
I recommend spamming the Ult as much as possible and hoping for the best.
Once you get a feeling for the range, this will unlock naturally.
________________________________________________________________
Go My Friend Difficulty: Very Easy
“As Raijin, do damage to three or more enemies with his minion Raiju.”
Raiju is Raijin’s 2nd ability.
After targeting an enemy, Raijin marks them with Raiju, which reveals and slows them for 4 seconds.
The next time the marked target is hit by Raijin, the mark bounces to other enemies close to the first target, applying a DoT and slow effect to everyone hit.
You can do this quickly in Co-op:
- As the match starts, run towards the enemy blue buff
- Get into a safe range
- Press 2
- Press 1
Rama
Ouch! Difficulty: Very Easy
“As Rama, Cripple 3 or more enemy Gods in a match using Rolling Assault.”
Rolling Assault is Rama’s 3rd ability.
Rama rolls forward, and his very next basic attack will cripple an enemy god if hit.
In Co-op, it’s very safe to use your dash offensively:
- Locate a bot
- Press 3 to dash toward the bot
- Hit a basic attack
- Repeat
________________________________________________________________
I’m a Pro Difficulty: Medium
“As Rama, kill two enemy Gods while in your Ultimate.”
Astral Barrage is Rama’s Ult.
Rama launches into the air and may shoot up to 3 arrows at a circular ground target area.
With each shot, the target area gets smaller, but the damage increases.
In Co-op, this can be done by weakening 2 bots and finishing them off while they flee:
- Build crit and attack speed items (for easier weakening)
- Weaken bot #1 until it flees
- Find another close bot #2
- Weaken bot #2 until it flees (before bot #1 makes it to base)
- Press 4
- Finish off bot #1
- Finish off bot #2
Ratatoskr
Got Nuts? Difficulty: Medium
“As Ratatoskr, stun three or more opponents at once with Acorn Blast.”
Acorn Blast is Rat’s 3rd ability.
Rat shoots 3 acorns forward in a cone. If an enemy is hit by 3 acorns, it stuns them.
The area in which you can hit 3 acorns is incredibly small.
However, that area can be increased by utilizing Rat’s Passive.
Acorn of Yggdrasil is Rat’s Passive.
He spawns with a unique Acorn item that has its own item tree.
The final options are (all cost 2050 gold):
Evergreen Acorn – bonus life steal from abilities
Thickback Acorn – buffs the 2nd ability and gives it a 2nd charge
Bristlebush Acorn – buffs the 1st ability so that it can crit
Thistlethorn Acorn – buffs the 3rd ability and makes it shoot 5 acorns
Building Thistlethorn Acorn is basically essential for this achievement.
Shooting 2 more acorns transforms the original small hit area into a short line.
The most consistent solo strategy that worked for me:
- Build Thistlethorn Acorn, defensive items and Beads
- Wait until at least 3 bots are somewhat grouped up
- Press 1 and 2 to aggro either the assassin or warrior bot
- While the bot attacks you, try to line up that bot with 2 other nearby bots
- Press 3
Alternatively, have an Ares, Athena, Cerberus, Hades or Xing Tian in your team.
Those gods excel at grouping up enemies and are therefore very handy for this.
________________________________________________________________
Look out Below! Difficulty: Easy
“As Ratatoskr, knockup three or more enemy Gods at once with Through the Cosmos.”
Through the Cosmos is Rat’s Ult.
Rat leaps on a branch in the sky, from where he can leap to 2 other branches.
After the 3rd branch (or when the Ult is cancelled / times out), Rat jumps down to a targeted area. Enemy gods in that area take damage and are knocked up.
Since the landing area has an OK range, you can use your Co-op minotaur for this:
- Wait for your minotaur to spawn and get close to the Arena’s center
- Press 4
- Wait for bots to group up around your minotaur
- Target as many bots as possible
- Land in the targeted area
Ravana
Feel the Rush Difficulty: Easy
“As Ravana, kill ten enemies with the damage from your Ultimate.”
Mystic Rush is Ravana’s Ult.
Ravana leaps to a target location, dealing damage and debuffing enemies so that they take more damage from all sources. Also, Ravana gets a buff to take less damage from all sources.
Both effects last for 5 seconds.
This does not need to be done in 1 match.
You can get 1 Ult kill in 10 different matches and you’ll get this.
This should unlock naturally by the point you reach Mastery 1 (if you’re grinding in Co-op).
________________________________________________________________
Watch My Moves Difficulty: Very Easy
“As Ravana, break out of a root using Overhead Kick.”
Overhead Kick is Ravana’s 2nd ability.
Ravana shoots a short range projectile and becomes CC and damage immune for 1 second.
You can check gods with root abilities in the General – Fighting section.
In Co-op, use your 2nd ability when you get rooted by:
- Artemis
- Baron Samedi
- Cernunnos
- Neith
- Osiris
- Sylvanus
Scylla
Yes, I’m a Monster Difficulty: Hard
“As Scylla, reset your Ultimate three or more times in a single use.”
I’m a Monster is Scylla’s Ult.
Scylla transforms for 6 seconds and may target a small circle ground area.
Upon confirming, after a short wind-up, any enemy in that area will take massive damage.
If this damage kills an enemy god, the timer resets and Scylla can target again.
You need to get a Quadra Kill using only your Ult, where each Ult bite kills only 1 enemy.
If one of the Ult’s bites kills 2 enemies, you can still save that attempt by going for a Penta.
Since the Ult’s damage output is very high, you can always try to get this Quadra Kill whenever bots are somewhat grouped up. If you have random players in your team who can’t kill bots quickly yet, your chances to pull this off by ‘securing’ some kills aren’t even that bad.
However, the minotaur is a more consistent Co-op strategy:
- Build as many magical power items as possible
- Wait for your minotaur to spawn
- Wait for bots to group up around the minotaur
- Weaken as many bots as possible using your 2nd ability
- Weaken the tankier bots further using your 1st ability
- Press 4
- Finish off 4 bots, 1 by 1
________________________________________________________________
Got You! Difficulty: Easy
“As Scylla, use Sic’em to root three enemy Gods.”
Sic ‘Em is Scylla’s 1st ability.
Scylla sends 2 hounds forward who root and cripple the first enemy hit.
At max rank, it also roots and cripples 2 additional enemies who are near the hit one.
You will probably get this while grinding the Scylla’s other achievement.
You can root all melee bots while they go for the minotaur:
- Max the 1st ability (earliest at LV 9)
- Wait for your minotaur to spawn
- Wait for bots to group up around the minotaur
- Press 1
Serqet
It’s Spreading Difficulty: Medium
“As Serqet, kill an enemy God with your Last Breath Poison and have it spread to two enemy Gods.”
Last Breath is Serqet’s Ult.
She jumps on a targeted enemy, stuns them, poisons them and pushes them away.
The poison deals 6 ticks of damage (including the initial sting) over 5 seconds.
If the target dies while poisoned, they explode and spread the poison to other nearby enemies.
Also, leveling the Ult gives a passive bonus to your crit chance.
Apparently, the achievement description is wrong.
You can get this achievement by killing an enemy god and spreading the poison to 2 minions.
Following that idea:
- Wait until an enemy minion wave is nearby
- Find a squishy target
- Weaken the target
- Press 4, push the target towards the minions
- Use other abilities to kill the target near the enemy minions
________________________________________________________________
Critalicious Difficulty: Easy
“As Serqet, have all three strikes of Death Bane trigger Critical Strike Hits.”
Death Bane is Serqet’s 1st ability.
It’s a zigzag dash that hits up to 3 times. Each hit can crit.
In any match, you can get this by:
- Build all crit items and prioritize leveling the Ult
- Get into close combat range
- Aim for as little range as possible
- Press 1
Set
Rise of the Spawn Difficulty: Medium
“As Set, control 6 Spawn at one time.”
Spawn of Set is Set’s 2nd ability.
Set creates a sand clone of himself that stays at the spawn location for up to 12 seconds.
Has up to 2 charges at a time.
There can ‘only’ be 8 spawns at once.
They can be controlled using Set’s 1st ability.
Kingslayer is Set’s Ult.
Set gains some movement speed and becomes empowered for 12 seconds.
In this empowered state, Set’s attacks apply marks on enemy gods.
At 4 marks, Set gets healed and gets a charge for his 2nd ability.
If Set is currently holding 2 charges, the bonus charge is consumed right away, spawning a Spawn.
The fastest way to have 6 Spawns active at once is:
- Build attack speed items
- Get close to a tanky enemy god
- Press 4
- Hold left click until 4 Spawns have spawned (should take 16 hits)
- Press 2
- Press 2
- Press 1
________________________________________________________________
From All Angles Difficulty: Easy
“As Set, hit 3 different gods with your spawn with a single instance of Skewer.”
Skewer is Set’s 1st ability.
It’s a slowing projectile that also causes all Spawn of Set to dash to a targeted point.
You can get this quickly in Co-op:
- As the match starts, run towards the enemy blue buff
- Spawn a Spawn very close to the crowd of bots
- Aim the 1st ability so that the Spawn crosses through the crowd
- Fire the 1st ability
Shiva
Three Prongs of Trishula Difficulty: Easy
“As Shiva, pull 3 enemy gods in a single use of Emblazoned Sweep.”
Emblazoned Sweep is Shiva’s 1st ability.
Shiva pulls enemy gods in a small circle around him closer to him.
This also creates a small circle with a burning outline, which deals some damage.
This can be done quickly in Co-op:
- Get Blink
- As the match starts, run towards the enemy blue buff
- Get in Blink range
- Use Blink to get into the center of the crowd of bots
- Quickly Press 1
________________________________________________________________
Dance of Bliss and Destruction Difficulty: Easy
“As Shiva, heal allies twice and deal damage to enemy gods twice in a single use of Shiva Tandava.”
Shiva Tandava is Shiva’s Ult.
Shiva goes into a dancing state, changing his abilities and performing steps every 1.5 seconds.
The 1st ability makes the next step heal himself and allies in an area around him.
The 3rd ability makes the next step deal damage to enemies in an area around him.
The 2nd ability makes the next step a mix between 1 and 3, but at half their power.
The 2nd ability also increases the range of the area for the next step.
This boils down to using your Ult optimally:
- Get in the center of a team fight
- Press 4
- Press 2 – perform step #1
- Press 1 – perform step #2
- Press 2 – perform step #3
- Press 3 – perform step #4
Alternatively, you should be able to unlock this while having the 2nd ability active the entire time.
Just make sure to get close enough to both allies and enemies.
Skadi
Ice isn’t Nice Difficulty: Easy
“As Skadi, catch 3 or more enemy Gods on Permafrost.”
Permafrost is Skadi’s 3rd ability.
It’s a circle area that deals tick damage to enemy gods and makes them slide within the area.
You can get this quickly in Co-op:
- As the match starts, run towards the enemy blue buff
- Get in Permafrost range
- Press 3
________________________________________________________________
Who let Kaldr out? Difficulty: Easy
“As Skadi, kill 3 or more enemy Gods in a match with Kaldr.”
Kaldr, The Winter Wolf is Skadi’s Passive.
Kaldr is Skadi’s dog, which can help her in battle.
He can take up to 5 hits from gods or 25 hits from minions.
You can command him to attack by using either the 2nd ability or the Ult.
Rune of the Hunt is Skadi’s 2nd ability. After selecting any enemy, Kaldr will attack that target.
Winter’s Grasp is Skadi’s Ult. She yeets Kaldr towards an enemy if he isn’t attacking already.
The Ult also surrounds Skadi & Kaldr with a snowstorm aura AND it fully heals Kaldr.
Since Kaldr needs to kill enemies (and not the snowstorm), it’s better to stick to your 2nd ability for kills. If Kaldr is currently dead, you can use the Ult to quickly heal him before you go for a kill.
This achievement will probably unlock naturally.
In Co-op, just make sure to help Kaldr out a little and carefully weaken isolated bots.
Sobek
Aren’t You a Tank? Difficulty: Easy
“As Sobek, use all four of your abilities to kill an enemy within 10 seconds.”
Charge Prey is Sobek’s 1st ability.
Sobek dashes forward, stopping at the first enemy god or minion hit and throws them behind him.
Tail Whip is Sobek’s 2nd ability.
Sobek spins around, knocking back all enemies near him.
Sickening Strike is Sobek’s 3rd ability.
It’s an AoE attack that hits enemies in a short cone in front of Sobek, applying anti-heal.
Lurking in the Waters is Sobek’s Ult.
Sobek submerges for 5 seconds. Then, he emerges, dealing damage in a large circle area.
10 seconds is more than enough time for this.
If abilities aren’t enough, try to hit some basic attacks between abilities.
Any order will work, but I’d recommend to start with the Ult:
- Build power items
- Find an isolated, squishy target
- Press 4 -> wait 5 seconds -> deal max Ult damage
- Press 1
- Press 3
- Press 2
________________________________________________________________
Get Plucked Difficulty: Very Easy
“As Sobek, pluck fifteen Enemy Gods with Charge Prey in a single match.”
Just spam 1 until this unlocks.
Building cooldown reduction items may help.
Sol
Disparate Difficulty: Easy
“As Sol, kill one enemy god with the trail from Disapparate.”
Disapparate is Sol’s 3rd ability.
Sol gets a movement speed buff and a slow immunity for 3 seconds.
During that time, she leaves behind a trail when moving, which damages enemies.
Then, she becomes incorporeal, and cannot take damage for another 3 seconds.
In Co-op, you can have a bot flee along your trail:
- Get Blink
- Build magical power items
- Find a squishy bot
- Weaken the bot using the 2nd ability and basic attacks
- As the bots start to flee, use Blink to get ahead in their fleeing path
- Press 3 and make sure the bot runs along the line
________________________________________________________________
Supernova Difficulty: Medium
“As Sol, hit an enemy with all 8 strikes of Supernova.”
Supernova is Sol’s Ult.
After activating, it creates 8 small circle areas where you’re aiming, each dealing damage.
The first hit will also knock back an enemy.
The knockback makes this a bit tricky.
Your best bet is to use the Ult against stationary targets, like Hades or Ymir (when they Ult).
In Co-op, you can try your luck against Ymir or Baron Samedi bots:
- Have a Baron Samedi or Ymir bot on the enemy team
- Have your Ult ready
- Stick to either bot until they use their Ult
- Press 4, and keep your aim at them
Sun Wukong
Eye of the Tiger Difficulty: Very Easy
“As Sun Wukong, get fifteen tiger stuns in a single match.”
72 Transformations is Wukong’s 3rd ability.
He transforms into a bull, tiger or bird and dashes forward.
As a bull, he knocks up enemy gods as he runs past them.
As a tiger, he stops at the first enemy hit and stuns them.
As a bird, he just dashes, but his speed is slightly faster.
You can select between the forms by aiming up or down during targeting.
The tiger transformation is the middle form, make sure your aim is in the center of the targeting ruler when confirming the ability.
Once you get the hang of it, keep spamming 3 until the achievement unlocks.
________________________________________________________________
That’s not Me Difficulty: Hard
“As Sun Wukong, have your decoy deliver the final blow to an enemy.”
Somersault Cloud is Wukong’s Ult.
After a short wind-up, Wukong jumps on a cloud, becoming untargetable and healing himself.
He may stay there for 5 seconds, summoning a decoy to fight in his place.
After 5 seconds, Wukong jumps off the cloud, dealing damage in a big circle area.
The summoned decoy only attacks with basic attacks, dealing 50% of what Wukong would deal.
The decoy also moves at a normal speed, and can’t catch up to fleeing bots.
However, you can slow fleeing bots with some body-blocking:
- Get Blink
- Build cooldown reduction and physical power items
- Reach LV 5
- Isolate a squishy bot (luring one to any red buff works fine)
- Weaken the bot until it flees (save your 3rd ability)
- Use your 3rd ability to get well ahead of the bot (Blink helps, too)
- Press 4
- Immediately jump further ahead
- Body-block the fleeing bot
- Have the decoy kill the bot
Surtr
Kindling Flame Difficulty: Medium
“As Surtr, empower Flames of Muspell with bonus damage stacks at least 30 times in a single match”
Flames of Muspell is Surtr’s 1st ability.
He buffs his next basic attack, dealing bonus damage and applying a fire DoT to any hit enemy.
If the enemy dies while the DoT is active, the ability gets 1 stack, increasing the bonus damage.
It also spawns a Fiery Imp that deals some minor extra damage.
The most reliable way to get lots of stacks is by killing a minion whenever the 1st ability is ready.
Note that although Surtr can cleave with basic attacks, only the first target hit by the cleave will count.
Keep finishing off minions until this unlocks.
Building cooldown reduction items and relics helps here.
________________________________________________________________
Taking Aim Difficulty: Very Easy
“As Surtr, hit enemy gods with a Magma Rock, Lane Minion and Fiery Imp using Giant’s Grasp on a single match”
Giant’s Grasp is Surtr’s 2nd ability.
He picks up a nearby Fiery Imp or enemy minion and can then throw it in a straight line.
If no imp or minion are nearby, he picks up a rock instead.
If the throw hits an enemy god, it deals some damage and stuns them.
If a thrown imp hits, it also causes a small explosion, dealing some extra AoE damage.
Just keep spamming 2.
You’ll usually pick up imps and minions randomly.
Building cooldown reduction items and relics may help a little, too.
Susano
Weather the Storm Difficulty: Very Easy
“As Susano, use a Basic Attack anytime while Storm Kata is activated.”
Storm Kata is Susano’s 1st ability.
It’s a combo ability that performs up to 3 different attacks.
The 1st attack is a far reaching cone AoE attack in front of Susano.
The 2nd attack is a circle AoE attack around Susano.
The 3rd attack is a short dash.
You can cancel the ability after any attack to add a basic attack into the combo.
However, each attack must be fired within 3 seconds after the previous for the full effect.
Just make sure to cancel the 1st ability after either the 1st or 2nd attack.
Switching to instant-casting is very helpful for combos like these, too.
The timing is a bit janky, but optimally, you should go for something like this:
- Get close to target
- Basic attack
- Quickly press 1
- Right click -> left click
- Quickly press 1
- Right click -> left click
- Press 1
________________________________________________________________
Calm Before the Storm Difficulty: Easy
“As Susano, pull three or more enemies with a single use of Wind Siphon.”
Wind Siphon is Susano’s 2nd ability.
It’s a cone AoE that pulls any enemies hit towards him.
You can get this quickly in Co-op:
- As the match starts, run towards the enemy blue buff.
- Get close to the crowd of bots
- Press 2
Sylvanus
Rooted! Difficulty: Very Easy
“As Sylvanus, root twenty enemy Gods in a single game.”
Verdant Growth is Sylvanus’ 1st ability.
Sylvanus throws a seed to a ground target location, dealing damage and rooting enemies.
If it misses, the seed will eventually grow into a MP5 buffing field.
If that grown seed is destroyed, the enemy who destroyed it will take more damage for some time.
Keep spamming 1 on enemy gods until this unlocks.
Build cooldown reduction items and this will unlock by itself.
________________________________________________________________
Feel My Wrath Difficulty: Easy
“As Sylvanus, knock up three or more enemy Gods with your Wrath of Terra Ability.”
Wrath of Terra is Sylvanus’ Ult.
It knocks up enemy gods around Sylvanus and applies a poison DoT effect on them.
The minotaur is the most reliable Co-op strategy for achievements like this one:
- Get Blink
- Wait for your minotaur to spawn
- Wait for bots to group up around your minotaur
- Get in position (Blink may help)
- Press 4
Terra
Shattered Monolith Difficulty: Easy
“As Terra, root 3 enemies with a single Shatter.”
Monolith is Terra’s 3rd ability.
It creates a monolith structure that heals allied gods in an area around it.
The monolith can be broken with the 1st ability, rooting enemies and dealing tick damage to them.
Force of Nature is Terra’s 1st ability.
It’s a short range dash that can shatter any structures created by Terra.
If a structure is shattered, Terra may dash again within the next 3 seconds (but only once).
This can be done quickly in Co-op:
- As the match starts, run towards the enemy blue buff
- Press 3, placing a monolith in the crowd of bots
- Press 1, shattering that monolith
________________________________________________________________
Bless You All Difficulty: Easy
“As Terra, activate Terra’s Blessing and buff all 5 members of your team in a single cast.”
Earthen Fury is Terra’s Ult.
It buffs all allies and enemies in a big circle area around her, lasting 10 seconds.
Allies gain 10% damage mitigation and stones that heal after taking 4 instances of damage.
Enemies receive 5% more damage and stones that deal bonus damage after taking 4 hits.
Press 4 when your entire team’s around you.
Can’t be done in 3v3 or 1v1 game modes.
Buff achievements don’t always work in Co-op, so try sticking to casual Arena.
Thanatos
Wrecking Ball Difficulty: Easy
“As Thanatos, execute three or more enemies in a single match using Hovering Death.”
Hovering Death is Thana’s Ult.
He flies up into the air for 5 seconds and dives down to a ground target location, dealing stunning damage. If enemies in the landing zone were below a certain health threshold (24% at LV 5, 40% at LV 20), they are executed.
Should unlock as you improve, but can always be safely unlocked against bots:
- Find a squishy bot
- Weaken the bot with abilities and basic attacks until it flees
- Press 4
- Land on the marked, fleeing bot
- Repeat
________________________________________________________________
Reaper of Souls Difficulty: Medium
“As Thanatos, silence fifteen enemies out of their abilities.”
Soul Reap is Thana’s 3rd ability.
It’s a short cone AoE attack that deals some damage and silences enemies.
The counter for this achievement is cumulative, meaning it does not need to be done in 1 game.
Simply spamming 3 won’t reliably work for this – you need to specifically silence channeled abilities.
In Co-op, the only bots that can channel abilities are:
- Ares (Searing Flesh = flame thrower)
- Bellona (Bludgeon = the hammer, while it spins)
- Guan Yu (Taolu Assault = the spear spin that goes on for a while)
- Thor (Berserker Barrage = the whirlwind)
- Vamana (Clear the Path = dash)
In casual games, other possible channel abilities include:
- Anubis (Plague of Locusts = the cone shaped spray)
- Artio (Heavy Charge = bear dash)
- Atlas (Kinetic Charge = dash)
- Bacchus (Belch of the Gods = the cone shaped belch)
- Cabrakan (Tremors = the repeated ground slamming)
- Cerberus (Ghastly Breath = flame breath)
- Charon (Swift Voyage = dash)
- Charybdis (Capsize = the water shot, while it still charges)
- Chiron (Giddyup! = dash)
- Cliodhna (Banshee’s Wail = the cone shaped scream)
- Cthulhu (The Mire = the swampy circle AoE)
- Da Ji (One Thousand Cuts = the 4 continuous half circle strikes)
- Erlang Shen (72 Transformations = dash, either turtle or mink)
- Eset (Wing Gust = the wing flaps)
- Fenrir (Brutalize = the 4 continuous mini jump attacks)
- Ganesha (Ohm = the silencing cone AoE)
- Geb (Roll Out = the dash, but only while it starts)
- Heimdallr (Gjallarhorn = the horn blow)
- Jormungandr (Consuming Bellow = the roar, while it builds up)
- Khepri (Abduct = the grab dash, but only when it hits)
- King Arthur (Bladestorm = the whirlwind that goes on for a while)
- Kumbhakarna (Groggy Strike = the rooting smash, while it charges)
- Kuzenbo (Sumo Slam = dash)
- Loki (Flurry Strike = the 5 continuous dagger strikes)
- Maui (Master Fisherman = the hook, while it spins)
- Merlin (Radiate = the fire beam)
- Nike (Rend = the 3 slams, Barrier Formation = the shield)
- Nox (Shadow Lock = the grab, when it hits)
- Odin (Gungnir’s Might = the spear throw)
- Olorun (Focused Light = the charged orb shot)
- Shiva (Pillar of Dawn = the dash that turns into an aura area)
- Sun Wukong (72 Transformations = dash, either bull, tiger or bird)
- Thoth (Final Judgement = Ult, while it charges)
- Tiamat (Primordial Onslaught = the charged projectile barrage)
- Yu Huang (Dao Cultivation = the charged AoE)
So, watch out for these abilities and be ready to press 3.
Repeat that 15 times and that’s it.
The Morrigan
Mirror Match Difficulty: Easy
“As Morrigan, transform into an enemy God and kill the God you transformed into.”
Changeling is Morri’s Ult.
After choosing any allied or enemy god, Morri transforms into that god, inheriting stats and items.
Lasts 10 seconds.
You do not need to 100 to 0 an enemy while using this; finishing off the enemy will work just fine.
In Co-op, you can easily kill any enemy god as themselves, but squishes are the easiest to pick:
- Find a squishy bot
- Weaken the bot to low health
- Press 4, turn into that squishy bot
- Finish off the bot within 10 seconds using their abilities
________________________________________________________________
3v3 Difficulty: Easy
“As Morrigan, hit 3 enemy Gods at the same time with her Deadly Aspects ability.”
Deadly Aspects is Morri’s 1st ability.
When activated, Morri’s next basic attack will deal stunning damage in a triangle area in front of her.
This can be done quickly in Co-op:
- As the match starts, run towards the enemy blue buff
- Press 3 to become invisible (don’t send your clone towards the bots)
- Get in position
- Press 1
Thor
Tectonic Stun Difficulty: Easy
“As Thor, stun three or more enemies at once using Tectonic Rift.”
Tectonic Rift is Thor’s 2nd ability.
It creates a wall in a line in front of Thor, stunning enemies hit.
You can get this quickly in Co-op:
- As the match starts, run towards the enemy blue buff
- Get into position
- Press 2
________________________________________________________________
Dunkmaster Difficulty: Medium
“As Thor, land on three or more enemies at once with your Ultimate, Anvil of Dawn.”
Anvil of Dawn is Thor’s Ult.
After a ~2 second long build-up, Thor launches into the air and can select a location to dive to.
Upon confirming, Thor crashes into the landing zone, dealing stunning damage to all enemies hit.
The landing circle is rather small, so it can be difficult to hit multiple enemies.
The most reliable Co-op strategy for this is your minotaur:
- Wait for your minotaur to spawn
- Wait for bots to group up around the minotaur
- Press 4
- Land on as many bots as possible
Thoth
Narrow Escape Difficulty: Medium
“As Thoth, use Evade and Punish to kill an enemy God while you are at 25% or lower HP.”
Evade and Punish is Thoth’s 2nd ability.
He dashes into the direction he’s moving towards, and buffs his next basic attack so that it roots.
In Co-op, you can get this in a ‘controlled’ 1v1 scenario:
- Lure the assassin bot to the side jungle
- Weaken the bot while being attacked
- When the bot is ~40% health, make sure to fall below 25% yourself
- Quickly weaken the bot using your 1st ability or Ult
- As the bot starts fleeing, press 2 to chase after it
- Finish off the bot with the empowered basic attack
________________________________________________________________
Wall of Death Difficulty: Easy
“As Thoth, use a single Glyph of Pain to augment the Basic Attacks of at least 2 of your teammates to one tower or objective.”
Can NOT be done in Co-op
Glyph of Pain is Thoth’s 3rd ability.
It creates a Hieroglyph that buffs the range and damage of all allied basic attack projectiles.
Thoth’s dash will also go further if he dashes through it.
I recommend sticking to Assault or Slash for this.
You’ll need 2 other ranged gods in your team for this to work.
When you’re grouped up and go for a tower, make sure to place a wall to buff your shots.
As long as your team doesn’t grief you, this should unlock by itself.
Tiamat
Mother of Monsters Difficulty: Medium
“As Tiamat, have each of your creature/pets assist on your player kills in a single match”
Children of Creation is Tiamat’s Ult in Flying Stance.
Tiamat’s abilities change, enabling Tiamat to summon one of her children.
The 1st summon is a puddle that spawns serpents, which die after taking 2 hits.
The 2nd summon is a minotaur that charges at enemy gods, dealing some damage.
The 3rd summon is a whirlwind that chases after close enemy gods and knocks them up.
You just need to deal damage with a summon before you get the kill on the damaged enemy.
However, the summon needs to be alive when their targeted enemy dies.
This can be tricky for the minotaur, who often dies right after being summoned.
In Co-op, the easiest way to get this is to:
- Find a squishy bot
- Weaken the bot to ~40% health using your ground stance abilities
- Press 3 to switch to Flying stance
- Press 4 to summon any child
- Once the child did some damage, press 1 & 2 to finish off the bot
- Repeat for the other summons
________________________________________________________________
Primordial Queen Difficulty: Very Easy
“As Tiamat, defeat two enemies in each of her stances in a single match”
Grounding Dive is Tiamat’s 3rd ability.
While flying, she leaps to a target ground location, entering Ground stance.
While on ground, she flings back into the air, entering Flying stance.
Should unlock naturally.
Just make sure to regularly switch between your stances by using your 3rd ability.
Tsukuyomi
Full Moon Difficulty: Medium
“As Tsukuyomi, dash through 12 targets using Piercing Moonlight.”
Piercing Moonlight is Tsukuyomi’s Ult.
Tsukuyomi starts channeling and fires 4 piercing beams in a line in front of him.
If a beam hits a god, it marks them. Each beam can mark up to 3 gods.
After the last beam, Tsukuyomi teleports to every marked god, dealing damage, one at a time.
You need to hit 3 gods with all 4 Ult beams.
In Co-op, you can try to hit bots as they attack your minotaur:
- Wait for your minotaur to spawn
- Wait for bots to group up around the minotaur
- Get in position
- Press 4, hitting as many bots as possible
________________________________________________________________
Watch your Step! Difficulty: Easy
“As Tsukuyomi, kill an enemy using the Caltrop damage from Silver Moon Caltrops.”
Silver Moon Caltrops is Tsukuyomi’s 3rd ability.
Tsukuyomi throws caltrops to a crescent-shaped ground area, dealing slowing damage.
If enemies move inside the area, they’ll take some extra slowing tick damage.
After casting the ability, Tsukuyomi’s next basic attack becomes ranged.
The caltrops damage is very low, but it’s enough to finish off low health bots:
- Find a squishy bot
- Weaken the bot to as low health as possible
- Get ahead of the fleeing bot
- Press 3, hitting the bot (and make sure the bot has to run through the area)
Tyr
I Like to Juggle Difficulty: Easy
“As Tyr, use Powercleave and Fearless together to juggle three or more enemy Gods at once.”
Fearless is Tyr’s 1st ability.
In Assault Stance, he does a short dash that pushes enemies hit along with him.
In Guard Stance, he does a short dash that knocks back enemies hit.
Power Cleave is Tyr’s 2nd ability.
It’s a short half-circle strike that deals damage.
In Assault Stance, it can be used as a follow-up to Fearless, juggling enemies in the air.
In Guard Stance, it heals Tyr for a flat value per enemy hit (max effect at 3 hits).
You’ll need to push and juggle enemies using your 1st and 2nd ability in Assault Stance.
In Co-op, you can get this quickly:
- Get Blink or Beads
- As the match starts, run towards the enemy blue buff
- Be in Assault Stance
- Run at the crowd of bots (Use either Blink to get close to them or use Beads to avoid CC)
- Press 1, hitting as many bots as possible
- Press 2
Alternatively, trust your minotaur:
- Wait for your minotaur to spawn
- Wait for bots to group up around the minotaur
- Get in position, be in Assault Stance
- Press 1, hitting as many bots as possible
- Press 2
________________________________________________________________
Bringing Down the Law Difficulty: Very Hard
“As Tyr, kill fifteen enemy Gods with the damage from Lawbringer.”
Lawbringer is Tyr’s Ult.
After a 1 second wind-up, Tyr leaps to a big circle ground target location, dealing damage.
In Assault Stance, the Ult deals more damage.
In Guard Stance, the Ult stuns.
You need 15 Ult kills in 1 match, making this is one of the hardest achievements in the game.
Unlocking achievements in Co-op only worked in Arena for me, which sets a rough time limit.
However, it is doable – even if it takes a god run:

In that match, I only got 1 double kill with the Ult; the other 13 were individual Ult kills.
To be fair, I also missed 1 Ult in that match, so it is possible to Ult 15 times.
If you somehow manage to keep your points even, you might get even more attempts than that.
Some advice:
- If there’s more than 2 other actual players in your party, you can’t get this – You’ll need as much time as possible, and that just won’t happen with too many randoms in your team
- Having people leave the lobby is really helpful – It slows the pace of the match
- It’s ok if enemy minions reach your portal – you’ll have enough to spare
- Early on, build as many cooldown reduction items as possible
- Then, get more damage by buying into physical power items and Frenzy
- Whenever your Ult is ready, try to kill at least 1 bot with it
- Getting multiple multi-kills is definitely preferable, but getting 1 safe kill is better than missing 2
- Like Cupid, try to improve, i.e. at weakening multiple enemies and timing your Ult
Ullr
Axemanship Difficulty: Very Easy
“As Ullr, land 20 axe stuns in a single match.”
Thrown Axe is Ullr’s 1st ability in Melee Stance.
Ullr throws an axe in a line in front of him, stopping at the first target hit, dealing stunning damage.
Be in Melee Stance (switch Stances by pressing 4) and keep spamming 1 until this unlocks.
Building cooldown reduction items helps for this.
________________________________________________________________
Bowmanship Difficulty: Very Easy
“As Ullr, land 20 Hail of Arrows in a single match.”
Hail of Arrows is Ullr’s 3rd ability in Ranged Stance.
An arrow shoots down from the sky, dealing damage in a small circle area.
Be in Ranged Stance (switch Stances by pressing 4) and keep spamming 3 until this unlocks.
Building cooldown reduction items helps for this.
If you stun an enemy with a thrown axe and then follow-up with this ability, you can get both achievements at the same time.
Vamana
Baby Smash Difficulty: Hard
“As Vamana, get a triple kill using your Colossal Fury Ability.”
Colossal Fury is Vamana’s Ult.
Vamana becomes a giant for 4 seconds, making him CC immune and gaining a stacking shield.
In giant form, Vamana’s basic attacks hit a small area in front him.
Vamana will also not suffer from any movement penalties for the duration.
If Vamana takes damage from enemy gods, the duration increases, up to 8 seconds.
While you can use your Ult whenever there’s enemies around, I’d recommend the Co-op minotaur:
- Build attack speed and crit items
- Wait for your minotaur to spawn
- Wait for bots to group up around your minotaur
- Weaken as many bots as possible using your abilities and some basic attacks
- Press 4
- Finish off as many bots as possible
________________________________________________________________
Out of My Way Difficulty: Easy
“As Vamana, knock up three or more enemies with Clear the Path.”
Clear the Path is Vamana’s 1st ability.
Vamana dashes forward, knocking up enemies hit.
This can be done quickly in Co-op:
- As the match starts, run towards the enemy blue buff
- Get into dash range
- Press 1
Vulcan
Locked and Loaded Difficulty: Medium
“As Vulcan, kill an enemy with your Ultimate at the Maximum Distance.”
Earthshaker is Vulcan’s Ult.
Vulcan launches a rocket that flies for a few seconds and then explodes in a big circle area.
The further the rocket is aimed, the longer it will fly and the more damage it will deal.
In Co-op, you can use your Ult to finish off any bot that’s currently fleeing:
- Find any isolated bot
- Weaken the bot using the 1st & 3rd ability, plus some basics
- As the bot starts running away, press 4 to aim your Ult as far as possible
- Fire the Ult when you feel like it will hit the fleeing bot
Avoid using your turret, as it may steal the kill from you.
You can also try to aim for the enemy base; just make sure to out-damage the base’s healing.
________________________________________________________________
That’s a Spicy Meatball Difficulty: Easy
“As Vulcan, kill an opponent with Backfire while they’re knocked up in the air from Magma Bomb.”
Magma Bomb is Vulcan’s 3rd ability. He throws a bomb on the ground, knocking up enemies hit.
Backfire is Vulcan’s 1st ability. He shoots forward, pushing himself back.
This 3 into 1 combo is Vulcan’s signature move.
Get some magical power items, keep spamming the combo and this will unlock by itself.
Xbalanque
It’s So Dark Difficulty: Very Easy
“As Xbalanque, kill an enemy who was currently blinded by your Ultimate.”
Darkest of Nights is Xba’s Ult.
All enemy gods on the map are put in a dark shroud, reducing their vision for 3 seconds.
Xba’s attack range, attack speed and movement speed are increased during that time.
Despite the Ult only lasting for 3 seconds, that’s more than enough time to finish someone off:
- Find a target at ~20% health (or weaken the target yourself)
- Press 4
- Hold left click
________________________________________________________________
More POWER Difficulty: Very Easy
“As Xbalanque, get a fully stacked passive before the fifteen minute mark in a game.”
Dead of Night is Xba’s Passive.
For every 1500 damage dealt, Xba gets 1 stack that increases his physical power by 5.
The stacks max out at 6, which equals 9000 damage.
Simply put, keep spamming your 2 and hold left click for easy damage.
9000 is a relatively low bar and should be easy to achieve within 15 minutes, especially in Co-op.
Xing Tian
Whirlwind of Pain Difficulty: Medium
“As Xing Tian, get an assist on three enemy Gods within five seconds using his Whirlwind of Rage and Steel Ability.”
Whirlwind of Rage and Steel is Xing Tian’s Ult.
After a short wind-up, Xing Tian starts spinning, grabbing all enemies hit.
As the spin ends, grabbed enemies are thrown towards the direction Xing Tian is facing.
This one seems to be easier than it sounds.
You don’t need to get 3 assists with 1 Ult.
You can get 1 assist on 3 individual Ults and it should also work.
The 3 Ults don’t even need to happen in the same match.
Anyway, just keep playing Arena and throw enemies at your teammates.
This will unlock randomly, and your best bet is to keep spamming the Ult.
Building cooldown reduction items and Blink will help here.
________________________________________________________________
The Rage Difficulty: Easy
“As Xing Tian, reach and stay at full stacks of Smouldering Rage for over 30 seconds.”
Smouldering Rage is Xing Tian’s Passive.
Xing Tians gains stacks each time he hits enemies with an ability.
Each stack increases Xing Tian’s HP5 by 3, reaching its maximum effect at 12 stacks = 36 HP5.
All stacks will fall off after 18 seconds of not hitting abilities.
Keep spamming your abilities at any enemy target you see until this unlocks.
Hitting minions also increases stacks, and are therefore an easy source for farming stacks.
Be careful not to run out of mana, though.
Building cooldown reduction and MP5 items helps here.
Yemoja
Omi Mastery Difficulty: Very Easy
“As Yemoja, gain 3 extra Omi in a single match”
Omi is Yemoja’s Passive.
Instead of Mana, Yemoja uses Omi as a resource.
She starts out with 7 Omi, but may obtain up to 3 additional Omi.
Originally, Yemoja gained extra Omi by building Mana and MP5 items.
Now, Yemoja gains 1 extra Omi at LV 6, 11 and 16.
So, to get this achievement, just reach LV 16.
As long as you’re not playing Joust, you’ll have nothing to worry about here.
________________________________________________________________
Turbulent Waters Difficulty: Medium
“As Yemoja, deal damage to 3 or more enemies in a single use of River’s Rebuke”
River’s Rebuke is Yemoja’s Ult.
Yemoja creates 2 large water walls, which block enemy movement and projectiles.
After ~4 seconds, the walls close in on each other, dealing damage and causing a slow and tremble. The field between the walls also buffs Yemoja’s Omi regeneration.
The Ult’s targeter is a bit misleading, the area you see while targeting includes the walls.
Therefore, if you fire the Ult while an enemy is at the left or right edge, they will be pushed outside. So, whenever you target the Ult, make sure that your targets are in the center.
Capturing 3 enemies can be very tricky.
In most cases, you can use a Riptide to keep enemies from exiting the field.
Riptide is Yemoja’s 3rd ability.
It places a watery ring, which pushes anything into the direction the ring is facing.
When placed at max casting range, the ring will face the reverse direction.
Allies are pushed further, gaining a movement speed and protection buff.
Enemies are slowed when pushed.
Word of advice: Allies can be pushed out of the base, stopping them from buying items.
This is very funny.
However, this can easily ruin an Assault match, so use this power wisely.
In Co-op, your best chance for this achievement is to catch bots in their base as they respawn:
- Wait for at least 3 enemies to be dead at the same time
- Near their base, wait for them to respawn
- Dive the exit that the bots try to leave from (often, it’s the one where minions spawn)
- Press 4
- Press 3, place a Riptide on the exit
- Wait for the Ult to go off
Ymir
You Go Boom! Difficulty: Hard
“As Ymir, kill three enemy Gods at once with your Ultimate.”
Shards of Ice is Ymir’s Ult.
Ymir starts channeling an explosion, which will damage all enemies in a big circle around Ymir after 3 seconds. While channeling, the explosion area slows enemies.
The Ult can be fired early, but will deal less damage.
In Co-op, I got this by using the minotaur strategy and building full damage:
- Build magical power items
- Wait for your minotaur to spawn
- Wait for enemies to group around the minotaur
- Press 3 & 2 to weaken bots
- Press 1 and place a wall so that bots won’t escape
- Get in position
- Press 4
- Channel the Ult as long as possible
- Boom
________________________________________________________________
Why So Cold? Difficulty: Easy
“As Ymir, hit 50 Basic Attacks on enemy Gods who are affected by Frostbite in a match.”
Frostbite is Ymir’s Passive.
All of Ymir’s damaging abilities apply a Frostbite debuff to the enemy that lasts for 6 seconds.
Ymir’s basic attacks against Frostbite afflicted targets deal double damage.
You need to hit 50 Frostbite basic attacks in 1 match.
Step by step:
- Build cooldown reduction and attack speed items
- Find enemy
- Press 2, 3 or 4
- Follow-up with basic attacks until the debuff falls off
- Repeat
Yu Huang
Phoenix Fire Difficulty: Medium
“As Yu Huang, kill an enemy god with the burn damage from Flames of the Phoenix.”
Flames of the Phoenix is Yu Huang’s 1st ability.
It’s an X-shaped AoE that shoots 4 cinders together, causing a circle AoE explosion in the center.
The explosion leaves a burning field, which stays for 3 seconds and burns enemies touching it.
The goal here is to kill an enemy with the burn’s lingering tick damage.
Therefore, make sure to max the 1st ability and build power items, for maximum damage.
You can get this either randomly by getting lucky or you can setup a trap for fleeing bots:
- Get Blink
- Find a squishy, isolated bot
- Weaken the bot as much as possible
- Once low enough, use Blink to get ahead of the fleeing bot
- Press 1, setting up the burning field in the fleeing path of the bot
- Watch as the bot runs through the field
- Let the tick damage handle the rest
________________________________________________________________
Dragon’s Call Difficulty: Medium
“As Yu Huang, damage three enemy gods with the explosion damage from Dueling Dragons.”
Dueling Dragons is Yu Huang’s Ult.
Yu Huang summons 2 dragons, 1 close to him and 1 far away in front of him.
Then, he may aim his close dragon for 3 seconds.
Upon confirming, the dragons fly forward, pushing enemies along with them in their path.
If the dragons collide, they create a circle explosion, dealing some damage.
The goal here is to catch 3 enemies in the explosion area.
In Co-op, you won’t have to rely on push forces for this; the minotaur will suffice:
- Wait for your minotaur to spawn
- Wait until bots group up around the minotaur
- Get into a position where the dragons will collide where the minotaur is at
- Press 4
Zeus
Detonate Difficulty: Very Hard
“As Zeus, kill three or more Gods at once who have three charges on them with Detonate.”
Detonate Charge is Zeus’ 3rd ability.
Hitting enemies with any lightning damage adds a charge to them that lasts 5 seconds.
Adding another charge refreshes the timer.
Enemies can have up to 3 charges at a time.
You need to get a triple kill using this, in which every killed god had 3 charges.
The most reliable way to apply multiple charges on multiple gods is by utilizing the Ult.
Lightning Storm is Zeus’ Ult.
It’s a big circle AoE that lasts for 5 seconds.
During that time, any enemy inside the AoE will be striked by lightning once per second.
Each lightning strike applies a charge.
There’s 2 Co-op strategies that proved successful to me.
No matter which one you try, always build cooldown reduction and power items + Frenzy.
Both worked when bots grouped for the minotaur or respawned as a group:
A) – The Squishy way
- Have all squishy bots grouped up (= Assassin, Hunter, Mage)
- Press 4, hitting as many squishy bots as possible
- Start counting the lightning strikes of the Ult
- Activate Frenzy
- If there’s also tanky bots inside the Ult, weaken them for better chances
- After 4 strikes, press 3
B) – The Tanky way
- Have all tanky bots grouped up (= Warrior, Guardian) and one squishy bot nearby
- Press 4, hitting only the tanks
- Activate Frenzy
- While the tanks get striked, use your 2nd + 1st ability to weaken the nearby squishy bot
- Once the squishy bot has 3 charges and is low enough, try to weaken the tanks some more
- Press 3
________________________________________________________________
Watch it Bounce Difficulty: Medium
“As Zeus, kill an enemy God on the fourth bounce of Chain Lightning.”
Chain Lightning is Zeus’ 1st ability.
Zeus fires a lighting projectile that bounces between targets, hitting up to 4 extra times.
This is mostly just luck.
Like the other achievement, build cooldown reduction and power items + Frenzy.
Keep spamming 1 against low health targets and this will unlock eventually.
Preferably, combine the chain lightning with the 2nd ability.
With the shield nearby, the lightning should bounce like:
Cast –> initial hit on god -> shield -> god -> shield -> god (this bounce must kill).
Zhong Kui
What’s In the Bag? Difficulty: Easy
“As Zhong Kui, use Expose Evil and Exorcism to fully stack your passive.”
Demon Bag is Zhong Kui’s Passive.
Whenever Zhong Kui successfully uses is 1 + 2 combo, he gets demon stacks.
The stack buffs Zhong Kui’s Protections and empowers his Ult; and maxes at 40.
This stack is cut in half whenever Zhong Kui dies or uses his Ult.
Expose Evil is Zhong Kui’s 1st ability. It’s a projectile that applies a DoT to all hit enemies.
Exorcism is Zhong Kui’s 2nd ability. It’s a wide cone-shaped AoE that deals damage.
If Exorcism is used against enemies with the DoT from Expose Evil, their demons are consumed by Zhong Kui’s Demon Bag. Works nicely against minions.
Thus, keep spamming the 1 + 2 combo until the Passive is full.
Building cooldown reduction and defense items helps for this.
Also, avoid using your Ult until the bag is ready.
________________________________________________________________
Book of Demons Difficulty: Easy
“As Zhong Kui, stun three or more enemy Gods with Book of Demons.”
Book of Demons is Zhong Kui’s 3rd ability.
He spins around, dealing stunning damage to all enemies in his spin circle.
You can get this quickly in Co-op:
- Get Blink or Beads
- As the match starts, run towards the enemy blue buff
- Use Blink to get close or use Beads and run into the crowd of bots
- Press 3
That’s all!
Hi. I know I’m writing late, but how did you unlock the adept of mastery achievement? I’m currently playing on Steam and I have mastery level 43 but I don’t have this achievement