Table of Contents Show
Wolfpack is a U-boat co-op game, where a crew of players man the stations of a German type VII U-boat fighting in the Second World War.
Wolfpack is designed to compel the players to run the U-boat like a real machine. Each player controls a crew member with different duties and responsibilities. For example, to dive, the top hatch must be closed by the captain, the diesel engine must be turned off by the helmsman, the ballast vents must be opened by the crew, and the dive planes must be rotated by the dive officer.
There are similar systems for aiming torpedoes with the Torpedo Data Computer, for using the hydrophones and Enigma machine, and managing navigation and charting the enemy ships. We want the game to give the players plenty to do and put them in pressure situations where fast, smart decisions have to be made to survive.
Hosting a game
1. In the main menu, press Play.
2. Choose lobby visibility using the dropdown menu below the New Lobby button.
3. Press the New Lobby button.
4. Use the sliders to set, month, year, and difficulty. Later during the war, convoys get bigger and more well defended. On higher difficulty levels the level objectives are harder to complete, and there are more escort ships.
5. To invite people to your game, press the invite button in the friends menu. Friends can also be invited when the game has been started, by pressing i when playing, invited via Steams friends interface, by pressing shift+tab.
6. To start the game, press start game. Other players may join the game after it has started.
Joining a game
If a lobby’s visibility settings is set to Public, or to Friends only, and you are friends with the lobby owner, the lobby will be visible to you in the Lobby list. To refresh the lobby list, press the Refresh Lobby List button. To join a private lobby, you need to be invited by a lobby member. If you are invited to a lobby, you will receive a popup message via Steam’s standard chat interface (press shift+tab to show/hide).
The U-boat pen
Once you have hosted or joined a game, you will first enter the U-boat pen. This is where you choose your role. Once you have chosen a role you may choose to start the mission and launch your U-boat. Other players may join after the U-boat has been launched. If the U-boat is destroyed, the mission continues, and you may select another U-boat from the pen. If all four U-boats are destroyed, the mission is lost.
Basic controls
Use the W, A, S and D keys to walk around. Hold shift to sprint. To start using a station in the U-boat, left click it. To stop using the station, right click anywhere.
To climb ladders, left-click the ladder to grab it, press W to climb upwards and S to climb downwards. When climbing, left click the top hatch to open or close it. Right-click to slide down and stop using the ladder. To access the radio compartment, walk or run through the open hatch in the control room.
While outside, enter binocular mode by scrolling forward on the mouse scroll wheel. To stop using the binoculars, scroll backwards. Press M to toggle the map view. Press escape to open the menu. Press T to start and stop the timer. Press R to reset and hide the timer. Enable the flashlight by pressing F. Switch between red, green and white light by pressing G. Press C to bring up the mission window. Press and hold Q to display the objectives window.
Press enter to access the in-game chat. Type your message, and press enter again to send the message. In game chat messages only reach your crew. Press and hold Tab to view a list of the players in the session. You can change the key bindings and turn on tooltips in the options menu.
The Engine order telegraphs
An Engine Order Telegraph, or EOT, is used to send orders to the engine room. There are two sets of EOTs, one in the control room, and one in the conning tower. The left and right EOT represent the port and starboard engine, and can be operated independently of each other. Holding shift while clicking an order change will change both EOTs simultaneously.
The EOT can be used to set various speeds, forward and backward. A higher speed makes more noise, and uses more energy. While in electric mode, the u boat’s battery reserves are drained while moving. The cost of moving increases quadratically with speed, so moving at a slow pace is much more efficient. If the u boat is surfaced, the diesel engines may be started.
The diesel engines are faster, and can be used to charge the batteries. To start charging, start the diesel engines, and select charge battery. The u boat will continue to charge until the diesels are turned off, or the battery is full. The faster the u boat moves, the slower it charges the batteries. If the u boat dives with the diesels still running, the diesels will flood.
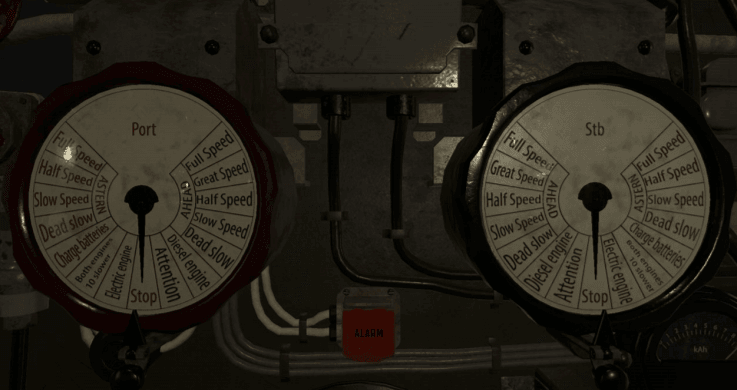
Use the EOT by clicking on it. The left and right EOT represent the port and starboard engine, and can be operated independently of each other. Holding shift while clicking an order change will change both EOTs simultaneously. Selecting the orders written in black makes the boat run forward and the red orders makes it run backward.
Rudder controls
The u boat has three rudder control stations. They are situated on the bridge, in the conning tower, and in the control room. To start steering, click the rudder. To steer left and right, use the A and D key. To move the rudder into a neutral position, press W. The rudder angle indicator to the right shows the resulting rudder angle.
Diving and surfacing
A U-boat maintains its buoyancy by filling and emptying large water tanks. With the ballast tanks empty, the u boat has a positive buoyancy, and floats on the surface. With the ballast tanks flooded, the u boat will have a neutral buoyancy, and will maintain its current depth. To flood the forward and aft ballast tanks, open the ballast vents located in the front and back of the control room. Once the tanks have been flooded, it is good practice to close the vents.
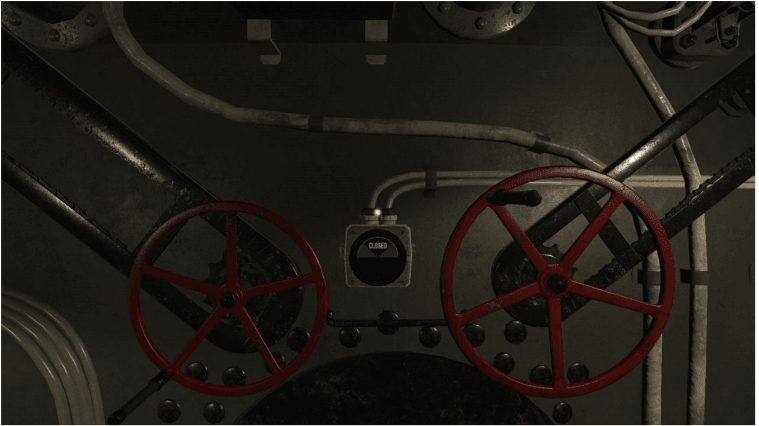
The ballast vents are located in the front and back of the control room.
Before diving: Make sure the diesel engines are turned off, that the crew is safe inside the U-boat, and that the top hatch is closed.
When the U-boat is neutrally buoyant, it can change its depth using the dive planes. The dive planes are pairs of horizontal rudders located in the stern and bow. If the U-boat has forward momentum, the dive planes force the U-boat up or down depending on the tilt of the plane. The dive plane controls are located in the forward starboard side of the control room. The forward dive plane can be moved using the A and D buttons, and the aft diveplane can be moved using the left and right arrow keys. The U-boat’s tilt is indicated by the tilt meter (blue liquid), and the depth is indicated by both the papenberg meter (red liquid), the fine depth meter (0-20 meter), and the coarse depth meter (0-200 meter).
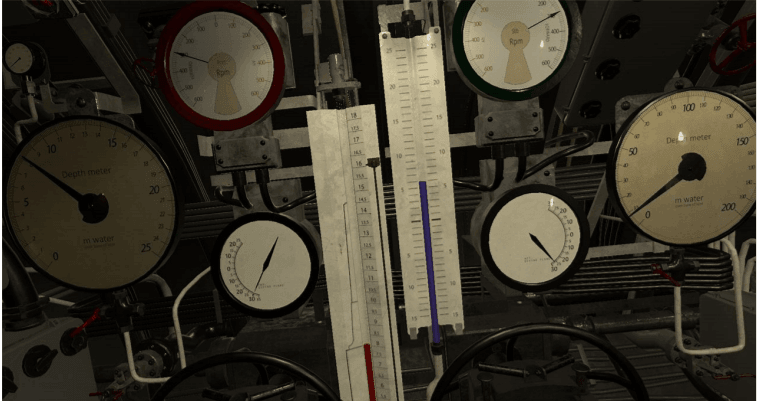
The forward dive plane can be moved using the A and D buttons, and the aft diveplane can be moved using the left and right arrow keys. The U-boats tilt is indicated by the tilt meter (blue liquid), and the depth is indicated by the papenberg meter (red liquid).
The U-boat can surface by blowing the ballast tanks using compressed air. The amount of compressed air required to blow the tanks is relative to the external water pressure. Water pressure increases with about 1 atmosphere with every 10 meters of depth. The tanks have a combined volume of 150 cubic meters, and require around 190 kg air per atmosphere of external pressure to be blown. The ballast tanks are blown using the ballast tank controls, located in the starboard side of the control room. Compressed air is shown by the dials at the ballast air controls, the negative tank controls, and on the bilge pump. To fill the compressed air, start the compressor while surfaced.
The U-boat is also equipped with a negative tank. The negative tank is small enough, so that if the negative is flooded, and the ballast is blown, the u boat still has positive buoyancy, and will float. If, however, both the ballast and negative tanks are flooded, the U-boat will rapidly sink. The negative tank is used for crash diving. Once the U-boat is below the surface, the negative tank should be blown, to keep the u boat from sinking. Both the negative tank vent and the negative tank air controls are located on the starboard side of the control room, next to the ballast tank air control.

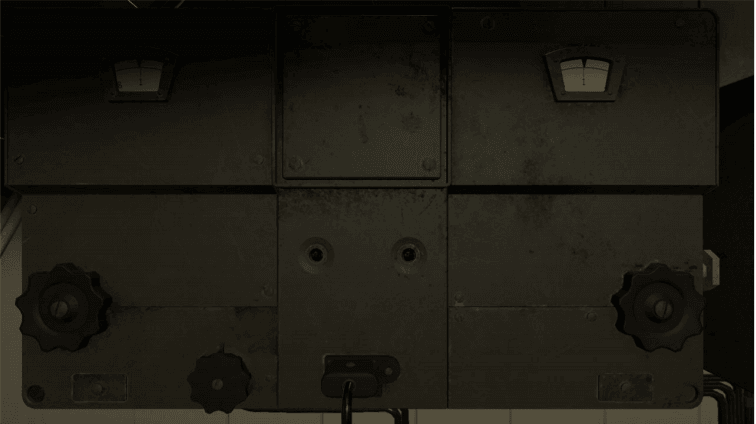
The compressor and bilge pump
No U-boat is completely waterproof, and at a certain depth, the U-boat will start taking in water. The water will accumulate in the bilge, and will decrease the U-boats buoyancy by weighing it down. The water can be pumped out using the bilge pump. When below the surface, the pump replaces the water it pumps out of the bilge with compressed air from the air supply, so it needs to be carefully monitored. The bilge pump is located in the back left corner of the control room. Turn the red valve to start and stop the pump.
The compressor is used to refill the U-boats air supply. It is located in the back right corner of the control room. It is started and stopped by turning the red handle. The compressor can not be started while under water.

The Deck & The Anti Aircraft Gun
The deck gun is located on the forward deck. You can reach the forward deck by climbing down the right or left ladder from the bridge. Left click to equip it. Use the A and D keys, or the mouse to rotate left and right. Use the W and S keys, or the scroll wheel to set the target distance. Setting the target distance allows you to aim straight at the target and hit it without over or undershooting.
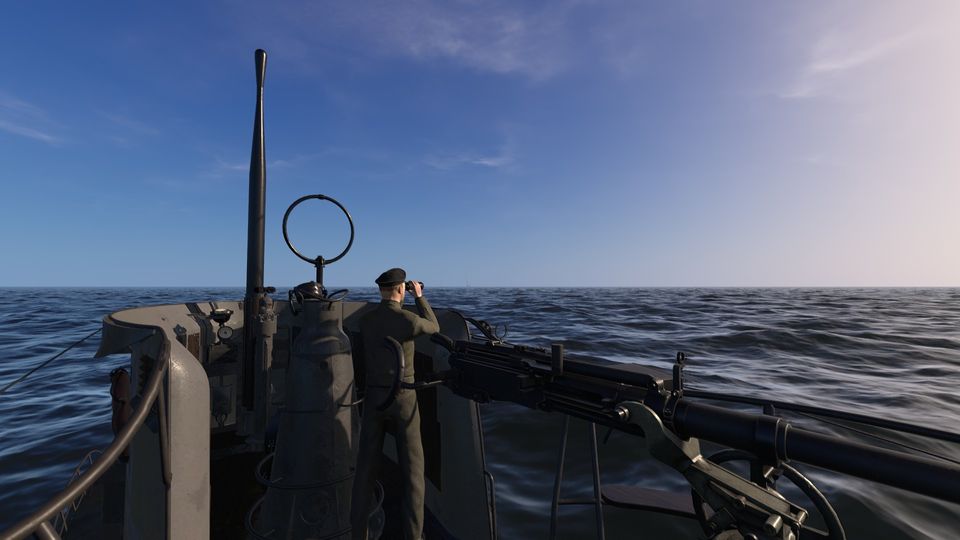
The anti aircraft gun is located in the crow’s nest on the bridge. Left click to equip it. Use space, or the left mouse button to fire. Right click to stop using it. The AA gun projectiles use ballistic trajectories and have a travel time, so you need to aim slightly higher, and lead the target in order to hit.
Periscopes and the UZO
A type VII U-boat has two periscopes – the observation periscope and the attack periscope. The attack periscope is located in the conning tower. This periscope has a small head to avoid detection, and its optics are designed in such a way as to allow the periscope to be raised and lowered while using it. To raise and lower the attack periscope, press W or S respectively. To zoom in or out using the periscopes, use the mouse scroll wheel.
The observation periscope is located in the control room. It has a larger head to take in more light, and is shorter than the attack periscope. It can be raised or lowered using the periscope hoisting mechanism, located to the right of the map table, on the port side in the control room. The observation periscope’s ocular is attached directly to the shaft, so it cannot be raised or lowered when used.
The periscopes measure the view angle in centiradians. 1 centiradian equals 1 meter seen from a distance of 100 meters. To calculate target distance, simply divide the target height (meters) by the view angle (centiradians). This gives you the distance to the target in hectometers, which is the scale used both in the torpedo data computer, and the deck gun sight. One hectometer is 100 meters.
Both periscopes have a normal magnification level of 1.5x, and a high magnification level of 6x. To calculate the distance to the target when zoomed in, multiply the derived distance value by 4. You can also use the attack distance table by pressing “C” and clicking the distance table tab.
For example:
A 30 meter tall mast will take up 3 centiradians in your scope if the ship is at a distance of 10 hectometers (1000 meters) at the normal zoom level, 40 hectometers (4 km) at the high zoom level. Target speed can be calculated by dividing the length of the target by the amount of time it takes for the target to pass the vertical line in the crosshair when the u boat is stationary. This will give you the target speed in meters per second. 1 meter per second is 1.94 knots, so multiplying this value by two gives you a good speed estimate.
The UZO (Underwasserzieloptik) is a simple targeting system used for quick surface attacks. The UZO is essentially a pair of binoculars mounted on a pedestal on the bridge. The pedestal contains a selsyn link that transmits the pedestal rotation to the U-boats torpedo data computer, and a trigger for firing torpedoes. The UZO has no range finder, and no zoom.
Underwater Navigation
When submerged, the position of the U-boat is not updated on the map. It is the navigator’s job to update the position manually. When accessing the map through the map table, the navigator’s tools become available.

These show the current speed, heading and odometer settings. The odometer can also be reset using the reset odometer button.
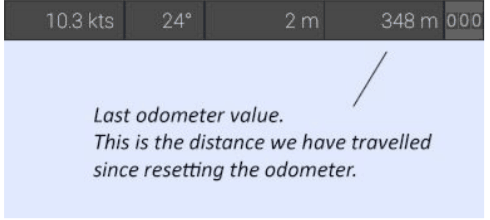
When the U-boat dives, the navigator should reset the odometer. Now the left hand value that is being updated is the distance travelled since we submerged. After a few minutes, when it is time to update the U-boat’s position on the map, the navigator resets the odometer again. The last odometer value is saved.
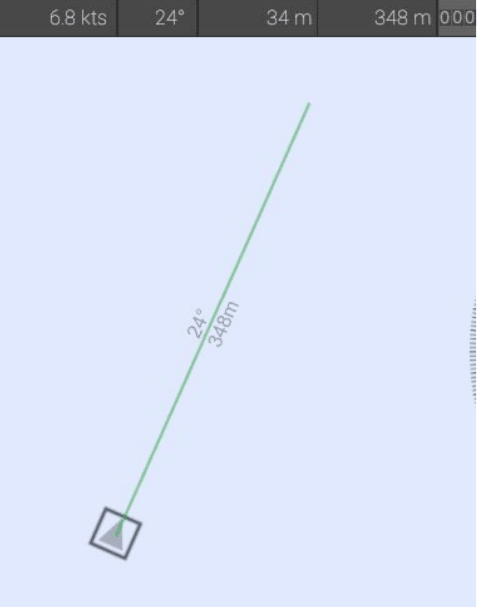
The navigator can now draw a line from the last known position, using the current heading and the distance read from the odometer.
This information will of course only be correct if the U-boat has not changed course since the last update. Before and after each course change, the odometer must be reset and the position updated. The navigator’s job is made easier if the helmsman calls out when he starts and stops turning.
The hydrophone station
A hydrophone is a submersible microphone designed to pick up underwater sound. The U-boat is equipped with a hydrophone mounted on a rotating shaft. The hydrophone operator can determine the location of a sound source by rotating the shaft until the sound is the loudest. A skilled hydrophone operator can determine the distance, size and speed of a surface vessel just by listening through the hydrophone. When surfaced, the hydrophone is above the water line, and can not be used to detect enemy ships.
To adjust the direction of the hydrophone, rotate the wheel. Adjust volume, gain and filters by turning the respective knobs.
The noise made by the U-boats engines affect the hydrophone, making it harder to use while traveling at higher speeds.
The Torpedo Data Computer

The torpedo data computer is located in the conning tower.
1. Target speed. Set the estimated speed of the ship you are targeting.
2. Torpedo depth. Set the torpedoes running depth.
3. Range. Set the estimated distance to the target ship.
4. Angle on bow. Set the direction in which the ship is traveling relative to your viewpoint.
5. Length. Set the estimated length of the target ship.
6. Torpedo status display. The lights indicates if the corresponding a torpedo tube is ready for launch.
7. Angle tracking device. Select your aiming device by turning the handle.
8. Torpedo tube selection. Turn the handle to select your desired torpedo tube for launch.
9. Salvo shot selection. Choose which torpedo tubes to use in a salvo shot.
10. Timer. The timer displays the torpedoes estimated travel time.
11. Error light. If the lamp turns red, the entered firing solution is invalid.
The Echo Ranger
The echo ranger is a device used for measuring the current distance from the U-boats keel to the seabed. It is located on the wall next to the compressor in the control room. Use the switch to toggle between long or short range. Press the button to measure the depth.

Record Player
Click the record player to enter the record player mode. Use the switchboard on the left to enable the speakers in the different compartments. Use the volume knobs to adjust the volume. Click the record to access the track menu. Click a track to play it.
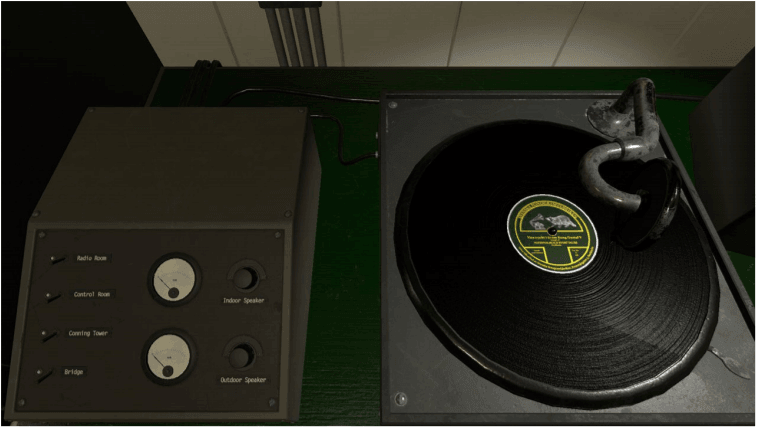
The record player is located in the radio room. Use the switchboard to enable the desired speakers and adjust the volume.
The Enigma machine
The Enigma machine is a device used to encrypt and decrypt radio messages. The Enigma uses a system of mechanical switches connected to rotating code wheels. The signal is then passed through a switchboard, before being passed to the top of the machine. The encryption key can be set by rotating the wheels located on the top of the device. The correct switchboard combination is already set when the game is started.
When a key is pressed, the corresponding cypher letter is lit on the top of the machine, and the encryption wheels rotate. This means that typing the same letter many times in a row will result in a seemingly random output pattern. This is what gives the Enigma its strength as an encryption device. The cipher is symmetrical, meaning that if a particular encryption key results in K being translated to F, then the same setting will translate F to K. To decrypt a message, the receiver simply needs to type in the ciphertext, and the output should be the plain text that the sender encoded, provided that both the sending and receiving machines use the same key settings.
Since the receiver must know what encryption key was used to send it, and the key changes as the message is typed, the message must always be preceded by the start encryption settings in plain text, followed by the encrypted message. This, however, presents a problem, as if the enemy has captured a machine, and has made the correct switchboard adjustments to it, they can decrypt the message. To avoid this, two encryption keys must be chosen: One public key, and one secret key. The public key is sent in plain text, and is used to encrypt the secret key. The secret key is then used to encrypt the rest of the message.
For example: I want to send the encrypted message “HELLO THERE”. I choose a random public key: “PKJ”, and a random secret key: “GWP”. I first write down the public key in plain text: PKJ, then I set the encryption wheels to PKJ and type my secret key GWP on the keyboard. This gives me the output UFI. I write that down. I then set the encryption wheels to GWP, and type HELLO THERE, writing down the output. I can now send the message, which should look like this:
PKJ UFI FIKDX QBLQB.
When the receiving u boat picks up the message, the radio operator sets their encryption wheels to PKJ, and then type in UFI, which gives them the secret key GWP. They then use that key to decrypt the rest of the message.
Remember to never use a public key that can be used to guess the secret key, for example public: BER and secret: LIN.
The radio direction finder
A radio direction finder is a device used for finding the direction of a radio source. The type VII U-boat uses a circular antenna located on the bridge of the U-boat, which can be rotated in order to determine the direction of the radio source. The diameter of the circle is the same as the length of the typical short radio wave. This means that when a radio wave hits the antenna from the side, it picks up the wave just like a normal aerial, but if the antenna is rotated so that it faces the source, both sides of the antenna are hit at the same time, causing phase cancellation and silence.
The direction finder controls are located on the desk next to the enigma machine. Use the band knob to choose which band you want to scan. Use the frequency dial to scan through the band. Adjust the volume using the volume dial. Use the compass plate mounted on the desk in front of the direction finder to rotate the antenna. When the signal becomes silent, the antenna is aligned with the wave. Remember that, since the antenna is symmetrical, the source may be at the 0, or at the 180 degree mark.
The Radio Transceiver
The radio transceiver is located above the enigma machine in the radio compartment. Turn the left knob to set the receiving channel, and the right knob to set the broadcasting channel. Use the Morse key located on the table below the radio to send the message. To send while using the morse key, simply type the letter you wish to send on the keyboard.