Table of Contents Show
This guide will go over the basics of playing Sazabi and tactics for dealing with a variety of opponents and scenarios.
So you want to play Sazabi?
Whether because Sazabi is a tank or you love him from the franchise you decided Sazabi is the right choice for you, throughout this guide I will discuss Sazabi’s abilities in depth, how to properly use them, and various tactics and strategies of their usages. Of course before we dive into the abilities we first have to discuss his basic tools
Sazabi Essentials
Sazabi sits at a whopping 1400 hp, together with his shield he can take extreme amounts of punishment before giving out, but don’t act too carelessly, without your shield up you can still be two shot with the right weapon or ability if your shield is down. Because of your massive hp pool making sure you are aware of medkit areas is of crucial importance. As often you will be able to utilize the stronger medkits to their fuller potential, I am sure that some of you can attest that having to fight an opponent heal mid fight is already a nuisance, but that opponent having another 1k hp can be a massive game changer. Another way to put this is whether you are defending a point or making a push make sure you have in mind at least one medkit you can reach with your dash. For informative purposes the haru medkits restore an amount of hp as follows based on number of harus.
3 = 1000/ 2 = 750/ 1 = 500
Weapon
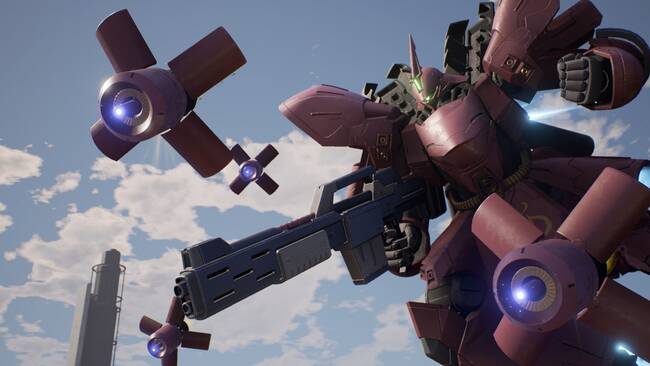
Next we go to the Beam shot rifle, effectively a glorified shotgun, you have 7 shots and you really have to make them count. First and foremost, is range, while it may seem obvious given that Sazabi has a shotgun, you have to be fairly close to your opponent in order for your shots to matter at all. At optimal range which is about the range of screenshot below, with slight variance you will deal between 350 – 450 damage per shot which is enough to 3 shot a majority of MS units. I will go into further detail with the tactics section, but, generally speaking you want to wait for the perfect shot against that wildly dashing zaku or barbatos, rather than shooting willy nilly and being forced to reload which will force you to put down your shield. One last note, try not to jump and shoot unless you are right in the enemies face, jumping scatters your shots so much you will do minuscule damage.

Mobility
Lastly for this section to talk about is Sazabi’s mobility and his dash. Sazabi is big and tanky, which also means he is slow, very slow, if your team is rushing to objectives you will usually arrive last. While Sazabi does have 1 ability which mitigates his mobility problem generally speaking you should get used to perfecting the use of your singular long dash. As mentioned previously, one good use of the long dash is to quickly get you to a medkit which you are hopefully near, another, is simply to close the distance to properly use your weapon, a fairly risky strategy depending on the circumstance. If separated from medkits and overwhelmed, it is always a good idea to save your dash for disengaging, as Sazabi benefits greatly from disengaging which will be delved into deeper later. Finally, while niche in usage, with quick movement inputs you can effectively cancel your dash, if done fast enough you will often save around half your dash gauge, useful if you decide your reason for dashing is unnecessary or just need a minor amount of movement.
Abilities
Sazabi’s abilities in the right hands can be a massive game changer, you could say this true for every MS unit, but for Sazabi it makes impossible battles much more feasible with proper usage. Of course as mentioned previously, I won’t go too deep into tactics for every ability but I will still discuss the optimal way to generally use them.

Shield
Sazabi’s Shield, Arguably his best and most valuable ability, very simply at a glance, but with a good amount of nuance to it.
So to start Sazabi’s shield has 1400 hp, this is equivalent to Sazabi’s own hp bar, meaning if an enemy is forced to go through your shield they have to grind through 2800 hp before they can kill you, a sizable amount I assume one can imagine. Sazabi’s shield when lowered (if not broken) starts to regenerate after a delay of 2.5 seconds, this makes it that together with your massive hp pool disengaging from fights is an incredibly strong strategy, even if you are wasting time sitting in a corner, it is much faster than having to respawn.
However, If you allow Sazabi’s shield to break, whether through an ability that stunned you or damage, you are forced to wait 12, whole, seconds before you can even use the shield again, and even then after those 12 seconds your shield will only be at around 700 hp, or half efficiency. Because of this, unless an ability or damage would kill you, having your shield destroyed must be avoided at all costs.
Your shield blocks all direct fire, however, any AOE abilities or attacks will completely bypass your shield and damage your HP, this means stuff like grenades, DOM, Turn A ult, ect.
Lastly, the shield covers Sazabi in a 180 degree radius, this means that if opponents are behind, or to your side, they are fully capable of still damaging you and bypassing your shields. As such, keeping track of enemy positions and making sure not to lose your opponents as they dash around you is of critical importance.
Towards this extent lets talk about using the shield in combat, if your get into a skirmish and your shield is damaged, you should try to not use your shield unless you know your about to get into a prolonged engagement. furthermore, try not to tap your shield into use as even the slightest use activates the 2.5 second delay and stops any regeneration. This brings up the question of whether your shield or hp is more important, sounds simple right? I bet your thinking “well of course HP is more important”. But it isn’t that simple, remember everything I said about staying next to medkits, well if your near a medkit, or you have an allied Menthus on you, HP becomes a resource equal to shields. At which point when engaging with enemies you should think that if your shield is damaged but you have a way of healing, you should tank some damage with your HP, but if your life is critically in danger, resort to the shield.
Finally, A minor thing to make note of, is that when you use a dash while your shield is up, your shield will be put down until the dash is complete, meaning if you are being shot at while low on HP, do, not, dash, you will cause your own undoing.
Homing Boost
Ah yes the boost, a magnificent tool which can help mitigate our mobility problem. As per the usage, the boost can lock on to an ally or the beam tomahawk, however, I heavily recommend against boosting towards allies, as their constantly changing location, will often mess up your intended boost route. The one time I could recommend boosting towards a teammate is if they are downed and you believe you have a good chance at repairing them.
One thing I see a lot of Sazabi’s do, is they tomahawk an opponent and will use their boost to get closer to their opponent. This can seem like a good idea at first, you save your dash, you get close to your opponent to use your shotgun, simple right? The problem is that while to a Sazabi their boost seems like the fastest thing in the world, to enemies it is incredibly slow, your are slowly boosting towards their teammate in a straight line, no one would give up that opportunity for a free kill.
The proper way to use the boost is using your beam tomahawk as a beacon to get to raised areas much more swiftly than you could ever hope to do, with some examples shown below.


Finally, while the boost has practically infinite lock on range, the distance of the boost itself is not that far, as per the screenshot below, using boost would bring you barely 1/3 of the distance.

Beam Tomahawk
This section will be relatively short, as the beam tomahawk is not a perfect ability, its hit box is extremely small and even then hitting it can be a bit finicky. Due to the nature of being an ability, using the tomahawk will also force you to spend a couple seconds without being able to shoot, or more importantly, raise your shield. Additionally, the tomahawk has a stun, however, you will only be able to fit in 2 shots as long as they are able to react well.
In general there are two primary uses of the tomahawk, using it together with the boost for mobility, dealing with enemies who also have a shield.
The first will be short as it was already explained in the previous section, but you want to try and use your tomahawk whenever not in a direct combat scenario for mobility.
The second is also fairly simple, most players who play MS units with shields will shield very aggressively right next to your face, especially GM’s since they have a shield bash. The second you see a player whip out their shield, you want to hit them with a tomahawk, most players will dedicate at least 2 seconds to purely holding their shield, you want to use this time frame to tomahawk them. The tomahawk deals 350 damage equal to around 1 of your shots, so unless you are fighting another Sazabi, you are guaranteed to kill them.
A couple of other minor points, for one, the tomahawk has drop, how much drop? About this much, (thrown from center of crosshairs)

The tomahawk has a measly 6 second cooldown, so in theory you could rapid fire them, but with how finicky it can be, it is better to spend that time shooting or repositioning.
It is heavily discouraged to try and trade abilities with most other MS units with stuns, most others like Turn A, have hyper armor during their stun abilities… or just better hit boxes.
Enemy Search
Enemy search, or scan, I just refer to it as scan, an odd ability, it doesn’t seem to really fit with most of Sazabi’s kit at first, and works a bit differently to most other scans in the game.
How the scan works is you need to be looking at the enemy while the ability is active, after you have looked at them for barely a second your enemies will be visible to you and allies for 8 seconds, (assuming you scanned your enemies the second you activated the ability). The scan is on a shared cool down, that is to say, if you scan an enemy 1 second into your ability, or 3 seconds into it, they will both be scanned for the same duration, which maxes out at again, 8 seconds.
However, scanning enemies is fairly easy, it has seemingly unlimited range for scanning, and you only need to have a sliver of the enemies model visible to actually scan them, as shown below.

So now to talk about the actual uses, of course, you can simply scan at the start of the fight to let your team know where a bunch of the enemies are, but there is one way I like to use it which plays into the usage of abilities I have been discussing.
That is, disengaging, I am sure all of you have tried to disengage only to be met with one super persistent player who will follow you three laps around the entire match just to catch you. To deal with this, as soon as you believe it is time to disengage use your scan (it has no animation so you can pop it at any time and also while shielded), and then disengage, if you notice an enemy is chasing after you, try to stuff yourself into a corner or behind a wall, and try to eliminate them in 2 shots if possible, as with this tactic they should come within extreme close range of you, and due to chasing you will likely be exhausted of dashes.
Funnels
At last we reach our ultimate, the highly devastating funnels, but for as strong they are they have one glaring weakness, you. For as tanky Sazabi is, using Funnels covers him in a bright target telling every enemy to focus fire you, and unlike some other ultimates you receive no damage reduction during your ult, you have only your base kit to protect you.
However, the Funnels have massive pros to offset these cons, as any of you who might have faced a competent Sazabi would know, a well used funnels can easily demolish an entire team, this is due to two reasons.
The first is that the funnels function based off of line of sight, but not off your line of sight, but rather an omni-directional line of sight placed on you. To make sense of this, as per below, even when looking away from opponent your funnels will be slaughtering the opponents, however, no matter how close they are, the second there is a wall between you and them, the funnels will no longer attack your opponents.

The second advantage of funnels is that they have deceptively long range, as with the screenshot below.

These two factors mean, that as long as you are alive, and could, have vision of your enemy, they will be rapidly whittled down by the funnels. As such, the funnels are best used either when your entire team is dedicated to a push, as if the enemies focus you hopefully the rest of their team will then be destroyed. Or, alternatively, used while flanking the opponent, even if you give off a large sound notification, not immediately being visible to your opponents will buy you the precious seconds needed to obliterate them.
Strategies
This section will be a minor amount of repetition but will go over strategies and tactics that will lead to victory, alongside how to deal with some problematic match ups.
Defense
When forced to play defensively Sazabi it can be a menace in two scenarios: a close range choke, and the objective.
At the start of a match unless your team is planning to play an offensive defense, it is best to bunker yourself down in a choke-point where enemies will arrive or be locked into a placement where they will be within your optimal range.
As the match begins to reach its climax your presence on the objective will be effectively necessary, this rings true for both offense and defense, but is often more prevalent in defense. If the objective is planting/defusing the bomb and you are defending, never defuse yourself unless utterly necessary, while defusing, this may sound obvious but, you cannot shield yourself. You can however, stand in front of an ally who is defusing and be a massive 2800 HP metal shield for them. Additionally, most capture points and bomb locations are in small tight rooms, perfect for a well placed funnel.
Offense
As a tank, most would likely argue that Sazabi should be at the forefront leading the charge, however, while this can work with a menthus at your back or being boosted with armor, it often fails if the enemy is heavily entrenched with a good sniper and dom mines around the area. However, because of your boost allowing you to maneuver to quickly to usually unreachable spots, and your proficiency in close range, Sazabi makes an excellent flanker. Even if it may take a while, a Sazabi in the rear end of your team is the last thing you want to see especially since most long range combatant tunnel vision into their choke, allowing a usually unobtainable easy tomahawk into their face.
Matchups
With all said and done, Sazabit can still struggle against certain opponents, which includes but is not limited to, himself.
Sazabi Vs Sazabi
Two Sazabi’s meeting leads to more of a fight of mind games then anything, becomes ultimately it comes down to two things, when is he throwing his tomahawk, and how many shotgun shots does he have. As mentioned before, Sazabi is a large slow tank, which ironically, makes him a perfect target for his shotgun, if you have all 7 shots, and can land your tomahawk, the other Sazabi is as good as dead. But there rises the problem, can you land your tomahawk? Sazabi knows the tomahawk best, you know you want to throw it at a shielded opponent, so the second you meet another Sazabi, you better have a trigger finger on that dash button. And thus, the mind games begin, sometimes the two Sazabis will both just shield up and start shooting, sometimes you try to take a gamble and dash behind the Sazabi and see if you can get a lucky shot at his back before he turns around. Maybe you place yourself near a medkit, but he could be thinking the same thing and take it first, maybe you just shield up and hope a teammate comes in to break the tie, but the same thing goes for him.
Overall, if you don’t want to think much, wait 2 seconds after seeing the Sazabi, if he doesn’t dash tomahawk him, if he dashes during those two seconds tomahawk him after the dash, then pray you reloaded before you met him.
Turn A
Turn A is a massive pain to Sazabi, their grapple hard counters you in every sense of the word, you want to be close range, but if your close range your an easy target for the grapple, the grapple has a big enough hit box that even if you try to dash away you usually get hit anyways. Try to tomahawk the turn A? their grapple gives them super armor so they ignore the stun and damage so good luck.
The best advice I can give is as follows:
the second you spot a turn A, immediately throw your tomahawk at them, but DO NOT CLOSE IN, this tomahawk is for a bait, after you have used your tomahawk use your boost to make it seem like you intend to charge them, cancel the boost as soon as possible and dash away. If your lucky you will have successfully evaded the grapple and the turn A has become an easy target.
Asshimar
His transformed mode usually makes it impossible to land a decent shot as Sazabi, the best advice I can give towards him is make sure to get away from his napalm grenade as the AOE goes through your shield, and to try your best at body blocking him, it is fairly difficult to pull off, but the satisfaction of point blank blasting an Asshimar is unlike any other so its worth it.
Zaku 2 Ranged
Zaku 2 ranged is hard to deal with because of his large amount of dashes and his immunity smoke, this makes it likely that even if you can track him, you will run out ammo and be forced to reload causing your death. How I usually deal with them is by placing my back to a wall forcing them to attack my shield and waiting for them to run out of dashes before shooting.
Zaku 2 Melee
Another rough matchup, but this time its a lot easier if it is a 1v1, melee zaku builds rage from damage taken and dealt, thus a lot of allies will shoot him while he is invincible and thus build his rage. As such, whilst in a 1v1, whilst risky, your best bet it to avoid him until you can land a tomahawk and then quickly kill him, if you can’t kill him before the stun ends you are pretty much dead.
Barbatos
Fairly simple, just use your dashes carefully to avoid his abilities and you can quickly kill him.
GM Sniper
Try to flank, if you can’t or he is too far for that to be viable, just avoid his sight lines. You know what, throw a cheeky tomahawk at him.