Table of Contents Show
What gamemode to play solo and why
When playing solo in hunt showdown the best way to make money is to que for the split maps where you have an option to find both bosses and most importantly 6 clues.
When loading into a split map the first thing I do is check where the extraction points are. If you spawn on an extraction point for example check both of the nearest area’s first. If you are lucky you could get in kill the boss and extract before the other players can react. This is obviously based on chance but say you go to the nearest compound to the extraction point and get butcher clue 1. This may eliminate the other compounds close to the extraction point but, if the map divide means that a spider clue is also relitively close the extraction point it is worth getting spider clue 1 as this could still mean an early boss find and quick escape.
However you aren’t always alone on the first clue player spawns are relitavely close so keep that in mind by checking angles you are exposed from with iron sights and avoid triggering sound que’s.
If you get Butcher clue 1, Spider clue 1 and you havent found either boss continue uncovering clues in your current area with some haste, in order to secure the $25 off of each clue, but not compromising stealth.
if somebody then starts to banish one of the 2 bosses focus on making your way to the boss that has yet to be killed. It is much more profitable to kill the boss yourself since when solo’ing the boss you get an extra $100.
By the time you make it to the boss that is still on the map you will have anywhere from 3-6 clues. If you have found all 6 then you will have bagged $150 assuming you have went undetected. and if you can kill the boss this means you have already made $250 before extraction.
Best ways to kill the boss solo
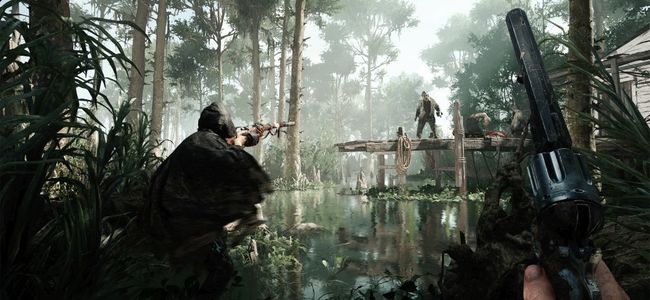
When killing the boss solo it is important to do it either quietly or instantly. This means either kill the boss with melee attacks, Concertina bombs or if you are high enough level a big dynamite bundle.
The first thing is getting in the boss room, if you can hear the boss and know it is very close to your entrance choose another as the sound of the door opening, window smashing or door cranking open will trigger the boss to start attacking you. If you can get in the boss room quietly and spot the boss before it has aggro’d you this means you can easily cook a big dynamite bundle to land on top of it. This is easier with the butcher as he doesnt run around on cielings, sometimes when entering the spider boss room it is dormant on the cieling. The way to deal with this is to line the arc of the dynamite bundle to hit the top side of its center, this will often have the dynamite bundle rest on the top side of it before detonation. If you would rather not take the risk the cook time for a dynamite bundle from lighting to exploding is roughly 5 seconds. Therefore cook the bundle for 4 seconds before throwing it, the bosses do not react to the bundle in time before it will explode this way.
Bare in mind your distance from the boss when throwing the bundle as it can one tap the boss so it can easliy one tap you if you linger to close to the blast. Another thing to bare in mind is explosive barrels in the boss room the initial explosion can trigger them as can the resulting fire left afterward.
If you arent high enough level to equip a big dynamite bundle there are easy and quiet ways to kill each boss. Each is vulnerable to specific damage types, for example the butcher is vulnerable to rending damage so if you sneak into the boss room and throw a concertina bomb at him it will take about a quarter of his hp bar off before he starts to move toward you. You can then either run through the wire yourself in order to get him to run back through it again, this will cause some bleeding damage but learning the boss room exits can ensure you have a place to run to banadge when getting low health. You can depending on where the wire is thrown find a way to run arounda pillar for instance and confuse its pathing casuing it to change path into the barbed wire, the more you do this the more spots in boss rooms you will find to do this reliably.
The next method applies to both the spider and butcher with slight differences, it requires a machete and a stamina shot. These two combined equate to $38 which is much more cost effective than the big dynamite bundle which is $110.
In regards to the spider sneak in the boss room and get as close to the spider as you can without aggro’ing it. then take the stamina shot, this will temporarily negate your stamina bar meaning you can spam heavy melee attacks for the next minute or so.
charge the spider with a heavy melee machete attacked primed and then lay into the spider with as many heavy melee’s as you can before it runs. this initial attack will do about 1/3 of the spiders HP.
Then proceed to chase the spider around the boss room which is aided by your stamina shot also, and proceed to attack the spider relentlessly. if the spider is on a low cieling jump just before you release the attack to knock it down. Some boss rooms have high ceilings which requires more of chasing the spider around but throwing knives are a good option to get it down. If you are relentless in attacking this wont give the spider an opportunity to pounce you and it wil rarely have time to poison you before it dies. The spider should take about 30-60 seconds to kill depending on which boss room for example blanchett graves is an easy place to melee the spider as it is very open and has low ceilings but the lumbermill could be much more troublesome.
For the butcher the method is essentaily the same apart from that you cannot prevent him from attacking you by attacking him, therefore you should kite him to a door on the side of the boss room wait for him to hit the invisible wall and make a swing for you then begin your attacking. If you are lucky you can get in enough damage in to cause him to take a knee. By the time he gets back up and is hostile again he should be half HP. Then proceed to repeat this process until he is dead it can take up to 3 runs to the door to kill him and requires some practise in order to learn when the butcher is prone to attack.
Both of these methods ensure you kill the boss without anyone hearing it unless they are in the same compound as you. Which brings us to the aspect of dealing with other players.
Dealing with other players
Other players will often be partnered so staying hidden is key when playing solo, but at the same time haste is required to cash in on the clue money before somebody starts extracting the boss.
This balance can be achieved by how you choose to equip yourself. My typical solo loadout consists of:
Weapons (depending on lvl)
- Romero, Caldwell, Spectere, Spectere Bayonet
- Machete, Romero hatchet (Requires the Quartermaster perk)
Tools
- Throwing knives
- Med kit
- Decoy’s
Consumables
- Frag grenade
- Big dynamite bundle
- (optional) Large vitality shot
Primary Weapons
Starting with the primary weapon’s, the shotguns i have found are the best option for a solo player because the best way to kill a duo solo is by ambush and the shotgun will drop one of the duo instantly making it a 1v1 before they have spotted you.
If you have been spotted the best option for you is to find some cover and consider their range if they are within frag grenade distance cook a frag and throw it at them. This will cover you in regards to medium range engagements since you have a shotgun and a melee weapon. depending on how close the duo are it can be worth using the big dynamite bundle as if you havent used any other ammo or consumables when you kill them you are garunteed to get it back when you loot the dead hunters as you can’t get ammo if you are at full capacity this then means you can only restock used consumables.
If the grenade doesn’t kill them or only kills one of them you need to find a way to get in shotgun range without giving them line of sight before you are ready to shoot back. you want to be within 10-15 ft with the shotgun to stand a chance of a kill or a hit to get them low enough that they will bleed out if they do not stop to bandage as shotguns cause rending damage.
Do not worry about sound que’s or aggro’ing mobs unless you can be pinned by them all mobs can be evaded by hoping over a fence barring the Hive mob. Therefore charging through a horde of grunts can be a viable option as it gives you partial cover depending where your attacker is and the noise of their shrieks when triggered will make it harder for the other player to pinpoint your foootsteps.
If the duo are on top of eachother when you get in shotgun range shotgun one of them and instantly push the other with a heavy melee machete attack landing a headshot with this is a 1 hit kill. Keep strafing and jumping to force a reload or until you are within striking range.
The machete is a very cheap and very strong weapon that can reliably 1 hit players. Ambushing players within melee range can result in an almost instant double melee kill as they dont know what is happening before they get killed.I have found the machete to be a much stronger secondary to the pistols unless you wanna be that guy and buy a dolch.
Another option is if your hunter has the romero hatchet, however as mentiond this requires the qaurtermaster perk, but does add an extra shotgun shot in while keeping the 1 hit melee. However it is slightly harder to land than the machete and has a slightly longer wind up animation.
Tool’s
The throwing knives suck for PvP so do not try it unless they are stood still and you are within about 5 ft and have a clear shot on his head. But what makes the throwing knives essential when staying quiet is there ability to 1 hit bee ladys out of aggro range (This does require practise) and also for killing the half dead horses out of aggro range. The bee lady will require a headshot to 1 hit and will take 2-3 body hits with the knives but you can recover them. The horse you can hit anywhere and it will die to 1 throwing knife.
Secondly the med kit is the most cost effective means of healing granting you 3 HP bar chunks of healing but once you unlock the doctor perk you can get 2 bars per use giving you 6 HP bar chunks of healing. The only downside is that this cannot be restocked by looting hunters or large ammo crates. The physician perk, which reduces the time taken to bandage, further adds to the efficiancy of this tool.
Finally in regards to tools the decoys are essential for dealing with the red Dog and Chicken pens found in most compounds. These pens always have a lit lantern above them, throwing a decoy at this will pop the lantern causing the dogs/chickens to be burnt with a small amount of noise and permenantly silencing them allowing you to walk or sprint past them.
Consumables
Initially the frag grenade is the perfect balance between power and cost. It is slightly stronger than the dynamite stick at $5 more, but less effective then obviosly the dynamite and big dynamite bundle. I have found it is just powerfull enough to kill a duo thats within about 10 ft of eachother and for $50 a duo kill is worth the money also as mentioned previously if you have full ammo and have used no other consumables you can get another one back from the dead hunters costing you nothing, Happy days.
The Big dynamite bundle is basically there just to one tap the boss but as its description says, “for when something really needs blowing up”. This could be the boss or it could be a duo thats decided to shoot at you from the top of a barn.
As for the large vitality shot at the steep price of $75 I dont think it is worth it. Given that it now takes a long time to administer the med kit is the better option in both cost and effeciancy when in combat. However if you dont mind splashing out the extra cash it can reset an ambush granted you find some cover for a few seconds.
Summary/General Tips
In conclusion, by using this loadout and boss killing strategies you should start killing the boss at least in every game, which componsates for the price of this loadout granted you found several clues prior to killing the boss.
The times you are most vulnerable to player ambush is while waiting for banashing or when entering compounds to fidn the clue.
For the first compound i would focus on staying quiet but not neccessarily hidden. If you get engaged on at the first clue and can make it to cover you can normally assume that this duo is the only one that has spawned at the same compound meaning once dealt with you can take your time. Use this time to use the first aid kits around the compound to save on med kit use, or usethe large ammo boxes to get full ammo before looting them to ensure a return of your grenade of big dynamite bundle if used.
For the 2nd and 3rd clue i normally take it very slowly but constantly progessing to the clue, if i hear a sound que get triggered or even a hell hound howl i could have triggered just by being in the area i will find a nice corner or place myself in the shrubs and listen for a minute or two. If you hear no more sound ques, footsteps or grunts being melee’d Etc. then you can assume its safe to go in and out while primarily focusing on shutting down or avoidong sound que’s.
As for the boss room location I scan the compound from the outside and then slowly make my way in constantly checking angles on me with my ironsights the extra zoom of iron sights makes it easier to spot other hunters. Then I look for a quiet way into the boss room and use my big dynamite bundle on it. While waiting for banish you want to find a spot in the boss room where you cant be seen from the exterior of the room, it is also important to make sure the side you are exposed from is limited to shotgun range. If somebody see’s you in a corner from 20 ft away its a lot harder to deal with than if they walk into one tap range before discovering you are there.
Another tip for when the boss is banashing is stay hidden until the bounties are on the ground ready to pick up, this means you won’t be stood on top of the boss looking down wating for the opportunity to grab it leaing you exposed. Also the last stages of banashing are extremely loud making it the perfect time for you to be rushed to stay hidden until this is over and you can accurately trace footsteps.
Once you have the bounty scan the boss compund to ensure you are alone if not use the PvP tactics as mentioned earlier with the added advantage of you seing them more clearly than they can see you. But be carefull not to burn all of the dark sight boost as it is limited and you may need it later for bush wookies at the extraction point.
When choosing an extraction point consider where the other players on the map likely are for example its better to run through the side of the map where the boss hasn’t been banshed as those players will be preoccupied, whereas the area you killed the boss in will have the other players searching for that boss focused on you. Finally be unpredictable even if an extraction point is twice as far away players might have already gotten set up at the closest one meaning they can’t catch you if you instantly B line for the opposite side of the map. This doesnt apply if they extraction point is in the same compound as where you banished the boss in the case its always best to try and get out before anyone knows whats happened.