Table of Contents Show
A collective of information regarding The Dark Lord’s Footprints, a large scale puzzle, for your convenience.
Other La-Mulana 2 Guides:
- La-Mulana 2 Getting the Feather Early On
- La-Mulana 2 Glossary Locations
- La-Mulana 2 App Combinations
Introduction
This is a compilation of information regarding the Dark Lord’s Footprints, a large scale puzzle that may stump some players upon reaching a certain area. The Dark Lord’s Footprints refer to an entity in the ruins of Eg-Lana that wandered about and did some stuff to obtain power or whatnot. The point is, he did some cryptic stuff and that leaves you to trace the footprints and solve a puzzle or two.
Each step in the guide is divided into two parts, Hints and Solutions. Preferably, the Hints section is all you should read, but if you really need the Solutions, there you go.
This guide assumes the following spoilers are known to the player:
- You already know of Mantras, and have the Djed Pillar
- You have been to the Dark Lord’s Mausoleum, one way or another
1st Step – 1a – Opening the Path Onward
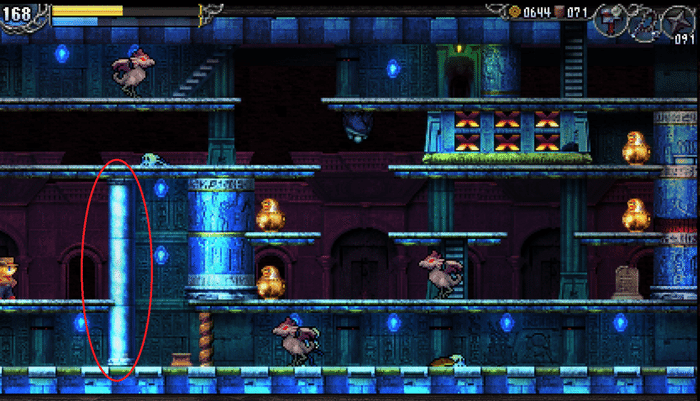
Upon reaching the Dark Lord’s Mausoleum, one way or another, you may find yourself coming across this room.

A room strewn with a bunch of tablets, some enemies (3 Ba, 1 of those draining enemies) if you’ve been thorough with Guardian extermination, a Bust of Ymir, and 4 Bastet statues (cats). Based on this layout, you are to assume you’ll have to chant a certain Mantra, and that the solution is in at least one of these tablets.
Except there’s a lot of tablets.
At the very least, you have two tablets (Row 3, Column 4 and 5) that clearly state what you need to do:
- “Trace the Dark Lord’s footprints.”
- “Incant the words of each of the five footprints in turn.”
- “When the five words are spoken the road will appear.”
So, basically, you have to figure out the correct order of 5 mantras at the Bust of Ymir in order to open the path onward. But, what could you possibly look at to even begin?
1b – Hints
- If you prefer to work out the solution for yourself, but just need a nudge in the right direction, start here.
- Do you recall any background images through your escapades in Eg-Lana? Possibly images that depict something similar to the tablets you saw in the Mausoleum?
- Are you familiar with the numerical system used in La-Mulana, and Eg-Lana by extension? Mulbruk may give you a hint if you’re unfamiliar: the sigils you’re carrying signify such.
- Have you found enough Mantras in the first place? You should have at least 3 before attempting to solve the puzzle..
- Note that you must incant the solution one at a time, not all at once.
- If you think you have an inkling as to what you should chant, or if you wish to brute force it, the Bastet statues’ eyes will glow red in sequence if you incant the right single mantra, and will all fade once you botch it..
1c – Solution
Explanation of the solution here:
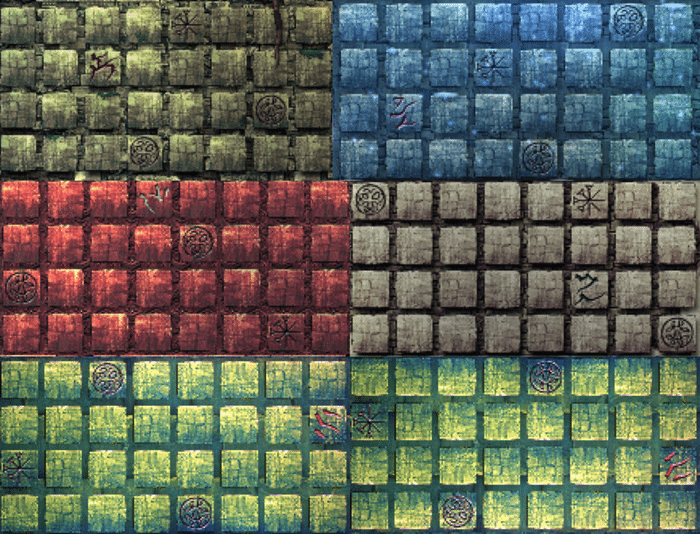
As you might have guessed, those large square murals you’ve seen in the ruins are, collectively, the Dark Lord’s Footprints. Each map possesses a set of icons that correspond to a specific tablet, hinting which mantra you are to incant in from the of the Bust. Each one is also adorned with a La-Mulanese number, which indicates the order in which each map step should be considered.
The murals are located at:
- Roots of Yggdrasil
- Shrine of the Frost Giants
- Immortal Battlefield
- Divine Fortress
- Gate of the Dead*
*Due to the nature of the Gate of the Dead, make sure to compare the orientation of the symbols with that of the other areas. That said, if you incant that result, you’re not exactly wrong…
So with all this collected, you can then determine which mantras to read and the proper order to chant the Mantras in; if you’re missing the mantra, go explore a bit more.
If you have the Race Scanner app, note that the solution tablets are all by the 1st Child: Kotoamatsu.
The outright solution is:
- Heaven
- Sun
- Earth
- Heaven
- Earth
This will open the path to Aten’s Room, which, if you’ve been talking to a certain Ra everywhere, will also lead you to the Ankh to deliver retribution to the jerk.
2nd Step – 2a – Opening the Path Downward
Although the solution for this puzzle comes into fruition later, this can be done immediately after solving the above puzzle. It may have been solved previously if you didn’t record the proper map.
Spoilers in this section are considered mid-late game spoilers.
So you’ve managed to solve the above puzzle, and opened the path to Aten-Ra, possibly moving even further onward. Eventually, you might find yourself at a standstill.
- Maybe you’ve heard people in the Gate of the Dead discussing something about a “Maat’s judgement.”
- Maybe you’re wondering why Fobos asked you if there was more to that room.
- Maybe you’re just curious as to why there’s an extra few rooms on your map regarding the Mausoleum or the Underworld.
- Maybe you’ve made it to the Underworld and are confused as what to do, or why a certain someone refuses to talk to you.
So, yes, you’ll have to return back to the tablet room once more. There is, indeed, more to the incanting in this room, as the Bust’s eye is still lit. But what?
2b – Hints
- Consider the murals you’ve visted, particularly the Gate of the Dead one.
- Consider what Nehkbet in that same room says.
2c – Solution
Simply incant the same first 4 mantras as with the Aten’s Room, but switch the last mantra (Earth) for where the Gate of the Dead’s La-Mulanese number is when flipped vertically.
In other words, more straightforward:
- Heaven
- Sun
- Earth
- Heaven
- Fire
As for what it opened: This will slightly open a room to the left that you will have to crawl into: The Room of Judgement. Hopefully you’ve been paying attention, regarding this room.
3rd Step – 3a – Opening the path to…where now?
Late game spoilers from here on out.
So, by this point, you should have entered the pyramid, now eligilbe to its secrets as you hold both the Pyramid Stone and the Destiny Tablet, as well as figured out that, yes, that is indeed a pillar you can swing around.
You’ve probably;
- Tried holding up the Pyramid Crystal in the pyramid, to the mockery of Fobos.
- Tried hitting the Pyramid mural, because that worked well in La-Mulana 1.
- Tried chanting certain words to the disgust of the Laser Eyes of Retribution.
So, you’re stumped. But, hey, least you have a map.
3b – Hints
At this point, you have all that you need. Return to the tablet room and compare your map again. At the very least, you’ll have to consider a few things.
- This incantation is all at once, not one at a time.
- This incantation is within the pyramid, not in the tablet room.
- Consider what the pyramid has been linked to based on what NPCs have been saying.This should help you pick the correct symbols to follow.
3c – Solution
As you’ve hopefully ascertained, the Pyramid is a means of returning to Nibiru, the origin of the Sky People in the stars. As such, you should have to follow the Star points on the maps you’ve collected. This time, make sure the Gate of the Dead map is aligned upright, with the Mulanese pointing at Earth.
In case you’re too lazy, the solution reads:
- Roof
- Wall
- Fire
- Moon
- Eternal
Afterward:
- Hold up the Pyramid Crystal proudly on the new pedastal.
- And watch out for the rock.
- And watch out for the pyramid face.
4- Cheat Sheet
This is for the lazier people who want to have the materials to solve the puzzle without outright solving it.
In case you don’t want to renavigate to the areas for the map, here is a compilation of all the images you will need.
5- Closing
Thank you for viewing this guide, although hopefully, all you needed were the hints. This game is best played as blind as you can, but I understand not everyone can deal with that.