Table of Contents Show
This short guide gives some tips on endurance driving with the DLC.
Endurance Driving Guide
This guide is no by means a comprehensive approach to the subject. Endurance driving doesn’t differ from other forms of racing that much, so I suggest using one of many good guides already published. I just want to stress some differences which will help you in managing an endurance team and give some hints for the start.
Endurance driving is really fun. I think it’s more fun than the core game as it requires a little more planning and strategy. It’s really a nice addition to the game and gives good replayability to those who already got a little bored with the core game or GT series add-on.
Basic strategy
I’m assuming here that you are starting with a new team from scratch. If you’ve been hired by a better team you might want to skip forward to the later chapters.
Before you begin you must ask yourself one question – what is the most important thing in racing? Winning – you may answer but I will object. There are three things you need to run a good racing team – money, money and finally a lot of money. Winning is of course important but you will need a lot of money to do so – to hire good drivers and mechanics, to expand your infrastructure and to design parts. Therefore, your first goal is to secure money.
How do you get momey in this game? Mostly through sponsors. Therefore, your marketing value is probbably the most important factor in the game. You might say here that by winning it will increase therefore one should quickly start winning by hiring expencive drivers etc. Unfortunately this strategy fails.
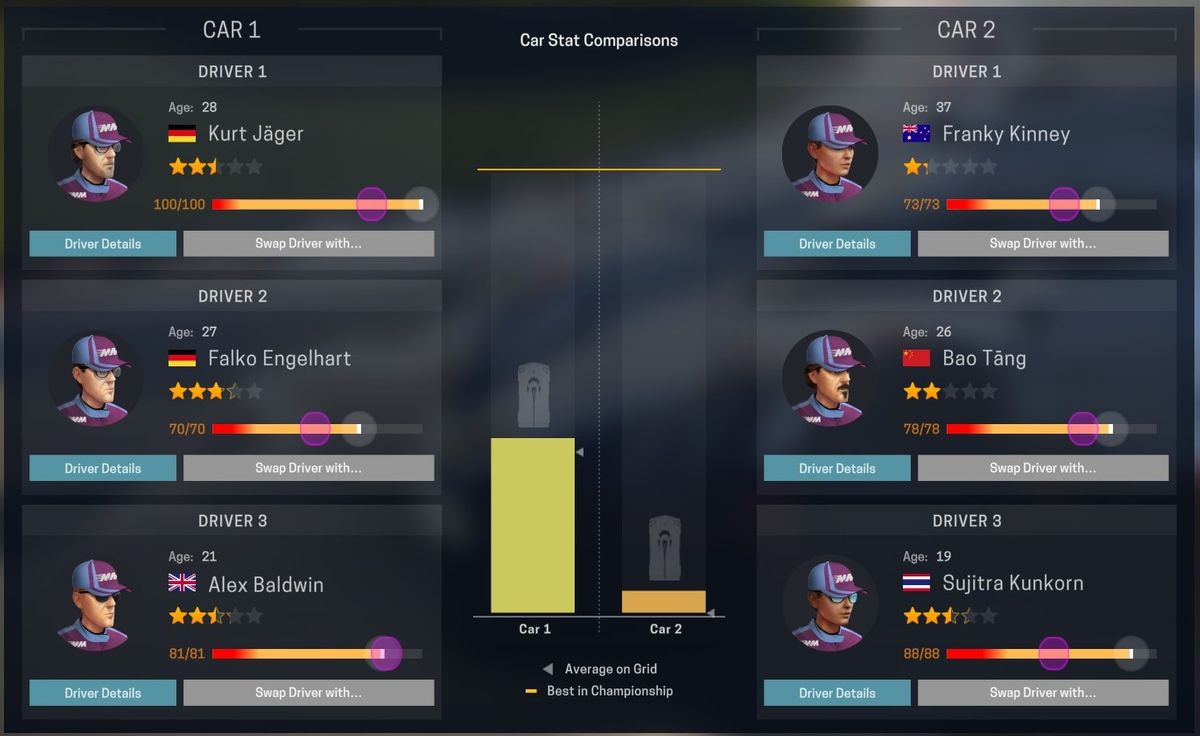
You might get a little better results with good drivers but your marketing value will grow slowly and you will already bankrupt before it reaches high level and the sponsors come. Another way of increasing marketing value is to hire drivers who have marketability parameter at high level. And this is the way to go.
When the game begins your first goal should be to scout all unemployed drivers (only these will be willing to join you) and look for those with high marketability value. I can’t stress this enough – it’s the most important parameter you will face at start. Don’t forget to hire a decent lead designer and race mechanics but do it cheaply. Here we come to the second point. It’s not only about earning money but also about saving it. Don’t expect to win at start – you will finnish last and it’s fine. Therefore, cut your costs. Good lead designer is good, but he won’t help you if you run out of cash. Pick a decent one but also a cheap one. Same aplies to the drivers.
I made this mistake many times when starting a new game. I tried to hire the best drivers and start winning immediately. Unfortunately in motorsports it’s not only the driver who is crucial to winning but also is the car. And you can’t have a good car in the beginning when you don’t have money and crucial buildings.
Therefore, you need to plan many years ahead. You will have to develop your buildings and parts and finally when you are ready, get the best drivers and win. It’s a long proces and patience is a must. Don’t rush it – know your place. The only thing I wouldn’t want to save money on are pit stop mechanics. Hire all decent ones that show up. Pit stops take really long time in endurance and you want as more realiable team you can get.
Car setups
I think the idea which I propose here works in every type of racing but endurance gives you more versatility, because you have 6 drivers to manage, and they actually all drive the cars (no reserve drivers). What I do is define the car one as developement car and the second one as a junk car. The developement cars is maybe not supposed to win but it should achieve some good positions while the junk car can come last every time.
Why is that? Because at the beginning you can’t really afford to have two good cars and you don’t need them. If you want to hit position requirement by a sponsor it’s enough to do it with one car. You should be able to make it as 8th on the finnish (for 12 drivers) you can even try to make it as 6th. What happens to other car – it doesn’t matter. Usually it will be last but I managed to take 3rd place once with my junk car once thanks to rain which messed up everything. Of course late you will need two good cars to win the league but for the first few seasons it’s pointless.
So what is a developement car? It should have cheap, decent drivers, with some potential. Why is that? Because a driver may be bad now, but if you sign a longer contract, he will develop and not ask for more money. This is ideal situation for you, where saving money is a must. Your drivers can be much better in the next season not draining any more money.
Of course as mentioned before marketability is the most important factor so check it first. You should also make some parts for this car to make it better – I will mention this in a moment. A typical race money I would pay to a driver would be between 100-200 thousands. If you find a really interesting driver with hight marketability, and he costs 300k it’s fine – take him. But try not to spend more than half a million for your developement drivers.
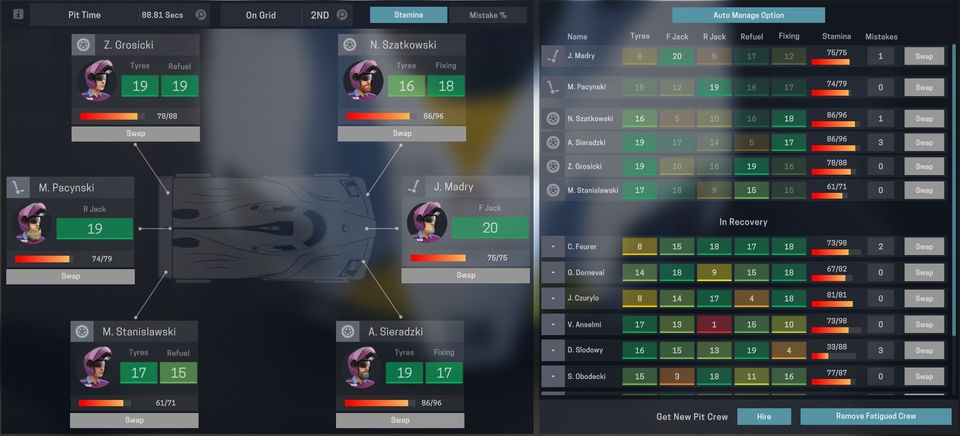
Now here’s an important thing about endurance drivers. They all have stamina bar. This is by far the most important racing stattistics. It literally says how long a driver can drive without need to rest. So if you see a driver with a bar of 80 length it means that he can drive for more or less 80 minutes. But keep in mind every driver also has a red field in his bar. In the red field he is tired, and he won’t drive very well. Therefore, you should subtract the red field from the total number.
The average red field is 20 minutes, the shorter one is 10, and the longer one is 30. So if a driver has 80 minutes total and 20 minutes red field, you may expect him to drive for about an hour. Still, it’s better to have longer total time. For example 90 minutes total with 30 minutes on red field is better than 70 minutes total with 10 on red. It’s because while usually you will avoid to drive in the red, sometimes you may need to use that extra time. So while picking drivers pay attention to this stamina factor. Very good and expensive driver might not be so good when his stamina is low because he will spend most of the time just resting rather than actually driving.
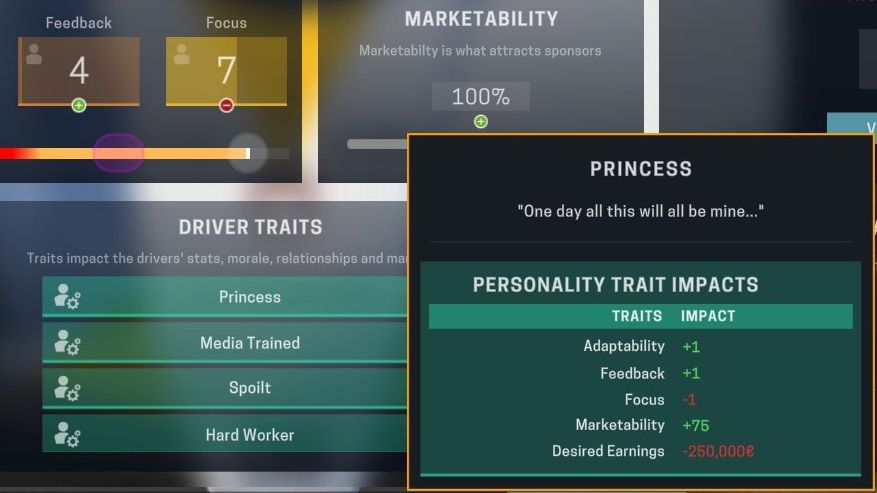
As for the junk car, you are not going to develop it really. What you need is three pay drivers. A pay driver not only doesn’t cost you anything, but he also brings some money to your company back. Ideally you should find 3 pay drives with high marketability value. You don’t really care about any other parameters. They can be bad, they can be old. You just need 3 princesses with rich daddies. Of course if you find a decent pay driver you can put him in your developement car, but this is rare occurence. Usually pay drivers are bad.
Designing parts
Now let’s talk about parts designing strategy. You might think that when I said that you don’t need to win, you don’t need to develop your parts. This could be true but the fact is that two of your best parts in each category are at the end transferred to your next season (the reability drops though). Therefore, you should develop some parts to have them ready at the next season. You can choose what to do of course but in my opinion it is best to develop cheap parts first.
So depending on the rules (some parts may be standarised) I would develop brakes and suspenssion to the maximum level, leaving engine and gearboxes for later. Your goal should be to max out those parts before the season ends. Of course put them on your developement car first.
You may also try developing an illegal part but just don’t use it. If you max it out and keep it to the end of the season it will become legal part next season. Neat, isn’t it? Once the second season starts you should start developing gearbox or engine and at that same time you should already have racing track or telementry center so you can develop them in higher quality. Third season with certain new buildings you could come back to developing brakes and suspennsion etc.
You should always develop realibilty first until it hits 70-80%. This is usually enough and you can switch to performance. With high realibility you can use the maximum engine power for the whole race which is a certain boost to you. Until that time you will have to drive a little slower. Of course if the rules allow reduction of weight the realibility becomes even more important.
Developing HQ
If you play it cheaply you should be able to afford factory improvement immediately. This is the most important building as it quickens improving the parts, but it also gives you few choices about new buildings. Beginning the next season I would personally build telemetry center and focus on gearboxes. But don’t build too much. You need at least 10 million free cash when the season starts (prefferably more), because you will lose around 1 million each race. Each season you can ask your boss for extra money – do it.
You will lose 50% of the trust but you will regain it quickly with every little success. That is of course if you’ve chosen last place as the season goal. You should also have some cash in hand in case mail comes which for example gives boost to your marketing value. I will pick all of such events for any money – increasing marketing value is a must for you.
Another thing are votes. Sometimes a vote will come to change the rules for the next season. I would suggest you to abstain in all those votes that don’t really matter because if you do so, your voting power comes to the next vote in that season. Sometimes a very dangerous vote comes and you need all the power to win it. For example you have just finnished building your nice telemetry center and a vote to standarise gearboxes comes. You just need to win this one because it would be devastating if you lost.
One more thing about interviews. Sometimes they will ask you about certain driver. Always say that you want to hire him. You lose nothing and gain a possibility to talk with that driver. You don’t need to hire him, but the possiblity is nice.
Racing strategies
I will discuss only 6 hour races. I never tried shorter ones. I think only 6 hours give the most fun.
The basic strategy most teams adapt is 5 pit stops, which means 6 phases:
pashe 1 -> pit stop 1 -> phase 2 -> pit stop 2 -> phase 3 -> pit stop 3 -> phase 4 -> pit stop 4 -> phase 5 -> pit stop 5 -> phase 6 -> finnish
With 6 phases and 6 hours to go obviously one phase on average lasts 60 minutes. The basic scheme you will use is:
driver 1 -> driver 2 -> driver 3 -> driver 1 -> driver 2 -> driver 3
As you can see on average you should have drivers with 60 minutes of yellow stamina bar. But this is only an average. If you have 2 drivers with above than average stamina for example 1 hour 10 minutes, the third one can have only 40:
1:10 -> 1:10 -> 40 -> 1:10 -> 1:10 -> 40 = 6h
Obviously if you have 3 drivers with long stamina you can design different strategies.
Let’s say driver 3 is bad and you want to relay mostly on drivers 1 and 2. You could think of such a strategy:
driver 1 -> driver 2 -> driver 1 -> driver 2 – > driver 1 -> driver 2
Unfortunately this won’t work because drivers recover slower than they tire. So when driver 2 finnishes, driver 1 won’t be fully rested yet. But this is a strategy that might work:
driver 1 -> driver 2 -> driver 3 -> driver 1 -> driver 2 -> driver 1
or combo of it:
driver 1 -> driver 2 -> driver 1 -> driver 3 -> driver 2 -> driver 1
While driver 1 may not be fully rested, and he would drive shorter in one phase, the other phases could compensate for that. This way you can minimise the time used by the weakest driver. Moreover, you can make him a specjalist for example weak and cheap driver but with a perk for wet weather. This way he would only take one phase in most races but you would use him more when it’s raining. This is really where endurance shines in comparison to core game, where you just have one driver for a car.
Another factor is driver form. This was already present in the core game but you could do nothing about it. Either driver was in form or not. In endurance if you have 3 drivers with above average driving time you can use presented schemes to limit the driving time for a driver with the least form at the moment.
Another possiblity with above average stamina drives would be to use only 4 pit stops. I think this strategy is most effective while your team is generally bad. The pit stops last very long time, up to around 60 seconds (without repairs) so reducing one pit stop is a real gain. Unfortunately with more fuel on board you will drive slower, but that time cut should compensate for it.
6 hours with 5 phases gives 1 hour 12 minutes on average for a phase. This should also work, sometimes maybe getting for a little into the red stamina zone. Here is the basic strategy:
driver 1 -> driver 2 -> driver 3 -> driver 1 -> driver 2
In this scheme one drive is naturally driving shorter than two others.
Some teams adapt strategy with 6 pit stops and 7 phases. I wasn’t successful with this one but it might work with good race mechanics and a fast car which can gain advantage on very soft tires and low fuel amount. Just bear in mind that if a driver is to earn any points he must spend 10% (36 minutes) of race time actually driving.
Race calculations
Ok, so you’ve adapted a strategy – how will you actually put it to work? Unfortunately the game doesn’t give us all the needed information so you will need to have a calculator handy. Let’s say that you’ve picked a driver with 85 minutes of stamina and 20 minutes in red field. I would subtract the red giving me 65 minutes of driving. Now you should check the average lap time. At the beginning of the race you will only have times from qualifying session, later you will have actual race times. Let’s say on qualify you made 1:28 for a lap. This is 88 seconds. I would add a second or two just to compensate for more fuel on board for total of 90 secunds per lap. Now divide it by 60 -> 90/60=1.5 – this will be your time for lap factor.
Now we take the 65 minutes of driving for our driver and divide it by our factor 65/1.5=43.3 – this gives us the actual number of laps this driver can make on his yellow stamina. I will check tires on this number (although the game also gives tires time but I just got used to lap counting). But you never want to go with tires to 0%, so pick those with a little longer lifetime in this case around 50-60 laps. Now we need to calculate fuel. It depends mostly on the engine mode we use. If we use the yellow one it will be the same number. Multiply by 1.1 if you use orange, 1.3 for red and 1.5 for purple (if you have it). Considering that I have >80% realibilities I want to use the red setting so my fuel would be 43.3*1.3=56.3 laps. Now this calculation isn’t very precise, so I usually add 3-4 more laps of fuel just in case. This is basically it.
When this is your last phase – instead of driver stamina put the time to end of the race in the calculations. Add a little more because you can’t hit 0 fuel when the time finnishes because the race is not over yet. Leading driver has to pass the finnish line. So you would like to have about one extra fuel lap at the end. You can also do some quick cross-checks for example when it’s 20 minutes till the end divide 20 by your factor, multiply by engine mode – here (20/1.5) * 1.3 = 17.3 and check the actual fuel laps on the driver. If it’s lower – decrease the engine mode for some time to conserve it. Do same cross-check at 10 minutes till end.
You will also have to take into account different factors – lower fuel usage of your car or your driver. With experience, you will know how to modify these basic calculation.
7) When it starts to rain
First of all don’t panic. The raining times were rescaled. Each bar showing level of water on the surface represents 6 minutes. Even if it has just started raining it will usually take around 20-30 minutes before you would actually need to change tires to your greens. So if you’ve planned a very long phase, switch to higher engine mode to burn the fuel a little quicker. Same goes for drying time, you might want to preserve your rain tires as long as possible and also exploit the red field of the driver for some time if needed.
Green and blue tires are usually shorter lived than the ones you normally use. Therefore, you should calculate not by driver time, but by tire’s time. If a tire is made for 40 laps, just multiply it by engine mode (here 1.3) giving 40*1.3=52 laps of fuel. You can also multiply it by time factor to check if the driver will manage 40*1.5=60 minutes of driving. This is basically it. Rain often blows everyones strategy and you will have to adapt. Check if you are able to continue with your standard number of pit stops – if not plan ahead. Generally I was always quite successfull with rain because I could adapt better than the CPU opponents.
I hope all of that helps. Good luck.
Thank you for this very beneficial blog! Keep up the good work.