Table of Contents Show
Naval Action is a hardcore, realistic, and beautifully detailed naval combat sandbox immersing players into the experience of the most beautiful period of naval history – when sailing ships ruled the seas.
Other Naval Action Guides:
How to Command Your Fleet
For information on how to command a fleet of AI ships, look no further.
What is a Fleet?
A Fleet is something the player can use to help bring themselves up into the world. As you first start off, your options are very limited as to the power and overall ability of ships you can command. Because your maximum crew level slowly rises with each rank, you must be content to use basic ships such as the Cutter, Pickle, or Privateer early on in your carrer.
These ships are hardly competent enough to hold their own in challenging battles – battles you need to fight if you want to quickly rank up and command a powerful ship of your own.
Luckily, that is where Fleets come into play.
Fleets consist of one or more ships under your command. They will come into battle with you and provide support, just as another player would in their own ship. But they will gladly take fire and ease your burden to stay alive in a fight, and they can help you take down ships more quickly. They can be commanded with certain orders, and will earn gold for you based on the damage they do.
Obtaining a Fleet
To hire a flee that you can command, simply dock in the nearest port and acess the ‘Fleet’ tab. There you will see a message telling you how many ships you may hire, and how many you may command. The difference between these two numbers is important, as you may hire more ships than you can actually bring with you into battle – so aim to only hire as many as you can command at once at any given time.
When seeking to hire a new ship, you will notice only two options available to you. Those are the Lynx (17700) and the Cutter (26500). While the Cutter may be the more expensive choice, the difference in cost gives you a decent bonus of combat ability over the Lynx.
Commanding your Fleet
Once you leave port with your new Fleet, you may notice that your maximum speed in open world has changed. The more ships you command, the slower you will go. The difference however is negligable, but just be aware if you are a trader seeking escorts.
In a battle however your speed is unhindered. You will start the battle with your fleet on either side of you and without any direct orders they will simply seek to destroy the nearest ship.
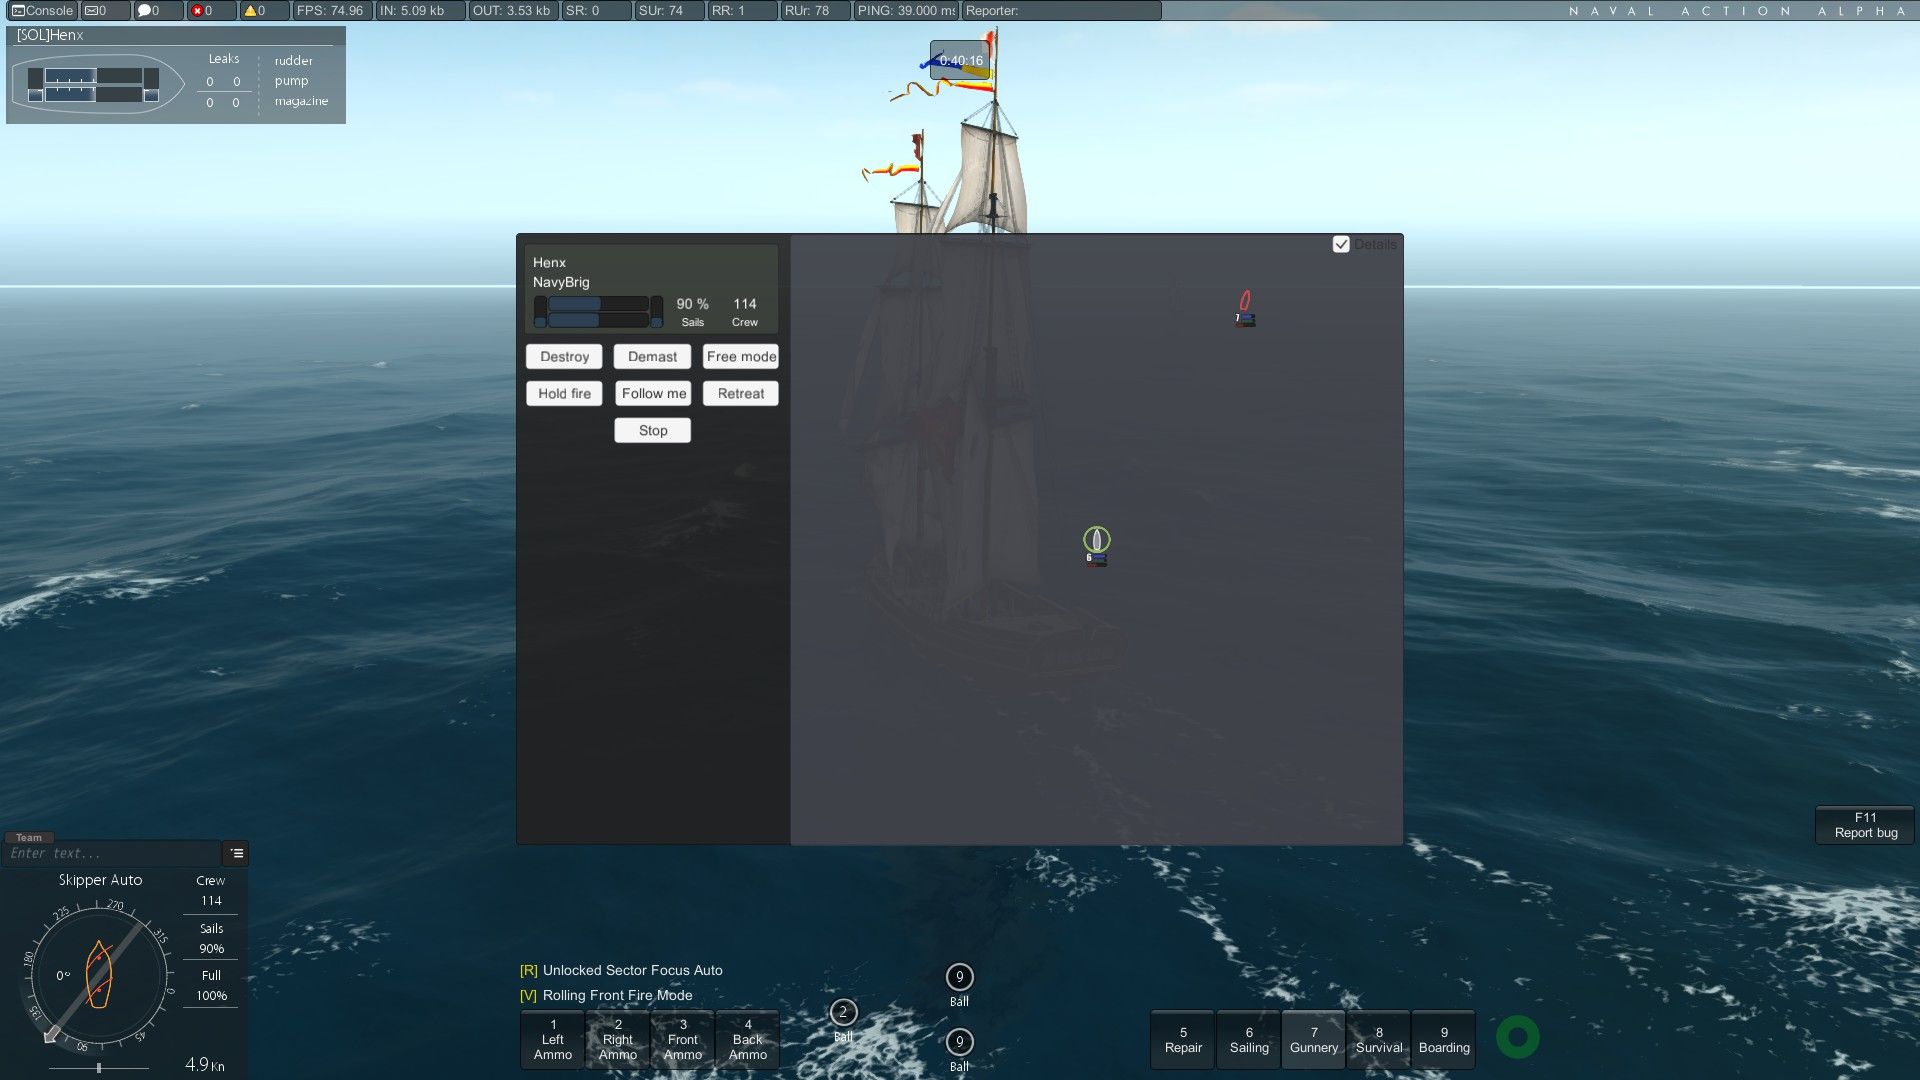
If you open your map [M by default] however, then you can give orders to your ships. Orders currently must be given after the battle starts and not in prep phase and are not absolute. Sometimes for example retreat orders given will randomly reset to ‘Free mode’.
To issue an order to a ship, you can click on it in the map and then click the appropriate order you wish to give. Additionally, for aggressive orders, you can select the enemy ship you wish to target and then give an appropriate order. If you have no other ship selected, all of your fleet ships should target that same enemy with the given command in mind.
Some of the available orders:
Retreat: The ship will break off the attack, hold fire, and try to maintain a course on the fastest vector away from the battle. Once it has not taken or delt damage for 2 minutes it will leave the feild of battle and is considered safe.
Hold Fire: The ship will stop firing its cannons and maintain its position. Useful if you wish to capitalize on damage XP and gold rewards yourself but still want a fleet member to soak up damage in your place, or be on standby should things go awry.
Follow Me: The ship will attempt to follow behind you and do as you do. Ideally this should allow for line formations but currently the AI has trouble succesfully following this order. As such it is not recommended that you use it.
Free Mode: The ship will do as it sees fit, targeting the nearest enemy whilst attempting to sink it.
Demast: An aggressive order that will have the ship fire of chain shot towards the enemy’s sails. It will attempt to bring down their sails health as much as possible, and may even begin to target the masts when given the oppertunity. Use this order when you wish to board a ship or when you are trying to outmanuever a larger ship.
Destroy: The basic aggressive order that will have the ship targeted to be sunk as fast as possible. Useful when you wish to simeltaneously order all of your fleet to focus fire on a single target.
Maintaining your Fleet
One of the most commonly asked questions I see from new players is how long your hired ships will stick around. The answer is for as long as they are kept alive.
Every ship has a durability level, and hired ships are no exception. Each ship you hire starts with 5 levels of durability; This means that they can sink 5 times before you no longer have acess to that ship in your fleet anymore.
In order to maximize the lifespan and usefullness of your fleet, you should seek to prioritize getting them repaired after each battle. They often will take substantial damage in a fight, and while they might survive until the end, should they engage in another battle the risk of them going down quickly is enormous. As such seek to head back into port and repair each ship in your fleet back to full health. It does not cost much and it will allow you to make the most of them. Keep in mind that you cannot use repair kits on them in the open sea, and you cannot order them to repair in battles. You can however order them to retreat from fights should you get into a fight that they cannot handle.
Ordering your fleet to retreat works the same way as it does for your personal ship and your ability to ‘leave battle’; The ship must not take damage or have delt damage for about two minutes, else the countdown will reset and the ship will not be able to leave.
A warning: If you decide to retreat from a battle that you cannot win, make sure that your fleet ships retreat and actually leave the battle before you do. If you leave the fight with them still there, they will be considered to have sunk and will loose a durability level.
If you want to keep an eye on how your fleet is doing during a battle, you can open up the map [M] and check the left side of the window. It will give you a breakdown of the ships you have under your command (as well as your own) and then give you a graphical representation of each ship’s overall armor strength, crew numbers, and sail health. It is also reccomended to check the ‘details’ checkbox in the top right of the map. This will place three colored bars next to each ship on the map. The blue bar represents Armor, the red bar represents Crew and the white bar represents Sails. This area will also tell you how long each ship has left before it can retreat from a fight in the form of a red countdown timer or a “safe to leave” message.
On Experience and Gold
In Naval Action, the main method for obtaining money and experience is damage done to enemy ships, crews, and sails. The reason this is important here is that you do not earn any XP from damage done by your fleet.
This means that if you have multiple ships in your fleet and they are able to do a large amount of damage, you will find that you will earn far less combat XP per battle. This is because there is less damage for you to do yourself. As such, you may find that you want to disable your fleet ships before easier fights you know you can take in order to maximize XP gained. You can also tell your fleet to ‘Hold Fire’ during battles to soak up damage but not dish it out, but be careful that you do not take to long to down the enemy ship and let your fleet sink.
Despite this, if you are fighting a higher level mission, you may need the backup to finish the job and survive in the meantime. You will still earn the same mission rewards from each job completed no matter the number of fleet ships you command.
Keep in mind that you will still earn gold for damage done by your fleet, so you can still benifit greatly from commanding a powerful fleet. You will also obviously end missions earlier, giving you the opertunity to knock many more of them out than you could have before to farm mission rewards and loot drop chances.
A very important note to keep in mind: You can no longer hire fleet ships after you reach rank level 3. If you still have ships in your fleet you may use them, but you cannot hire any that you loose back after that point. This is done for balance currently and will likely be subject to change before the game releases. It becomes less important for you to have a fleet later on once you have the rank to command a bigger ship anyway, but should you wish to keep yours around make sure you hire as many as you can before ranking up and do your best to keep them alive.