Table of Contents Show
A step by step walkthrough on how to build a modular submerged electrolyzer and SPOM.
1. Introduction
Some of you may be familiar with my original guide on Fail-Safe Electrolyzers. The design in that guide had a singular purpose, to ensure that H2 and O2 gasses would never mix in the output pipes from the electrolyzer.
Like many of you my first couple colonies used a “Rodriguez” design, popularized by Francis John. I later discovered the Kharnath design in the Amazing Compendium here on Steam. Both designs served me well, but I always ran into (self-inflicted) issues when my water supply would get cut, or an output pipe would back up, and the whole electolyzer system would start mixing gasses, potentially even needing to be opened up, vacuumed and re-primed. My previous guide set out to solve that issue, but in the year-plus since then the ONI meta has changed.
Nowadays submerged electrolyzers are the rage, and they have some distinct advantages over conventional designs:
- They exploit a game engine quirk to automatically filter hydrogen from oxygen for free.
- There is neither a power cost nor a “mechanical filter” required
- They will never over-pressurize, so you get 100% uptime / efficiency for free
- Because of the above, you also get “infinite storage” of both H2 and O2 for free
- With one small exception, discussed later, you get “fail safe” operation for free
That combination of perks makes conventional electrolyzer designs obsolete, unless you happen to consider submerged vents and infinite gas storage an exploit of unintended game mechanics. I won’t judge either way anyone’s single-player game experience, but at least now I’ll have a guide available for both groups of players.
2. Objectives
My goal this time was to take advantage of the simplicity of the submerged electrolyzer mechanic to create a stupidly simple design. Like all my guides I wanted something modular that could expand with your colony as you take on dupes or find extra water sources. I also wanted something that could evolve from the most basic “I need more oxygen right now!” in the early game to later adding hydrogen generators, pumps for atmosuits and oxylite, etc. The idea was to not have to build all those extra frills at once as you’re watching your colony’s algae count dwindle. My design objectives are listed below:
Requirements
- Must be a scalable design pattern that can work for various numbers of electrolyzers
- Must be capable of running as a Self-Powered Oxygen Machine (SPOM)
- Must be “Fail-Safe”, e.g. not allow mixing of output gasses during any failure condition, and not allow a situation where the electrolyzer needs to be opened up or re-primed
- Loss of power input
- Loss of water input
- Blockage of oxygen output pipe(s)
- Blockage of hydrogen output pipe(s)
Goals / “Nice to Haves” (In approximate order of importance)
- Should be relatively easy to build, no tricky order of operations or dupe pathing
- Should be dupe accessible while operating, as much as possible
- I recently played on Desolands with no gold amalgam and had to keep opening up my electrolyzer to reconstruct broken copper parts. Eventually I replaced everything with steel, but that also required opening it up. I’d prefer a design that you can work on while it’s running without “breaking the seal”, especially since submerged builds will have “infinite” gas storage.
- Should be as compact as possible (arbitrary, but smaller is better)
- Should fit within a standard 4-tile height room layout
- I discarded this objective and settled on modules which are 3 tiles high instead. SPOMs aren’t generally integrated with your “core” base (beds, baths, etc.) so I gave priority to “smaller is better”
3. Bottom Line Up Front – The Design
The design consists of a series of modules, each one containing a small “v” shaped cavity with a submerged electrolyzer. One side of the “v” will fill with hydrogen and the other with oxygen. A hydrogen generator can optionally be put in the hydrogen side, creating a Self-Powered Oxygen Machine or SPOM. Additional modules, up to a stack of 5, can be constructed below the first to increase the total oxygen output. Pumps can be added to either the hydrogen or oxygen side as needed. Finally, the entire stack can optionally be turned into a power plant to increase power output.
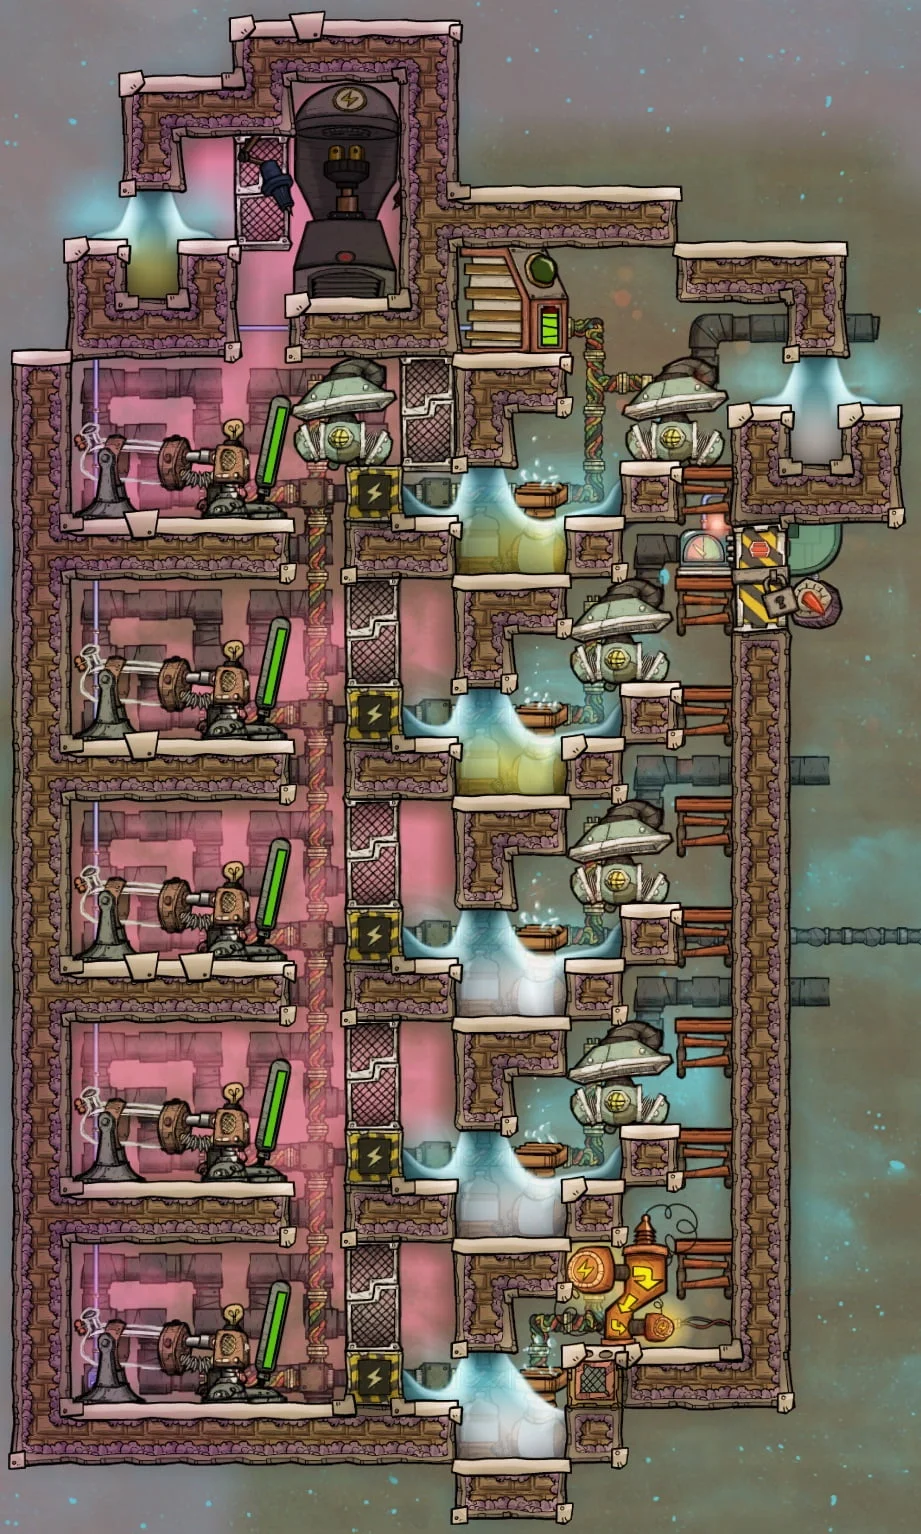
Speaking of power output, it hardly seems right to call this design a SPOM. Typical SPOMs just barely power themselves, and have next to no power leftover to feed into the rest of your colony. For that reason I always built my SPOMs on their own electrical network, isolated from my main grid. This ensures that in times of intermittent power issues the electrolyzer wouldn’t be interrupted, or even worse run out of stored hydrogen, lose power completely, and need a jumpstart from a hamster wheel.
The submerged electrolyzer mechanic supports an entirely different concept where your electrolyzers can be a major power producer for your colony. As long as you can supply enough water (1kg/s per module, 5kg/s for a full stack) the stack could produce 3-4 kW of excess power. For that reason I expect this SPOM to be plugged directly onto your main power spine, and I wired the internals with heavy watt wire. I thought it’d be fun to make up a new name for such an electrolyzer-based power plant, so I came up with Hydroelectric Oxygen Producing Power Plant or HOP3 (“hope”). Yeah that’s definitely not going to catch on, so I guess we’ll just stick to calling it a SPOM 🙂
4. Background – What is a Submerged Electrolyzer?
Most readers can skip this section and jump straight to the step by step build instructions in section 5. This section is for people who want to learn about the game mechanics of a submerged electrolyzer, and potentially design their own system rather than build mine.It’s funny that the mechanics for submerged electrolyzers can be so confusing when the name is so perfectly descriptive. I know I’m not the only one who struggled with the mechanics at first, as I see “why won’t my hydra run” posts on Reddit just about every week.
At the most basic level a submerged electrolyzer is an electrolyzer sitting in a pool of liquid (minimum 2×2 tiles) so that the entire electrolyzer is in the liquid. There are really only two requirements for this pool:
- There must be two different liquids, a layer of one liquid on bottom and a second liquid on top
- Both liquids must be below the total weight which would trigger the “flooded” building debuff
Basic Mechanics – Submerged, or Flooded?
To clarify that second point, if you put “enough” liquid in a tile, any building sharing that tile will become “flooded” and inoperable. The exact amount varies by liquid, as it is 35% of the maximum amount of that liquid that can be in a single tile. Using plain water as an easy example, a single tile can hold 1000 kg, so the flooded debuff will occur at 350 kg or more. Any amount of plain water less than that is perfectly OK to create “submerged” buildings.
Ethanol and polluted water share the same 350 kg value as plain water, and saltwater and brine are slightly higher. Crude oil causes flooding at ~304 kg, petroleum and naphtha at ~259, and I doubt there’s any other liquid you’d ever use for this purpose.
So the main takeaway is that you can always use a full 200 kg bottle from a pitcher pump to create each layer, regardless of what liquid you’re using.
There’s no need to get fancy measuring amounts, just dump in 200 kg per layer and it will spread out to a maximum of 100 kg per tile, far less than the threshold for triggering flooding.
Intermediate Mechanics – Diagonal Gas Displacement
This is where things can get a little tricky. Lets say we’ve built a basic submerged electrolyzer according to the above. One 200 kg bottle of polluted water (or similar) on bottom, and another 200 kg bottle of plain water on top.

If we then power up the electrolyzer and provide water it will start generating gasses.
The important thing to know is that it always generates gas in the upper left-hand tile, and it alternates between generating hydrogen and oxygen.
With the above design the gas being generated would push aside the liquid in the upper left-hand tile, forcing it to merge with the identical liquid either to the left or the right. The gas would then diffuse upwards, allowing the liquid to move back into place. This cycle will repeat, creating a mix of hydrogen and oxygen in the open space above. But the real magic happens when you block the location immediately above with another tile.
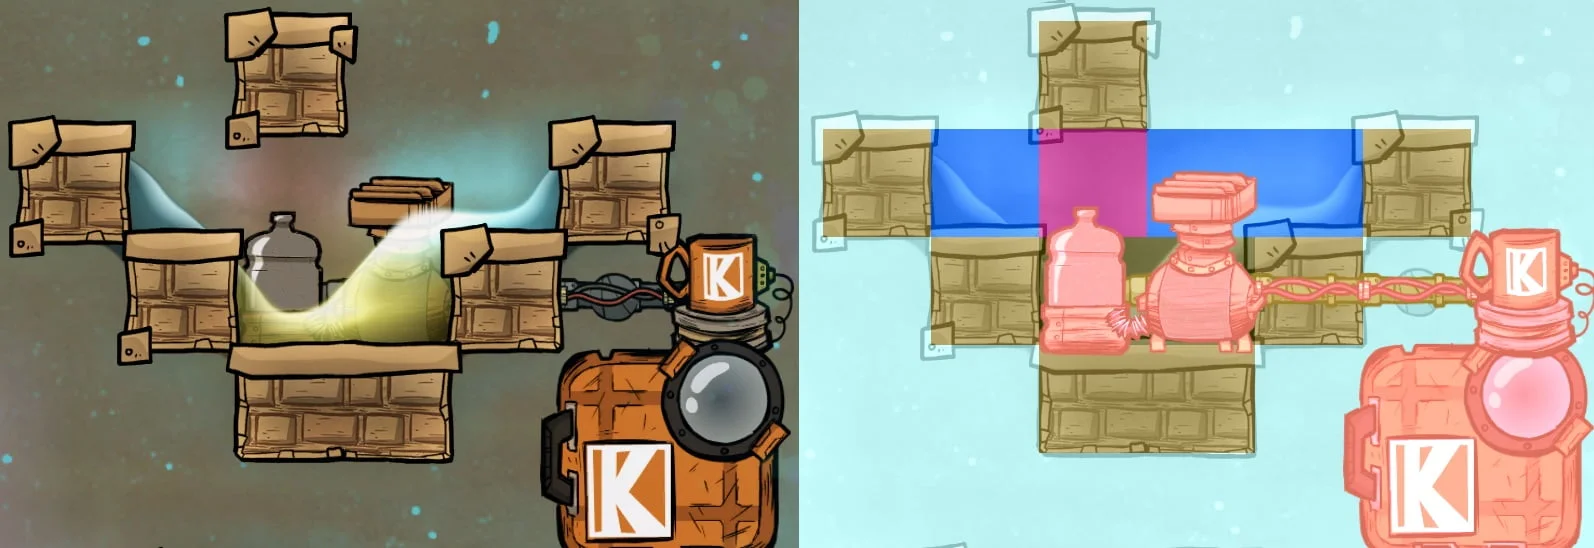
The hydrogen (~112 g) is now trapped and can’t move anywhere. The tiles left, right and down are all full of liquids, and the tile above is blocked with a solid tile. What will happen in this case is that on the next tick oxygen (~888 g) will be generated and since it is a much larger mass the existing hydrogen will be deleted and replaced.
Something unique happens on the next tick once the “trapped” tile is full of oxygen instead of hydrogen. Normally ONI does not allow liquids or gasses to move diagonally, but in this special case the rules change. The electrolyzer wants to make hydrogen in the cell that is now full of oxygen, but there’s nowhere for the oxygen to go, like the problem with hydrogen before. However, because there is oxygen in a tile diagonal to the trapped gas, ONI allows the two to merge, making space for the hydrogen. This is called diagonal gas displacement, and is the mechanic submerged electrolyzers rely upon. The key rules are:
- Gas can only move diagonally to a tile already occupied with the same gas.
- Vacuum is treated as it’s own “gas” in the ONI engine, so other gasses will not diagonally displace into a vacuum.
The takeaway here is that if we can ensure one of the neighboring or diagonal tiles contains hydrogen while another contains oxygen, both gasses will displace into those tiles rather than being deleted.
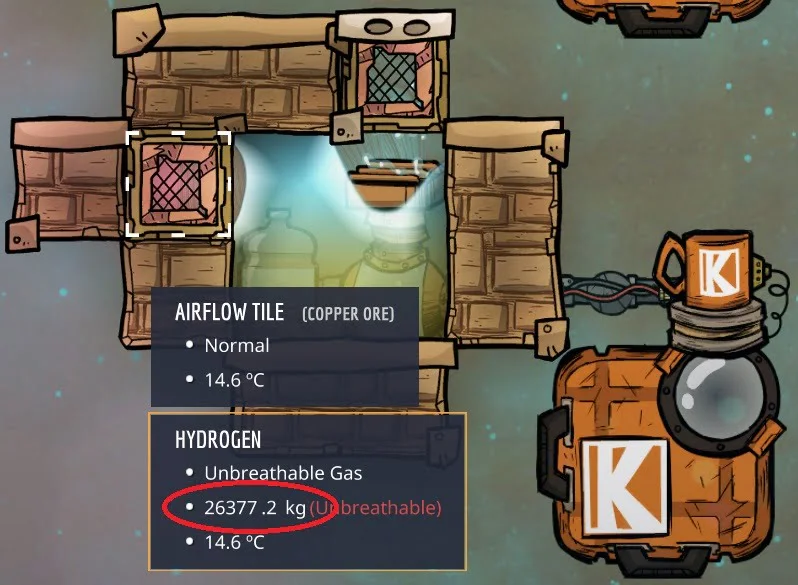
In addition to the above, the electrolyzer only checks pressure in the upper left tile where it is generating the gas. Because it pushes the liquid aside to place the gas, there is no pressure in that tile, thus the electrolyzer will never overpressurize. This can be exploited to create infinite storage as shown below with 26 tons of hydrogen (and growing) contained in a single airflow tile.
– And What About a Hydra?
A hydra is a particular type of submerged electrolyzer, generally constructed in a compact array of 2-3 rows of 2-3 electrolyzers each. A common example (borrowed from the ONI fandom wiki [oxygennotincluded.fandom.com]) is shown below:
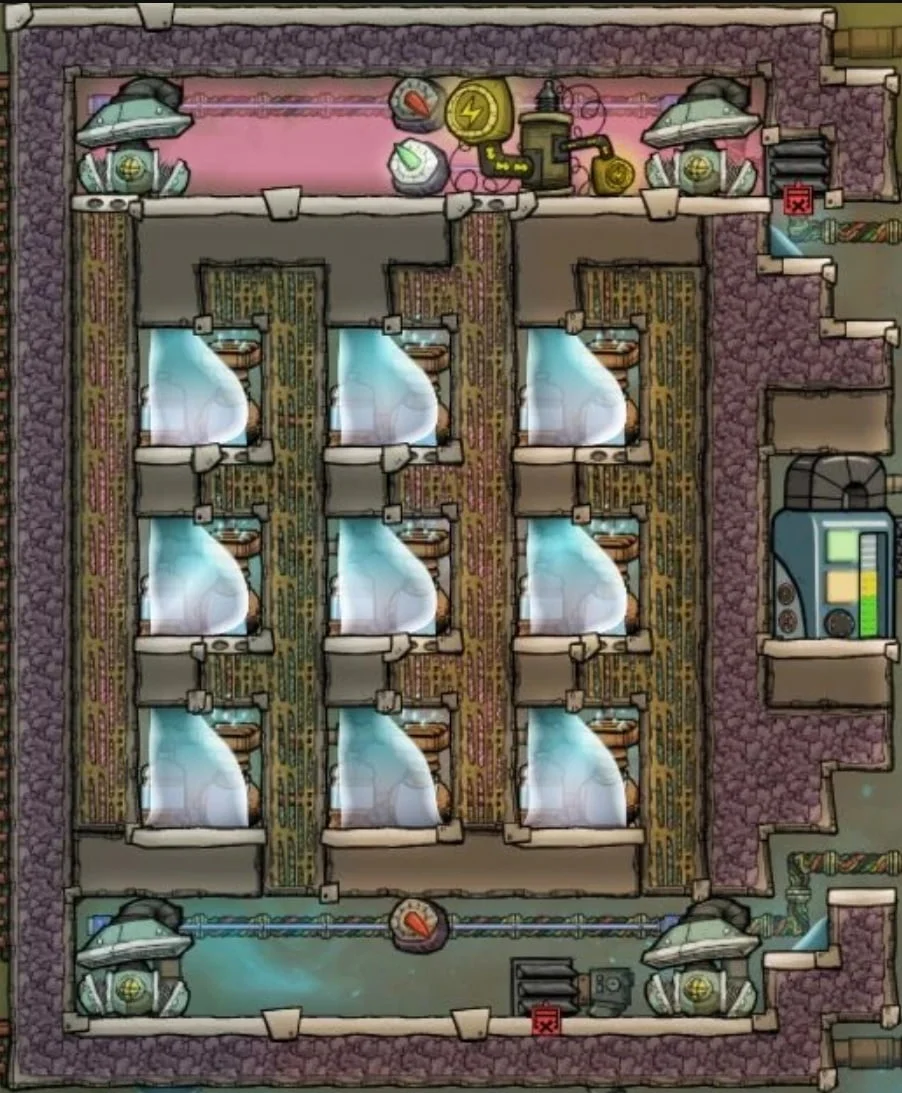
The “hydra” name relates to the many-headed creature of Greek mythology, where each electrolyzer in the array is a “head” of the hydra. The use of airflow tiles is exactly like the final image in the previous section; the modules I pictured are simply chained together to allow the gasses to disperse up or down into separated chambers.
Hydra’s are very much the meta right now. They’re extremely compact and deliver every advantage a submerged electrolyzer can offer. That said, I intentionally didn’t go that direction with this guide. The main reason is that there are many other guides out there on how to build a hydra, and I don’t believe there’s anything unique I could offer in that space. The second reason is that once constructed and running hydras are a HUGE pain to break into and repair or upgrade. In most cases they also aren’t very modular. You generally decide how many heads to build from the beginning and construct the whole thing all at once, rather than for example starting with 3 and adding on another 6 down the road.
My guides lean towards modular designs that grow and evolve with your colony, so I wanted to create something different. It may not be as compact as the ubiquitous hydra (it’s not even close, to be honest), but I hope it offers a refreshing twist on the meta.
5. Construction
The following subsections describe how to build my submerged electrolyzer in a progressive fashion. The expectation is that you would build a single module in the early game and gradually expand it as your colony grows.
A number of build options are provided to enhance the basic design, including operating as a SPOM or even a power plant.
For this reason I recommend reading through this entire section before starting your build, to determine which design options are right for you.
– Initial Construction and Priming
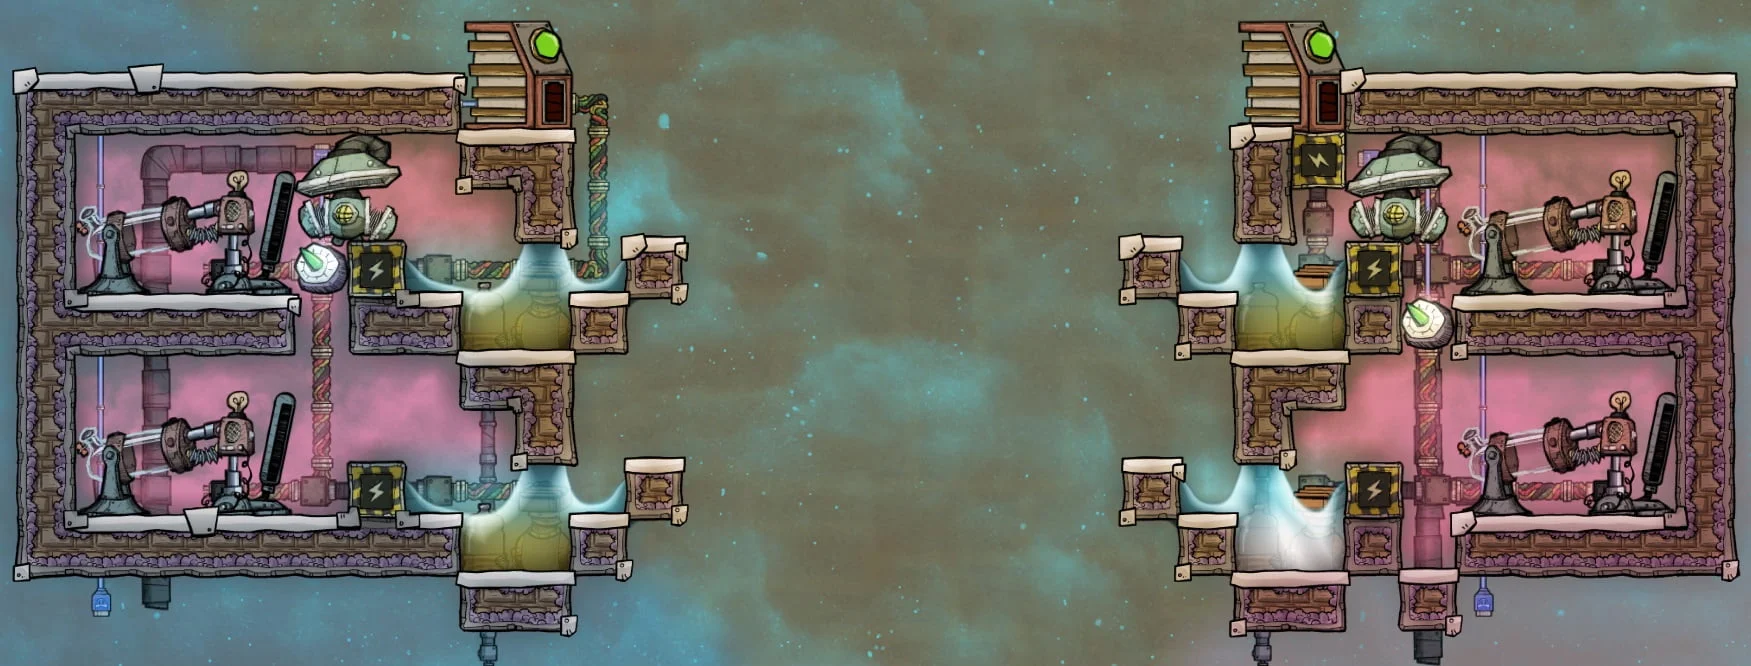
The initial construction is, as I put it in the Introduction “stupidly simple”. Below I show both the left-handed and right-handed builds.

Yep, that’s pretty much the whole thing. Note that the build on the left (what I would call right-handed, as oxygen comes out the right) is one tile wider than the other build, due to how gasses always come from the upper left electrolyzer tile. Also note that during initial construction neither the water nor electricity inputs should be connected. The system is not yet ready to run.
Once you have this foundation built, the following steps must be performed in order to prime the system:
- Dump a 200 kg bottle of any liquid in the bottle emptier
- I recommend any of the “heavy” waters (polluted, salt or brine)
- Dump another 200 kg bottle of any *other* liquid in the bottle emptier, preferably a lighter liquid than the first one
- I recommend plain water
- Build a tile above the upper-left tile of the electrolyzer
- Connect electricity to the pump, allowing it to vacuum out the inner chamber
- Remove electricity from the pump once vacuum is achieved
- Alternatively you can turn it off with automation
- Connect a water pipe to the electrolyzer
- Briefly connect electricity to the electrolyzer, pulsing it on, and then remove the electricity again
- Alternatively you can pulse it on and then back off with automation
Note that you don’t have to worry about running the electrolyzer for “too long”, it’s just that as it continues running at this stage it will be deleting hydrogen and wasting water and electricity. So you just want to turn it on, get a little hydrogen, and then turn it back off before continuing.
At this stage your system will look like this:
You have a vacuum inside, a trapped tile of hydrogen, and oxygen on the outside of the system. Here I’ll admit that I stole the following priming technique from Tuxii_industries’ 2023 ezSPOM. See a link to his video in the thank you section.
The next steps are:
- Build a new tile to the “outside” (oxygen side) of the tile currently trapping the hydrogen
- Deconstruct the original tile trapping the hydrogen, allowing it to disperse into the vacuum
Your system will now look like this and is fully primed:
The final step is to undo the previous two steps in reverse order. So first re-construct the tile above the upper-left tile of the electrolyzer, then delete the temporary tile you constructed on the “outside”.
The module is now ready to to be switched on. Hydrogen will be created in the infinite storage and can be pumped away, and oxygen will naturally disperse into your base.
– Open Air Oxygen Production
As mentioned in the previous section, this design doesn’t begin with pumps for oxygen, only for hydrogen. Oxygen is allowed to naturally disperse into your base, and your base acts as an “infinite storage” for the oxygen. With 888 kg/s of output a single module is more than sufficient to support a colony of 8 dupes. One of the other benefits is that the module is so small and simple you could build a second in a remote part of the base if necessary to bring up oxygen pressure.
Hydrogen can be pumped from each module to wherever it is convenient to run a power plant, or a LOX/LH facility, etc, or see below for the SPOM variation. There are some downsides to this natural dispersion approach, particularly that the electrolyzer will never turn off due to over pressurization.
Popped Eardrums
If left unchecked, it won’t be long until everyone in the colony is running around stressed from popped eardrums. The popped eardrums debuff is triggered when a dupe enters an area with more than 4 kg of gas pressure, and causes 20% stress per cycle. In order to prevent this we’ll use an atmosensor to limit oxygen output.
Fail-Safe Operation
As mentioned in the Introduction, submerged electrolyzers are immune to almost all failure conditions by default. The only thing that can cause us a problem would be to accidentally pump the hydrogen chamber back to a vacuum. This would prevent the diagonal gas displacement from working, requiring us to re-prime the system. In order to prevent this, we’ll add an atmosensor to the hydrogen chamber, turning off the pump if the pressure gets too low.
With those two additions, at a cost of 85 refined metal, our design now looks like this:
The settings on the atmosensors are not critical, you just want the hydrogen side to prevent a vacuum (I chose 1 kg minimum pressure) and the oxygen side to prevent popped eardrums (I chose 3.5 kg maximum pressure). I would recommend setting the oxygen sensor a bit higher than the “normal” 1.8-2.0 kg range you’d want your base at, so that the higher pressure will naturally push into the rest of your base.
– Expanding the Stack
Eventually you’ll want to expand the system with another module. Perhaps you’ve grown beyond 8 dupes, or perhaps you’re ready to start filling atmosuit docks and making oxylite for rockets. It was previously mentioned that a second module could be installed elsewhere in the base if desired due to the simplicity of construction. However, because of the modular design, a second module can also be constructed immediately below the first and integrated together. Each new module only costs 40 refined metal, for an additional atmosensor and some automation wire.
The second module is constructed identically to the first one, except that we do not require a second pump or atmosensor for the hydrogen.
At this point DO NOT connect the new electrolyzer to water and/or electricity.
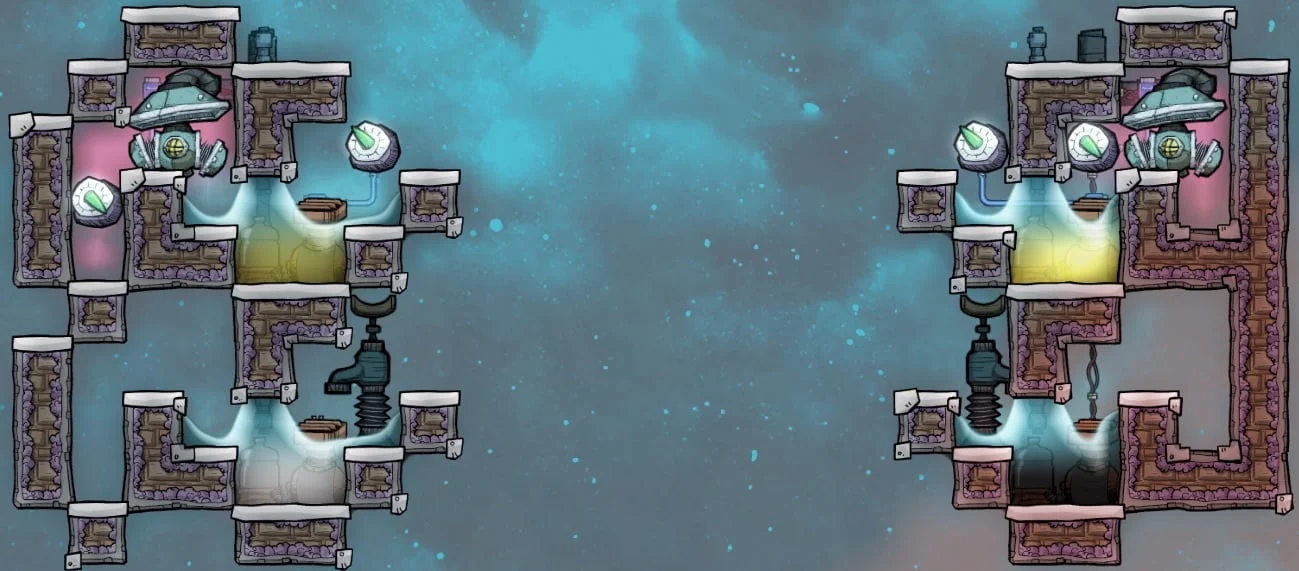
I recommend running electrical wires and water pipes straight up and down through the modules, as long as everything is built out of gold amalgam or better. If building out of copper or similar basic metal you’ll need to snake incoming cool water through the hot H2 room and liquid pools in order to keep the system below 75C. You can also snake pipes in front of where the oxygen is dispersed to help cool the output.
Inside the new module will likely be oxygen and carbon dioxide or other gasses and we need to create a vacuum again. There’s enough space to temporarily install and then remove either a regular pump or a couple mini pumps. Or an alternative way to creating a vacuum would be to build tiles in every cell and then deconstruct them. Note that the build orders for these tiles must be given in stages from the inside out, so the dupes don’t leave holes during construction, or even worse wall each other in.
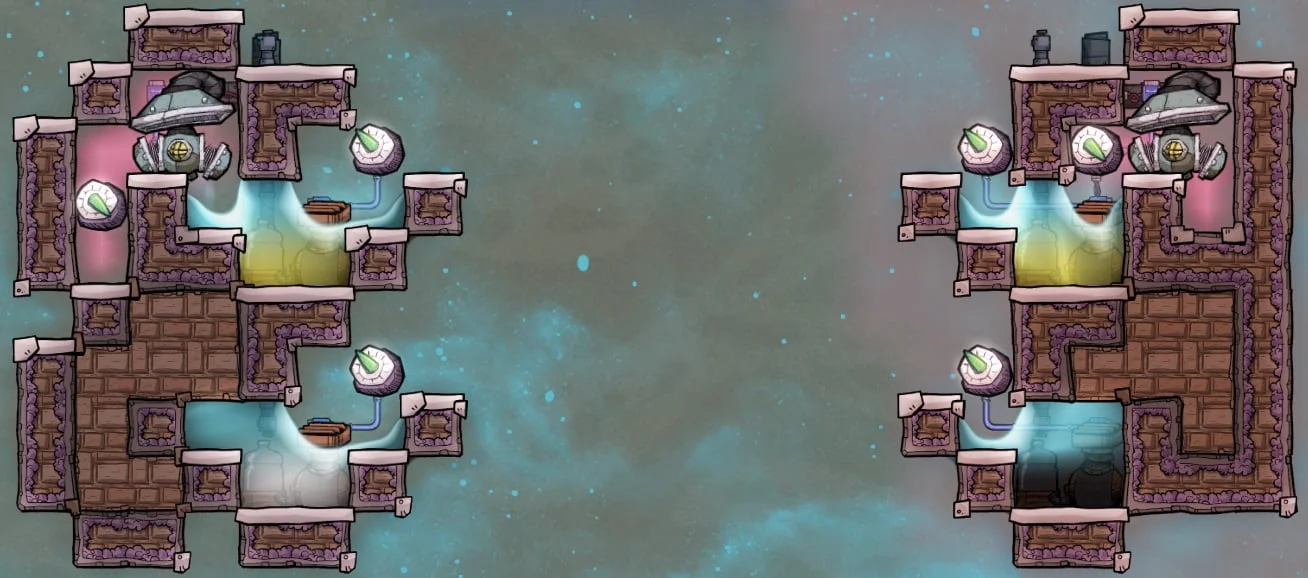
After bringing the inside chamber to vacuum we only need to delete a single tile from the module above us to allow its hydrogen to flood down. I’ve circled the appropriate tile in the image below.
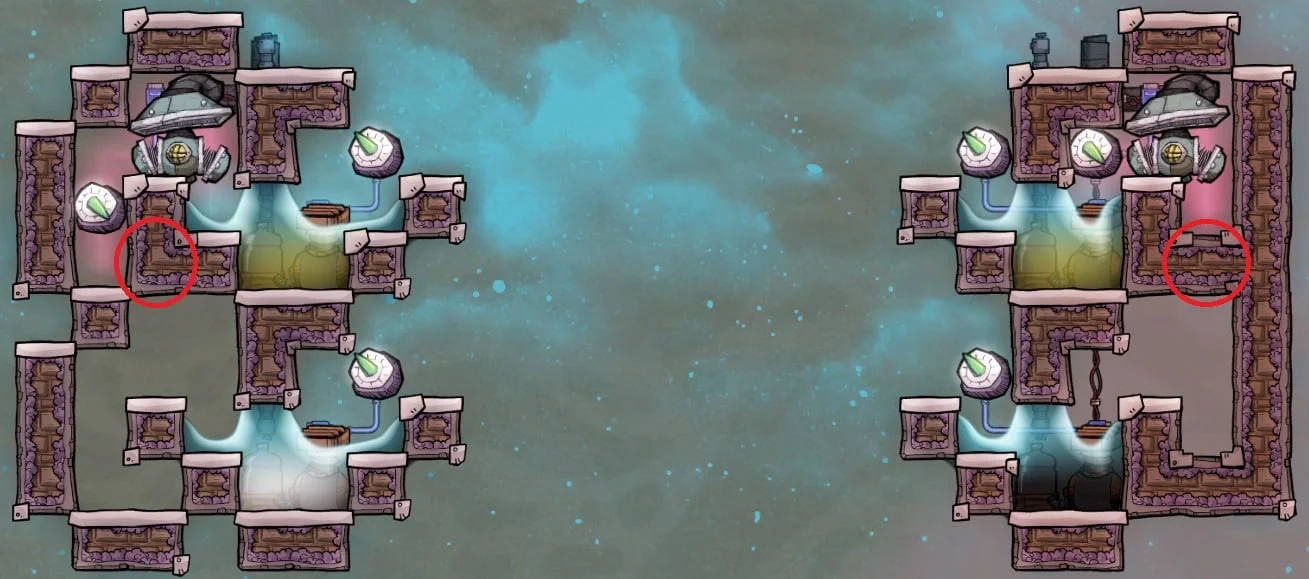
With that complete, our new module is primed and ready to run. At this point you can connect water and power to the new electrolyzer, copy down the settings on the oxygen atmosensor, and enjoy your extra production.
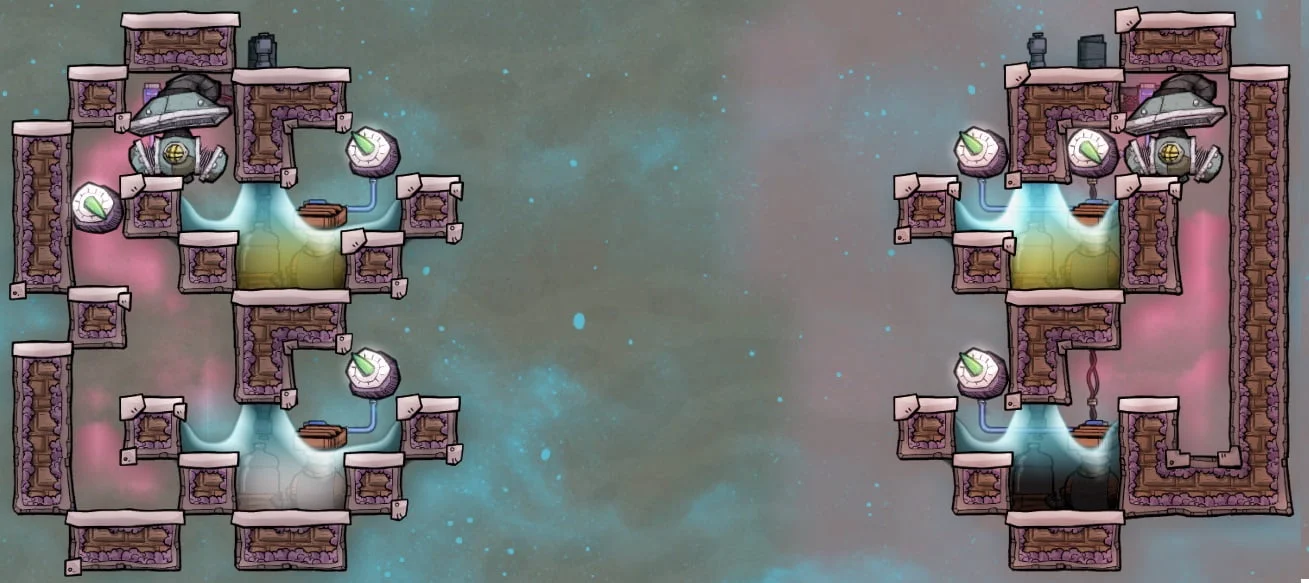
This process can theoretically be repeated for as many modules as you can supply water for (1 kg/s per module, 10 modules max from a single liquid pump and pipe) however I recommend a limit of 5 modules in a single stack. The main reason for this is the hydrogen pump. Each module produces 112 g/s of hydrogen, and a gas pump can move 500 g/s. So our single pump is perfectly sized to handle 5 modules with a little hydrogen leftover in the tank. Going above 5 modules would require a second pump.
Another reason 5 modules is a handy number is that you can run the entire stack as shown from a single non-conductive (1 kW) wire. Each module only requires 120 W for the electrolyzer, plus 240 W for the single hydrogen pump, so a full stack of 5 would require 840 W. If you protect the circuit with a transformer you could even add the 240 W pump supplying the water (1080 W max total) all on a single wire.
– Optional: Including a SPOM
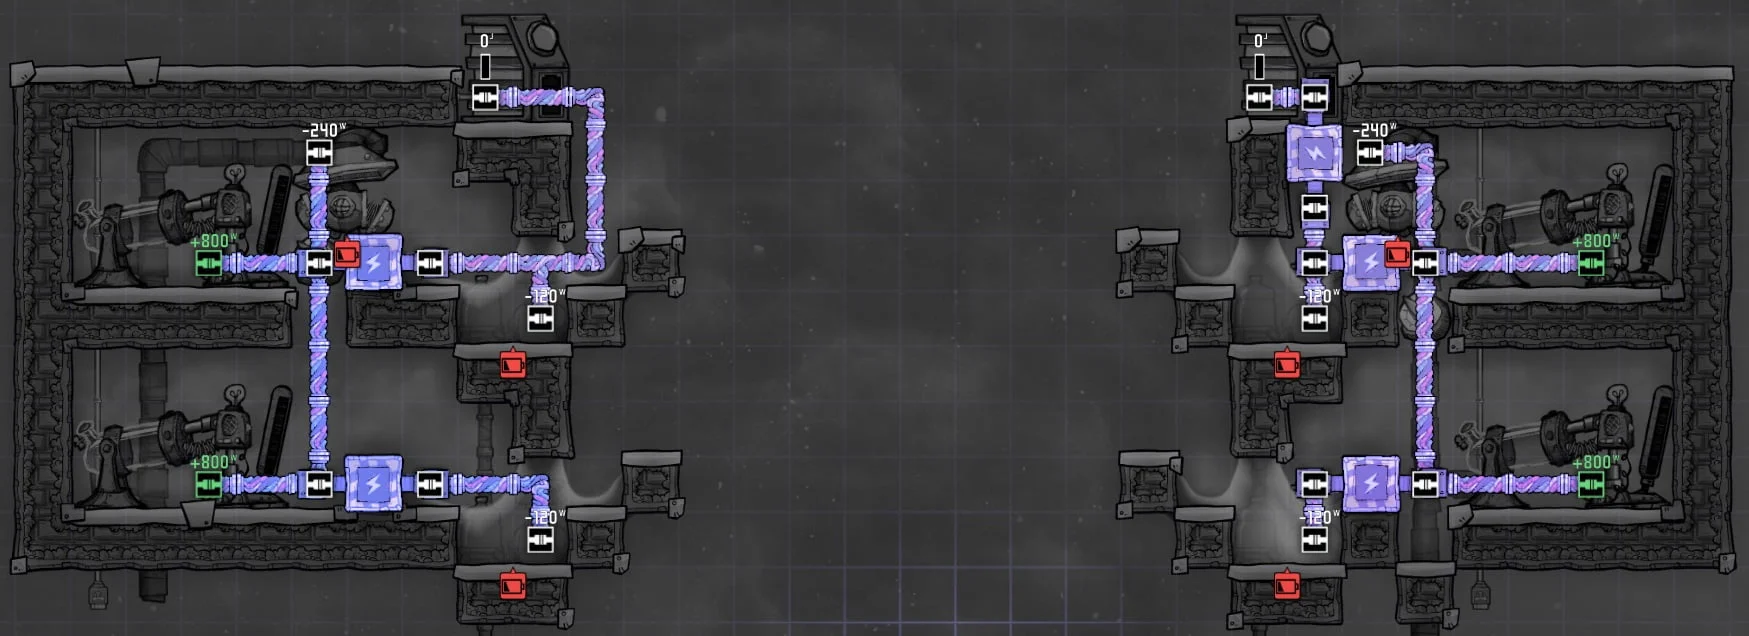
The primary difference between the SPOM and non-SPOM build is that the hydrogen storage chamber is made larger in order to contain a hydrogen generator. In addition to this, I assume that a SPOM build will be plugged directly into your main power spine so the entire stack is wired with heavy watt wire. Finally, a smart battery is added with automation wire to control how often the hydrogen generators run.

The stack can be expanded downwards exactly like the non-SPOM version, growing with your colony’s need for more oxygen or power.
Like the non-SPOM build the automation wire and gas and liquid pipes can be run straight up and down through the modules, unless you need to snake cool water around for cooling.
The electrical wiring, particularly on the left design, looks a little wonky, but it serves a purpose later if you intend to convert to a power plant. You are of course free to wire everything up any other way if this approach is too ugly for your taste.
You may have noticed that these SPOM modules are shown without an atmosensor controlling the oxygen output. You can still use such a sensor if you want, however the interaction with a SPOM is a bit more complicated. If your base is overpressurized and the electrolyzer is shut off, then it won’t be making any hydrogen. It also won’t be using any power, however if your generators are powering the rest of your base, they’ll slowly drain away your hydrogen reserves. This could leave you in a situation where your whole base suddenly has no power, and your SPOM has no hydrogen to make more. Since the only downside of too much oxygen is the popped eardrums debuff, and I never have a stress problem in my colonies, I personally prefer to take the stress penalty over risking a hydrogen shortage down the road.
That said, to cover all bases the next subsection shows additional methods of preventing the popped eardrums debuff, by adding infinite oxygen storage to the electrolyzer modules.
– Optional: Infinite Oxygen Storage
As mentioned previously, the submerged electrolyzer gives us infinite gas storage for free, we’ve just been using our entire base as the storage container up until now. In order to change that we simply need to build a wall around where the oxygen is being released.
This new chamber can be as large or as small as you need, and it can be expanded later like the hydrogen chamber on the other side. We’re going to need access inside the chamber, so that necessitates another liquid lock. I’m showing a slightly smaller version of the same lock used on our electrolyzers. The only difference is the lack of side tiles to hold in the upper liquid.
You can still dump a 200 kg bottle for each liquid as long as the top liquid used in this new lock is the same as the top liquid in your bottom electrolyzer.
The spilled liquid will merge together, there won’t be nearly enough present to cause the flooding debuff, and you can mop up the bottom step if desired. Otherwise if you want to use a new liquid you’ll have to be more precise in your delivery.
I show an example (including water spillage) for the SPOM build, but this can be done the same way for a non-SPOM.
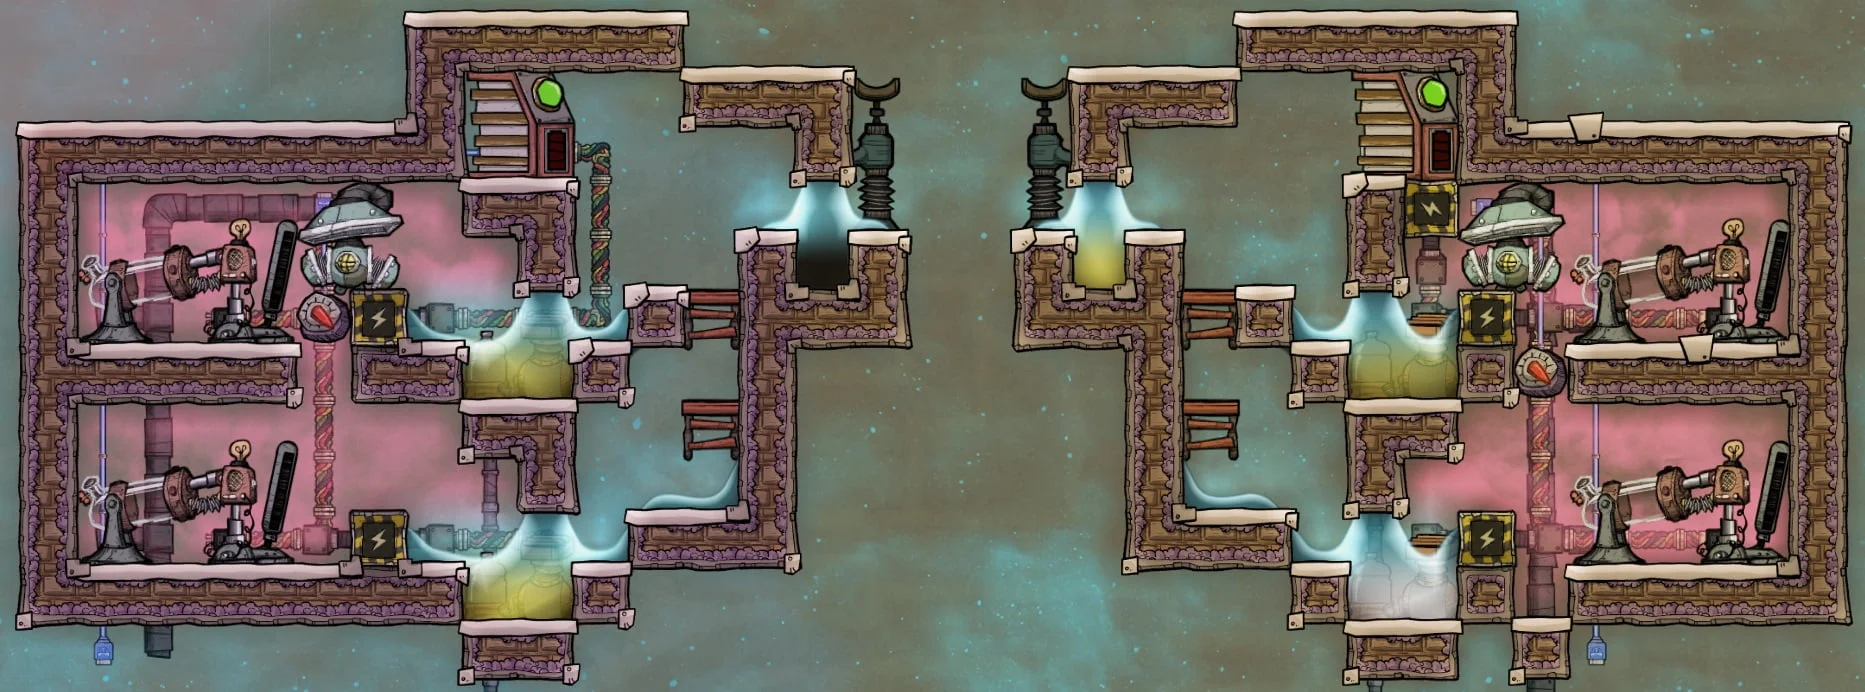
Now we need a way to get the oxygen out to our base again, and the obvious answer is adding pumps. Each electrolyzer produces 888 g/s of oxygen, and a pump can move 500 g/s, so you may want to build the chamber wide enough to hold 2 pumps for each electrolyzer. The image above can only support one pump per electrolyzer, plus one additional pump, so it would never be able to extract all of the oxygen produced, if that much was needed. You might also consider sizing the room to hold one pump per 5 dupes to cover their breathing needs, plus an extra pump or two for filling suits, producing oxylite, etc. A full “double wide” with two pumps per module could look something like this:
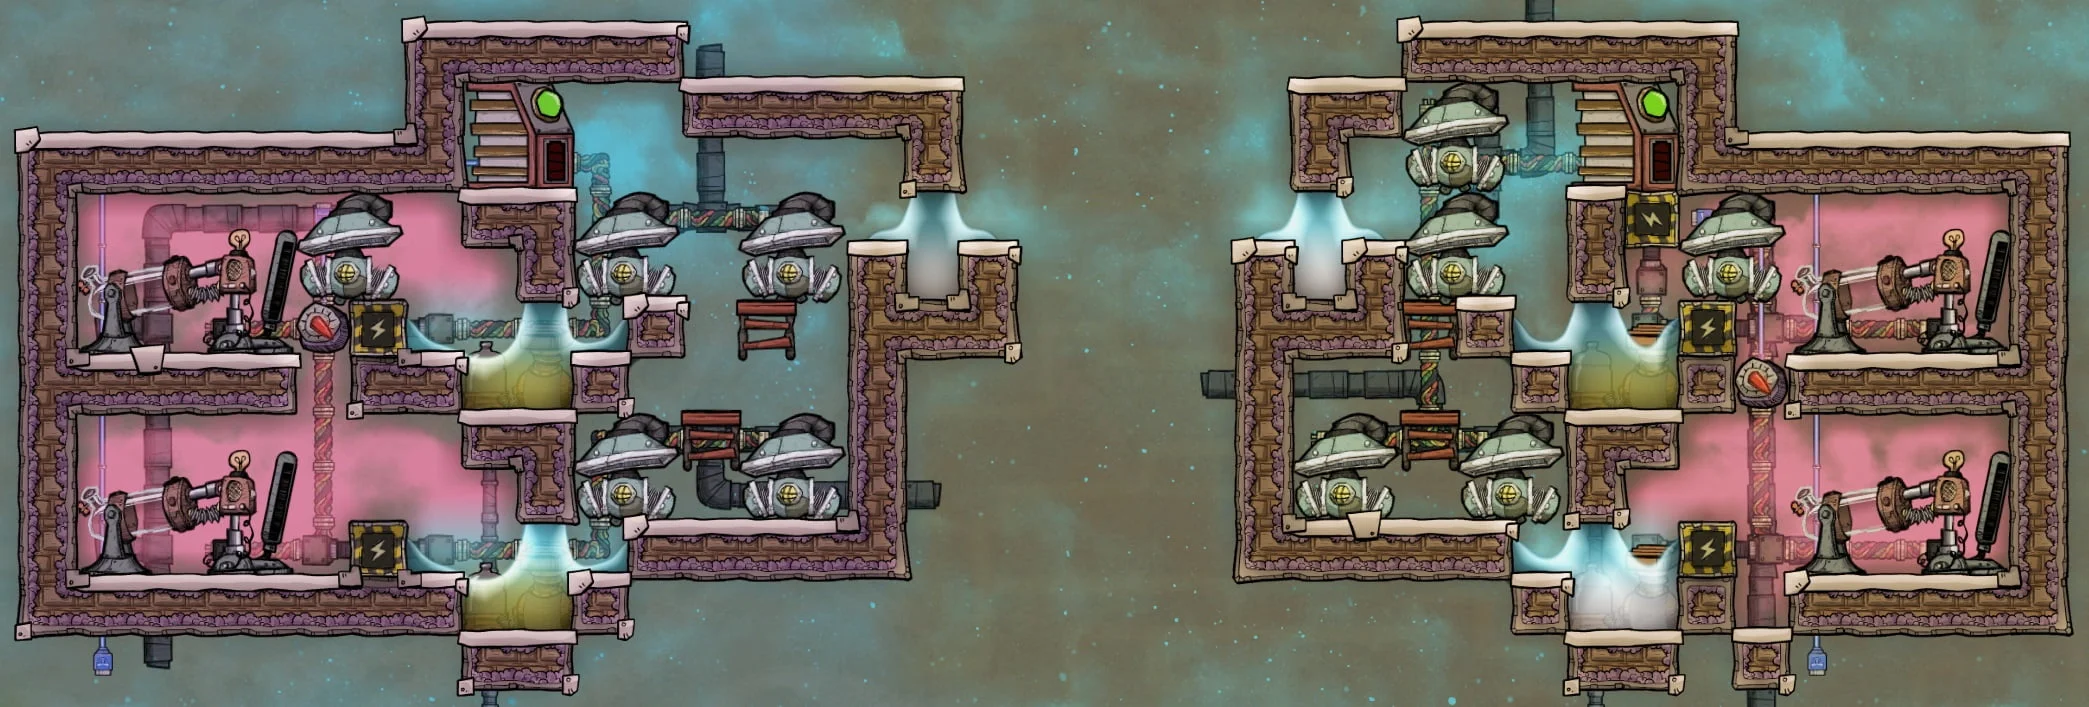
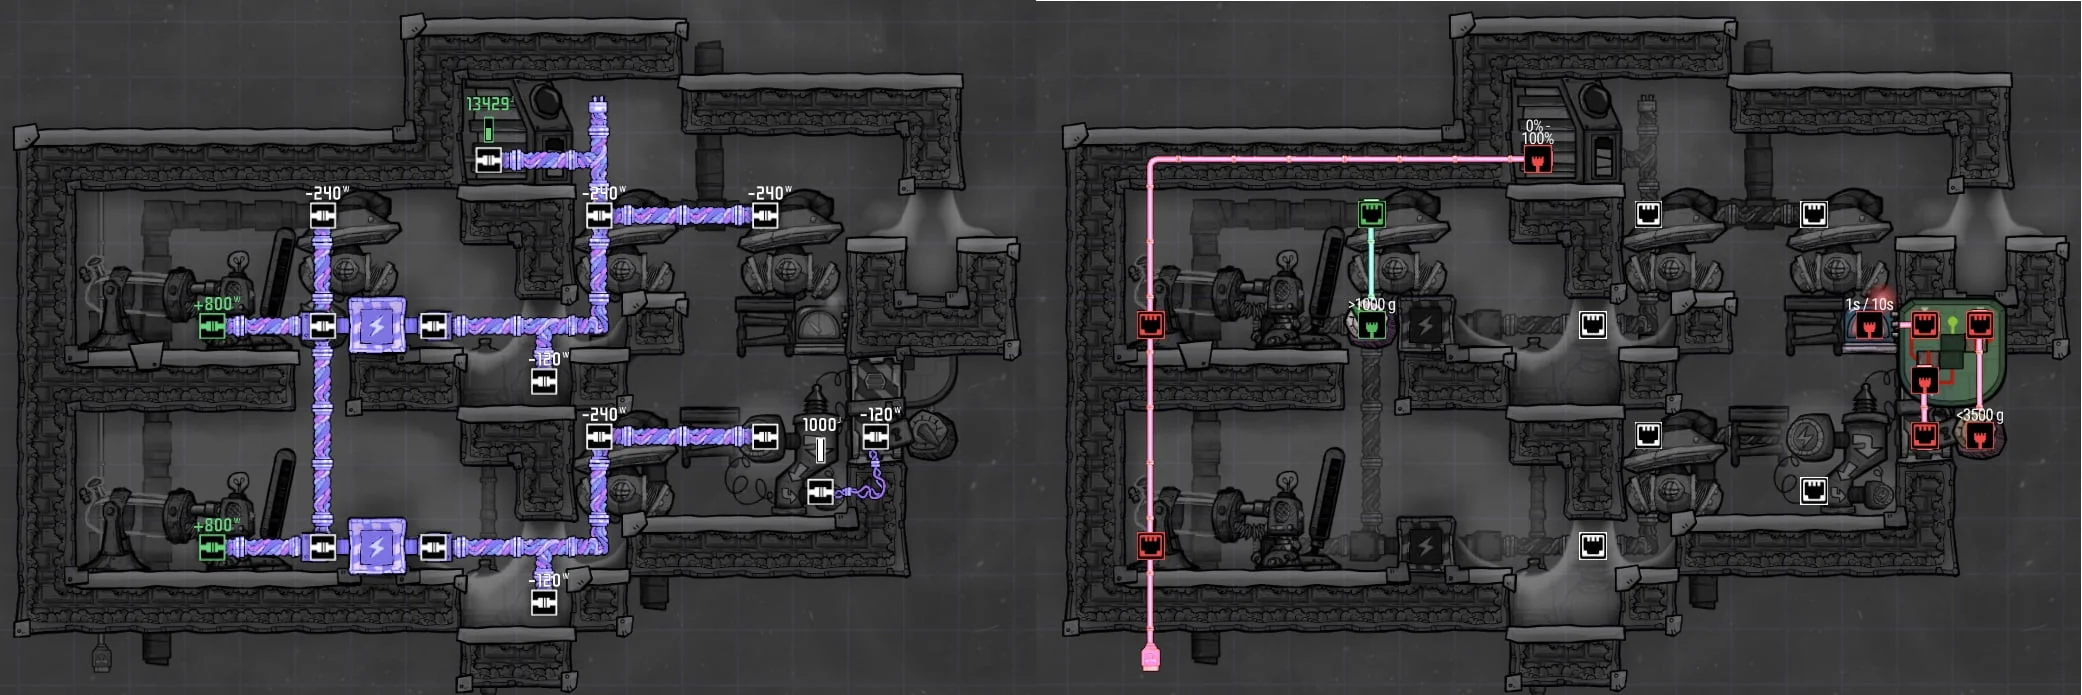
Unfortunately all those pumps can put a serious dent into our power production, though the SPOM will always be at least slightly power positive. That said, there is an alternative to pumps that saves a considerable amount of power and brings back the “natural diffusion” method of filling the base. By building a mechanical airlock into the wall of the oxygen chamber, the door can be opened and closed using an atmosensor, emulating the process we had before without having to turn off the electrolyzers.
This approach isn’t entirely without it’s problems. Because you may have hundreds of kg of air pressure inside the storage chamber, when the door opens the nearby tiles can immediately jump up to 80+ kg before the sensor triggers and the door closes again. If you have a small base with the electrolyzers nearby you may still experience popped eardrums due to this massive burst.
We’ll make three minor changes to overcome these limitations:
- We’ll provide power to the airlock door to ensure it can open and close as fast as possible.
- Unpowered doors open and close very slowly and would release far too much oxygen
- Heavy watt wire cannot be run directly to doors, so we’ll install a small transformer.
- I recommend replacing one of the pumps at the bottom of the stack with the transformer.
- The atmosensor’s reaction time is quite slow, so I recommend pairing it with a timer sensor to keep the door open only a fraction of a second.
- The timer sensor might be set to 0.5 green and 10 red, for example, so that when the atmosensor requests oxygen the door will only be pulsed open for half a second. The exact green timing will depend on your preferred game speed and how much oxygen you want released in each burst.
With all that in mind, the end result could look something like this (showing right-handed build only, it’s simple enough to mirror image):
– Optional: Cooling the Oxygen
I’m not going to go into much detail in this section, as I feel everyone has their preferred way to cool the oxygen from their SPOM, and there’s no unique design feature I can add here. If you’re using pumps to distribute the oxygen, then this design in no different than any other SPOM. If you’re allowing the oxygen to naturally disperse, then you may be wondering how best to cool it. For that reason I list a few ideas below.
- Use cold input water and snake it through the oxygen chamber in radiant pipes before the electrolyzers consume it.
- Install a wheezewort plant (or a few) in the oxygen chamber and/or just outside by the atmosensor. Bonus points for getting pips to wild plant them.
- Snake radiant pipes from an aquatuner cooling loop through the oxygen chamber and/or just outside by the atmosensor.
- Build the system near (or around!) a Thermo Nullifier and use the excess hydrogen to cool everything.
The list could probably go on, but again I have nothing unique to add here. I just wanted to mention the subject of cooling so that it wouldn’t look like I forgot. Especially since the “natural dispersion” of oxygen without pumps and pipes is not something I’ve seen done often.
– Optional: It’s a Power Plant Too!
I gave away the surprise in the Bottom Line Up Front section, but if you want to get even more power from your hydrogen generators it’s possible to slap a power control station on top and turn the entire SPOM into a power plant. As long as you have spare refined metal, electrical engineering dupes will create microchips and use them to boost your power output by 50%! This isn’t very useful early game, but once you’ve tamed a metal volcano, you should have more refined metal than you’ll know what to do with. Might as well turn it into free power!
The conversion requires installing pneumatic doors in the hydrogen chamber of each module to turn the whole chamber into a “room”. The maximum allowed size of this room is 96 total tiles. The image below shows what it will look like:
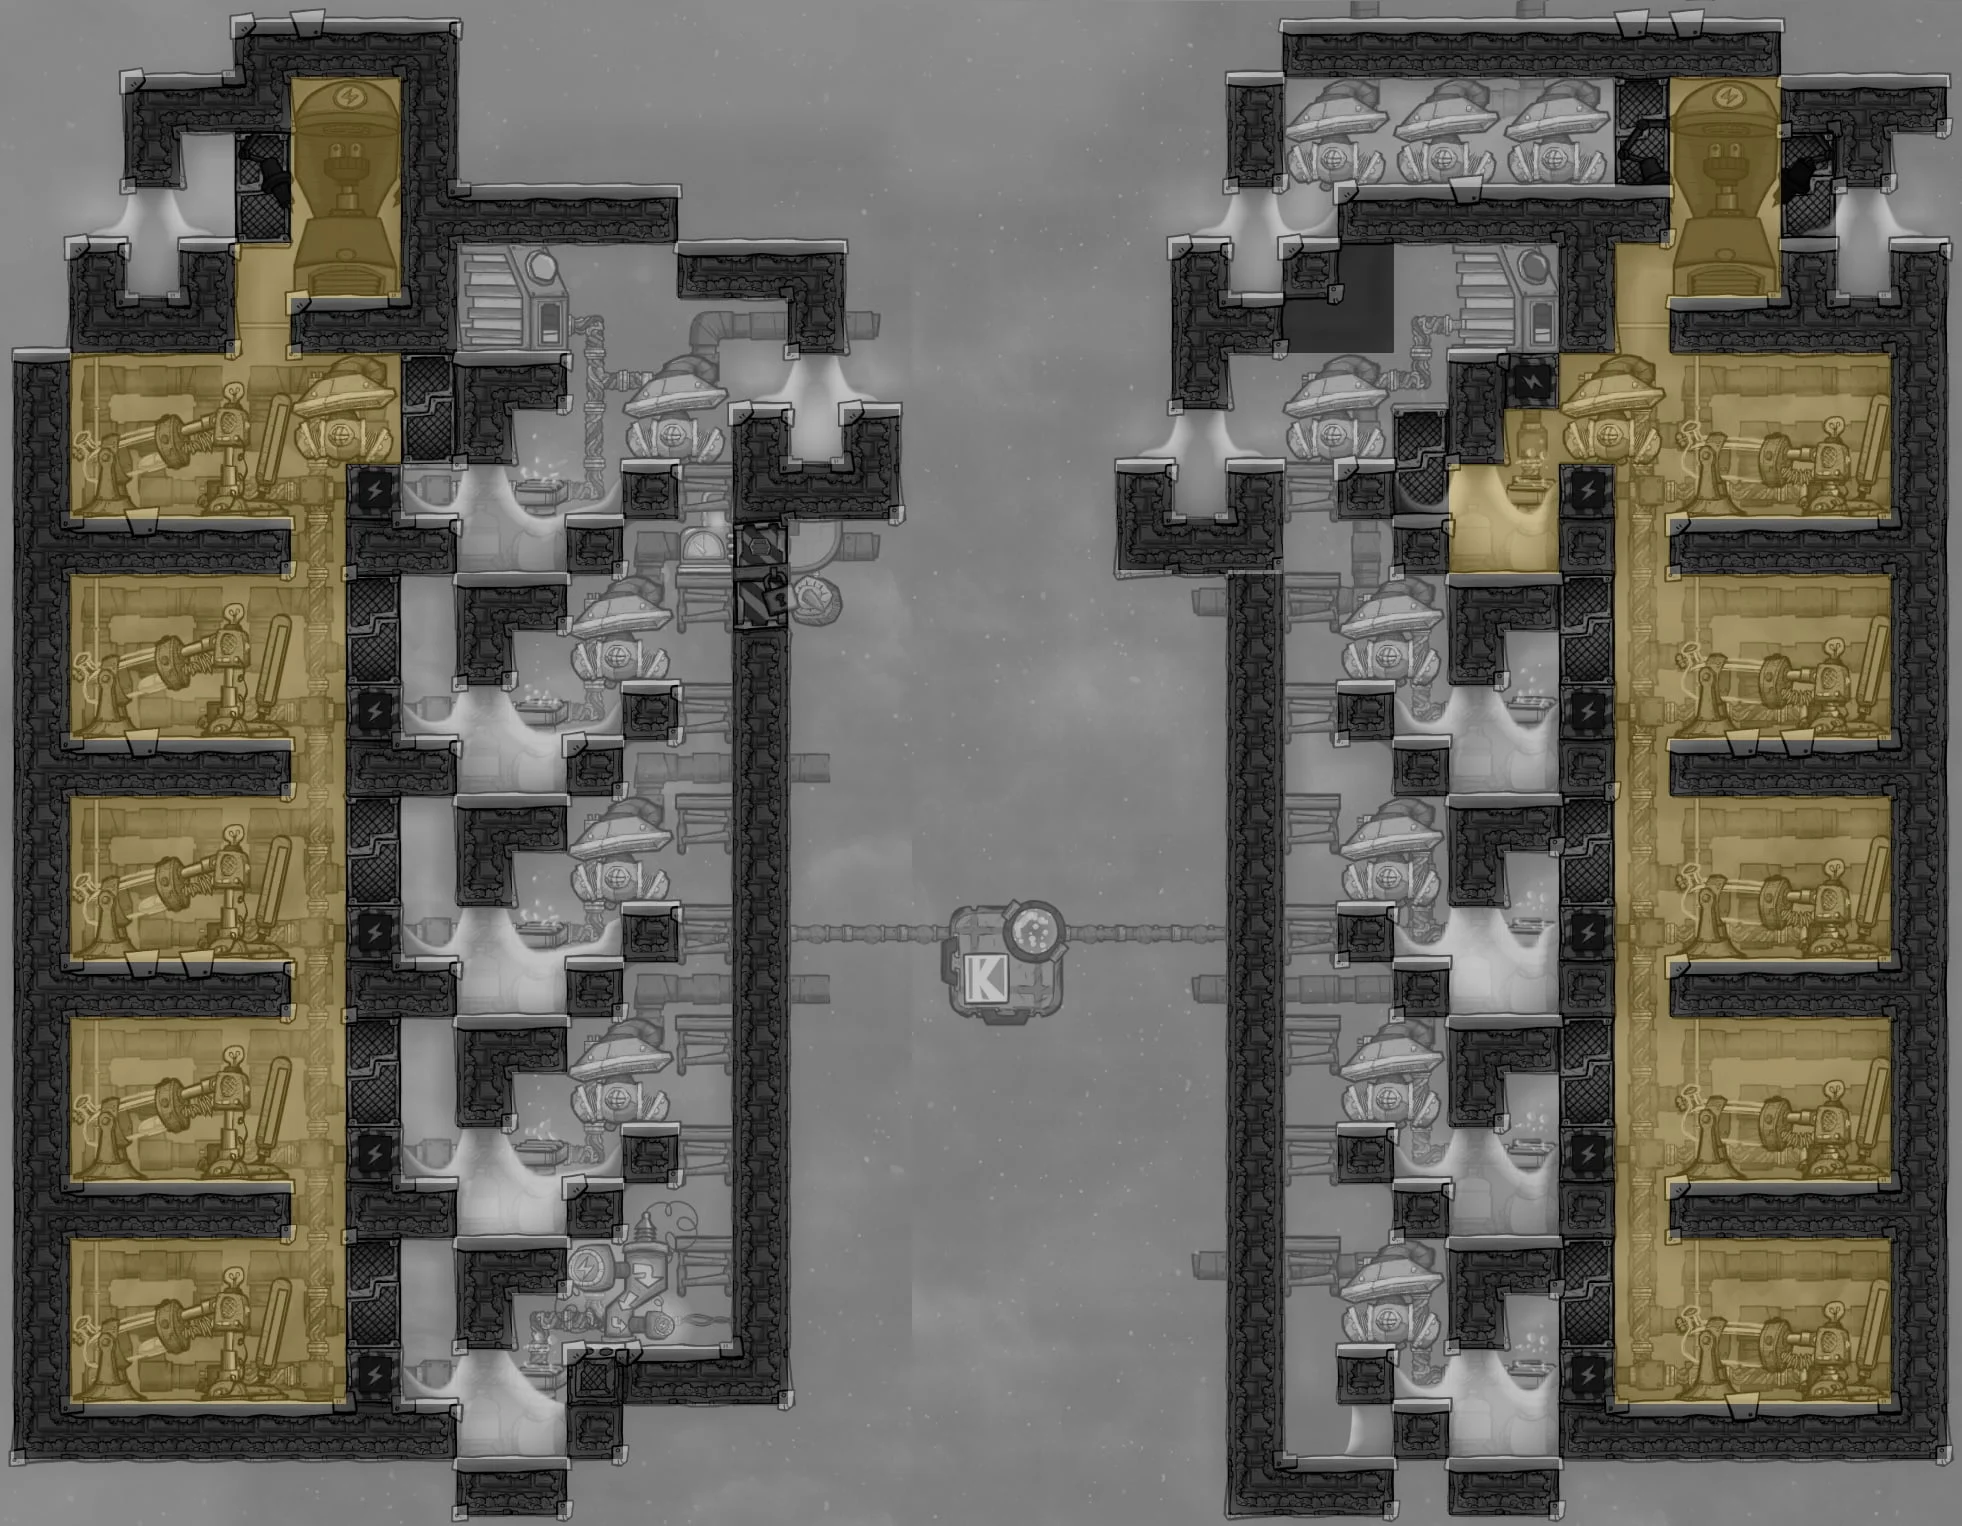
The build on the left is a 91 tile room while the one on the right is exactly 96 tiles, so there’s not much room for variation. The build on the right also shows a way you could add additional hydrogen pumps, for example for late-game rocketry. In the following section I’ll provide estimates on the expected power generation numbers for various configurations.
6. Summary and Statistics
In summary, we built a modular, scalable, submerged electrolyzer design that can grow with your colony from the early game to the end game. Depending on the number of pumps used, the design can produce large amounts of excess power thanks to its “natural dispersion” option, and that can be enhanced further with optional Engie’s Tuneups from a power control station. I thought I’d use the rest of this section to give some example power numbers for various configurations.
Starting with the first module, you have an 800 W generator (can boost to 1200 W w/ Engie’s Tuneup), a -120 W electrolyzer, a -240 W gas pump, and I’ll include the -240 W water pump. If you start out with the natural dispersion technique which is perfect for the early game (same as you’d get from the oxygen diffuser building) you’ll have 200 W of extra power, or half a hamster wheel.
That could be boosted to 600 W extra with Engine’s tuneups, but nobody will have the metal, the research, or the skillpoints for that at this stage.
By the time you add a second module you’re likely to need to add oxygen pumps as well. Even if you’re fully happy with the natural dispersion method, you’ll want pipes for atmosuits, oxylite refining, etc. So for the second module we add another 800 / 1200 W generator and another -120 W electrolyzer. We have a combined 880 W remaining at this point even without tuneups, so we can add at least three and most likely four gas pumps, costing -720 or -960 W respectively. Most of the pumps won’t be running full time so there’s probably enough headroom. On the other hand, if we’re using Engie’s Tuneups, we can support all 4 of those pumps and still have 720 W of power to spare. This is not unrealistic if you’re lucky enough to have a gold volcano nearby, as you can generally pop those open and let the environment soak the heat for a few hundred cycles before it gets out of hand.
For the third, fourth and fifth modules, it’s unlikely we’ll need to add two oxygen pumps with each one. Or if we do add more pumps, it likely just results in all of the pumps running even less often. If I assume we install one oxygen pump with each new module, along with the new generator and electrolyzer, then each module will produce a surplus of 440 W, or 840 W with Engie’s Tuneups.
So putting that all together, for a full stack of five modules, with a reasonable number of pumps for gas distribution, optionally supplemented by natural dispersion, we should be able to generate at least 1.3 kW of extra power, or with Engie’s Tuneups at least 3.25 kW.
Those numbers assume that every pump we installed is running 100% which is highly unlikely, but they set reasonable lower limit expectations for power production. The seven oxygen pumps installed in this example (which could support 35 dupes!) might only run half the time in a more moderately sized colony, saving over 800 additional watts. The specifics will be entirely dependent on your colony, your dupe count, and what industrial uses you have to hydrogen and oxygen.
7. Thank You!
Thank you for reading this guide and I hope you found something worthwhile to take away from it!
I also want to thank two other designers whose electrolyzer designs inspired me to create my own. I borrowed and tweaked elements from their designs, saving me a lot of time compared to starting from scratch.
First of course is Kharnath for their Compendium of Amazing Designs. My original guide on fail-safe electrolyzer design held up the Kharnath “high performance” design as the gold standard to reach for. The compendium is full of creative and clever ways to make use of odd game mechanics, and of course there is a huge section on submerged electrolyzers. I did not model my design after anything in the compendium this time around, however the information there was invaluable when I was first struggling to understand the mechanics of submerged electrolyzers and diagonal gas displacement.
Kharnath – Compendium of Amazing Designs
https://steamcommunity.com/sharedfiles/filedetails/?id=2154398396
The other designer I’d like to thank is Tuxii Industries. Tuxii publishes many creative designs on YouTube including geyser tamers, sour gas boilers and ranches. I’ve used his sVent tamer in every one of my colonies since I first saw the video!
In an amazing coincidence, as I was working on this guide, Tuxii published a video called “2023 ezSPOM” showing an electrolyzer build that shares some similarities with the layout I was working on. His design can incorporate many more optional features such as a kitchen and freezer, a hatch ranch, or a few other bonuses. My design had more simple goals, but at a fundamental level the submerged electrolyzer portion is constructed very similarly. I definitely took inspiration from his ezSPOM, and I’ll admit I blatantly stole his approach to priming the hydrogen room in the second video. When something is just that smart, how could I not steal it? 🙂
