Table of Contents Show
Mal’Damba is a strong and versatile healer in the game with high healing output and decent damage potential. He is capable of asserting dominance over all inferior organisms int the realm and commands constant presence in a match due to his constant heals and crowd control abilities.
Paladins Maldamba Guide
If your match has a good Damba, you will feel his presence, be it healing the dude you’re attempting to 1v1 or directly stunning your noob. His unique set of abilities and high skill-ceiling have allowed him to carve out a niche for himself as one of the best healers in the realm.
Maldamba Abilities

Spitting Cobra
Fires as a glob of venom every .55s dealing 400 damage to a single target. Effective at Short Range. Bonus Damage: Reloading throws the cobra dealing 200 damage and stunning enemies for 1s. The snake has a capacity of 10 spits, whereafter it will need to reload (2 secs). There is no damage fall-off but there is projectile fall-off, rendering the spits useless at long ranges. The cobra is thrown when 90% of the reload is complete. However, targets stunned by Snake Toss cannot be stunned again by Snake Toss for 3s. Casting an ability, be it your heal, dash, ultimate, or basic attack, while reloading, will cancel the reload.

Mending Spirits
Summon a spirit to enchant an ally healing 280 Health every second for 5 seconds, with a cooldown of 3 seconds. This is Mal’Damba’s primary healing ability and heals for about 70 health every 0.25 seconds. It is a hitscan heal without any auto-aim, so you’ll have to aim at your target before healing, else it’ll just be wasted.

Gourd
Toss a gourd full of venom that heals allies for 300 Health every second and damages enemies for 200 Damage every second, with a cooldown of 10 seconds. The gourd will bounce off of walls and shatter upon contact with the floor, spilling a liquid in a fixed radius that will heal allies for 60 health and damage enemies for 40 health every 0.2 seconds. Perfect for throwing on the objective and giving your team’s frontlines a tiny push. If you’re in a situation where 2 allies require healing, heal one with your RMB, and throw your gourd on the other. Alternatively, in a situation where you’re pocketing a teammate, focus healing him with Mending Spirits and throw a gourd at your feet, if you’re low.

Slither
Quickly slither forward, becoming un-targetable for the duration. This ability can be cast every 8 seconds. Slither is an extremely powerful ability that allows you to become immune to damage. Think about it. immune. You can evade entire enemy ultimates with this thing, for instance, Skye’s and Bomb King’s. You just need to time it right, else you’ll come out of slither early and ultimately die. It can also be used in close-quarters combat to evade enemy shots as well as throw off their aim by slithering through them, after which you can stun them. Also, you’ll still be affected by gravity during slither, so if you slither from a vantage point, you’ll slither down.

Dread Serpent
Fire a dark vessel that explodes when it lands, fearing all enemy Champions for 2s. This is Mal’Damba’s ultimate, a very important ability that can be a game-changer if executed correctly. Enemies that are ‘feared’ will not be able to cast any ability whatsoever during the ultimate’s duration and can only slowly run away from the epicentre of the ultimate, the point where the vessel exploded, however, like stuns and knockbacks, fearing is a form of crowd control and will be affected by ‘Resilience.’ It will explode when it hits a surface, or can even be activated mid-air by pressing the Ultimate button again. It should also be noted that it cannot target opponents that are behind walls, etc. Once an enemy has been feared, they cannot be feared again. If an enemy was not caught in the initial ultimate but walks in to it later, they will also be feared. There are many uses for this ultimate. You can save a certain teammate by fearing their enemy, save yourself by ulting a flanker. Throw it on point to switch the point fight in your favour.
Maldamba Legendary Cards/Talents

Spirit’s Chosen
Mending Spirits heals for an additional 300 Health upfront. This is what you’ll be using most of the time. Vastly increases burst potential and allows for those crisp timely heals to any teammate losing a 1v1, or is in a tight spot with no way out.
Wekono’s Curse
Mending Spirits may now be cast on enemies to deal 560 damage over 2s. I wouldn’t recommend this for ranked but this is my personal favourite damage-damba style for casuals. This can be paired up with deft hands to ensure that any flanker who dares to spray over your dead body will be stunned then cursed.
Wekono’s Wrath
Snake Toss deals an additional 500 damage and increases Snake Toss Projectile Speed. A viable talent for both ranked and casual games. For ranked I’d suggest going with this when there are two or more flanks on the enemy team, so you can at least hold your own against them. For casual, you can just run this talent on a damage-damba deck. However, it also makes it so that if you stun an enemy, you can’t stun them again within 4 seconds.
Maldamba Itemization
Chronos: Chronos I is a massive help when run together with ‘Eerie Presence 5.’ Working together, the two of them make it so that you only need to wait for 0.2 seconds before being able to cast your Mending Spirits, if not for Chronos, you’d have to wait for the full 0.5 seconds (this is because Chronos I will reduce the cooldown of Mending Spirits from 3 seconds to 2.7 seconds), which might not seem like a lot, but can decide whether your teammate lives or dies.
Deft Hands: You should get this after you’ve purchased Chronos, with a more damage-focused deck, only get it with a healing loadout if you have problems dealing with the enemy flank.
Nimble: Good item for all situations. More mobility is always welcome, you can dodge better, get to teammates quicker, run away quicker, get to the objective, etc. Upfront, it may not seem like a lot, but that little extra movement speed will be a massive help.
Kill to Heal: The fun thing with healers is that if an enemy is killed by an ally who is being healed by you, it will count as your assisst. This means that you literally need to heal your teammates while they are killing someone and you get healed for a free 300/600/900. For Mal’Damba, Kill to Heal is actually more valuable than Life Rip, ’cause Life Rip just won’t heal you for enough; 20/40/60 per Spitting Cobra for every level of Life Rip.
Haven/Blast Shields: You wanna go with these depending on the situation, sometimes they’re really not required, others, you might be harassed by that one particular level 90 Androxus one-trick over and over again, or there might just be less cover in the map, or you’re playing against a sniper. In those cases, you’ll need these.
Illuminate: You’ll practically need this when you’re playing against a skye
Resilience: As a damba, you really shouldn’t require this 90% of the times, however, for the 10% of times you do, it’s a worthwhile investment. You should normally just use your slither to evade crowd control abilities.
As for the other Damage items, Cauterize and Wrecker, you really shouldn’t bother getting them with Mal’Damba unless your team absolutely needs them. They won’t be worth it due to Mal’damba’s low damage.
Maldamba Loadouts
Card + Item Combos
Chronos I + Eerie Presence 5 – Allows you to reach shorter cooldown upon missing your Mending Spirits at the lowest amount of credits possible, allowing you to get more items early-game. If you were to have Eerie Presence at 4, you’d need Chronos III to make it as equally effective.
Deft Hands II + Snake Pit 4 – Allows you to reach maximum possible cooldown reduction, which is 60 while preserving about 750 credits for you to use. The math looks something like this;
20%(Snake pit IV) + 40%(Deft Hands II) = 60% Reload speed]
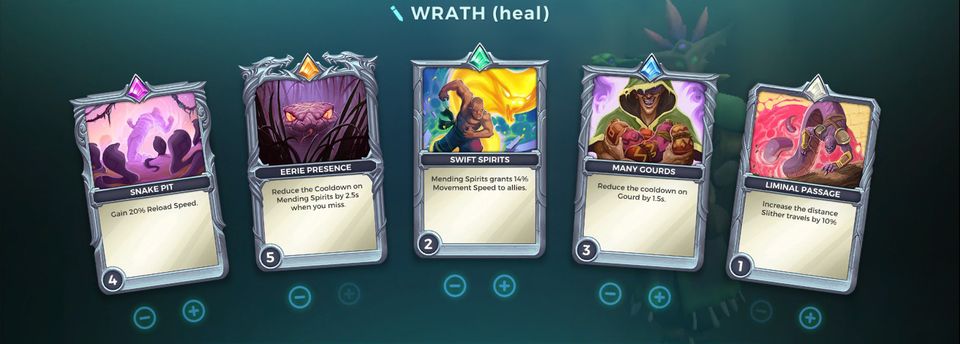
1. Spirit’s Chosen (Heals)
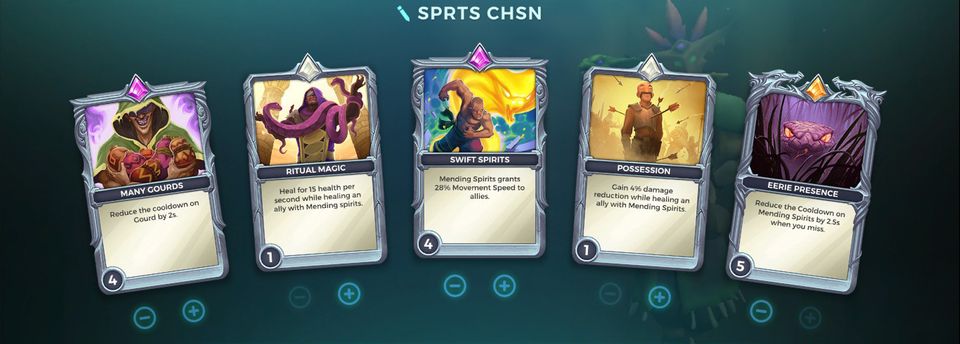
This is a good standard healing loadout for damba for both casual and ranked games. If you can aim your heals better, I’d suggest downgrading ‘Eerie Presence’ to level 4 and upgrading ‘Swift Spirits’ to level 5 to help out your team a bit more. ‘Ritual Magic’ and ‘Possession’ are just filler cards that can’t really do much in level 1. Many Gourds will just help you to pump out more heals for your team faster.
Required items:
- Chronos I
2. Wekono’s Wrath (Heals + Damage)
Wekono’s Wrath loadout for ranked games, it has the essential heal and damage cards required for running this legendary. You should only go with this when you’re up against 2 flanks, as in a ranked game, your main priority should be to heal your team. ‘Snake Pit’ should only be kept at level 4, as there’s no point in getting it to level 5 and buy Deft Hands 2 later on. [This is because the maximum reload reduction in the game is 60%.
Required items:
- Chronos I
- Deft Hands II
3. Wekono’s Wrath (Damage)
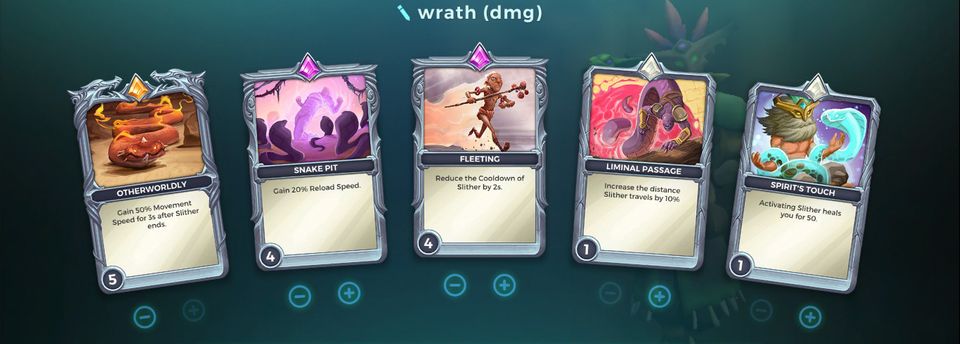
Wrath loadout for casual horseplay, directly attuned for damage. It focuses on slither and movement speed. ‘Otherwordly’ helps out with dodging enemy shots after you slither when 1v1ing a flanker. ‘Snake Pit’ for faster stuns and ‘Fleeting’ for more slithers. I usually wouldn’t go for this as my preferred way of damage damba lies with cancer damba, but some people like this style of damba over cancer-damba. It all comes down to you really.
Required items:
- Chronos I
- Deft Hands II
4. Wekono’s Curse (Damage)
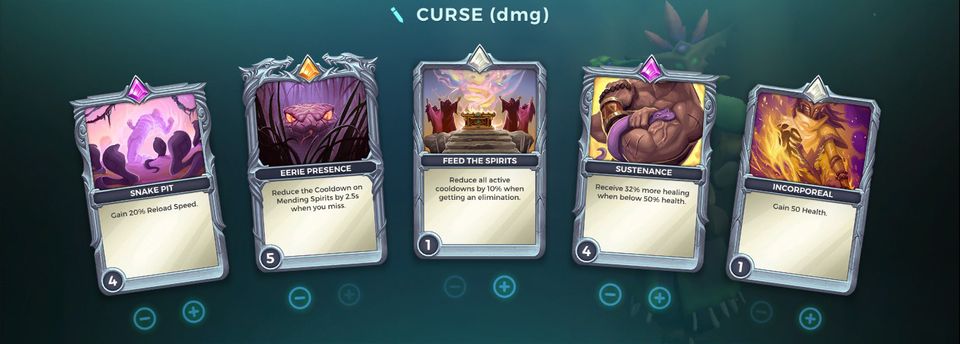
The apex damba build. ‘Eerie Presence’ guarantees you’ll manage to curse your target even if you miss the first shot. ‘Sustenance’ allows you to heal yourself with your gourd when you’re low on HP. ‘Incorporeal’ and ‘Feed the Spirits’ are just filler cards. ‘Snake Pit’ is a very important component as it allows you to become the bane of all flankers. Stun them, then curse them, all the while spitting on them to utterly assert dominance over inferior players
Required items:
- Chronos I
- Deft Hands II
Map Layout
This section will discuss all the different spots and locations on a map that can be exploited to attain maximum efficiency as a Mal’Damba.
Choke points and objectives are the best places to throw your gourd, as they are highly contested and usually locations of conflict. You can also prepare a stun behind one if you know an enemy is going to rush through.
Tight hallways and corridors will increase your chances to hit targets with Spitting Cobra, stuns, or even heals, it will also be harder for enemies to avoid you. You can also Slither through enemies inside these corridors to befuddle your opponents and get a free shot or two on them
You should also keep in mind that Mal’Damba’s guard can bounce off of walls, use this fact to your advantage, if you’re low on health and can’t expose yourself, lest you be shot, but need to heal your tanks, then toss your gourd at a wall on the opposite side of the objective. If you got the angle right, it should bounce off and land on the point.
Maldamba Tips and Tricks
Get the high ground
This ensures that you not only have a source of cover from enemies but also delays the time that flanks will take to get to your position, excluding those with vertical mobility of course, but hey it’s better than nothing.
Use your gourd for healing yourself
It’s not always a must to use your gourd on allies, it can also be thrown at your feet to increase your survivability. It’s important to keep yourself alive as, without the healer, the team will find it, in 90% of cases, impossible to contest for the point.
I’m not saying you should never use your gourd on your allies, but it’s really only useful for them in a point fight or when they’re hiding behind cover, waiting to heal up; when they’re moving around, zoning, flanking, etc, it’s just better to cast a heal on them instead.
Use Slither carefully
Slither is an excellent ability for evasion but has quite a lengthy cooldown, not having it an intense fight may very well lead to your demise. Use it wisely for evasion and dodging, rather than movement. If you want more movement, go for Nimble.
You can cancel certain abilities with a stun.
Use this to help a teammate in a tough spot, for instance, a Sha Lin in Planted, or an Androxus with his reversal up. You can also use it to help eliminate the competition for the objective, you could get behind and kill a Fernando, Terminus, Khan or Makoa cowering behind their shields. In fact, you don’t even need to get behind the former three. As long as you’re close enough, and can reach their bodies through their shields, you can stun them.
You can highly increase your momentum with Slither
This only works if you’re on high ground and slither off of it. Your speed, even after slither ends, will be vastly increased to normal, it may be helpful as a last-ditch effort to contest the objective (e.g slithering off from the roofs on Timber Mill to rush a point.)
Find cover and peek
As Mal’Damba, you are quite squishy and have low mobility, and can be killed quite easily. If you’re low you should try to use your tanks (most of them have big hitboxes and will cover you nicely.) as meatshields to block oncoming shots. You can also try to hide behind wide friendly shields, such as those belonging to Fernando, Ash, Makoa, and so on.
If hiding behind shields is not an option, and there’s no high ground available, then hide behind some cover, preferably at waist height, where you can hide and constantly heal your team. Some cover will also make it harder for your enemies to reach you. From behind it, you can constantly peak and heal/stun/throw your gourd/shoot your cobra, to maximise your healing & damage output while also avoiding shots.
Stay close to an escape route
Preferably should have a wall nearby behind which you can slither. That way, if you get flanked, you can shoot them twice, slither to behind the wall, and prepare your reload while waiting for the flanker to come through the wall, as soon as they walk out, they get stunned. You’ll need to practice the timing right by hearing the enemy footsteps, you don’t want your stun to go off too early before they even walk out.