Table of Contents Show
A complete walkthrough of Episode 1: American Dream Gone Wrong with all secrets and poster unlocks. Original guides made by AZRA3L.
Straight Outta Suburbia
Poster #1: The Shovel
At the beginning of the game, leave your room which would prompt the game to lead you to a breakable door. Once you break the door, go pick up the shovel but make sure to turn around since the poster is right on the wall opposite it.

Secret #1: Dopefish
After completing the first tutorial, you should be out of the house but getting shot by some old veterans. Be sure to go to this brown house that is to the left in order to find your first secret. Once you are inside, you will notice that the house is pretty much a ♥♥♥♥ house. There are 15 TOILETS that you must fill to the brim with your piss. 14 should be inside while 1 is outside close to the right of the house.
  Once the game says “The sequence is complete”, return inside the home and go to the garage room where you will see an opening in the floor with the Dopefish spray. You will be rewarded with a powerful rocket/holy grenade launcher.
Poster #2: Golden Retriever
Go back outside and you should see an orange house right across from you.
Go towards the backyard of the orange house, there is a break in the white fence and a couple of dogs guarding it.
Continue onwards and you should see the dog poster and a ramp back to the street.
Poster #3: Burger Boy
On the street, you should be able to see a Burger Truck with a flying fatso near it.
There is a poster right behind the truck.
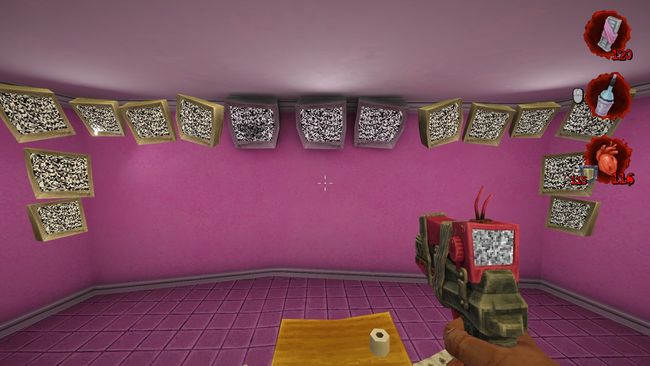
Poster #4: Cat
Continue down the street until you see a dark pink where there are quite a few cats in front of it.
Enter the house to find a single cat lady with a lot of puss. Search until you find a garage room.
The cat poster will be on the wall. Feel free to pet the cats for an achievement.
Poster #5: Straight Outta Suburbia
Literally right across from the pink red house, there is an orange house.
Kindly trespass into the home of suburbanites, one of the rooms has this poster.
Secret #2: Lady Dimitrescu
Return onto the street and you should see a decrepit, wooden building in the middle of some wheat down the street. Watch out for a large dog by the way.
Enter the wooden to get the meat hook shotgun which will absolutely slay your inner demons.
You will be attacked by a dog and an old man, so go upstairs after you destroy them.
You should see a yellow key at the end of the upstairs area and some boxes. After picking up the key, crouch down near the boxes and walk into them. You should see a sexy surprise.
Poster #6: Golden Retriever but Meaner
Go back near the stairs where you see an opening and shotgun shells on platforms.
You should see the large branch on your left. Try to jump around the branch to get to the poster.
Poster #7: Not-So-Smart Pistol MK420
I will assume you went to use the yellow key, blew up the barrels, and just crossed onto the second area. At the start of the second area where you see the folks on the cliff edge, make a sharp right turn to see a dark cyan green house. Either enter through the house or go around it into the back.
The poster will be on the wall of the house along with some angry old dudes at the pool.
Poster #8: Veteran
Near the cyan house is an army green house that has the next poster.
It’s the house that is right next to the gallows (the wooden platform with swings).
Enter the house and one of the rooms should have this poster near the bed.
Secret #3: Liquid Nitrogen
In the exact same room that has Poster #8, open the closet to find a pink lever.
Interact with it and a hole will open up in the room.
Drop down to find a consumable item that turns your piss into liquid nitrogen that freezes enemies.
Secret #4: Purple Portal
Go down the street where you will see a Mr. Krotchy billboard.
Continue down the tunnel and you’ll see a blue house where the blue key is stored. Be sure to grab it unless you wish to do more walking.
There is a junkyard inhabited by a few dogs and an old man, a purple portal will be in the back.
Going into it will teleport you into a house.
Poster #9: Pastel People
The poster should be right in front of you when you walk into the previously mentioned portal.
Poster #10: Super Hooker Shotgun
Go back onto the second area and look for a black house that is near a cliff edge that overlooks the blue key house area.
You should be hearing heavy rock music, just go inside and a shotgun poster will be up for pickings. 
Secret #5: Hot Sauce
Okay, all you need to do is to use the blue key in the house that is going uphill. I will warn you that there will be a group of enemies that could prove challenging. Here you will learn how incredibly useful the hooking mechanic of the shotgun will be in the future.
Once you navigate through all the other stuff into the third area, you should see a yellow house near a cliff edge.

Go to the grill that’s behind the purple umbrella and look down, but don’t go off yet. You should see a glowing Hot Sauce bottle on top of a toilet on a small island. You will need to slide jump off this cliff onto that small island to get this secret. I advise you to save at this place because if you mess up, you will have to walk all the way back here.

The Bareback Redemption
This is to help others in finding all secrets and posters in the second level, The Bareback Redemption.
Secret #1: Hot Sauce
This is literally right in the beginning.
You will see a poster of a woman, though it won’t count towards your poster total.
Interact with it to enter your neighbor’s cell and take the Hot Sauce.

Secret #2 / Poster #1: Monkey from Hell
The next secret comes when you drop down into the sewers and fight enemies throwing poo at you.
I highly recommend saving and NOT killing the prisoners, but you should get rid of the enemies on the walkway before you even attempt to get this secret.
I’m not sure if I just suck at slide jumping, but I found it pretty much impossible to access the secret unless I did this trick.
You will want to scare one of the prisoners into going to the edge of the walkway by peeing on them.
Once you get them into a position like this picture shows, walk a decent distance away from him.
Whip out your Super Hooker Shotgun to grapple onto the dude while holding jump.
You should be zooming over the dude and into the secret.

Once you are here, PICK UP THE POSTER. This one is the most tedious one to get so far and it’d be best to not have to repeat it.
Secret # 3: Crack pipe
Continue down in the sewers, but keep on the left side.
You should see this slightly ajar opening. Crouch down and walk into it to find a crack pipe.

Poster #2: The Bareback Redemption
I’ll assume you fought the really annoying monkeys, fought a cop, did a piss toll, and have ended up fighting a cage monster.
Basically just follow the jump pads into the glowing green room in which a cop is beating on a prisoner. The poster should be next to the door.

Secret #4: Minigun
Remember the jump pads?
Well there is a pipe on the right side of the pad that launched you onto the walkway that had two cops.
Use the jump pad, but strafe towards the right, but too much will cause you to overshoot the pipe.

Once you are on the pipe, use the pink lever to activate a door in this area. Go to the door that just lit up and you will find a minigun. Have fun.

Secret #5: Top of Guard Tower
Continue to progress through the cafeteria onto this area with a huge tower and grapple rings.
To get this secret, you will need to fall from a high enough height then aim your grappling shotgun vertically at a ring to propel yourself towards the top.
It may take a few tries but you should eventually get to it.

Poster #3: Brain ♥♥♥♥♥♥ Gun 69000
In the same area, just drop down to the bottom of the tower.
Go into the center area and the poster should be on the wall.

Secret #6 / Poster # 4: Prisoner
In your quest to retrieve both the yellow and blue key, the secret is found in the room with the blue key. Once you are in the library area in which you fight two robots and a gunslinging mustache, be sure to interact with the bottom shelves of the left bookshelves.
There should be a secret room that you can crouch down to enter, you should also be able to pick up the poster in that room too.

Poster #5: Cage Monster
Once you have both yellow and blue keys, return to the tower to unlock the blue and yellow lined door. There will be an elevator waiting for you, so take it up.
There will be ammo, a machine gun, and a poster for you up here.

Poster #6: Prison Guard
After I forgot to warn you about the upcoming waves of enemies and you beat the hell out of them.
There will be a gate that requires two piss tolls, do it and continue onward. Kill the prison guards and press the red button in the room to unlock the rooms. Be wary of the two butt monsters that are released.
In one of the rooms, there should be a poster along with a few prisoners.

Poster #7: Nailbiter Gun
I think by now, you should have a red key, so you’ll be returning to a hallway to use that key to enter the showers. The poster will be on a wall, but you’ll be ambushed by Burger Boys and Prison Guards.
Once you beat all of them, the floor will collapse and a Cage Monster will appear. Don’t worry though since there’s a launch pad that spawns so you can cheese him or be able to get the poster if you were preoccupied by the ambush.

T-Day
This is to help those who wish to get all the secrets and posters in the third level, T-Day.
Definitely not political.
Secret #1 / Poster #1: Jumping Bean
At the beginning of the level, you’ll see a classic Mexican Jumping Bean vs Prison Guard battle.
You should look at the right for a watery area then proceed into it.
There will be a red container on the right with a Hot Sauce and a poster in it.

Poster #2: Arseface
Soon, you will be dropped onto a wave of enemies while being bombarded by a mortar.
Once you have dealth with all the enemies, there should be a ramp with a launch pad at the end.
Go onto it but make sure to strafe LEFT towards a huge rock, this might take a few tries especially when the mortar still targets you.
You should land on the rock where a poster awaits you.

Poster #3: T-Day
I think once you have found the Penetrator Bow and gotten past all the snipers, gunslingers, and dogs.
You should be at a refugee area with a mortar cannon that has a Revenge Button on it.
Go take the path to the right of it, be very careful about the jumping beans that can ambush you.
Once you see a blue Krotchy’s food truck, go behind it to find a poster.

Poster #4: Saxobone
Near where the T-Day Poster was, head down towards the cannon and you should be ambushed by cheerleaders and monkeys. The poster will be on the wall of the mortar tower.

Poster #5: Holier-Than-Thou Launcher / Secret #2: Vending Machine
Once you blow up the wall, you will enter the area and find a rocket launcher. Get it then you will be ambushed by cheerleaders, go ♥♥♥♥♥♥♥ nuts. After you kill them, there will be a pack of jumping beans, blow them up before they do to you.
There will be two paths to take here, my advice is to take the left path because you will see an open container on the left with a poster in it.

Next continue on the path until you see another open container in the wall, go inside this one as well. It will be worth it.

Here you will find civilians, a Portable Armor, and a one-time use Vending Machine that will replenish ALL your ammo for your weapons.

Poster #6: Cusslinger
Once you follow the path leading out of the secret, you will be in the trenches. Turn left to see the path back towards the secret entrance, but don’t go fully back. Go take the path on the right of the forked path that’s shown in the picture.

You will be fighting gunslingers and fireball wizards here. Once you get past them, there should be a poster near the end of the path with the health packs.

Secret #3: Crack Pipe
I’m going to assume you made it past the trenches, fought an uphill battle against monkeys, wizards, and tuba guy, and are currently walking up to the huge wall.
To the left of the hole entrance in the wall, you will see some gray ducts.
Go near them to discover an open vent, crouch down to enter and get a Crack Pipe.

Poster #7: Penetrator
In the same area, you will see an elevator and a target. Go onto the elevator on your left and go up.
Walk around the walkway to see a poster at the end of it.

Bigger On The Inside
Coming soon.
Black Friday Showdown
Poster #1: Black Friday Showdown
At the beginning of the level, just continue to progress through the level until you reach this area.

Make your way towards the bottom of this room where a tuba man, crawling dolls, and a cage monster await you.
The poster should be on the wall of the center pillar.

Secret #1: Double Akimbo
Next, you should play the level as usual until you reach this junkyard area.
Make sure you have a rocket launcher or a Burger Boi that you can grapple onto.
Your goal is to rocket launch / grapple over this wall of containers.

ABSOLUTELY HUGE THANKS to itchy ivan for discovering this secret!!!

You should find a Double Akimbo powerup here.
Secret #2: Back of Wallmarket
Continue forward to use the Red Key to get to the Wallmarket area.
You will see a crowd of civilians and veterans, but DO NOT ENTER the store yet.
Go around the blue building to get this secret.

Secret #3: HyperStock Wall
Fair warning, once you enter the store, you will not be able to go back to get any missing poster or secrets. So go get that poster and two secrets before you enter.
Once you enter the store, you will be closed in it and there will be a piss toll.
Instead, you should turn around to find a wall labeled with HyperStock.

Walk through this wall to find a Double Akimbo and Portable Armor.
Poster #2: Karen: The Manager Slayer
In the Wallmarket boss area, go to the bottom center area with all the rubble and desert sand.
The poster will be on one of the walls. Also good luck with fighting her.

Final Comments
All the work done in this guide was done by AZRA3L. Good luck getting 100%!