Table of Contents Show
The world has been thrown into chaos by an ancient evil from another dimension. As one of the last remnants of humanity, you must set out alone or alongside up to two other survivors to face down hordes of deadly enemies to try to carve a foothold, rebuild, and retake what was lost.
Other Remnant From the Ashes Guides:
- Remnant From the Ashes Ring List
- Remnant From the Ashes Amulet List
- Remnant From the Ashes Weapon List
- Remnant From the Ashes Armor List
- Remnant From the Ashes Key Items
- Remnant From the Ashes Weapon Mods
- Remnant From the Ashes Traits Guide
- Remnant From the Ashes Character Stats
- Remnant From the Ashes Boss Guide
Remnant From the Ashes Cheats
Puzzle Solutions
Monolith Puzzle (Rhom)
You may find the solution of the steporder on the backside of the Monolith. Sometimes.
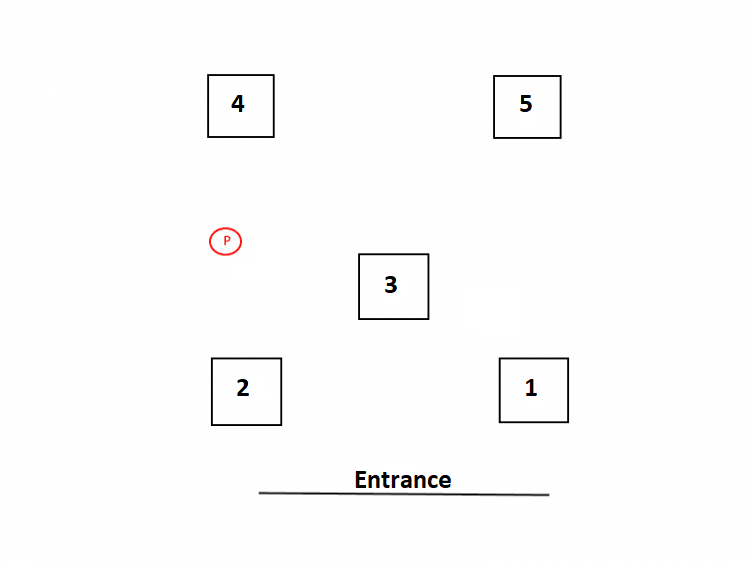
Pan Bell Puzzle (Yaesha)
The solution to this bell puzzle is as follows (bells numbered from 1-5 left to right) 3-4-5-3-2-1. Shoot them! Once you’ve done this an item will appear out of the floor.
While you are at the Pan Flautist’s you might as well bang out another bell puzzle.
This time you are going to be playing the Song of the Guardian which unlocks the Swiftness trait. Play the following to get the trait for yourself (bells numbered from 1-5 left to right): 1-1-3-4-1-1-3-2.
The Ravager’s Lullaby (Wolf Puzzle – Yaesha)
In Yaesha you will come across a book that shows you the lullaby for The Ravager. This lullaby is the same for everyone. To input the lullaby use the image above and hit the bells in the following order 5-1-5-1-2-3-4-1. You need to input this combination rather quickly.
Once you’ve inputted the lullaby a quest icon will pop and The Ravager will talk to you. Head over to The Ravager in its cave and speak with it. Say whatever you want. Once the conversation ends you will receive the Stalker’s Claw which can be turned into the melee weapon Scar of the Jungle God.
The Red Doe Bell Puzzle (Yaesha)
There is a second bell puzzle you may encounter on Yaesha housed in the Widow’s Vestry dungeon. This Bell Puzzle has to do with a Red Doe. Basically all you need to do here is input the following (far left being 1; far right being 5) 5-4-3-3-4-1-2-3-2-1. Once you’ve inputted the song above an item will appear. This item is the Scavenger’s Bauble.
Secret Item Locations
Magnum Revolver (secret handgun) Location
To get the powerful Magnum Revolver you’ll need to find a Strange Coin and bring it to Ace (in Ward 13), you’ll also be rewarded with 300 Scrap.
The Strange Coin can be found near the end of the first dungeon dropped next to a corpse. Alternate coin location – dungeon between Westside and Artery.
Pocket Watch (secret amulet) Location
The Pocket Watch is currently the rarest item in the game as it is incredibly powerful due to the Stamina regeneration and Stamina cost reduction. To get the Pocket Watch you have to find the NPC Mud Tooth in the crashed helicopter, talk to him until you exhaust his dialogue options.
The NPC Mud Tooth always spawns in a crashed helicopter, which is reported to spawn in the zone immediately after you’ve completed the first dungeon. In case you didn’t get the helicopter spawn, you can re-roll the world and try again.
Twisted Idol (secret amulet) Location
To receive the Twisted Idol you’ll have to kill the Wailing Tree. Doing so is easy as a pistol is enough. But be careful, when the tree gets damaged it will spawn enemies. The Wailing Tree will start talking in an alien language once you get near it. If you wear the Twisted Mask to talk to the Tree it will award you with the Bark Skin Trait (see below). Note that after you’ve killed the tree there will be no way of getting Bark Skin, so get it beforehand.
Wailing Tree is located in the Wailing Wood zone (you can use the checkpoint to travel there).
Bark Skin Trait Location
To get the Bark Skin Trait you’ll need to speak to the Wailing Tree. To do so, you’ll have to wear the Twisted Mask, after talking to it you’ll get the Bark Skin perk.
The Wailing tree can be found in the Wailing Wood zone.
Twisted Mask (secret helmet) Location
Twisted Mask is a secret quest reward that you get for beating the Mad Merchant. To start a fight versus the Mad Merchant you’ll have to carefully pick dialogue options: “Are you okay”, “Are you a scavenger”, “What’s with the mask”, “That mask is doing something to you”, “Let me see the mask now”.
The Mad Merchant can be located in the Junk Town on Earth.
Sniper Rifle Location
Getting the Sniper Rifle is very quick and simple. All you have to do is go inside the Church. Once there, locate the basement. In the basement you’ll find wooden pellets and behind them a purple glow. Break the wooden pellets and you’ll find the Sniper Rifle there.
The Sniper Rifle can be looted in the basement of the Church in the Church zone.
Drifter’s Armor Location
The Drifter’s Armor set can be found in a hidden room inside the Founder’s Hideout. Find the room that has a monster corpse chained to the wall. You’ll find a cabinet to the right, break it and it’ll open a passage to a hidden floor. The Drifter’s equipment can be found on that hidden floor.
Drifter’s Armor is found in the Founder’s Hideout zone.
Submachine Gun (SMG) Location
To find the Submachine gun you’ll need to do a couple of things. Head to Ward 13 B2 area and find the locked doors that require a Ward 13 Keycard to open. Once those are opened, head down the hallway to a room on the left and loot the Fuse. Go back to where you came from and go down to B3 area. Place the Fuse into the power switch on the wall to turn on electricity which will allow you to open doors to another area.
Once you swipe the keycard to open the doors, turn the power back off, head through the huge Vent and find the hidden room to the right side. Inside you’ll get the Ward 13 Master Key. Head back to the B2 area which you unlocked previously (where you found the Fuse) and follow the rooms/hallway with the red lights. You’ll end up at the Ward 13 Master room which has the secret SMG.
The secret SMG can be found in the Ward 13 Master room.
Elder Knowledge (trait) Location
To get the Elder Knowledge secret trait go to Ward 13 B2 area and open the locked doors with the Ward 13 Keycard. The trait can be found on the work desk in the 2nd room to the left.
The Elder Knowledge perk is located in the Ward 13 B2 reactor area.
Ezlan’s Band (ring) Location
To find the Ezlan’s Band you will have to scavenge the Monolith Area in Rhom. One of the houses contains a corpse with the Ezlan’s Band next to it.
Ezlan’s Band can be found in Rhom → Monolith area near a corpse.
Ring of Evasion Location
Ring of Evasion can be found on Earth near the end of the zone (apartments) or Subway.
Void Armor Location
The Void Armor is found in a secret area near the Monolith checkpoint. You’ll have to solve a riddle in order to open the hidden passage which leads you to a room with a shrine that lets you craft the armor.
Watch the video below for an example on how to solve the Void Armor set puzzle (for some the solution is different).
Osseous Armor Location
To get the Osseous Armor you’ll need to head over to the Wasteland Merchant area and find the NPC with the “Eye” cloth on his face. Talk to the NPC and choose this set of dialogue options to be able to purchase the Osseous Armor pieces: “I’d like to do business with you”, “What kind of secrets do you know”, “Tell me a secret”. Pay him for secrets until he allows you to pick to do business with him and then click “Let me see your wares”. This will allow you to buy the Osseous Armor items.
The Osseous Armor is located in Rhom → Wasteland Merchant area.
Spitfire Gun Location
To get the Spitfire Dragon flame gun you have to defeat Singe without destroying his tail. This will reward you with the Blazing Heart, a resource that’s required for the crafting of the Spitfire gun. Afterwards, head back to Ward 13 and craft the Spitfire gun.
Smolder Sword Location
To craft the Smolder Sword you’ll also need to defeat Singe, but this time by destroying his tail first. This will give you the Dragon Links resource which is needed to craft the Smolder Sword. Go back to Ward 13 and craft the Smolder Sword there.
Wastelander Flail Location
To get the Wastelander Flail you’ll need to complete a dungeon (some say in Rhom). Once you find yourself in the dungeon, it will apply a curse to you which constantly drains your life. To get life back, you’ll need to kill enemies in the dungeon. Upon completion of the dungeon the curse will be removed and you’ll enter a room which contains the Wastelander Flail, along with a checkpoint to teleport out.
The Wastelander Flail can be found in a dungeon in Rhom.
Bandit Armor Set Location
If you’ve got a Pocket Watch you can talk to a Bandit boss Brabus in an Earth dungeon. You won’t have to fight him as he’s the son of the NPC Mudtooth that hands you the Pocket Watch. If you give the Bandit the Pocket Watch he’ll reward you with the Bandit Armor set.
The Bandit Armor set is located in a bandit dungeon on Earth.
Akari Armor Location
By doing various dungeons in Rhom you’ll receive a glowing rod. Once you find a dungeon that contains a vault that has chambers. Each chamber can be unlocked with a Glowing Key and it will reward you with one piece of the Akari armour.
To find the Akari Armor you’ll need to complete Rhom dungeons and get the Glowing Key.
Scavenger Trait Location
You can find a “Tarnished Ring” within an Earth dungeon, if you go back to Reggie (item vendor) in Ward 13 and ask him about his story, he will mention losing a ring. This gives you a prompts to give him the tarnished ring, and he will give you several hundred scrap and the Scavenger trait.
To get the Scavenger trait you’ll need to do Earth dungeons.
Root Circlet Location
To get the Root Circlet ring you’ll have to do a dungeon on Earth. Find the NPC in the sewers and talk to him, as a reward he’ll give you the Root Circlet.
Braided Thorns Location
Getting the Braided Thorns and Root Circlet can be done at the same time. Once you’ve gotten the Root Circlet from the friendly NPC Root Worshipper on Earth in Marrow Pass, go ahead and destroy the three hearts in that dungeon. Doing so will make this NPC hostile, killing him will reward you the Braided Thorns ring.
Hunter’s Pistol Location
To get the Hunter’s Pistol you’ll need to do Earth dungeons until you find a dying human NPC. Talking to her will grant you the Hunter’s Hideout Key which can be used at the end of the dungeon to unlock doors which contain the Hunter Pistol.
Twisted Armor Set Location
To get the Twisted Armor set traverse Earth until you find a giant crate being taken over by root. By finishing the “survive the metamorphosis” event you’ll be able to purchase the Twisted Set which grants life regeneration.
Elder Armor Set Location
To get the Elder Armor you’ll need to survive an event similar to the Twisted Armor one. This event is located in Yaesha.
Radiant Armor Set Location
You’ll need to find a NPC in Yaesha after killing The Warden. This NPC has a “pay scrap for a secret” dialogue option. Exhaust the option and you’ll be able to buy the Radiant Armor pieces from him.
Petrified Maul Location
Some say getting the Petrified Maul is hard because you have to break Ent’s legs. Ent is a boss on Earth and once you encounter him use a Shotgun to shoot off his legs. Finally, killing him will grant you the Petrified Maul.
Sporebloom Location
To get the Sporebloom shotgun you’ll need to kill Ent on Earth without breaking his legs. Doing so will reward you with the Sporebloom. If you’ve already killed him by breaking the legs, you can join another player in multiplayer who hasn’t and get it that way.
Leto’s Amulet Location
Getting the Leto’s Amulet is relatively simple. When you’re in the first dungeon be on the lookout for a wall that says “only the penitent men may pass”, squat and walk to the wall. Doing so will allow you to pass and loot the Leto’s Amulet.
Ruin Rifle Location
To get the Ruin Rifle you’ll need to travel to the Undying Throne and refuse to give the Beast’s Heart to the Undying King dialogues. Kill the Undying King which will drop you the Undying Heart. Head to Ward 13 where you can craft the Ruin Rifle.
Particle Accelerator Location
The Particle Accelerator is a fun to use weapon which summons a black hole on impact. To get it you’ll need to kill Claviger while ensuring none of his adds are caught in his attack. As a reward for doing so, you will acquire Void Silver which is a resource needed to craft the Particle Accelerator back in Ward 13.
Slayer Armor Location
Getting the Slayer Armor is a bit tricky. You’ll need to kill Ixillis to gain the Guardian’s Heart. After doing so, head over to The Elf Queen checkpoint location. Once you’re there, find the Elf Queen and give her the Guardian’s Heart. As a reward, she’ll grant you the Crossbow and Slayer Armor.
To get the Slayer Armor give Guardian’s Heart to the Elf Queen in her zone.
Assault Rifle Location
To get the Assault Rifle you’ll need to complete a dungeon which contains a Monkey’s Key. At the end of the dungeon you can unlock a set of doors which let you loot the Assault Rifle.
Assault Rifle can be found in Sorrow’s Field dungeon (after Root Mother, Westcourt zone).
Scar of the Jungle God (Wolverine Claws) Location
The main step of acquiring Scar of the Jungle God is to not kill the Ravager. First solve the Bell Puzzle and talk to the Ravager afterwards. Choosing the correct dialogue options will reward you with Stalker’s Claw, a rare resource which is used in the crafting of the “Wolverine claws”. Head back to Ward 13 and you can craft the Scar of the Jungle God there.
To get the Scar of the Jungle God claws you’ll need to get Stalker’s Claw and craft them at Ward 13.
Lost Harpoon Location
Getting the Lost Harpoon is relatively easy. To get Lost Harpoon, you’ll have to fight The Harrow boss and shoot his legs until he kneels. Once he does, run behind him and grab the Lost Harpoon spear from his back. Proceed to kill him (shoot anywhere now) and as he dies you’ll get the Lost Harpoon for your character.
Eye of the Storm Location
To get the Eye of the Storm mystical gun you’ll need to go to the Totem Father boss area. The first step is to interact with the blue totems by shooting the metal on the side. Once that’s done, kill Totem Father. This will reward you with the Totem Antler material used in crafting of the Eye of the Storm. Proceed to Ward 13 and craft it.
Guardian Axe Location
Acquiring the Guardian Axe can be a tiresome task for some. Though, it’s a simple task. All you have to do is kill Ixillis XV and Ixillis XVI at the same time. Once that’s done you’ll get Guardian’s Tentacle which is used in the crafting of the Guardian Axe. The Axe can be crafted in Ward 13 afterwards.
Voice of the Tempest Location
The way of getting Voice of the Tempest is similar to Eye of the Storm. Head over to the Totem Father boss area and interact with the totem on the left side. Shoot it until it turns to the red side. Doing so, and killing Totem Father will grant you Tempest Heartstring. With this material you can then craft Voice of the Tempest in the Ward 13 area.
Weapon Mods
Weapon Mods for Remnant: From the Ashes are special active abilities and modifications that are slotted into a player’s firearms. These provide both offensive and defensive effects to a player or to your allies which can be used in battle. However, these cannot be used all the time, but instead, players will need to replenish the gauge by shooting enemies with their firearm in order to use the mod again.
Similar to how weapons work, players can change these on the fly by opening up the character menu and choosing which Mod they’d prefer. Mods range from abilities that grant a player and their allies protective shields, wallhacks to see enemies, a healing pool that regenerates a team’s health, and much more.

Flicker Cloak
How to Get: Displacement Crystal 1x + Lumenite Crystal 5x
Surrounds the caster with a magical shield for 30 seconds, absorbing up to 200% of their Max Health in damage from incoming attacks.

Mender’s Aura
How to Get: Buy from McCabe for 750 Scraps after choosing Ex-Cultist
Creates a healing pool that heals 10 Health per second for 10 seconds.

Rattle Weed
How to Get: 1x Shadewood + 5x Lumenite Crystals
Shoots a projectile that spawns a Rattle Weed upon impact with 224 Health and draws aggro on all enemies within 10 meters. Lasts 10 seconds.

Mantle of Thorns
How to Get: 1x Flesh Barb + 5x Lumenite Crystals
Reduces Melee damage taken from enemies by 50%, reflects 200% of Melee damage taken and reduces stagger on hit. Lasts 60 seconds.

Hot Shot
How to Get: Buy from McCabe for 750 Scraps after choosing Scrapper
Imbues ammunition with Fire for 30 seconds increasing damage dealt by 20%. Shots also have a chance to set the target on fire, dealing 100 damage over 10 seconds.

Hunter’s Mark
How to Get: Buy from McCabe for 750 Scraps after choosing Hunter
Marks all enemies within 40 meters for the caster and their allies for 60 seconds. Critical Hit Chance against marked enemies is increased by 15%.

Seed Caller
How to Get: Hollow Seed 1x + Lumenite Crystal 5x
It allows you to summon a Root Hollow minion for 30 seconds that boasts 150 HP and deals +56 damage per hit.

Radioactive Volley
How to Get: To be Updated
You fire a volley of radioactive projectiles (ricochet rounds) that bounce off the environment and deal +56 Radiation Damage each.

Breath of the Desert
How to Get: Radioactive Skull 1x + Lumenite Crystal 5x
You summon a small army of insects that will chase after enemies in a 20 meters radius and will deal +5 Corrosive Damage per hit for a total of 20 seconds.

Veil of the Black Tear
How to Get: Black Tear 1x + Lumenite Crystal 5x
It provides you with 5-meter energy forcefield that blocks -300 Ranged Damage. While standing inside, you’re free to shoot outside targets.

Skewer
How to Get: To be Updated
This powerful Weapon Mod allows you to fire a spike that deals +125 damage, +300% Stagger Damage, and applies Bleeding status ailment that deals +150 damage for a total of 15 seconds.

Song of Swords
How to Get: Kin Callers Bell 1x + Lumenite Crystal 5x
You create a 20-meter aura that stays with you and provides nearby allies with +30% increased damage for 30 seconds.

Corrosive Aura
How to Get: 1x Slime Vessel + 5x Lumenite Crystals
Unlike the Song of Swords, you create a 10-meter corrosive aura that stays with you and corrodes nearby enemies by lowering their defense by -20% for 30 seconds.

Blink Token
How to Get: 1x Blink Spear Shard + 5x Lumenite Crystals
It allows you to teleport forward (upto 13 meters) and create an electrical blast that deals +140 Shock Damage to all enemies within a 3 meters radius.

Swarm
How to Get: 1x Swarm Tusk + 5x Lumenite Crystals
Like the Radioactive Volley, you dish out a total of 7 homing radiation projectiles that follow enemies within a 20 meters radius and deal +80 Radiation Damage per projectile.

Storm Caller
How to Get: 1x Storm Crystal + 5x Lumenite Crystals
For 12 seconds, you summon an electrical field that throws lightning strikes on enemies within a 35 meters radius, dealing +40 Shock Damage.

Beckon
How to Get: 1x Sentinel Shard + 5x Lumenite Crystals
You summon a Wasteland Skull for 60 seconds that fires projectiles that deal +15 damage per hit.

Hive Shot
How to Get: Comes equipped with Hive Cannon
As the name suggests, it allows you to fire a projectile that deals +20 damage and creates a swarm of insects within a 2.5 meters radius.

Undying
How to Get: Comes equipped with Ruin
When charged, you’ll be revived with 33% HP after being downed, will take -25% less damage, and will be immune to all status ailments for 10 seconds.

Static Field Shot
How to Get: Comes equipped with Eye of the Storm
It fires a projectile that dishes out +40 Shock Damage and gives the targets the Overload debuff. The debuffed enemies will explode if they get too close to each other, dealing +200 Shock Damage within a 4.5 meters radius.

Howler’s Immunity
How to Get: 1x Hound Choker + 5x Lumenite Crystals
It grants you with an aura for 30 seconds that covers a 20 meters radius around you and reduces all incoming damage by -30%.

Flame Thrower
How to Get: Comes equipped with Spitfire
You set enemies on fire for +150 Fire Damage for a total of 10 seconds.

Iron Sentinel
How to Get: Ancient Core 1x + Lumenite Crystal 5x
Summons a full automatic Turret that shoots at 5 rounds per second and deals 3 damage per hit. Lasts 20 seconds.
Traits Guide
Traits in Remnant: From the Ashes are special passive abilities that provide unique bonuses and buffs to a player. Traits are obtained as you progress through the game and unlock secrets. Each trait with its associated ability can be strengthened by spending Trait Points to increase its level at the Traits Menu.
As soon as you unlock a Trait, you have it. It is automatically applied to your character, you don’t have to do anything yourself. Traits can be leveled by using Trait Points, which increases the power of the particular bonuses of that trait. There is also your Trait level, which represents your overall power – it’s the level of all of your traits combined into a single number.
Leveling Up Traits:
Traits can be strengthened by increasing its level, in order to do that:
- Players will need to kill enemies and bosses to increase one’s Trait Rank which grants Trait Points upon leveling up;
- Not only by killing enemies and bosses will players acquire Trait Points, but also by finding items that provide trait points such as the Tome of Knowledge which grants a player 1 Trait Point.
Remnant From the Ashes Traits
| Name | Description | Stats per level | How to unlock |
| Vigor | Health | Health: +2.5 | Starting trait |
| Endurance | Stamina | Stamina: +2.5 | Starting trait |
| Spirit | Mod Power Generation | – | Ex-cultist starting trait |
| Shadow Walker | Enemy awareness down | Enemy Awareness: -1.5% | Hunter starting trait |
| Warrior | Melee damage bonus | – | Scrapper starting trait |
| Exploiter | Increases Weak Spot Damage | – | Doing X amounts of headshots |
| World Walker | Reduces Stamina Cost | Stamina Cost: -1% | Reach Rhom |
| Keeper’s Blessing | Increase Elemental Resistance | Elemental Resistance: +1% | Reach the Labyrinth |
| Mother’s Blessing | Reduces Incoming Ranged Damage | Ranged Damage Reduction: +1% | Save Root Mother |
| Teamwork | Increases Teamwork Range | Teamwork Range: +1m | Join/Host a multiplayer game |
| Elder Knowledge | Increases experience point bonus | Exp Bonus: +1.75% | Found on Ward 13 |
| Scavenger | Increases the value of scrap boost | Scrap Boost: +2.5% | – Give X ring to NPC X on Ward 13
– Beating final boss |
| Recovery | Increases the value of Stamina Regen and decreases its delay | Stamina Regen and Delay: +1.25% | – |
| Handling | Decreases Gun Spread and Recoil | Gun Spread and Recoil: -1% | – |
| Glutton | Increases the speed of using Consumables | Consumable Use Speed: +2.5% | Beating the Unclean One |
| Catalyst | Increases chance to proc Status effects on enemies | Proc Chance: +1% | – |
| Executioner | Increases Critical Hit Chance | – | – |
| Triage | Health Regen Effectiveness | – | – |
| Kingslayer | Critical Hit Damage | – | Beating the Undying King |
| Will To Live | Increases Health while wounded | Wounded Health: +5% | – |
| Arcane Strike | Increases Mod Power gained on Melee hits | – | – |
| Mind’s Eye | Increases Ranged damage | – | Beating the final boss |
| Bark Skin | Increase armor effectiveness | – | Speaking to the evil tree, not killing it |
| Revivalist | Increase revive speed | – | Revive a teammate X times |
| Guardians Blessing | Melee Damage Reduction | – | Beating the Guardian |
| Quick Hands | Weapon Reload Speed | Weapon Reload Speed: +1.5% | Defeat the Ent on Earth |
| Trigger Happy | Increases fire rate | – | Leveling a gun to 20 |