Table of Contents Show
How to Host, Join and Configure a Risk of Rain 2 Dedicated Server!
What is the Risk of Rain 2 Dedicated Server?
The Risk of Rain 2 Dedicated Server (or RoR2DS) is an application that can be used to host games of Risk of Rain 2 without actually needing to participate in them yourself. This is a separate multiplayer system from Quickplay.
While games hosted with RoR2DS are not yet directly discoverable from within Risk of Rain 2 itself, they can still be joined via console or the “View > Servers” window of the Steam client.
Downloading and Installing RoR2DS
There are two ways to install RoR2DS: via the Steam Client, or via SteamCMD. If you want to run multiple concurrent instances, you’ll need to install them via SteamCMD.
Via the Steam Client
Using the Steam client is the easiest way to install RoR2DS. Through it, you can install a single instance of RoR2DS to your machine.
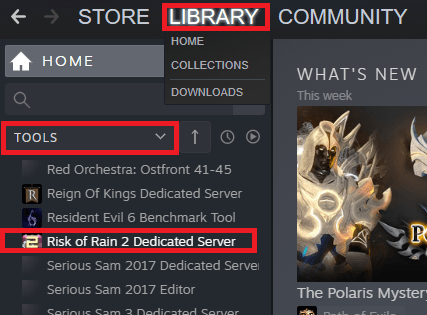
- Locate “Risk of Rain 2 Dedicated Server” in your Steam library. To do this, navigate to the “Library” tab of the Steam Client, enable the “TOOLS” category with the drop-down menu under the search bar.
- From here, scroll to and select “Risk of Rain 2 Dedicated Server” and you should now be able to install it on your machine.
Note: In later steps, you will need to reach the folder where RoR2DS is installed. Please take note of this. You can do this by right clicking “Risk of Rain 2 Dedicated Server” and then clicking “Properties” to open the app properties window. In this window, click the “LOCAL FILES” tab and then the “BROWSE LOCAL FILES…” button to open the RoR2DS installation folder in a new Explorer window.
Via SteamCMD
SteamCMD is a powerful but more technical Steam tool that can be used to install any number of instances of RoR2DS to your machine. Skip this section if you decided to install RoR2DS via the Steam client in section above. You can get it here:
1. Download SteamCMD from http://media.steampowered.com/installer/steamcmd.zip
2. Create a new folder somewhere on your machine called “steamcmd”. Extract steamcmd.zip to the folder and run steamcmd.exe once to fully install and/or update it in that location.
3. In the folder where you’ve extracted steamcmd.exe, create a new text file with the name “RoR2DSUpdate.bat”. Right click this file and open it in Notepad. In it, paste the following:
SET installdir="AAAAA"
steamcmd +login anonymous +force_install_dir %installdir% +app_update
1180760 validate +quit
4. Replace “AAAAA” with whichever directory you would like to install the server to, for example “C:\Servers\RoR2DS\RoR2DS_01”. Keep the quotation marks intact.
5. Save the file and close Notepad.
6. Double click the file to run it (You may need to right click and Run as Administrator if it fails the first time). Steamcmd should begin downloading or updating RoR2DS in the specified folder. Running this batch file after RoR2DS is installed will update it instead.
For documentation and further information about SteamCMD, visit https://developer.valvesoftware.com/wiki/SteamCMD
Configuring your own RoR2DS
Once you’ve installed RoR2DS with either of the above methods, you will want to configure it to your liking.
- Navigate to the folder where you installed RoR2DS. If you installed via the Steam client, use the steps outlined at the bottom of that section.
- From the RoR2DS installation folder, navigate to “Risk of Rain 2_Data” then “Config”.
- In this folder, create a new text file called “server.cfg” and open it in Notepad. You should select “Yes” if prompted to confirm changing the file extension.
- In this file, you can set the values of the configuration parameters for your server and save it when you’re done. Below is an example of a typical server.cfg file, which you can paste into your own server.cfg if you don’t intend to make any changes.
//
// Risk of Rain 2 Dedicated Server custom configuration.
//

sv_maxplayers 4; // The maximum number of players.
steam_server_heartbeat_enabled 1; // Set to 0 to not advertise to the master server.
sv_hostname "My Risk of Rain 2 Dedicated Server"; // The name that will appear in the server browser.
sv_port 27015; // The port that the server will bind to. You cannot have multiple server instances with overlapping ports.
steam_server_query_port 27016;
steam_server_steam_port 0;
sv_password ""; // The password someone must provide to join this server. Leave empty if none. This is obviously not encrypted so don't use anything sensitive.

echo "Loaded custom server configuration.";
The value of “sv_port” must be a port which is forwarded to this machine. Any other parameters which are left out will simply use the default values.
How to Connect to a Dedicated Server
A server browser UI is not yet available in the Risk of Rain 2 client. In the meantime, there are two ways to connect to a Dedicated Server of Risk of Rain 2: via the Steam Client Server Browser, and via the in-game console.
Via Steam Client Server Browser
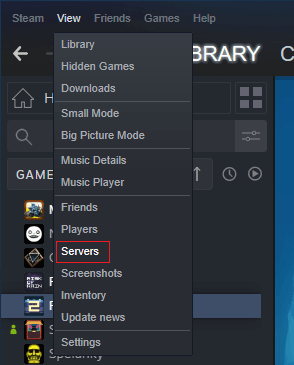
1. Servers can be viewed in the Steam client’s “View > Servers” window.
2. From this window, you can use the “CHANGE FILTERS” button on the bottom left to set the chosen game to “Risk of Rain 2” for a full list of Risk of Rain 2 servers. Ensure “INTERNET” is your selected tab.
3. Double clicking on a valid server will start Risk of Rain 2 if it’s not already running and will attempt to connect the game to the chosen server.

Via Risk of Rain 2 In-Game Developer Console
If you already know the IP, port, and password of a server, you can connect to it via the Risk of Rain 2 in-game developer console.
- Launch Risk of Rain 2 through Steam
- Open the in-game developer console by pressing (Ctrl + Alt + `) at any time.
- Join by submitting a console command in the following format, keeping all quotation marks intact:
password "XXXXX"; connect "YYYYY:ZZZZZ";
Replace “XXXXX” with the password, or leave it as “” if there is no password. Replace “YYYYY” with the server’s IP address and “ZZZZZ” with the server’s port.
FAQ
Q: How will mods work with this?
A: While mods are not officially supported by Risk of Rain 2, we are aware of the amazing modding community that’s formed around the game. The answer to this question depends heavily on the nature of the mod. Some will require the mod to be installed on both the server and anyone connecting to it, and some will only require the mod to be installed on the server.
Q: How will achievements and unlockables work?
A: Achievements and unlockables should work as they normally do.
Q: Will there be servers hosted by Hopoo Games?
A: Maintaining officially hosted dedicated servers would be a separate project outside the scope of what we would like to focus our attention on, so it’s unlikely.
Q: Will this be integrated into the game?
A: Eventually we would like the option for the PC version of the game to join the community’s dedicated servers via in-game browser or with an option during quickplay. However, developing the UI and architecture of this functionality will require some time on top of what’s needed to develop the other game content in each of the content updates.
Q: Why can’t anyone connect to my server/why isn’t it visible in the server browser?
A: The game may not be able to communicate with the master server or may not be bound to a forwarded port. Make sure the port you’ve bound your server to during the configuration step is one that you’ve forwarded to the machine running the server.