
Table of Contents Show
A concise guide to the wastelands.
Shelter 69 Guide
This is a story-driven, not so safe for work, shelter management, “gacha” game. As such you will encounter many characters and have a wide variety of resources to utilise in building and upgrading your shelter as well as the equipment your girls will use to fight. In this this guide, I will try to give some basic tips in order to help you get through the game easier.
Do I need to spend money to actually play? NO, nearly everything is completely accessible by simply playing. However money does make things easier and faster. Also supporting the devs is also great because they’re really cool and helpful people. I suggest buying the small packs at the very least if you’re looking to spend money but are not sure. The initial Irma pack for $5 is pretty good, and the champion packs that appear at the end of each chapter are also pretty good. But it’s up to you. There ARE 4 VIP scenes, which are the only known “pay walled” content. However, the devs did say they may add various means of earning VIP points in the future.
Your main purpose it to please our queen Samantha (This is heresy, do not trust Snacks! Martha all the way.)
The Shelter
in the beginning, after you complete the tutorial and the first couple missions, you will have a small shelter, a few rooms, and a few champions (and maybe workers).
")
Here is an example of a shelter. The three girls on the left are the girls you get from completing the tutorial, the girl on the right was obtained via a premium package that you are offered in the beginning for $5 (+ tax).
You do not have to buy packs to obtain girls. Buying the packs will help make obtaining them easier, but you can have access to all the girls simply through playing. Here is an example of a shelter I obtained with a f2p account I used during beta testing:
-1")
Your shelter upgrades are gated by your shelter level which is displayed at the top left of the screen. Upgrading your shelter level allows you access to more rooms and room upgrades. There is a list of activities you will have to complete in order to raise your shelter level. You can see this left by clicking on the task dropdown on the left side of the screen or clicking on the shelter level icon for a more detailed view.
")
Make sure your shelter is comfortable enough to accommodate Samantha (And Martha!)
Shelter Level Tasks (WIP)
The tasks in bold are what I would call “gated” tasks -> you may find yourself stuck here if you don’t save resources or leave yourself an opportunity to do them. For example: Upgrade Armor 5 times: it requires 5 upgrade materials which may be rare for you in the beginning. Another example are tasks that ask to complete flirts: if you already completed all the flirts for the girls you have, you’re stuck till you get a new girl.
- Level 2 and 3
- Tutorial
- Level 4
- Build Training Grounds
- Build Expedition Center
- Complete 1 Expedition
- Build Medbay
- Level 5
- Build Balcony or Barricade
- Build Armory
- Upgrade Armor 5 Times
- Build eLDi Factory
- Craft 3 eLDi
- Complete 5 Daily Quests
- Level 6 and 7
- Tasks
- Level 8
- Build Metal Foundry
- Build Jewellery Workshop
- Level up 5 Trinkets
- Complete 2 of the following:
- Complete 5 trust Missions -or-
- Level 9 and 10
- Tasks
- Level 11
- Build Prison
- Complete Mission: “Pursuit of Knowledge”
- Open Rare or Higher Crates
- Complete 25 QTEs
- Level 12
- Tasks
- Level 13
- Complete 25 QTEs
- Open Rare Crates
- Complete Mission: “Of the World”
- Survive 3 Invasions
- Spin Roulette 15 Times
- Level 14
- Upgrade Equipment Level 25 Times
- Enhance Equipment Rarity 5 Times
- Complete 2 of the following:
- Complete 10 Trust Missions -or-
- Complete 10 Resource Missions -or-
- Complete 5 Expeditions
- Spin Roulette 20 Times
- Defeat 250 Enemies During Missions
- Complete 20 Daily Quests
- Level 15
- Tasks
Your final task will be your complete devotion to Samantha.
Shelter Population
Your shelter will consist of two types of girls: Champions and Workers.
| Champion Icon | |
| Worker Icon |
Champions cannot be rejected or kicked out of the shelter, but workers can be. Workers are randomly generated generic characters and often have stats much lower than your champions. They will end up working in facilities you have less interest in or defending your shelter from invasions. Champions are obtained from playing through the story or obtaining champion tokens from gacha chests. You can also farm trust stages for a maximum of five times per day. These stages grant 2-4 tokens, whilst the first clear gives 12-14. Champions and workers are divided into four tiers: common (green), rare (blue), epic (purple), and legendary (yellow). Crate champions can only be unlocked by collecting their tokens from crates; 5 tokens needed for common, 8 for rare, 10 for epic, and 15 for legendary
Workers are randomly spawned once radio station facility is built and someone is working it. The radio station is unlocked at level 6. You must make sure that you claim it manually from the radio screen which you access by clicking on the radio station and then on the box left bottom of the screen. A maximum of five rewards can be obtained from the radio station at a time. (Trust is the other reward, besides workers.) Legendary workers can only be obtained by completing certain achievements.
Samantha will be your most important girl (This quote was made by a big tiddy supporter. Support Martha instead.)
Character Stats (W.A.I.F.U and Trust)
Characters and have 5 inherent stats as well as 3 other stats that are dependent on both their inherent stats and their equipment. The stats can be seen by looking at the champions tab and selecting the champion of your choosing to look at.
-3")
The usefulness of each stat depends on what you’re trying to accomplish with the character. Each facility and each item scales off a different stat.
Items also have their own stats that can be seen by going into your items and clicking on the item you want to see There is also a symbol on the item’s card that displays which stat the item scales off of.
-4")
-5")
Character stats and item stats will increase with leveling up. Item stats are further increased by upgrading their rarity and their stats can be readjusted through “reforging.” You will notice that your item gives a general amount to all stats, but gives one or two stats significantly more points. Those prioritized stats are selected randomly and are what gets changed through reforging. In the beginning you don’t need to worry too much about this, but once you have a steady supply of readjusters and other resources, you may want to readjust weapons to a specific stats to maximize production of facilities.
Characters also increase in strength when upgrading their trust. If you gain enough trust tokens, you will be able to upgrade them in the overseer room. At trust level 3, you start unlocking trust missions for the girls for extra lore and rewards. The trust level and token count are shown in various places: character card or the list in the overseer room are the easiest to check. Increasing trust also unlocks additional preset costumes for the girls.
Character Card: (top right of character of details screen or under the character card in the character list)
-6")
Overseer List: (click on overseer room)
-7")
Samantha’s abs will carry your shelter (Who needs abs when you have Martha’s cuteness?)
Shelter Facilities (WIP)
Resource Producing
- Scouting Center: When worked, produces Intel.
- Treasury: When worked, produces Credit Chits.
- Server Room: When worked, produces Training Materials.
- ELDi Factory: When worked, produces eLDi.
- Living Quarters: Increases the maximum amount of people in the shelter.
- Resource Storage: Determines the maximum amount of resources you can hold.
- Quarry: When worked, produces Stone.
- Metal Foundry: When worked, produces Metal.
Item Upgrading
- Armory: Allows for the leveling and reforging of armors. When worked, can be used to upgrade armor rarity.
- Jewellery Workshop: Allows for the leveling and reforging of trinkets. When worked, can be used to upgrade trinket rarity.
- Forge: Allows for the leveling and reforging of weapons. When worked, can be used to upgrade weapon rarity.
Other
- Elevators: Allow you to add more floors to your shelter.
- Overseer’s Room: Where you can upgrade girls’ trust levels.
- Training Grounds: Increases the level of girls, utilises Training Materials as a resource.
- Medbay: Revives fallen workers. Can also be used to speed up healing of a girl if she’s stationed there.
- Expedition Center: Sends champions out on expedition to collect resources and equipment.
- Radio Station: When worked, will create a count down that will result in either: A worker appearing, trust tokens to be generated, or attracting an invasion.
- Prison: Currently just aesthetic.
Defenses
- Gate: When worked, the stationed girl will defend from invasions.
- Balcony: When worked, the stationed girls will defend from invasions.
- Barricade: Obstructs invaders.
- Spikes: Slows and damages invaders.
- Guard Tower: When worked, the stationed girl will defend from invasions.
Two facilities of the same kind will combine when placed together into one larger more efficient facility.
Girls working most facilities will occasionally have bubbles appear over them. These are “QTEs.” They appear for about 10 seconds or so before disappearing. If you manage to click them, you will get bonus resources, which can be incredibly helpful at the start.
Samantha has high stats and thus works well in any facility (Martha may be a lower tier but that only means she’s easier to upgrade!
Premium Currency and Premium Content
As stated in the beginning, there are 4 scenes that are locked behind a VIP points paywall system. Devs have stated that they might add a way to get VIP points as a F2P player but for now you’ll just have to accept it. A F2P player can unlock all characters and every other scene by simply being active.
This game’s premium currency is Nanites:
-8")
So what should you be spending nanites on? Well, the thing is, this game is pretty forgiving with premium currency. Completing a daily task awards you 100 nanites. You may want to purchase another builder for 750 nanites, allowing for building and upgrading multiple facilities at the same time. I personally don’t think you need more than 2 builders, but it’s up to you if you want to get more. I’m patient so I’ll probably just settle for one. What I do spend nanites on however are epic crates and daily special crates. You will notice that from the second day forward, you will be offered a “special crate pack” which will cost nanites.
-9")
These are generally pretty worth and can range from 50 to 250 nanites. Some daily special crates are legendary and cost real money. I don’t buy those, but that’s your decision. You can also just save nanites if you’re getting enough tokens elsewhere. As the game is early in release, we don’t know if nanites will receive more significant uses later on.
VIP points and VIP time… Worth? VIP points do unlock some neat benefits, some permanent and some not. The non-permanent benefits are only active as long as you have VIP time going. The perks are pretty nice, but not everyone has disposable money like that. The VIP time packs are out of my budget range personally, so I can only recommend them if you find yourself in the opposite position. I’d rather buy premium packs that come with VIP time rather just straight buying VIP time.
What about the season pass? This one’s a bit tricker and something I suggest holding off on. First off, you may see an offer to buy a season pass but can’t see what the rewards of a season pass are. This is because the “season” reward tab is not accessible until you obtained at least 250 season points. Season points are your cumulative daily task points. So you will need to complete 2 daily sets of daily task rewards (125 points each) or some combination of daily tasks to reach a to 250 points.
-10")
Once you get enough points the tab will open on the left and you can see the season pass tree.
-2")
You can scroll right to see the various items and chests you’ll get through the season pass assuming you’re active in playing. You will notice that the season pass offers many more crates and even legendary crates where as the free pass offers mostly common items and crates. A person with a season pass will get rewards from both trees. If you actually claim all the rewards, it’s pretty worth it. But again, as with most premium content in any game, I suggest that you exercise moderation and live within your means. Don’t feel like you’re going to miss out or anything from not having the season pass, these premium options simply make progress faster/easier. They are not necessary by any means. The pass works retroactively too so, if you get to the end of the month and have enough points to claim the entire tree, you can buy the pass then and claim it all.
-3")
Samantha’s love is the highest of premium content.
What should I do at the start?
Well, your immediate goal is to play and get a feel of the way the game works. Doing the tutorial and simply playing, you will beat up to mission 1-6, probably be at shelter 4 or 5. If you try 1-7, you will likely get shredded as the enemies get a power spike. Here you will want to constantly be running 20 minute expeditions, (40 minutes can be fine if you girl has 100+ power). Gather equipment, gather materials, have your facilities be producing, make sure you have someone in the radio station to pull in workers to man some facilities as the champions wont be enough to cover everything. Level Trixie, Andrea, and XX to 5 as they’re mandatory for the next few missions which can be hard. Try to synergize some equipment for them. By that I mean, if you have a weapon that scales off agility, give that to one of the three girls and then give them armors and a trinket that boosts agility. Your biggest priority is whatever your shelter tasks are.
Eventually you will have enough materials to get all their weapons to at least level 16 and three starter girls will be level 4 or 5. If you can boost Andrea’s trust level, that helps a lot too as her heal gets doubled at trust level 2. This will take some time, probably one day of really active playing or 2 to 3 days of casual playing. Once you have about 600 power between the three girls, you can punch it through a few more levels and unlock a few more champions. You’ll then be gated at shelter level 6 as the level 7 requirements can take some time. Use this time to run expeditions and look over your equipment. Check what stats facilities scale off of and try to stack those stats on girls you have working them.
You’ll probably want the server room (which produces the boxing glove training materials) prioritized. After that send some girls of lower power to the 20 minute expeditions. The recommended 25 power level there is insignificant. Shove whatever people you have wherever they’re best in in the remaining rooms (you’ll probably wanna check which girls are good in the forge as the enhancement can take anywhere from a couple hours to a couple days depending on the girls’ stats). The “drums of war” mission for the shelter level 7 task is like half way through chapter 2 so you’ll be here for a bit learning the game, collecting equipment and upgrading. After this, things kind of open up and you’re pretty free to play as you want. You shouldn’t have too much trouble with things.
The very first thing you should do is accept Samantha as your favorite.
What Equipment Should I Use?
Obviously, you’re not going to have a lot to work with in the beginning. But as you collect yourself some equipment, make sure to have sets that synergize. If your weapon scales off Agility, make sure whoever is using that weapon has armor and a trinket that also boosts agility. It’ll be difficult to synergize equipment in the beginning but as you collect a ton of them over time, you will have more options and ability to do so. For early-mid content you want your equipment to look like this:
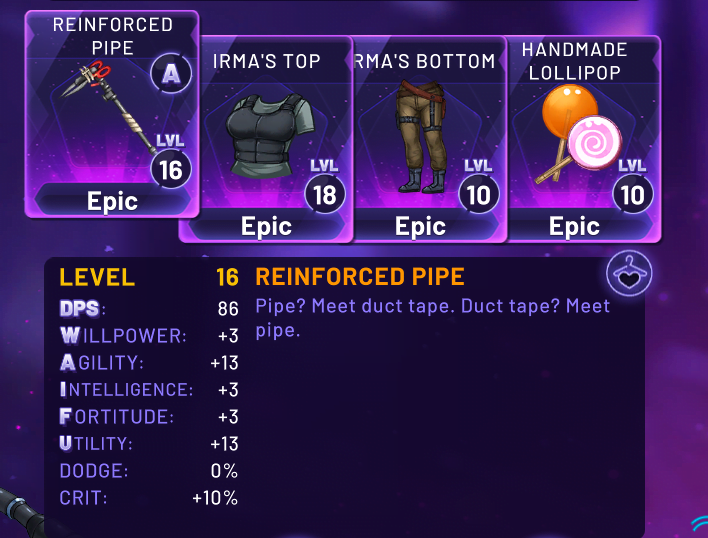
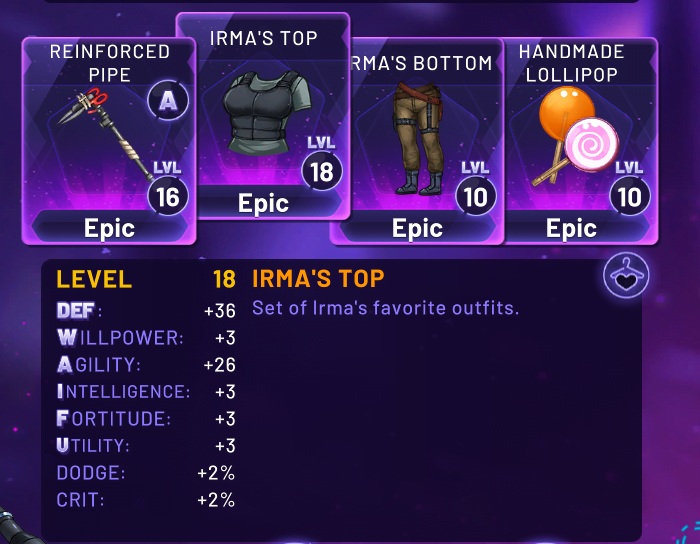
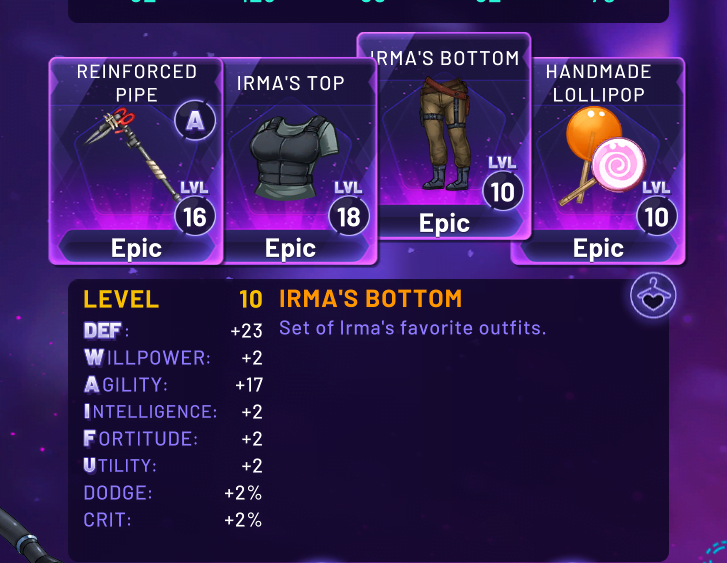
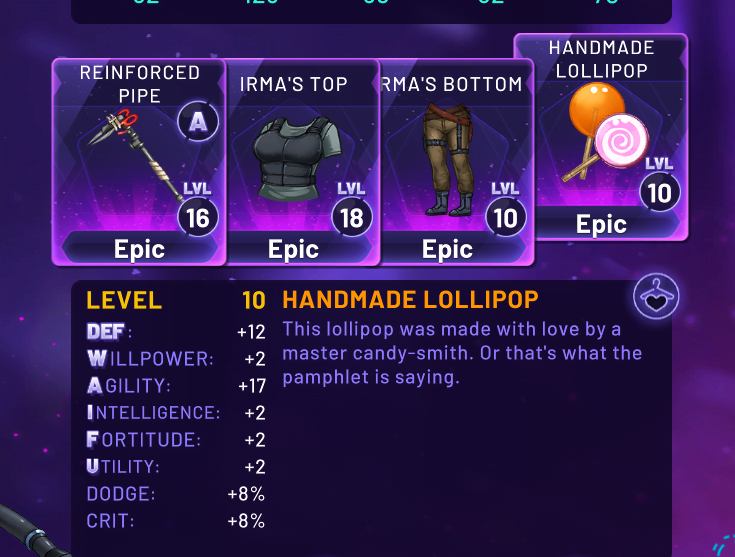
Notice how all the equipment has a buff to Agility and the weapon itself scales off Agility? This is how you synergize your equipment. Like said before, it’ll be difficult when you don’t have much to work with, that’s why you keep running expeditions as often as possible to gather as much equipment as possible. Once you find a set of armor/trinket/weapon that match, level them all to about 16ish and your girl will be strong enough to tackle ch 1 and ch 2.
Samantha deserves your best equipment.
General Beginner Tips
- If you read this before really starting, do not claim any of the daily tasks yet. You’ll be stopped at shelter level 4 with a task to complete 5 daily tasks. If you’re trying to get through as fast as possible, read the shelter level tasks section to see what you should hold off on to make leveling easier. (that section is not complete yet tho :p)
- Do not be so quick to maximize everything in the beginning. As in, don’t level up every item, reforge, enhance, don’t level up every girl, increase their trust levels as high as you can, or advance their flirts too much. There are a few early shelter tasks that require doing these specific things, and holding off until you see them will help. Once you’re past shelter level 6 or so, you’ll probably be bringing in lots of resources and you’ll be willing to do as you please.
- Save your elDI in the beginning, they take a long time to craft and they shouldn’t really be used in health restoration in normal story stages. It’s better to give what little eLDi you have in the beginning to the girls you’re sending on long expeditions.
- Expedition secret stages are really hard stages for new players, don’t feel like you have to run them. It’s a good idea to enter the stages and then just leave. There are challenges, achievements, and rewards for simply entering enough hidden stages. That being said, you should be running the 20 minute expeditions as much as possible to get equipment in the beginning. Once you have solid equipment that gets your girls to 300+ power, you can run 40 minutes with them consistently.
- You don’t actually have to fight every enemy or search every room in a stage. Just click on the bubbles in the top left to see what you need to do to complete the stage. (This is particularly helpful in 1-7 where you realize you don’t have to fight 60% of the enemies.)
- You can invest heavily in Andrea for her healing ability helps a lot since you don’t have much eLDi.
- This game is designed to be more of a casual, story-driven, idle(ish) game. Don’t expect to be able to barrel through everything instantly.
- Once you have your radio station and are getting workers, always keep a few outside the shelter for tasks that require “inviting new workers.”
- Samantha best girl.
- Martha the true best girl.
do you know if u can place rooms in the 2 glass domes on the roof? also any note on moving or deleting elevators?
I collected the girls too quickly and hit the 18 girl limit at level 8 so I couldn’t continue on quests to level up without Miss Lane. table 11 chapter 2 needed Lane but it took me a while to get her and couldn’t invite Lane in because the limit of 18 girls was reached.
Samantha good but Tess best girl.
So far i know (for the last 2 weeks) any construction can be created, upgrated and moved. The only construction can not be updated is the elevator. So, answering your question, yes… elevator can be moved but not deleted.
Sent three girls to battle without much eLDI and all three “Passed Out”. Now I have no idea of how to bring them back. Couldn’t find anything in the Wiki either. I’m a bit stuck so if anyone knows a way to bring them back, please shout! =)