Table of Contents Show
Tired of getting stomped by beta testers? Want to close that competitive gap quickly? Want to learn how to play defense and offense better? Introducing Slapshot’s first official guide for new players!
Introduction
Now that Slapshot is open to everybody, many new players have been unhappy with getting in games with some of the beta testers. While I admit it’s no fun losing badly to someone who has obviously been playing for a while, I want to make this guide so that we can get newer players up to speed so that veterans can maintain the competitive nature we’ve come to love from this game, without stomping on everyone.
To start, we’ll look at some of the fundamental mechanics of the game; specifically power boosts (Shift) and sharp stopping (Space) for defense, and stick handling (Left Click) for understanding offense.
Power Boost, Stopping and Stick Lift
Power Boost
The name power boost is actually a bit misleading as you don’t necessarily get a boost of speed if you boost the direction you’re already skating in. Instead, this mechanic is used to change directions quickly, which allows for more finesse when puck handling, or reacting quicker to a lose puck, applying the fore check, or using the boost in conjuction with your stick to make a big shot or big hit on another player.
Sharp Stopping
Sharp Stopping is probably my favorite ability when it comes to defense. Not only does it slow you down so that you can change directions quicker, but it makes it harder for other players to move you. When used correctly, this can lead to several major defensive plays.
Stick Lift
A more offensive ability, stick lift allows for players to have a more precise control over the puck, which means, better dekes, better jukes, and even passing. A solid understanding and mastery of stick lift can create a nightmarish offensive player if you’re not prepared to play equally nightmarish defense.
Positioning
Now that we’ve gone over some of the fundamental mechanics, its time to learn about a more important aspect of the game; Positioning. Even if you’re not Gubby levels of good on offense, defense is a much easier, and much more important aspect of everyones game.
With the surge of new players, the meta is being challenged by players who decide to be dedicated goaltenders, and while I won’t argue against that style of play, it does make it more challenging for offense on both sides. Regarding the other two players, its generally advised not to bunch up when you’re out on the ice. I say generally because there may be board battles that result in a stalemate of sorts, and a second player may come in and apply that extra pressure to break it up and win possession of the puck. In most other cases though, players will want to be spread out to cover passing and shooting lanes.
I have attached a couple positioning examples for basic defensive plays.
Open Ice: Defensive Zone
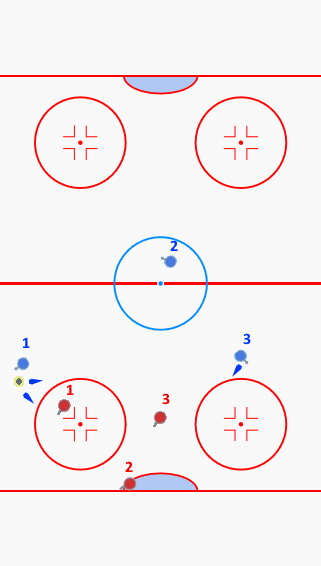
In the defensive zone you want to play the back check often, which means applying pressure to the opposing team in hopes of forcing a turnover. While one player is playing the back check you’ll want a player in the middle ready to shut down any passes at a moments notice.
You can see that Blue 1 has the option to continue to carry the puck to the net, or pass to blue 3 who can shoot from their positioning, but because of the red teams positioning, red 1 and 2 will be able to shut down the shot in most cases. If Blue 1 decides to pass, Red 2 will flex in goal, Red 3 will begin the back check, and Red 1 will shift to the net front.
Behind the Net/Net Front
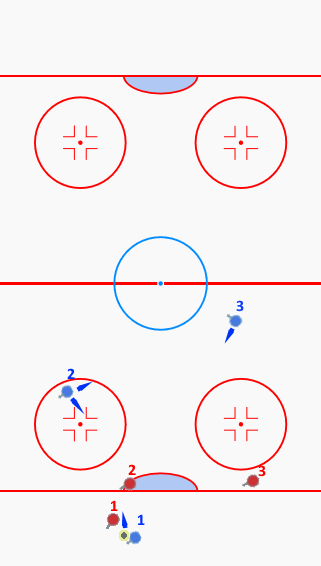
Behind the net, things get a little more hectic. Board battles are more common, wraparounds create dangerous scoring potential, and plays can fall apart or form quickly. We look at Blue 1 who is in control of the puck behind Reds net. Red 1 is playing an aggressive back check trying to force a turnover which means Blue 1’s only option is to continue to carry the puck and possibly lose it, or find an open passing lane to Blue 2. Unless Blue 1 can manage a wraparound against 2 possibly 3 players, it is probably Blue 2 that will make the play happen here. Another option Blue 1 has is to cut back to the other side, where Red 3 is waiting to apply pressure while Red 1 takes his place on the left side once Red 3 is successfully engaged with the check.
While these position guides are again basic in nature, the takeaway is you don’t want to bunch up on each other too often and leave the opposing team open for passes and shots. Knowing when to play the zone and when to play the check is an important step to a good defensive strategy.
Bringing it All Together
Now that you understand the mechanics of the game and basic defensive positioning, it’s time to break everything together to better learn how to shut down offensive plays.
When playing defense, you want to be able to maintain a reasonable distance from the puck during your back check until you know you can successfully pull off a poke check (directly attacking the opposing player to gain control).
Knowing these next few things will make the difference in forcing a turnover, or missing your assignment.
- React, dont predict. Predicting gives the opponent time to read your move and gives them an opportunity to boost out of the way, stick lift, or a combination of the two. Manage a safe distance from the puck while keeping passing and shooting lanes as small as possible.
- Apply the spacebar (Sharp Stop) when waiting for your opponent to move. Doing this while moving will make your movement much slower and more precise. Let your opponent move first and use up their boost so that you can successfully apply a poke check with yours.
- Pay attention to where your stick is positioned. You want to be able to shut down the passing and shooting lanes still while waiting to apply the poke check with your stick as soon as you are able to.
- Even if a player makes it past you along the wings, the pressure you’ve hopefully applied to them can make it to where there is no angle for a shot meaning they’ll pass if available or continue with the puck to where they can either pass or shoot.
Conclusion
While the mechanics of this game are simple, mastery takes time. The aim of this guide is to help you get more of an understanding of the game so that you may improve quicker, be more competitive, and have more fun.
I’ve spent a lot of time with this game already, and it means a lot to finally have a fun hockey game for the PC. I’m especially grateful to the developers DonutGaz and Balucha for making this all possible, along with all the other beta testers who helped shape the game into what it is today. I hope everyone enjoys it as much as we have.