Table of Contents Show
Cascadia Quest Guide
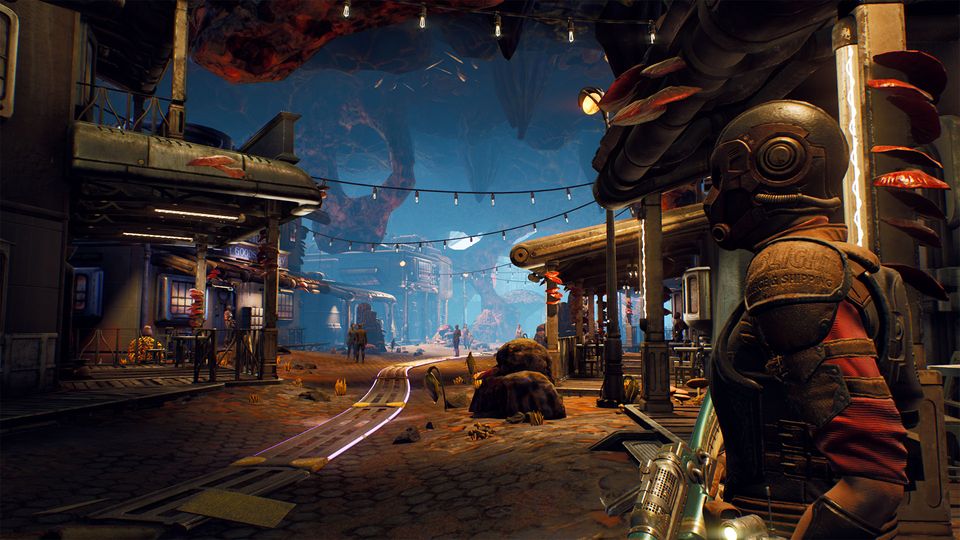
Cascadia is one of the Locations in The Outer Worlds. Cascadia is an abandoned town on the southwest of Monarch Wilderness. Marauders have taken over the locale and claimed it for their own..
Space-Crime Continuum Walkthrough
This quest is obtained by taking the job with Lilya Hagen aboard the Groundbreaker after you’ve gained access to Stellar Bay on Monarch.
Head outside to the fishery docks in Stellar Bay of Monarch and loot the corpse there in the corner. This will provide you with a Bloody Note that has a passcode on it. Take the note to Catherine Malin in Fallbrook.
Make your way to Fallbrook, visiting Amber Heights for several quests in the process. Talk to Mortimer Bell near the entrance and, if you’re doing Space-Crime Continuum, ask him where to find Catherine Malin, and you’ll gain Sublight Salvage & Shipping reputation.
Go to meet Catherine and tell her you’re here to fix the problem. She says you must syphon the gas from Cascadia’s lab into one of your ship’s fuel tanks. She warns you the town is overrun by Marauders and the lab is swarmed with mantisaurs. You can mention that Nyoka can kill them or Ellie can drug them. She will tell you technical skills are needed, you can mention Parvati or Vicar Max. You’re to take the gas to the Groundbreaker once you obtain it. Finish the dialogue and earn 5000xp
Catherine has an extra job, however. You can pick it up now. She wants you to take Clive Lumbergh’s boarst factory, owner dead or alive. You can kill him or sabotage the factory. This unlocks the side quest Slaughterhouse Clive. Speak to Duncan Elley for an ID if you wish to sneak in. You’ll have to Persuade (50), Lie (50) or Intimidate (50) to get one.
Clive is located inside C&P Boarst Factory to the southwest of Fallbrook. If you can reach him and convince him to work with Catherine then you can bring his proposition to her. Or you can just kill him. If you tried to get them to work together when you speak with Catherine you need a Persuade (50) or Lie (100) to get her to do it.
Head to Cascadia and interact with the terminal near the sealed door containing what you seek (it’s inside a building). You need to override the system with the password and the door will reveal a lift that takes you to Rizzo Secret Laboratory. Be sure to look around Cascadia before you head inside, as you can find Zora’s Executive Review on another terminal inside Rizzo’s. This will allow you to use the terminal at the locked gate to Cascadia.
Once inside the lab you’ll gain 5000 XP, and you’ll come across a security robot, but you can get by with Lie (60). To the left of the robots there’s a room with a terminal. Use it to signal ADA to land, and your quest will update and grant you 5000 XP. Continue exploring by taking the route left from the entrance. You’ll pass a locked door with some loot inside and come to a room with several Mantisaur.
Following the path-ridden trap without Mantisaur, that has Mechanical Guardian MK 2 instead. You’ll have to dodge mines and ray tripwires unless you have lockpicking 100. Watch out for the steam and the mines on the walls as well! This is the way you must take if you want to use ventilation to solve your bug problem
Defeat the mantisaur and climb the ladder then interact with the terminal to align the fuel. After that, initiate Alta-Vitae Gas transfer – you’ll learn this terminal is not allowed and you have to make it to another one. Earn 5000xp
Go down the ladder and open the nearby door. There’s more Mantisaur to kill, and a creepy shrine to Dr. Thomas Lynwood Ryall to observe. Go to the far end of the room and you can take a right to loot some items and read a terminal, and then take the opposite direction to fight a Mantiqueen. The terminal up the stairs past the queen is the one you need for your quest. Pick to connect storage tanks to the landing pad refueling system. You can now Engineering (40), Hack (60) or Overload the systems. You’ll gain 5000xp.
While you are inside the lab, find the Mind Control Ray for the quest Weapons from the Void. Go toward the lift and look right – there’s a gap to jump across, leading to a ladder, another jump and another ladder. You’ll find a dead scientist and a safe that contains Mind Control Ray. (3500xp)
Take the lift out and you’ come out by a group of Mantisaur on the opposite side of the locked gate from the main town. You can head to the Unreliable and back to the Groundbreaker to complete the quest by talking to Lylya Hagen at SubLight. (5000xp)
Finishing the quest gives you 20000xp, SubLight Salvage & Shipping Reputation Up, 2188 Bit Cartridge. You can Persuade (100) for 2300xp and 500 Bit Cartridge. If you completed Slaughterhouse Clive you’ll receive further SubLight Salvage & Shipping reputation, and Lilya will ask if the swine gave you any strange looks.
You’ll also unlock the quest to move in and commandeer a decommissioned station as a SubLight Salvage & Shipping Remote Station. Accept to obtain the quest The Ice Palace and obtain Override Cartridge, which allows you to travel to the quest destination.
Canid’s Cradle Walkthrough
This quest is triggered automatically when you flip the switch to restart Devil’s Peak Station during the Radio Free Monarch quest. The crash site is just south from the Sulfur Pits, a location on the south-west of Monarch Wilderness.
Make your way there and a new location will unlock: Gunship Crash Site. As you enter, you can loot some corpses and then read the nearby terminal to gain some knowledge about the crash. You’ll find out their crash was human error. Eject the Gunship Captain’s Key and it will be added to your inventory. You can now access the rest of the ship.
Retrieve the Cantankerous Canid Targeting Module and gain 3428xp. The quest will update giving you two separate options: side with Monarch Stellar Industries (talk to Sanjar) or side with the Iconoclasts (talk to Graham).
Talking to Sanjar
If you talk to Sanjar Nandi, you can ask him if he can call a truce, and point out that you read his reviews, and he can’t do this alone. If you insist and point out he is good at details, he will ask who you’d expect him to work with. Offer Zora, as she has demonstrated to be rather level-headed. Sanjar says he’s willing to consider it if he sees her review first – accept and you’ll have to go to Rizzo offices in Cascadia to procure them. Head over to Cascadia and find the HR terminal on the ground floor of a large building to the right of the entrance. Read Executive Review – Zora Blackwood to find out she is highly praised and recommended employee of the month. Export it to obtain the Zora’s Executive Review quest item. You can now return to Sanjar at Stellar Bay.
Sanjar will be very impressed by Zora’s credentials and say that if you convince her, he’ll be willing to discuss terms.
Talking to Zora
Travel to Amber Heights and Zora will stop you on your way to Graham. She thinks the Iconoclasts need a new leader, and proposes deposing Graham. Agree to support her confronting Graham. Go upstairs and Zora will tell Graham it’s time to step down for the benefit of everyone. He will counter that his people are believers, not soldiers, and ask you why you’re supporting this “mutinous blasphemer”. Answer as you see fit, and Zora will bring up what you found out during the Sucker Bait quest, that Graham is to blame for the massacre. Graham will refuse to stand down and say you’ll have to kill him. Kill Graham for 3425xp. You’ll get negative Iconoclasts reputation and increased The Board reputation.
Talk to Zora, who is not thrilled about what happened. Tell her that her and Sanjar should negotiate. You’ll need Persuade (55) or you can use intelligence and perception. Persuade works well, and she’ll agree to meet him. You’ll get 3428xp
The Negotiation
Fast travel to Stellar Bay Ruins (South) and head to the meeting point, the OSI church. You can push Sanjar by saying that Zora is ready to storm the city, or mention the Iconoclasts can support supply lines for Stellar Bay. A back-and-forth about Graham ensues, but you’re pretty sure Sanjar was not involved. Eventually they will agree, rewarding you with 3428xp and the Peace of our Time trophy / achievement.
Completing the quest gives you 16000xp, the unique weapon Soft Speaker, and 2118 Bit Cartridge.
Don’t Bite the Sun Walkthrough
This quest is unlocked when you dock at the Groundbreaker during Passage to Anywhere. It is only available if you recruited Parvati into your party. You must have completed Drinking Sapphire Wine and Parvati must have taken a step toward being open with Junlei.
Talk to her in the Unreliable, and she will mention she wants to go to Gladys, on the Groundbreaker, to ask her about a fancy shop to purchase Cleansing Products. Speak with Gladys and you’ll gain 4,800 xp for picking a soap. There are 3 soap options: rose, apple and “scrub”. Then speak to Parvati and give her the Soap to gain another 4,800 XP. Then you’ll be asked to find a Dustback Casserole and Sweetheart Cakes.
Terra One Dustback Casserole can be purchased from Chef Raymond in Stellar Bay, inside his establishment just in front of the town’s apartments. You can pay 3000 bits or intimidate (50) to get a better price of 2000 bits. Gain 4400xp
Sweetheart Cakes can be found in Rizzo’s Facility in Cascadia, Monarch. Loot Ersatz Sweetheart Cake from a bar counter inside a building in the Maradeur-occupied part of town. The building is left from the Bottling Plant sign. Right by the cakes, a terminal will let you read the code to open the locked gate in the middle of town, so make sure to read it.
Go back to the Unreliable and talk to Parvati. She will say that she’s now missing something nice to wear. You’ll get 4400xp and she’ll want you to go to Byzantium next.
Head to Prosperity Plaze in Byzantium and head to Jolicoeur’s Haberdashery and speak with Celeste Jolicoeur. She will offer to make an outfit for you to challenge Byzantium’s standards. She wants samples of clothes from workmen, and for you to model an Iconoclast, Marauder and Spacer gear.
After this, bring up that Parvati needs an outfit for her date. You can offer to pay for the outfit 6000 Bit Cartridges or Persuade (65) or Intimidate (65) to 3000 Bit Cartridges. Either way you will gain 4800 XP. You’ll get Fancy Evening Wear, Collarless.
If she was killed during the Task: Makes Space Suits, Won’t Travel then you’ll need to speak with Malini Gupta instead. You can offer to pay for the outfit 6000 Bit Cartridges or Persuade (65) or Intimidate (65) to 3000 Bit Cartridges. Either way you will gain 4800 XP.
Speak with Parvati and give her the Evening Dress. Parvati will try to find something else you can do for Junlei, but you’ll tell her she needs to get on with it and gain 4800 more XP. Travel back to the Unreliable and speak with Parvati again, then head to Groundbreaker and speak to Parvati once more to gain a further 4800 XP.
Head to the ship’s kitchen and listen to their date and then leave the ship. Re-enter the ship and speak to Parvati to get all the details of the date, and learn they are now a couple. This will complete the quest and you will gain 28000 XP and 2500 Bit Cartridges, along with a picture of them together.