Table of Contents Show
This guide describes a late game (NG+) build that makes a super strong use of signs, mainly Aard.
Because of this, there are obviously content/gameplay spoilers, notably for the extensions. If you’re on your first playthrough and want to discover everything by yourself, I suggest you come back to this guide at a later time.
Everything is used to make Aard hit like a truck: potions, enchantments, mutations, and even the latest Wolven armor inspired by the Netflix series.
Since you need a lot of things to make everything work, this is the kind of build you want to play for NG+. However, you can have it working in the first hours of a Blood and Wine playthrough, provided you have all the requirements.
Purpose
The purpose of this build is to make a strong use of Aard, as explained above. For this, we’re going to use three DLC mechanics:
- Mutation: Piercing Cold to deal a lot of damage with Aard and even have a chance to oneshot enemies.
- Enchantment: Entanglement to place an Yrden glyph on each enemy hit by an Yrden Magic Trap.
- Armor set: Forgotten wolven armor to combine Yrden and Aard for even more damage. Aard, Yrden, Aarden, Haardened. If you were wondering where the name came from, there you are.
You can easily see how those free combo with each other. We’re going to use the alternative Yrden sign, Magic Trap, to slow down and stun each enemy. With each hit, an Yrden glyph will be placed on the enemy, which will result in our Piercing Cold Aard dealing additional damage.
Needless to say, signs do the bulk of the damage with this build. You’ll find yourself using your swords more to finish off enemies knocked down by Aard than to deal actual damage. But don’t worry – Aard does a stupid amount of damage with this build, even on Death March! difficulty.
Requirements
To use this build, you will need to have:
- A full Forgotten Wolven armor set. Since the armor set perks are not restricted to the Grandmaster version of the armor anymore, any iteration of the set will do, even the first one.
- Mutations unlocked, specifically Piercing Cold. You do not need to have all mutations researched, the 4 mutation-related skill slots are just a bonus.
- Enchantments level 2 unlocked.
- The following potions and decoctions: Tawny Owl, Swallow, Petri’s Philter and Ancient Leshen.
- 1 Greater Red Mutagen.
- 3 Greater Blue Mutagens.
- 4 Greater Glyphs of Aard.
- 1 Glyph of Yrden, 1 Glyph of Axxi and 1 Glyph of Binding.
Skills
Build overview
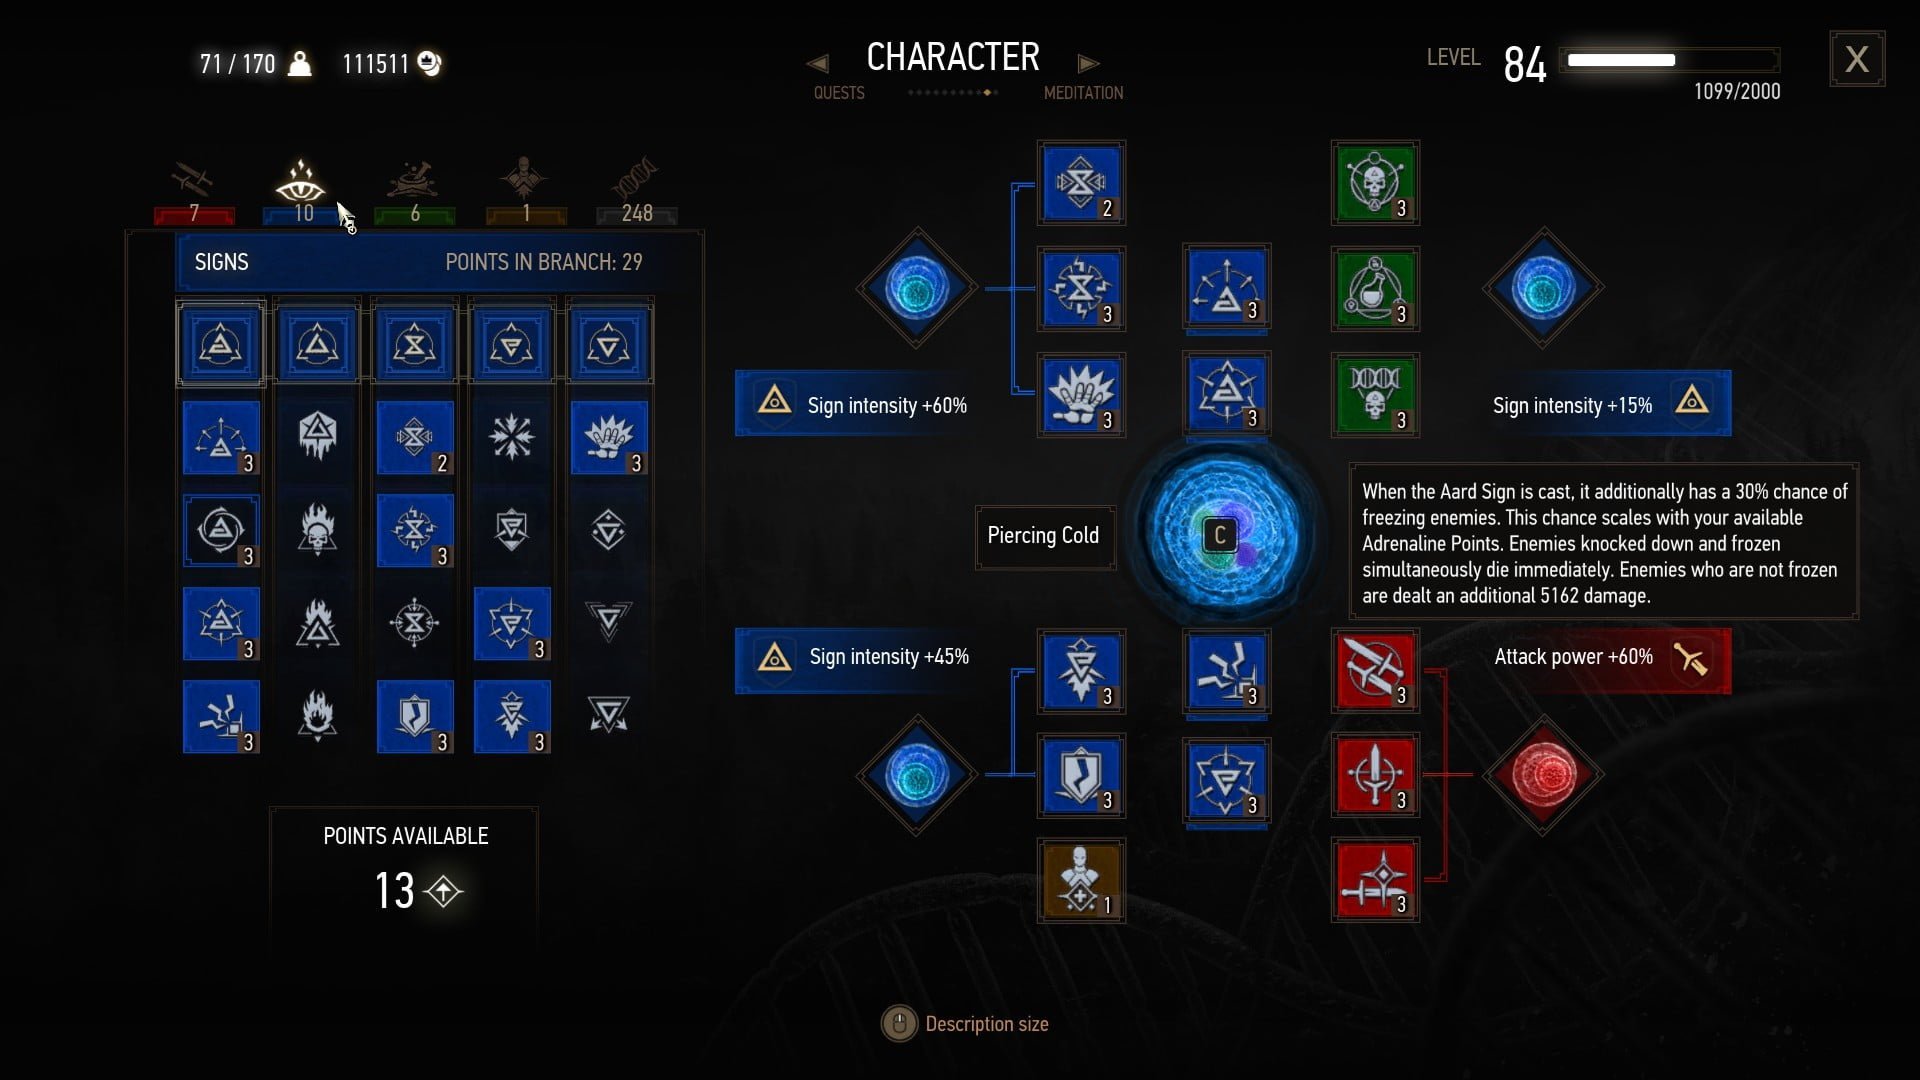
The build looks like this:

Build details
Mutation
Piercing Cold as described before. It allows Aard to deal a ton of damage scaling with Sign intensity, and you get one-shot kills on enemies if Aard both freezes and knocks them down.
Combat skills
We’re going to have three combat skills, coupled with a Greater Red Mutagen.
- Muscle Memory (3/3).
- Precise Blows (3/3).
Not much to say about these two. These are here simply to ensure your sword attacks deal a bit more damage whenever you use them.
The third slot is kind of free. You can use Rend since it’s basically broken (almost guarantees a critical hit and bypasses all defenses including shields), Razor Focus to gain more Adrenaline (and boost Piercing Cold) or anything else you like. You can even just slam the passive in there and put another Signs skill on a blue mutagen slot.
Signs skills
We want to have at least five skills tied to a blue mutagen. The rest can go in the four mutation skill slots (since we’re using Piercing Cold, we can only put Signs skills there anyway).
Aard
Unsurprisingly, we’re going to take a bunch of skills from that tree.
- Far-Reaching Aard (3/3) to make it easier to hit enemies with Aard.
- Aard Intensity (3/3) to increase knockdown chance and damage.
- Shock Wave (3/3) to add some more damage.
I didn’t put Aard sweep in there because I didn’t find it too useful. You’re already going to be moving in order to let the enemies come at you (and into your Yrden glyphs), so having them all in front of you shouldn’t be a problem. That said, it is not a bad skill at all, so you can always take it if you like.
Yrden
I don’t use nor need Igni on this build. Moving on to the the Yrden Tree, we have the following:
- Sustained Glyphs (2/2) to be able to have two Yrden glyphs down. We won’t need to place them, our Entanglement enchantment will take care of that for us.
- Magic Trap (3/3) for two reasons. First to handle archers without having to cast Quen every two seconds (seriously, these guys are so annoying). Second, to combo with Entanglement and have glyphs on the ground, which will boost our Aard.
- Supercharged Glyphs (3/3) to maintain the enmies in our glyphs. The damage effect doesn’t do too much (and I didn’t bother investing in Yrden Intensity since our main focus is Aard), but it does help maintining the enemies in place with the stun.
Quen
- Quen Intensity (3/3) for a stronger shield.
- Quen Discharge (3/3) to punish enemies that hit us (usually a rare occurence).
These two are completely optional. Quen Intensity especially doesn’t seem to have a lot of effect in Death March!, apart from visuals. You can use Exploding Shield, Active Shield if you like those better, or even drop this tree completely.
Axii
- We only have the good old Delusion (3/3) to help in dialogs.
Alchemy skills
We’re going to take only three alchemy skills – in my opinion the three most useful:
- Acquired Tolerance (3/3) to raise our maximum toxicity and be able to consume more potions.
- Heightened Tolerance (3/3) to raise our overdose threshold (whenever your Toxicity exceeds this threshold, you start taking damage), pretty much for the same purpose as the previous one.
- Synergy (3/3) to increase our mutagens’ efficiency.
Since the Green mutagens are kind of useless, we use a third Greater Blue Mutagen on those three to gain another +15% Sign Intensity.
Passive
Since we’re using a Medium armor and signs, Griffin School Techniques is the best candidate.
Inventory

Armor and swords
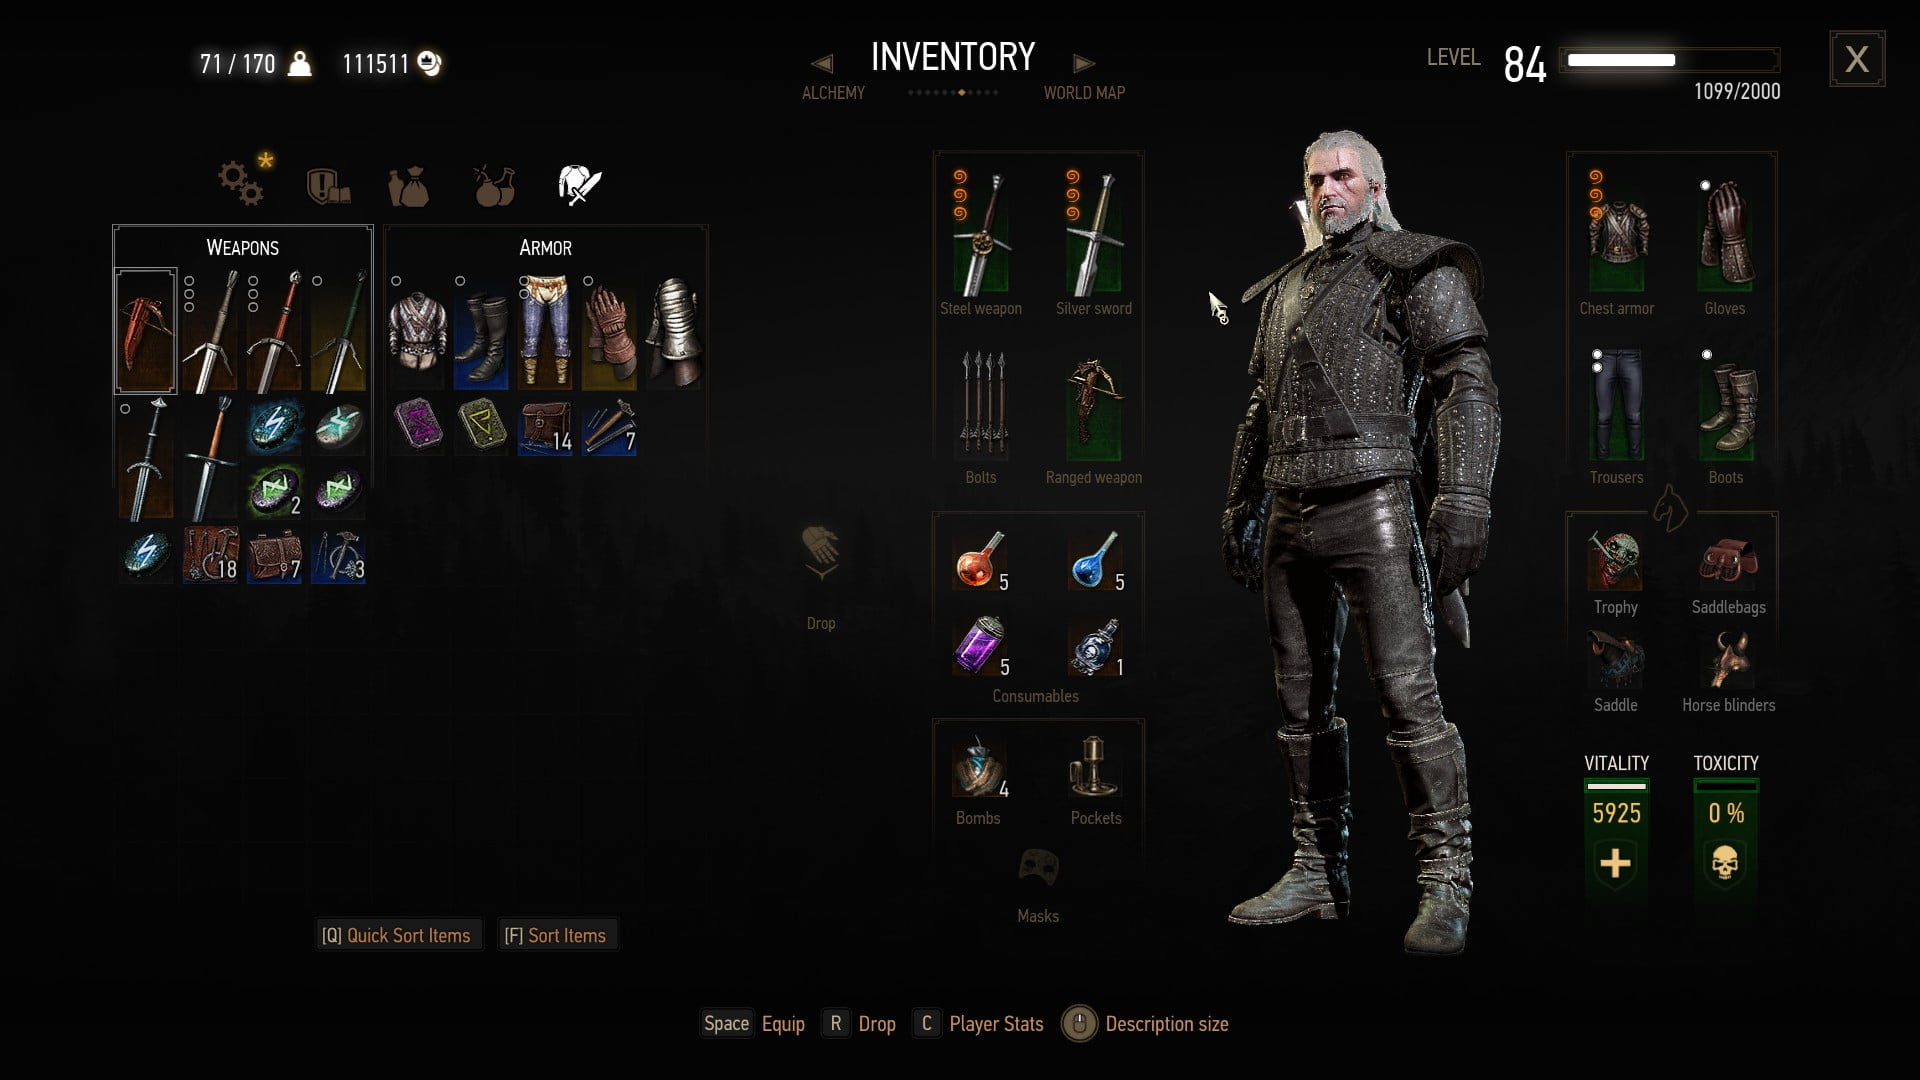
As mentioned before, we use the complete Forgotten Wolven set to make use of the damage boost for Aard on enemies affected by Yrden.
Enchantments
Armor enchantment
We’re going to use Entanglement to have Yrden glyphs automatically spawned on enemies whenever they are hit by our Magic Trap, which saves us a lot of casting time (and stamina).
Swords enchantments
This is honestly not very important. Just avoid using Replenishment. While it is a tempting options for sign builds, it is going to siphon our Adrenaline which would be better invested in buffing our Piercing Cold Aard.
You can even not have enchantments at all and directly slam your favourite runestones into your swords.
Potions and decoctions
We’re going to use the following four:
- Swallow for healing, since we’re not tanky at all.
- Petri’s Philter to boost Sign intensity and guarantee knockdowns on Aard. It doesn’t seem to be too useful, however, and you could replace it with Maribor’s Forst to boost Adrenaline gains (and thus Piercing Cold).
- Tawny Owl for stamina regeneration.
- Ancient Leshen Decoction for pretty much the same purpose. You’ll be casting a truckload of Aard signs, so the decoction will benefit you in any long combat.
How do I play this?
There isn’t too much to it.
You want to enter the fights with a Quen sign activated, to ensure you can take one hit without dying. Then, you want to start by casting Yrden. If you see a lot of enemies and/or archers, go for a Magic Trap (your Quen should protect you just long enough for you to cast it). If there’s only a handful of monsters, you can go for a simple Yrden glyph.
Once you have an Yrden down, you can just let the enemies walk into it by positioning yourself correctly (just have the glyph between you and them). If you have a Magic Trap down, you don’t even need to worry about that as the Yrden glyph will appear on enemies on their own. Just keep in mind you can only have two Yrden glyphs at a time.
Regardless on how you achieve it, once enemies are in an Yrden glyph, you can just start casting Aard on them and enjoy the absurd damage this does.
Your potions should be used as soon as you enter the fight, apart from Swallow, obviously.
You shouldn’t need Quen too much once you have an Yrden down, especially a magic trap. Enemies will just be stunned forever and will take ages to get back up on their feet if you knock them down with Aard.
Speaking of knockdown, your sword mostly comes into play to damage (or one-shot, whenever the game triggers it) knocked down enemies.
I don’t use Igni at all because I don’t need to. There’s no real reason to use it, as Aard and Yrden will provide better damage and better crowd control. The one exception I can see is to cast it on Devorers and Rotfiends, to let them burn while you move away from their explosions.
Outro
That’s pretty much it for this build.
Thank you for reading the guide, and feel free to give me feedback or suggestions in the comments below!
