Table of Contents Show
How to create and manage Districts, and the material flows / logistics between them.
Foreword
I’ve provided this guide to explain Districts in Timberborn because that’s what most people seem to be struggling with.
Keep in mind this was written to explain how to use districts in the Pre-Release version of the game. Things really are subject to change in this game.
If you’re already well versed in the basics of the game, I suggest you skip right to Chapter 4.
Chapter One: The 1st. District and it’s limitations
When you start a fresh save, you’ll be given a District Center (DC), which is a building that represents the central government and “heart” of each District. The DC is also an engineering office where you can employ up to four builders that will do construction jobs around your settlement. They will also haul resources from place to place when they have nothing else to do.
This game divides each map into separate Districts, but you the player get to decide their location and size (within reason).

In the image above you can see my original District on the middle peninsula. The new Wheat-Farming District is seen in the upper right of the image.
When selecting the DC, you will see lines painted upon roads connected to the building. The lines begin as green and gradually turn yellow and finally red. This is an intuitive measure of the “reach” of your DC. If you build enough road, you’ll eventually reach a point where the red line stops. This means the road is too long, and anything built beyond the red line will not count as “connected” to your District Center. This means your builders will have difficulty building there, and workers will not be able to work in buildings outside the reach of the DC.
This leaves you with two options: Build a new district where you want to expand, or move your District Center closer to the desired location.
The basics of creating a new new District:
- Place a new District Center in the region you want to populate. DC buildings are free and instant! I recommend placing this strategically so that it doesn’t take up valuable real-estate. But still within reach of the desired resources and farmable land.
- Place a District Gate between this and your main district. Both the DC and Gate can be found in the same category as roads. Please note that the gate will decide the boundary between governing Districts.
- Connect the new DC to the gate, (using roads). And connect this gate to the main district DC.
- See the following chapters to learn how to manage the flow of materials and Beavers between Districts.
Moving an existing District Center:
I wanted to briefly go over this before going on to more advanced stuff, because even moving a DC can entail some intricate dilemmas.
- When just starting a game, you have starting resources to act as training wheels to get your industry rolling. Do not delete your DC while you still rely on these resources. You must first create a water source, food source, and storage in your original District.
How to move a DC when you’re ready to do that:
- Make sure you’re not reliant on the starting resources stored in your original District Center.
- Place the new District Center where you want it. Do not connect it to the road network.
- Click on your original District Center.
- Click “migrate population”
- See how many adult and children beavers the district currently has, and type that in the box.
- Select the new DC and click OK.
- Delete the old DC.
- Connect the new DC to the road network.
- Rename the new DC to what you want.
Chapter Two: The Bountiful New World

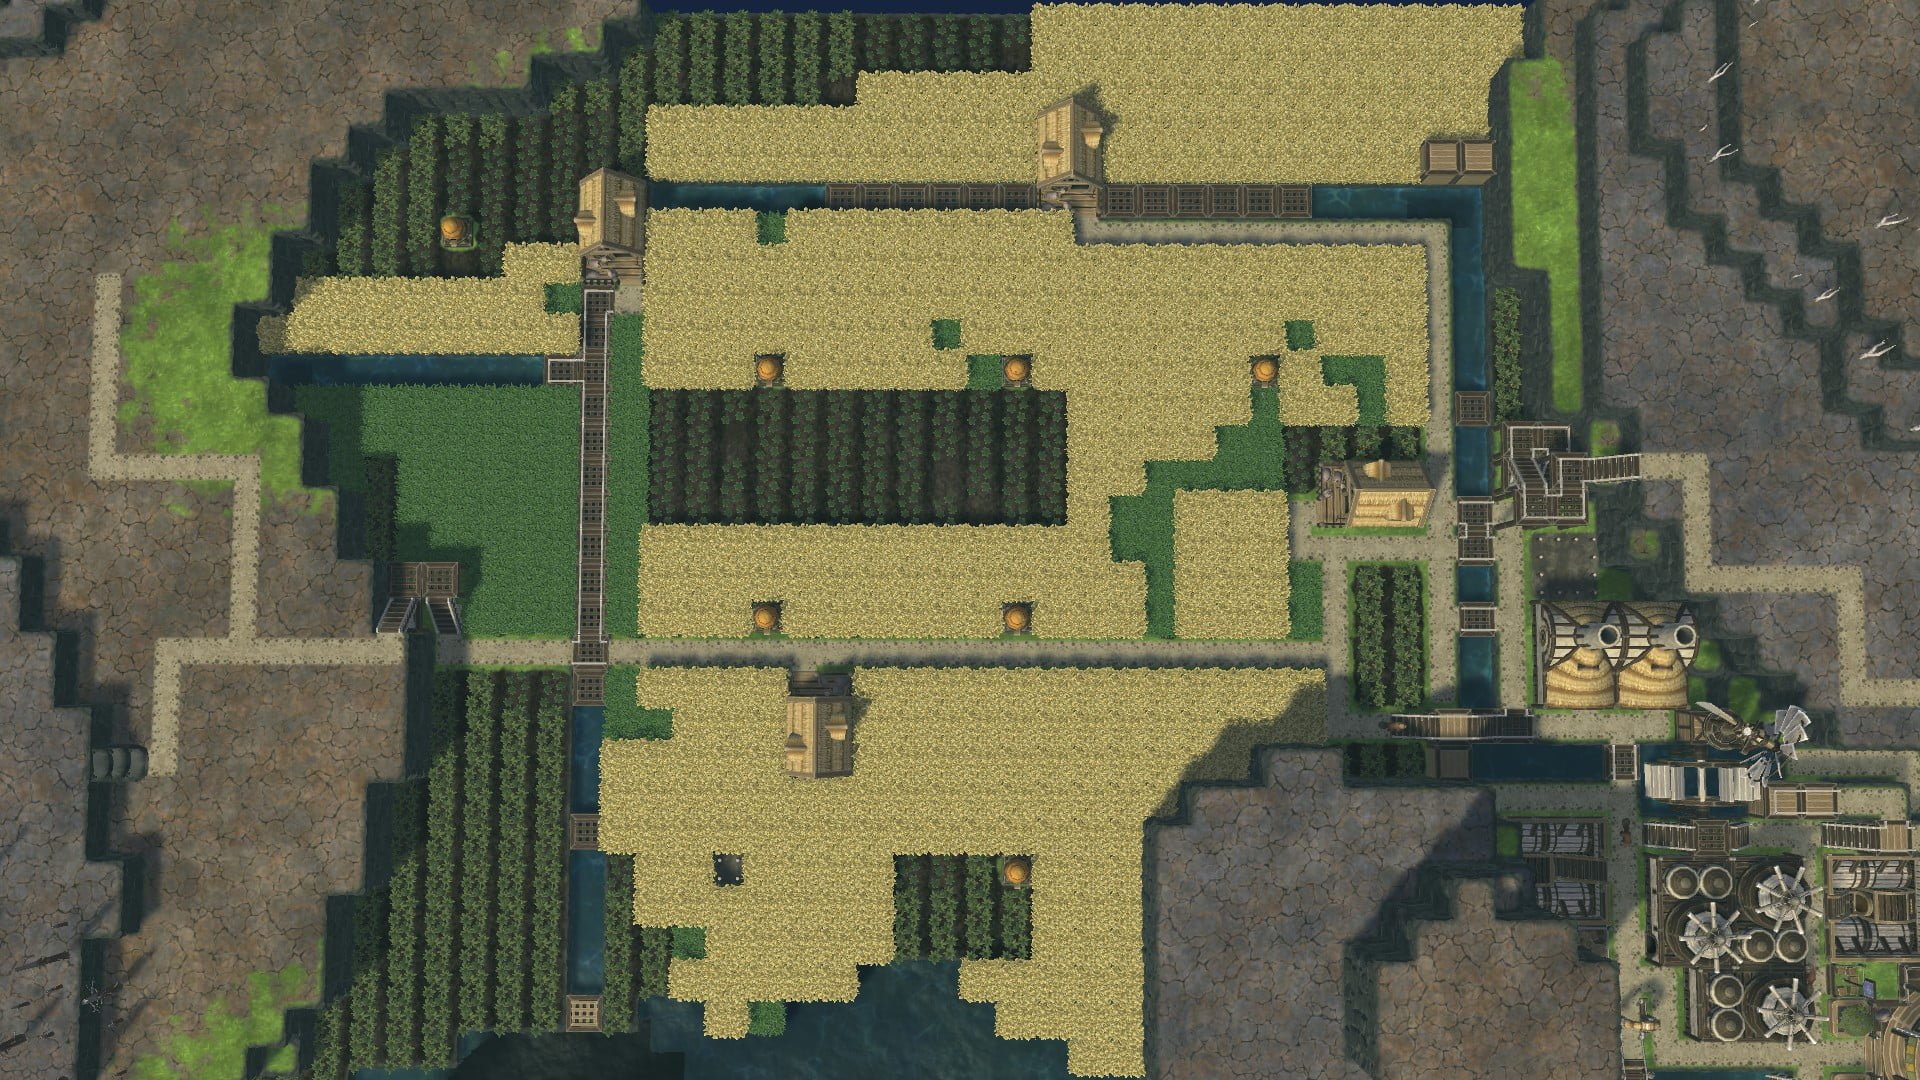
This image shows the way I chose to layout my farming area in my new District. Work in progress.

This is by no means a perfect layout but I wanted to show that I’m utilizing a large amount of flat real-estate using an irrigation canal, and I have covered this in platforms that can be used as roads.
The important part is to think about the material flows in your district to minimize the amount of back-and-forth travel done by the beavers. Do yourself a favor and think about this before you start placing down buildings.
In this picture I’m routing all material resources directly into a small industrial zone for processing. This is primarily a Wheat-farm, but I allow carrots because it makes food readily available for the farmers, and because you can store 50 of each type in a farmhouse (Not just 50 resources total). Also I want the farmers to have something to do while the wheat is growing (slowly).

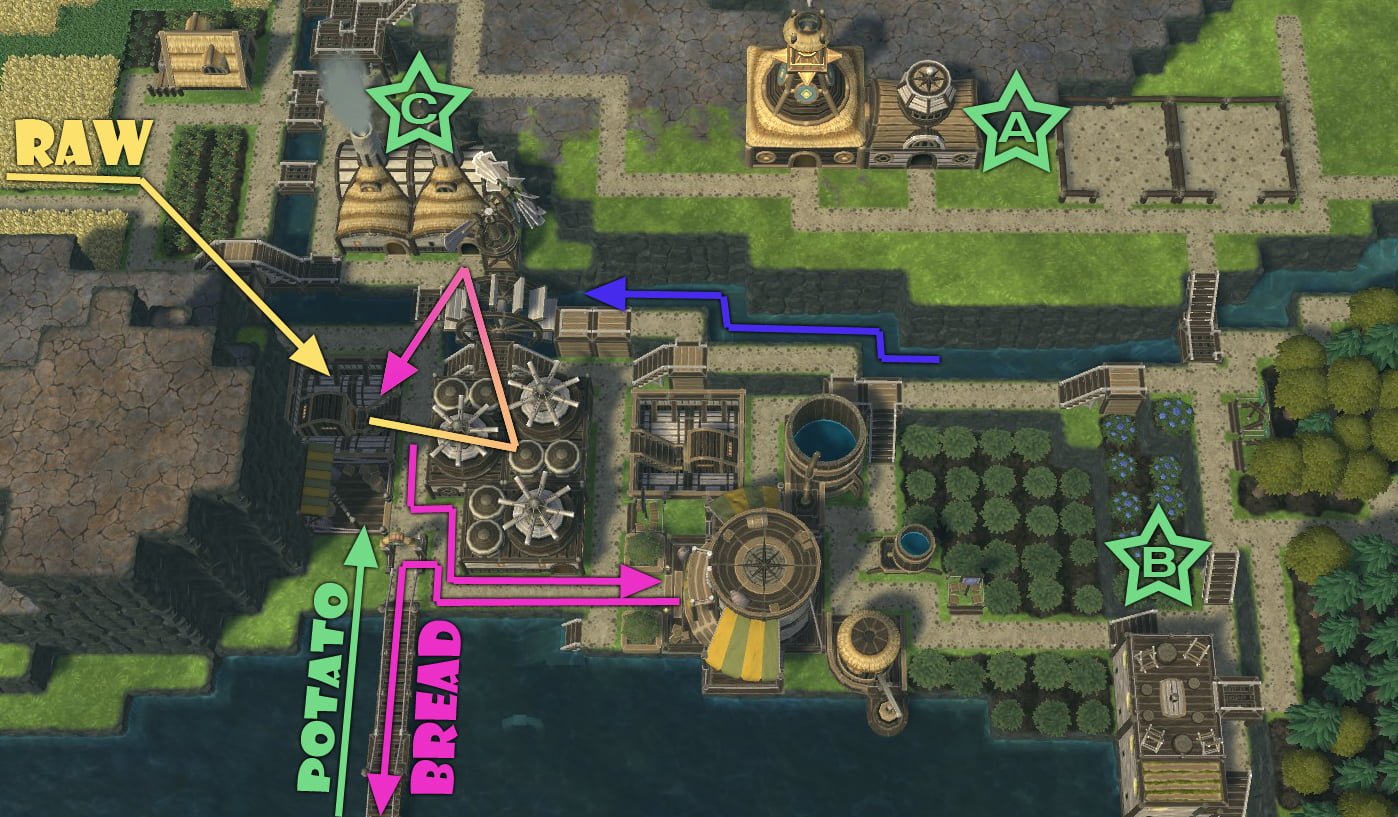
This is the small industrial area where I process the wheat into flour, and bake it into bread. The bridge at the bottom of the image leads to the original District (Main Base). Pay attention to the placement of the import and export buildings. The industrial zone is powered by waterwheel during temperate season, and wind-turbine during drought.

The lines show the flow of materials through the system. As you can see, the path from storages to Gristmill, and further through the bakeries is quite short. This is intentional. You never want your industrial workers to spend the majority of their time hauling materials or finished products from place to place. To maximize the output, you want them to spend maximum amount of time inside the building.
I’ve made some additional notes on this picture:
- (A) I’ve employed Haulers via this building. This is an extremely good performance boost to the farmhouses because the haulers take the job of moving the material from the houses to the storage (and industrial buildings). -Leaving the Farmers to do more farming. In addition the Haulers have a massive strength boost, meaning they get to carry more resources.
In the settings for each farmhouse, you can tick the box for them to be prioritized by haulers. - (B) I’ve Placed the housing on the outskirts of the districts in an area that cannot otherwise be used productively. This placement also funnels workers through the industrial zones on the way to work, which means they have food and water available twice a day without making extra trips.
- (C) For two bakeries, I should actually have 3,6 Gristmills working continually (as if no drought), but I’m only using the one bakery most of the time (one is a redundancy for unemployed beavers). And I also find that the wind-turbine doesn’t always provide power so that’s why the ratio is a bit off here. Don’t copy my example ratio. Do the math for your specific District and/or entire settlement. it also depends on whether or not you want to import/export materials to/from another district.
Chapter Three: Beavers, Stockpiles and Socialism
So before we move on to discuss the really juicy stuff, we need to have a word about storage and inventory management.

When you’ve finished building a storage building, the first thing you should do is click on it and take a look at the menu that pops up.
As marked on this picture, on the bottom of the menu there are autofill buttons to affect all the values in the list.
Allowed:What kind of resources are allowed to be put in this building.
Desired:How many are allowed. Beavers currently pay no attention to this value if above zero.
I suggest that you immediately click Allowed:None. Then go through the list and check the boxes for the resources you actually want in this particular storage.
In this example, I do not want scrap metal or metal blocks, because those are made on the other side of the map. I mostly want farming related resources like Wheat, Flour and Bread, plus a surplus of grilled potatoes and some building materials from other Districts.
Another reason I like to be strict with the rules for the storage buildings is because these beavers are borderline communists. They distribute everything evenly, if given the opportunity.

I want to point out that if you click on your DC, the upper left user-interface turns to a green color, and it shows you the resources and population for that District (not the whole colony). This is very useful to know if they have enough water/food, as well as in instances where you have to locate runaway goods. It happens.
Chapter Four: Import, Export, Logistics, and most of all, Confusion
Congratulations. You’ve made it this far in the guide, and now we’re gonna talk about the thing that most people seem to struggle with; Managing the import/export posts and the material flow between Districts.
Please be patient when reading this chapter. The way the district distribution system currently works is a bit convoluted, unfortunately. But fret not, even though the setup is a bit tedious, it allows us to do a lot of useful things.

This is a Distribution Post (DP), and the menu associated with it. This building allows a District to export supplies (send them out) to other Districts.
As you can see, you can hire 0-8 beavers to haul resources to any Drop Off Point (DOP) of your choosing. Please note the DOP needs to be outside the district.
Also note that these workers are essentially identical to Haulers, in that they have a Strength boost (they can carry more stuff).
Beneath the worker list, the menu shows Trade Routes and Stock.
Stock is the inventory of supplies housed in the DP itself. This is listed because beavers like to bring outgoing goods to the DP before carrying it to the DOP.
Trade Routes are the outgoing transportation veins of resources from the given Distribution Post.
To start, click “Add a new route“.

As you can see, the local Drop Off Points will be displayed in red, and foreign DOPs will appear in green. Click on a green DOP.

You’ll be given the opportunity to choose a resource to export to the given destination. Here I am selecting Bread.

This right here is where things usually go downhill. On both the Distribution Post, and the Drop off Point, there is a red button called “District distribution limits“. This is both an extremely important function, and in some cases a major source of confusion.

Get this straight: In my district called “Main Base”, it doesn’t matter if I click the red button on the Distribution Post menu, or if I click it on the Drop off Point menu. They both lead to the same menu.
In the District Distribution Limits menu (I’ll call it DDL from now on), you can see near the top which District it belongs to.
So, in summary, you don’t have a separate DDL-menu for import and export. You have one DDL for each District. I hope that makes sense.

Now let’s talk about the numbers in the DDL. The terms “Low” and “High” may be misleading, But I will explain how these work as seen in the picture above.
Let’s focus on the values for the Gear and Paper resources (see image above).
Stock:
In he case of the DDL, the Stock value lists the amount of that resource currently residing in that entire District (Not like the Stock value for resources inside a DP-building, seen in the DP-menu). This district has 11 Gears and 15 Paper.
LOW:
This number is supposed to affect both imports and exports to/from the Delta Base District. Other districts will try to make sure that Delta Base has at least 3 gears (because Low-value is set to 3). Also, Delta Base will not send out Gears if their total count of gears is 3 or lower.
In this case, the District called Delta Base has more than 3 Gears, but less than 15, so it will still get Gears from other districts through gear-trade-routes.
However, if you look at the Paper resource, you can see that they have 15 Paper, which is one less than their “Low” value of 16. When the stock is less than Low, other districts will prioritize the given resource.
In this case, that means they will bring Paper before they bring Gears.
You can, and should, use this to your advantage if a district has a crisis. For example if they run out of water, you have to raise the “Low” number on water, and at the same time lower it on the other resources that have trade-routes.
Then the haulers will prioritize bringing the water and nothing else.
The default setting for “Low” is zero on all resources, and I suggest you keep it like that for everything other than water and one food source.
HIGH:
This value only affects imports. The “High” value is the number of resources the other districts are allowed to bring you. In the case of the image above, other districts are allowed to bring up to 15 Gears to Delta Base. However, Delta Base is still allowed to make more than 15 Gears themselves.
The default value for “High” is always 100. You need to change this to reflect what you plan to do with the District in question. You can set the value for Grilled Potatoes to 40, and the foreign haulers will keep bringing potatoes and refill the Drop off Point as the workers eat up the potatoes.
Pay attention to that. Local beavers in a district will consume the resources from the Drop off Point at will. This means you have to be strategic if you want an exact amount of materials for a building.
Pause the construction of a building with exotic materials, so you can get the exact amount you need.
Example:
Let’s say you have a beehive construction going in a new district. You need 12 more paper, but the district can’t make its own paper. You have to import it.
Set the Low value to 0, and set the High value to 12. And pause the construction of the beehive.
Wait until all the paper has arrived. Then delete the Trade Route with Paper. Then press play on the construction of the beehive.
If you don’t pause it, the beavers in the DC of this district will take Paper from the DOP before all the Haulers have arrived. This leads them to bring more Paper than the District needed in the first place, and’ you’ll have 12 Paper left after the beehive is done. This could have been used elsewhere.
Alternatively, you can do it like I do with food, and create a “buffer zone” that gets replenished as it gets consumed. Always adjust the “High” number to match the expected consumption of a given resource.
Disclaimer:
Beavers do not always offer “Same day delivery”, so when you add new trade routes or change the DDL settings, give them until the next work-day to get on it.
They also like to finish their trade route trip even though you fire them (If you were wondering where the workers went when you needed them elsewhere).
Chapter Five: Population Control
I also wanted to touch on the subject of under-population/overpopulation as it pertains to Districts.
If you send out, lets-say, six Beavers to a new district, then your old District will have six open housing beds. If you’re playing Folktails, and you’ve built a campfire and rooftop terrace, you can be sure that the beavers will get busy making babies.
This may be undesired, because a large population will consume more food. Also, if you plan to bring back the six beavers, where will they live?
So what you do is press pause on one or more of your lodges to reflect how many beds you want to “reserve” for returning beavers.

If you want to pause a massive amount of buildings, you can sever the road to these buildings, and the beavers will not use them.
Beavers don’t have the nerve to enter buildings without pavement.
Chapter Six: Summer Camp
There are some interesting things you can use Districts for other than expanding your territory. For example, you can use Districts to mass-manage a part of your population.
For example, I have a lot of industry workers that work in water-powered buildings. These are all out of a job when the Drought rolls in, so I have to pause those buildings and put them to work somewhere else.
I have a district called “Summer Camp” that’s just a bunch of science buildings and a drop-off for food. Instead of having to press play on all the science buildings, and then having to pause them again, I just mass migrate my industrial workers into this mini-district and they all go to work making science.
I don’t want to partition my industrial area though, since it relies on a lot of infrastructure and storage in the main District.
It’s not perfect but I hope it shows you that you can use Districts to your advantage and not just a detriment.
Another thing I want to point out is that each Drop Off Point building is free and instant to place, and has a storage capacity of 300 units of anything. This will probably get nerfed to hell but right now it means you essentially have a free Large Waterbarrel, and a high-capacity, low-footprint Log-Pile.

This cant possibly be correct. I have 20 water pumps, and 300 thirsty/dying beavers. In normal mode, on the helix map