Table of Contents Show
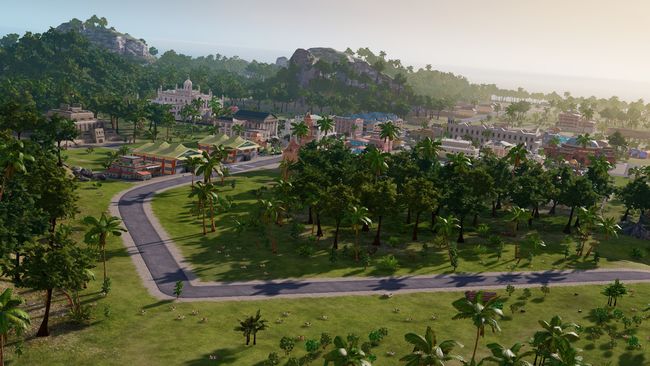
For the first time in the series, manage extensive archipelagos, build bridges to connect your islands and use new means of transportation and infrastructure. Send your Tropicans on raids to steal the wonders of the world, including the Statue of Liberty and the Eiffel Tower. Customize your palace at will and give election speeches from your balcony, to win the favor of your subjects.
In Tropico 6 you begin your journey in the colonial era, sent by the crown to tame and bring civilization to the wild lands of Tropico. Improve your standing towards the revolutionaries and use them as a stepping stone towards gaining ultimate control over your tropical state. Once you are free from the iron grip of your royal oppressors, you can enjoy the freedoms of rule that only a true dictator can experience!
Tropico 6 Controls
Mouse and Keyboard controls for the PC version of Tropico 6 are as follows:
- Camera movement – W, A, S, D
- Open construction menu – Right Mouse Button
- Free camera rotation – Middle Mouse Button
- Zoom in/out camera – Mouse Wheel
- Road building mode – R
- Pause – P
- Archipelago view – Space
- Rotate building – R
- Remove selected building – DEL
- Leave to menu – ESC
- Open game options – F9
- Quicksave – F5
- Quickload – F8
- Open Task Overview – 1
- Open Almanac – 3
- Open Overlays – 4
- Open Edicts – 5
- Open Research – 6
- Open Raids – 7
- Open Trade – 8
- Open Constitution – 9
- Open Politics – 0
- Open Broker – (–)
- Open Era Outline – (=)
Transport and city planning
Tropicans can effectively walk on foot in a circle with 9 squares radius (area of one metro station):
So on ideal flat map you can build a square districts of 20×20 size (or maybe 25×25). Place houses, grocery and church in the center; production buildings on the sides and not-so-visited buildings (like garbage dump or embassies) in the corners. During then World wars era centers of the districts may be connected with buses and since Cold War buses will be replaced with metro stations.
Alternative way is to build parkings and use “Right to wheels” edict.
Each tropican can use a small boat to get to the port another island.
There are few kinds of ports in Tropico:
- landing and tourist port accept only small boats
- main port and teamster port can also be used by teamsters and builders
Driving boat is faster than walking, so on some maps you can build districts on different islands and citizens will easily get there without buses.
Trading
The same currency is used for external trading and on the islands.
Everything produced on the island will be moved to the port (if it’s not required in some other building). By default everything that appears in the port when the ship arrives will be exported. You can disable this behavior by removing tick in the product list:
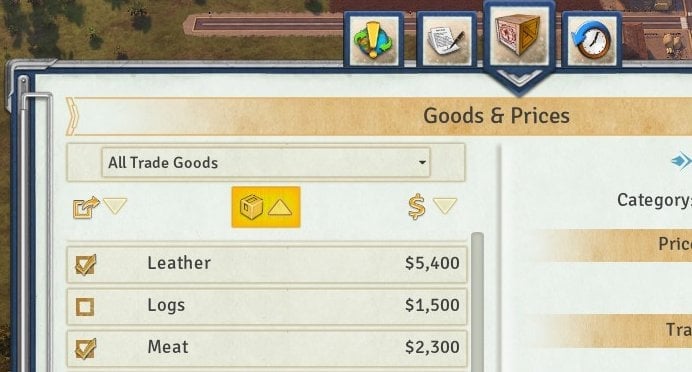
Here “Logs” are disabled from export. For this product port becomes a kind of warehouse where logs may stored and used.
Also there are trade contracts:
- export ones just increase price of the product. Bonus depends on superpower relationships and is up to 25%
- import actually allows importing goods. For example, you can have Rum Distillery without sugar plantations; just use the contract.
Trade contracts have three possible amounts:
- small is suitable for quests like “Fulfill trade contract with crown”
- medium
- large is like “forever”; you sign it if it is really good deal and should not be changed
Reexport is possible: you can sign one contract for import below base price, and the goods will be exported giving you profit out of nothing.
Amount of products imported per one ship visit depends on era. Ship brings 500 units at one time in colonial era, 1000 units in WW etc.
There is no need to have more than one port (comparing to Tropico 5 where a few ports were required). But you can build additional ones if you want ships to appear more often.
El Presidente and government buildings
There is one and only El Presidente (or La Presidenta) on the island.
El Presidente can give election speeches promising tropicans something
El Presidente can visit buildings; it costs some money and boosts building productivity. Also this mechanics is used in various quests.
You can build a “Ministry: building and appoint five ministers: foreign affairs, interior, education, economy and military. Each minister brings some kind of bonus, but the upkeep of the ministry is about $300 per month so make sure you can afford it.
Other government buildings include:
- immigration office can control (or prohibit) immigration
- courthouse handles bad effects related to arresting people
- customs office
Tropicans and their needs
There are three levels of education:
- uneducated
- high school
- college
Each building has a minimum required level of education for its workers. A person with higher education level can work on lower position but not vice versa.
Also there are five levels of wealth:
- broke (mostly for unemployed people)
- poor
- well-off
- rich
- filthy rich (mostly criminals)
Wealth level for a person is calculated for whole family including children (see also “Child allowances” edict), so people with the same wage may be assigned to different levels. However usually a wage of $11-$25 makes tropican well-off and people with lower wages are poor.
Residential buildings have a minimum wealth requirement. For example, Apartment is for well-off people so poor and broken can’t live there.
Service buildings (entertainment, medical and churches) also have a minimum wealth requirement.
Each person has following needs (happiness):
- health care – access to medical buildings
- food. By default each tropican can go to any plantation or ranch and take food for free. However he will be much happier to take various kinds of food in the grocery
- entertainment – access to entertainment buildings. Note, the Tavern satisfies this need and not a “food” need
- crime safety
- job quality
- liberty is a bit tricky. It’s reduced by military buildings and police stations; and increased by media. But some people (like communists) on the island do not like high liberty and want it to get lowered.
Buildings, teamsters, electricity
Every building has following parameters:
- amount of workers. Note, usually it’s fine that only one or two of the workers are present at the factory and others wander elsewhere. Just make sure they can get to work easily and satisfy their basic needs.
- minimum education level for workers.
- budget is the easiest way to change productivity of the building
You can fire worker right-clicking his face in the building. Right click on empty icon closes vacancy (and all vacancies to the right) so the building will operate with reduced workforce.
Left click on empty vacancy asks to import worker with required education level from abroad. It costs money and this person will arrive on next ship. Also if there is not enough people on the island you can try to perform “Rescue” raid in Pirate Cove.

Service buildings additionally have
- amount of serviced clients (depends on total amount of workers)
- service quality – that’s how they satisfy people needs
Also there are some terms related to production buildings:
- efficiency is amount of time needed for one worker to produce one item.
- consumption rate (for factories) is amount of resources needed to create one unit of product
- pollution
Various edicts, building upgrades, modes etc usually change one of this parameters.
Storage limits in the building can hint the consumption rate. For example:
- Lumber mill stores 4960 logs and 9900 planks
- Boat factory stores 9900 planks and 1280 boats
- Rum distillery stores 6960 sugar and 3584 rum
And it looks close to consumption: one log per 2 planks, two sugar for one rum, 7-8 planks for one boat.
Production speed (efficiency) is different for different kinds of products. For example, boats have the highest price per 1000 units. But it will take a lot of time produce 1k boats and maybe you’ll get same amount of money with other products.
Teamsters deliver goods from one building to another (or to the port). There is no clear formula to determine how much teamsters you need. The best advice is to check output storage in few production buildings; if the store too much goods then you need additional teamster office.
Some buildings require electricity to operate. Just build some power plant and it will supply electricity to any building in some radius. You can extend the coverage with electrical substations if needed.
Tourism
Tourists are similar to tropicans except they don’t have to work. They use transport in same way as tropicans and they have a wealth level for accessing entertainment buildings.
Broker and Swiss money
El Presidente has a personal Swiss Bank account; money related to this account are often referred as “S$”
Ways to get S$:
- as a reward for some quests
- as a reward for “Broker” quests. Broker will give you opportunities from time to time. By default only one quest can be processed at a time; but it’s possible to unlock additional slots for this kind of tasks
- after “Building permit” edict. In current implementation it’s really bad way because it increases building cost at 18-20% and only 1-3% of the sum reaches the account. If average building cost is $2k you’ll get only S$20 but the economy will get ruined
- appoint “Broker candidate” in the Ministry and he will give you S$100 per month.
- use special mode of the Bank building
Broker can provide various services in exchange of Swiss money: negotiating protests, technologies and knowledge generation, improving relationships with superpowers or local political fractions.
Guide to Resources
A handy guide to all the resources in the game, whether they’re renewable or not, and what produces and consumes them – including upgrades and work modes!
Most buildings in Tropico 6 have at least one upgrade or alternative work mode, and it’s hard to memorize them all. With some of them, it becomes slightly difficult to determine whether a resource is renewable or not, as well – so I made a handy guide you can check with when you need a resource and can’t remember what your options to get it are!
Bear in mind, this guide makes no mention of eras or research – some resources start out non-renewable, but become renewable as you progress.
By resource
Here’s a list of all the resources in the game with the buildings that produce them, the buildings that consume them, and whether or not they’re renewable.
Note that this only takes industrial buildings into account – eg. food is also consumed by your citizens, raid buildings sometimes require you to supply a certain amount of a resource to overcome a setback, etc. These are not listed here.
| Name | Produced by | Consumed by | Renewable? |
| Aluminium | Mine (Aluminium), Automated Mine (Aluminium), Waste Treatment Facility (with Scrapheap Scrounging upgrade) | Shipyard (with Welding Plant upgrade) | No* |
| Apparel | Fashion Company | Yes | |
| Banana | Plantation (Banana), Hydroponic Plantation (Banana) | Juicery | Yes |
| Boats | Shipyard | Yes | |
| Canned Goods | Cannery | Yes | |
| Cars | Car Company | No | |
| Cheese | Creamery | Yes | |
| Chocolate | Chocolate Factory | Yes | |
| Cigars | Cigar Factory | Yes | |
| Cloth | Textile Mill | Fashion Company | Yes |
| Coal | Mine (Coal), Automated Mine (Coal) | Steel Mill | No |
| Cocoa | Plantation (Cocoa), Hydroponic Plantation (Cocoa) | Chocolate Factory (in Sweet Chocolate work mode), Chocolate Factory (in Dark Chocolate work mode) | Yes |
| Coconuts | Coconut Harvester | Juicery (with Nut Cracker upgrade) | Yes |
| Coffee | Plantation (Coffee), Hydroponic Plantation (Coffee) | Cannery (with Flash Freezer upgrade) | Yes |
| Corn | Plantation (Corn), Hydroponic Plantation (Corn) | Factory Ranch (Cattle), Factory Ranch (Sheep), Factory Ranch (Goat), Factory Ranch (Pig), Factory Ranch (Llama), Plastics Plant (with Bio-Polymer Fabrication Facility upgrade) | Yes |
| Cotton | Plantation (Cotton), Hydroponic Plantation (Cotton) | Textile Mill | Yes |
| Electronics | Electronics Factory | No | |
| Fish | Fishermen’s Wharf, Fish Farm (Fish) | Factory Ranch (Crocodile), Cannery | Yes |
| Furniture | Furniture Factory | Yes | |
| Gold | Mine (Gold), Automated Mine (Gold) | Jewelry Workshop, Electronics Factory | No |
| Hides | Ranch (Cattle), Factory Ranch (Cattle) | Tannery | Yes |
| Iron | Mine (Iron), Automated Mine (Iron) | Steel Mill | No |
| Jewelry | Jewelry Workshop | No | |
| Juice | Juicery | Yes | |
| Leather | Ranch (Crocodile), Factory Ranch (Crocodile), Tannery | Fashion Company | Yes |
| Logs | Logging Camp | Lumber Mill | Yes |
| Meat | Ranch (Cattle), Ranch (Pig), Factory Ranch (Cattle), Factory Ranch (Pig) | Cannery (with High Pressure Canner upgrade) | Yes |
| Milk | Ranch (Sheep), Ranch (Goat), Factory Ranch (Sheep), Factory Ranch (Goat) | Creamery | Yes |
| Nickel | Mine (Nickel), Automated Mine (Nickel), Waste Treatment Facility (with Scrapheap Scrounging upgrade) | Weapons Factory | No* |
| Oil | Oil Well, Oil Rig | Plastics Plant, Pharmaceutical Company | No |
| Pharmaceuticals | Pharmaceutical Company | Yes | |
| Pineapple | Plantation (Pineapple), Hydroponic Plantation (Pineapple) | Cannery, Juicery | Yes |
| Planks | Lumber Mill | Shipyard, Furniture Factory | Yes |
| Plastics | Plastics Plant | Furniture Factory (with Casting Molds upgrade), Electronics Factory | Yes |
| Rubber | Plantation (Rubber), Hydroponic Plantation (Rubber), Waste Treatment Facility (with Scrapheap Scrounging upgrade) | Car Company | Yes |
| Rum | Rum Distillery | Yes | |
| Shellfish | Fishermen’s Wharf (with Fishing Dredge upgrade), Fish Farm (Shellfish) | Yes | |
| Steel | Steel Mill | Shipyard (with Welding Plant upgrade), Weapons Factory, Car Company | No |
| Sugar | Plantation (Sugar), Hydroponic Plantation (Sugar) | Rum Distillery, Chocolate Factory (in Sweet Chocolate work mode), Pharmaceutical Company (in Powerful Placebos work mode) | Yes |
| Tobacco | Plantation (Tobacco), Hydroponic Plantation (Tobacco) | Cigar Factory | Yes |
| Uranium | Mine (Uranium), Automated Mine (Uranium), Waste Treatment Facility (with Scrapheap Scrounging upgrade) | No* | |
| Weapons | Weapons Factory | No | |
| Wool | Ranch (Sheep), Ranch (Llama), Factory Ranch (Sheep), Factory Ranch (Llama) | Textile Mill | Yes |
*Only renewable in trace amounts through Scrapheap Scrounging.
By building
Food & Resources
| Name | Produces | Consumes |
| Coconut Harvester | Coconuts | |
| Logging Camp | Logs | |
| Fishermen’s Wharf | Fish | |
| – with Fishing Dredge upgrade | Fish, Shellfish | |
| Plantation | ||
| – Banana | Banana | |
| – Cocoa | Cocoa | |
| – Coffee | Coffee | |
| – Corn | Corn | |
| – Cotton | Cotton | |
| – Pineapple | Pineapple | |
| – Rubber | Rubber | |
| – Sugar | Sugar | |
| – Tobacco | Tobacco | |
| Ranch | ||
| – Cattle | Meat, Hides | |
| – Crocodile | Leather | |
| – Goat | Milk | |
| – Llama | Wool | |
| – Pig | Meat | |
| – Sheep | Wool, Milk | |
| Mine | ||
| – Aluminium | Aluminium | |
| – Coal | Coal | |
| – Gold | Gold | |
| – Iron | Iron | |
| – Nickel | Nickel | |
| – Uranium | Uranium | |
| Oil Well / Rig | Oil | |
| Fish Farm | ||
| – Fish | Fish | |
| – Shellfish | Shellfish | |
| Hydroponic Plantation | ||
| – Banana | Banana | |
| – Cocoa | Cocoa | |
| – Coffee | Coffee | |
| – Corn | Corn | |
| – Cotton | Cotton | |
| – Pineapple | Pineapple | |
| – Rubber | Rubber | |
| – Sugar | Sugar | |
| – Tobacco | Tobacco | |
| Factory Ranch | ||
| – Cattle | Meat, Hides | Corn |
| – Crocodile | Leather | Fish |
| – Goat | Milk | Corn |
| – Llama | Wool | Corn |
| – Pig | Meat | Corn |
| – Sheep | Wool, Milk | Corn |
| Automated Mine | ||
| – Aluminium | Aluminium | |
| – Coal | Coal | |
| – Gold | Gold | |
| – Iron | Iron | |
| – Nickel | Nickel | |
| – Uranium | Uranium |
Industry
| Name | Produces | Consumes |
| Lumber Mill | Planks | Logs |
| Rum Distillery | Rum | Sugar |
| Tannery | Leather | Hides |
| Cannery | Canned Goods | Pineapple / Fish |
| – with Flash Freezer upgrade | Canned Goods | Pineapple / Fish / Coffee |
| – with High Pressure Canner upgrade | Canned Goods | Pineapple / Fish / Meat |
| – with Flash Freezer and High Pressure Canner upgrades | Canned Goods | Pineapple / Fish / Coffee / Meat |
| Creamery | Cheese | Milk |
| Cigar Factory | Cigars | Tobacco |
| Shipyard | Boats | Planks |
| – with Welding Plant upgrade | Boats | Planks / Steel / Aluminium |
| Steel Mill | Steel | Coal, Iron |
| Textile Mill | Cloth | Wool |
| Weapons Factory | Weapons | Steel, Nickel |
| Chocolate Factory | ||
| – in Dark Chocolate work mode | Chocolate | Cocoa |
| – in Sweet Chocolate work mode | Chocolate | Cocoa, Sugar |
| Furniture Factory | Furniture | Planks |
| – with Casting Molds upgrade | Furniture | Planks / Plastics |
| Jewelry Workshop | Jewelry | Gold |
| Plastics Plant | Plastics | Oil |
| – with Bio-Polymer Fabrication Facility upgrade | Plastics | Corn |
| Car Company | Cars | Steel, Rubber |
| Electronics Factory | Electronics | Plastics, Gold |
| Fashion Company | Apparel | Leather / Cloth |
| – in Haute Couture work mode | Apparel | Leather, Cloth |
| Pharmaceutical Company | Pharmaceuticals | Oil |
| – in Powerful Placebos work mode | Pharmaceuticals | Sugar |
| Juicery | Juice | Banana / Pineapple |
| – with Nut Cracker upgrade | Juice | Banana / Pineapple / Coconuts |
| Waste Treatment Facility | ||
| – with Scrapheap Scrounging upgrade | Aluminium, Rubber, Uranium, Nickel |
Tips to Avoid Shacks
Shacks popping up everywhere? Despite your best efforts, you can’t get rid of every single one and you’re sick of shacks between beach villas ruining your tourist paradise?
Here’s what you should do:
- Check the residency overlay and if every residential building in a housing area is green, then you’ll need more housing there.
- Understand the citizen a.i.: people rather live in a shack next to their workplace then walk across the entire island! Creating affordable housing near workplaces. Bus stops and metros help to increase the distance from workplace tolerance level.
- Be aware that there will always be broke people unless you heavily invest into the social systems. There will be unemployed and old people that are broke.
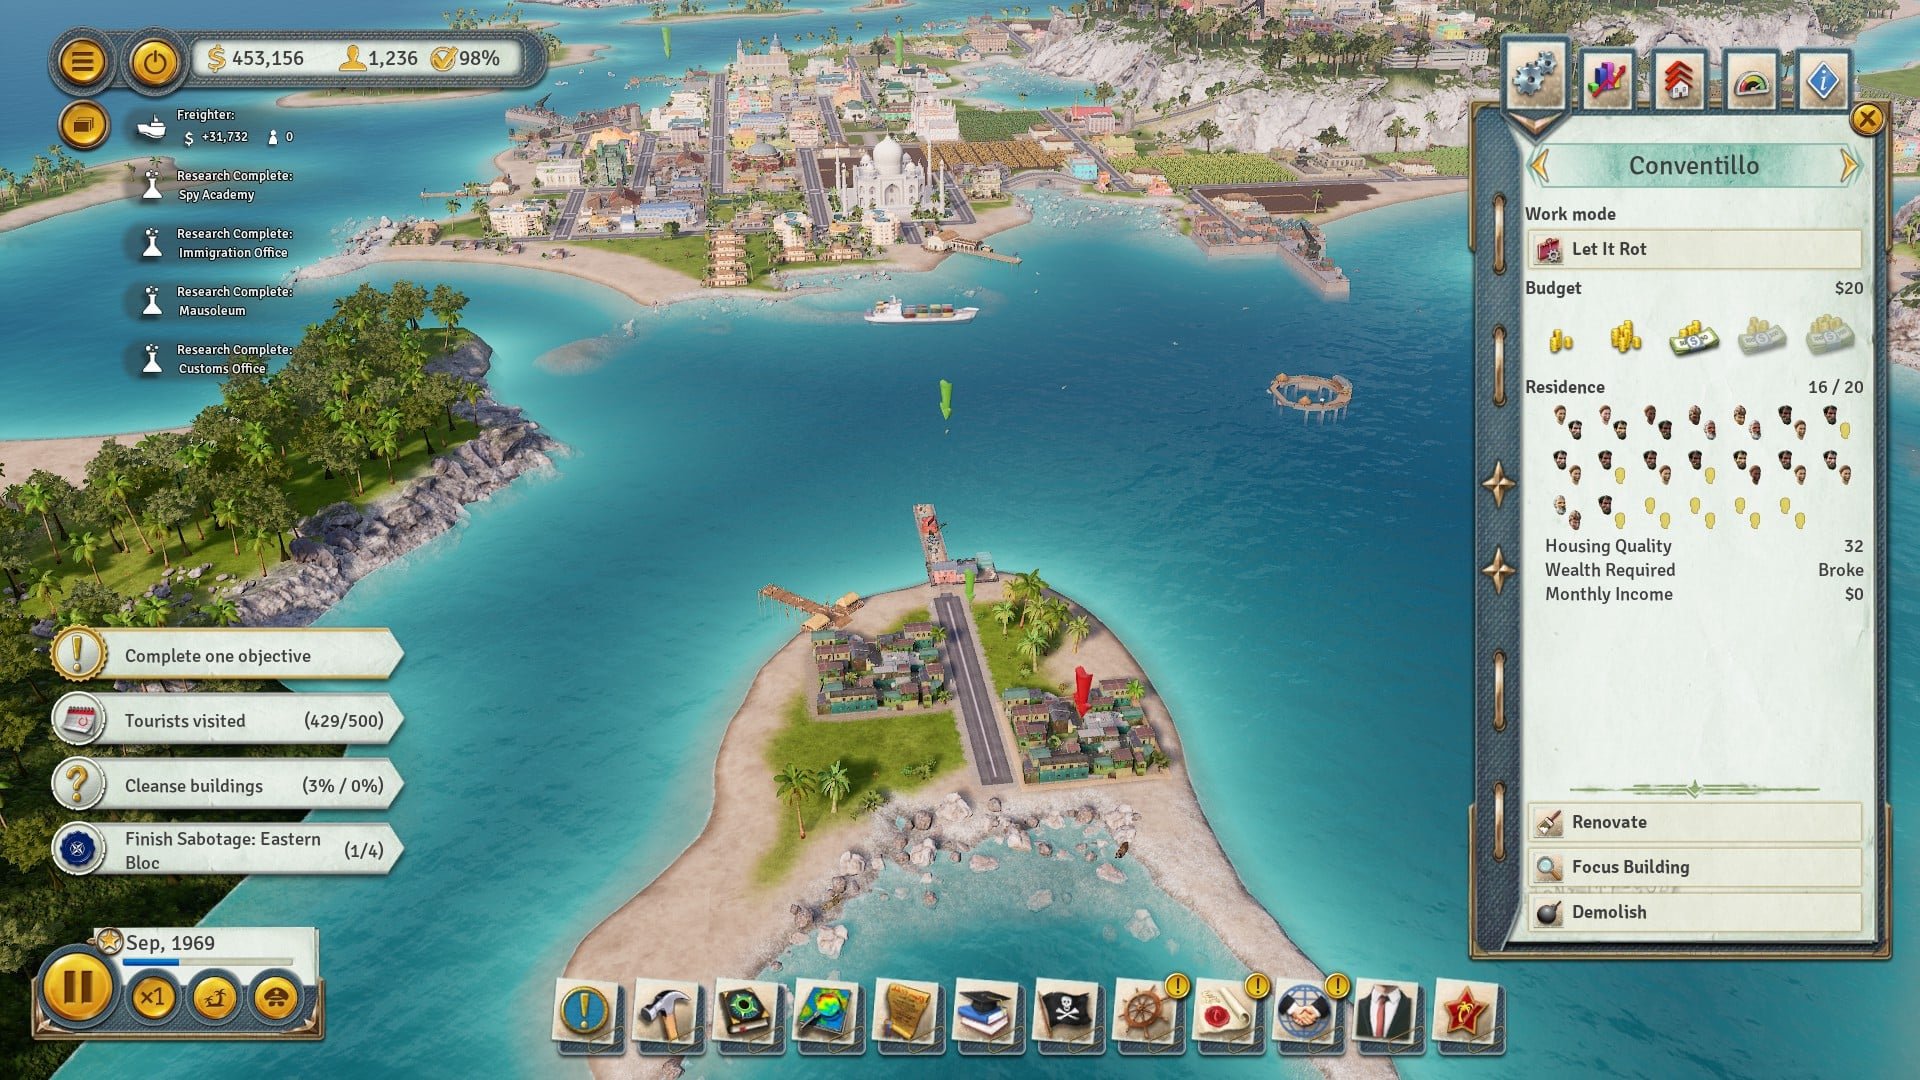
Just to add to step 3, students will also be broke. By the Cold War period I always end up building a Conventillo set to ‘Let It Rot’. I like to place it near a fishing wharf. Broke people will visit the fisherman’s wharf to get food.
- Create housing that broke people can afford. That can be bunkhouses or conventillos on the mode that enables broke people to move in (“let it rot” it’s called for conventillos).
- Remember the 3rd step. People with jobs prefer paying 0 rent if possible. To avoid non-broke people moving into your rent-free buildings you have to construct them far away from any workplace!
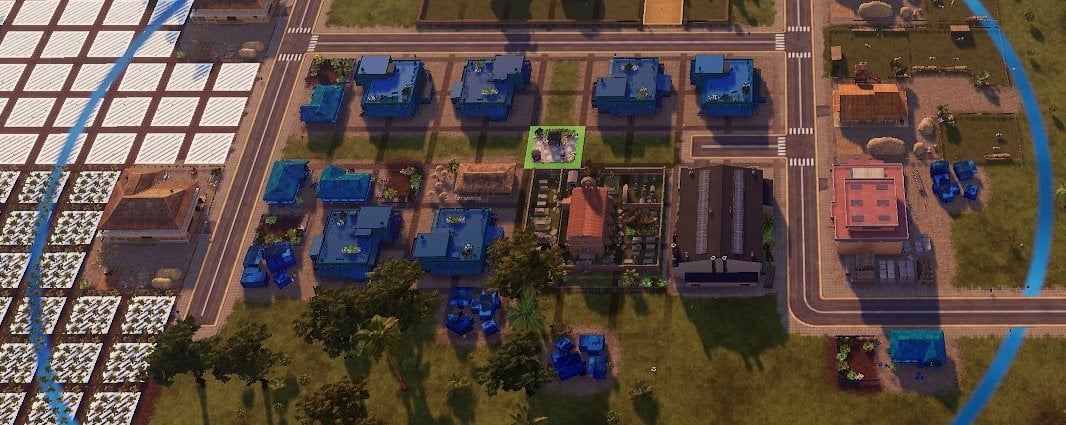
I present to you “ghetto island”, the solution to the shack problem:
Guide to Political Support
Or how to keep yourself democratically elected and pretend you’re not actually a dictator.
Are you wondering why your popular support is tanking even though all the factions love you? Have you just been playing Tropico 6 for the last couple of hours and can’t figure out the secret to staying elected? Did you just take the easy way out and cancel elections altogether and now get annoyed about constant guerilla fire attacks?
This is the guide for you. It will go over the most important elements that contribute to your popular support level and how to skew them in your favour. Don’t be one of those evil dictators that hate democracy, use democracy to justify you being a dictator!
Your Popular Support
There are a few elements that determine your popular support, all of which can be seen in the Almanac and by clicking individual citizens. We’ll start by breaking down the elements that lead to approval for one citizen.
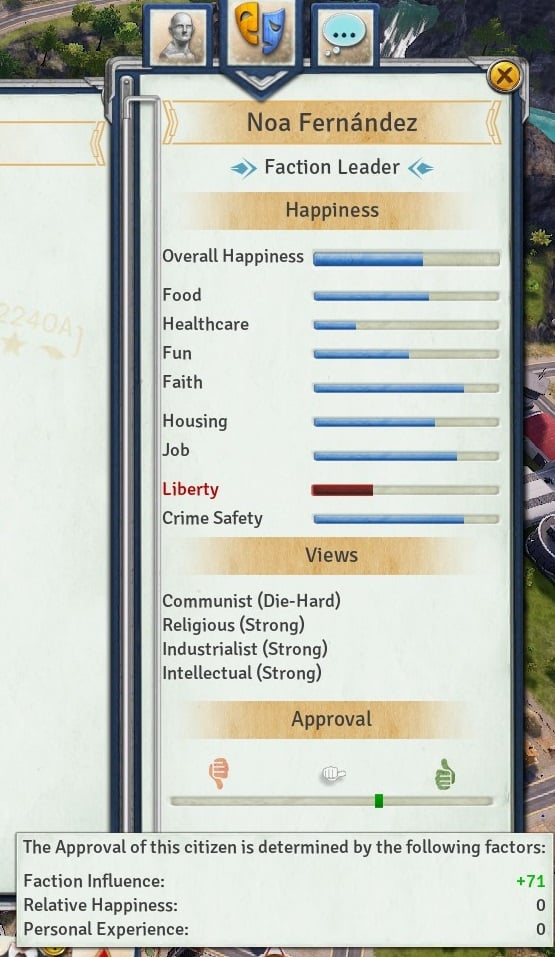
1. Faction influence
Probably the most important bit, but also the one that most people focus completely on and then don’t realise why their support is in the drain.
In the Almanac under the Politics tab is your overall faction standing description. When you click on a faction button you’ll see a breakdown of all the faction members. It’s important to know that your citizens can be members of multiple factions, and that their overall faction approval bonus or malus is averaged between the (maximum 4) factions they are a member of. I’m not sure if the die-hard/strong/moderate status of support has any effect directly on a citizen’s support (a weight perhaps?), or whether it only dictates how hard is it to convert a citizen to another faction using propaganda.
Ultimately, this one is directly related to the factions you choose to keep happy. More on that later.
2. Relative happiness
The interface must be bugged here because this always shows as +0, but it does actually affect your popular approval heavily. The key to understanding this one is to notice the word “relative” in the description. Relative to what? The answer is: to the rest of the Caribbean.
In the Almanac under the Happiness tab is the Overall Happiness graph. When you click it you’ll find a comparison of your overall happiness to the caribbean happiness. The relative happiness modifier is then the difference between the two. If you don’t keep up with your overall happiness, this will eventually become the defining factor of why you cannot get re-elected in later eras.
Example: you are in the modern era and caribbean happiness is maxed out at 80. Being the money focused dictator that you are you put all of your cash into building your industry and neglected public services. Your overall happiness is 60. This means that every citizen of your banana republic is getting a hit of -20 to their personal opinion of you. This unsurprisingly tanks your elections to the point where you are unelectable unless all the factions are absolutely in love with you, which is impossible without spending heavy with the Broker.
3. Personal experience
This is the bit where people hate you because you denied them their voice. From my experience this exists solely to punish you for denying people elections or committing election fraud, and won’t ever be positive unless you use the Broker’s image campaign.
Things that change this:
- Election fraud (negatively)
- Failure to hold elections (negatively, particularly big hit of usually -20)
- Broker’s image campaign for 7,500 swiss dollars (positively, around +10)
Strategies: Faction support
One of the more complicated aspects of Tropico 6, but once you learn how to use it it becomes like putty in your hands.
Things that matter to factions
1. What buildings you build
This is either an exercise in common sense, or with steady research of what’s the effect of what building on the political factions, but it boils down to this:
Capitalists love money making buildings that make money out of nothing. To get their approval build Banks, Offices, and in earlier eras industry. They hate most public service buildings that don’t make money.
Communists love schools, public transport, Tenements. Despite what the description tells you they dislike Police Stations. They absolutely hate Mansions and Banks, and building a few in a row of these will make them start a general strike ultimatum really quickly.
Religious obviously love it when you build churches. They also like Clinics and Hospitals. They hate army stuff, Rum Distilleries, Night Clubs, Cabarets, and other such degenerate activities.
Militarists again obviously love it when you build army stuff. More Barracks, Army Bases, Guard Towers, etc. They hate it when you build Embassies, don’t particularly like schools or environmentally friendly buildings.
Environmentalists love their parks. You have a problem with them due to industry expansion? Build parks. Everywhere. They also love Wind Farms, Solar Power Plants, and I think also Plantations. They hate all industry buildings that create pollution, especially oil.
Industrialists are the opposite of Environmentalists. Build oil and they will love you. Build industry and they will love you. Build Waste Management Plants and they will not like that though. But in general it’s difficult to have this faction dislike you if you are trying to make money.
Intellectuals love science. Most of the buildings unlocked in the modern era they will like when you build. Science labs especially. They won’t like Immigration Offices though, since freedom of movement should be absolute and all that. They hate army stuff, churches.
Conservatives love army stuff, churches, Police Stations, and also TV Stations for some reason (I guess Fox News is the reason). Their hate mostly overlaps the Religious, although they also don’t like anything that might seem too progressive.
Note that pretty much all factions hate it when you build bunkhouses starting in the cold war era especially. Stop building them later on.
2. What edicts you declare
This one is a lot simpler because all the edicts descriptions actively warn you what impact the edict will have on politics. Things to remember:
- Detente policy is great for getting rid of rebels in the modern era, but conservatives absolutely hate it
- Mandatory Waste Sorting mostly manages the Environmentalists for you unless you go full ham on oil production
- Communists love Agricultural Subsidies and it’s a great edict in of itself if you build any plantations at all, I always enable it as fast as possible
- Free Wheels and Wealth Tax makes Communists love you and Capitalists hate you. If you’re planning to use either of these at all, I’d suggest swaying citizens towards Karl Marx using the wonder that is Newspapers.
Faction management
With some experience you’ll be able to know exactly what to do to keep important factions onside before an election, but here’s some strategies:
Try to pick your long term plan in advance. Do you want to focus heavily on industry supported by plantations? The Communist party is going to be your best friend through the game. Do you want to transition towards Banks, Offices, Mansion rents and other means of passive money generation? The Capitalists will love that but the Communists not really. Pick a strategy and stick with it, otherwise you’ll see major political upsets.
Following up from the above: if you want to change your strategy, prepare the ground for it with your media. If the Communists love you and the Capitalists hate you, that doesn’t matter if 80% of people on that political axis are Communists. And vice versa. Use newspapers and especially radio stations to change the membership numbers of each party before you start swinging your economy in another direction.
Use edicts for their political effects as much as for their bonuses. Sometimes doing a quick edict before an election can swing it in your favour.
If your Swiss bank account is fat, use the Broker to buy support with political factions. Don’t do it unless the election is 1 month away, it’s wasted money otherwise because this support decays fairly quickly.
If all else fails, quick build a few buildings that a faction likes just before the election. You can demolish them straight after if you want, but this kind of thing is just a quick, dirty and temporary fix for an otherwise persistent problem and you’ll need to spend some time tweaking your city before the next election is due. Just remember that building stuff that one faction likes almost certainly will annoy another faction.
You can also bribe faction leaders for their support. It helps to squeeze out a percentage point or three.
Strategies: Relative happiness
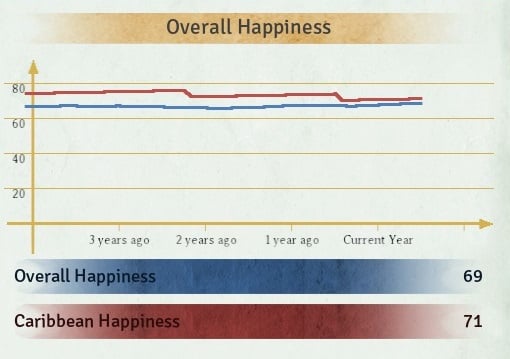
This is the part that tends to cause the most confusion. See the picture on the left: the difference between these two graphs has a direct impact on your personal approval. This swings in both the positive and negative direction, so its entirely possible to have all factions hate your guts while you maintain a 70% approval rating simply because caribbean happiness is 40 and your overall happiness is 60. This is rare and not easy to pull off and you have to actively work towards that to achieve it, but it illustrates a point.
Caribbean happiness is like a clock of doom ticking down. If you’re not fast enough with improving living standards, you will be unsurprisingly hated no matter what the factions think you’re doing right, and much like in Eastern Europe, your citizens too will yearn to experience the green of the grass on the other side.
You manage this in a simple way: keep increasing your happiness. The ways to do that on the overall are too much to cover, as most of it is down to designing your island in an efficient manner where your citizens are in range of everything they might need at any given time, but here’s some quick tips to help you along:
- If your housing happiness is tanking, electrify everything.
- If your job happiness is tanking, start upgrading buildings and setting budgets to highest. Non automated mines are a gigantic culprit here, as are non hydroponic plantations eventually. Eventually you might even want to think about destroying low job quality buildings and replacing those jobs with something else. Importantly, keep an eye on your numbers of unemployed people. If it gets over a 100 and your population is around a 1000 or more, it’s worth considering setting your immigration policy to Tropico First, because your own people will make enough babies to keep you occupied trying to make jobs for them and unemployed people tend to tank job happiness the most.
- Use the coverage overlays. Selecting fun/faith/healthcare/food coverage will give you a nice colour map of where your buildings reach, but more importantly it will highlight buildings that are currently fully occupied with an icon. Much of the problem with keeping these happiness stats high is the fact that there’s not enough provision in a high demand area. If your residential area has all your fun buildings highlighted with an icon that shows they are full, the solution is simple: build more fun buildings in the area. The supply/demand aspect of this cannot be stressed enough.
- If you simply can’t keep up for whatever reason, build a Commando Garrison, set it to max budget, and set the Intimidate Neighbours raid into a loop. This raid reduces the Caribbean happiness level, and can make or break an election while you’re still building up your economy.
Strategies: Personal experience
The last section is also the briefest.
As mentioned before, this statistic is mainly for punishing you for failing to allow for elections. The idea is to never be in a situation where you need to deny elections because your support is too low, because this particular stat causes a downward spiral that you will not be able to exit without spending your swiss bank account, because the negative effects on this stat take a long time (usually around 2 terms) to actually properly decay.
One way to mitigate this is to use the Broker. If you built up your banks and your swiss bank account, you can unlock all of his 8 slots and refresh until you find “Image Campaign”. This is a $$7,500 spend that will add a +10 bonus to every citizen’s personal experience. This is one way to offset that one time where you had to cancel elections or rig the vote. It can also help in a tight squeeze during an election where, say, the communists suddenly hate your guts because you stupidly just built 3 mansions right before the vote.
Another way is to use Tax Cuts. Again, only use this right before the vote, but your economy better be able to handle it. If it’s not, you can always use a Wealth Tax right after you win the election to make some of the losses back.
Thank you for this! Really helpful.
What I liked best was the ability to mark certain resources as not-exported, something I’d not have noticed without this.
The other thing I liked was the explanation of Coverage. I come from Cities Skylines where Green means good in the coverage maps. Here, it means bad. I get it now 🙂
I would like a Hint sction on how to begin your mission ex….. build houses first or bild plantatons, ranch to offer work ? etc,etc.
I have goods at my dock but the ship leaves and i get no money. Whats going on?