Table of Contents Show
A guide on whats the best approach against the enemies or “Citizens” of the Nebula based on my experience. This is my first guide and feedback is welcome.
Other Void Bastards Guides:
- Void Bastards: Crafting Workbenches
- Void Bastards: Tips and Tricks
- Void Bastards: How to Get and Save Ammo
Void Bastards: Enemies Guide
The “citizens” of the nebula are the main opposing force when salvaging the derelicts in the nebula. These unfortunate foul-mouthed souls were somehow mutated in the nebula and have gained abilities that can be a real pain in the *** when encountering them. Hopefully this guide will help you find the best approach and help you survive them.
The Janitor
The Janitor is one of the first low tier opponents you will encounter in the nebula. When idle, it walks around the room making stepping noises. Once it spots you, the face starts glowing and it starts hovering in the air. Then it begins shooting bolts of energy at you from the head dealing a fair amount of damage while chasing you down. Its main weakness is th head so aim at it to deal extra damage. Any primary weapon is recommended when facing one. Bushwackers and Bangers can easily dispatch large groups of them and poison spikes can kill one with only one spike.
Veteran Janitor
This first class Janitor is first encountered in the third depth level of the nebula and is much sturdier than it’s weaker cousins. It is also are capable of shooting a volley of two shots in each attack. Its best to use stronger weapons like the Stapler to one shot it and always have some explosives when they’re too many of them to pick off one at a time.
The Juve
These small rude guys are the second weakest enemies in the nebula. Although they are small, they are fast on their feet and can employ hit and run tactics causing you to potentially waste ammo when attacking them. They make “Tap Tap” noises when walking around idle and like all enemies start hovering when attacking. The best weapon to use is the Regulator since it can kill them in one headshot. Bushwackers are useful with setting up traps to cover your rear.
Hardened Juve
These are stronger versions of the regular Juve who are the same in every aspect but with more health, meaning that it will take more than one Regulator headshot to kill them. Either switch to the Stapler or the Spiker to deal with them. Any explosive weapon is recommended when dealing with large numbers of them.
The Tourist
These glowing blobs are hard to miss with their sloshing noises and their pitifully weak health but this masks their true threatening quality, as living bombs. Once they spot you, they will move towards you and once in range they began to glow and shake violently for a moment before exploding in a large area dealing heavy damage. They can be triggered to explode with one shot from a pistol which is useful in destroying any enemies near the Tourist like gunpoints or other Tourists. If you want to save ammo you can walk up to them to trigger their detonation and run like **** before they explode. Just remember to steer clear of the blast zone since being near it can cause minor damage. There is also a special trait called “Tour Guide” that makes them mostly harmless to you, if you’re lucky enough to find it.
Glowtrotter
These jaundiced relatives of the Tourists are less explosive than their bluer cousins but they move a bit faster and have a habit of leaving an irradiated spot that persists forever from where they exploded. If encountered in large numbers they can leave narrow corridors impassable without getting radiation on you. Your best options are either lure them towards large rooms where you can safely disposed of them, seal the rooms with the rifts that spawn them, or find a HAB room on a ship and purchase hazard immunity from the contaminants remover.
Friendly Tourist
Unknown. Not enough data
The Screw
This is one enemy you do not want to be caught with in the same room. It’s tough, mean, slow, and takes a lot of pepper to bring down. When attacking, it bursts bolts from its body towards you and the bolts are capable of bouncing of walls making it difficult at avoiding damage from it. If you’re planning on fighting it with a pistol you’ll only waste ammo so your beast option is to avoid it by all means. The zapper is highly recommended if you’re in a derelict that have more than a few Screws in them. Also seal off any rooms containing a screw in order to effectively trap it. The Stapler and Zapper combo is an effective method of dispatching them if fighting one is unavoidable. They can become a useful damage sponge with the help of the Scrambler.
Trusty Screw
This is the big brother of the Screws only found in the deepest parts of the Nebula. Its twice more stronger and tougher than the average Screw and can go toe to toe with the WarBot and win. Face one or two head on and you’re screwed, pun intended so you really, really, really REALLY, have to avoid it by all means. Zapper along with an upgraded Roaster is the best combo to eliminate it.
The Scribe
This mutated office worker is a mid tier enemy and is first encountered in the 2nd depth level of the nebula. The Scribe is constantly hovering and when it starts attacking it takes a couple of seconds for it to bloat and unleash a volley of bolts at you. After it attacks once it will run off and hide before attacking again, similarly to the Juve. Those first few seconds are its main weakness where it can be killed before it starts attacking. Any weapon is useful in these encounters.
Senior Scribe
Basically, a stronger version of the Scribe. Stun it with the zapper to keep it from escaping and causing more damage later on. Also, it is immune to headshots.
Veteran Scribe
Probably the most dangerous of the Scribes. It is stronger than the lesser Scribes and the volley of bolts it fires are capable of homing in on you, even while you’re in cover they will snake their way behind the walls towards you. It is also capable of deploying explosive poop. Yes, poop that explodes like trip minds. Those “mines” will bar your way and a group of Veteran Scribes will create a minefield in seconds. You can turn those mines against them with a well placed shot at the right time. The Herd-Zapper is helpful in stunning a group of them if you feel overwhelmed. Kittybots can draw their fire away. Overall, kill them fast before they become a growing problem.
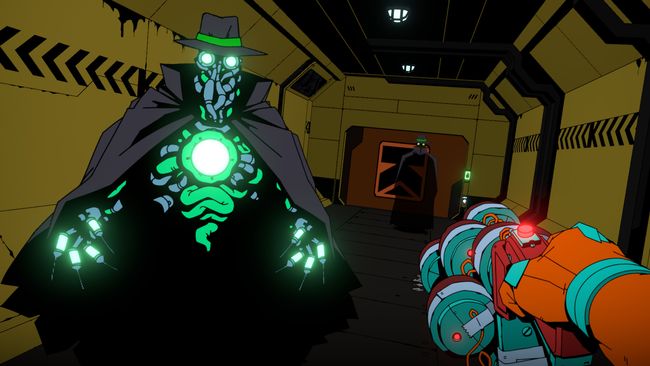
The Spook
The Spook is a mostly annoying opponent in the mid regions of the nebula. It usually found floating around aimlessly but when it see you it fades away like a ghost and reappears usually from behind you where it will open its coat to reveal its core and starts shooting at you. The core is its main weakness and you must attack it once it’s exposed or it will cover the core and take reduced damage from bullets. The Spiker or RadSpiker are recommended when fighting a Spook because once it’s poisoned, the clouds it will give away its position when it’s invisible and allowing you to prepare to kill when it reappears, or you could let the poison kill it instead.
Shifty Spook
Unknown. Not enough data
The Patient
These are a swarm of floating heads that on their own can cause little damage to you but in large numbers and they can quickly overwhelm you. Once they see you, they will move quickly moves towards you in close range and rapidly shoot small bolts at you. Each head is a separate hitbox and are constantly moving around in circles making aiming difficult and will lead to wasting ammo. The Bushwacker and the Riveter are highly effective against them. The Stapler can also be used but it may takes up to 4 shots to take out a Patient swarms which will waste ammo so use weapons with splash damage.
The Zec
This is one of the most dangerous enemies you will encounter deep in the 4th depth of the nebula. What makes it special is that it constantly has a protective shield in front of it that blocks any projectile or weapon you throw at it, and also it shoot explosive bolts at you that can tear through chunks of your health. It’s only weakness is that the shield only protects the front, not its back and sides, so explosive weapons like the Nebulator and Bangers are a must have. The Nebulator will only work if you shoot at the floor, ceiling or walls so the blast zone can bypass the shield and hit the Zec. If needing protection, use a Bouncer to reflect the explosive bolts back at it. The Scrambler is also useful but it must make direct contact with the Zec itself instead of the shield. Kittybots can draw its attention so you can get some shots at it from behind.
The Peeper
The Peeper is just your average everyday security camera that keeps a look out for intruders, mainly you. Once it spots you it will send out an alarm that after a few seconds will trigger the ship’s security system to send out it’s security robots to hunt you down. This can be avoided by destroying the camera before it can finish reporting you. A single shot from a pistol or a zapper is sufficient to destroy them.
Watcher
These red coloured security cameras are twice more sturdier that the peepers and can alert twice as fast. That means you should destroy them twice more quickly.
The Gunpoint
This mechanical turret protects the corridors and rooms from invaders such as yourself. Once it has a clear line of sight at you, it takes a second to deploy and unleash deadly bullets at you. It is important to keep out of its sight if possible. As a mechanical enemy, it is immune to poison spikes and radiation but the Zapper is highly effective at stunning it for a long time. Once stunned you may either destroy it with explosives and bullets or override it with some merits to turn it on your side. Important note, override is only possible once unlocked in the workbench. Kittybots can also draw its line of fire away from you.
Boompoint
This turret is more well built than the gunpoint and instead of bullets, it shoots guided rockets with splash damage that can shave a lot of health if you’re not careful. Zapper or Bouncer is recommended.
Radpoint
This turret is similar to the Boompoint and is only installed in derelicts found in the deepest pits of the nebula. It shoots rockets as well but they also cause radiation damage. Can be dealt with the same strategy as the Gunpoints.
The SecBot
This is a walking wall of impending doom that can eliminate any inexperienced scavenger once activated. In the beginning it is inactive in its port that is usually found in the NAV room or the SEC room but rely on the Peepers or Watchers to alert it of any intruders. You can tell if it is nearby by the sound of a loud siren. It is also the only enemy capable of opening locked doors. Like any mechanical enemy, it is extremely weak against the Zapper and can stun it long enough to slip past it or to override it. Remember, override is only possible once unlocked at the workbench. Another method to disable the SecBot is to find the SEC room and either reset the security system or spend merits to shut it down.
WarBot
This is a more powerful model of the Security bot, a version 2.0 if you will. What makes the Warbot a superior model is that it has more health, stronger guns, slightly faster, and more importantly it can repair itself, meaning that trying to destroy them will only end up wasting ammo. While this makes it dangerous to you, overriding it makes it your most powerful ally against mutated citizens or unwanted pirates.
The Pirate
This fearless female cutthroat is only seen when a pirate ship has encountered you and follows you into a derelict. She is heavily armoured, packs some serious heat, and will actively hunt you down until you’re dead. You will need your best and strongest weapons like the Nebulator and the Roaster to deal significant damage. Upgraded tools like Herd-Zapper or the Bouncer are highly recommended.
It’s also worth noting that zapping a Spook stops it from teleporting and makes it very easy to pick off.
i found the friendly tourists… it seems like they have a bigger explosion radius, they do more damage and are tankier to weapons. they can take way more bullets, but it seems like they dont follow you around ( im not sure about that last part)
The friendly tourists as compared to the other tourists will actively follow you on sight and will only explode once near. Like what “nobody” said, larger explosion, more damage, I’m not so sure on the health part as I was using a legislator but it died in 1 shot.