Table of Contents Show
A short and clean guide on the graphical options of the game, allowing you to achieve the best possible looking game while maintaining an FPS stability of 60.
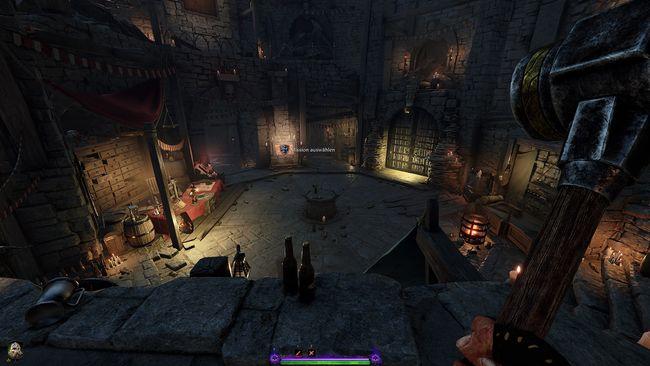
PREVIEW
This guide used metalcreeper52’s Optimization Guide as reference.
This is what my game looks like with the graphical configurations of this guide, without the shader and then with it. The changes are way more noticeable in-game. The idea here is to have the game look as pretty as possible while still maintaining a stable FPS. If all you care about is performance, there are other guides out there for that.
I really have to empathize this once more: The screenshots don’t do it justice, give it a try!
NOTE: In the near future, more specifically after March 15, 2022… This guide will be edited to include “visual clarity mods” that are approved into the official realm. Or perhaps… A new guide?
Your feedback is appreciated!


CHANGELOG
Idk how to make changelogs.
10 of March, 2022 – Reduced the shader’s effects. It is now more subtle with less saturation, less contrast and softer bloom.
DISCLAIMER
I’ve “face-value tested” all graphical options of the game with the intent of achieving the best performance while maintaining the prettiest graphics possible. I managed to settle on something beautiful with an FPS stability of 60 on the vast majority of the time.
The lowest my FPS has ever gotten was 45, on the worst possible scenario of vast open areas of poorly optimized sections of certain maps (ending of Engines of War, for example). This is, however, a rare occurrence. Unfortunately there is nothing we, the players, can do about this. A poorly optimized map will run poorly on any machine.
It is important to note that the positive result in performance will vary depending on your setup, as these options here were used for mine. If your GPU is stronger than mine, you will have better results than I did and might even consider bringing some options up. If your GPU is weaker than mine, you will either have similar results than mine or inferior ones, requiring you to tweak some options.
I made sure to try to point out what each graphical option does and how big of an impact in performance I noticed from it, that way you can know what to tweak, if needed. In any case, I strongly suggest you try these options exactly as they are in the guide first, before attempting to change anything.
The shader that greatly complements these options will also be a case of ‘your mileage may vary’. Everyone’s screens have different contrast, brightness, color fidelity, etc., but unless you’ve made drastic changes to its options, you shouldn’t have any issues.
MY PC SPECS
The computer this guide was made on top of has the following relevant parts:
- CPU: AMD Ryzen 5 2600x.
- GPU: EVGA GTX 1070.
- RAM: 16GB.
GUIDE’S SYNTAX
This guide was constructed to be effective. Here’s what you need to know to understand it:
- N/A – Means you should leave that option it as it is, or as what you prefer.
- ↑ – If you have performance to spare and wish to increase the beauty, increase this option.
- ↑↑ – Same as before, but increase it even further.
- ↓ – If you’re lacking performance with the current options, decrease this option.
- ↓↓ – Same as before, but decrease it even further.
LAUNCHER OPTIONS
Before booting up the game, go into the launcher’s settings and select the following:
- Quality: N/A.
- DirectX Version: Pick DX11, as DX12 will possibly drasticaly decrease your performance with little to no graphical benefits. I wrote an extra about DX12 at the bottom of this section, if you wish to learn more.
- Display: N/A.
- Resolution: N/A.
- Screen Mode: Fullscreen. Every game ever will never reach their best performance unless they are running in fullscreen mode.
- Vertical Sync: N/A.
- Debug Mode: N/A.
- Attach Debugger: N/A.
- Worker Threads: Select the second-to-last option avaliable to you. In other words: if the maximum is 10, select 9. Going into the last one might actually decrease performance.
This is what mine looks like:

And while we are here, turn on Steam’s built-in FPS counter, that way you can know what’s up. You can do that by going to Steam>Settings, on the top left corner of its window.

And in there you can go to in-game and enable the In-Game FPS Counter.

DX12 BAD?Sincerely, I do not know how DX12 behaves, but it might give you better performance than DX11, if the techonology from the parts of your computer happen to work in harmony with DX12. Feedback provided to me claims that the technology needs to create a cache of sorts to function properly, which takes a few matches in low performance to finally kick in with its benefits.
I can neither prove nor disprove this, but what I do know is that DX12 either haven’t benefitted the majority of people, myself included, or the said majority just haven’t given DX12 the time it needs to function properly. There is also the possibility of Fatshark not having spent their resources to implement the technology into the game in a better way than it was done.
I won’t, however, shoot myself in the foot by staining the performance-increasing veracity of my guide by recommending that you worsen your performance with DX12 under the possibility of it getting better later. So… If you want to give it a try, I wish you success.
VIDEO SETTINGS
There are rumors of an increase in performance if the voice chat feature is turned off. I do not know how much truth is there to it.
DISPLAY
- SCREEN MODE: N/A.
- RESOLUTION: N/A.
- MINIMIZE ON ALT TAB: N/A.
- FIELD OF VIEW: N/A. Vermintide uses ‘Vertical FOV’, which is different from most games. If you don’t have an ultra-wide screen, any value above 80 will warp the image too much, ruining the beauty.
- VSYNC: N/A.
- CAP FRAMERATE: 60. Selecting higher values will make your GPU work harder than it needs to, for no reason. If you have a monitor that goes beyond 60hz, you know how to handle options such as this one.
- MAX STACKING FRAMES: N/A. Recommended: 1.
- GAMMA: N/A. Recommended: 2.3. Once the shader is applied at the end, if things look too dark or too bright for you, adjust accordingly.
OVERALL QUALITY
- GRAPHICS QUALITY: N/A.
TEXTURES
- ↑ CHARACTER TEXTURE QUALITY: Medium.
- ↑ ENVIRONMENT TEXTURE QUALITY: Medium.
The difference between medium and high is only noticeable if you’re actively looking for it, up close, without moving. This is totally worth the performance boost and I strongly suggest you stare at something while switching in between high and medium. The easiest to notice will be the weapon in your hand, but as stated, when you’re actually playing Vermintide, it won’t make a difference. But in any case, if you have the performance to spare, go high!
PARTICLES
- ↓↓↓ PARTICLE QUALITY: Extreme. This controls the quality of bright, dopamine-giving, fantasy effects of fire, explosions, moonfire bow, Sienna’s existence, etc. This can have a heavy influence in performance at certain locales and situations.
- ↓ TRANSPARENCY RESOLUTION: High. This further influences the effects controlled by the ‘particle quality’ setting. If set to low, Globadier’s gas will lose its cloud effects.
- SCATTER DENSITY: 100%. Lower values are not worth it, as they make the floors of maps sad to look at.
- BLOOD DECAL AMOUNT: N/A. I honestly still haven’t been able to figure out what exactly this is supposed to be doing, but it sure does pollute the combat at high values, preventing me from seeing incoming attacks in the middle of hordes. High values also influence performance during combat.
LIGHTNING
- ↓ LOCAL LIGHT SHADOW QUALITY: Low. Turning this off will disable shadows cast by objects.It is a worthy trade-off as the difference without it doesn’t make things uglier. I haven’t noticed difference in higher values.
- SUN SHADOWS: Low. Turning this off will cause dark areas of certain maps to be completely lit up. I wouldn’t take it any lower. I haven’t noticed difference in higher values.
- ↓↓↓ MAX SHADOW CASTING LIGHTS: 10. This will allow the effects of the ‘local light shadow quality’ setting to be applied to more objects at once.
- ↓ VOLUMETRIC FOG QUALITY: Low. This option is VERY performance taxing. Values higher than low make too little difference are not worth it. The value ‘lowest’ will allow dust clouds to be seen, floating around, specially inside Taal’s Horn Keep, which can either look really cool or very out of place depending on your opinion. Ironically, the value ‘lowest’ also makes fog look cooler is some places, like during the gate-opening section of Blood in the Darkness, where the fog lies near the gorund, like a smoke machine. I guess this is also part of the dust cloud effect, only truly noticeable without the presence of fog.
- AMBIENT LIGHT QUALITY: High. I’m not entirely certain on what this does. This is the unfortunate reality of many of VT’s graphical options: They’re barely noticeable, or only noticeable in specific things. From my testing, this seems to influence the Bloom effect, allowing brighter areas like, like the day sky, to be brighter than usual. I did not notice a change in performance from lowering this option.
- AUTO EXPOSURE SPEED: 1. Vermintide controls the brighteness of its visuals based on the very center of your screen, where your crosshairs are. If you look at the day sky, things will darken down so you can see more than just a white flash. If you look at a the inside of a dark cave, things will brighten up so you can see more than just a black void. This is a somewhat realistic simulation of the human eye’s pupil retracting itself or otherwise in order to block or allow more light to come through. High values makes these shifts faster, but unimmersive. Lower values makes them slower and thus, more realistic, but can become annoying and even get in the way of gameplay.
AMD FIDELITYFX SUPER RESOLUTION 1.0
- ENABLE AMD FSR 1.0: Off.
- QUALITY MODE: N/A.
- This technology might increase performance, and Janfon1 even made a video about it, but for some reason he failed to mention how aborrhently awful it makes the game look, even on the “best quality” option.
POST-PROCESSING
- ANTI-ALIASING: TAA. Both TAA and FXAA have their ups and downs, but the one that looks the best overall is TAA. Not using any makes the game look awful.
- SHARPNESS FILTER: On. Without this, the game will look blurry.
- ↓↓↓ SSAO: Extreme. This option is VERY performance taxing, but the lack of it kills a big portion of the game’s beauty. I’d wouldn’t go past medium on a worst case scenario.
- BLOOM: On.
- SKIN SHADING: Off. I honestly still haven’t been able to figure out what this is supposed to be doing, as I fail to see any difference with it being on or off.
- ↓ DEPTH OF FIELD: On.
- ↓ SCREEN SPACE REFLECTIONS: On. There are very few locations with puddles or water in the game. This option will give them a little bit more life.
- LIGHT SHAFTS: On.
- LENS FLARE: On.
- COLOUR AND LENS DISTORTION: N/A.
- MOTION BLUR: N/A.
OTHER
- PHYSICS DEBRIS: On. Turning this off removes the pleasure that comes from destroying doors.
- ANIMATION LOD DISTANCE: 1.
SHADER
ReShade is a third-party software that manipulates the graphics of a game in a range of ways, IF that game is supported. You may go to its website[reshade.me] and download ReShade’s latest version. It is an executable file that you can launch from anywhere.
Upon launching it, click on Browse and head to the folder where your game is installed, or more specifically the folder Binaries that is inside the folder where the game is installed. “SteamLibrarysteamappscommonWarhammer Vermintide 2binaries”
Select the option ‘Microsoft DirectX 10/11/12’, followed by the package SweetFX, which should be already pre-selected. In any case, make sure you tick its box off and on again so it becomes a black square, allowing you to select exactly what shaders from the package you want.

Then, click uncheck all at the top and select only DPX and Levels.

The third and last shader is callled Magic Bloom, but was removed from ReShade’s repository, which is where these packages comes from. It can be acquired manually through the author’s GitHub page[github.com].

Since this too is a package and we only want a single shader from there, extract the .zip anywhere you want and fetch MagicBloom.fx from inside the Shaders folder. Paste it inside the Shaders folder now present in “SteamLibrarysteamappscommonWarhammer Vermintide 2binariesreshade-shaders”.

The last thing we need is to copy the file MagicBloom_Dirt.png from the Textures folder of the extracted zip, and paste it into the Textures folder inside the same directory from above.

This concludes the instalation. ReShade should now automatically load itself when you launch your game. You will see a message at the top of your screen, with the key you should press in order to bring up ReShade’s config pannel. You can Change this keybind in there, but don’t launch the game just yet.
As it is, your shaders are in their default state and must be configured. Thankfully, you can just download a file with my configuration from here[drive.google.com] and place them in the same binaries directory from above.
Now you can launch your game, hit the ReShade keybind, click skip tutorial and select the configuration file you downloaded.

IMPORTANT NOTES ABOUT RESHADE
The recommended gamma from this guide is 2.3, however, depending on your monitor, you might find this to be too dark once the shaders are applied. Merely bring the gamma up until you’re satisfied. If you’re going past 2.7, however, something is deeply wrong either with your monitor or with your eyes.
- DPX controls colors: Their brightness, saturation, range and HUE curves.
- Levels controls the difference range between the dark and white points, regardless of colors.
- MagicBloom, however, much like a lot from ReShade, is a makeshift effect. It wasn’t specifically tailored for Vermintide, and because of this, it is only capable of doing so much. MagicBloom will affect everything that is currently being shown on screen, which can give some unexpected results at times, such as portraits glowing when moving through the dark section of Hunger in the Dark. This takes some getting used to, which happens quickly, so don’t worry.
MagicBloom will also affect glowing skins on your weapons. Hopefully this will make you stop using these disgusting illusions?
THE END
Thank you for coming to my TedTalk. In the near future, more specifically after March 15, 2022… This guide will be edited to include “visual clarity mods” that are approved into the official realm. Until then… enjoy!
If you follow the guide and end up taking some good screenshots, feel free to share them with me so I can showcase them here. If you know how to and feel like creating high quality gifs that would work well as showcase, please do share them as well.
Your feedback is appreciated!
SHOWCASE
I really have to empathize this once more: The screenshots don’t do it justice, give it a try!
Please also keep in mind that I have been tweakin the shader to make it more subtle. These screenshots are from its first first release iteration, which were a bit too much.


Thank you for the guide,
I am having trouble accessing the imbedded links to downloads