
This guide will help you find every coin locker key in the game, as well as a list of the locker rewards.
Other Yakuza Kiwami Guides:
Coin Lockers location
The Coin Lockers are located near the Millennium Tower, next to the Lottery Ticket Booth.

Map of key locations
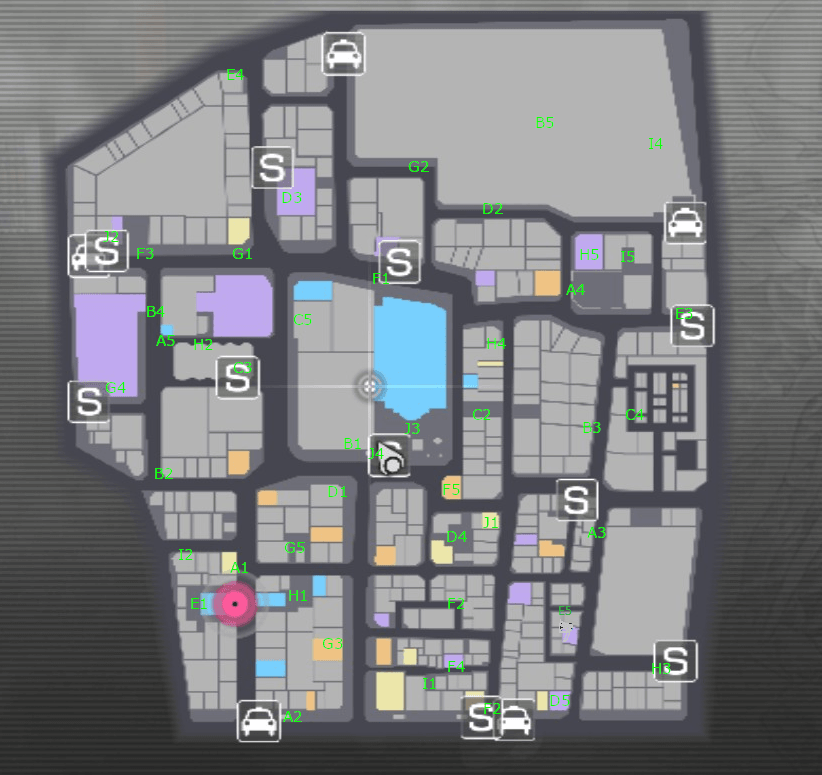
There are a few key locations not marked on the above map. These are:
- B5 – In the Underground Red-light District
- I4 – In Purgatory
- J4 – In the Japanese-style gambling parlor
They’re marked with asterisks in the below list just for clarification purposes.
A1 (Chapter 2+; on the ground)
Medieval Silver Coin – Meant to be sold
A2 (Chapter 4+; on the ground)
Buddhist Statue – Meant to be sold
A3 (Chapter 4+; on the ground)
Dinosaur Fossil – Meant to be sold
A4 (Chapter 4+; on the ground)
Clay Figurine – Meant to be sold
A5 (Chapter 4+; inside Debolah on the dance floor)
Meteor Fragment – Meant to be sold
B1 (Chapter 4+; on the ground next to the coin lockers)
Sacrifice Stone – Accessory
B2 (Chapter 2+; on the ground)
Brass Knuckles – Weapon
B3 (Chapter 4+; on the ground)
Scotch Whisky – Alcohol
B4 (Chapter 4+; on the ground)
All Ones Charm – Item for use in cee-lo
B5* (Chapter 5+; inside the Underground Red-light District)
Medieval Painting – Meant to be sold
C1 (Chapter 5+; finish sub story 42)
Dagger – Weapon
C2 (Chapter 4+; on the ground)
Dagger – Weapon
C3 (Chapter 2+; on the ground)
1-2-3 Gum – Item used in cee-lo
C4 (Chapter 4+; on the ground)
Trips Yokan – Item used in cee-lo or oichi-kabu
C5 (Chapter 2+; down a stairwell next to the Todo Building)
Staminan Spark – Restorative item
D1 (Chapter 4+; on the ground)
Binding – Armor
D2 (Chapter 4+; on the ground)
Bloody Binding – Armor
D3 (Chapter 4+; inside Yoshida Batting Center next to the arcade machines)
Fighter’s Binding – Armor
D4 (Chapter 4+; on the ground)
Metal Jacket – Armor
D5 (Chapter 4+; inside Shoten)
Springy Arm Guards – Accessory
E1 (Chapter 2+; behind Serena)
Gentleman’s Umbrella – Weapon
E2 (Chapter 4+; on the ground)
Tauriner Maximum – Restorative item
E3 (Chapter 4+; on the ground)
Piss Mountain Stone – Item used in cee-lo
E4 (Chapter 4+; on the ground)
Even Goro’s Beads – Item used in cho-han
E5 (Chapter 4+; on the ground)
Cool Striker – Pocket Circuit racer
F1 (Chapter 4+; on the ground)
Golden Blackjack – Weapon
F2 (Chapter 4+; on the ground)
Repair Kit – Can be used to repair weapons
F3 (Chapter 4+; on the ground)
Lopsided Cigarette – Item used in cho-han
F4 (Chapter 4+; inside Orchid Palace Mahjong)
BANKER’S Piece – Item used in baccarat
F5 (Chapter 4+; inside Akashimaru, Taihei Boulevard)
Toughness Infinity – Restorative item
G1 (Chapter 4+; on the ground)
Blackjack – Weapon
G2 (Chapter 4+; on the ground)
PLAYER’S Piece – Item used in baccarat
G3 (Chapter 4+; inside Cafe Alps)
Blackjack Amulet – Item used in blackjack
G4 (Chapter 4+; inside Mach Bowl)
Bust Amulet – Item used in blackjack
G5 (Chapter 4+; on the ground)
Stone of Enduring – Accessory
H1 (Chapter 4+; on the ground)
Stun Gun – Weapon
H2 (Chapter 2+; on the ground)
Black Jewel – Item used in roulette
H3 (Chapter 4+; on the ground)
Royal Joker Card – Item used in poker
H4 (Chapter 4+; on the ground)
Lucky Hanafuda Card – Item used in koi-koi
H5 (Chapter 4+; inside Vincent)
Ruby Plate – Meant to be sold.
I1 (Chapter 4+; on the ground)
Zero Jewel – Item used in roulette
I2 (Chapter 2+; on the ground)
Lucky Tile – Item used in mahjong
I3 (Chapter 4+; finish sub story 23)
Modified Model Gun – Weapon
I4* (Chapter 5+; inside Purgatory (West Gate Park))
Marble Sphere – Meant to be sold
I5 (Chapter 4+; on the ground)
10-10-1 Charm – Item used in oicho-kabu
J1 (Chapter 4+; on the ground)
Metal Bat – Weapon
J2 (Chapter 4+; inside Pocket Curcuit)
Metal Frame – Pocket Curcuit part
J3 (Chapter 4+; on a thin stairway in front of Millennium Tower)
Give Up Piece – Item used in shogi
J4* (Chapter 7; on the floor in the Japanese gambling hall)
Diamond Plate – Meant to be sold
J5 (Chapter 6+; finish sub story 43)
Charismatic Photo – Accessory
Coin Locker rewards
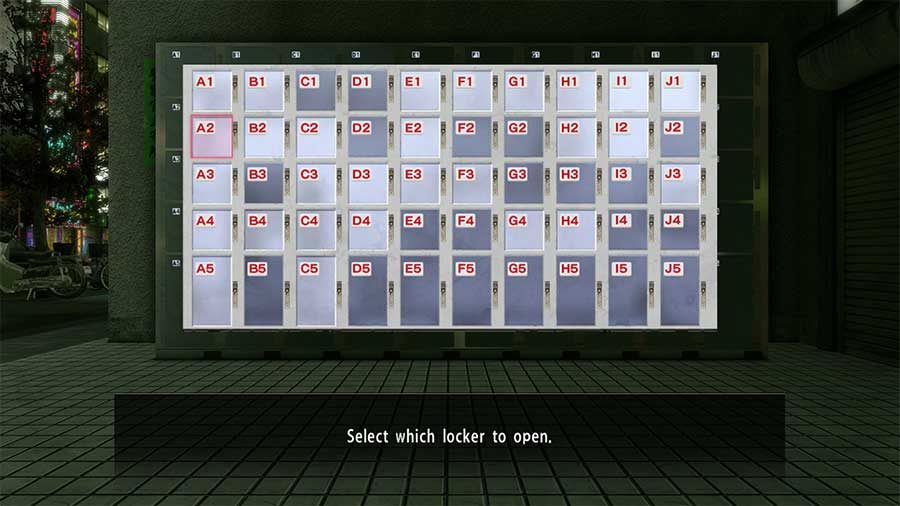
- Locker A1 – Medieval Silver Coin
- Locker A2 – Buddhist Statue
- Locker A3 – Dinosaur Fossil
- Locker A4 – Clay Figurine
- Locker A5 – Meteor Fragment
- Locker B1 – Sacrifice Stone
- Locker B2 – Brass Knuckles
- Locker B3 – Scotch Whiskey
- Locker B4 – All Ones Charm
- Locker B5 – Medieval Painting
- Locker C1 – Dagger
- Locker C2 – Dagger
- Locker C3 – 1-2-3 Gum
- Locker C4 – Trips Yokan
- Locker C5 – Stamina Spark
- Locker D1 – Binding
- Locker D2 – Bloody Binding
- Locker D3 – Fighter’s Binding
- Locker D4 – Metal Jacket
- Locker D5 – Springy Arm Guards
- Locker E1 – Gentleman’s Umbrella
- Locker E2 – Tauriner Maximum
- Locker E3 – Plss Mountain Stone
- Locker E4 – Even Goro’s Beads
- Locker E5 – Cool Striker
- Locker F1 – Golden Blackjack
- Locker F2 – Repair Kit
- Locker F3 – Lopsided Cigarette
- Locker F4 – Banker’s Piece
- Locker F5 – Toughness Infinity
- Locker G1 – Blackjack
- Locker G2 – Player’s Piece
- Locker G3 – Blackjack Amulet
- Locker G4 – Bust Amulet
- Locker G5 – Stone of Enduring
- Locker H1 – Stun Gun
- Locker H2 – Black Jewel
- Locker H3 – Royal Joker Card
- Locker H4 – Lucky Hanafuda Card
- Locker H5 – Ruby Plate
- Locker I1 – Zero Jewel
- Locker I2 – Lucky Tile
- Locker I3 – Modified Model Gun
- Locker I4 – Marble Sphere
- Locker I5 – 10-10-1 Charm
- Locker J1 – Metal Bat
- Locker J2 – Metal Frame
- Locker J3 – Give Up Piece
- Locker J4 – Diamond Plate
- Locker J5 – Charismatic Photo