- The Genesis Order: Walkthrough Guide
- Enable Steam Screenshots
- Your Phone
- Walkthrough – Part 1
- Walkthrough – Part 2
- Walkthrough – Part 3
- Walkthrough – Part 4
- Walkthrough – Part 5
- Walkthrough – Part 6
- Walkthrough – Part 7
- Walkthrough – Part 8
- Walkthrough – Part 9
- Walkthrough – Part 10
- Walkthrough – Part 11
- Walkthorugh – Part 12
- Walkthrough – Part 13
- Walkthrough – Part 14
- Walkthrough – Part 15
- Walkthrough – Part 16
- Walkthrough – Part 17
- Walkthrough – Part 18
- Walkthrough – Part 19
- Post Story
- The Shop
- Offerings
- Briefcases
- Booty Calls
- Puzzles
A complete walkthrough guide for The Genesis Order: Maps, item locations, puzzle solutions, and everything you need to know!
The Genesis Order: Walkthrough Guide
| # | Details |
|---|---|
| Guide Version | This guide is for version 1.00. |
| Main Purpose | The guide focuses on completing the main story. Avoid spending money on non-essential items until the story is finished. Buying items early may limit funds for story progression items. |
| The Genesis Order | A continuation of Lust Epidemic and Treasure of Nadia. Playing these earlier games is optional but helps understand the plot and characters. |
| Gameplay Style | Despite seeming like an open-world adventure, it’s a point-and-click game with gated progression. You need specific items to interact with objects. Use the Oracle if stuck. |
| Game Structure | More similar to Lust Epidemic, most actions happen indoors, so navigating maps is trickier. Room images will be provided to guide you. |
| Searching in the Guide | Use CTRL+F to search for specific items or scenes. The guide’s walkthrough includes instructions followed by images. |
| Guide Logic | Actions may seem unclear, but following the steps will make things clearer. If something doesn’t match, you probably missed a step, which may not seem directly related. |
| Oracle Usage | The Oracle can help guide you when stuck, especially during the main story. |
| Scenes | Scenes containing NSFW content are marked in red. |
| Keys | Keys are highlighted as “Chest Key” for clarity. |
| Crafting | Crafting items are marked as “Craft Quest Item” to stand out in the guide. |
| Profiles | Each character has a profile, marked as “CharacterName’s Profile” for easy identification. |
| Completion Percentages | Percentages are based on items like profiles and Karma Sutra pages. If it isn’t increasing, don’t worry. Use the last unlocked scene as a better progress indicator. |
| Getting Stuck | If stuck, first consult the Oracle. If that doesn’t help, check your last unlocked scene in the Scene Player and search the guide for it using CTRL+F. |
| Walkthrough Structure | The walkthrough presents written instructions first, followed by images. If you have questions, the images are below the text. |
| Progression Steps | Some progress steps, like visiting the Condos for Melissa’s number, are required for story progression. You can’t enter the number without visiting but can’t move forward without it. |
| Unreachable Items | Some items in the walkthrough cannot be interacted with until later in the game, usually after obtaining specific items. |
| Scripted Events | Some parts of the guide may seem confusing due to scripted events. Directions given are mostly for stairs (left/right). Images of key items will help you find your location. |
| Exclusions from the Guide | Story and scripted events are excluded to keep the guide concise. |
Enable Steam Screenshots
Go into the Game properties and add:
--in-process-gpu
In the Launch Options box, as shown below.

Your Phone
Your phone is a very powerful tool.
It is used to Save your game, Load a saved game, set Options, Booty Call (You can only call women who have given you their number), and the Scene Player to watch scenes that you have experienced in the game.

After Save Game and Load Game, Options are the next thing you will use frequently.

- Voice Volume is actually on or off selections for Your Voice, other character Voices, and Moans during scenes.
- Save Reminder is how often Arianna reminds you to save your game.
- Move Speed is how fast your character moves around the map. I advise that you set it to Fast as Arianna recommended.
- Speed Run mode allows you to either show or skip the story. This will also skip all of the scenes.
- Exit / Restart allows you to exit the game, restart returns you to the title menu.
Walkthrough – Part 1
One thing to note is that directions that include stairs will tell you which stairs to take and then frequently a direction to go. You may be able to go that way when you select the stairs, so the directions may seem “off” by one room. If the instructions are “Take the right stairs” and the next instructions are “Go right (east)” if you went right (east) when you click on the stairs you can disregard the movement.
I use Go to Map and Exit to Map to cut down on the directions to get you back to the map. You should know how to get back to map from where I tell you.
You start off by customizing your character’s name, if you prefer. You have to click twice on each letter, unless you have two identical letters together. The first click selects the letter and the second click sets the letter. Right click to delete.
You will then experience the introduction. If a scene is not safe for work (NSFW) I will note it with a [*]. This may include anything from nudity to sexual acts.
Scene 1*
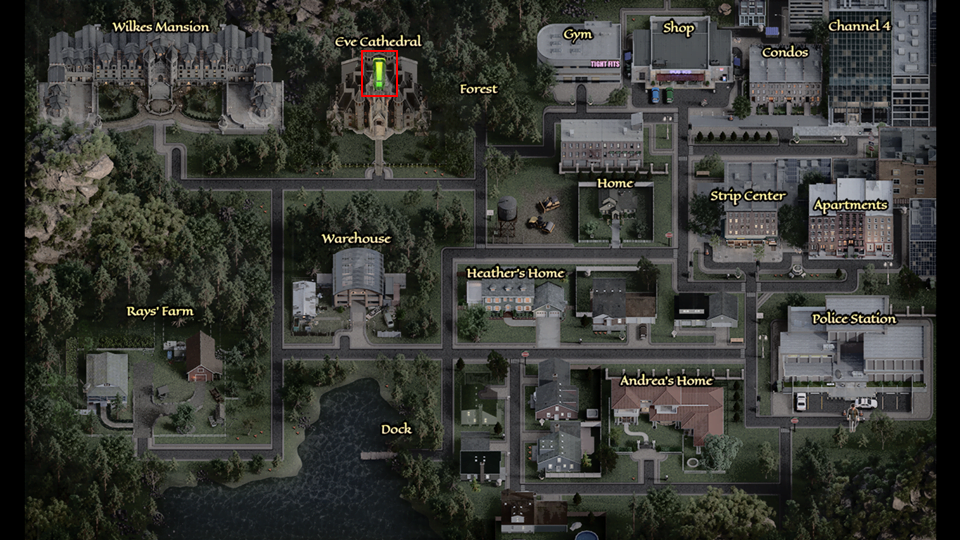
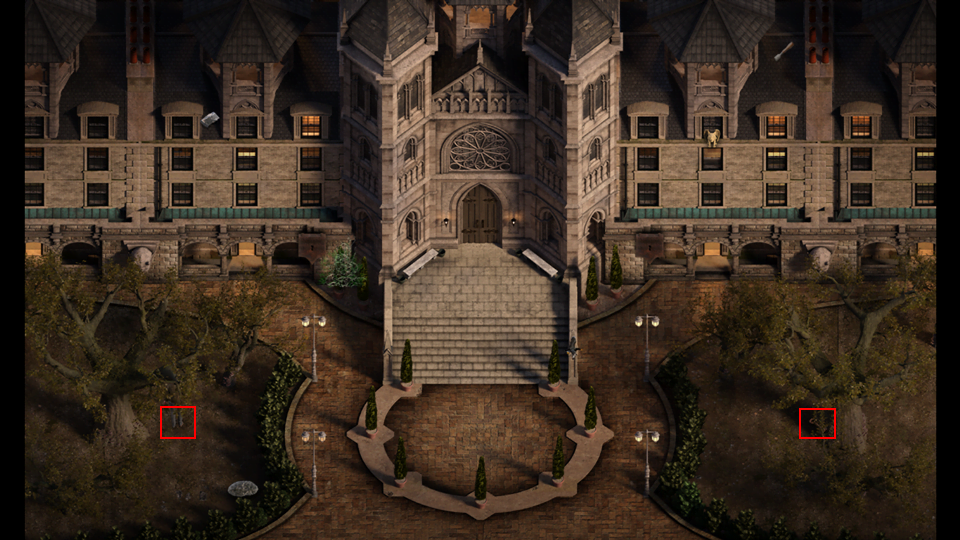
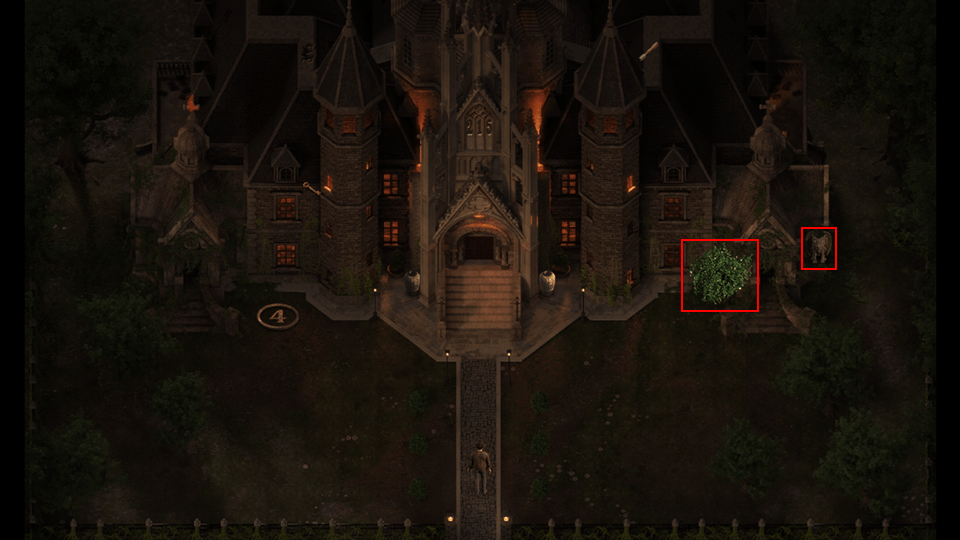
After the introduction you will be shown to the town map. This should look very familiar if you played Treasure of Nadia. The large green ! shows you items you need to complete to advance the story. Time is just an illusion. If there are multiple ! you can do them in any order, but they must all be done to advance the story. Just because there is a ! doesn’t mean that everything you need to do is that location. Go to Eve Cathedral by left clicking on the location. If you do not enter the area click again on the walk way.
Scene 2
Receive Oracle of the Seraph.
You meet Arianna. She informs you that she is an Empyrean and is here to assist you. She is the messenger of God’s will. Unfortunately she only knows what God has laid out for her to see, when the time is right.
Next Arianna introduces you to your phone. Please see the Your Phone section for additional information about your phone. You can now save your game. I highly recommend that you set your Move Speed to fast as Arianna recommends.
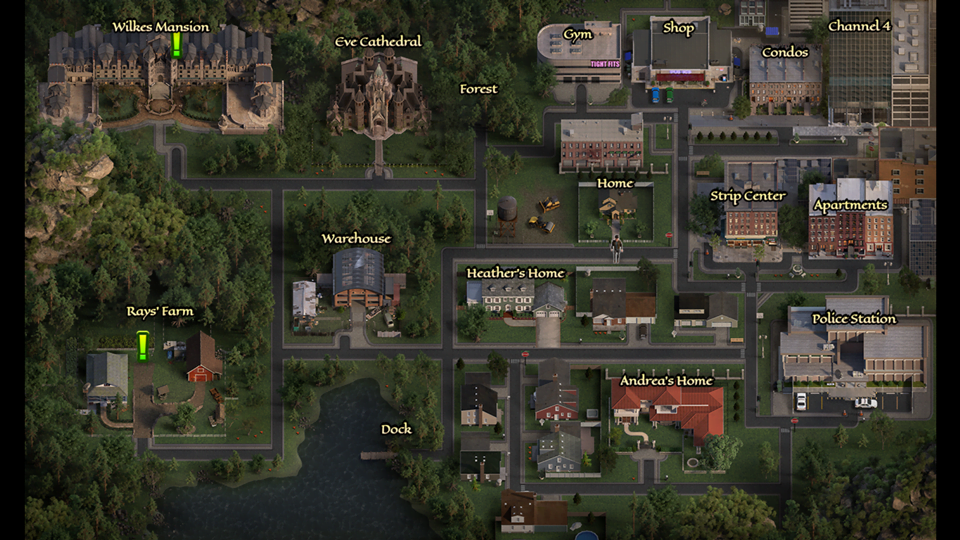
Now you will see two large green ! on your map, one at the Wilkes Mansion and one at Home. You can clear the ! in any order, but they must all be cleared in order to advance the story. Just because there is a ! at a location does not mean that everything you need to do is at that location. I will attempt to put the actions in the order that minimizes running around.
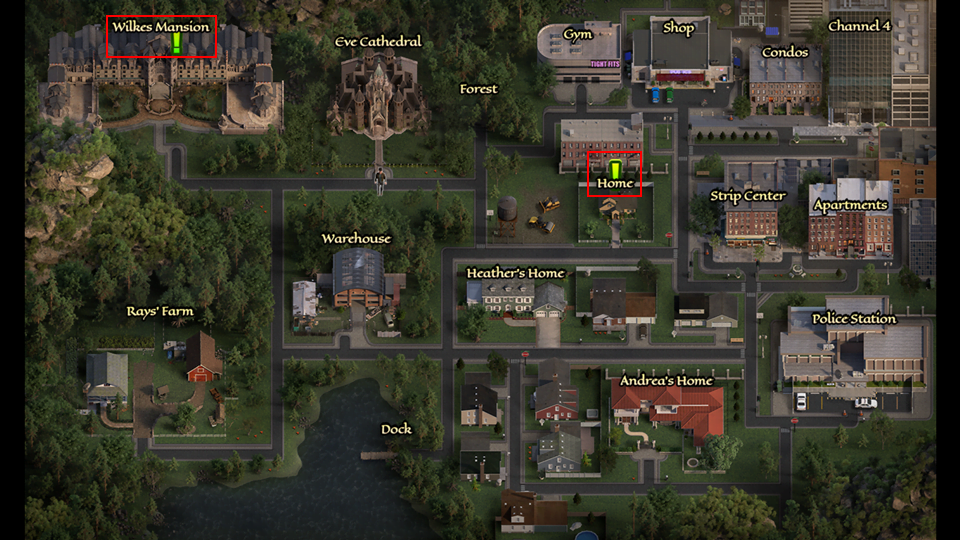
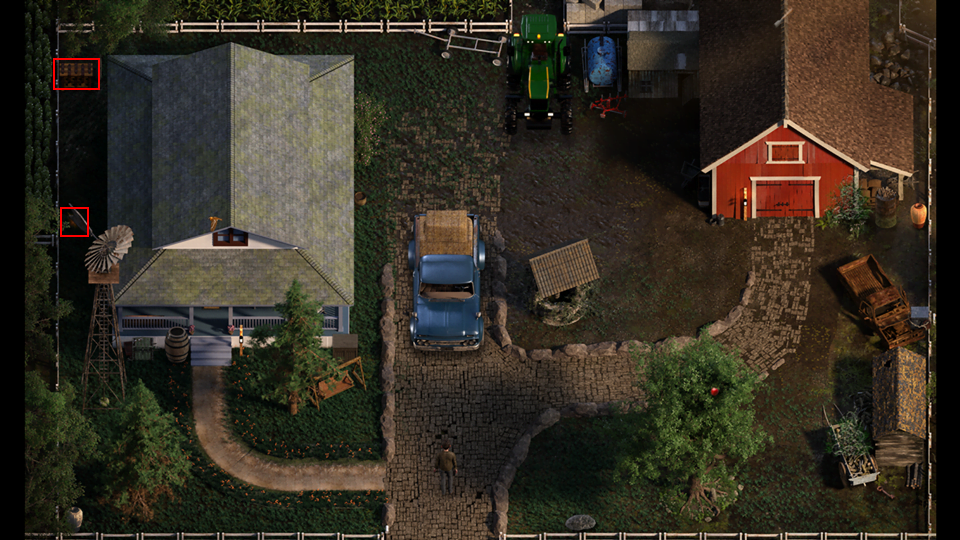
Go Home and meet Heather. There is a brief scene with Heather as she hands you the keys to the house and tells you that she will see you at dinner. Arianna will then show up and let you know that you can talk to her by selecting the Oracle option in your inventory. After talking to Heather and Arianna you will have a new ! on the map at the Rays’ Farm.
This is the perfect opportunity to introduce you to some of the items you will need to interact with in the game. Most of these things are gated and you will be unable to interact with them until you have the correct item in your inventory.
- Chest (Need Chest key to open)
- Profile (Each woman has a Profile to find)
- Metal Vase (Needs Hammer Shovel and Strength of 3+)
- Chest (Needs Lock Pick)
- Thorny Bush (Needs Weed Killer)
- Burn Barrel (Needs Blow Torch)
- Ceramic Vase (Needs Hammer Shovel)
- Rusty Locked Chest (Needs Hacksaw)
- Apple (Or any item our of reach that you need to throw something you need a Boomerang)
- Stone (Need Crowbar)

Go inside the Farm House and talk to Hannah
Scene 3*
- Exit to the Map
- Go to the Wilkes Mansion
Scene 4
- Return to the Map
- Go to the Apartments
Scene 5
- Go to the Map
- Go to Heather’s Home
- Enter the house
Scene 6*
- Exit your house
- Go get your mail from the mailbox
- Receive a check for $150
- Go to the Map
- Go to the Strip Center
- Talk to the guy outside of ♥♥♥♥’s Grill with a !
- Exit to the Map
- Go to the Shop
- Pick up the Car Fob and the coins. The coins will show in a few locations as you walk around, you should pick them up whenever you see them.
- Enter the Shop
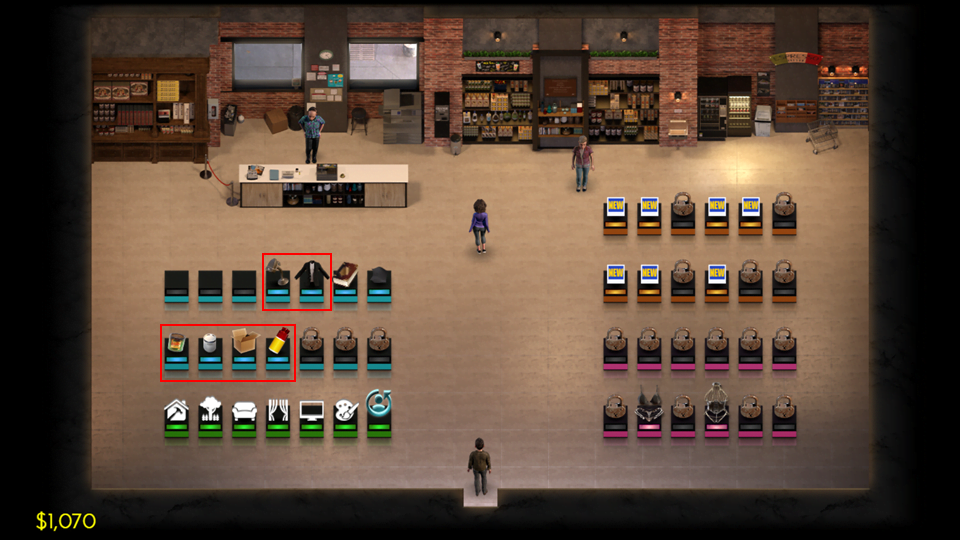
- Right now we want to purchase the Shovel for $50, the Gym Shirt for $50, and the Jump Shoe for $50.
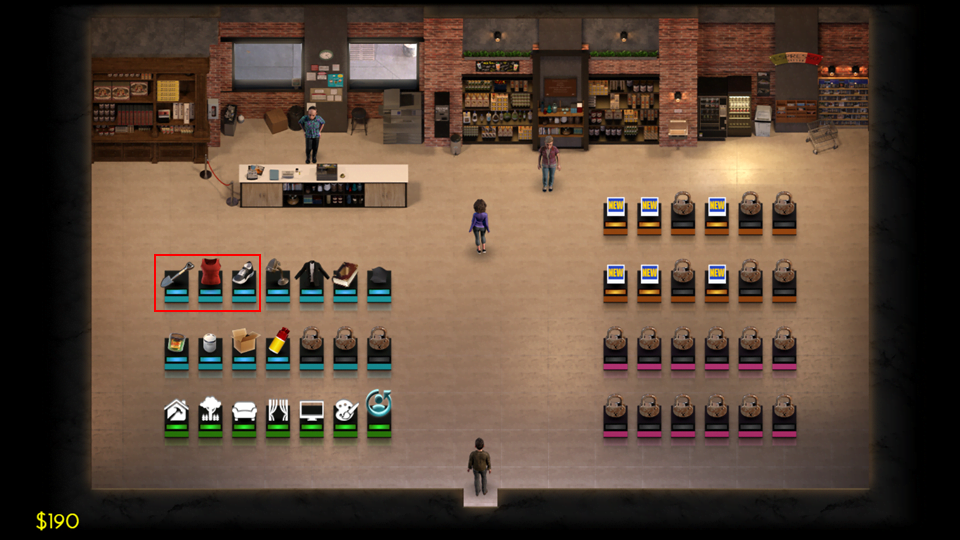
The first row, closest to the door, of items on the left improvements for your home. You have to improve your home in order to have women come over. The more sophisticated the woman the more stuff you’re going to need to purchase to have her come over for a booty call.
The second row on the left are crafting items. There can be only one of each item in existence. If you have the item in your inventory it won’t be for sale. As soon as you use the item it will appear available for sale in the Shop. Once you start earning money I recommend always having these items in your inventory.
The third row on the left are quest items. You will need to purchase them for various quests. These items will change as different items are required for quests.
All of the items on the right side are pictures or outfits for the women and are not necessary to complete the story.
- Go to the Map
- Go to the Forest
Walk around the Forest until a Sparkle appears. Unlike Treasure of Nadia, the Treasure Sparkles will not appear when you enter an area, they appear when you get close to them.
- Click on the Sparkle to collect the treasure
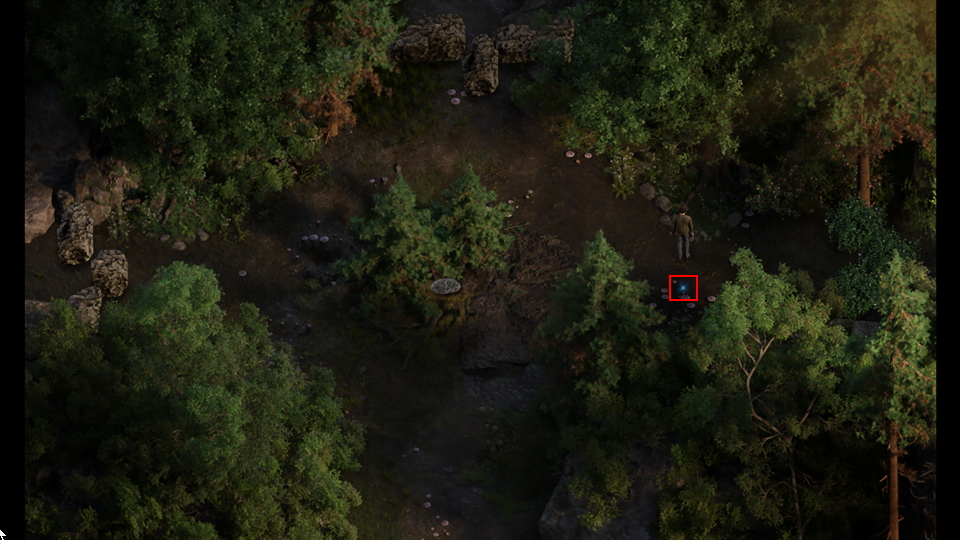
- Once you have the Stone Figurine exit to the Map
- Go to the Strip Center
- Give the Stone Figure to the man outside of ♥♥♥♥’s Grill
- Receive $200.
- Go to the Map
- Go to the Warehouse
You can now sell the artifacts you find to Jonathan. Unlike Treasure of Nadia the artifacts have very limited use and you can sell most of them to Jonathan for cash.
- Go to the Strip Center
- Go to the XXX Shop
Scene 7*
- Exit to the Map
- Go to the Gym
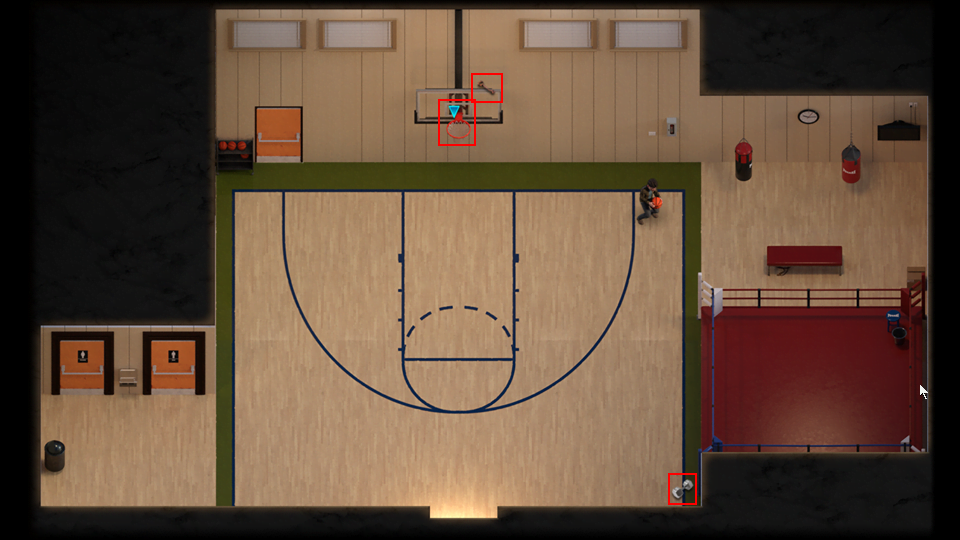
Scene 8
- Workout with Heather – Strength +1
Strength allows you to move heavy objects and acts as a gating mechanism, you need X strength to do Y.
- Exit to the Map
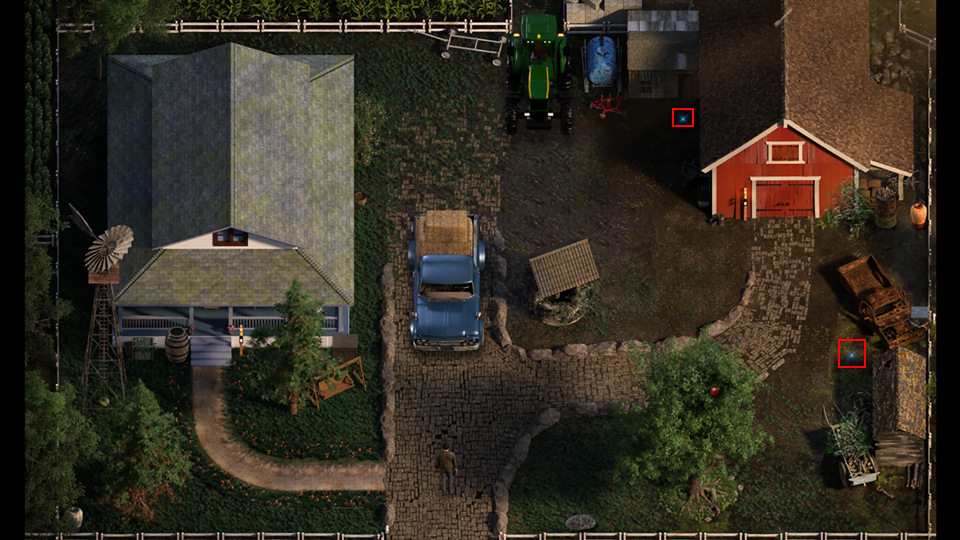
- Go to Rays’ Farm
- Receive a Clay Idol
Now you have a push puzzle where you have to get the hay to the barn door. If you mess up on a puzzle leave the area and come back and the puzzle will reset.
- Push Bale 2 left one then push Bale 1 out the door
- Walk behind Bale 3 and push Bale 2 back into its original position then out the door
- Push Bale 3 right one and then out the door
- Push Bale 5 left two and then out the door
- Push Bale 4 left three and then out the door

- Exit the Barn
Scene 9*
- Receive Hannah’s contact information
- Exit to the Map
- Go to the Apartments
Scene 10*
- Receive Erica’s contact information
- Follow Erica up the stairs to the left
A few things to note here.
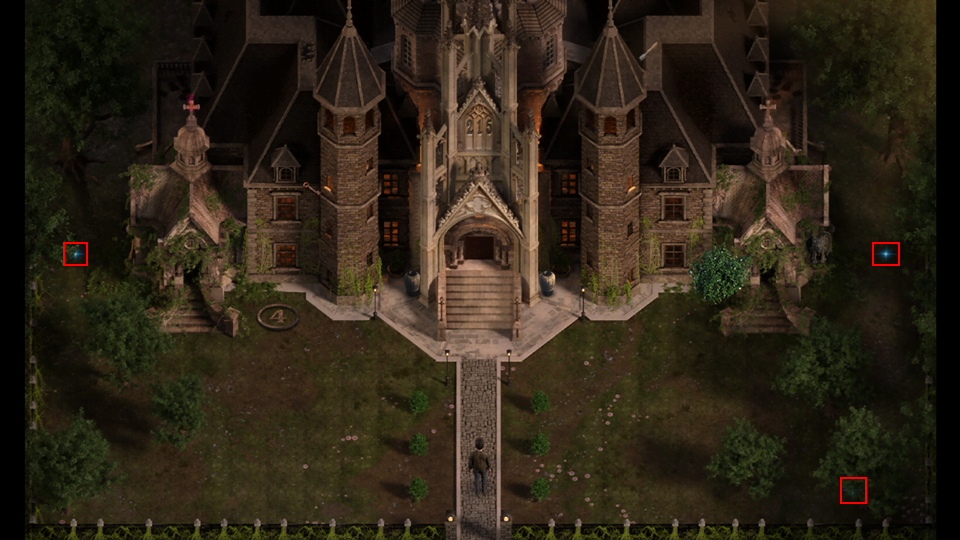
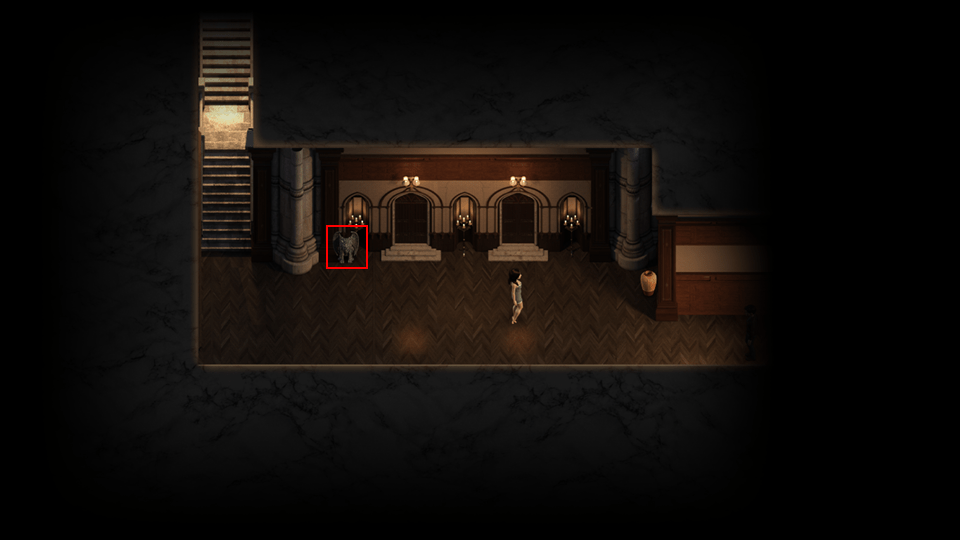
The number 5 in a circle. This is similar to the Treasure of Nadia numbers, where you had to light the number of torches equal to the number and something would appear there. In this case you have to activate gargoyles. There are only eight gargoyles to activate at this time.
The piece of paper on the table. You want to read all notes and document all numbers you encounter, especially if those numbers appear in odd places, as they are normally needed to open a lock.
Talk to the man with a ! over his head. He buried a statue under a tree, but he forgot where.
- Exit the mansion
Walkthrough – Part 2
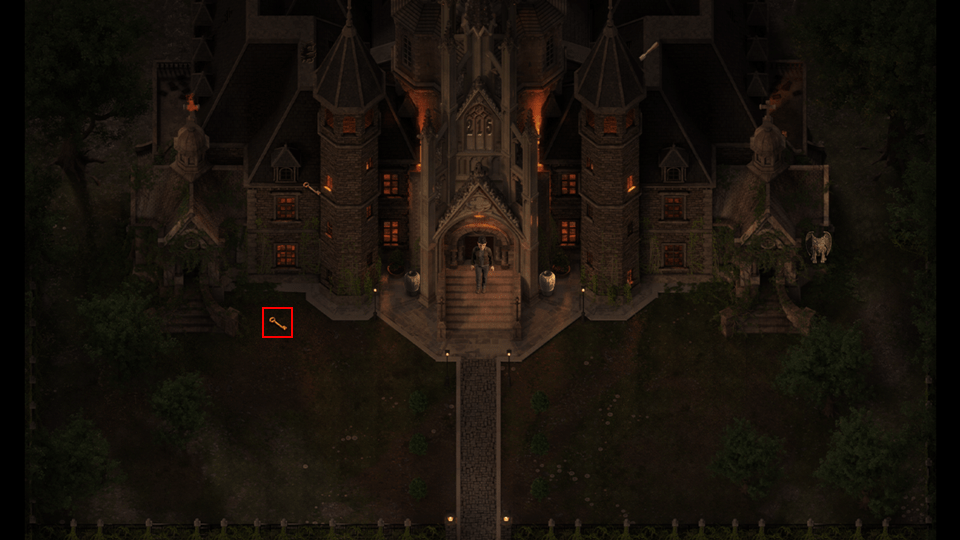
- Click near the tree on the left to find the Silver Statue
- Click on the key near the tree on the right
- Go to the Map
- Go to the Apartments
- Pick up the Wallet
- Go to the Map
- Go to Channel 4
- Talk to the guy with the !
- Give him the Key Fob and Wallet
- Receive a Chest Key
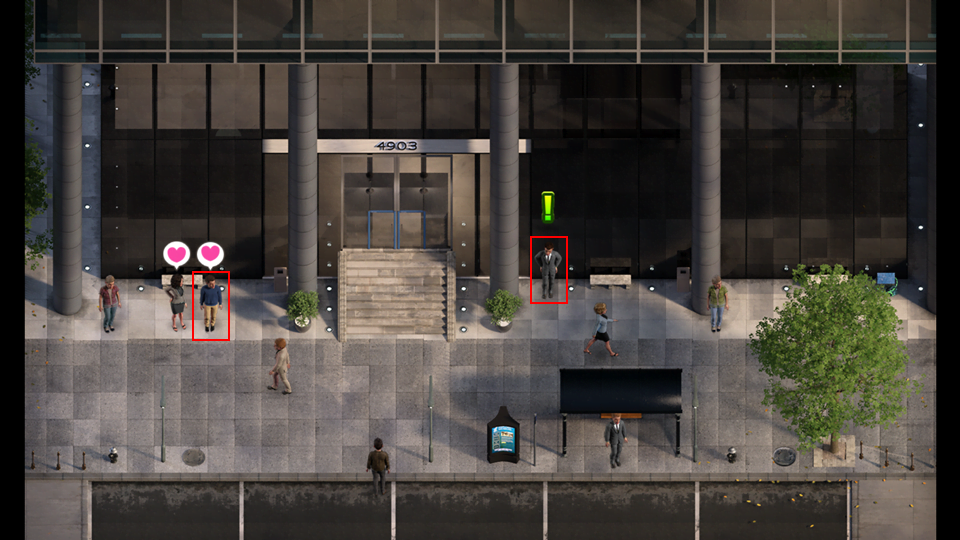
Make a note of the guy’s shirt color next to the woman with the hearts over his head.
- Go to the Map
- Go to the Strip Center
- You’ll hear a conversation between Henry and Diane
- Go into ♥♥♥♥’s Grill
- Talk to the guy with the ! over his head
- Tell him the color of the guy’s shirt that was outside of Channel 4 with the woman
- Exit Disk’s Grill
- Go to the XXX Shop
- When you exit the XXX Shop you will see a black cat on the right
- Click on the sidewalk to the right of the cat
- Receive Angry Black Cat
If you don’t catch the cat re-enter the XXX Shop and try again until you catch the cat.
- Exit to the Map
- Go to the Condos
- Talk to the guy with a !
- Give him the Angry Black Cat
- Receive $200
- Go to the Map
- Go back to Channel 4
- Receive $500 and Intelligence +1
Your Intelligence affects how much you are able to sell artifacts to Jonathan, more intelligence equals more money.
- Exit to the Map
- Go to the Rays’ Farm
- Unlock the Chest at the back of the house
- Pick up Kama Sutra Hannah – Handjob
- Click on the Orange Sparkle at the tail of the Weather Vane
- Receive Hannah’s Profile
- Go to the Map
- Go to the Gym
- Pick up the Dumbbell in the lower left
- Talk to the guy with a !
- Buy a Gym Membership for $20, no need to worry about a monthly charge, you won’t be here that long
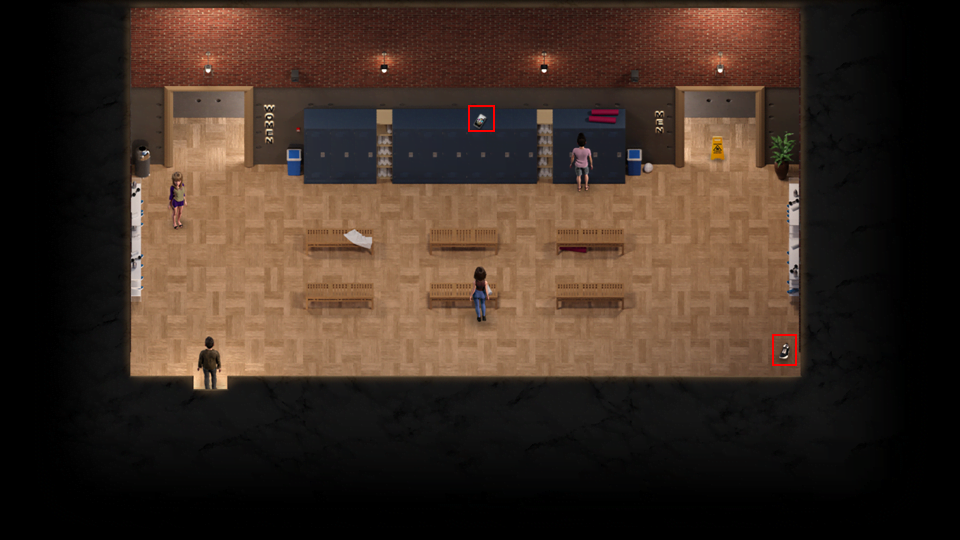
- Receive access to the locker area, the door on the right at the top of the stairs
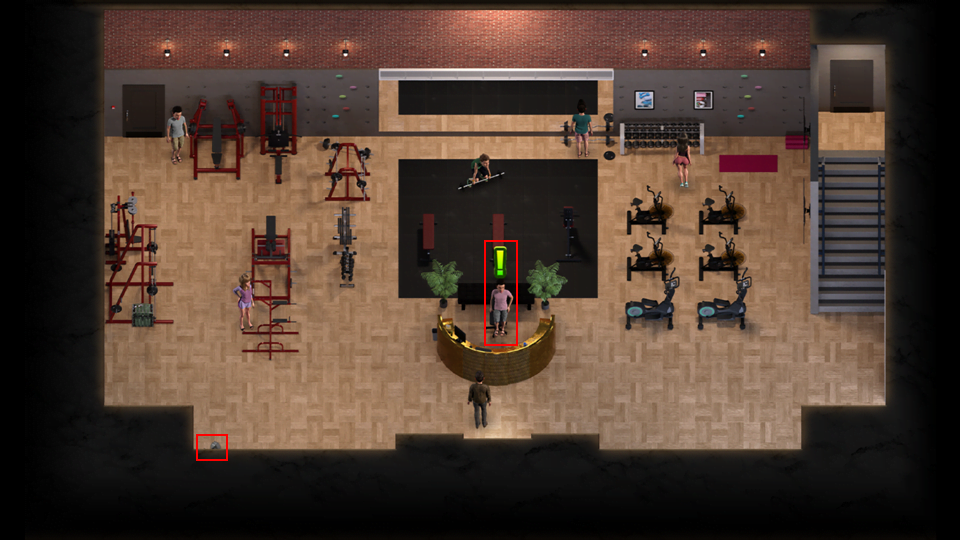
- Go to the Locker Room
- Pick up the Jump Shoe
- Now that you can jump you’ll be able to access some of the items that have been out of reach
- Pick up the Lost Phone
- Exit to Map
- Go to the Strip Center
- Go to ♥♥♥♥’s Grill
- Talk to Ella
- Go to the Map
- Go to the Forest
Scene 11
- Exit to Map
Scene 12
- Exit to the Map
Scene 13*
- Receive a Dildo
- Go to Eve Cathedral
- Enter Eve Cathedral
- Pick up the Shredded Cable
- Read the note:

- Push the box on the left up two and then right six
Scene 15
- Pick up the Crafting Scroll
- Receive Rigging Cable (Cable Crimp, Cable Crimp, Fishing Thimble, Shredded Cable)

- Arianna will tell you about Crafting and adds Angelcraft to your Inventory options
- Exit to the Map
- Go to the Shop
- Pick up the money on the top of the vending machine
- Receive $150
- Enter the Shop
- Purchase the Metal Detector for $140
- Purchase the Formal Suit for $400
- Purchase the Grease for $100
- Purchase the Basic Container for $100
- Purchase the Empty Box for $100
- Purchase the Glue for $100
From now on you’ll want to have Grease, Basic Container, Empty Box, and Glue in your inventory. If you use an item, or two, you’ll need to replace them. You’ll know they aren’t in your inventory if they are available for sale.
- Exit to the Map
- Go to the Dock
- Click on the Sparkle
- Receive Fishing Thimble

- Go to the Map
- Go to the Warehouse
- Click on the Sparkle
- Receive Cable Crimp
- Go to the Map
- Go to the Rays’ Farm
- Click on the two Sparkles
- The upper Sparkle is a Lock Pick
- The lower Sparkle is a Cable Crimp
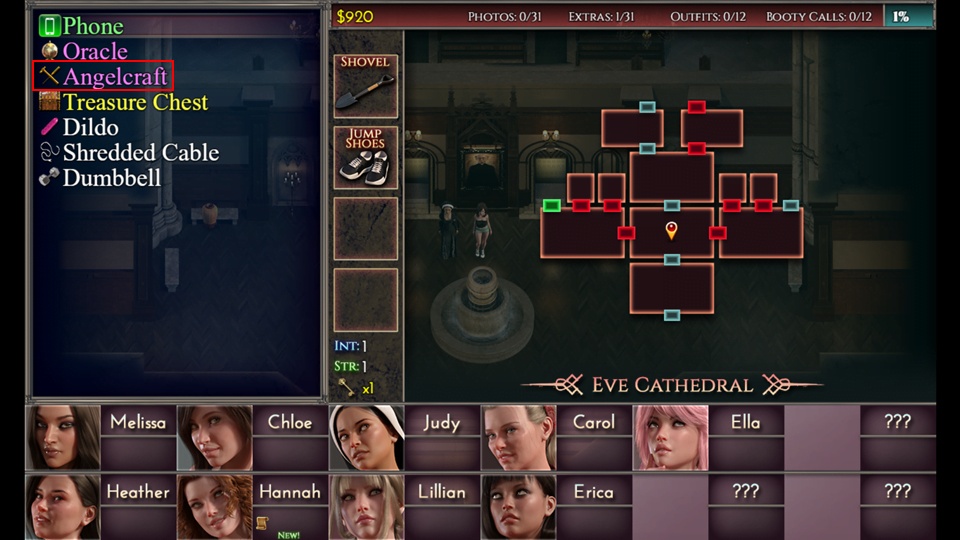
You now have all of the items you need to craft the Rigging Cable. Open your inventory and select Angelcraft. Click on the scroll in the upper left. If you have all of the items required to craft you will be asked if you want to craft the item. Select Yes. After the Rigging Cable is crafted you will notice that the crafting scroll disappeared. This is standard for quest items as you will not need to craft that item again. After you have crafted the Rigging Cable click on the !. This will open a portal to take you to the puzzle area. At the time of this guide there are only four puzzles completed.
- You will see that you have two puzzle available to you.
- The solutions to the Puzzles are in the Puzzle section, if you need them.
- Exit by walking out the bottom center of the screen
- Enter the Farm House
Scene 14*
- Exit to the Map
- Go to Eve Cathedral
- Pick up the two Sparkles on the sides of the Cathedral
- The left Sparkle is a Jade Figuriene
- The right Sparkle is a Lock Pick
- Next pick up the Sparkle in the bush in the lower right
- Receive a Chest Key
- Enter the Cathedral
- Go up (north)
- Talk to the Priest (man with the !)
- Go to the Map
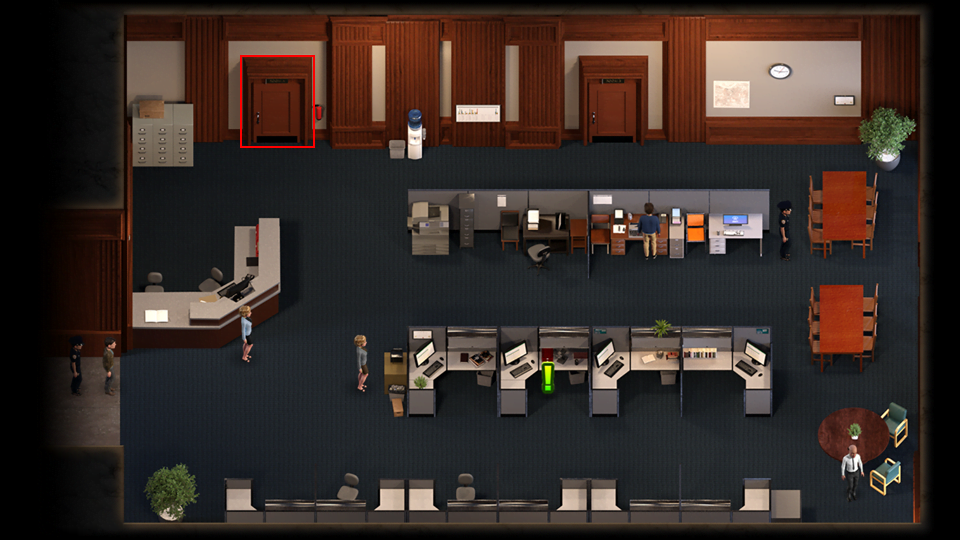
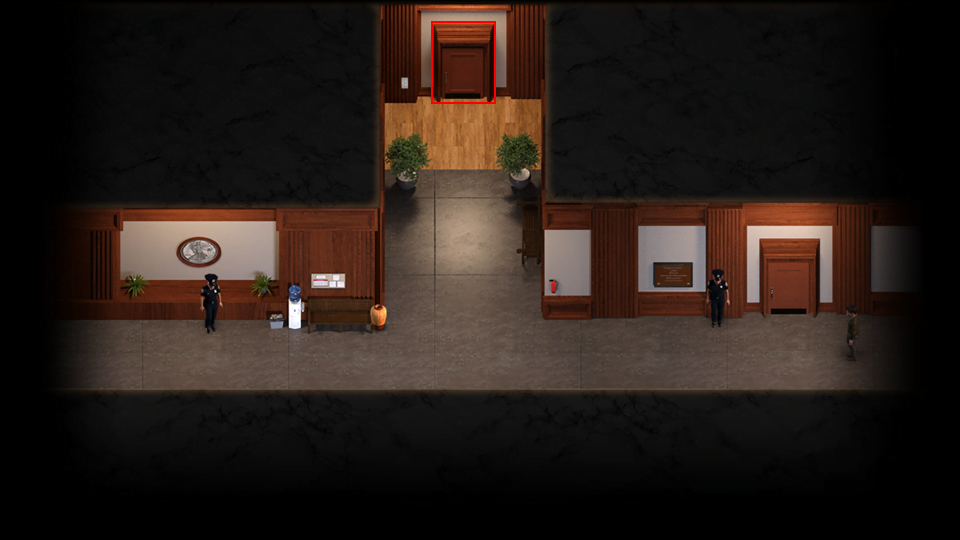
- Go to the Police Station
- Enter the Police Station
- Go Right
- Go to your desk, the one with the !
- You need higher security clearance
- Go to Melissa’s Office
- Click on the Sparkle in the file cabinet
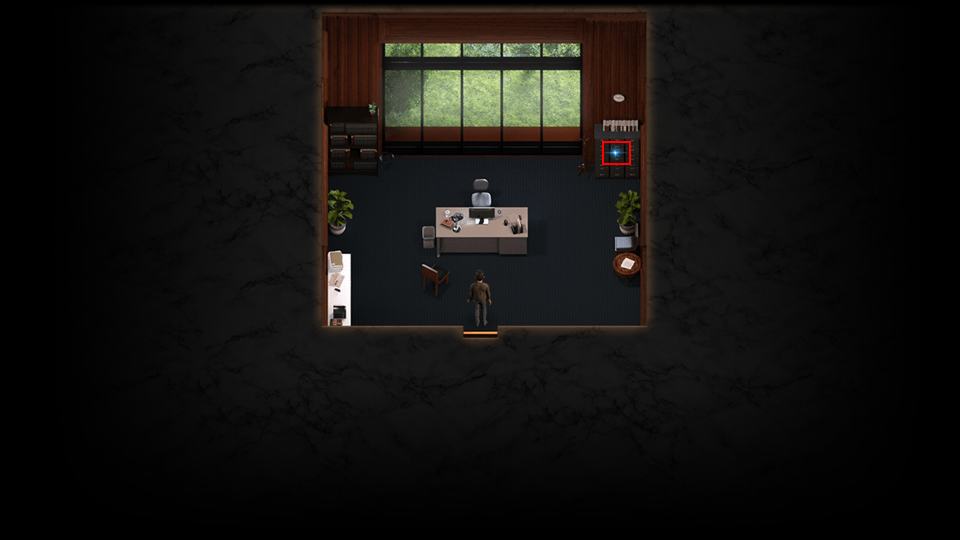
- Pick the Lock
- You can press a button or click the mouse to send the arrow down the channel to push the pins to the top. Once all of the pins are in the top row the lock is picked. The pin settings are entirely random.

- Receive an Access Card
- Go back to your desk
This is required, if you just enter the code it will work but you will be unable to advance the story.
- Go to the Condos
- Watch Melissa go into her Condo, Number 102
- Go back to the Police Station
- Go to your desk
- Enter Melissa’s house number, 102
Scene 16
- Exit to the Map
Walkthrough – Part 3
- Go to the Apartments
- Go to the Gym
- Talk to Larry

- Strength +1
- Go to the Strip Center
- Click on the trash can with the !
- Receive Blade Sharpener
- Go into ♥♥♥♥’s Grill
- Click on the woman with the !
- Receive Unknown Locker Key
- Exit to the Map
- Go back to the Apartments
Scene 17*
- Receive Ella’s contact information
- Go back into Ella’s cam room and pick up the Leather Straps
- Exit to the Map
- Go to Heather’s Home
- Enter the House
- Go into the back yard
- Pick up the Wood Handle by the umbrella
- Click on where the caterpillars pop up to catch them
- Continue until you catch six caterpillars
- Exit to the Map
- Go to the Rays’ Farm
- Pick up the key in the lower right
- A snake will come out. You’ll feed the caterpillars to the snake and then you can pick up the key
- Receive Chest Key
- Go into the Barn
- Pick up the bag of Fertilizer
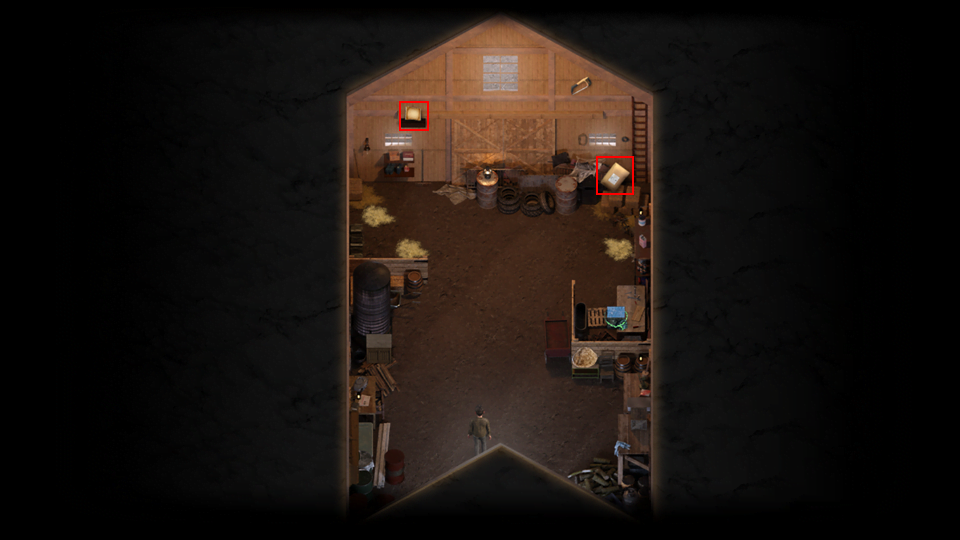
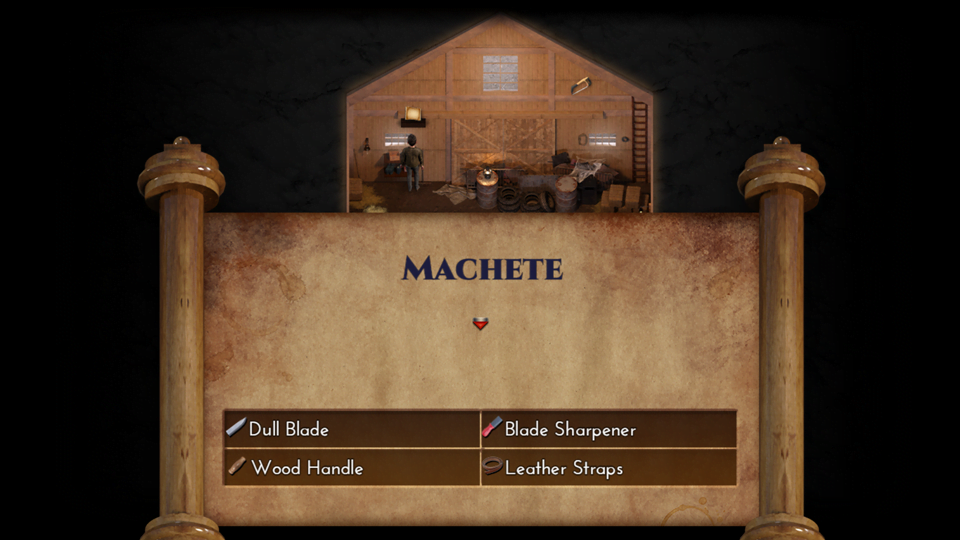
- Pick up the crafting scroll Machete (Dull Blade, Blade Sharpener, Wood Handle, Leather Straps)
- Return to Heather’s Home
- Enter the house
- Go into the back yard
- Talk to the women and deliver the fertilizer
- Turn on the water
Scene 18*
- Go right (east) to get to the kitchen
- Pick up the Dull Blade from the counter
- Craft the Machete
- Pick up the Hand Lotion from the Laundry Room

- Exit to the Map
- Go to the Forest
- Use the Machete to clear the brush on the trail to the east
- Receive Artifact Segment
Scene 19*
- Exit to the Map
- Go to the Warehouse
- Talk to Jonathan
- Exit to the map
- Go to the Police Station
- Talk to the Policeman out front with the !
- Tell him, “I know everything about this city.”
He will give you a quiz, for every right answer you get $100 and if you get them all right your intelligence will increase by 1.
- Tell him, “Bring on the quiz! I’m ready!”
Here are the answers:
- L
- 1
- Hot tub
- 3
- 102
- Waterfall
- Exit to the Map
- Go to the Apartments
Scene 20*
- Pick up the Cheese from the table
- Go left (west)
- Open the chest with your Lock Pick
- Receive Mansion Room Key
- Activate the grey Gargoyle, the eyes of the Gargoyle will flash red after being activated
- Go down (south)
- Go right (east)
- Activate the Gargoyle
- Go up (north) through the left door

- Receive Burner Flip Phone
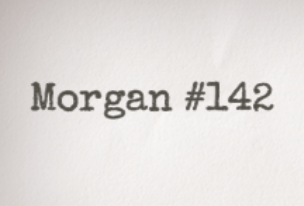
- Remember that note we found on the table on a previous visit?
- Open the phone and use 142 as the code
- Read the texts between Charles and Moragn
- Pick up the Old Book in the lower left corner
- Open the Chest
- Pick up Kama Sutra Hannah – Blowjob
- Go left (west)
- Exit the mansion
- Click on the Sparkle
- Receive Lock Pick
- Exit to the Map
- Go to Eve Cathedral
- Go to the Map
- Return to Eve Cathedral
- Use your Machete to chop down the bush
- Pick up the Crucifix
- Activate the Gargoyle on the right corner of the Cathedral
- Remember the note from the attic?
Note the number on the Cathedral, 215:

- Enter the Cathedral
- Go left (west)
Scene 21
- Go left (west)
- Activate the Gargoyle, this is the 4th Gargoyle and will activate the circle outside of the Cathedral
- Exit the Cathedral
- You will see the Circle 4 being replaced by a key
- Pick up the Mysterious Key
- Exit to the Map
- Go to Rays’ Farm
- Enter the Barn
Scene 22*
- Exit the Barn
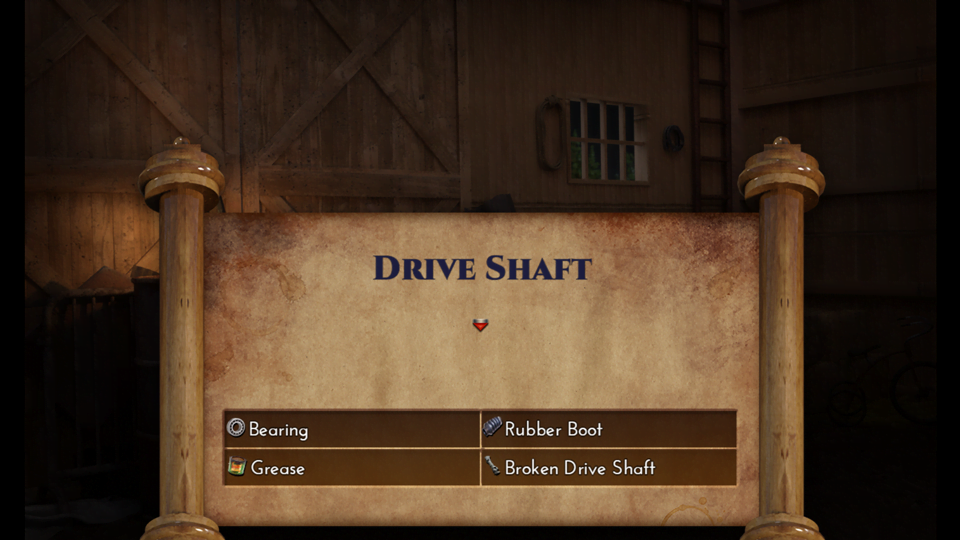
- Receive crafting scroll Drive Shaft (Bearing, Rubber Boot, Grease, Broken Drive Shaft)
- Receive Broken Drive Shaft
- Exit to Map
- Go to the Warehouse
- Cut down the bush in the lower right
- Pick up the Rubber Boot
- Pick up the Bearing
- Craft the Drive Shaft
- Exit to Map
- Since we’ve used our Grease, lets go replace it
- Go to the Shop
- Click on the mouse to the left of the Shop
- You will put out the Cheese and the mouse will knock down the key for you
- Pick up the Chest Key
- Enter the Shop
- Purchase Old Book ($100)
- Purchase Rubber Wrap ($200)
- Purchase Grease ($100)

- Go to the Map
- Go to the Rays’ Farm
- Go into the Barn
- Hannah will fix the tractor and open the path to the Cave
- Go to the Farm House
- Receive Lantern
- Go back to the Cave
- Enter the Cave
Scene 23*
- Exit to the Map
- Go Home
- Go to the Map
- Go to the Police Station
- Exit to the Map
- Go to the Warehouse
Scene 24
- Exit to the Map
- Return to the Police Station
- Enter the Police Station
- Go right (east)
- Click on David’s computer and enter a password, any password will do
- Go left (west)
- Go left (west)
- Enter the Interrogation Room (right door)
- Enter the Police Gym (center door)
Scene 25*
Notice the Basket Ball on top of the water stream in the women’s locker room?
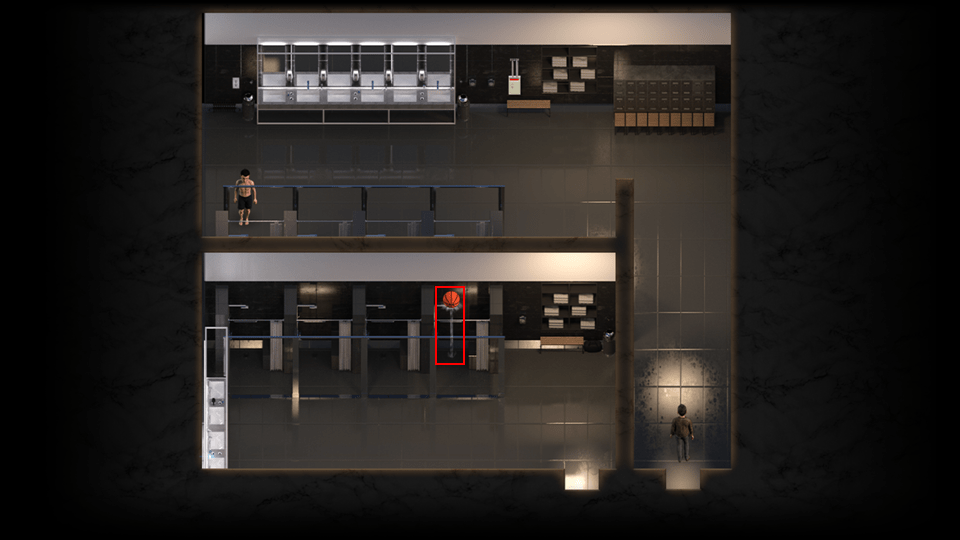
- Exit the Police Station
- Use some Grease on the valve handle on the left
- Go back inside the Police Station
- Go to the Women’s Locker Room
- Click on the Basket Ball
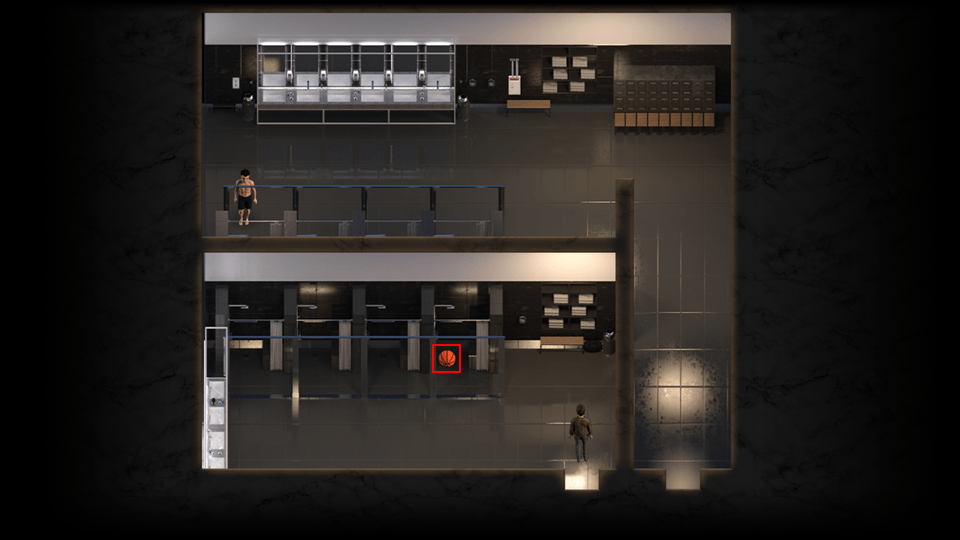
- Go back to the Gym
- Click on the Basket Ball, this will activate the Trick Shot mini game

If you click the mouse when the arrow is over the net you will get a basket. How much you earn depends on your Intelligence. With an Intelligence of 1 you earn $5, with an Intelligence of 2 you earn $6. Each consecutive shot will add that amount, so if shot 1 is $5, shot 2 is $10, shot 3 is $15, and so on.
- Right now you want to knock the key off the backboard
- Play until you knock off the key
- Pick up the Chest Key
- Pick up the Dumbbell
- Go down (south)
- Go right (east)
- Go right (east)
- Go to the Map
Walkthrough – Part 4
- Go to the Strip Center
- Talk to the woman with the !
- Receive $300
- Exit to the Map
- Go to the Shop
- Purchase Grease ($100) to refill your supply
- Exit to the Map
- Go to the Wilkes Mansion
Scene 26*
- Go to the Map
- Go to the Strip Center
- Go to the XXX Shop
- Receive Mysterious Key
- Exit to the Map
- Return to the Wilkes Mansion
- Use the Mysterious Keys on the locks on each side of the mansion

Scene 27
Push the push block to either one of the pressure plates, then stand on the other pressure plate.

- Exit to the Map
- Go to the Rays’ Farm
- Go to the Cave
- Enter the Cave
- Go up (north)
- Activate the Gargoyle to the right of the stairs

- Exit to the Map
- Go to the Wilkes Mansion
- Enter the Mansion
- Go left (west)
- The circle 5 will now change
- Pick up the Hammer Shovel

- Go right (east)
- With your new Hammer Shovel break the two jars, bottom left and right
- Receive a Silver Figurine and a Copper Idol

- Exit to the Map
- Go to Heather’s Home
- Enter the house
- Go upstairs
- Click on the Orange Sparkle in the lower left
- Receive Heather’s Profile
- Go to the Bathroom (middle door)

- Break the jar
- Receive a Chest Key
- Click on the two Sparkles
- Receive Soap
- Receive Suntan Oil

Scene 28*
- Receive Carol’s contact information
- Go to the back yard
- Go upstairs
- Go to the bathroom
- Put on your clothes
- Ignore the Sparkle, it just puts your clothes back on the floor

- Go to the Rays’ Farm
- Break the jar by the barn
- Pick up crafting scroll for Aloe Lotion (Hand Lotion, Aloe Plant, Basic Container, Essence of Medicine)


- Go up (north)
- Click on the rocks blocking your path to the north.

- Go up (north)
- Collect the Aloe plant
Aloe, like the grease, basic container, empty box, and glue will only appear if you do not have it in your inventory, so just like those items you’re going to want to get another one when you use the one in inventory.

- Return to the Map
- Go to Eve Cathedral
- Enter the Cathedral
- Break the jar in the entry way
- Receive Old Book

- Go up (north)
- Break the jar on the stage
- Receive Clay Idol

- Go up the stairs on the right
- Read the note

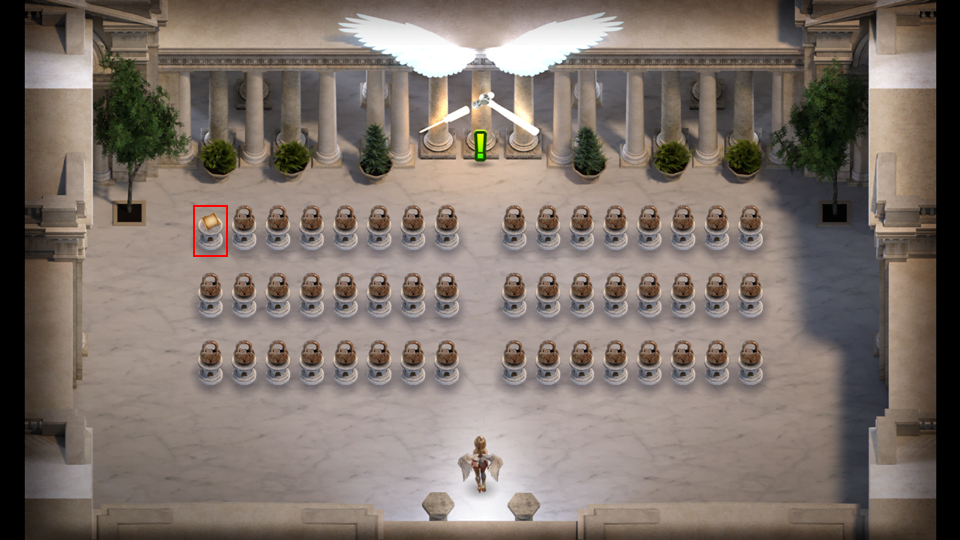
- Click on the Offering Plate
The Offering Plate allows you to convert artifacts into Essences, which you will need for crafting. Long story short non-metal (other than Jade) items will give you an Essence of Intelligence and Jade and metal items will give you an Essence of Intelligence. Currently you cannot create an Essence of Strength. You can carry multiple Essences. Please see the Offerings section for the preferred order of offerings, listed from least valuable to most valuable.
Since we need an Essence of Medicine offer a Stone Figurine if you have one, a Clay Statue if you do not.
Receive an Essence of Medicine.
- Craft Aloe Lotion
- While you’re here offer a Jade Figurine also, if you have one.
- Receive an Essence of Intelligence

- Exit to the Map
- Go to Heather’s Home
- Enter the house
- Go right (east)
- Click on one of the women to give them the Aloe Lotion
Scene 29*
- Exit to the Map
- Go to Eve Cathedral
- Go right (east)
- Break the jar
- Receive crafting scroll for Seed of Knowledge
- Craft a Seed of Knowledge
- Open your Inventory
- Use the Seed of Knowledge

- Click on the Clock
- Receive Batteries

- Go left (west)
- Go up (north)
- Click on the pile of clothes
- Receive Judy’s Clothing

- Exit the Cathedral
- Chop down the bushes blocking the path to the right (east)

While walking in the Forest you may discover treasures, Sparkles will appear as you walk near them. Pick up any treasures you discover.
- Go right (east)
- Go right (east)
- Break the rocks blocking your path to the right (east)
- Break the rocks blocking your path up (north)

- Go up (north)
Scene 31*
- Exit to the Map
- Go to the Gym
- Talk to Larry and give him the batteries
Scene 30*
- Exit to the Map
- Go to the Police Station
- Enter the Police Station
- Go right (east)
- Go left (west)
- Talk to the woman with an !
- She’s expecting a package
- Don’t give her anything
- Go right (east)
- Open your inventory and select the Empty Box
- Select Yes to put something in the box
- Put a Silver Figurine in the box if you have one, if not you can use a Copper Idol or Silver Statue
- Go left (west)
- Click on the woman with an ! and give her the Filled Heavy Box
- Go up either set of stairs
- Click on the Weak Wall section near the right hand stairs
- Talk to the guy with the !
- Talk to Andrea, she is standing by the vending machine

- Go right (east)
- Read the note on the table in the upper right

- Take note of the time on three clocks on the wall (169)

- Go left (west)
- Go downstairs
You’ll now see a key at the top of the center column on the right, because you broke the weak wall. You can’t pick it up yet, but that’s why you broke the wall.
- Click on the Safe on the right
- Pick the lock
- Receive a Belt Buckle

- Go back up stairs
- Talk to the guy with the !
- Receive a Chest Key
- Exit to the Map
- Go to the Shop
- Purchase the Basic Container and Empty Box so you’ll have them in your inventory again
- Exit to the Map
- Go to the Strip Center
- Go to ♥♥♥♥’s Grill
- Break the jar in the upper left
- Receive Phosphoric Acid
- Talk to the Bar Tender, the guy with the !
- Buy the Red Wine for $50

- Exit to the Map
Walkthrough – Part 5
- Go to Andrea’s Home
Scene 32
- Click on the green vines right of the door
- Receive Sodium Carbonate
- Break the jar in the lower right
- Pick up crafting scroll Seed of Strength (Dumbellx3, Essence of Strength)


- Exit to the Map
- Go to the Police Station
- Enter the Police Station
- Go left (west)
- Break the jar
- Pick up crafting scroll Soot Cleaner
- Craft Soot Cleaner


- Exit to the Map
- Go to Eve Cathedral
- Enter Cathedral
- Go left (west)
- Break the jar
- Receive Essence of Strength
- Go to Judy’s room (left door)

Scene 33*
- Exit to the Map
- Go to the Rays’ Farm
- Enter the Farm House
- Talk to either of the women
Scene 34*
- Enter the house
- Go upstairs
- Pick up the Dumbbell
- Craft Seed of Strength
- Open your inventory and use the Seed of Strength
- Strength +1
- You can now break open the metal jars
- Time to pick up some stuff

- Exit the Farm House
- Break the Metal Jar in the lower left corner
- Receive crafting scroll Hatchet (Axe Head, Handle, Grip, Glue)

- Exit to the Map
- Exit to the Map
- Go to Eve Cathedral
- Break the Metal Jars that are left and right of the door
- Receive Copper Idol
- Receive Silver Statue

- Exit to the Map
- Go to the Shop
- Break the Metal Jar by the vending machine
- Receive Rubber Waste

- Enter the Shop
- Replace your Basic Container
- Exit to the Map
- Go to the Apartments
- Break the Metal Jar in the upper right
- Pick up crafting scroll 2-Sided Dildo (Empty Package, Dildo x 2, Glue)


- Exit to the Map
- Go to the Dock
- Click on the weak ground
- Receive Limestone

- Exit to Map
- Go to Andrea’s Home
- Break the Metal Jar in the lower left and by the tree
- Receive Gold Figurine
- Receive Titan Shovel Handle

- Return to Map
- Go to the Police Station
- Enter the Police Station
- Go up stairs
- Break the Metal Jar in the Interrogation Room
- Receive Metal Hook

- Go down (south)
- Go right (east)
- Go up stairs
- Break the Metal Jar in the upper right
- Receive Lock Pick

- Exit to the Map
- Go to Channel 4
- Enter the building
Scene 35*
- Pick up the Rigging Cable
- Create Grapple Hook
- Good, now we can get a lot of that stuff that has been out of reach
- Pick up the Bag of Junk in the lower right corner

- Go left (west)
- Pick up the Bag of Junk to the left of the plant in the lower center (click on the wall to pick up)
- Pick up the Bag of Junk behind the desk, next to the woman with the !
- Take the elevators down to the first floor

- Talk to the man with the !
- Break the jar in the lower left corner
- Receive $300
- Pick up the Bag of Junk in the lower right corner

- Open your inventory and select the Empty Box
- Select Yes
- Select the Bag of Junk x 4
- Receive Filled Box
- Take the elevators
- Talk to the woman with the ! (click on the desk in front of her)
- Take the elevators
- Talk to the man with the !
- Receive $2,000
- Exit to the Map
- Go to the Wilkes Mansion
- Use your Grapple Hook to pick up the Axe Head on the left roof
- Use your Grapple Hook on the Gargoyle, on the right, to enter the Mansion

Scene 36*
- Receive Lillian’s contact information
- Enter the Mansion
- Go up (north)
- Go up (north)
- Click on the greenery on the right fire place
- Receive Sodium Carbonate
- Activate the Gargoyle in the upper right

- Go up (north)
- Click on the weak ground
- Receive Coal

- Go left (west)
- Break the jar
- Receive Titan Shovel Head

- Go right (east)
- Go right (east)
- Use your Grapple Hook to pick up the Handle
- Break the rocks and cut down the bushes in front of the arch

- Go left (west)
- Enter the mansion
- Exit to the Map
- Go to the Police Station
- Enter the Police Station
Scene 37*
- Go down (south)
- Go right (east)
- Go right (east)
- Go to Melissa’s office

- Exit to the Map
- A Grappling we will go
- Go to Andrea’s Home
- Use your Grapple Hook to pick up the Grip on the roof
- Craft Hatchet

- Exit to the Map
- Go to Rays’ Farm
- Go up (north)
- Use your Grapple Hook to pick up the Sparkle
- Receive Silver Statue

- Go up (north)
- Pick up the Aloe Plant for your inventory
- Use your Hatchet on the dead tree
- Receive Chest Key Half
There are two different Chest Key Halves, a Front and a Back. You need one of each to make a complete Chest Key using Glue.

- Go left (west)
- Chop down the old, dead tree

- Pick up the Farmhouse Key
- Open the chest
- Pick up Kama Sutra Lillian – ♥♥♥♥♥ Sex

- Exit to the Map
- Go to the Warehouse
- Use your Hatchet on the two dead trees
- Receive Wrench
- Yes, another tool
- Use the Wrench on the rusted out car
- Receive Rubber Boot
- Receive crafting scroll Grippy Shoes (Old Shoe x 2, Rubber Waste, Glue)


- Exit to Map
Walkthrough – Part 6
- Go to Heather’s Home
- Use your Grapple Hook to get the Old Shoe off the roof

- Exit to the Map
- Go to the Police Station
- Use your Wrench on the Fire Hydrant
- Pick up the Chest Key

- Exit to the Map
- Go to the Apartments
- Use your Grapple Hook to pick up Chest Key Half
- While we are here open up the Chest in the upper left
- Receive Kama Sutra Erica – Eat Out

- Exit to the Map
- Go to the Strip Center
- Exit to the Map
- Go to the Shop
- Purchase the Empty Box and Glue to refill your inventory
- Exit to the Map
- Go to the Forest
- Go right (east)
- Use your Grapple Hook to get the Sparkle
- Receive a Gold Figurine
- Click on the weak ground
- Receive Sand
- Open the Chest
- Pick up Kama Sutra Ella – Sixty-Nine

- Go left (west)
- Go up (north)
- Use your Hatchet on the dead tree by the Bee Hive
- Receive Chest Key Half
- Open the Chest
- Pick up Kama Sutra Erica – ♥♥♥♥♥ Sex

- Go down (south)
- Go left (west)
- Use your Hatchet on the dead tree
- Receive Copper Idol
- Use your Grapple Hook on the Sparkle
- Receive Silver Statue

- Go left (west)
- Go down (south)
- Click at the base of the wall under the Chest Key to use your Grapple Hook to get the Chest Key

- Enter the Cathedral
- Go left (west)
- Go up stairs
- When you arrive the 6 in a circle will change into a Lid of Extreme Holiness, pick it up
- Pick up the Old Book
- Break the jar to the left of the door
- Pick up crafting scroll for Glass Pane (Sand, Coal, Limestone, Sodium Carbonate)
- Craft Glass Pane


- Exit the Cathedral
- Talk to the Priest
- Exit to the Map
- Go to the Police Station
- Enter the Police Station
- Go upstairs
- Go downstairs
- Go right (east)
- Go to Melissa’s Office
Scene 40*
- Exit to the Map
- Go to the Cathedral
- Enter Cathedral
- Go left (west)
- Go to Judy’s room (left door)
Scene 38*
- Go up (north)
You should see a number of Sparkles appear along the trip, feel free to pick them up as you go, they will be random artifacts.
- Go right (east)
- Go right (east)
- Go left (west)
- Go left (west)
- Go down (south)
- Talk to the Priest
Receive crafting scroll for Holy Water Bomb (Holy Water, Chalice, Essence of Intelligence, and Lid of Extreme Holiness).

- Enter the Cathedral
- Click on the Fountain
- Provided you have a Basic Container in your inventory you will receive Holy Water
This will use up your Basic Container. I recommend that you add Holy Water to the things you always have on hand. You can have both Holy Water and a Basic Container in your inventory at the same time.

- Go up (north)
- Go up the left stairs
- Go upstairs
- Use your Grapple Hook to get the Chalice
- Pick up the Old Book

- Go downstairs
- Go downstairs
- Go up the right stairs
Make an offering of a Jade Figurine if you have one (You can offer a metal item, but they are worth more, see the Offering Section for values).
- Receive an Essence of Intelligence
- Craft a Holy Water Bomb
- Exit the Cathedral
- Talk to the Priest
Scene 39*
- Enter the Cathedral
- Go left (west)
- Enter Judy’s bathroom (right door)
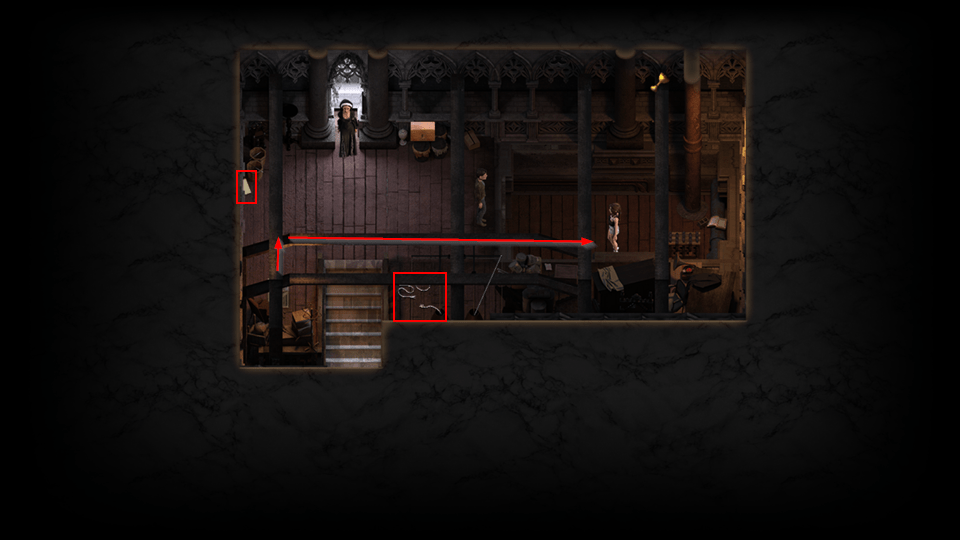
Click on the edges of the screen to follow the arrow path. This is one of my big complaints about the Genesis Order, too many of these objects hidden in the walls for you to find. In general when there is one of these I will show an arrow path. Once you’re inside the wall the rest of it is easy as you click near the edge of the screen to walk to the end of the path.
- Receive a Chest Key

- Exit to the Map
- Go to the Apartments
- Break the Metal Jar in the lower left corner
- Receive Empty Package

- Exit to the Map
- Go to the Strip Center
- Enter the XXX Shop
- Talk to Tasha
- Buy the dildos for $200
- Receive Dildos
- Craft 2-Sided Dildo
- Exit to the Map
- Go to the Warehouse
- Talk to Jonathan
- Sell all valuables
- Exit to the Map
- Go to the Shop, time to refresh our inventory
- Purchase the Treasure Detector for $3,000 (This is why we cashed out our artifacts)
- Purchase Basic Container and Glue
- Open your inventory and select either Chest Key Back Half or Chest Key Front Half
- Receive a Chest Key
- Purchase another Glue

- Exit to the Map
- Return to Ella’s Apartment (Right Door)
Scene 41*
- Exit to the Map
- Go to the Police Station
- Enter the Police Station
- Go left (west)
- Talk to the officer guarding the door to the gym (center door)
- Refuse the bribe
- Give a $500 bribe
It is possible to get it down to $50 if you raise your Intelligence to four, but that will require you to create another Seed of Intelligence and come back. Since money is easy, now that you have a Treasure Detector, I advise paying the $500.
- Go up (north)
Scene 42
- Exit the Police Station
- Talk to the two officers out front
- Exit to the Map
- Go to Heather’s Home
- Enter the house
- Go upstairs
- Break the Metal Jar in the lower right
- Receive Chest Key Half
- Enter Chloe’s Room (right door)

Scene 43*
- Pick up the Dumbbell

- Exit to the Map
- Open your Inventory and select either Chest Key Back Half or Chest Key Front Half
- Receive a Chest Key
- Go to the Shop and replace your Glue
- Go to the Map
- Go to the Rays’ Farm
- Enter the house
Scene 44*
- Exit to the Map
- Go to the Wilkes Mansion
- Enter the Mansion
- Receive Chapel Key Half
- Go up (north)
- Go up the right staircase
- Go right (east)
- Break the Metal Jar in the lower right
- Receive Chapel Key Half
- Open your inventory and select one of the Chapel Key Halves
- Receive Chapel Key

- Go left (west)
- Go up (north)
- Go up (north)
- Go right (east)
- Chop down the three dead trees with your Hatchet
- Receive Gold Statue
- Receive Clay Idol
- Receive Clay Statue
- Open the door in the arch with the Chapel Key

- Click the smoking item on the altar
- Read the two notes
- This is the combination to the chest in the room
- I’ll save you the running around
- There are Four (4) Lions above the fires
- There are Six (6) Guardians on the red carpet
- There are Two (2) Gardians by the clock
- The combination is 462
- Use the combination 462 to open the box
- Receive Artifact Segment


Scene 46*
- Exit to the Map
Walkthrough – Part 7
- Go to Andrea’s Home
- Talk to either of the women
Scene 45*
- Exit to the Map
- Go to Eve Cathedral
- Exit to the Map
- Go to Heather’s Home
- Click on Carol to give her the grease and rubber boot
Scene 47*
- Exit to the Map
- Go to the Apartments
- Exit to the Map
- Go to the Warehouse
- Trade Jonathan a Clay Statue for Erica’s Apartment Key
- Exit to the Map
- Go to the Apartments
- Talk to Erica to give her the Apartment Key
- Exit to the Map
- Go to the Shop
- Purchase Grease and Glue
- Exit to the Map
- Go to Eve Cathedral
- Enter the Cathedral
Scene 48*
- Receive Roof Shingle
- Go downstairs
- Go right (east)
- Go right (east)
- Go to the Priest Room (left door)
- Pick up the Old Shoe
- Craft Grippy Shoes
- Read the note on the floor


- Exit the Cathedral
- Click on the weak area of the roof
- Pick up the Chisel on the other side

- Enter the Cathedral
- Go left (west)
- Go upstairs
- Go right (east)
- Go to the Priest Room (left door)
- Remember that note we found a long time ago?
- Click on the Sparkle and use the number (215) to open the safe
- Receive Old Book
- Receive $200
- Receive Bottle of Pills
- Receive Zephaniah’s Journal


- Go to the Fountain in the Cathedral Entry and get some Holy Water
- Exit to the Map
- Go to the Shop and buy a Basic Container and some Glue
- Exit to the Map
- Go to Heather’s Home
- Enter the house
Scene 49*
- Receive Judy’s contact information
- Exit to the Map
- Exit to the Map
- Go to the Wilkes Mansion
- Pick up the Chisel on the right roof

- Exit to the Map
- Go to Rays’ Farm
- Pick up the Chisel from the roof of the Barn

- Go into the Barn
- Pick up the Hacksaw
- The Hacksaw will allow you to open the blue boxes with the yellow chains

- But not the blue boxes with the green chains


- Exit the Barn
- Open the blue box on the right
- Receive Chest Key Half

- Exit to the Map
- Go to the Police Station
- Enter the Police Station
- Go right (east)
- Go left (west)
Scene 50*
- Exit to the Map
- Go to the Gym
Scene 52
- Exit to the Map
- Go to Eve Cathedral
- Enter the Cathedral
- Go right (east)
- Click on the weak wall
- Click on the weak wall
- Click on the weak wall

Scene 51*
- Exit to the Map
- Go to the Gym
- Pick up the Sparkles on the lights of the Climbing Walls
- Receive Locker Key
- Receive Locker Key

- Go upstairs to the Locker Room
Scene 52*
- Go upstairs to the Locker Room
- Open the third locker in the center section
- Receive Dumbbell
- Open the fifth locker in the center section
- Receive $250
- Open the center locker in the right hand section
- Receive Unbreakable Pick
- Now you can open any of the remaining locked boxes

- Go down (south)
- Let’s try out our new lock pick
- Open the chest on the left
- Receive Rubber Heel

- Exit to the Map
- Go to the Police Station
- Enter the Police Station
- Click on the bottom of the middle column on the right section to pick up the Chest Key

- Go right (east)
- Exit to the Map
- Go to Eve Cathedral
- Enter the Cathedral
- Go left (west)
- Enter Judy’s Bedroom (left door)
- Take the stairs down to the caves
- Pick the lock on the chest on the left
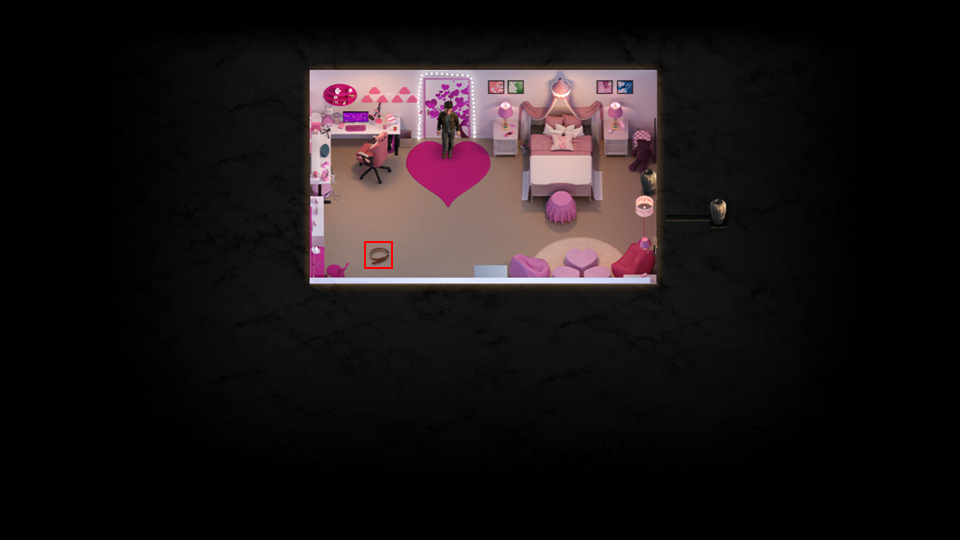
- Receive Unknown Amulet

- Go up (north)
- Pick up the Sparkle
- Receive Locker Key
- Open the Chest
- Pick up Kama Sutra Carol – Cowgirl

- Go down (south)
- Take the stairs up to Judy’s Bedroom
- Exit to the Map
- Go to the Wilkes Mansion
- Enter the Mansion
- Open the blue box on the left
- Receive Silver Statue
- Go up (north)
- Open the chest at the top of the left stairs
- Go down the stairs back to the main room
- Go up (north)
- Open the locked chest on the left
- Receive crafting scroll Titan Shovel (Titan Shovel Head, Titan Shovel Shaft, Titan Shovel Handle, Glue)

- Open the Chest
- Pick up Kama Sutra Lillian – ♥♥♥♥♥ Play

- Go down (south)
- Go down (south)
- Talk to the man blocking the stairs on the left

- Go up the right stairs
- Enter the balcony on the left (west)
- Exit the balcony to the left (west)
- Go left (west)
Scene 54*
- Pick the lock on the chest in the upper left
- Receive Silver Statue

- Go left (west)
- Pick up the Old Book on the right
- Activate the Gargoyle
- Open the Chest on the left
- Pick up Kama Sutra Nellie – Ass Play

- Exit to the Map
- Go to Eve Cathedral
- Enter the Cathedral
- Go left (west)
- Enter Judy’s Bedroom (left door)
- Take the stairs down to the caves
- The Seven in the circle turns into a Blowtorch
- Pick up the Blowtorch
- Pick up the Old Book by the rock in the center

- Go up the stairs
- Exit to the Map
- Go to the Rays’ Farm
- Pick the lock on the chest left of the stairs
- Pick up crafting scroll Goat Dessert (Corn, Barley, Oats, Soybeans)

- Click on the burn barrel by the barn
- Receive Chest Key

- Go up (north)
- Pick up the Corn on the right
- Enter the Cave

- Open the Chest
- Pick up Kama Sutra Ella – Lapdance ♥♥♥♥

- Go up (north)
- Pick the lock on the chest on the left
- Receive Gold Figurine
- Click on the Sparkle
- Receive Copper Idol
- Light the TNT

- Move the far left rock up 3
- Move the center rock of the lowest level down 1
- Move the right rock of the bottom level right 3
- Move the left and right rocks up one
- Move the center rock left or right
- Collect the Sparkle

Scene 55*
- Open the blue box
- Receive Silver Statue
Walkthrough – Part 8
- Go up (north)
- Receive Nelly’s contact information
- Go up (north)
- Go right (east)
- Light the TNT

- Go up the stairs
- Exit to the Map
- Go to Heather’s Home
- Enter the house
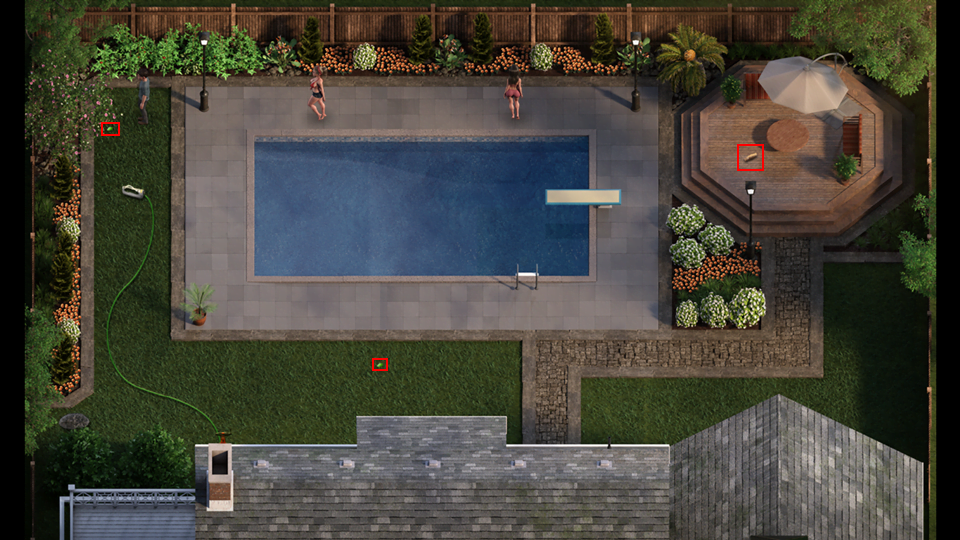
- Go to the back yard
Scene 56*
- Exit to the Map
- Go to the Strip Center
- Light the burn barrel
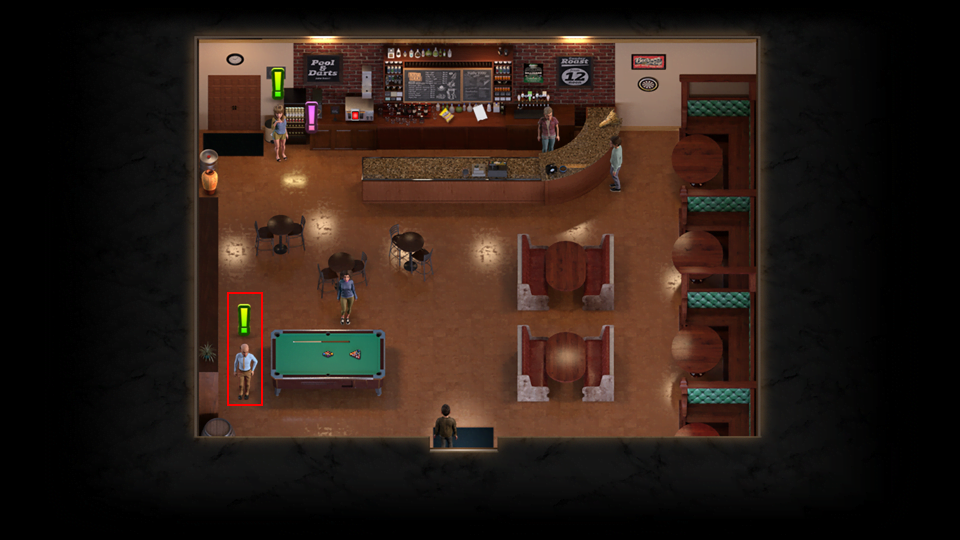
- Talk to the man with the !
- Receive $1,000

- Go to the Map
- Go to Eve Cathedral
- Enter the Cathedral
- Go up (north)
- Go up the right stairs
- Make an offering of a Jade Figurine
If you don’t have a Jade Figurine you can either walk around in the Forest until you find one, or substitute a Silver Figurine, Copper Idol, or Silver Statue. However if you substitute the other items are much more valuable than a Jade Figurine.
- Receive Essence of Intelligence
- If you have a second Jade Figurine you might want to Offer it now also
- Craft a Seed of Knowledge
- Open your Inventory and use the Seed of Knowledge
- Intelligence +1
- Exit to the Map
- Go to the Wilkes Mansion
- Enter the Mansion
- Exit to the Map
- Go to the Forest
- Go up (north)
- Click on the wood under the bee hive
- Receive Honey Comb

- Go down (south)
- Go down (south)
- Return to the Wilkes Mansion
- Enter the Mansion
- Go up (north)
- Go up the right stairs
- Go right (east)
- Go right (east)
Scene 57*
- Exit to the Map
- Go to Heather’s Home
- Go into the house
- Exit to the Map
- Go to Eve Cathedral
- Enter the Cathedral
- Go left (west)
- Go to Judy’s Bathroom (right door)
- Click on the Sparkle
- Receive Toothbrush

- Exit to the Map
- Go to the Strip Center
Scene 58*
- Exit to the Map
- Go to Wilkes Mansion
- Enter the Mansion
- Go up (north)
- Go up (north)
- Go up (north)
- Enter the Mansion
- Go up (north)
- Go up (north)
- Go up (north)
- Light the burn barrel on the left
- Receive Essence of Strength
- Pick up the Crucifix on the right

- Go right (east)
- Click on the person hiding
- Receive Wireless Transmitters

- Go left (west)
- Enter the Mansion
- Go down (south)
- Click on the left Sparkle when the man is around the corner and cannot see you
- If you fail, you will have to try again

- Go down (south)
- Go up the left (west) stairs
- Go left (west)
- Same concept as the last one, you need to click on the Sparkle when the man is facing away from you

Exit to the Map, you won’t be able to place the last Wireless Transmitter until you increase your strength and can move the barrel in the kitchen.
- Go to the Strip Center
- Go to the XXX Shop
- Pick the locked chest in the upper right
- Receive Dumbbell
- Craft Seed of Strength
- Open your Inventory
- Use Seed of Strength
- Strength +1

- Exit to Map
- Return to the Wilkes Mansion
- Enter the Mansion
- Go up (north)
- Take the right (east) stairs
- Go right (east)
- Go right (east)
- Open the Chest in the upper right
- Pick up Kama Sutra Erica – Anal Sex
- Open the chest in the lower right
- Receive Soybeans
- Move the Barrel blocking the passage down (south)

- Pick up the Sparkle in the upper left
- Receive Driver’s License
- Note the number on the sacks (349)
- Click on the Sparkle in the lower left to place the last Wireless Transmitter

Scene 59*
- Exit to the Map
- Go to the Dock
- Light the burn barrel
- Receive Gold Figurine

- Exit to the Map
- Go Home
Scene 60*
- Exit to the Map
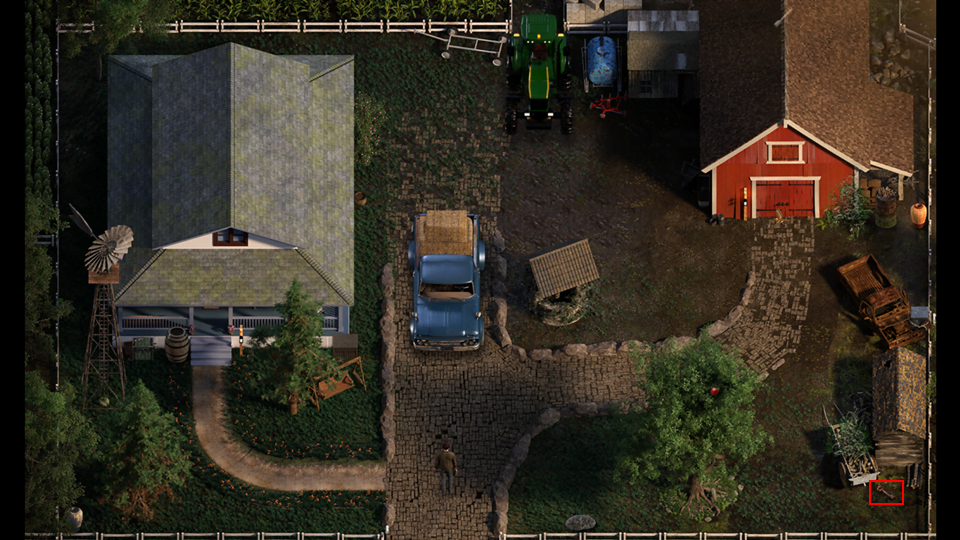
- Go to the Rays’ Farm
- Since you’re here, pick up the Aloe Plant

- Go down (south)
- Pick the Corn from the right field
- Click to enter the corn field
- Click to pick up a Chest Key
- Click to find a Silver Statue

- Exit the corn field
- Go down (south)
- Enter the house
- Go upstairs
- Go to the bathroom (center door)
- Click on the sink
- Receive Closet Key
- Click on the tub
- Receive Rubber Toe

- Go back to the first floor
- Click the Orange Sparkle in the bottom left corner
- Receive Carol’s Profile
- Unlock the pantry door

- Click on the crafting scroll Wading Shoes (Rubber Heel, Rubber Toe, Rubber Wrap, Rubber Sole)

- Click on the Sparkle
- Receive Catnip
- Open the chest
- Receive Oats
- Read the book


- Exit to the Map
- Go to the Strip Center
- Go to ♥♥♥♥’s Grill
- Click on the Barley on the bar to the right of the Bar Tender
- Purchase Barley for $500
- Craft the Goat Dessert
- Click on the ! and purchase Energy Drink for $1,000
- Click on Chips
- Purchase Chips for $100
- Read the Note


- Exit to the Map
- Go to the Rays’ Farm
- Go up (north)
- Go up (north)
- Click on the goat
- The goat will knock down the Rubber Sole, pick it up
- Craft Wading Shoes

- Go left (west)
Scene 61*
- Exit the house
- Go up (north)
- Go up (north)
- Go left (west)
- Click on the green arrow to go down stream

- Click on the Sparkle
- Receive an Artifact Segment
- Click on the area in the woods to receive a Chest Key

- Return to the Farm house
Scene 61*
- Go up (north)
- Enter the cave
- Go up (north)
- Go right (east)
- Click on the green arrow to go down stream
- Jump in the water

- Move the right rock up one
- Move the left rock left one
- Move the left rock up one
- Move the right rock right one
- Move the rock right one
- Move the center rock up two
- Open the Chest
- Pick up Kama Sutra Lillian – Throat ♥♥♥♥

- Go up (north)
- Go up (north)
- Go right (east)
- Go up the stairs
- Exit to the Map
- Go to Channel 4
- Enter the building
- Exit to the Map
- Go to the Strip Center
- Go to ♥♥♥♥’s Grill
- Give Melissa the Driver’s License you found at the Mansion
Scene 65*
- Click on the Cat
- Pick up the Chest Key Half

- Exit to the Map
- Go to the Apartments
- Open the locked blue box
- Receive Note
- Open your Inventory to read the Note (1998)


- Exit to the Map
- Go to the Strip Center
- Enter the XXX Shop
Scene 63*
- Exit to the Map
- Go to the Warehouse
- Receive Package
- Light the burn barrel
- Receive Nails
- Open the locked blue box
- Receive Silver Statue

- Exit to the Map
Walkthrough – Part 9
- Return to the Strip Center
- Go to the XXX Shop
- Talk to Tasha
- Lose Package
- Receive Love Potion
- Exit to Map
- Go to the Rays’ Farm
Scene 64*
- Enter the Cave
- Go up (north)
- Go right (east)
- Go up (north)
- Pick up the Crate of Bullets
- Click on the green arrow pointing left
- Jump in the water
- Open the Chest
- Pick up Kama Sutra Nellie – ♥♥♥♥♥ Sex
- Click on the green arrow pointing right
- Jump in the water

- Go down (south)
- Go left (west)
- Go down (south)
- Go down (south)
- Talk to either of the women
- Exit to the Map
- Go to Andrea’s Home
- Enter the house
- Exit to the Map
- Go to Channel 4
- Enter the building
- Use the elevators
- Go right (east)
- Receive Wireless Transmitter
Scene 66*
- Click on the Sparkle in the lower right corner
- Receive a Chest Key
- Note the number over the mirror (124)

- Go down (south)
- Go through the right door

- Pick up the key
- Receive Channel 4 Locker Key
- Open the locker in the upper left
- Receive Crowbar
- Receive Transmitter Battery
- Read the note on the floor

- Click the Orange Sparkle in the lower left
- Receive Kimberly’s Profile

- Exit the building
- Lift the right manhole cover
- Receive Briefcase

- Exit to the Map
- Go to the Condos
- Lift the manhole cover
- Receive Briefcase

- Open your Inventory
- Select either Chest Key Back Half or Chest Key Front Half
- Receive Chest Key
- Exit to the Map
- Go to the Shop
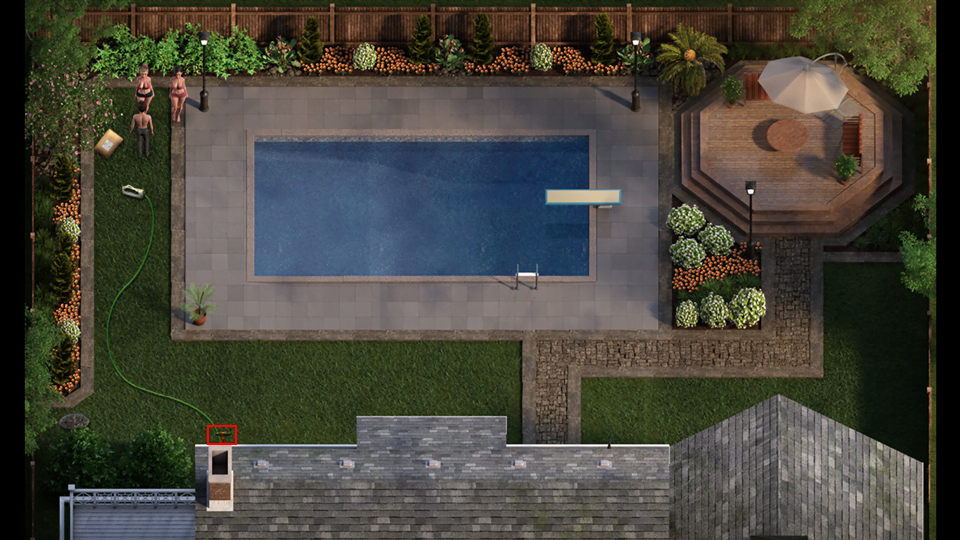
- Open the manhole cover in the lower left
- Receive Briefcase

- Enter the Shop
- Purchase Glue
- Exit to the Map
- Go to the Gym
- Go up the stairs to the Locker Room
- Open the far right locker
- Receive Shinto Shrine Bell

- Exit to the Map
- Go to the Forest
- Lift the rock
- Receive Right Swim Shoe

- Go right (east)
- Click on the green arrow
- Jump in the water
- Receive Acacia
- Lift the rock on the right
- Receive Mace Grip

- Go left (west)
- Go up (north)
- Go left (west)
- Open the blue box
- Pick up crafting scroll Weed Killer (Dicamba, Mecoprop, Glyphosate, Basic Container)


- Go right (east)
- Go down (south)
- Go left (west)
- Go left (west)
- Lift the rock in the upper left
- Receive Antique Key

- Go down (south)
- Enter the Cathedral
- Go up (north)
Scene 67*
- Exit to the Map
- Go to the Wilkes Mansion
- Lift the rock (it is easiest if you are above it)
- Receive Saw Blade

- Enter the Mansion
- Go up (north)
- Go up the right stairs
- Go right (east)
- Attempt to go right (east)
- Exit to the Map
- Go to the Apartments
- Go down (south)
- Click on the Sparkle to replace the Wireless Transmitter

- Make note of the number on the wall (969)

Scene 68*
- Exit to the Map
- Go to Channel 4
- Enter the building
- Use the elevators
- Go right (east)
- Receive Kimberly’s contact information
- Exit to the Map
- Go to Eve Cathedral
- Enter the Cathedral
- Exit to the Map
- Go to Heather’s Home
- Lift the rock in the upper left
- Receive Gylphosate

- Enter the house
- Go to the back yard
- Lift the rock in the lower left
- Receive Safe Key

- Go to the Map
- Go to the Strip Center
- Open the manhole in the lower left
- Receive Briefcase

- Co to the XXX Shop
- Go to the Map
- Go to the Apartments
- Open the manhole in the lower left
- Receive Briefcase

- Exit to the Map
- Go to Heather’s Home
- Enter the house
- Go upstairs
- Go to Heather’s Room (left door)
- Talk to Heather
- Talk to Heather again, to give her the Safe Key
Scene 69*
- Exit to Map
- Go to Rays’ Farm
- Lift the rock lower center
- Receive Dicamba

- Enter the farm house
- Receive Bin Keys
- Exit the Farm House
- Open the Bin on the right side of the porch
- Receive Cheese

- Go up (north)
- Open the Bin in the upper right
- Receive Mecoprop
- Craft Weed Killer
- You can now kill the spiky weeds, try it out on the weeds around the bin
- Pick up the Chest Key that was behind the weeds

- Go down (south)
- Kill the weeds in the Barn Yard
- Pick up crafting scroll Pen Door (Wood, Nails, Hinge, Latch)

- Pick up Wood

- Enter the Barn
Scene 70*
- Open the Bin
- Receive Black Pepper

- Exit the Barn
- Enter the Farm House
- Talk to Carol
- Go down stairs
Scene 71*
- Exit to the Map
- Go to the Forest
- Go up (north)
- Go right (east)
- Use the weed killer on all of the weeds blocking your way

- Lift the rock
- Receive Left Swim Shoe, this completes the set and you now have Swim Shoes
- Notice the green arrow that appeared you can now swim in deep water
- Open the Chest
- Pick up Kama Sutra Judy – Blowjob

- Go left (west)
- Go down (south)
- Go left (west)
- Kill the weed in the lower left
- Receive Mace Handle

- Go up (north)
- Kill all of the three weeds in a row preventing you from grabbing the Sparkle
- Grab the Sparkle
- Receive Silver Statue
- Exit to Map
Walkthrough – Part 10
- Go to the Rays’ Farm
- Enter the Farm House
- Go upstairs
- Go to Hannah’s Room (right door)
- Pick up the Dumbbell in the lower right corner

- Exit to the Map
- Go to Eve Cathedral
- Enter Cathedral
- Go right (east)
- Go upstairs
- Open the Chest
- Receive an Old Book
- If you have an Essence of Intelligence craft a Seed of Knowledge
- Open your Inventory
- Use the Seed of Knowledge
- Sneak to the hallway when the Henchwoman isn’t looking at you

Scene 72*
- Receive Machine Gun
- Go upstairs
- Exit to the Map
- Go to Heather’s Home
- Enter the house
- Exit to the Map
- Go to the Rays’ Farm
- Exit to the Map
- Go to Eve Cathedral
- Enter the Cathedral
- Go left (west)
- Enter Judy’s Bedroom (left door)
Scene 73*
- Exit to the Map
- Go to Andrea’s Home
- Enter the house
- Go right (east)
Scene 74*
- Note the number on the wall (9112)

- Go left (west)
- Go upstairs
- Watch the lights above the door as Andrea plays the code (132)

- Go to the Map
- Go to the Shop
- Purchase the Basic Container
- Exit to the Map
- Go to Eve Cathedral
- Enter the Cathedral
- Go right (east)
- Go upstairs
- Read the note on the floor

- Go left (west)
- Click below the mouse, it will jump down to the table
- Click on the mouse to catch it
- Receive Rat in a jar
- Open the box
- Receive Titan Shovel Shaft
- Craft Titan Shovel
- Artifacts will now be picked up more quickly
- Click on the Orange Sparkle bottom center
- Receive Judy’s Profile

- Go left (west)
- Unlock the Chest
- Pick up Kama Sutra Hannah – ♥♥♥♥♥ Sex

- Exit Cathedral
- Go up (north)
- Use the weed killer
- Releases a cat

- Click on the cat
- Pick up Chest Key

- Exit to Map
- Go to Heather’s Home
- Enter house
- Go upstair
- Enter Chloe’s Room (right door)
- Click on the Orange Sparkle in the lower right
- Receive Chloe’s Profile

- Exit to the Map
- Go to Channel 4
- Enter the building
- Use the elevators
- Go right (east)
- Exit to the Map
- Go to the Shop
- Purchase a Basic Container and Glue
- Exit to the Map
- Go to the Apartments
- Kill the weeds
- Receive Ella’s Key Fob
- Click on the Red vehicle
- Receive Large Buttplug
- Receive Bubble Gum
- Receive Shinto Shrine Bell

- Exit to Map
- Go to the Wilkes Mansion
- Kill the weeds to the left of the stairs
- Pick up crafting scroll Diamond Saw (Rough Diamond, Saw Blade, Saw Handle, Glue)


- Enter the Mansion
- Go up (north)
- Go up (north)
- Go up (north)
- Kill the weeds
- Receive Saw Handle
If you’ve been clicking on the Sparkles in the Forest you should have picked up the Rough Diamond. The Rough Diamond is a random drop and does not have a fixed place to find it.
- Craft Diamond Saw
- The Diamond Saw will open all of the blue boxes

- Go right (east)
- Click on the stone Gargoyle on the right

- Go up the right stairs
- Go right (east)
- Go right (east)
- Go down (south)
- Click on the Sparkle
- Receive Watcher’s Eye

- Go up (north)
- Go left (west)
- Click on the Orange Sparkle on the center Gargoyle

- Go left (west)
Scene 75*
- Open the blue box
- Receive crafting scroll Mace (Mace Handle, Mace Grip, Mace Head, Glue)


- Exit to the Map
- Go to the Strip Center
- Go to the XXX Shop
- Exit to the Map
- Go to the Warehouse
- Click on the gate
Scene 76*
- Sell all valuables
- Receive Melissa’s contact information
- Kill the weeds
- Receive Hinge
- Lift the rock
- Receive Latch

- Go up (north)
- Click on the Orange Spark right of the door
- Receive Nellie’s Profile
- Click on the Copper Wire
- Buy it for $900
- Pick up the Dumbbell
- Click on the box with the !
- Buy
- Purchase Defrost Timer – $1,000
- Purchase Nut and Bolt set – $600
- Purchase Condenser Fan – $2,000
- Purchase Motor Pulley – $2,500
- Purchase Blower Wheel – $3,000
- Purchase Handle Seat – $500
- Total cost is $9,600
- Click on the wall by where the mouse ran
- Receive Chest Key

- Exit to the Map
- Go to the Strip Center
- Go to ♥♥♥♥’s Grill
- Break the Metal Jar
- Receive Old Book

- Go up (north)
- Click on the Safe
- Remember that note we found in the blue box out in the parking lot?
- Unlock the safe (1998)
- Receive Small Buttplug

- Go upstairs
- Pick the lock on the chest
- Receive Medium Buttplug

- Go downstairs
- Go into the Cam room
- Talk to Ella
Scene 77*
- Exit to the Map
- Go to Heather’s Home
- Enter the house
- Exit to the Map
- Go to the Apartments
- Go to Ella’s Apartment (right door)
- Exit to the Map
- Go to the Wilkes Mansion
- Enter the Mansion
- Exit to the Map
- Go to the Rays’ Farm
- Exit to the Map
- Go to the Dock
- Open the blue box
- Receive Boomerang

- Go to the Map
- Go to the Ray’s Farm
- Click on the base of the tree with the apple in it to use the Boomerang to knock the apple down
- Pick up the Apple

- Go up (north)
- Talk to either of the women
- The goat will race back and forth and then try to run past you
- Stand still until the goat makes its break and then click to be in front of it

- Open the blue box
- Receive Nails
- Craft Pen Door
- Talk to Heather

Scene 78*
- Exit to the Map
- Go to Heather’s Home
- Enter the house
- Go upstairs
- Go to Heather’s Bedroom (left door)
- Read the book on the floor

- Open the Chest
- Pick up Kama Sutra Judy – Footjob

- Exit to the Map
- Go to the Strip Center
- Open the blue box behind the tree
- Receive Gold Figurine
- Click on the Key up in the tree
- Receive Chest Key

- Go to ♥♥♥♥’s Grill
- Talk to the Bar Tender with the !
- Buy Red Wine for $200
- Exit to Map
Walkthrough – Part 11
- Go to Heather’s Home
- Enter the house
- Go right (east)
- Talk to Hannah

- The girls will ask you what goes in Stir Fry answer: Sugar, Soy Sauce, and Cornstarch
- Double click, once to select and the second to submit, each item

Scene 79*
- Exit to the Map
- Go to the Wilkes Mansion
- Enter the Mansion
Scene 80*
- Exit to the Map
- Go to Heather’s Home
- Exit to the Map
- Exit to the Map
- Go to the Police Station
- Talk to the office with the ! in the parking lot
- Give him the Nut and Bolt Set
- Receive Chest Key Front Half

- Enter the Police Station
- Go right (east)
- Go left (west)
- Go upstairs
- Go right (east)
- Go to Andrea’s Office (right door)

- Go left (west)
- Go downstairs
- Go right (east)
- Go to the Map
- Go to Channel 4
- Open the blue box on the right
- Receive Silver Statue

- Enter the building
- Use the elevators
- Exit to the Map
- Go to the Apartments
- Go to the Map
- Go to the Warehouse
- Go up (north)
- Receive Diving Mask
- Use the Boomerang on the Compressor
- Receive Compressor

- Exit to the Map
- Go to the Forest
- Go up (north)
- Go right (east)
- Click on the Snorkel in the tree
- Receive Snorkel
- The Snorkel and Mask complete the Snorkel Gear set
- Click on the green arrow and collect the Sparkle
- Receive Valuable Coin

- Exit to the Map
- Go to the Warehouse
- Go up (north)
- Receive Ella’s Apartment Key
- Exit to the Map
- Go to the Apartments
- Enter Ella’s apartment (right door)
- Go to the cam room
- Exit to the Map
- Go to the Rays’ Farm
- Go up (north)
- Go up (north)
- Go left (west)
- Click the green arrow pointing up
- Receive crafting scroll Electromagnet (Burner Flip Phone, Copper Wire, Nails, Electric Tape)


- Continue north
- Break the jar
- Pick up crafting scroll Stun Gun (Batteries, Glue, High-Voltage Inverter, Nails)

- Open the Chest
- Pick up Kama Sutra Judy – Anal
- Click on the green arrow pointing left to return

- Exit to the Map
- Go to Andrea’s Home
- Enter the house
- Go upstairs
- Click on the Piano
- Play C Chord
- Play E Chord
- Play D Chord
- Open the blue box
- Receive Electric Tape
- Craft Electromagnet
- Now you will be able to get some of those items you have seen in the walls
- Open the Chest
- Pick up Kama Sutra Nellie – Hole Buffet
- Go through the door on the right

- Go right (east)
- Click in the wall where the cockroach ran
- Find a note


- Go to the Apartments
- Go to Ella’s Apartment (right door)
- Go to the cam room
- Click on the Metal Jar in the wall
- Receive Dumbbell

- Go up (north)
- Go upstairs
- Click on the Metal Jar in the wall
- Receive crafting scroll Flame Thrower (Blow Torch, Basic Container, Gasoline, Compressor)

- Click on the black rectangle by Ella

- Go to the back yard
Scene 81*
- Exit to Map
- Go to Andrea’s Home
- Enter the house
- Go right (east)
- Go down (south)
- Click on the Hot Tub
- Get in the tub

Scene 82*
- Receive Andrea’s contact information
- Exit to map
- Go to the Condos
- Click on the Orange Sparkle
- Receive Melissa’s Profile

- Go to Melissa’s Condo (right door)
- Exit to the Map
- Go to Channel 4
- Enter the building
- Use the elevators
- Go right (east)
- Go to Kimberly’s Dressing Room (left door)
- Open the blue box
- Receive Sunglasses

- Exit to the Map
- Go to the Shop
- Buy Glue
- Exit to the Map
- Go to the Strip Center
- Go to the XXX Shop
- Receive Fake Mustache
- Exit to the Map
- Go to the Police Station
- Click on either of the Police Cars with a !
- Receive Police Uniform
- Sunglasses, Fake Mustache and Police Uniform create Disguise

- Enter the Police Station (You will automatically put on the Disguise)
- Go up the left stairs
- Go right (east)
- Go into Andrea’s Office (right door)
- Click on the Safe
- Remember that note we found a long time ago?
- Unlock with 169
- Receive Thumb Drive
- Click on the red light left of the file cabinets

- Go down (south)
- The Pylon is no longer blocking the corner
- Click in the corner
- Click under the file cabinet to the left of the first chair
- Receive Chest Key

- Go left (west)
- You need to sneak past Bobby
- Wait until he is at the vending machine and then go to the left staircase

- Go downstairs
- Exit to the Map
- Go to the Condos
- Go to Melissa’s Condo (right door)
- Talk to Melissa
Scene 83*
- Exit to the Map
- Go to Channel 4
- Enter building
- Use elevators
- Go right (east)
- Click on the Red Button in the upper left
- A crafting scroll will drop onto the cabinet
- Pick up crafting scroll Ant Killer (Soap, Vinegar, Baking Soda, Basic Container)


- Go to the right door
- Exit to the Map
- Go to the Wilkes Mansion
- Enter the Mansion
- Go up (north)
- Click on the Sparkle in the right wall
- Receive Mace Head
- Craft Mace

- Go up (north)
- Go up (north)
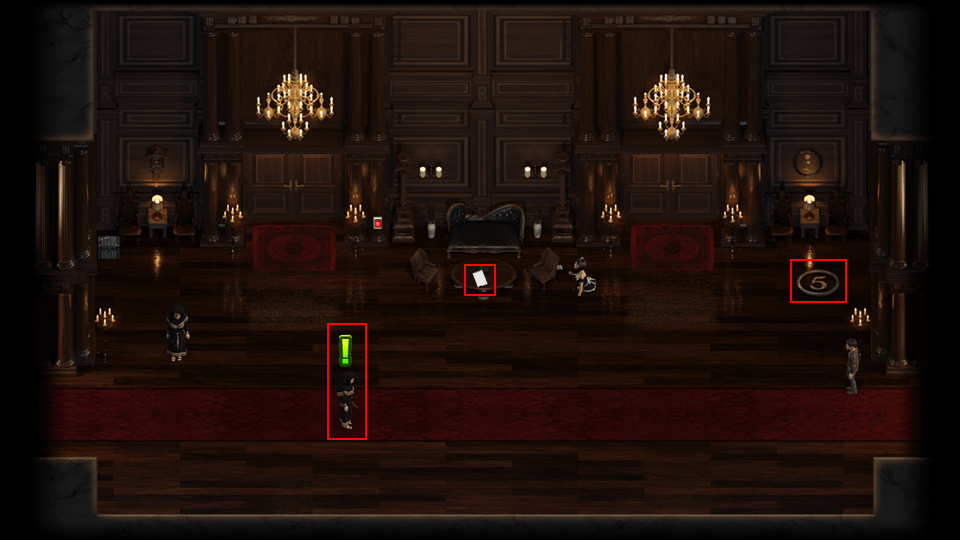
- Receive Dark Chapel Room Key
- Click on the Old Book in the tree

- Go right (east)
- Go up (north)
- Go up (north) (through the door)
- Pick up the Crucifix in the lower left corner
- Push the blue button

- Open the Chest
- Pick up Kama Sutra Chloe – Mouth Fun

- Go down (south)
- Go up the ladder
- Go down (south)
Scene 84*
- Left (west)
- Enter the Mansion
- Exit to the Map
- Go to the Warehouse
- Exit to the Map
Walkthorugh – Part 12
- Go to Rays’ Farm
- Enter the Farm House
- Go upstairs
- Go into Carol’s Room (left door)
Scene 85*
- Go into Carol’s Room (left door)
- Open the Chest in the upper left
- Pick up Kama Sutra Carol – Mouthwork

- Exit to the Map
- Go to Heather’s Home
- Click on the pile of clothes on the couch
- Receive Bathroom Key
- Go to the back yard

- Go back into the house
- Go upstairs
- Go to Heather’s Room (left door)
- Go into the bathroom
- Pick up the Dumbbell in the lower left
- Click on the Sparkle
- Receive Soap

- Exit to the Map
- Go to the Strip Center
- Go to ♥♥♥♥’s Grill
- Click on the Red Button
- Receive Vinegar

- Go to the Map
- Go to the Rays’ Farm
- Enter the Farm House
- Go to the Pantry
- Get the Baking Soda from the high shelf
- Craft Ant Killer

- Exit to Map
- Go to Heather Home
- Enter the house
- Go to the back yard
- Click on the Ant Mound

Scene 86*
- Receive Chloe’s contact information
- Exit to the Map
- Go to Eve Cathedral
- Enter the Cathedral
- Go up (north)
- Take the right stairs up
- Open the blue box
- Receive Nails
- Make an offering of a Jade Figurine
- Receive Essence of Intelligence

- Exit to the Map
- Go to the Strip Center
- Go to the XXX Shop
- Receive Ammo for Machine Gun
- Exit to Map
- Go to Eve Cathedral
- Click on the Burning Cross on the left
- Receive Essence of Strength
- Craft Seed of Strength
- Open your Inventory and use the Seed of Strength
- Strength +1

- Exit to the Map
- Go to the Rays’ Farm
- Go up (north)
- Go up (north)
- Go left (west)
- Click on the Chest Key
- Click the green arrow pointing up to go north

- Move the small round rock out of the way, direction doesn’t matter
- Every time you use this path in the future you will need to move the rock again
- Go right (east)
You need to avoid the police office or you will get tossed back to the area you just came from. The easiest way it to move behind the trees and then make a dash for the Mansion when he is turned the other way.
- Enter the Mansion

- Go down (south)
Again you have to avoid the police officer. I found going to the right, behind the statues, then to the base of the stairs, finally up the stairs was the best route.
- Go right (east)

- Go right (east)
Scene 87*
- Go left (west)
- Go left (west)
- Use the right stone Gargoyle to open the path down
- Go down the path you just opened

- Return to the Map
- Go to the Warehouse
- Go up (north)
Scene 88*
- Exit to the Map
- Go to the Police Station
- Exit to the Map
- Go to Eve Cathedral
- Go up (north)
- Move the center rock up

- Go down (south)
- Exit to the Map
- Go to the Warehouse
- Go up (north)
- Click on the Sparkle in the left wall
- Click on the Sparkle to collect it
- Receive Batteries

- Exit to the Map
- Go to the Police Station
- Click on the power box to the right of the entrance
- Receive High-Voltage Inverter

- Exit to the Map
- Go to the Shop
- Purchase Basic Container and Glue
- Craft Stun Gun
- Purchase Glue
- Exit to the Map
- Go to Eve Cathedral
- Go up (north)
- Go up (north)
- Receive Artifact Segment
- Pick up Demon Horn
- Pick up the Crucifix next to the path down, on the left

- Go down (south)
- Go down (south)
- Enter the Cathedral
- Go up (north)
Scene 89*
- Exit to the Map
- Go to the Apartments
- Talk to the woman with a !
- Give her the Condenser Fan
- Receive Chest Key Back Half

Walk to the front of the blue car on the left, near the tree. A man will come out of the tree and drop money and a Chest Key.

- Exit to the Map
- Go to the Police Station
- Enter the Police Station
- Enter the Police Station
- Go left (west)
- Click on the outlet by the Gym Door (center)
- This will cause a temporary power outage and everything will go black
- Move down (south) to the wall, then move left (west) past the guard

Wait until the two police officers are together in the center then pick up the flashlight on the table, then make a break for the door.

- Pull the power outage again and go back to the interrogation room
- Read the note on the floor


- Exit to the Map
- Go to Channel 4
- Go into the building
- Use the elevators
- Enter Kimberly’s Dressing Room (left door)
- Go through the On-Air door
Scene 90*
- Pick up the key on the ground
- Receive Studio Key
- Exit to the Map
- Go to Eve Cathedral
- Enter the Cathedral
- Go right (east)
- Go upstairs
- Go up (north) through the door
- Open the Chest in the bottom left corner
- Pick up Kama Sutra Melissa – ♥♥♥♥♥ Sex
- In order to read a book you click on the books by the Priest and then pick a row and number
- Here are the Notes we have found that relate to books
- Read Row 2, Book 98
- Receive Attic Box Key Half
- Read Row 2, Book 78
- Receive Old Book
- Craft a Seed of Knowledge
- Open your Inventory and use the Seed of Knowledge
- Intelligence +1
- Read Row 1, Book 12
- Receive crafting scroll Snake Trap (Empty Box, Glue, Egg, Basic Container)


- Go down (south)
- Go downstairs
- Go left (west)
- Go up (north)
- Go up the right staircase
- Move the front barrel to the left 1
- Pick up the Attic Box Key Half
- Click on the nest
- Receive Egg
- Create Snake Trap

- Exit to the Map
Walkthrough – Part 13
- Go to the Shop
- Purchase the Siphon for $3,500
- Purchase Basic Container, Empty Box, and Glue
- Open your Inventory and select either Chest Key Back Half or Chest Key Front Half
- Receive Chest key
- Purchase Glue
- Open your Inventory and select Attic Box Key Half
- Receive Attic Box Key
- Purchase Glue
- Exit the Shop
- Talk to the man with a !
- Trade your Aloe for a Chest Key
- Click on the light colored car on the right
- Receive Gasoline

- Exit to Map
- Return to Eve Cathedral
- Enter the Cathedral
- Go up (north)
- Take the left staircase up
- Take the staircase up
- Open the Chest
- Pick up Kama Sutra Erica – Blowjob
- Open the other chest
- Receive Reliquiae

Scene 91*
- Exit to the Map
- Go to the Rays’ Farm
- Exit the Farm House
- Go up (north)
- Go into the corn field from the top left
- Go down to where the snake turns around
- Go over to the snake
- Use your Snake Trap
- Receive Snake in a Box
- Pick up Corn
- Exit the corn field and head over to the women

Scene 92*
- Exit to the Map
- Go to the Wilkes Mansion
- Enter the Mansion
- Go up (north)
- Use the Gargoyle to open the stairs down
- Go down
- Open the Chest
- Pick up Kama Sutra Melissa – Sixty-Nine

- Go right (east)
- Open the Chest
- Pick up Kama Sutra Kimberly – ♥♥♥♥♥ Sex
- Light the burn barrel
- Receive Nails

- Go to the Map
- Go to Channel 4
- Go into the building
- Take the elevators
- Go through the doors on the left

- Read the note on the table

- Go up (north) through the doors

- Pick the lock on the chest
- Pick up crafting scroll Antibiotic Cream (Aloe Plant, Essence of Medicine, Basic Container, Penicillin)


- Go to the Map
- Go to the Forest
- Go up (north)
- Go left (west)
- Kill the weeds
- Pick up the Gold Idol
- Pick up the Crucifix

Continue to walk around the Forest until you find a Stone Figurine. A Clay Statue or Clay Idol will also work, but a Stone Figurine is the least expensive item.
- Once you have a Stone Figurine head to Eve Cathedral
- Enter Cathedral
- Go up (north)
- Go up right staircase
- Make an offering of a Stone Figurine
- Receive Essence of Medicine
- Make an offering of a Jade Figurine
- Receive Essence of Intelligence
- Go downstairs
- Go down (south)
- Go right (east)
- Go upstairs
- Go up (north)
- Read Row 1, Book 88
- Receive Chest Key
- Exit to Map
- Go to the Rays’ Farm
- Enter the Farm House
- Exit the Farm House
- Go to the Barn
- Click on the Goat
- Click on the pile of rotten hay
- Receive Truck Key

- Exit the Barn
- Click on the back corner of the truck to drive it into the goon

- Go up (north)
- Go up (north)
- Pick the Aloe Plant
- Exit to the Map
- Go to the Shop
- Talk to the woman with the dog
- Give her Bubble Gum
- Receive Penicillin
- Craft Antibiotic Cream
- Open your Inventory and use the Antibiotic Cream

- Enter the Shop
- Purchase Basic Container
- Exit to the Map
- Go to Andrea’s Home
- Enter the house
Scene 93*
- Click on the slot in the bottom wall
- This will release your Snake in a Box
- It will go get the mouse and move the key up
- Click on the key
- Receive Kitchen Key
- Open Chest
- Pick up Kama Sutra Andrea – Tits and Mouth

- Go down (south)
- Click the red button on the wall
- Go right (east)

- Step on the pressure pad
- Go up (north) through the door

- Click on the Sparkle on the right wall
- Receive Fuse
- Open the Safe
- Remember the number on the wall from the room with the statue?
- Enter the code 9112
- Receive Vinegar & Baking Soda

- Go down (south)
- Go left (west)
- Go up (north)
- Break the Metal Jar behind the chair in the back
- Receive Gold Figurine

- Exit to the Map
- Go to Heather’s Home
- Enter the house
- Exit the house
- Click on the green box and replace the fuse

- Enter the house
- Go upstairs
Scene 94*
- Exit to the Map
- Go to Eve Cathedral
- Enter the Cathedral
- Go right (east)
- Go upstairs
- Go up (north)
- Go down (south)
- Go left (west)
Since you can’t go downstairs you need to cut through the balcony, it may take a couple of tries to come out the other side, which is why I preferred to go down the stairs and then back up.

- Go left (west)
- Click on the Red Button
- Then go up (north) through the left door

- You need to move the rock onto the pressure pad
- Move it left two
- Move it down four
- Move it left three
- The secret passage will open

- Now you need to go back and get the rest of your group
- Go down (south)
- Go right (east)
- Go right (east) cutting through the balcony
- Go up (north)
Scene 95*
- Exit to the Map
- Exit to the Map
- Go to the Police Station
- Click on the Sparkle on the back of the right black car
- Receive Gasoline
- Craft Flamethrower

- Enter the Police Station
- Go upstairs
- Go right (east)
- Go to Andrea’s office (right door)
- Exit to the Map
- Go to Eve Cathedral
- Enter the Cathedral
- Go to the Map
- Go downstairs
- Go left (west)
- Go up (north)
- Click on the Torn Page on the left side

- Go up the left stairs
- Go up the stairs
- Go down stairs
- Go down stairs
- Go down (south)
- Go left (west)
- Enter Judy’s Bedroom (left door)
- Go down the stairs into the Cave
- Receive Cellar Box Key Half
- Go up stairs
- Exit to the Map
- Go to the Shop
- Enter the Shop
- Purchase the Miner’s Shaft for $12,000
- Purchase the Basic Container

- Exit to the Map
- Go to the Warehouse
- Go up (north)
- Click on the Sparkle
- You will use your Flamethrower on the spiders
- Click the Sparkle again
- Receive Dimmer Circuit

- Exit to the Map
Walkthrough – Part 14
- Go to Eve Cathedral
- Enter the Cathedral
- Go up (north)
- Go up the right stairs
- Go upstairs
- Pick up the Crucifix to the right of the stairs, under the beam
- Pick up the Demon Feather
- Pick up the Cellar Box Key Half
- Open your Inventory
- Select one of the Cellar Box Key Halves
- Receive Cellar Box Key

- Go downstairs
- Go downstairs
- Go down (south)
- Go left (west)
- Enter Judy’s Bedroom (left door)
- Go down into the Cave
- Open the box
- Receive Porn Magazines
Scene 96*
- Go left (west)
- Click on the green arrow pointing left
- Jump in the water
- Click on the spider to introduce them to your friendly Flamethrower

- Go left (west)
- Pick up the Gold Idol

- Go right (east)
- Click the green arrow pointing right
- Jump in the water
- Go right (east)
- Go up the stairs
- Exit the Cathedral
- Go up (north)
- Go up (north)
- Pick up the Demon Fang
- Click on the squirrel
The squirrel will run into the trees and come out the other side, this is the path you need to use (in reverse) to move the propane tank. Click on the squirrel again and he will go back to where it was the first time.
- Move the Propane Tank up five
- Move the Propane Tank right five
- Move the Propane Tank up four
- The Propane Tank will explode clearing the way up (north)

Scene 97*
- Receive Heather’s contact information
- Let’s go back and get that Chest
- Go up (north)
- Click the green arrow pointing left
- Go up (north)
- Open the Chest
- Pick up Kama Sutra Heather – Oral Pleasure

- Go down (south)
- Click the green arrow pointing right
- Go down (south)
- Exit to the Map
- Go to the Wilkes Mansion
- Enter the Mansion
- Click on each of the Green Sparkles to place a demon part from your Inventory

Scene 98*
- Pick up the Demon Fang

- Go down (south)
- Pick up the Demon Horn from the couch on the left

- Go up the left stairs
- Go left (west)
- Go left (west)
This one I can’t explain to you why you get caught. I found going to the right of the Gargoyle, then to the candle stand to the left of the door, and then finally for the Demon Feather, allowed me to get it. Keep trying until you succeed.

- Go right (east)
- Go right (east), if you didn’t get caught getting the Demon Feather
- Go up (north)
- Use the stone Gargoyle to open the path down
- Go down
- Go left (west)
- Pick the lock on the chest
- Pick up crafting scroll Hellfire Extinguisher (Holy Water, Toilet Paper, Vinegar, Baking Soda)

Click on the three Green Sparkles again, to place the demon parts and open the portal

- Go right (east)
- Go upstairs
- Exit to the Map
- Go to the Police Station
- Enter the Police Station
- Pick up the gun
- Shoot the outlet on the back wall
- Talk to Bobby
- Talk to Bobby again to leave

- Go down (south)
- Enter the Men’s Locker Room

- Click on the power unit on the back wall with the flashing red light
- Don’t worry about the fire now, you started it by shooting the outlet in gun range

- Return to the gun range
- Pick up the gun
- Shoot the target three times
You want to lead the target by about one panel width, when it starts to enter the panel before where you are aiming press the mouse button to shoot.

- Exit to the Map
- Go to Eve Cathedral
- Enter the Cathedral
- Go right (east)
- Go upstairs
- Go up (north)
- Talk to the Priest
- Talk to Judy
- Go left (west)
- Click on the Sparkle to place the 1st Crucifix

- Go left (west)
- Go downstairs
- Click on the Sparkle to place the 2nd Crucifix

- Go right (east)
- Click on the Fountain to create another Holy Water
- Click on the Sparkle to place the 3rd Crucifix

- Go up (north)
- Talk the left stairs up
- Click on the Sparkle to place the 4th Crucifix

- Go downstairs
- Take the right stairs up
- Click on the Sparkle to place the 5th Crucifix

- Go right (east)
- Go upstairs
- Go up (north)
- Go upstairs
- Go right (east)
- Go right (east)
- Go downstairs
- Go left (west)
- Go left (west)
- Go to Judy’s Bathroom (right door)
Scene 100*
- Receive Toilet Paper
- Craft Hellfire Extinguisher
- Exit to the Map
- Go to Wilkes Mansion
- Enter the Mansion
Scene 99*
- Go down into the basement
- Go right (east)
- Go up (north)
- Pick up the Chest Key in the lower left
- Click on the flames

Scene 101*
- Exit to the Map
- Go to the Police Station
- Enter the Police Station
- Go left (west)
- Go to the Gym (center door)
- Go to the Men’s Locker Room
- Click on the fire
- Pick up the Chest Key

- Exit to the Map
- Go to the Shop
- Talk to Larry, the guy shooting fireworks
- Give Larry the Porn Magazines
- Receive Firework

- Enter the Shop
- Purchase Basic Container and Glue
- Exit to the Map
- Go to the Wilkes Mansion
- Enter the Mansion
- Go up the left stairs
- Go left (west)
- Go left (west)
- Enter the left door
- Click on the Orange Sparkle in the middle of the lower left wall
- Receive Ella’s Profile

- Go down (south)
- Go left (west)
- Open the Chest in the lower left
- Pick up Kama Sutra Chloe – ♥♥♥♥♥ Sex

- Go right (east)
- Go down (south)
- Chop down the bushes in the upper left
- Receive Useless Key

- Exit to the Map
Walkthrough – Part 15
- Go to the Apartments
- Click on the Sparkle on the blue car on the left
- Receive Gasoline

- Exit to the Map
- Go to the Forest
- Go left (west)
- Go up (north)
- Click on the burn barrel
- Put Firework
- Click on the burn barrel
- Put Gasoline
- Click on the burn barrel to light it

- Move the small rock down 1
- Pick up the Church Key

- Go down (south)
- Go down (south)
- Go left (west)
- Move the small rock down 2
- Move the small rock left 5
- Move the small rock up 4
- Move the small rock left 4
- Go and stand on the last switch

Scene 102*
- Pick up the King Idol
- Go down (south)
- Go down (south)
- Go left (west)
- Exit to the Map
- Go to the Warehouse
- Go up (north)
- Talk to Jon
- Sell all valuables
- Go down the stairs into the Bunker

- Pick up the Unknown House Key

- Go up (north)
- Break the jar
- Pick up crafting scroll Fingerprint Lift Kit (UV Flashlight, Fluorescein, Rhodamine, Basic Container)


- Go left (west)
- Click on the wall below the box
- Click on the right wall at the tip of the arrow

- Click on the Copper Wire

- Exit to the Map
- Go to Andrea’s Home
- Enter the house
- Go upstairs
- Use the door on the right
- Go up (north) through the right door

- Click on the Sparkle
- Receive Unknown Amulet

- Exit to the Map
- Go to Eve Cathedral
- Enter the Cathedral
- Enter the Cathedral
- Click on the Fountain to refill your Holy Water
- Go left (west)
- Go upstairs
- Go up (north) through the door
- Read the note in the lower left corner

- Pick up the Torn Page in the upper left corner
- Open the Chest
- Pick up Kama Sutra Kimberly – Anal Sex
- Pick up the Useless Key in the lower right corner

- Go down (south)
- Go right (east)
- Go right (east)
- Go up (north)
- Time to read some more books
- Read Row 3, Book 88
- Receive Book of Genesis
- Read Row 2, Book 21
- Receive crafting scroll Zephaniah’s Last Letter (Torn Page x 3, Glue)

- Go down (south)
- Go downstairs
- Talk to Heather
Scene 103*
- Go up (north)
- Pick up the Torn Page in the lower left
- Craft Zephaniah’s Last Letter
- Read Zephaniah’s Last Letter


- Pick up the Chalice in the upper left

- Go down (south)
- Go upstairs
- Go up (north)
- Talk to the Priest
- Exit to the Map
- Go to the Shop
- Purchase Basic Container and Glue
- Go to the Map
- Go to Channel 4
- Enter the building
- Use the elevators
- Go right (east)
- Go to Kimberly’s Dressing Room (left door)
- Pick up the clothes on the floor
- Receive Maid Uniform
- Receive Security Card

- Go down (south)
- Go left (west)
- Use the elevators
- Go right (east)
- Click on the Orange Sparkle, center of the bottom wall
- Receive Erica’s Profile
- Talk to the guy in the upper right corner
- Give him Disguise
- Receive Chest Key Back Half
- Talk to him again
- Give him the Maid Uniform
- Receive Chest Key Front Half
- Open your inventory
- Select either Chest Key Back Half or Chest Key Front Half
- Receive Chest Key
- Click on the Red Button in the upper left

- Go up (north) through the left door

- Exit to the Map
- Go to the Shop
- Purchase Glue
- Exit to the Map
- Go to Andrea’s Home
- Enter the house
Scene 104*
- Exit to the Map
- Go to the Strip Center
- Go to the XXX Shop
- Ask Alia, “Where did you go today?”
- Ask Alia, “What did you do after you got here?”
- Ask Alia, “What did you do after lunch?”
- Ask Alia, “What did you do right before you came here?”
- Ask Alia, “Where did you throw the rocks?”
- Exit the Shop
- Go to ♥♥♥♥’s Grill
- Go up (north) through the door on the left
- Click on all three of the fires
- Pick up the Dropped Book, behind the range
- Click on the sink
- Click on the Sparkle on upper the wall
- Receive Rhodamine
- Click on the Sparkle on the left wall
- Receive Fluorescein
- Craft the Fingerprint Lift Kit

After you craft the Fingerprint Lift Kit you will see Footprints on the floor. Click near the edge of the screen in line with the Footprints.
- Receive Cooking Timer

- Exit to the Map
- Go to the Shop
- Enter the Shop
- Restock any missing items
- Pick up the Dropped Book in the upper right

- Exit to the Map
- Go to the Dock
- Pick up the Dropped Book at the end of the dock
- Click on the green arrow pointing left to jump in the water
- Pick up the Useless Key
Now you have an idea of how swimming off the dock works you have seven seconds to swim and then you are back on the dock.

- Go to the Strip Center
- Go to the XXX Shop
- Exit to the Map
- Go to Eve Cathedral
- Enter Cathedral
- Enter Cathedral
Scene 105*
- Exit to the Map
- Go to the Police Station
- Enter the Police Station
- Exit to the Map
- Go to the Warehouse
- Go up (north)
- Click two squares in from where the footprints end
- Receive Used Rag

- Go up (north)
- Go left (west)
- Move the stack of boxes to the right

- Click on the keypad
- Enter 2780


- Go up (north)
- Move the TNT right 2
- Move the TNT down 5
- Move the TNT right 5
- Open the Chest
- Pick up Kama Sutra Andrea – An*l Sex

- Go left (west)
Scene 106*
- Exit to the Map
Walkthrough – Part 16
- Go up (north)
- Click up one and right one from the last set of foot prints
- Receive Chest Key Front Half

- Go right (east)
- Go up (north)
- Go up (north)
- Go down the ladder
- Go down (south)
- Click on the Orange Sparkle by the barrels
- Receive Andrea’s Profile
- Click on the wall where the cockroach disappered
- Receive Bunker Key

- Go right (east)
- Go right (east)
- Pick up the Chalice
- Pick up the Ladder Segment

- Go up the stairs
- Go left (west)
- Click low on the wall, in line with where the foot prints end
- Receive crafting scroll Thermite Grenade (Powdered Aluminum, Iron Oxide, Used Rag, Grease)
- Go down the stairs

- Step on the blue pressure plate

- Go upstairs
- Go down (south)
- Go through the door

- Move the TNT left 4
- Move the TNT down 4
- Move the TNT left 1

- After you blow up the barrels notice the arrow on the floor where the TNT used to be
- Walk one space inside the wall and then to the top
- Receive Chest Key

- Go up (north)
- Light the TNT
- Click on the Sparkle
- Receive Powdered Aluminum

- Go right (east)
- Go right (east)
- Go upstairs
- Go down (south)
- Go upstairs
- Exit to the Map
- Go to the Condos
- Go to Melissa’s Condo (right door)
- Click on the Sink
- Use Handle Seat
- Click on the Refrigerator
- Use the Defrost Timer
- Click on the Washing Machine
- Use the Blower Wheel
- Go down (south)
Scene 107*
- Go to the Map
- Go to Eve Cathedral
- Enter the Cathedral
- Step on the blue pressure plate

- Go up (north)
Scene 108*
- Exit to the Map
- Go to Eve Cathedral
- Enter the Cathedral
- Pick up the clothes
- Receive Hannah’s Clothes

- Go right (east)
- Go upstairs
- Go up (north)
- Receive Zephaniah’s Journal
- Go down (south)
- Go left (west)
- Go left (west)
- Go downstairs
- Pick up the clothes
- Receive Carol’s Clothes

- Enter Judy’s Bedroom (left door)
- Go downstairs
- Pick up clothes
- Receive Heather’s Clothes

- Go left (west)
- Pick up clothes
- Receive Chloe’s Clothes

- Go down (south)
- Click on the wall at the end of the footprints
- Receive Iron Oxide
- Craft Thermite Grenade
- Click on the green arrow pointing up
- Receive a Gold Statue

- Go up (north)
- Go up (north)
- Stand where indicated in the image below to throw the Thermite Grenade and bring the platform down

- Go left (west)
Scene 109*
- Exit to the Map
- Go to Wilkes Mansion
- Enter Mansion
- Go up (north)
- Use the stone Gargoyle on the right to open the stairs
- Go down stairs
- Go right (east)
- Go up (north)
- Talk to the Priest
- Go down (south)
- Go left (west)
- Go upstairs
- Go up the left stairs
- Go left (west)
- Click on the Red Button
- Go in the right door

- Open the Chest
- Pick up Kama Sutra Andrea – ♥♥♥♥♥ Sex
- Click on the bottom of the left wall
- Receive Lillian’s Hair

- Go down (south)
- Go left (west)
- Break the jar
- Pick up crafting scroll Miner’s Tool (Miner’s Shaft, Pickaxe Head, Mining Shovel Head, Hercules Grip)


- Go right (east)
- Go right (east)
- Go down (south)
- Go left (west)
- Go through door on left
- Click in the corner at the end of the footprints
- Receive Lillian’s Hair

- Go down (south)
- Go left (west)
- Go through door on left
- Click in the corner at the end of the footprints
- Receive Lillian’s Hair

- Go down (south)
- Go right (east)
- Go right (east)
- Go up (north) (through the door)
- Use the stone Gargoyle on the right to open the stairs
- Go down stairs
- Go left (west)
- Click on the three Green Sparkles to place Lillian’s Hair
- Go right (east)
- Go right (east)
- Go up (north)
Scene 110*
- Exit to the Map
- Go to the Warehouse
- Go up (north)
- Exit to the Map
- Go to the Police Station
- Enter the Police Station
- Go left (west)
- Go to the Gym (center door)
- Go down (south)
- Use your Stun Gun on the outlet to take out the lights
- Go down and left to sneak past the guard in the dark
- Pick up the Bagged Lunch in the lower left corner when the Police officers aren’t looking

- Go right (east)
- Go upstairs
- Go left (west)
- Talk to the man with the !
- Receive a Pencil
- In the lower left corner go down 1
- Go right to be directly under the woman with the green shirt
- Receive Chest Key Back Half
- Click on the security box by the door

- Go up (north) through the door
- Pick up the Fingerprint Lock
- Pick up Chest Key Front Half

- Exit to the Map
- Go to Eve Cathedral
- Enter the Cathedral
- Go right (east)
- Go upstairs
- Go up (north)
Scene 111*
- Exit to the Map
- Go to the Shop
- Restock any items missing from your inventory
- Exit to Map
- Go to the Warehouse
- Go up (north)
- Talk to Jonathan
- Exit to the Map
- Go to Andrea’s Home
- Exit to the Map
- Go to the Wilkes Mansion
- Go to the Rift Room
- Talk to the Priest
- Click on the spot just out of sight on the right
- Receive Hell Boot

- Go up (north)
- Click on the column to the left of the entry
- Receive Hell Boot
- Throw the switch on the left

- Go down (south)
- Pick up the Sparkle behind the lowest column
- Receive Devil’s Container
- Click on the Chest
- Pick up Kama Sutra Chloe – Anal Sex
- Move the bottom rock left 2
- Move the bottom rock up 4
- Move the bottom rock left 5
- Move the top rock up 1
- Move the top rock left 8
Ella will walk over to you, you need to either get her on the top pressure pad, or the bottom one by where the Sparkle was. Once she is on the pad you need to stand on the last pressure pad.

Scene 112*
- Exit to the Map
- Go to the Police Station
- Enter the Police Station
- Go upstairs
- Go right (east)
- Go to Andrea’s office (right door)
- Click down the wall where the footprints stop
- Receive Locker Room Key

- Go down (south)
- Go left (west)
- Go downstairs
- Go left (west)
- Go to the Gym (center door)
- Go to the Women’s Locker Room (left door)
Scene 113*
- Exit to the Map
Walkthrough – Part 17
- Go to the Shop
- Enter the Shop
- Open your inventory and select either Chest Key Back Half or Chest Key Front Half
- Receive Chest Key
- Purchase Glue
- Exit to Map
- Go to Channel 4
- Enter the building
- Use the elevators
- Go up (north) through the door
- Go up (north) through the door
Scene 114
- Exit to the Map
- Go to Eve Cathedral
- Enter the Cathedral
- Go left (west)
- Enter Judy’s Bedroom (left door)
- Go down the stairs into the Cave
- Go left (west)
- Click on the green arrow pointing left
- Jump in the water
- Go left (west)
- Click at the bottom of the screen directly below where the footprints end
- Receive Pickaxe Head

- Go right (east)
- Click on the green arrow pointing right
- Jump in the water
- Go down (south)
- Go left (west)
- Click at the bottom of the screen directly below where the footprints end
- Receive Mining Shovel Head

- Go up the stairs
- Go up the stairs
- Click at the bottom of the screen directly below where the footprints end
- Receive Devil’s Container
- Open the Chest
- Pick up Kama Sutra Carol – Stimulation
- Click the flashing item on top of the statue
- Receive Hercules Grip
- Craft Miner’s Tool
- Open the blue box in the lower right
- Receive Silver Statue

- Go down (south)
- Go down stairs
- Go right (east)
- Go up (north)
- Enter the Bunker
- Go up (north)
- Go up (north)
- Up the ladder
- Go down (south)
- Go down (south)
- Go left (west)
- Receive Ladder Segment
- Go left (west)
- Go left (west)
- Move the rock
- Click on the green arrow pointing left
- Go right (east)
- Pick up Aloe Plant
- Go down (south)
- Go down (south)
- Enter the Farm House
- Go upstairs
- Go to Hannah’s Room (right door)
- Click deep in the wall opposite the last set of footprints
- Receive Ladder Segment

- Exit the Farm House
- Go up (north)
- Go up (north)
Now that you have the Miner’s Tool you’re going to start seeing ground like this. Click on it to receive an artifact, they are pretty much just like the Sparkles.

- Go left (west)
- Click on the green arrow pointing up
- Move the rock
- Go right (east)
- Place the Ladder Segments just right of Henry over the gap.

- Pick up the Chest Key Back Half at the top of the pillar

- Go down (south)
- Click on the circle on the head of the statue
- Receive Demon’s Offering Coin
- Open the Chest
- Pick up Kama Sutra Heather – Anal

- Go up (north)
- Go right (east)
- Go down (south) (where the pipe is going)
- Open your inventory
- Select Chest Key Back Half or Chest Key Front Half
- Receive Chest Key
- Open the Chest
- Pick up Kama Sutra Melissa – An*l Sex
- Click on the equipment at the base of the tower
- Click on it again to put the Gasoline in

- Go up (north)
- Go left (west)
Scene 115*
- Exit to the Map
- Go to the Shop
- Open your Inventory and select either Chest Key Back Half or Chest Key Front Half
- Receive Chest Key
- Purchase Glue
- Exit to the Map
- Go to the Warehouse
- Go up (north)
- Go up (north)
- Go up the left stairs
- Go upstairs
Scene 116*
- Exit to the Map
- Go to the Wilkes Mansion
Scene 117*
- Go up (north)
- Click on the Sparkle
- Receive Master Key

- Go down (south)
- Now you need to go into all of the rooms with green doors
- Go up (north) through the right door
- Pick up the Gasoline
- Make note of the 8 in a circle, when you activate the next Gargoyle you’ll need to come back here

- Go down (south)
- Go left (west)
- Go left (west) (You’ll need to go down and then up the left stairs)
- Go up (north) through the left door
- Pick up the Useless Key

- Go down (south)
- Go down (south) through the wall

- Go down (south)
- Go left (west)
- Go up (north) through the right door
- Pick up the Sparkle on the left side by the dresser
- Receive Demon’s Offering Coin

- Go down (south)
- Go left (west)
- Pick up the crafting scroll Chest Key (Useless Key x 3, Key Mold) in the bottom right corner


- Go down (south)
- Click on the equipment at the bast of the tower

- Go up (north)
- Go up (north)
- Pick up the Useless Key on the chair on the right
- Click on the right side of the screen one space below the carpet
- Receive crafting scroll Hell Key (Unholy Ashes, Unholy Metal, Unholy Water, Key Mold)


- Go down (south)
- Go right (east)
- Go down (south)
- Use the switch to active the 8th Gargoyle

- Go up (north)
- Go right (east)
- Go right (east)
- Go right (east), need to go down and then up the right stairs
- Go up (north) through right door.
- Pick up the Sparkle in the lower left corner
- Pick up the Treasure Map
- Receive Demon’s Offering Coin
- Throw the switch in the lower right

- Return to the room with the 8 in a circle
- Go left (west)
- Go up (north) through the door
- Take the right stairs
- Go right (east)
- Go up (north) through the right door
- Pick up the Key Mold
- Craft a Chest Key
- Go down (south)
- Click just behind the weak wall at the foot of the table
- Go down (south) to enter the newly opened area

- Open the Chest
- Pick up Kama Sutra Kimberly – Oral Fun
- Pick up the Orange Sparkle in the rocks
- Receive Lillian’s Profile
- Use the ladder to return to the Dining Room

- Exit to the Map
- Go to Eve Cathedral
- Enter the Cathedral
- Go left (west)
- Go to Judy’s Bedroom (left door)
- Go down the stairs into the Caves
- Go left (west)
- Go up (north)
- Go left (west)
- This is the area that the Treasure Map refers to
- Pick up the Useless Key
- Craft a Chest Key
- Click the bottom of the screen, one space left of the rock
- Receive King Idol
- Open the Chest
- Pick up Kama Sutra Heather – ♥♥♥♥♥ Sex

- Go right (east)
- Go down (south)
- Go right (east) not into the Bunker
- Click on the weak area of the floor
- Receive Unknown Relic

- Go up the stairs
- Go down (south)
- Go up the stairs
- Go right (east)
- Click the weak area on the pillar
- Receive Unknown Relic

- Go left (west)
- Go downstairs
- Go right (east)
- Go up (north)
- Go up the right stairs
- Go up the stairs
- Click the right side of the screen, inline with the last footprints
- Receive Unknown Relic

- Go downstairs
- Go downstairs
- Talk to Arianna
- Give her the right relic

Scene 118*
- Exit to the Map
Walkthrough – Part 18
- Go to the Wilkes Mansion
- Enter Mansion
- Go up (north)
- Use the stone Gargoyle on the right to open the path down
- Go down
- Go right (east)
- Go up (north)
- Talk to either woman
- Go down (south)
- Go left (west)
- Go upstairs
- Go down (south)
- Go up the left stairs
- Go left (west)
- Go up (north) through the right door
- Click towards the edge of the screen inline with the footprints
- Receive Devil’s Container

- Go down (south)
- Go right (east)
- Talk to Ella
- Tell Ella, Go to the Bunk Room
- Go up (north)
- Take left stairs
- Go left (east)
- Go left (east)
- Talk to Ella
- Receive Devil’s Container
- Exit to the Map
- Go to Eve Cathedral
- Enter the Cathedral
- Click on the Fountain five times
- Receive Unholy Water x 4 and Holy Water x 1
- Go up (north)
- Go up the right staircase
- Click on the Offering Bowl
- Use Demon’s Offering Coin
- Repeat two more times
- You should now have Unholy Metal x 3
- Exit to the Map
- Go to the Shop
- Enter the Shop
- Purchase a Basic Container
- Exit to Map
- Go to Wilkes Mansion
- Enter Mansion
- Go up (north)
- Use the stone Gargoyle on the right to open the path down
- Go down
- Click on the fire to put it out
- Receive Unholy Ashes

- Go left (west)
- Click on the three fires to put them out
- Receive one Unholy Ashes per fire extinguished
- Craft three Hell Keys

- Go right (east)
- Go upstairs
- Go down (south)
- Go up the left stairs
- Go left (west)
- Go left (west)
- Go left (west)
- Go up (north)
- DO NOT open the Chest in the lower left corner unless you have two, or more, Chest Keys
- Click each of the three Demon Chests
- Receive Amulet of Shmine
- Receive Amulet of Hamalos
- Receive Amulet of Kimpet

- Go down (south)
Scene 119*
- Receive crafting scroll for Lasso Gun (Crossbow, Fishing Net, Fishing Weights, Rope)

- Exit to Map
- Go to the Warehouse
- Go up (north)
- Talk to Jonathan
- Receive crafting scroll Detonator (Cooking TImer, Switch, Batter, Copper Wire)

- Exit to the Map
- Go to the Dock
- You are going to need to explore all six areas of the Lake to get the items needed for the Lasso Gun
- As soon as you drink the Energy Drink the timer starts
- You can always purchase another Energy Drink, but you can only have one in your inventory
- I recommend going the farther areas first
You need to collect the following items from the Lake:
- Rope
- Lid of Extreme Holiness x 2
- Fishing Weights
- Rusted Handgun x 3
- Fishing Net
- There is a Chest also
- Pick up Kama Sutra Carol – Anal Sex
- Chug your Energy Drink, click on the green arrow pointing left and go hunting
- Exit to the Map
- Go to Channel 4
- Enter the building
- Use the elevators
- Go up (north)
- Go up (north)
- Click near the edge of the screen, in line with the footprints
- Receive Switch

- Go down (south)
- Go right (east)
- Go down (south)
- Go up (north) through right door
- Click on wall, in line with the footprints
- Receive Battery
- Craft Detonator

- Exit to the Map
- Go to the Warehouse
- Go up (north)
- Talk to Jonathan
- Receive Crossbow
- Craft Lasso Gun
- Exit to the Map
- Go to Eve Cathedral
- Enter the Cathedral
- Go up (north)
- Go up right stairs
Make two offerings of Jade Figurines (you can also use Silver Figurine, Copper Idol, or Silver Statue, but Jade Figurine is the cheapest).
- Receive Essence of Intelligence x 2
- Craft two Holy Water Bombs
- Go downstairs
- Go down (south)
- Go right (east)
- Go upstairs
- Go up (north)
- Talk to the Priest
- Talk to Tasha
Scene 120
- Go left (west)
- Go upstairs
- Go down (south)
- Go up left stairs
- Go left (west)
- Go left (west)
- Go left (west)
- Go left (west)
- Go up (north)
Scene 121*
- Go down (south)
- Go right (east)
- Go right (east)
- Go right (east)
- Go up (north) through door
- Go up left stairs
- Go left (west)
- Go up (north) through left door
- Stand on the last pressure plate
- Receive Lillian’s Pube

Fortunately you don’t have to escort all of the women, just two. However, the lightening strike pattern changes on every trip.
- Go right (east)
If you click on the squares it should auto path to where you need to be, the arrows are provided for reference.
- Go into the hidden passage by the left two lightening strikes

- Go down (south)
- Go to the far right wall and then out the door

- Go to the right of the lightening strike on the left stairs, then up (north) through the door

- Go right (east)
- Go to the top of the lightening strikes on the left
- Down (south) past the top row
- Left (west) to the left row
- Down (south) to the wall
- Down (south) the secret passage

- Go to either side of the top lightening strike
- Go to the center of the lightening strikes
- Go down (south) out the door

- Go to the candle stand on the left (west)
- Go to the center of the room
- Go to the top left of the right lightening strikes
- Go right (east) to the wall
- Go right (east) out the door

- Go to the right of the lightening strike on the left stairs
- Go to the bottom of the left stairs
- Go to the carpet
- Go up (north) through the door

Scene 122*
- Exit
Walkthrough – Part 19
- Go down (south)
- Go left (west)
- Go up (north)
- Click on the columns on the left and right to install the Shinto Shrine Bells

- Go down (south)
- Go down (south)
- Go right (east)
- Go up (north)
Scene 123*
Click on the Sparkle
Receive Demon’s Offering Coin
Click on the weak ground
Receive Chest Key

- Need to return to the Offering Plate to turn the Demon’s Offering Coin into Unholy Metal
- Go down (south)
- Go down (south), exit the Rift
- Go down (south)
- Go left (west)
- Go upstairs
- Exit to the Map
- Go to Eve Cathedral
- Enter Cathedral
- Go up (north)
- Go up the right stairs
- Make an offering of the Demon’s Offering Coin
- Receive Unholy Metal
- Craft a Hell Key
- Exit to the Map
- Return to the Wilkes Mansion
- Enter the Mansion
- Go up (north)
- Use the stone Gargoyle to open the path down
- Go down
- Go right (east)
- Go up (north)
- Go up (north), enter the rift
- Go left (west)
- Go up (north)
- Go up (north)
- Click on the Orange Sparkle by the box in the middle of the right wall
- Receive Arianna’s Profile
- Click on the lock in the center of the top wall

- Go down (south)
- Go up (north)
Scene 124
Make sure you don’t step on the red flashing footprints or you will be attacked and have to start over. Auto pathing really sucks here, so plan on making a lot of clicks.
- Move up (north) behind the top police officer
- Move right (east) over to Lillian
- Move down (south) to the rock
- Push the rock down 2
- Push the rock left 3
- Get back to the top behind the police office by reversing the path you just took, if you click there auto pathing will take you to the left and you get to start over
- Go left (west) to line up with the rock
- Push the rock down 4
- Push the rock right 4

- Ring the left bell
- Daemalius will move against the left rock
- Click on Ella and she will attack
VERY IMPORTANT, click left and walk around the back to ring the right bell. If you click the bell directly you will be attacked and have to start over.
- After you right the right bell Daemalius will be against the right rock
- Click on Henry and he will steal the box
- Ring the left bell
- Ring the left bell again so that Daemalius is against the left rock
- Click on Ella and she will attack
VERY IMPORTANT, click left and walk around the back to click on Bobby. If you click Bobby directly you will be attacked and have to start over.

Scene 125*
- Go up (north)
- Open the chest in the upper right
- Pick up Kama Sutra Judy – ♥♥♥♥♥ Sex

- Go down (south)
- Go down (south)
- Go right (east)
- Go up (north)
- Click on the Sparkle
- Receive Artifact Segment

- Take the Portal to return
- Since you can’t take the usual route back you have to climb the rubble on the right to get out

- Go up the stairs
- Go left (west)
- Go left (west)
- Go up (north)
- Go up (north)
- Go right (east)
- Go up (north) into the Dark Chapel
- Pick up the Soul Crystal from the altar

- Go down (south)
- Go left (west)
- Enter the Mansion
- Go down (south)
- Go up the right stairs
- Go right (east)
- Go right (east)
- Go down (south)
- Click in the lower left corner to go to the basement

- Walk down into the room
- Click on the Portal
Scene 126
- Enter the Police Station
- Click on the doors to enter the court room

- Click on the Chest Key in the lower left by the third seat
- Click on the phone
- The judge will walk over and drop piles of money
- Pick up the money

- Exit to the Map
- Go to the Wilkes Mansion
- Talk to Judy
- Continue to the party
Scene 127*
- N/A
Scene 128
Congratulations, you have completed the main story.
Post Story
As the game has been released in Early Access a lot of this content is currently missing. I will cover what has been released as of this time.
You no longer have access to the Oracle.
- Go to the Map
- Go to the Apartments
- Go to Erica’s Apartment (left door)
- Pick up the Chest Key by the Kitchen table

- Exit to the Map
- Go to the Condos
- Go to Condo 101, this is Andrea’s new location

- Exit to the Map
- Go to Andrea’s Home
- Enter the house
- Go right (east)
- Go right (east)
- Go down (south)
- Click on the left side, in line with the bottom wall to get to the back yard

- Pick up the Sparkle under the tree
- Receive Bedroom Key

- Go up (north)
- Go up (north)
- Go left (west)
- Go left (west)
- Go upstairs
- Go into the “secret” room
- Use the door on the right

- Enter the Bedroom (left door)
- Open the Safe with the code 821, that you found on the note in the wall of the previous room.
- Receive Crypto Wallet
- Open the Chest at the foot of the bed
- Pick up Kama Sutra Ella – Pound Town

- Exit to the Map
- Go to the Condos
- Go to Andrea’s Condo, 101
Bonus Scene 1*
You can access the Bonus Scenes by using the Teleport in the bottom of the Scene Player.

- Open Angelcraft
- Go through the Blue Portal
- You have to clear the four puzzles. Each puzzle will put an Angel Feather at the bottom of the screen
- Pick up the four Angel Feathers at the bottom of the screen

- Go down (south)
- Craft Arianna’s Bonus Profile


- Go to the Wilkes Mansion
- Enter the Mansion
- Go up the left stairs
- Go left (west)
- Go left (west)
- Go left (west)
- Go up (north)
- Open the Chest in the lower left corner
- Pick up Kama Sutra Lillian – An*l Sex

- Exit to the Map
- Go to the Warehouse
- Go up (north)
- Talk to Jonathan
- Sell all valuables
- Exit to Map
- Go to the Briefcase section and open the five Briefcases
- Go to the Shop
- Purchase all of the upgrades for your house, You cannot currently purchase the Jukebox.
- Purchase all of the outfits
- Purchase all of the pictures and profile upgrades
- Exit to the Map
- Go to the Strip Center
- Go to the XXX Shop
- Click on the !
- Purchase all of the X-Rated Content
- I had to go search for Artifacts to purchase all of the content
The Shop
In addition to selling crafting and quest items the shop also sells improvements for your house, pictures of the women, and outfits for the women.
The total cost to upgrade your house from 0 to maximum is $48,310. You need to upgrade your house to have a successful Booty Call. Each woman has different requirements, please see the Booty Call Requirements.
I find it easier to wait until the end to do it. You can only purchase each item once and once all of the items are purchased the icon will no longer appear in the shop.
Each woman has:
A $100 photo x 12 = $1,200
A $300 photo x 12 = $3,600
An $400 outfit x 12 = $4,800
Total: $9,600
Everyone except Arianna has:
Profile Upgrade $1,000 x 11 = $11,000
Pinup $2,000 x 11 = $22,000
Total $33,000
Grand Total: $42,600
Offerings
Basically the non-metal items will get you an Essence of Medicine and the metal items will give you an Essence of Intelligence. Do yourself a favor and only use the “cheap” items. You can carry multiple Essences, so you can stock up.
Stone Figurine – base worth – Essence of Medicine
Clay Statue – 2 x base – Essence of Medicine
Clay Idol – 3.5 x base – Essence of Medicine
Jade Figurine – 5 x base – Essence of Intelligence
Silver Figurine – 15 x base – Essence of Intelligence
Copper Idol – 25 x base – Essence of Intelligence
Silver Statue – 37.5 x base – Essence of Intelligence
Briefcases
There are five Briefcases you can find after you find the Crowbar. All five Briefcases are located under manhole covers.
Channel 4
Condos
Shop
Strip Center
Apartments
- After you have the Briefcases you can open them with codes that you find around town.
- The NPC at Channel 4 tells you where to look for one

- 124 from the mirror in Kimberly’s Dressing Room
- 349 from the sacks in the Mansion Pantry
- 576 from the note in the Channel 4 Media Room
- 666 from talking to an NPC, I haven’t found the character, but the number works
- 969 from the wall of the Rift Room
Open your Inventory, select Briefcase and then enter one of the combinations to open it: 124, 349, 576, 666, 969. The amounts are tied to the combination you use to open the Briefcase. Each combination can only be used once.
I received:
Briefcase 1: $1,000 (124)
Briefcase 2: $2,000 (349)
Briefcase 3: $800 (576)
Briefcase 4: $3,000 (666)
Briefcase 5: $1,500 (969)
Booty Calls
Each woman has requirements for a Booty Call. If your house doesn’t have their required items you won’t be spending time with them.
Part 1
| – | Hannah | Erica | Ella | Carol | Lillian | Judy |
| Total Cost | $60 | $300 | $650 | $1,000 | $4,700 | $8,300 |
| Porch Flowers – $30 | X | X | X | X | X | X |
| Entry Rug – $30 | X | X | X | X | X | |
| Porch Plants – $150 | X | X | X | |||
| Wall Clock – $90 | X | X | X | X | X | |
| Potted Garden Flowers – $150 | X | X | X | |||
| Sofa Table – $200 | X | X | X | |||
| Garden Bushes – $200 | X | |||||
| Side Table – $150 | X | X | ||||
| Tall Bushes – $400 | X | |||||
| Entry Bushes – $800 | X | |||||
| Coffee Table – $400 | ||||||
| Media Cabinet – $200 | ||||||
| Accent Chair – $900 | ||||||
| Sofa – $1,000 | ||||||
| Basic Renovation – $3,000 | X | |||||
| Large Rug – $600 | X |
Part 2
All items from Part 1 must be purchased in addition to the listed items.
| – | Nellie | Kimberly | Melissa | Andrea | Chloe | Heather |
| Total Cost | $13,400 | $22,630 | $28,210 | $36,210 | $38,010 | $48,310* |
| Brick Walkway – $2,000 | X | X | X | X | X | X |
| Yard Trees – $1,000 | X | X | X | X | X | X |
| Wall Table $400 | X | X | X | X | X | X |
| Curtains $500 | X | X | X | X | X | X |
| Entertainment Center – $1,200 | X | X | X | X | X | X |
| East Side Home Expansion – $5,000 | X | X | X | X | X | |
| Kitchen Table – $1,600 | X | X | X | X | X | |
| Refrigerator – $2,200 | X | X | X | X | X | |
| Indoor Entry Plants – $250 | X | X | X | X | X | |
| Window Fern – $180 | X | X | X | X | X | |
| West Side Home Expansion – $5,000 | X | X | X | X | ||
| Room Plant $280 | X | X | X | X | ||
| Trashcan $100 | X | X | X | X | ||
| Standing Lamp – $200 | X | X | X | X | ||
| Yard Statues – $5,000 | X | X | X | |||
| Piano $3,000 | X | X | X | |||
| Arcade Machine – $1,500 | X | X | ||||
| Dart Board $300 | X | X | ||||
| Second Story Expansion – $5,000 | X | |||||
| Pool Table – $2,500 | X | |||||
| Framed Photos – $500 | X | |||||
| Framed Art – $1,500 | X | |||||
| Wall Guitar $800 | X | |||||
| Jukebox $??? |
Use your phone to call a woman who has give you their contact information. They will come over, and provided your house has their required amenities, they will accompany you to your bed room. If you have purchased their outfit from the Shop you can click on the sparkle in the upper right to change them into it. The Kama Sutra scrolls you have found for them will be available to select from on the right. If you don’t have any Kama Sutra scrolls for them you won’t be able to do anything with them.

Puzzles
Puzzle 1
These puzzles are both similar and different from the Treasure of Nadia puzzles. In this puzzle you need to pick up the three hearts, one for each demon. Then walk to the chest. You will lose one heat each time a demon touches you and the demon will disappear. If you don’t have an available heart you will fail the puzzle and have to start over.
- Open the chest and receive a Clay Statue

Puzzle 2
- Pickup the lower left heart
- Pickup the bomb
- Pickup the second heart
- Blowup the yellow spinner
- Open the chest and receive a Clay Statue

Puzzle 3
- Push the slider up to trap the demon
There are many ways to get the bombs, the easiest is to push up the center right three push blocks up one and then collect the bombs.
- Blow up the three yellow spinners
- Open the chest and receive a Clay Statue

Puzzle 4
This puzzle serves to introduce you to some of the different object in the puzzles and how they behave.
- Push the push block four spaces to the left
- Push the slider to the right
- Pick up the lower bomb
- Blow up the upper right yellow spinner
- Pick up the upper bomb
- Pick up the heart
- Blow up the center yellow spinner
The demon will attack you taking your heart
Open the treasure chest and receive a Clay Statue
