- Treasure of Nadia: Walkthrough Guide
- Inventory Screen
- Maps
- The Walkthrough – Part 1
- The Walkthrough – Part 2
- The Walkthrough – Part 3
- The Walkthrough – Part 4
- The Walkthrough – Part 5
- The Walkthrough – Part 6
- The Walkthrough – Part 7
- The Walkthrough – Part 8
- The Walkthrough – Part 9
- The Walkthrough – Part 10
- The Walkthrough – Part 11
- The Walkthrough – Part 12
- The Walkthrough – Part 13
- The Walkthrough – Part 14
- The Walkthrough – Part 15
- Empty Pocket – Extras
- Post Story – Part 1
- Post Story – Part 2
- Post Story – Part 3
- Post Story – Part 4
- Crafting Guide
- Crafting Recipes – Part 1
- Crafting Recipes – Part 2
- Gold Compass
- Plants & Locations
- Treasure Spawns
- Talismans
- Treasure Maps
- Booty Calls
- Fishing
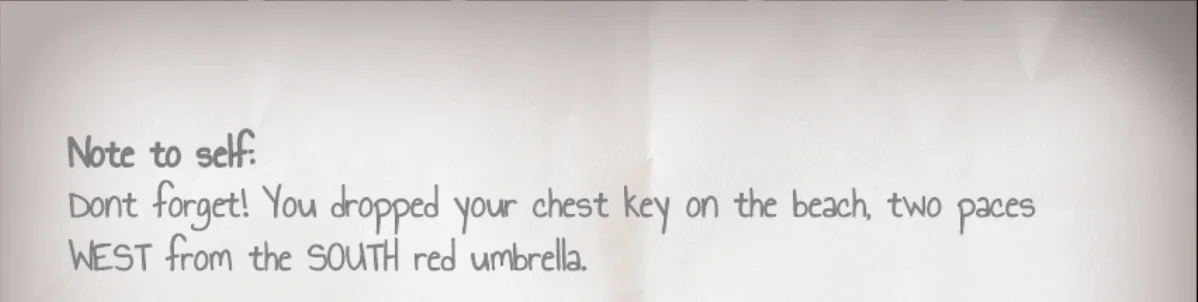
- Locker Keys
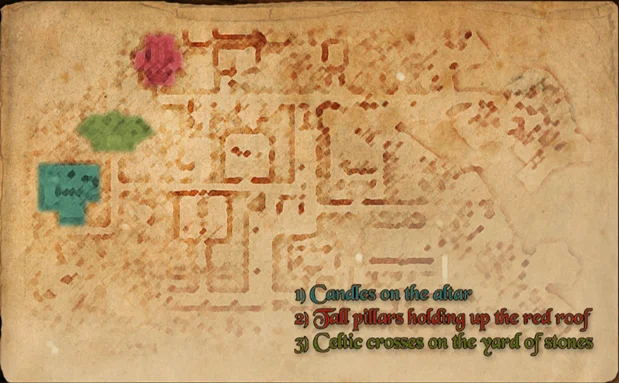
- Ancient Temple Puzzle Solutions
- Ancient Temple: Puzzles 1 – 10
- Ancient Temple: Puzzles 11 – 20
- Ancient Temple: Puzzles 21 – 30
- Ancient Temple: Puzzles 31 – 40
- Ancient Temple: Puzzles 41 – 48
- Ancient Temple: Puzzle 49
A step-by-step walkthrough and complete guide for Treasure of Nadia.
Treasure of Nadia: Walkthrough Guide
Use CTRL+F to search for what you need and follow the guide step by step. There are dedicated sections for Crafting, Fishing, Plants, and Ancient Temple puzzles.
The guide may not make full sense when reading, but things usually become clear when you follow the steps.
This guide is now complete – after 200 hours and four 100% runs, I’m done.
- Looking for a Profile? Check Empty Pocket > Extras
- Looking for a Kamasutra page? See the Booty Call section – the chart shows each location by name.
If something doesn’t match the guide, you probably missed a step – even one that seems unrelated.
(For example, I couldn’t find Albert because I forgot to pick up a key segment.)
During the main story, the Soul Stone can help point you in the right direction.
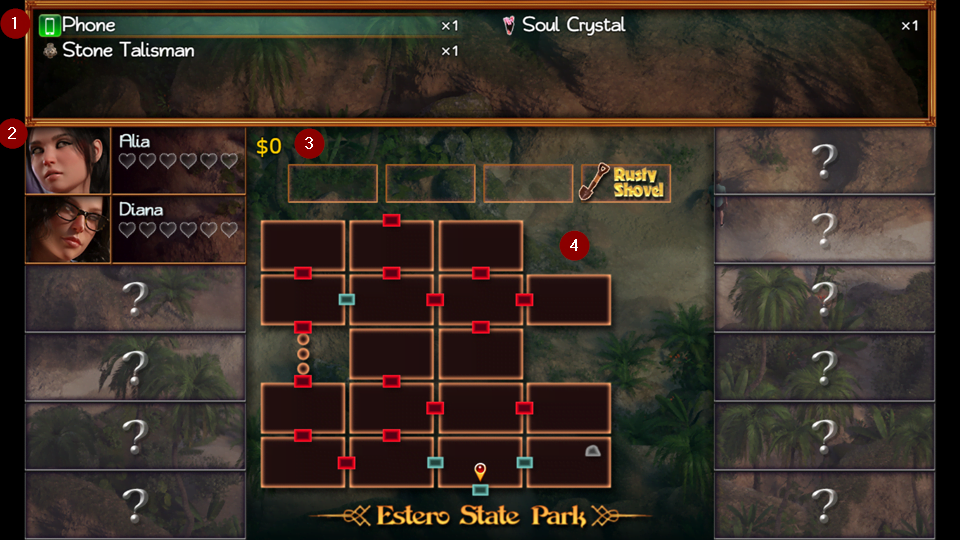
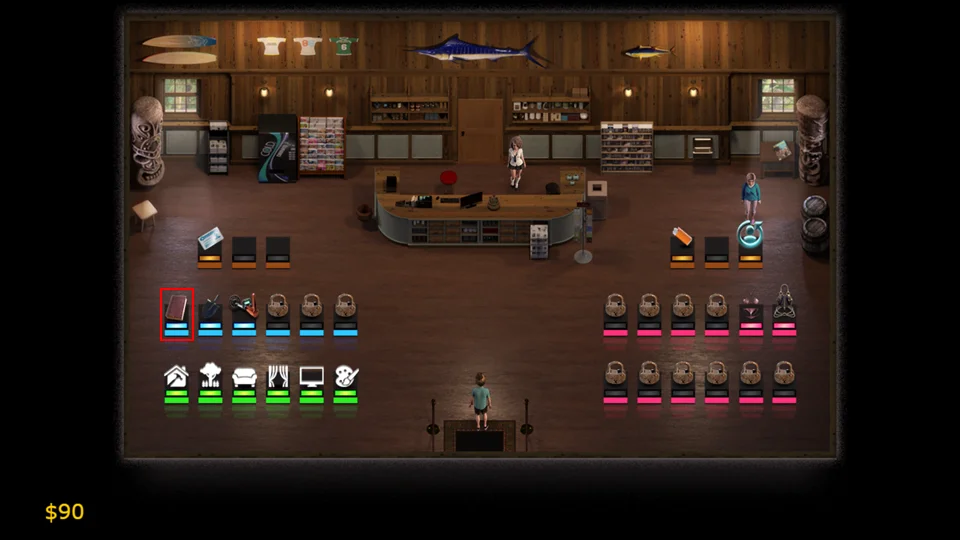
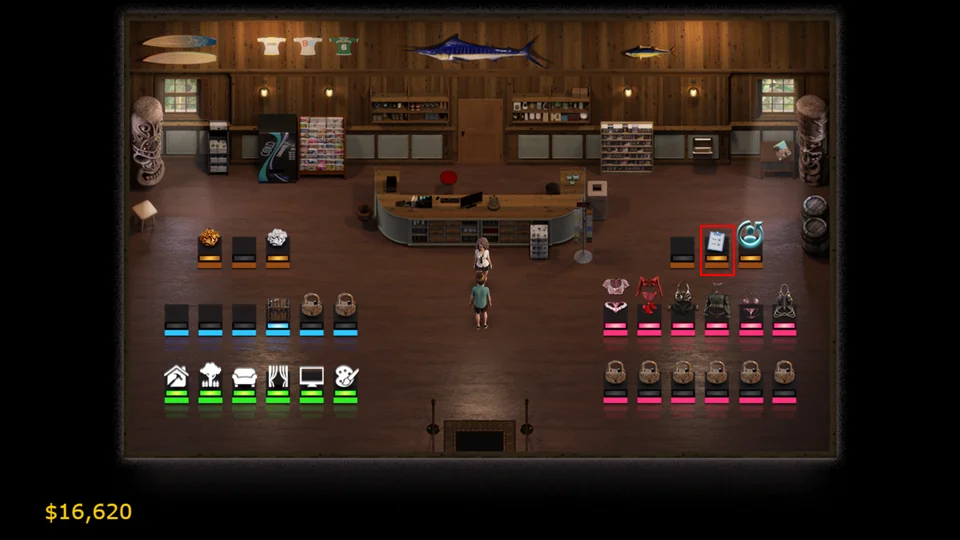
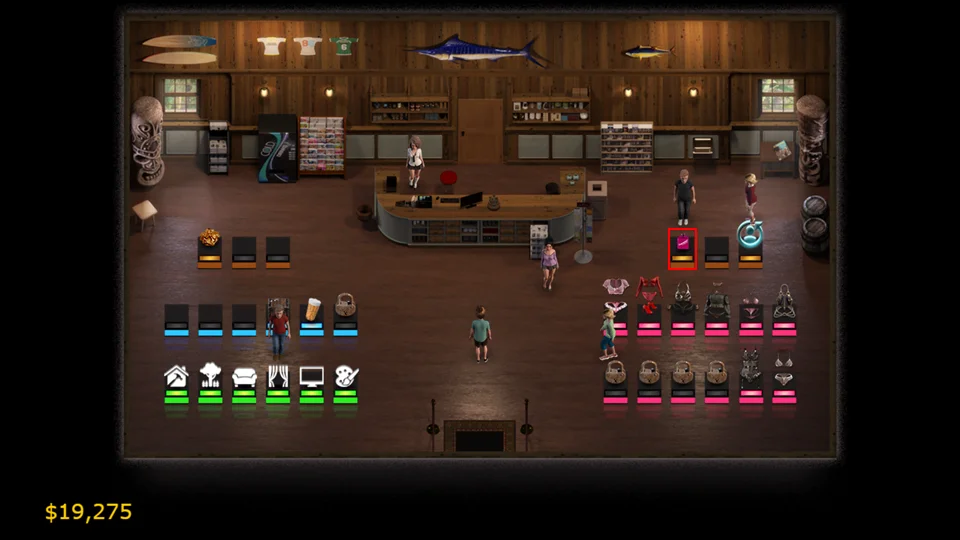
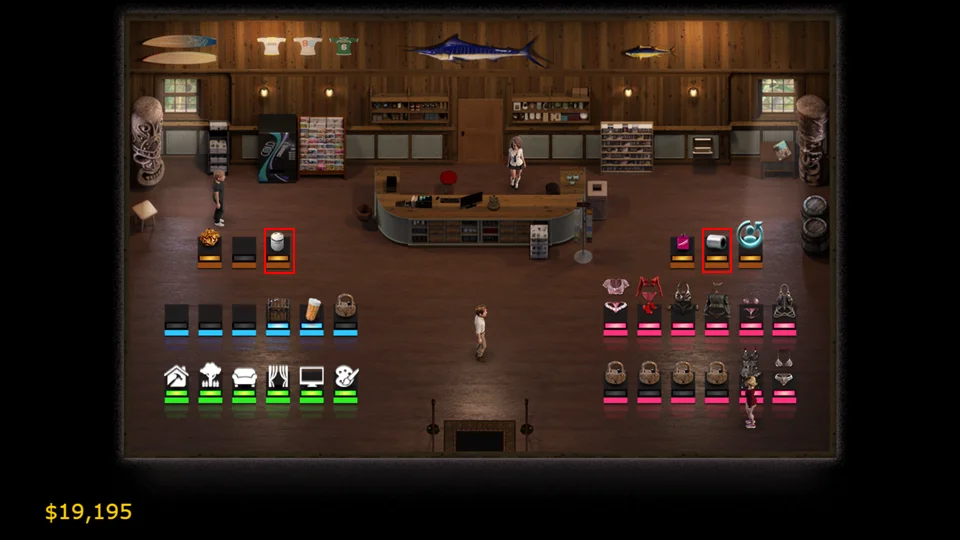
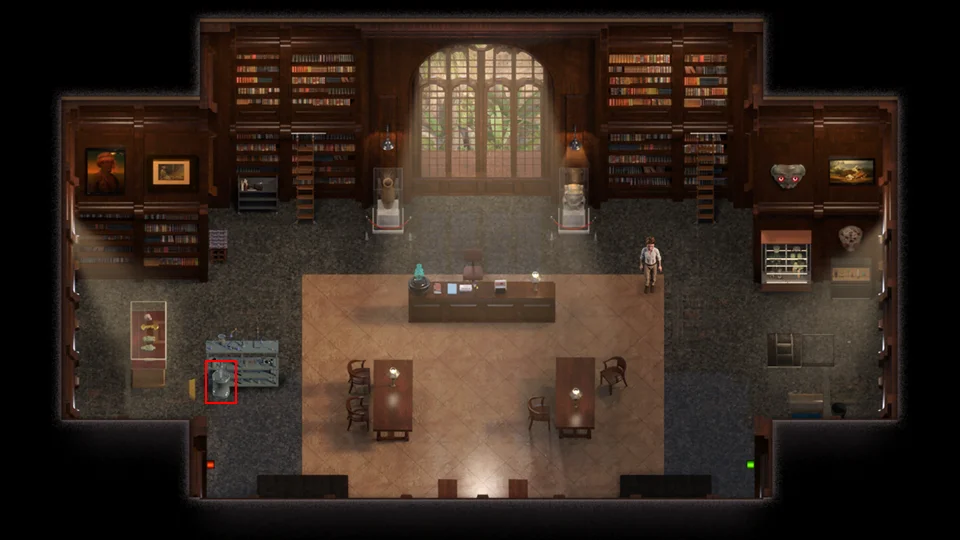
Inventory Screen
You can access the inventory screen by pressing the ESC button or right mouse clicking.
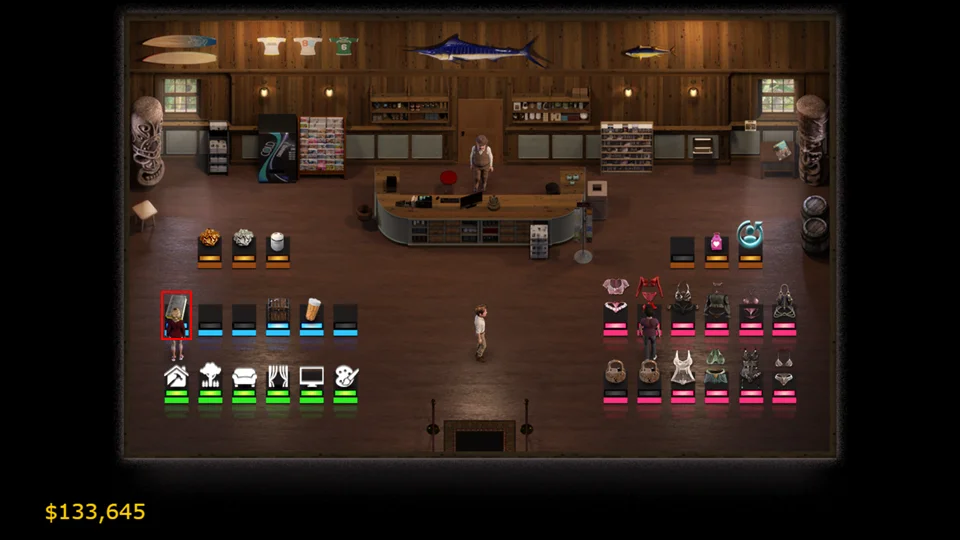
1. Your inventory
These are the items that you have collected. You can click on them to find out more information about them, or use them. As you gain more items you will need to scroll down to see them.
2. Status with the ladies
The number of hearts you have affects the different acts they will be comfortable doing with you.
3. Your tools
You have four tools: Boots, Metal Detector, Guide, and Shovel. With the Metal Detector in your inventory you will be able to collect gold piles. The gold piles come in four different sizes.
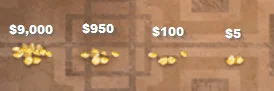
The $5 and $100 being the most common that you will find. The $950 and $9,000 are normally only encountered in treasure rooms. You will be able to upgrade the boots, guide, and shovel during the course of your adventure. The boot upgrades will give you immunity to different aspects of the environment. The guide upgrades will improve the talismans you find. The shovel upgrades will speed up the time required to collect lower level talismans.
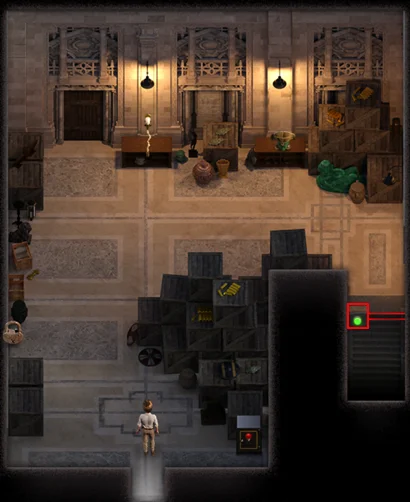
4. Local Map
The map will show you the areas available to you. The green boxes indicate that you can travel between the two “rooms”. Red “doors” mean that you are unable to currently access the area.
Maps
This story takes place in Cape Vedra.

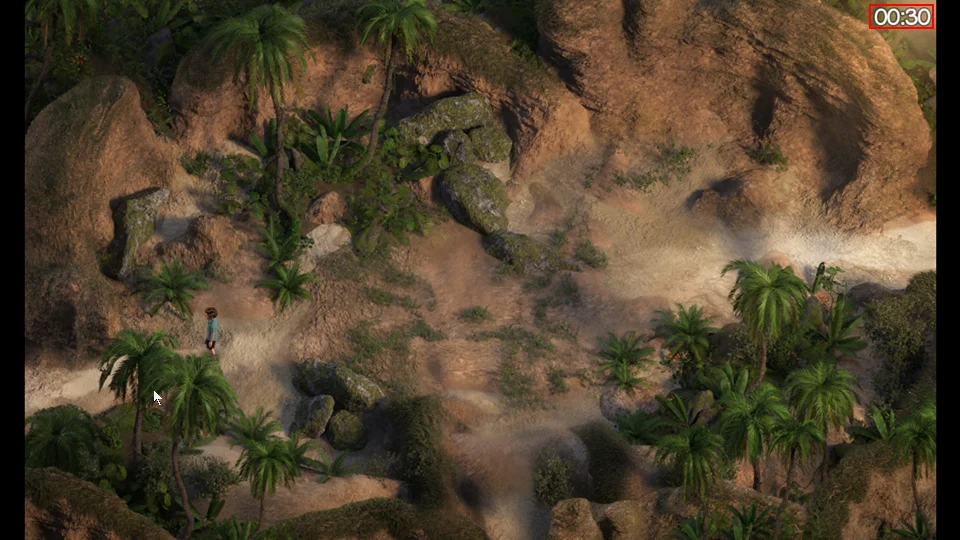
Estero State Park

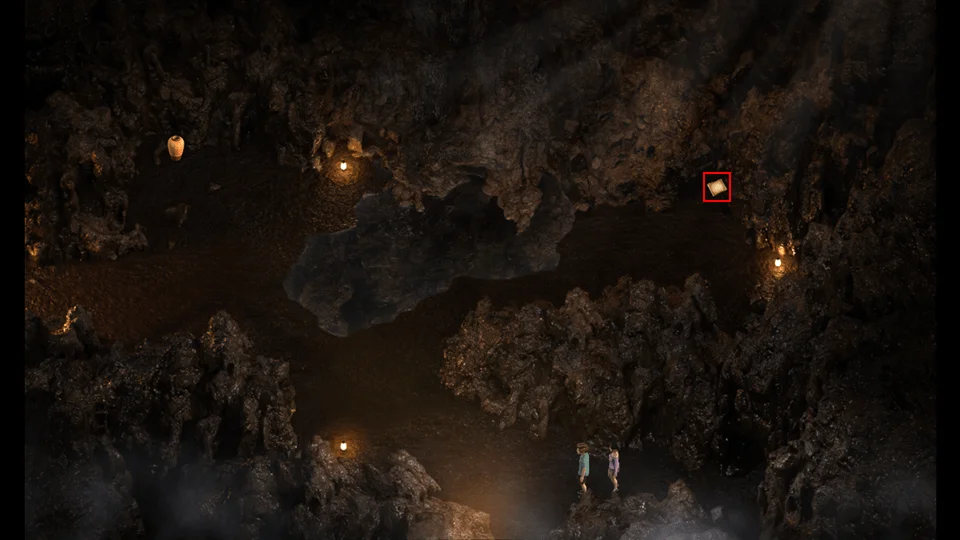
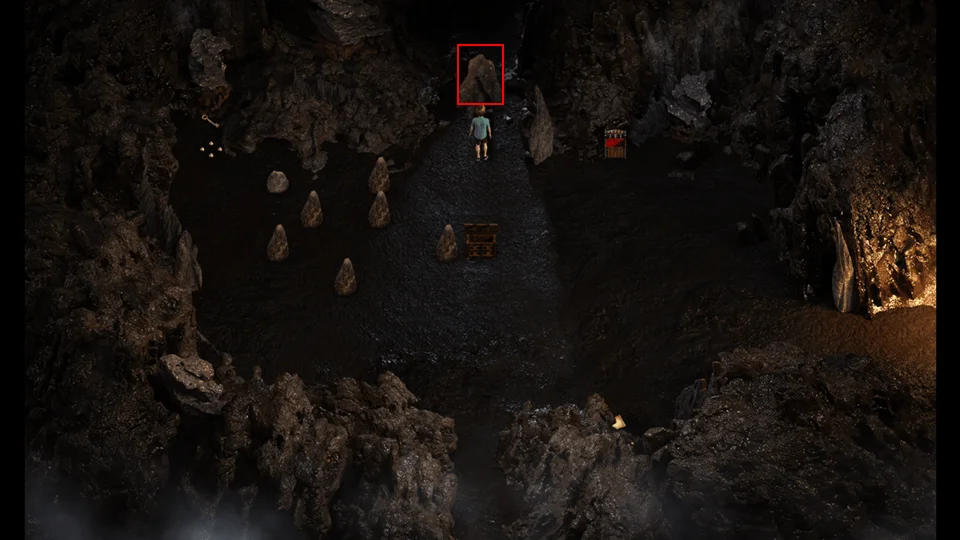
Caverns (Cave)

The Walkthrough – Part 1
This guide starts after the initial game tutorial stops, when you pick up the Soul Crystal. I highly advise you to set your Move Speed to Fast as Evie suggests. The “Save Often” motto is also highly recommended. If you leave the default options Evie will remind you to save.
This guide is divided into parts, mainly due to Steam limitations on how much text can be in a guide section. There is no “logical” reason for a new part, just that I ran out of room in the previous part.
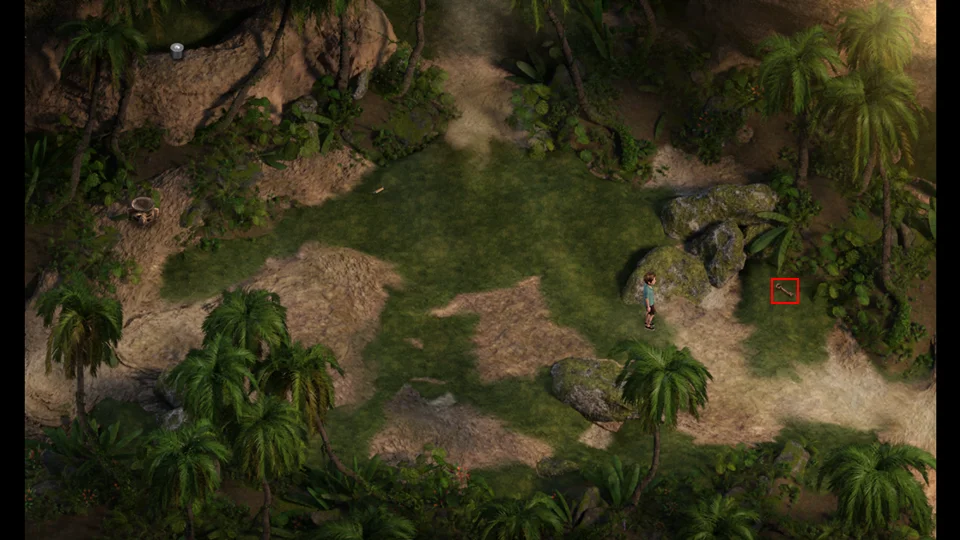
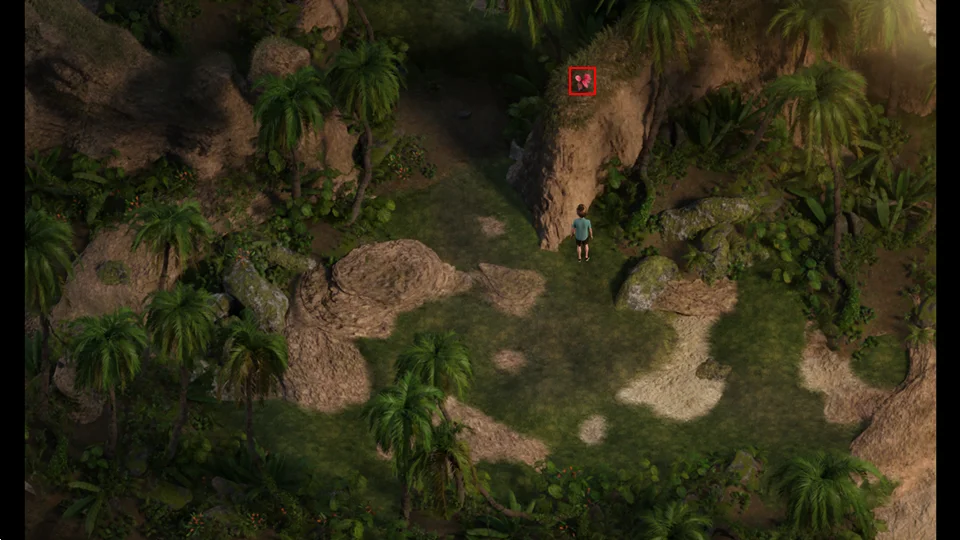
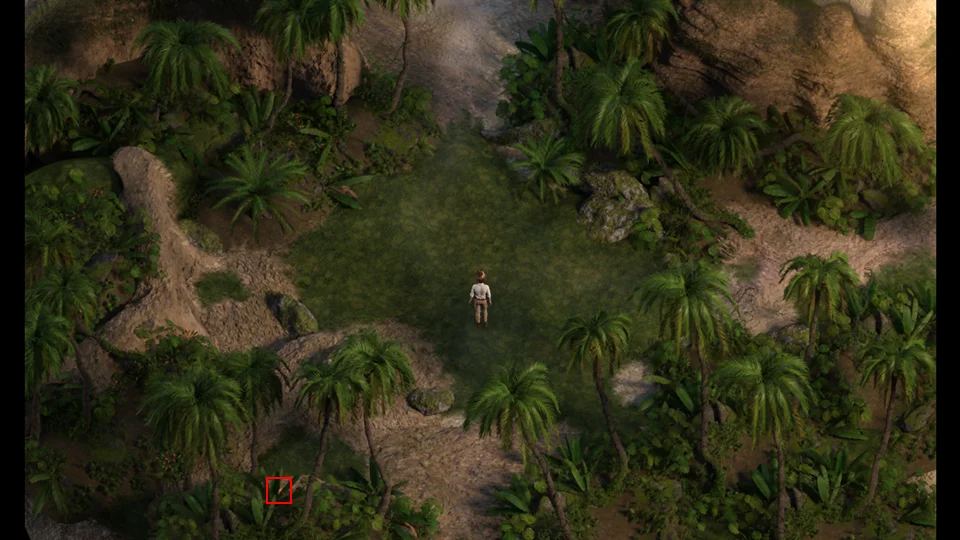
- Go to Estero Park and meet Michael, the park ranger.
- Click on the sparkle to find your first “treasure”. Any time you see a sparkle you’ll want to collect it. Don’t worry, if you don’t it doesn’t disappear. However, it can’t reappear in that spot until you collect it.
- Go to the Library and sell the Stone Talisman to Diane.
- Looks like it is going to take a lot of work to become a successful treasure hunter.
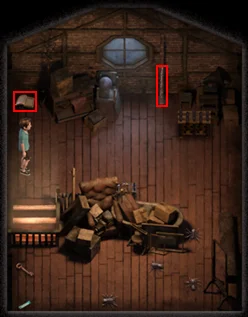
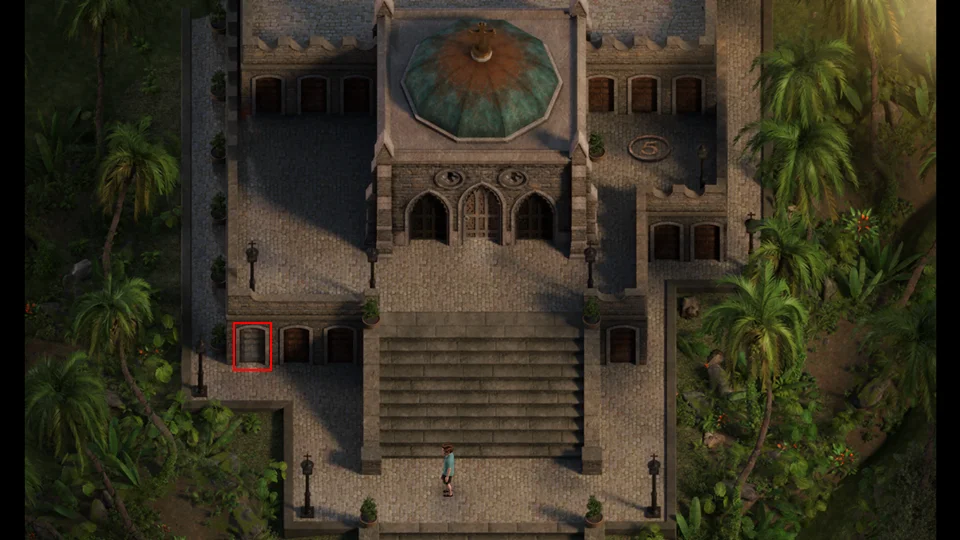
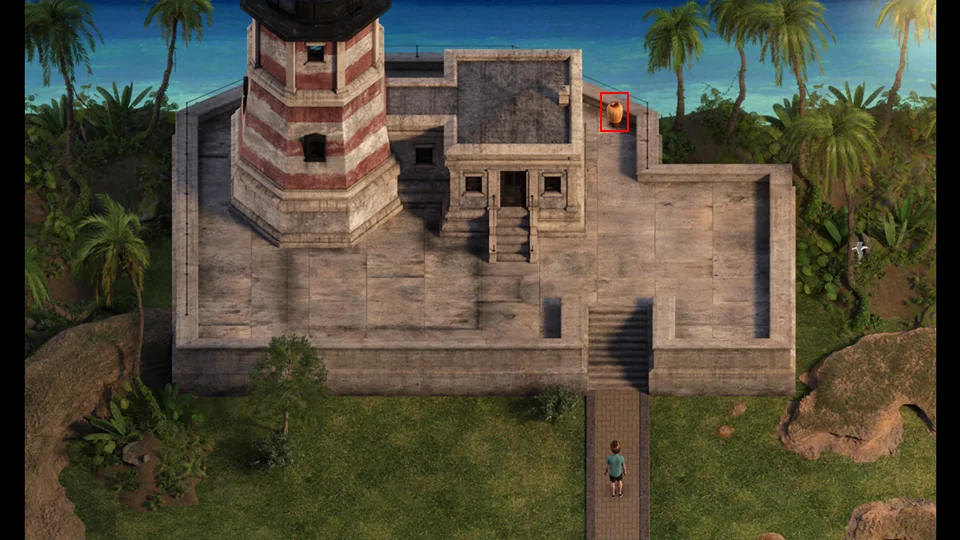
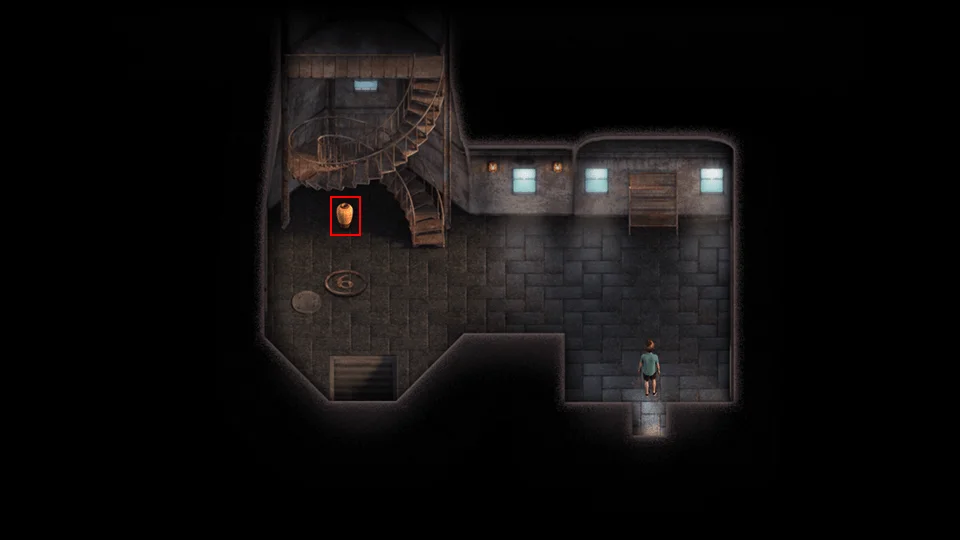
- Go to the Lighthouse to visit Albert.
- Notice the number 6 on the floor. You will need to light six torches to unlock what is there.
- Go to Full Mast Bar.
- Pick up the Room Key from the sparkle in the corner.
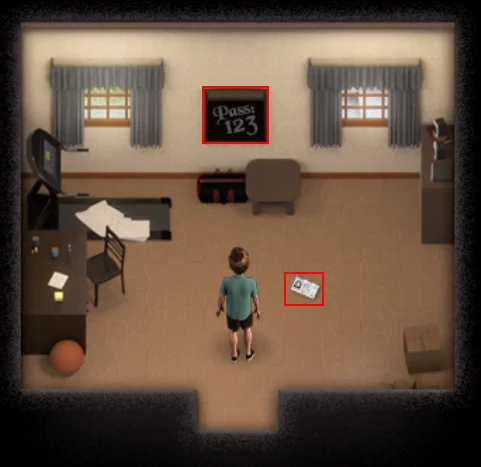
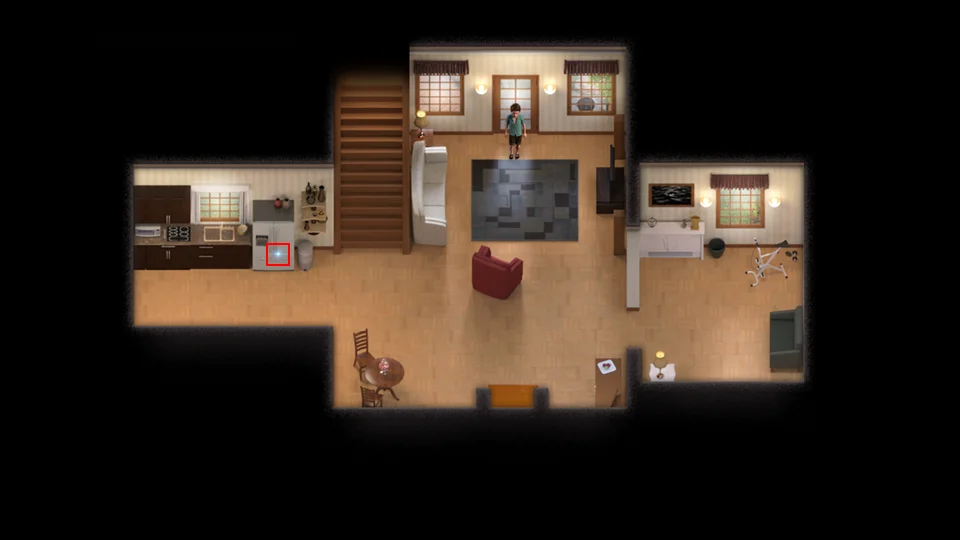
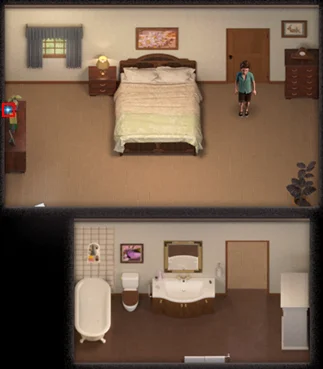
- Go to Janet’s Home.
- Go upstairs and unlock the door on the right with the Room Key.
- Pick up your Photo ID and note the number on the Chalkboard.
- Go back to the bar.
- Talk to Tasha.
- Pay attention to Naomi’s order, Sex on the Beach.
- Bring the Dark Rum to Albert in the Lighthouse.
- Receive a pair of Binoculars.
- Let’s go to Estero Key and do some bird watching.
- Use the Binoculars to get a better look.
- Naomi solo scene and earn Naomi’s first heart.
- Go to the Doctor’s Office.
- Talk to the Receptionist. I’ve found that clicking around their knees is the best spot.
- Need to get an Insurance Card.
- Go to the Church.
- Notice the 5 on the upper level to the right of the entrance.
- Go to Squallmart.
- There isn’t anything you can purchase with your $10.
- Time to go to the park and hunt for treasure.
- Go to the left and pick up the Chest Key.
- Search the Park until you have enough Talismans to turn in for $30.
- Go to the Library and sell your Talismans to Diane.
- Go to the Parlor.
- Take the path on the right and go to the back.
- Pick up the Shovel Handle and read the crafting recipe (Silver Talisman Crafting).
- Enter the Massage Parlor.
- Select Yes. I’ll take a massage for $30.
- Scene with Pricia.
- Go back to the Park.
- Pick up any talismans.
- Go to the Beach.
- Use your Binoculars to get a better view.
- Brad and Valerie scene.
- Go to the Mansion
- Talk to Sofia.
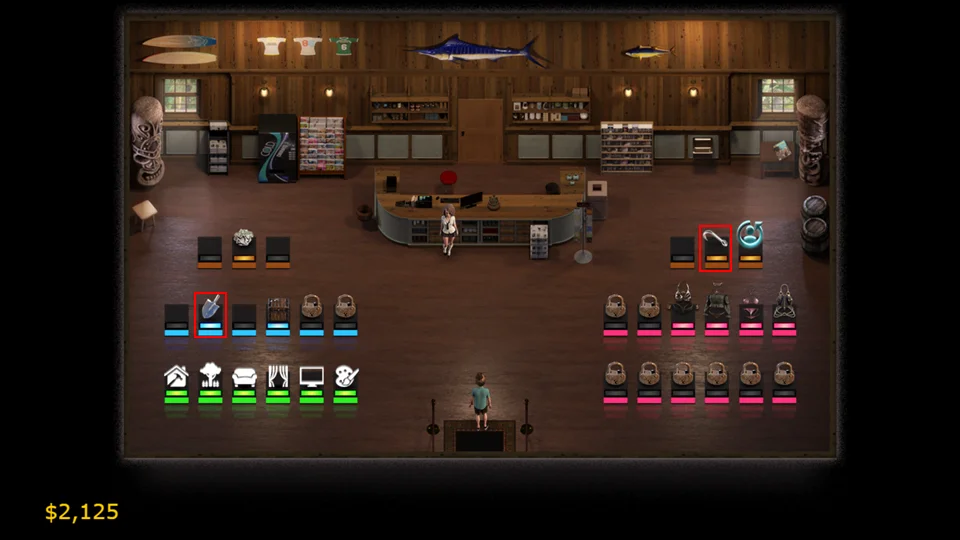
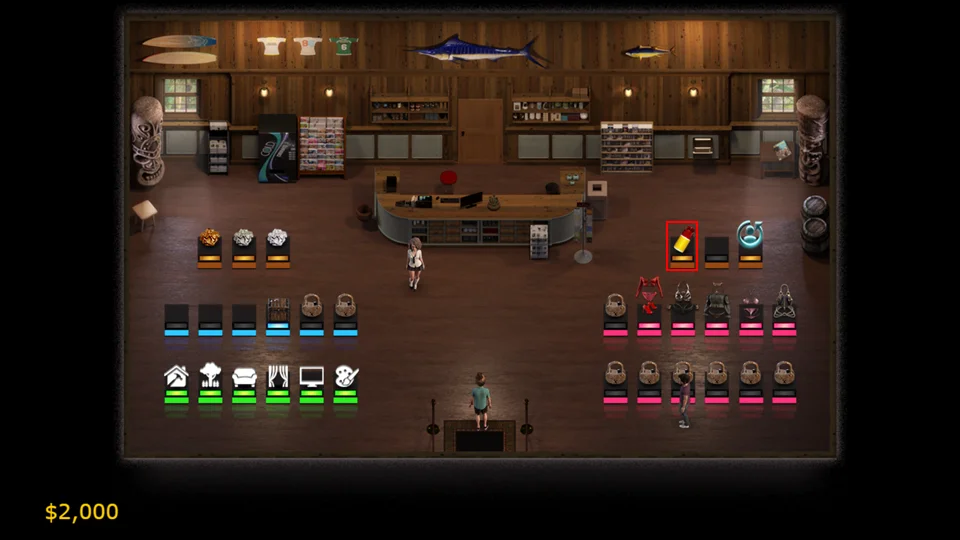
- Go to the Bait Shop.
I recommend waiting until after the story is complete to do the side quests: Ancient Temple Puzzles, Booty Calls, Fishing, and upgrading your house. This guide will purchase the bare minimum to advance the story.
- Don’t buy anything now from the Bait Shop. You’ll want to wait until you unlock the Heavy Lures.
- Go to Janet’s Home and talk to Janet.
- Go upstairs and in the left door and search Kaley’s room.
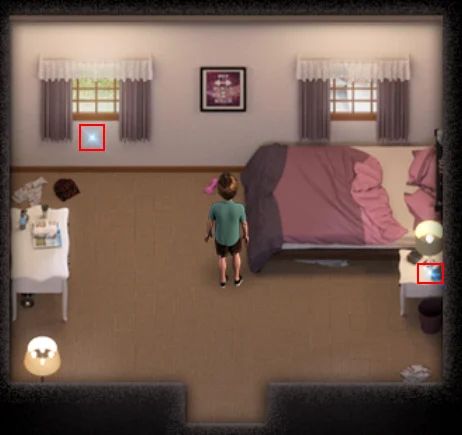
- Click on the sparkle by the window and use your Binoculars.
- Click on the sparkle on the bedside table.
- Go to Estero Key.
- Follow Alia.
- Talk to Alia.
- Receive an Unknown Treasure.
- Open the chest with your Chest Key.
- Receive Kama Sutra – Alia – Foolin’ Around.
- If you invite a girl over you need to have Kama Sutra pages for her to do anything with her.
- Go to the Library and show Diana the Unknown Treasure.
- Sell any Talismans you have to Diana.
- Go to Estero Key.
- Receive Alia’s phone number and first heart.
- Go to Squallmart.
- Talk to Ash.
- Trade your Binoculars for the Photo Album and Photo: Dr. Jessica Amor.

- You can access the photos in the Extras Album in your inventory.
Go inside of Squallmart and get something for your house, we don’t need much. You should have enough money for Basic Walkway ($10), Basic Fence ($30), and Garden Flowers ($20). If you don’t have enough money go to the Estero Park and look for talismans. It doesn’t take much to impress Alia. Don’t worry about the prices for other things. As you progress you will find better Talismans that will sell for more money.
- Go Home. Looking better already.
- Use your phone to call Alia for a Booty Call. This does not count as an actual Booty Call with Alia.
- Scene with Alia.
- Go to Estero Park, we need to find some Talismans to earn some cash. We need $60 to purchase the Field Guide.
- Click on any sparkles you find.
- Follow the “Goons” west.
- While the park ranger is distracted pick up the Shovel Shaft and any sparkles.
- You will now be able to access this area and not be turned back by the park ranger.
- Head north (Up).
- We have to wait until we get some gear to deal with the scorpions, otherwise we’ll get stung and have to visit the doctor, and we don’t have insurance yet.
- Go back to the Park entrance and then east (Right).
- Go into the Cave.
- Pick up the Small Screwdriver.
- Clare solo scene.
- Continue entering the areas you have access to in the park until you have enough Stone Talismans to get you a total of $60.
- Go to the Library and sell the talismans to Diana.
- Go to Squallmart.
- Purchase the Field Guide for $60.
- You will now start finding Jade Talismans.
- Go to Estero Park.
- Continue entering the areas you have access to, until you find a Jade Talisman.
- Go to the Parlor.
- Give the Jade Talisman to Pricia.
- Scene with Pricia and earn first heart.
- Gain a 60 second Awareness bonus. This is shown by the countdown timer in the upper right corner of the screen. You will want to give Pricia one of each level talisman that you find as the bonus increases with each talisman level.
- Go to Estero Park and look for talismans until the timer runs out.
- Go to the Library.
- Sell your talismans to Diana.
- Go to Estero Park.
- Go West (Left).
- Go North (Up).

- Grab the Chest Key, you will get stung by a scorpion.
- Go to Squallmart.
- Depending on your cash purchase the following, in this order, if you run out of cash you’ll have to search for more talismans to afford the rest.

- Insurance ($60)
- Metal Detector ($70)
- Lighter ($40)
- Shovel Head ($80)
 | Once you purchase the Metal Detector you will start finding coins. |
The small piles are only worth $5, the larger piles are worth $100, and there are even larger piles that you will find. Like the sparkles pick up any money you see laying around and they don’t disappear if you don’t collect them, they just can’t respawn.
- Now that we have insurance, lets go see the Doctor about the scorpion sting.
- Go to the Doctor’s Office.
- Talk to Ash outside the building.
- Ash wants your help getting the Church Key.
- Talk to the Receptionist.
- Scene with Jessica.
- You will now receive an Intelligence boost. Similar to Pricia the Intelligence boost will increase with subsequent visits. You will notice that this one is based on items and not time.
- Go to Janet’s Home.
- Go upstairs.
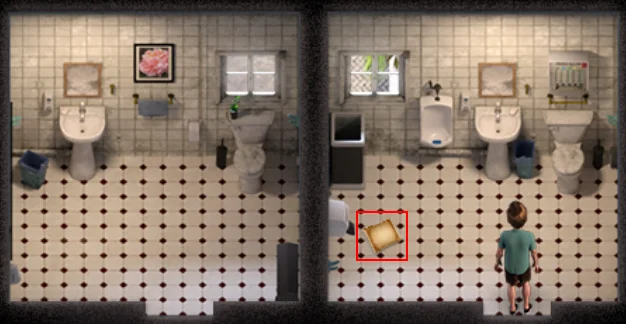
- Check on Kaley in the bathroom.
- Kaley solo scene and earn Kaley’s first heart.
The Walkthrough – Part 2
- Go to Janet’s room.
- Use the Small Screwdriver.

- Click on the sparkle.
- Click on the note by the wall.
- Where have you seen a note on a chalkboard?
- Click on the Shoe Laces in the bathroom.
- You’re going to need $50 for this next part, so if you don’t have it look for talismans in the Park until you have it.
- Go to the Library.

- Talk to Naomi.
- Naomi wants you to get her a drink and a good book.
- Go into the library.
- Don’t click on the sparkle. If you click on the sparkle you’ll have a useless book in your inventory for the rest of the game.
- Talk to Diana.

- Click on the sparkle on the cart
- Receive A Sinful Affair, this sounds more like what Naomi wants.
- Now lets get her that drink.
- Go to the Full Mast Bar.
- Talk to Tasha.
- Now what was Naomi’s usual drink?
- Purchase Sex on the Beach for $50.
- There is a guy next to the dumpster that will trade you a treasure for a drink. Don’t do it, it is a Stone Talisman and the cheapest drink is $10.
- Go to the Library.
- Talk to Naomi.
- Give Naomi A Sinful Affair and the Sex on the Beach.
- Scene with Naomi, her phone number, and second heart.
- Grab your pants.
- Go to the Church
- Go into the Church while Ash keeps Madalyn busy.
- Click on the sparkle to get the Church Key.
- Open the chest with the Chest Key.
- Receive Kama Sutra – Naomi – Blowjob.
- Exit the Church.
- Receive the picture of Mother Superior.
- Go to Estero Park.
- Take Alia into the cave.
- Read the crafting recipe (Jade Shovel Crafting).
- Go west (Left)
- Scene with Alia.
- Click on the Sparkle.
- Receive Silver Talisman.
- Light the torch with the Lighter, if you purchased it, if not you’ll have to come back.
- Go to the Park entrance.
You should have found at least one Jade Talisman. Let’s craft the Jade Shovel. If you don’t have a Jade Talisman search the Park until you find one.
- Go to the Shrine in the cave.
- Click on the Shrine and add the Shovel Head, Shovel Shaft, Shovel Handle, and Jade Talisman.
- Receive the Jade Shovel.
Evie tells you that the new shovel will make digging faster. What it does is Stone Talismans will now instantly pop up and Jade and higher talismans will do the spin thing. You’ll know that you’ve found one of the better talismans when your character says something.
- Go to Squallmart.
- Emily wants you to catch the robber.

- Buy the Pipe Wrench ($40) since you’re already here.
- Go to the Parlor.
- Follow the robber into the backyard.
- Talk to the robber.
- Beak the Jar to the left of the building with the Pipe Wrench.
- Receive a Jade Talisman.
- Give the Silver Talisman to Pricia.
- Scene with Pricia and a three minute Awareness bonus.
- Go to Estero Park and look for talismans in the outside areas you have access to.
- Since we’re in the park already, let’s light the second torch. Go to the area West (Left) of the entrance and light the torch with the Lighter.
- Go to Squallmart.
- Talk to Emily.
- Give Emily the $350
- Scene with Emily, Emily’s phone number and first heart.
- Go to the Library.
- Break the Jar on the right side of the Library with the Pipe Wrench.
- Pick up Chest Key.
- Talk to Ash on the left side of the Library.
- Offer Ash $250 for Diana’s picture.
- Talk to Diana.
- Diana needs an MRI magnet to fix her scanner.
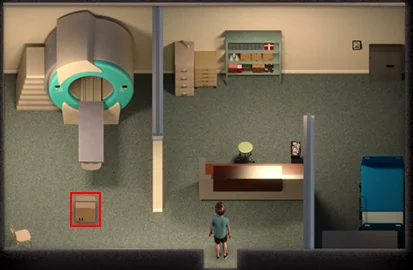
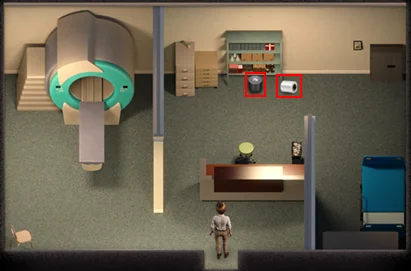
- Go to the Doctor’s Office.
- Go to the bird in the parking lot.
- Click on the sparkle.
- Receive MRI Room Key.
- Go into the West (Left) door.
- Use the MRI Room Key.

- Click on the sparkle.
- Receive High Powered Magnet.
- Click on Chest Key.
- Go to the Library.
- Show Diana something. Give Diana the High Powered Magnet.
- Earn Diana’s first heart.
- Talk to Diana.
- Sell all Talismans.
- Go to Estero Key.
- It doesn’t matter which one you pick to do first, the other will be available after you’re done.
- Go East (Right).
- Talk to Alia.
- Light the torch with the Lighter. This one doesn’t count for your torch count.
- Scene with Alia.
- Earn Alia’s second heart.
- Go to the Full Mast Bar.
- Break the Jar on the left side of the building with your Pipe Wrench.
- Pick up Silver Ore.
- Go upstairs.
- Click on the leaking pipe, towards the bottom, and use your pipe wrench.
- Let’s leave the chest alone for right now as there is a chest key that we will be able to pick up later.
- Read the book in the corner.

- Go downstairs.
- Scene with Naomi and Tasha.
- Earn Tasha’s first heart.
- Go to the Men’s room in the bar.
- Read the crafting recipe (Stompin’ Boots).
- Go to the Library.
- Talk to the guy blocking the door.
- Go to Squallmart.
- Talk to Ash.
- Go back to the Library.
- Go back to Squallmart.
- Talk to Ash.
- Buy photo from Ash for $100Go to Janet’s Home.
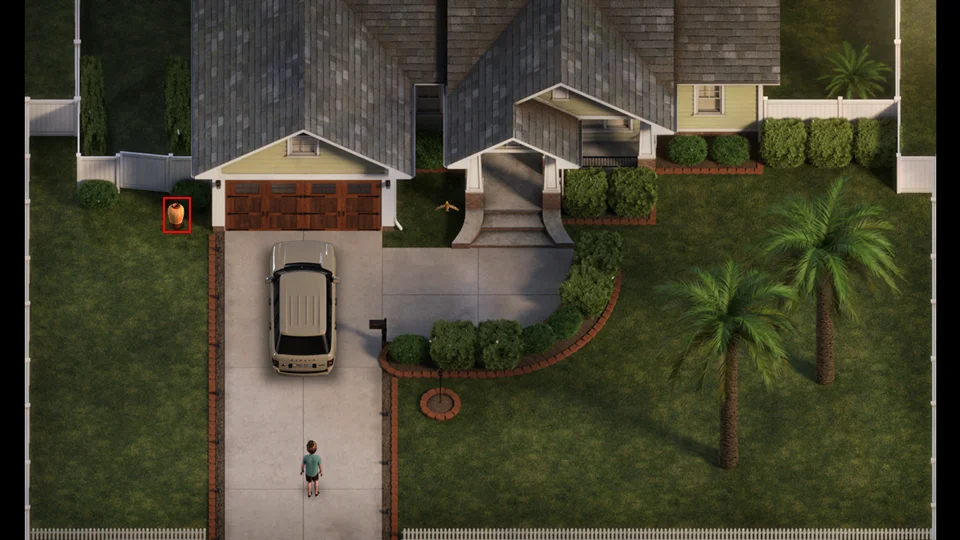
- Break the Jar left of the garage with your Pipe Wrench.
- Pick up a Basic Container.
- Go upstairs.
- Janet Solo Scene.
- Go to the Library.
- Pick up the stuff Ash dropped.
- Receive Church Key, Silver Talisman, and Broken Camera.
- Go inside and sell your talismans to Diana so you’ll have some walking around money.
- Go to the Church.
- Click on the bottom left door and open with the Church Key.
- Click on the sparkle.
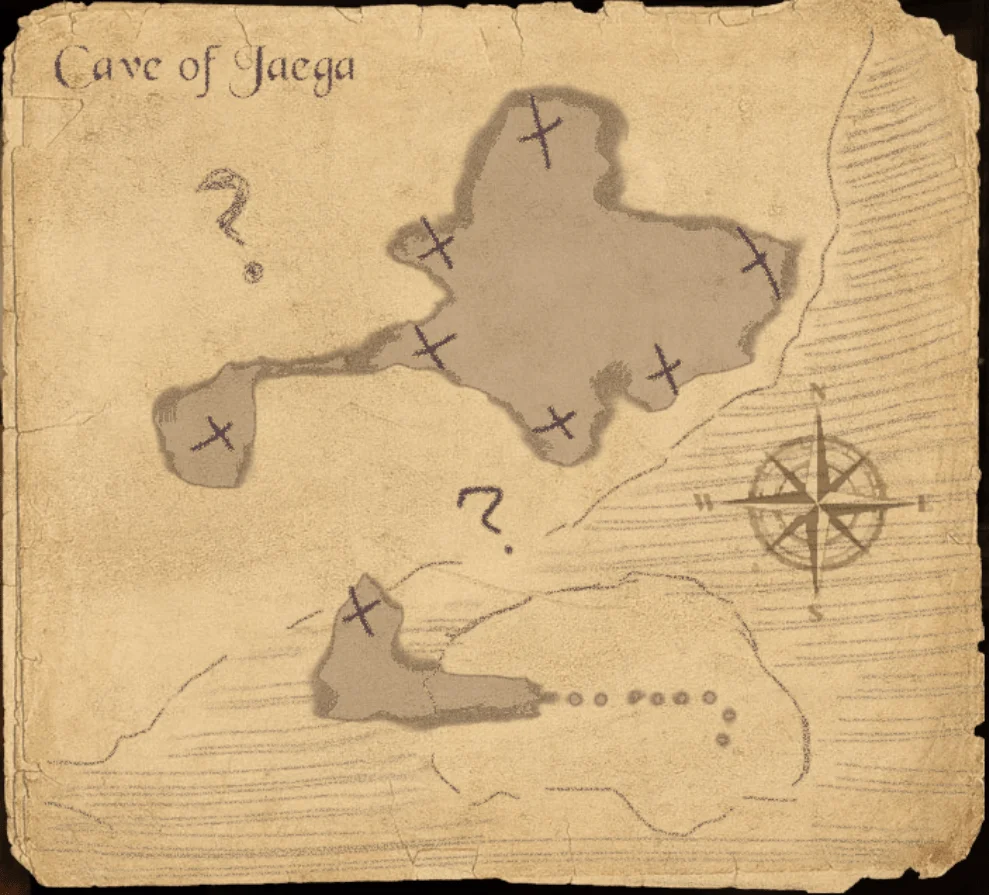
- Receive Cave of Jaega map and Chamber Key.
- Light the two torches on the sides of the door.
- Notice that if you step on the round pressure pad a Chest Key appears in Madalyn’s Room, and it disappears when you step off.
- Click on the door between the torches and open with the Chamber Key.
- Go to Estero Park.
- Earn Madalyn’s first heart.
- Go back outside.
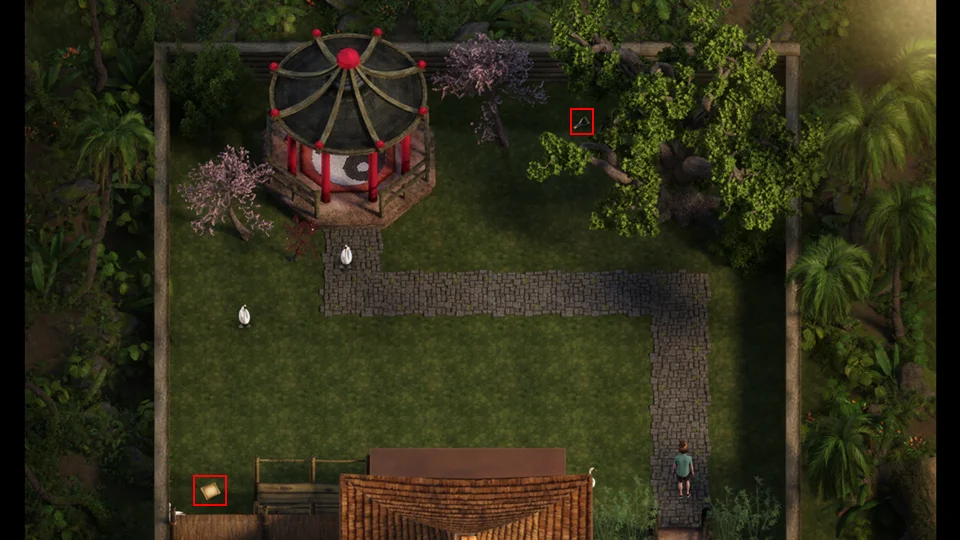
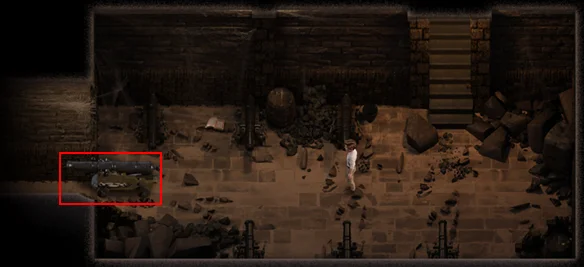
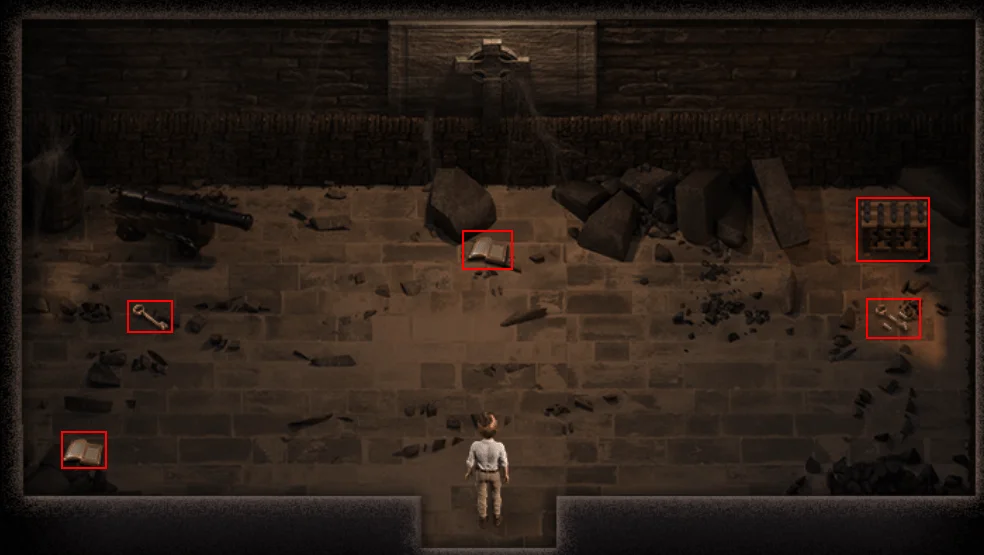
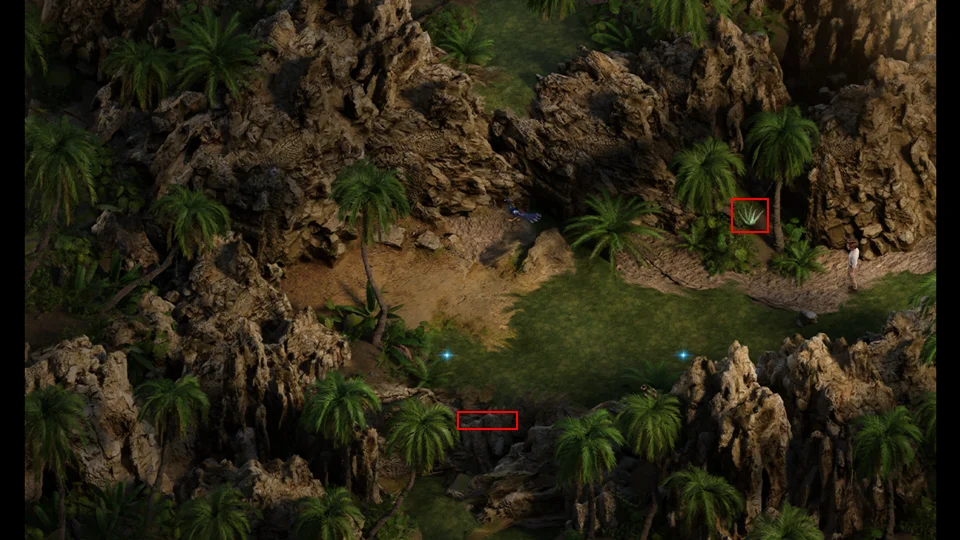
- Now that the Michael is busy at the Library we can go a little farther West (Left)

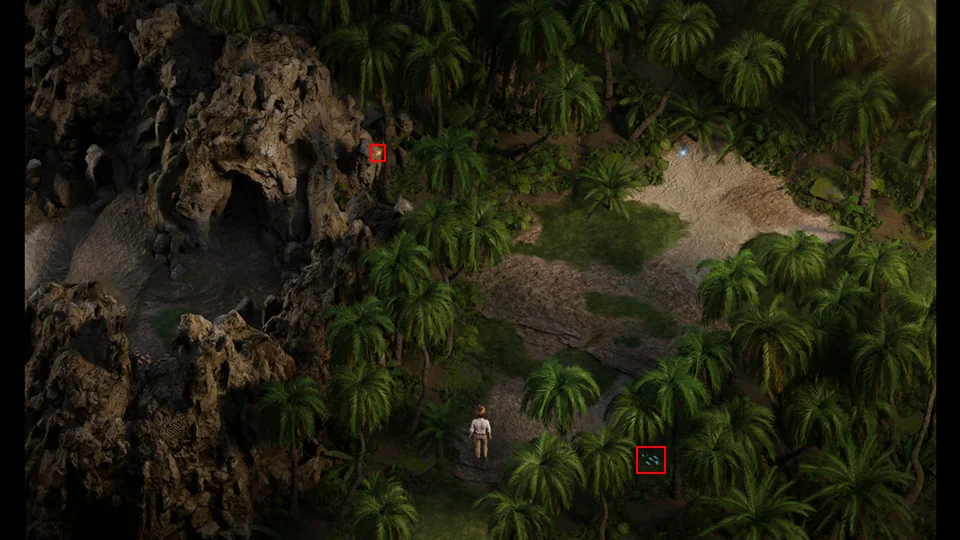
- Click on the sparkle (may not be here as talismans are random)
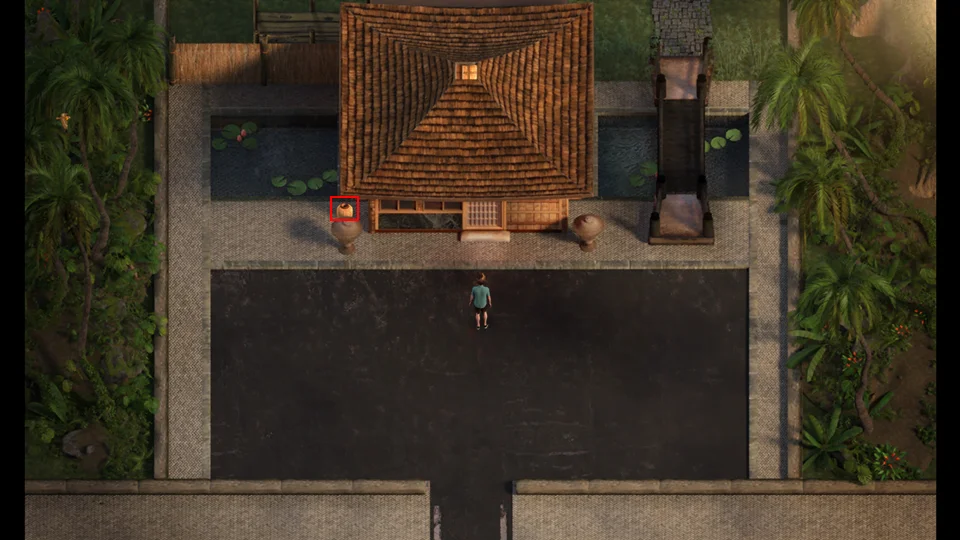
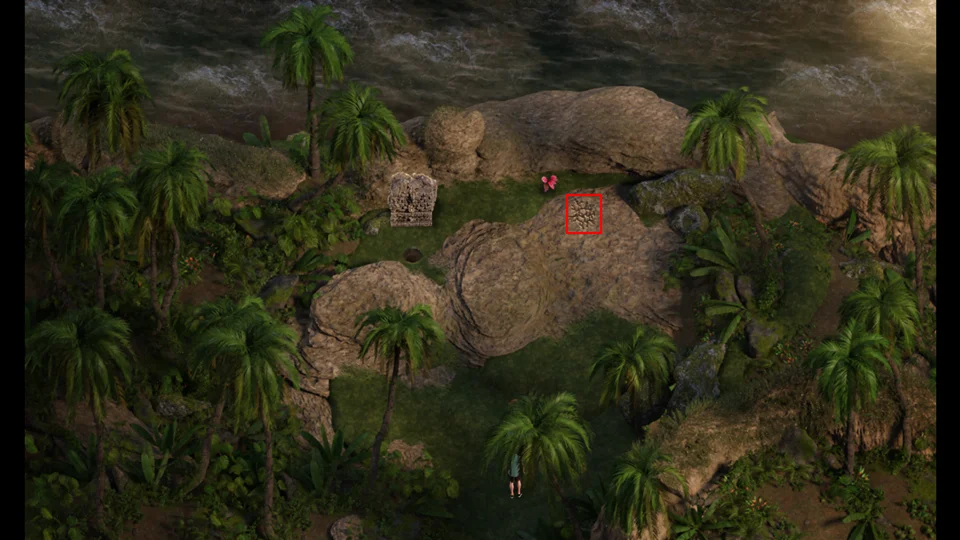
- Click on the Kama Sutra page, receive Kama Sutra – Tasha Strip Tease
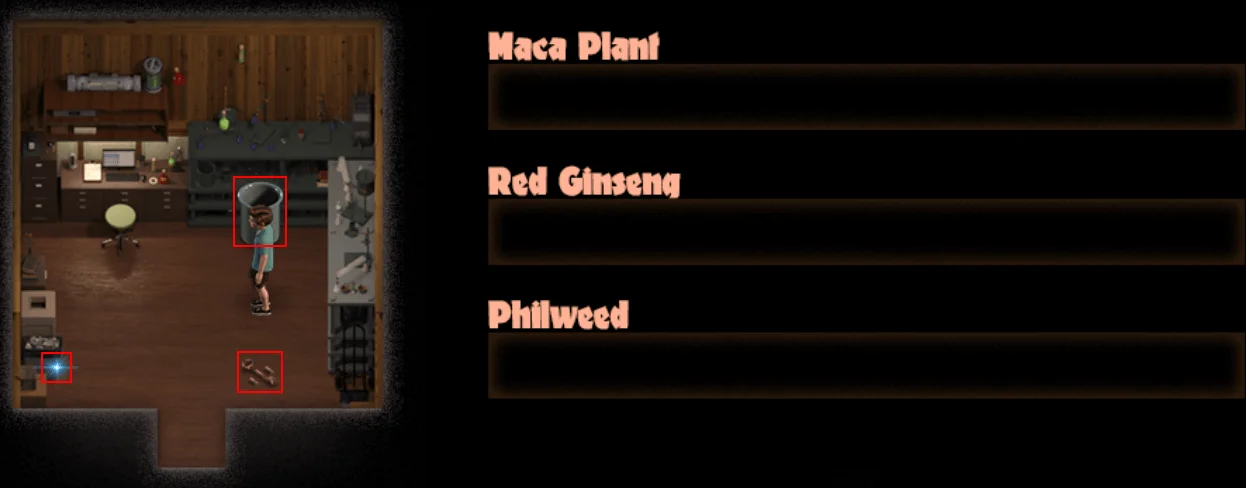
- Click on the green plant, receive Ginseng Plant
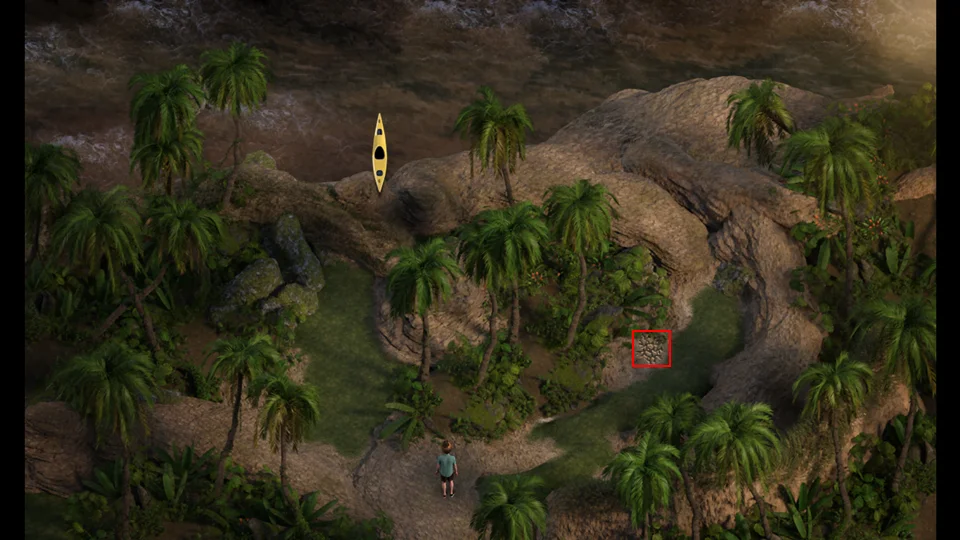
- Click on the gold pile (nay not be here as gold is random) this is an image of a $100 pile.
- Click on the crafting recipe, receive Camera Repair
- This plant is too high to reach right now
You will want to start collecting plants as you discover them. See the Plants section for additional information. We can’t go north (Up) as there are scorpions blocking the path. Eat the Ginseng Plant.
The Walkthrough – Part 3
- Go to the Doctor’s Office.
- Talk to the Receptionist.
- See Doctor Jessica for $140Scene with Jessica
- Receive an Intelligence Boost.
- Click on the x-ray machine.
- Go to the west (Left) door.

- Click on the sparkle, receive Loose Screws.
- Click on the Camera, receive Camera Base.
- Go with Jessica to the bar.
- Receive Jessica’s first heart.
- Drinking game with Tasha. You take turns drinking and the first one to get drunk loses.
- You have to wait until Tasha turns her head and then Pretend to take a drink. If you fail you restart the game.
- Scene Tasha dancing topless.
- Receive Tasha’s phone number.
- Looks like we have everything to fix the camera, let’s go to the Shrine and put it back together.

- In the first cave room, with the pool, break the Jar with your Pipe Wrench.
- Pick up a Basic Container.
- Use the Shrine with the Broken Camera, Camera Base, Small Screwdriver, and Loose Screws.
- Receive A Working Camera and a picture of Clare.
- Go to Squallmart.
- Talk to Ash.
- Go to the Church.
- Talk to Ash.
- Go to Squallmart.
- Talk to Ash.
- Ash wants to use the Lighthouse for pictures.
- Go inside Squallmart.
- Emily wants some Ginseng and Philweed.
Purchase the Sunscreen ($30). You will need to purchase the Recipe Chest ($1,900) to be able to purchase Prayer of Remote Offering ($30,000) later. Prayer of Remote Offering allows you to craft anywhere. Other than that the Recipe Chest is useless (since you have this guide).
Go to Estero Park. You’re going to walk around to pick the plants that Emily needs. Due to the random nature and fact that they won’t spawn if you have them in inventory, they may not be in the places I find them.
To make it easier I will reference the locations in a row and column format, where the first number is the row of the “room” and the second number is the column of the room. Please see the Maps section for a visual of this.
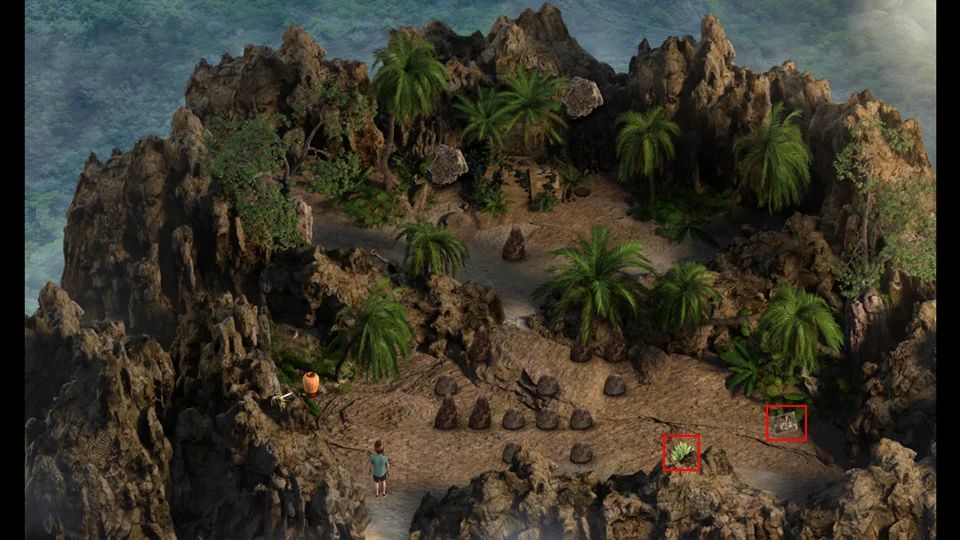
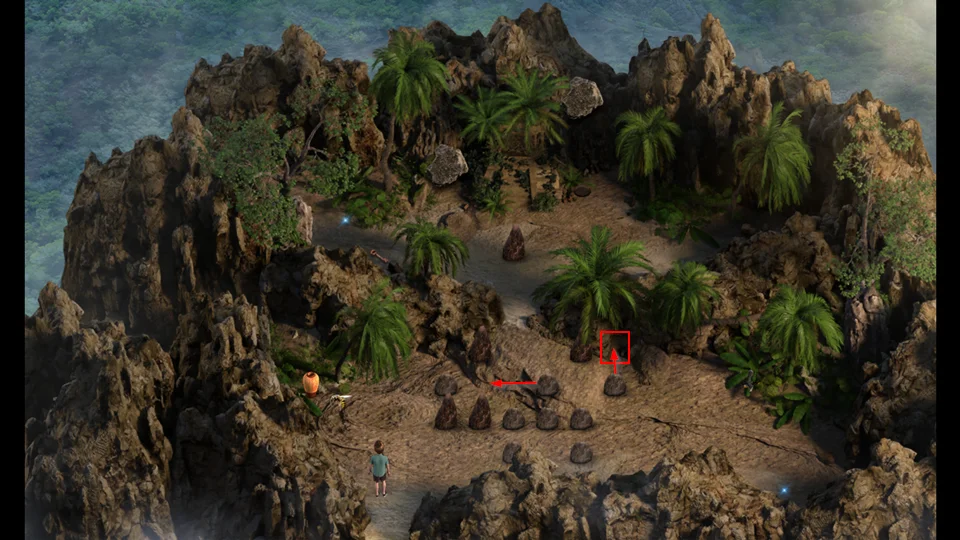
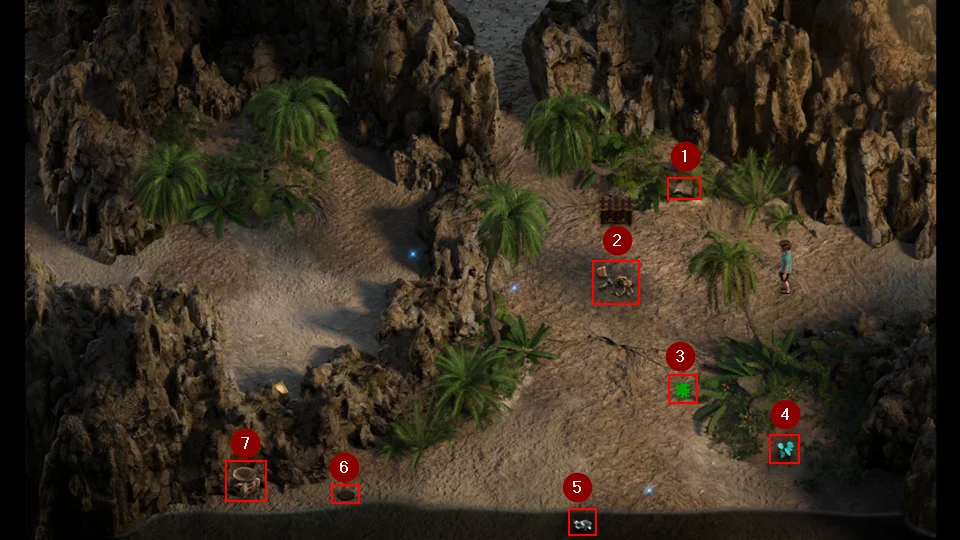
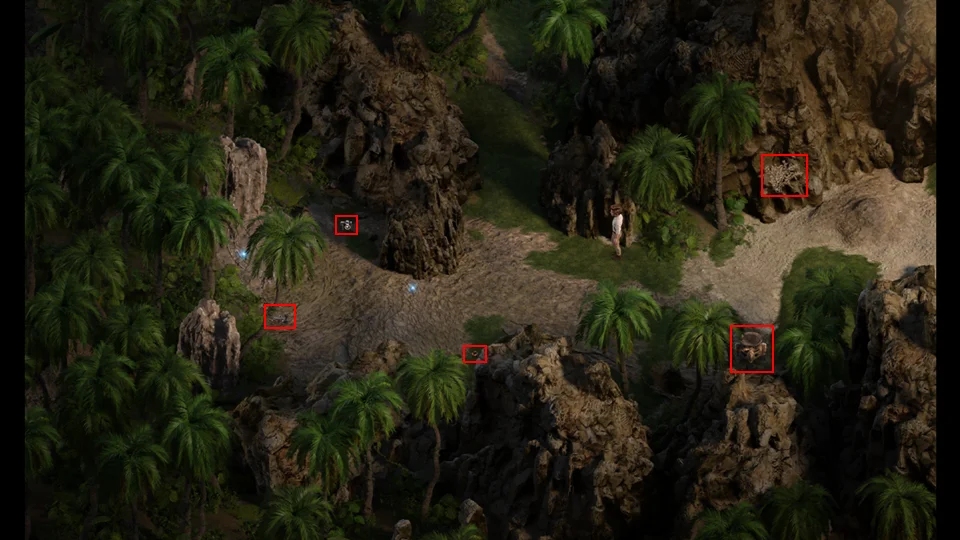
Go to 5 – 1, the lower left grid on the map. Watch Clare’s group stomp the scorpions to open the next area.
Pick the Ginseng Plant. (May not be at this location due to the random nature of the plants). Go to the new area (4 – 1) that Clare’s group opened for you.
- Pick up the Philweed Plant.
- Pick up the Floppin’ Fish. This will allow to purchase more lures from the Bait Shop.
- Move the Loose Rune.
Collect all of the cockroaches. - Click on the Orange Spark by the tree.
Receive Naomi’s Profile.
After you have collected both the Philweed Plant and the Ginseng return to Squallmart.
Talk to Emily. Give the Philweed Plant and Ginseng to Emily. From now on you will want to pick any plants when you see them. Scene with Emily. Earn Emily’s second heart.
- If you bought the Recipe Chest and don’t have the money search the Park for talismans and sell them to Diana, until you do.
- Purchase the Alloy Shovel Head ($200).
- Purchase the Metal Hook ($90).
- Go to the Library.
- If you’re running low on money you can sell your talismans to Diana.
- Go to the Lighthouse.
- Break the Jar on the right side of the Lighthouse with the Pipe Wrench.
- Receive a Jade Talisman.
- Go inside the Lighthouse.
- Break the Jar by the stairs up with your Pipe Wrench.
- Receive a Jade Talisman.
- You should already have the five roaches necessary.
- Go to the Library.
- Put the Roaches in the box.
- Go to the Beach.
- Talk to Diana.
- Scene with Diana.
- Go to the Library.
- Receive Diana’s second heart.
- Go to Squallmart.
- Talk to Ash.
- Go to the Lighthouse.
- Go inside the Lighthouse.
- Go upstairs.
- Talk to Ash.
- Pay Ash something for the photo.Receive pictures of Naomi.
- Go to Estero Key.
- Go to Squallmart.

- Purchase the Antacid Tablet ($30).
- Talk to Pricia.
- Pricia wants a Ginseng Plant.
- If you don’t havea Ginseng Plant look for one in Estero Park.
- Once you have a Ginseng Plant go to the backyard of the Parlor.
- Talk to Pricia.
- Receive $250.
- Receive Leather Gloves.
- Click on the garden and Plant the Ginseng in the garden.Go into the Massage Parlor.
- Talk to Pricia to receive your reward.
- Scene with Pricia.
- Receive Awareness Boost, Pricia’s phone number, and Pricia’s second heart.
- You can now sell plants to Pricia. As you won’t find more if you’re carrying one of most plants, you should sell them frequently.
- Go to the Library.
- Go to Janet’s Home.
- Go to the backyard.
- Go back into the house.
- Talk to Janet.
- Janet and Naomi want something to drink.
- Go inside.
- Click on the sparkle on the refrigerator.
- Receive Iced Tea.
- Go upstairs.
- Go into Janet’s room.
- Click on the sparkle on the dresser.
- Receive Iced Tea with Alcohol.
- Go back to the backyard and deliver the drinks.
- Give them the Iced Tea with Alcohol.
- Scene with Naomi.
- Go back to the backyard.
- Go to Kaley’s room.
- Earn Kaley’s second heart.
- Go to the Lighthouse.
- Go downstairs.
- Talk to Albert.

Read the note on the bed.

- Read the crafting recipe (Swift Shovel).
- Pick up the Damaged Boots.
- Talk to Albert
- Receive the Idaho’s Cryptic Note.
- I’ll save you the walking around and counting. The code is: 6846 Candles at the Church
- 8 Pillars at the Library
- 4 Crosses in the Graveyard
- Open the chest and receive Rare Guide Book. You can now find Silver Talismans.
- Go to Squallmart.
- Receive photo of Emily.
- Buy the Shoe Glue ($40).
- Let’s go to the Shrine and craft some Stompin’ Boots.
- At the Shrine use Shoe Glue, Damaged Boots, Shoelaces, and Leather Gloves.
- Receive Stompin’ Boots.
The Walkthrough – Part 4
- Go to the Full Mast Bar.
- Go up to the Attic.
- Stomp on those Spiders.
- Pick up the Chest Key.
- Pick up the Carbon Shovel Shaft.
- Open the chest with the Chest Key.
- Pick up Kama Sutra – Naomi Tit ♥♥♥♥.
- Time to take care of those scorpions.
- Go to Estero State Park 4 – 2 and stomp all of the scorpions.
- Go north (Up).
- Scene of Clare
- Read Clare’s book.


- Pick up Ultra Shovel Handle.
- Pick up Floppin’ Fish.
- Pick up crafting recipe (Pickaxe)
- Go to 4 – 3.
- Give the Antacid Table to the bird.
- Pick up the crafting recipe (Gold Talisman Crafting)
- If you do not have a Silver Talisman search the Park until you find one, or craft one. Silver Talisman: Stone Talisman x 3 and Silver Ore.
- Go to the Shrine.
- Craft Swift Shovel: Alloy Shovel Head, Carbon Shovel Shaft, Ultra Shovel Handle, and a Silver Talisman.
- Receive Swift Shovel. Now Stone and Jade Talismans will be instant.
- If you found a Gold Talisman go to the Parlor to give it to Pricia.
- Optional scene with Pricia and an awareness boost that will last until you find another Gold talisman.
- Go to the Library.
- Talk to Diana.
- Sell your talismans to Diana.
- Go to Squallmart.
- Go back to the Library.
- Talk to Emily.

- Click on the third sparkle from the top.
- Receive Perennial’s of Cape Vedra.
- Talk to Emily.
- Give Emily the Perennial’s of Cape Vedra.
- Go to Estero Park.

- Pick up the Heavy Cord.
- Pick up the Basic Container.
- Open your inventory and select the Metal Hook.
- Attach the Heavy Cord to it to create a Grappling Hook.
- Time to go get that Red Ginseng.
- Go to Estero Park.
- Go west (Left) to Estero State Park 5 – 2.
- Use the Grappling Hook to get the Gaffer Tape.
- Go west (Left) to Estero State Park 5 – 1.
- Use the Grappling Hook to get the Red Ginseng.
- Go to Squallmart.
- Talk to Emily.
- Give Emily the Red Ginseng.
- Scene with Emily.
- Go to the Shrine.
- Use the Grappling Hook to get the Wrench Grip.
- Use the Shrine to craft the Pickaxe: Wrench Grip, Gaffer Tape, Grappling Hook, Pipe Wrench.
- Receive Pickaxe.
- The Pickaxe can be used in place of the Pipe Wrench to break Jars.
- Go to Estero Key.
- Scene with Alia and Kaley.
- Receive Alia’s third heart.
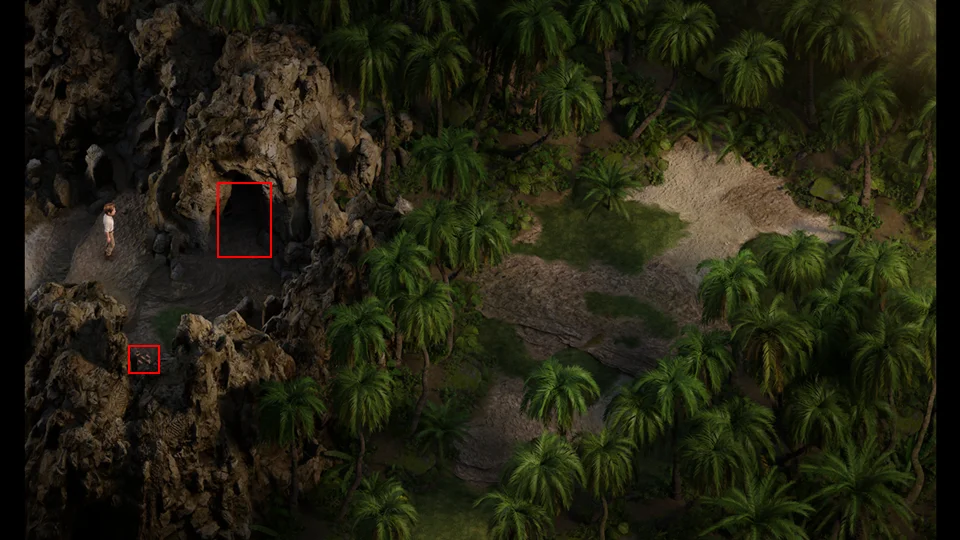
- Go to Alia’s secret place.

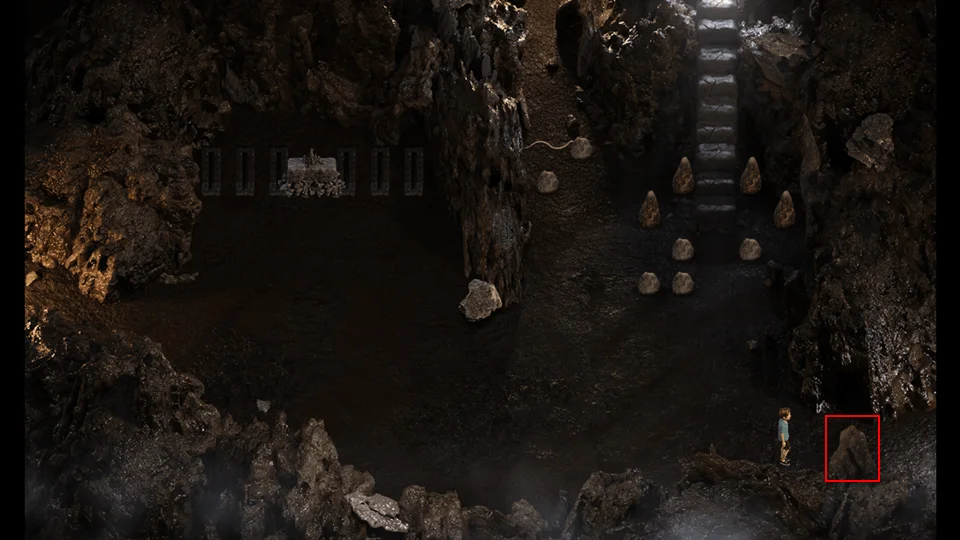
- Use your Pickaxe on the loose stones.
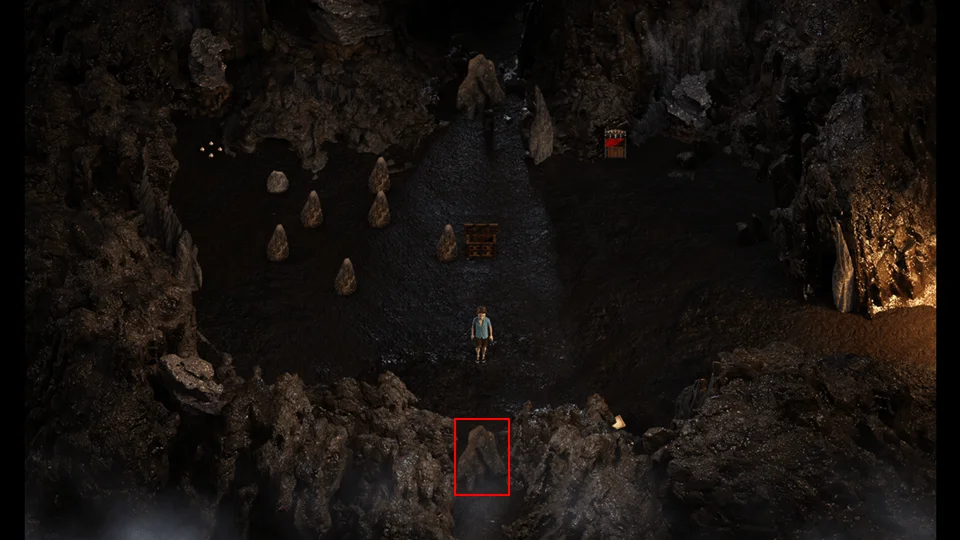
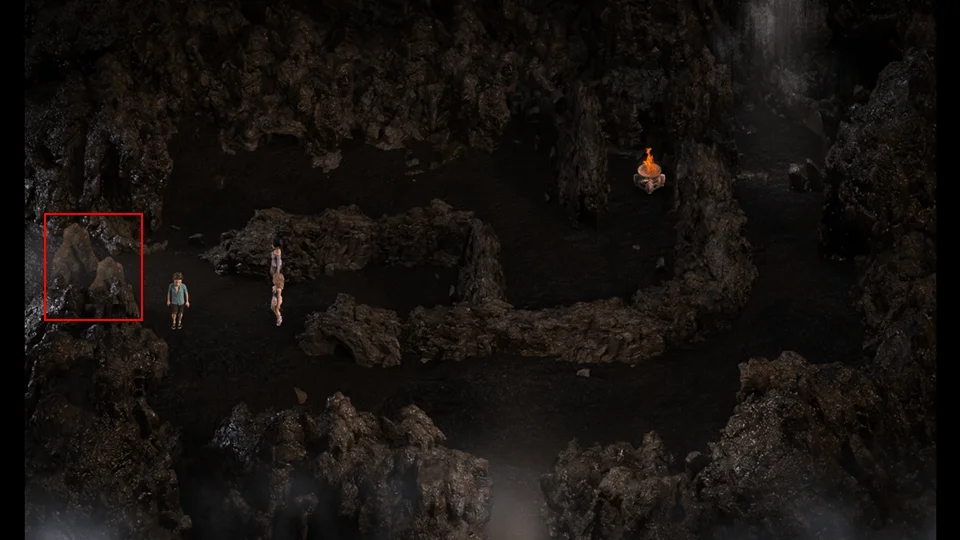
- Go down into the cave.

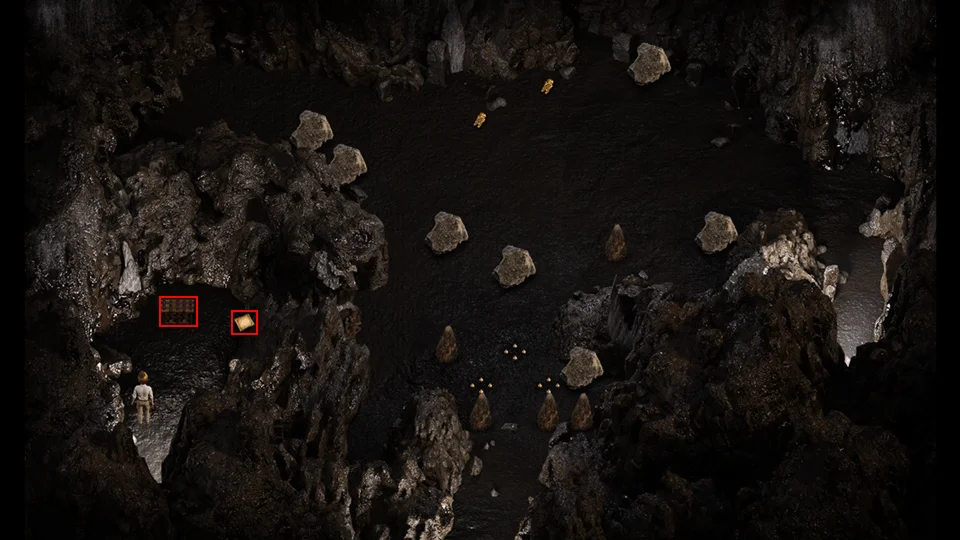
- The cave is dark.
- Go to the far Left.
- Go to the top.
- Click on the torch, your avatar will find the correct path.
- Light the torch.
- Pick up the Shaman Staff.
- Reject OfferReceive $10,000.
- Earn Clare’s first heart.
Now you should have enough money for most things from selling plants to Pricia, picking up gold coins, and selling Talismans when you get close to 90 of a specific type. Other than that you”ll want to hold onto your talismans for crafting.
- Go to the Church.
- Since you’ve lit five torches a Chest Key will appear on the upper level.
- Pick up the Chest Key.
- Go to see Madalyn.
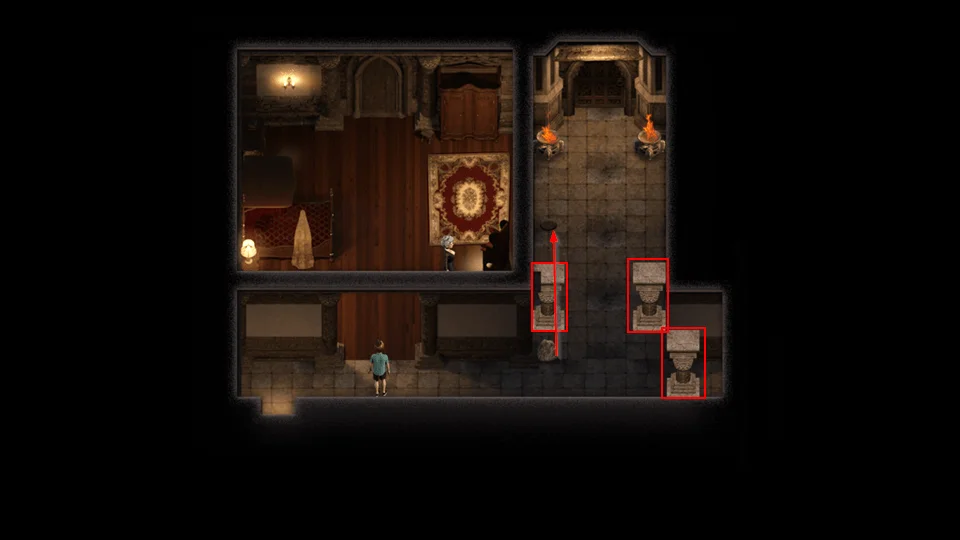
- Use the Pickaxe to destroy the three pillars.
- Push the rock onto the pressure plate.
- If you screw up on the push puzzles just exit the room and re-enter and the puzzle will be reset.
- Pick up the Chest Key in Madalyn’s room.
- Go East (Right) to the room opened by destroying the bottom pillar.
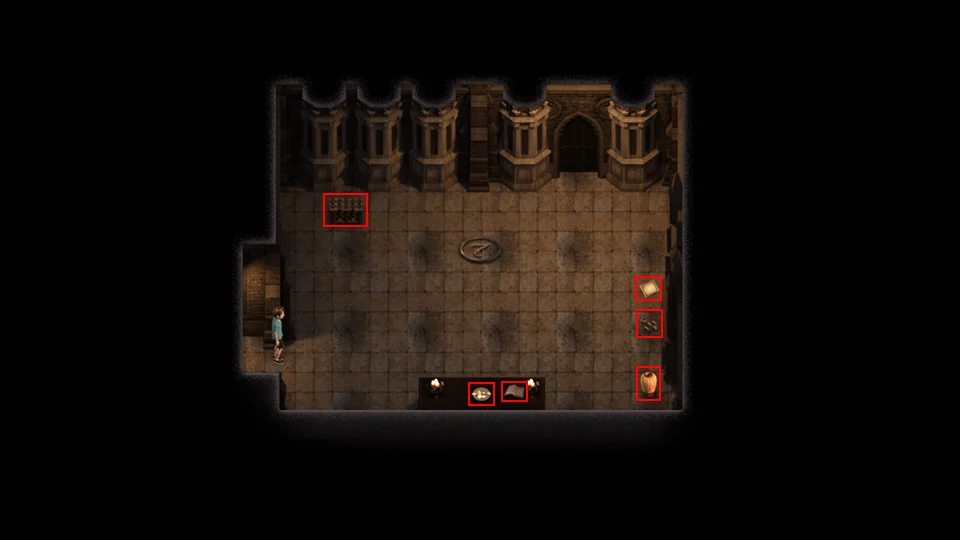
- Pick up the Gold on the plate.
- Read the book.

- Break the Jar in the corner with the Pickaxe.
- Receive a Silver Talisman.
- Pick up the Broken Key.
- Read the crafting recipe (Chest Key)
- Go to Estero Park.
- Look for some more Red Ginseng.
- Go to Estero State Part 4 – 1.
- Use the Pickaxe on the weak spot.
- Receive Quartz.
- After you have found some Red Ginseng eat it. Oh no, we have to go see the Doctor again.
- Go to the Doctor’s Office.
- Talk to the Receptionist.
- See Doctor Jessica for $140Scene with Jessica.
- Receive an Intelligence Boost.

You can see your Intelligence and Awareness boosts on your inventory page, along with your boots, metal detector, guide, and shovel.
- Go to Estero Park.
- Go to the Shrine.
- Scene with Clare.
- Receive Encyclopedia 1999.
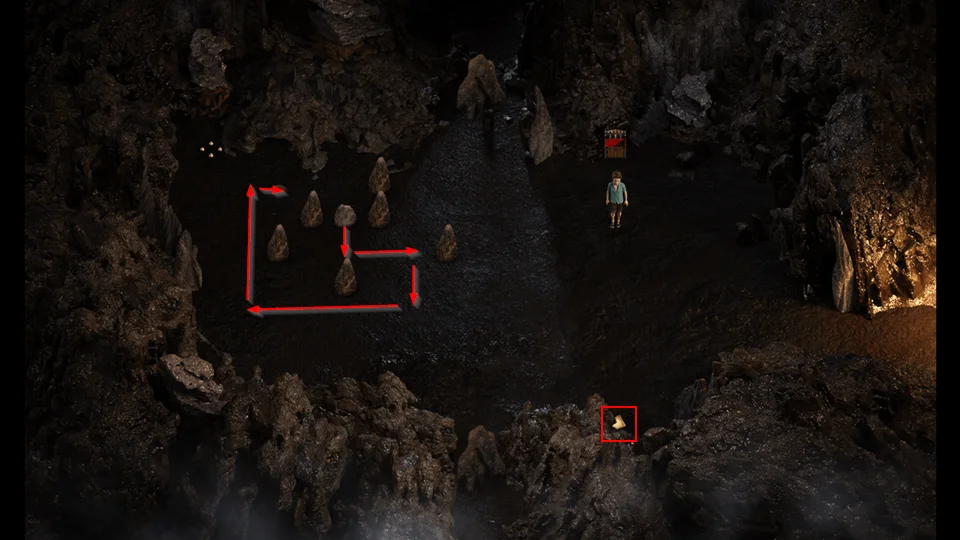
- Read the crafting recipe (Pirate Shovel)
- Push the rock down 1.
- Push the rock right 2.
- Push the rock down 2.
- Push the rock left 5.
- Push the rock up 4.
- Push the rock right 1.
- Open the chest in the middle of the room.
- Receive Unknown Treasure.
- Go to the Park Entrance.
- Go to the Library.
- Show Diana something.Give Diana the Unknown Treasure.
- Go to Estero Park.
- Receive Silver Talisman.
- Scene with Tasha and Naomi.
- Receive Tasha’s second heart.
- Go to Janet’s Home.
- Go into Janet’s room.
- Receive Janet’s first heart.
- Go to the Full Mast Bar.
- Enter the bar.
- Receive Citation.
- Go to the Library.
- Click on the sparkle on the desk.
- Receive Diana’s Note.

Receive Secret Key.
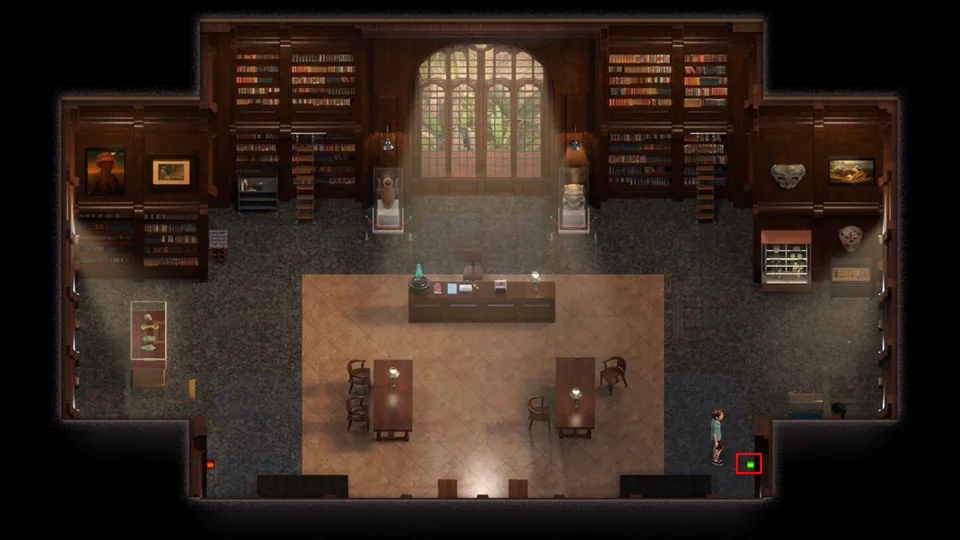
- Turn on the east (Right) light.
- It turn on the light over the item to the right of the window in the back.
- Go outside the Library.
- Open the chest with the Secret Key.
- Go Home.
- Go upstairs.
- Scene of Diana.
- Go to the Church.
- Go to Madalyn’s Room.
- Go to the Doctor’s Office.
- Go to the MRI Room (Left door).
- Click on the box.
- Receive Nitroglycerin Bottles.
- Go to Estero Park.
- Go to Estero State Park 4 – 4.
- Pick up the Broken Key.
- Read the crafting recipe (Rock Bomb).
- Open the chest with a Chest Key.
- Pick up Kama Sutra – Tasha Mustacheless Ride.
For the next part you are going to need three (3) Jade Talismans and three (3) Silver Talismans. Roam the Park until you meet those requirements.
The Walkthrough – Part 5
Go to the Shrine. Craft as many Rock Bombs as you have materials for: (Nitroglycerin, Basic Container, Silver Talisman, Jade Talisman).
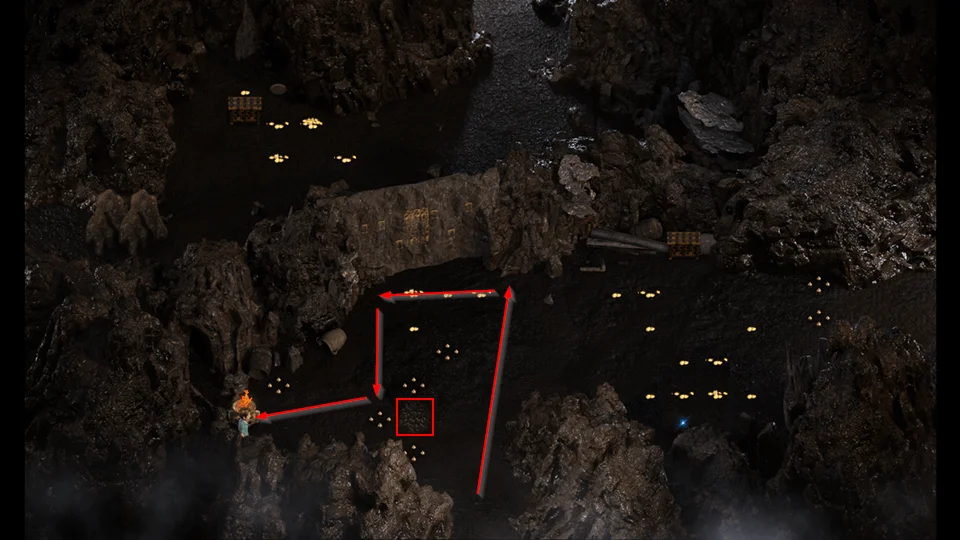
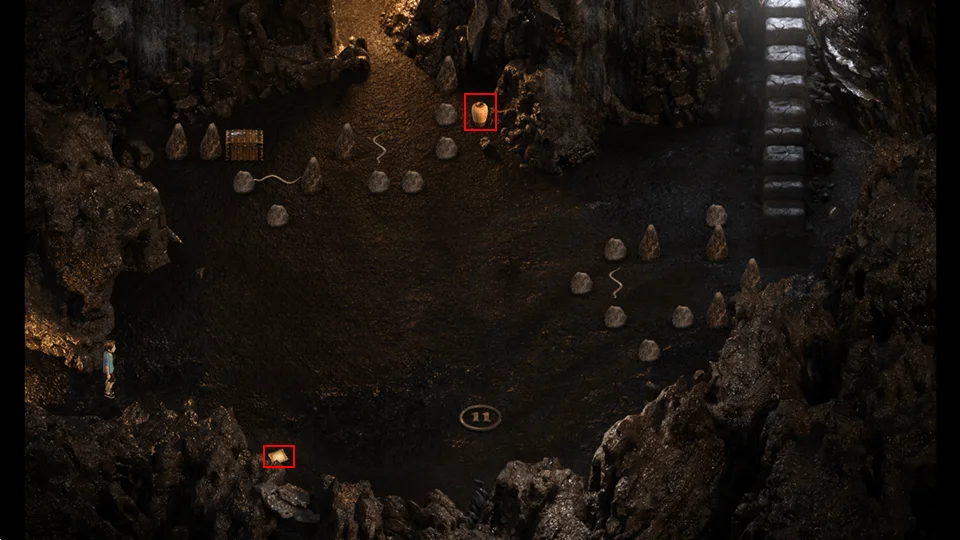
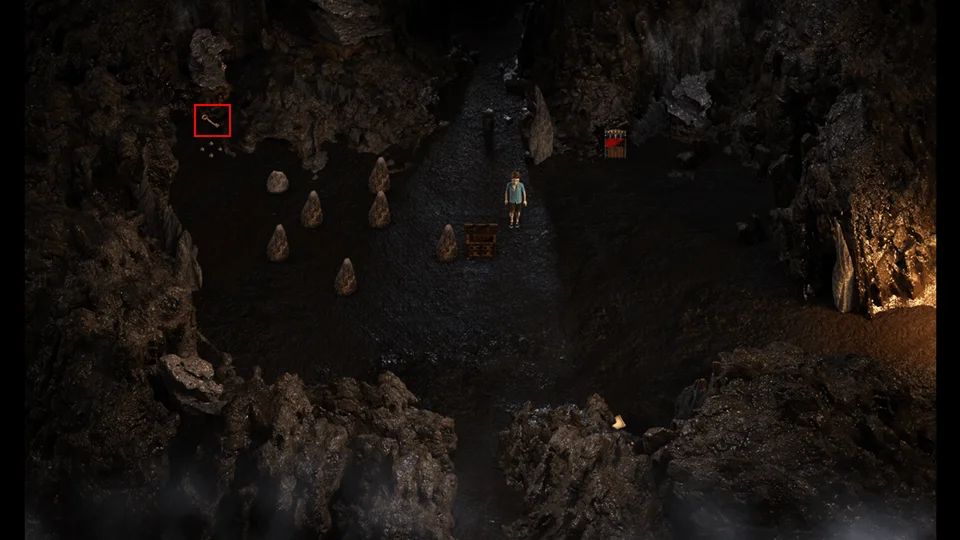
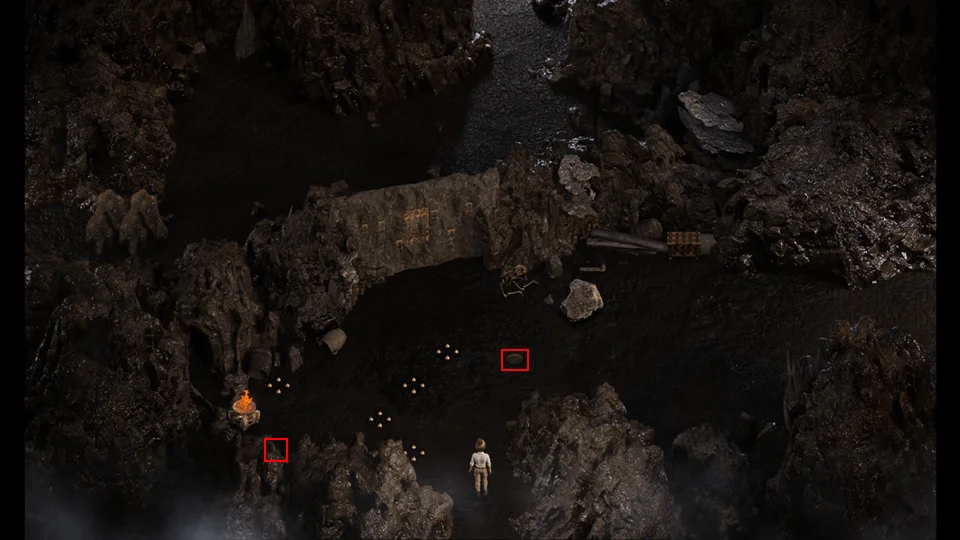
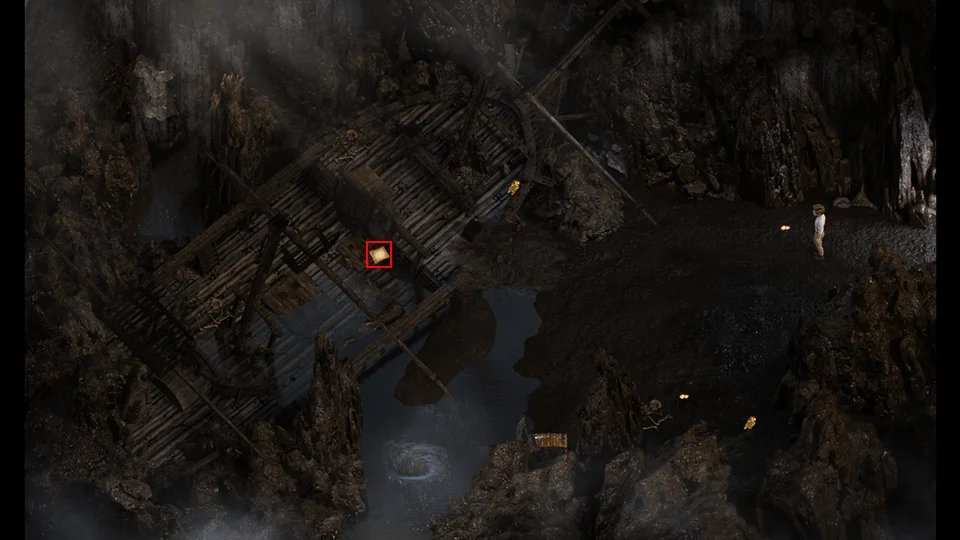
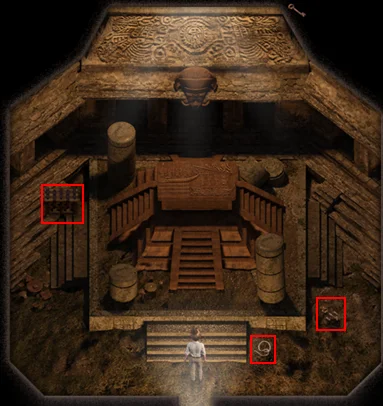
I will be using the same references for room in the cave as in the Jungle. The upper left room is 1 – 1 and the bottom right room is 5 – 4. See the Maps section for more information. Go to Caverns 3 – 2.
- Use a Rock Bomb on the bottom rocks.
- Go down to Caverns 4 – 2.
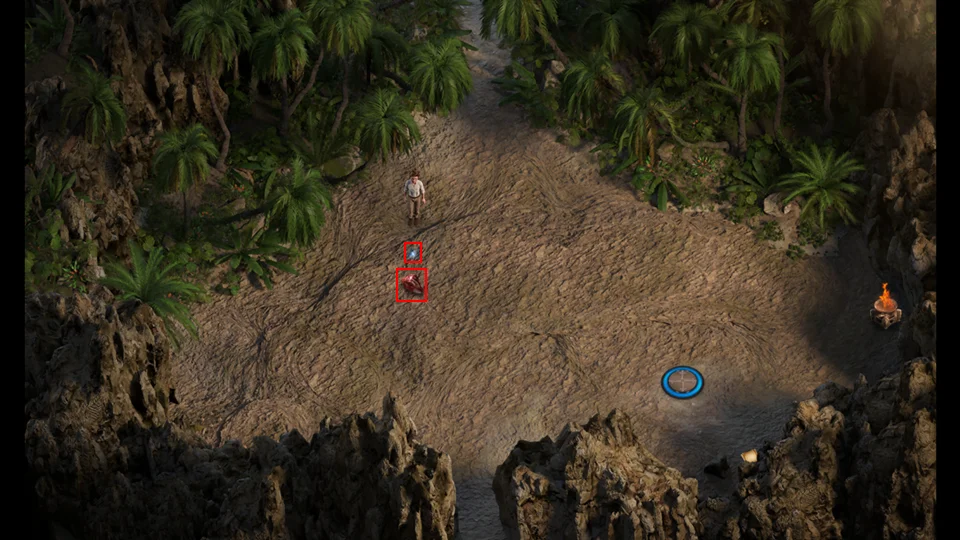
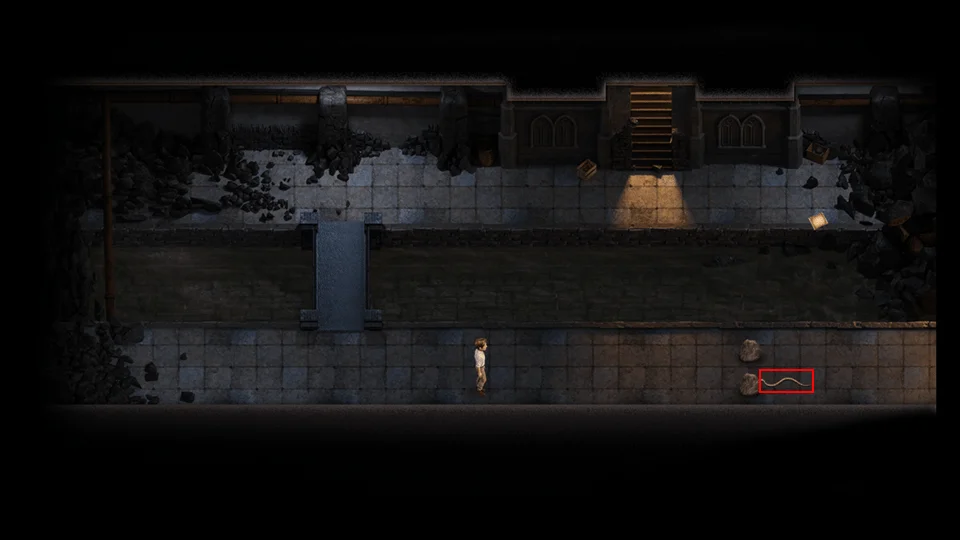
This is your first experience with a snake in the push puzzles. A snake will follow your movements and try to get to you. You need to make sure that snakes have no way to get through. If a snake touches you, you will have to start the puzzle over.
- Push the center rock down 1.
- Push the right rock left 1. Your screen should now look like the image below.
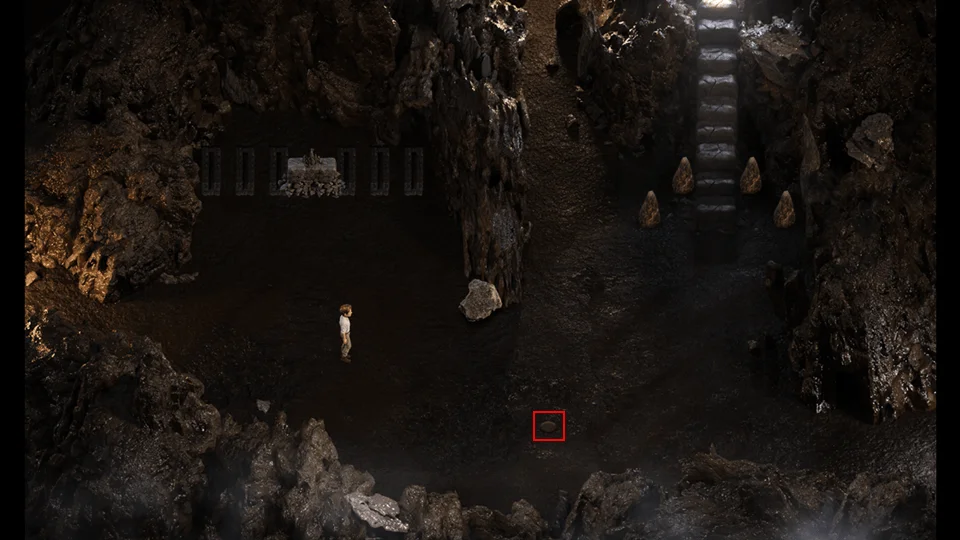
- Start at the 1 to draw the snake up to the top level.
- Go to the 2 to draw the snake to the level with the barrel.
- Even though it looks like there is space for the snake to come through there isn’t. Go to the 3 to trap the snake in the barrel.
- Click on the orange sparkle.
- Receive Emily’s Profile.
- Pick up the Snake in a Barrel.
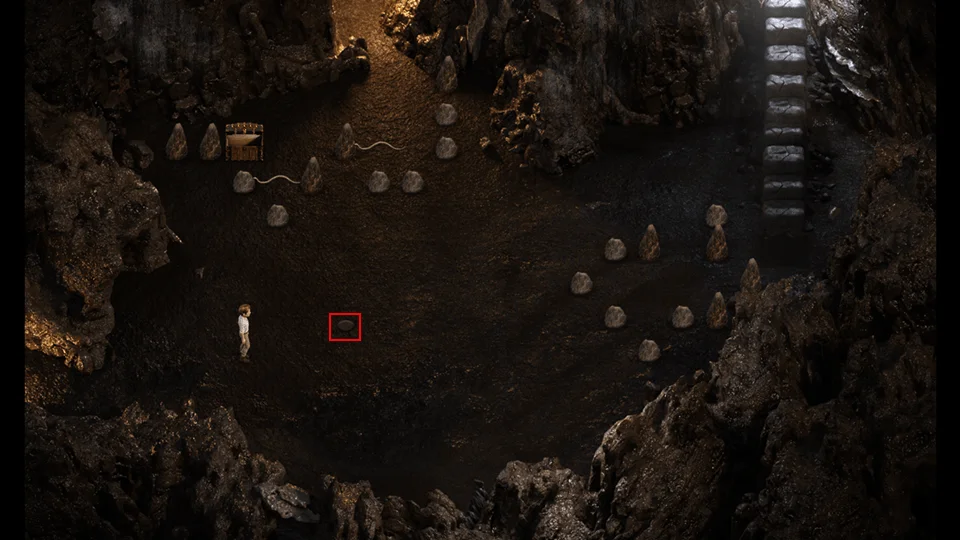
- Now lets use that pressure plate.
- Move the right rock left 1.
- Move the bottom rock up 4.
- Move the rock to the left 12.
- Move the rock up 1 to activate the pressure plate.
- Pick up the Chest Key that appears where the snake started.
- Now that we have the snake return to the Doctor’s Office.
- Talk to Jessica in the examination room.
- Give Jessica the Snake in a Barrel.
- Go to Janet’s Home.
- Talk to Janet.
- Receive Photo of Naomi and Alia.
- Go to Estero Key.
- Earn Naomi’s third heart.
- Go to Alia’s secret spot.
Use a Rock Bomb on the rocks. If you didn’t have the talismans necessary to create enough Rock Bombs you will need to go to the Estero Park and search for Jade and Silver Talismans until you do.
- Go to the Doctor’s Office.
- Talk to Kaley.
- Scene with Jessica and Kaley.
- Earn Jessica’s second heart.
- Go to Estero Park.
- Go to the Cave.
- Go to Caverns 3 – 2.
- Use a Rock Bomb on the rocks to the north.
Another dark room. The spike traps trigger if you step on them, but you don’t have a health meter, so it isn’t that big of a deal. The auto pathing is terrible in this room. Walk to the back wall avoiding the spike traps. Walk behind the spike traps and then over to the torch and light it.
- Pick up the gold laying on the floor.
- Use your Pickaxe on the weak spot on the floor.
- Receive Dolomite.
- Go to the Shrine.
- Take Kaley back to Caverns 2 – 2.
- Scene with Kaley.
- Receive a Pirate Medallion.
- Pick up the book.
- Receive the Pirate Diary.


- Return to the shrine.
- Receive Kaley’s phone number.
- Go to the Library.
- Show Diana something.
- Show Diana the Pirate Medallion.
- Go to the Church.
- Talk to Madalyn.
- Give her the Pirate Diary.
- Scene with Madalyn.
- Go to the Library.
- Talk to Pricia.
- Diana will show you a book.


Click on the sparkle to read and remember the Kayaking Tips, there will be a test later. Or you can just come back here.


- Go to Estero Key.
- Go to Squallmart.
- Purchase the Kayak License Exam ($250)
- Open your inventory and select the Incomplete License Exam.
- Take Kayak License Exam

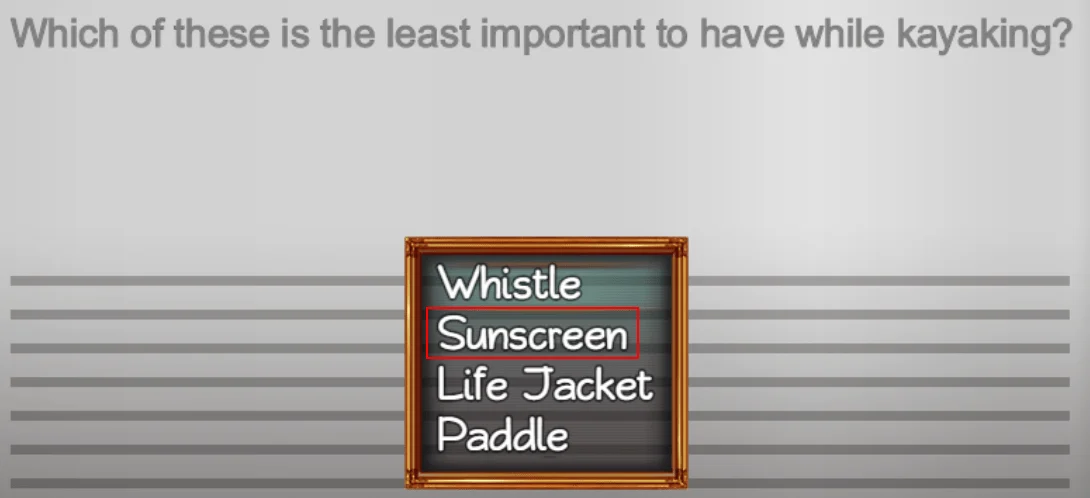
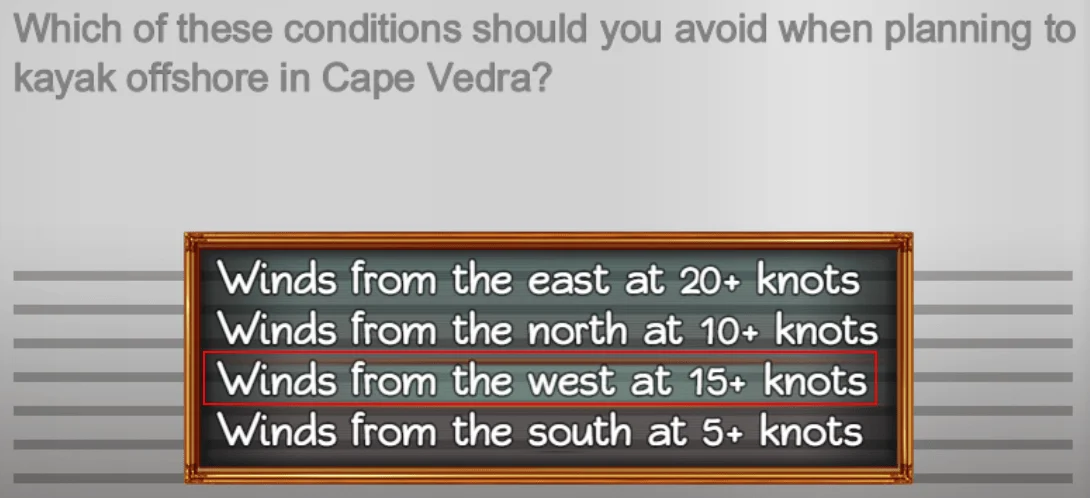
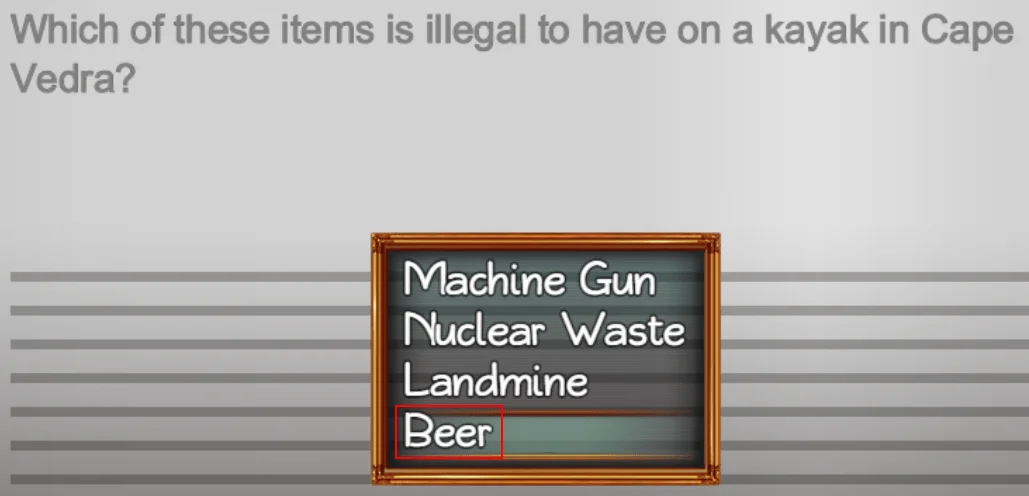
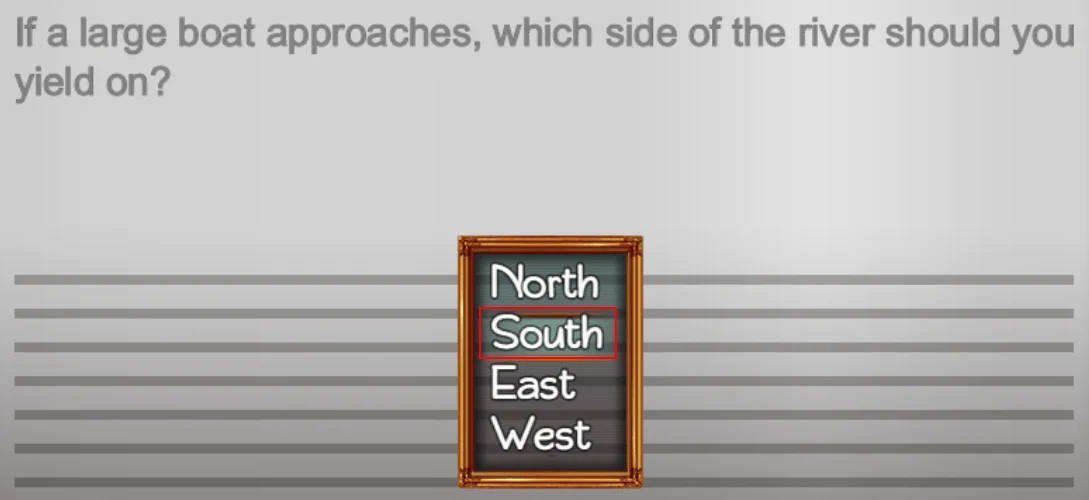
- Receive Completed License Exam.
- Go outside and talk to Michael.
- Give Michael the Completed License Exam.
- Go to Estero Park.
- Go to Estero State Park 4 – 1.
- Talk to Michael.
You basically have to avoid the rocks for 60 seconds. The money is only $5 per and you don’t need it bad enough to hit a rock over it.
- Go to Estero State Park 4 – 1.
- Talk to Diana.
- Step on all of the scorpions.
- Pick up the Broken Key.
- Break the Jar with your Pickaxe.
- Pick up Gaffer Tape.
- Move the rock right 3.
- Walk around to the other side and move the rock left 1.
- Move the rock up 2.
- The path to the north (Up) will now be open.
- Go north (Up).
- Pick up the plant.
- Receive Maca Plant.
- Pick up the Old Map.
- The Old Map is for a Chest Key in Estero State Park 5 – 1.
- Play with the rock puzzle and keep resetting it until the one rock isn’t there when you enter.
- Push the top right rock up 1.
- Push the rock rock that was to the left of it left 1.
- Move into the top area.
- Scene with Diana.
- Pick up the Rusty Key.
- Go to Estero State Park 2 – 2.
- Read the crafting recipe (Ant Killer).
- Open the chest with a Chest Key.
- Pick up Kama Sutra – Naomi Doggy Style.
- Go to Estero State Park 2 – 1.
- Talk to Diana.
- Receive Tikpak Artifact.
- Go to Estero State Park 5 – 1.
- Use Pickaxe on weak ground under palm tree.
- Receive a Chest Key.
- Go to Estero State Park 3 – 2.
- Use your Pickaxe on the weak spot.
- Receive Fossilized Algae.
- Go to Squallmart.
- Talk to Emily.
- Receive Incomplete Serum Mixture.
- Scene with Emily.
- Receive Emily’s third heart.

- Purchase Alumina ($1000)
- Purchase Plastic Wrap ($100)
- Go outside.
- Talk to Ash.
- Go to the Shrine.
- Craft some Ant Killer: Fossilized Algae, Quartz, Alumina, Rusty Key.
- Receive Ant Killer.
- Go to Estero State Park 3 – 2.
- Use the Kayak.

- Click on the Ants.
- Use the Ant Killer.
- Pick the Maca Plant.
- Go to the Parlor.
- Follow Pricia to the backyard.
- Talk to Pricia.
- Give Pricia the Maca Plant.
- Scene with Pricia.
- Earn Pricia’s third heart.
Since you’re here you can sell any Ginseng plants you have to Pricia. You won’t find more if you have one in inventory. Red Ginseng sells for $600 and Green Ginseng sells for $250.
- Go to the Mansion.
- Go to the Library.
- Talk to Diana.
- Go to the Full Mast Bar.
- Go out the back door of the bar.
- Take the drink orders.
- Go back into the bar.
- I’m ready to grab the drinks.Go back into the main bar and click on the sparkle.
- Go back out and serve the drinks.
- User your Lighter on the Grill.
- Receive Fly Ash.
- Use your Pickaxe on the Jar by the grill.
- Pick up the Basic Container.
- Read the crafting recipe (Rat Trap)
- Open the chest with a Chest Key.
- Pick up Kama Sutra – Jessica Heart Checkup.
- Click on the orange spark under the tree.
- Receive Pricia’s Profile.
The Walkthrough – Part 6
- Go back into the bar.
- Go to the Men’s Room.
- Catch the Cockroach.
- Go back into the main bar.
- Go to Squallmart.

- Buy Peanuts $50.
- Go back to the Full Mast Bar.
- Scene with Tasha.
- Earn Tasha’s third heart.
- Leave the bar.
- Talk to Albert.
- Receive photo of Kaley.
- Go to the Shrine.
- Scene with Diana and Clare.
- Go to Janet’s Home.
- Talk to Janet.
- Go to the Shrine.
- Craft a Rat Trap: Plastic Wrap, Gaffer Tape, Roach, and Basic Container.
- Receive a Rat Trap.
- Go to Janet’s House.
- Talk to Janet.
- Give Janet the Rat Trap.
- Go inside the house.
- Talk to Janet.
- Go back outside and check the Rat Trap.
- Scene with Janet and Jessica.
- Receive Jessica’s third heart and phone number.
- Go to the Lighthouse.
- Go inside the Lighthouse.
- Pick up the Basic Container.
- Go to the Shrine.
- Craft a Rock Bomb: Nitroglycerin, Basic Container, Silver Talisman, and Jade Talisman.
- Receive Rock Bomb.
- Go to the Lighthouse.
- Go inside the Lighthouse.
- Go downstairs.
- Use a Rock Bomb on the weak area of the wall.
- Go into the new area.
- Use your Pickaxe on the weak area of the floor.
- Receive a Chest Key.
- Read the book on the floor.

- Go to Squallmart.
- Go to the Library.
- Talk to Diana.
- Go to Estero Park.
- Go to the Cave.
- Follow Clare to Caverns 2 – 2 and watch her disable the trap to open up a new area.
- Follow Clare to Caverns 2 – 3.
- Go back to Caverns 2 – 2 and look at the cave art.
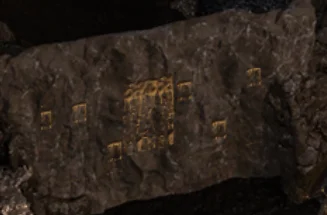
Go back to Caverns 2 – 3 and place the switches in the places indicated on the cave art.
Up, Up, Down, Up, Down, Up.
- Click on the Gold Symbol.
- Use the Tikpak Artifact.
- Earn Clare’s second heart.
- Click on the rocks opposite the Snake.
- Receive a Chest Key.
- Move left rock down 1.
- Move rock that was next to it left 1.
- Move side rocks up 1.
- Move center rock to either side.
- Pick up Pirate Diary.


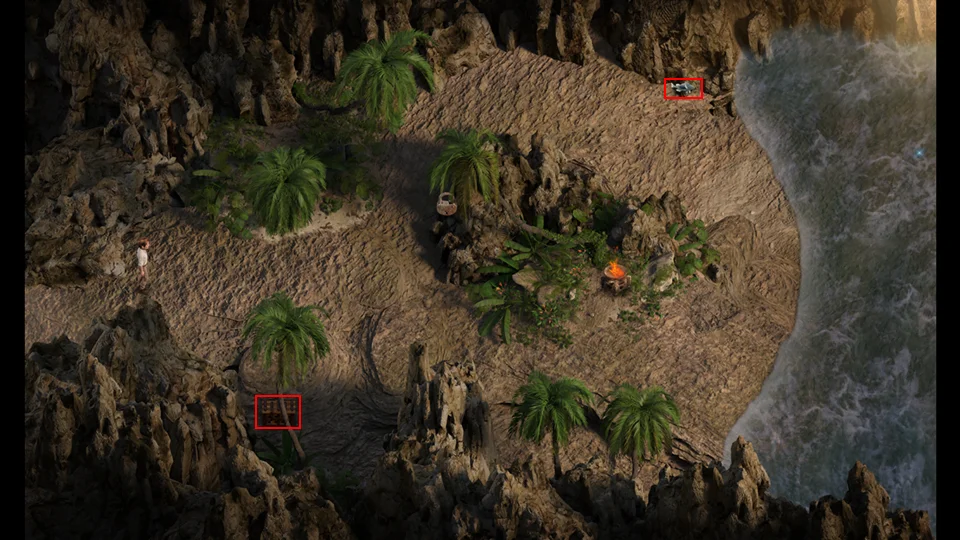
Go upstairs. Evie tells you this is the main place for the Maca Plants. You will find a Maca Plant here if there is not one in your inventory.
- Light Torch with Lighter
- Use Pickaxe on weak ground
- Receive White Sand
- Pick up Floppin’ Fish
- Pick Philweed Plant
Whenever you have Philweed you should deposit it in the back room of Squallmart the next time you’re in town. I’m going to document the Philweed deposits.
- Pick Maca Plant
- Pick Maca Plant
- Read crafting recipe (Concrete)
- Open the chest under the tree with a Chest Key.
- Pick up Kama Sutra – Tasha Blowjob.
- Go to the Shrine.
- Craft Concrete: Stone Talisman, Fly Ash, White Sand, and Dolomite.
- Receive Concrete.
- Go to Estero Key.
- Follow Sam to Alia’s secret spot.
- Talk to Sam.
- Give Sam the Concrete.
You should already have Philweed, Red Ginseng, and Maca Plant in your inventory if you’ve been picking them up while you’ve been walking around. If you do not, walk around in Estero Park until you find some.
- Go Home.
- Talk to Emily.
- Scene with Alia and Emily.
- Earn Alia’s fourth heart.
- Eat a Maca Plant.
- Go to the Doctor’s Office.
- Receive a text message (and picture) from Naomi.
- Talk to the Receptionist.
- See Doctor Jessica for $140Scene with Jessica.
- Receive Intelligence Boost.
- Go to the Church.
- Talk to Madalyn.
- Give Madalyn the Pirate Diary.
- Scene with Madalyn.
- Go to Janet’s Home.
- Go to Kaley’s Room.
- Janet and Naomi scene.
- Go to the Lighthouse.
- Go to Squallmart.
- Receive a text message (and picture) from Naomi.
- Click on the sparkle.
- Receive a Small Screwdriver.
- Pick up the Broken Key.
- If you have any of the plants put them in the grey bin.
The bars on the right will fill up as you add plants. The number of plants never goes down. If you want to maximize your money you can fill up the Red Ginseng and Maca Plants by going back and forth to the Maca Plants until you have them both filled. About half the time I found a Red Ginseng when I went to get the Maca Plant.
- Go to Janet’s Home.
- Go to Kaley’s Room.
- Use the Small Screwdriver.
- Scene with Kaley.
- Earn Kaley’s third heart.
- Go to the Library.
- Talk to Diana.
- Go to Estero Park.
- Go to the Cave.
- Go to Caverns 2 – 3.
- Go upstairs.
- Scene with Diana.
- Earn Diana’s third heart.
- Return to the Cave and use the stairs in Caverns 2 – 3 to return to the Estero State Park.
- Go to Estero State Park 2 – 3 where the Jaguar is.
- Go west (Left) to Estero State Park 2 – 2.
- Read the book.

- Pick up the Camera.
- Pick up the Scorpion Venom.
- Pick the Philweed Plant.
- Pick up the Floppin’ Fish.
- Step on the Pressure Plate.
- Light the Torch with your Lighter.
- Go to Estero State Park 2 – 1.
- Click on the Bird.
- Give the Bird Peanuts.
- The bird will start to follow you. Take the bird to the Library.
- Pick up the Chest Key.
- Go behind the Library.
- Scene with Diana.
- Receive Diana’s phone number.
- Destroy the Pillar with your Pickaxe.
- Move the rock down 1.
- Move the rock across to the Pressure Plate.
- Pick up the Gothic Key (Not the one by the bug) and Broken Key.
- Click on the weak ground next to the red bush.
- Use your Pickaxe.
- Receive Library Key.
- Go to Squallmart.
- Deposit any plants you picked up in the grey container.
- Talk to Emily.
- Receive Love Potion.
- Go to the Church.
- Go to the room that is right of Madalyn’s chambers.
- Pick up the Cursed Shovel.
- Open the door with the Gothic Key.
- Go through the L shaped room to the next chamber.
- Pick up the Broken Key.
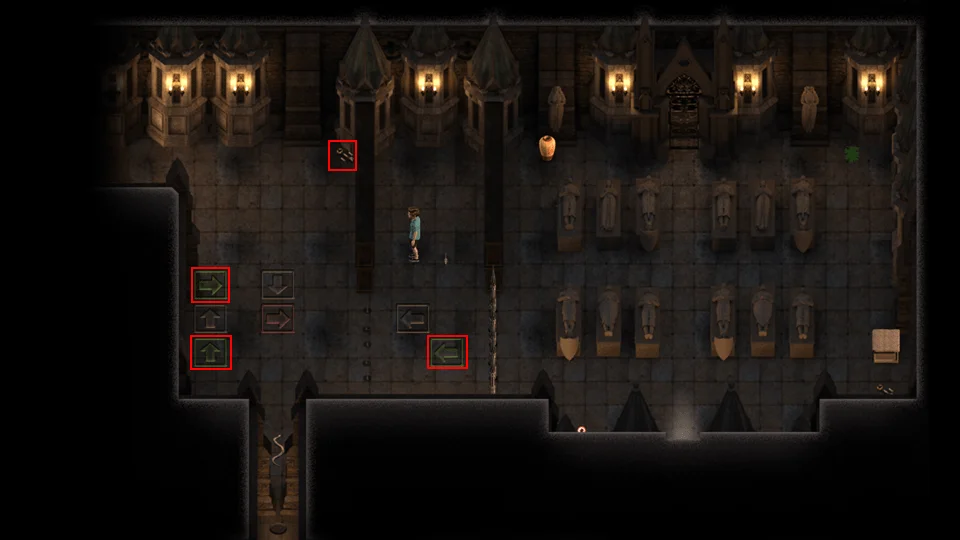
- Set the arrows as shown in the picture above.
This puzzle is part logic, part timing. The logic part is setting the arrows. When the mouse hits an arrow it moves in the direction of that arrow. The same applies for the snake. I found that clicking when the red arrow is pointing at the snake works most of the time. If you fail too many times the snake will be removed and you should be able to pass the puzzle easily.
- Go to Janet’s Home.
You can now go to the safe in the back room of Squallmart to pick up your cut of the Love Potion sales. The more plants you bring and the longer you wait the more money you will get.
- Go to the Full Mast Bar.
- Talk to Tasha.
- Go to Janet’s House.
- Go to the backyard using the gate on the left side of the house.
- Go in the backdoor.
- Scene with Janet.
- Receive Janet’s fourth heart.
- Janet’s phone rings.
- The passcode is the number from the chalkboard.
- Go to the Parlor.
- Scene with Pricia and Naomi.
- Receive Naomi’s fourth heart.
- Go to Squallmart.
The Walkthrough – Part 7
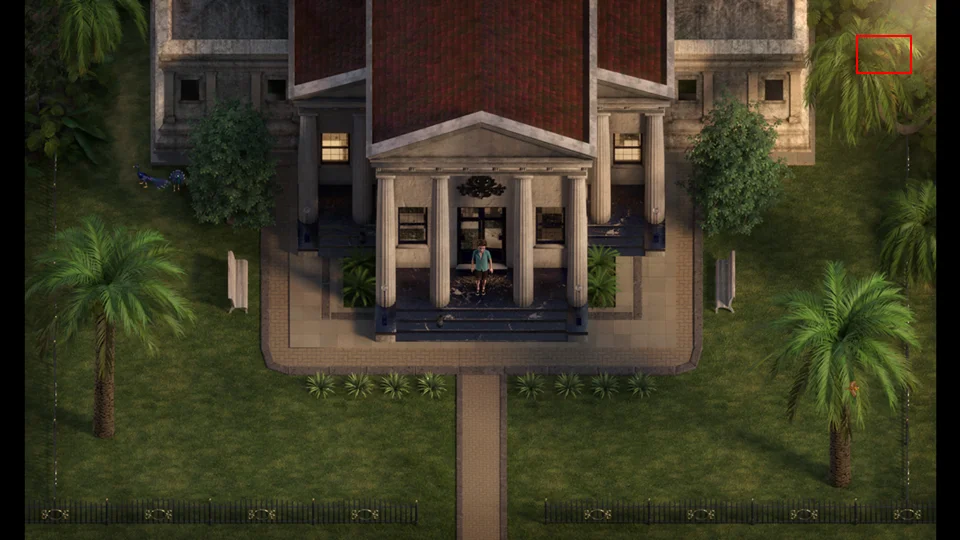
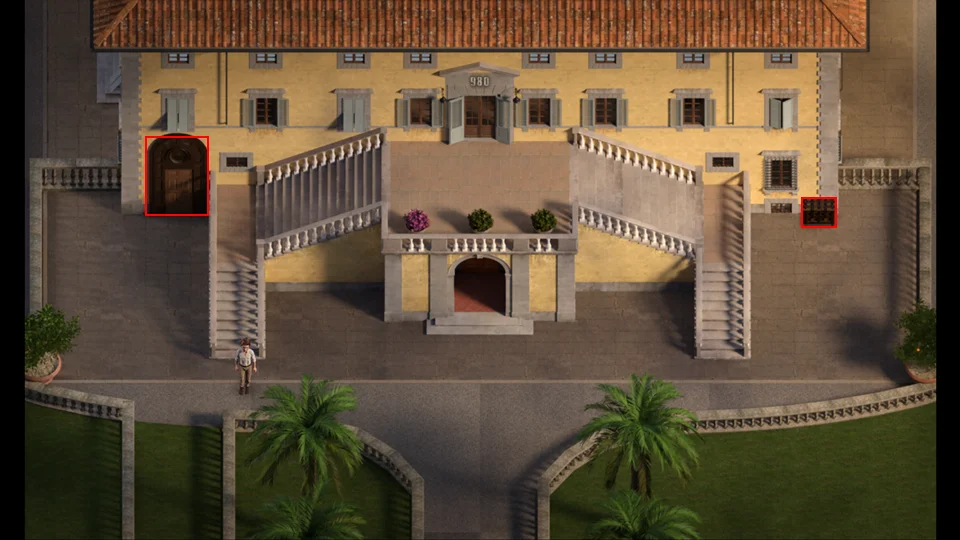
- Go to the Mansion.
- Click on the sparkle.
Jump when the guard is in the far position and set, and the camera is pointing the other direction. If you fail you just have to do it again.
- Pick up the Feather.
When the guard is in the alcove go the to other side. - Smash the Jar with your Pickaxe.
Receive Fossilized Algae. - Move the container left 1.
- Smash the Jar with your Pickaxe.
Receive Quartz.
Go up the stairs. - Click on the colored flowers.
Receive Hidden Key.
Note the House Number. - Smash the last Jar with your Pickaxe.
Receive Gold Talisman. - Push the container down 3.
- Open the door with the Hidden Key.
- Scene with Tasha.
- Earn Sofia’s first heart.
- Earn Tasha’s fourth heart.
- Go to Squallmart.
- Receive Rusty Key.
- Purchase Dart ($100).
- Purchase Alumina ($1000).
- Go to the Shrine.
- Craft Ant Killer: Fossilized Algae, Quartz, Alumina, Rusty Key.
- Receive Ant Killer.
You should have the parts to craft a Pirate Shovel: Cursed Shovel, Pirate Medallion, Jade Talisman, and Gold Talisman.
- Go to Caverns 2 – 3.
- Go upstairs.
- Go to Estero State Park 2 – 2.
Click on the Ants. Use Ant Killer. Go north (Up) into new area.
- Read crafting recipe (Blow Dart)
- Squash scorpion to the right of rock.
- Move rock left 1.
- Move rock next to boxed in scorpion up 1.
- Squash scorpion.
- Move left bird left.
- Pick up Bamboo.
- Squash scorpion.
- Move rock down 1.
- Squash scorpion.
- Move rock down 1.
- Pick Philweed Plant.
- Move rock right 1.
- Squash scorpion.
- Move rock left 1.
- Move rock up 1.
- Move right bird right.
- Move rock right 1.
Move rock down 1. - Break Jar with Pickaxe.
Pick up Chest Key. - Light Torch with Lighter.
Teleporter activated. - Click on orange spark left of crafting recipe.
Receive Kaley’s Profile.
The Teleporter will take you to the park entrance. The Teleporter at the part entrance will bring you here.
Go to Squallmart. Deposit your plants in the grey container. Go to the Beach.
- Click under tree.
- Receive Chest Key.
- Talk to Emily.
- Scene with Emily.
- Go to Squallmart.
- Purchase Love Potion ($2000).
- Drink Love Potion.
- Go to the Doctor’s Office.
- Talk to Receptionist.
- See Doctor Jessica for $140Scene with Jessica.
- Receive Intelligence Boost.
- Go to Squallmart.
- Go to the Parlor.
- Go to the Full Mast Bar.
- Go to the Doctor’s Office.
- Go to the Shrine.
- Craft a Blow Dart: Dart, Scorpion Venom Bamboo, and a Feather.
- Receive Blow Dart.
- Go to Squallmart.
- Earn Emily’s fourth heart.
- Go to Squallmart.

- Purchase Plastic Wrap ($100)
- Go to Estero Park.
- Go to the Cave.
- Go to Caverns 4 – 2.
- Go south (down) to Caverns 5 – 2.
- Move the rock up 2.
- Move the rock over 5.
- Pick up the Pirate Diary.

- Click on the sparkle.
- Receive False Talisman.
- If you need a False Talisman in the future you can find one here.
- Push end rock down 1.
- Activate Pressure Plate.
- Another Pressure Plate appears, active the new Pressure Plate.
- Go into the new area to the east (Right).
- Receive Grand Talisman.
- Pick up Old Wood.
- Go back to Clare.
- Talk to Clare.
- Give Clare the Old Wood.
- Go east (Right) to Caverns 5 – 3.
- Click on the near sparkle to traverse the water.
- Talk to Clare.
- Follow Clare to Caverns 5 – 4.
- Talk to Clare.
- Go to the Parlor.
- Sell any Ginseng you want to Pricia.
- Give the Grand Talisman to Pricia.
- Scene with Pricia.
- Awareness Boosted.
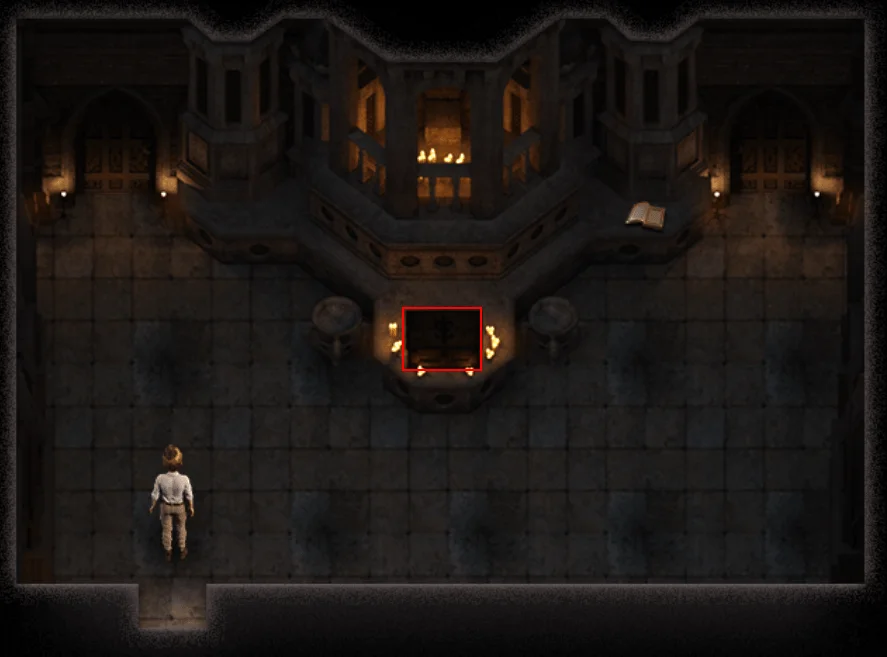
- Go to the Church.
- Go to Madalyn’s Chambers.
- Click the sparkle.
- Receive Chamber Key.
- Open the right door with the Chamber Key.
- Break the Jar with your Pickaxe.
- Pick up the Basic Container.
- Read the book.

- Pick up the Bathroom Key.
- Go back to Madalyn’s room and open the left door with the Bathroom Key.
- Scene with Madalyn.
- Receive Madalyn’s second heart.
- Go back into the bathroom.
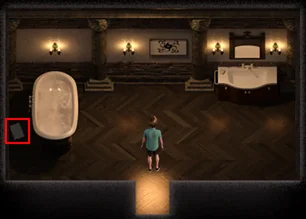
- Read the note on the floor by the tub.


- Go to the Cemetery.
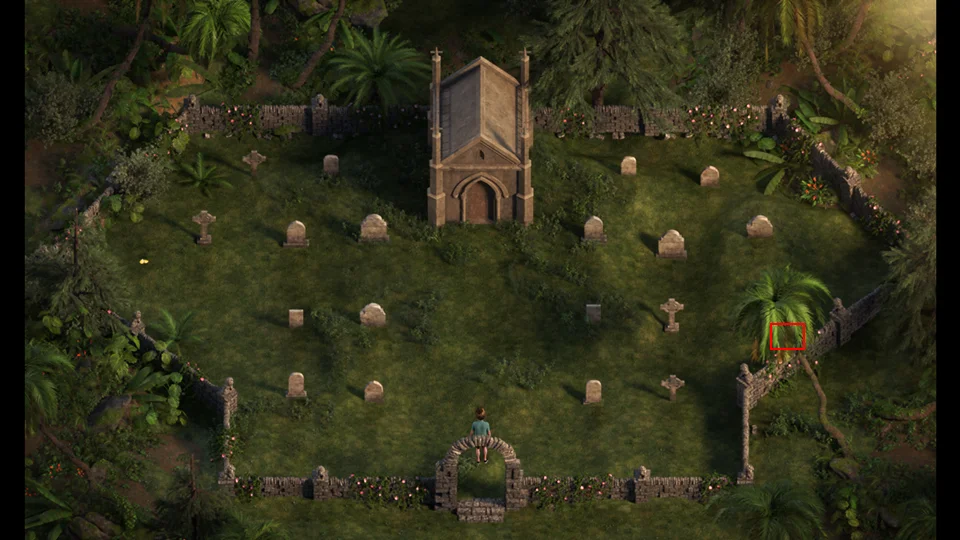
- Click on the ground under the palm tree.
- When you find the piece that is weak break it with your Pickaxe.
- Receive a Chest Key.
- Go to the Ancient Temple.
- I’ll cover these puzzles in their own chapter.
- There are videos available online for all of the puzzles.
- Go to Squallmart.
- Receive a text (and picture) from Emily.

- Purchase the Master Guide ($19,000).
- Go to Estero Park.
- Go to the Cave.
- Scene with Alia and Kaley.
- Recieve Kaley’s fifth heart.
- Go to Caverns 5 – 2.
- Go to Janet’s Home.
- Go to Janet’s Bedroom.
- Janet Solo Scene.
- Go to Estero Key.
Read the paper.


- Pick up the Gaffer Tape.
- Go downstairs.
- Go to Janet’s Home.
- Go to Estero Park.
- Go to the Cave.
- Go to Caverns 5 – 2
- Click on where the cockroach ran.
- Go to the Shrine.
- Craft a Rat Trap: Plastic Wrap, Gaffer Tape, Roach, and Basic Container.
- Receive a Rat Trap.
- Go to the Lighthouse.
- Receive Rat in a Trap.
- Go to Estero Park.
- Use the Teleporter.
- Go to Estero State Part 2 – 3.
- Now that the Jaguar is busy break the Jar with your Pickaxe.
- Pick up the Basic Container.
- Go east (Right).
- Pick up the Pirate Medallion.
- Two rocks will appear.
- There are two Pressure Plates hidden by the palm trees.
- Push the rocks to the Pressure Plates.
- Light the Torch with your Lighter.
- Pick up the Philweed Plant.
- Pick up the Tikpak Treasure.
- Go to the Library.
- Talk to Diana.
- Show Diana something.Show Diana the Tikpak Treasure.
- Scene with Diana.
- Earn Diana’s fourth heart.
- Go to Squallmart.
- Receive text message (and photo) from Tasha.
- Scene with Emily and Tasha.
- Receive 2 Nitroglycerin Pills.
- Go to Estero Park.
If you don’t have the talismans required for the Rock Bomb, one Jade and one Silver, walk around the park until you do.
- Go to the Shrine.
- Craft a Rock Bomb: Nitroglycerin, Basic Container, Silver Talisman, and Jade Talisman.
- Receive a Rock Bomb.
- Go to the Full Mast Bar.
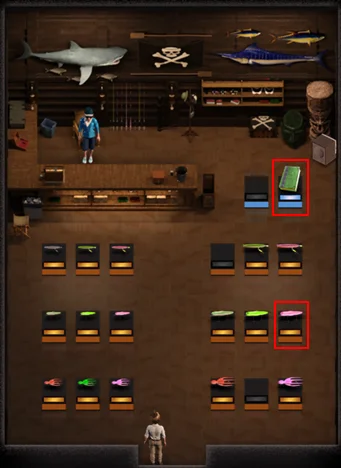
- Go to the Bait Shop.
- Purchase Finding Rare Fish ($1,000)
- Purchase Heavy Natural Jig ($100)
- Purchase Heavy Green Squid ($350)
Those lures will catch most of the fish you need. I recommend only using Heavy lures as they will catch both smaller and larger fish. You will need to purchase all of the small lures to unlock a puzzle in the Ancient Temple.
- Go to the Beach.
- Talk to Jessica.
- Catch a fish. See the Fishing section for information about fishing.
- Scene with Jessica.
- Earn Jessica’s fourth heart.
The Walkthrough – Part 8
- Go to Estero Park.
- Go to the Cave.
- Go to Caverns 2 – 3.
- Use a Rock Bomb on the rocks blocking your way east (Right).
- Go east (Right).
- Read the crafting recipe (Loaded Musket)
- Break the Jar with your Pickaxe.
- Pick up the Basic Container.
- Go back to the Shrine.
- Craft a Rock Bomb: Nitroglycerin, Basic Container, Silver Talisman, and Jade Talisman.
- Receive a Rock Bomb.
- Go to the Church.
- Go to the L shaped room.
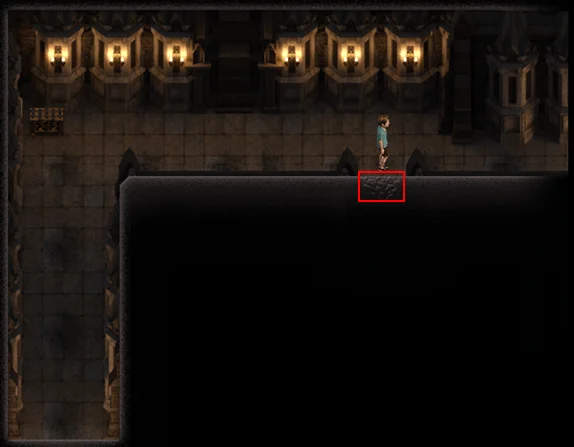
- Use the Rock Bomb to open the weak wall.
- Go into the new area.
- Break the Jar with your Pickaxe.
- Pick up the Basic Container.
- Read the crafting recipe (Pirate Key)
- Pick up the Gaffer Tape.
- Read the book.

- Pick up the Broken Key.
- Pick up the Floppin’ Fish.
- Pick up the Spike Boots.
If you don’t have a Grand Talisman go to Squallmart and purchase three Gold Ore ($4000).
If you don’t have $12,000 you will need to collect your share of the Love Potion sales, sell any plants you can to Pricia, sell any talismans to Diana.
- Go to the Shrine.
- Craft a Grand Talisman: Three Gold Ore and one False Talisman.
- A new False Talisman will spawn at Caverns 5 – 2 if you do not have one in inventory.
- Craft a Pirate Key: Pirate Medallion, Grand Talisman, and two Broken Keys.
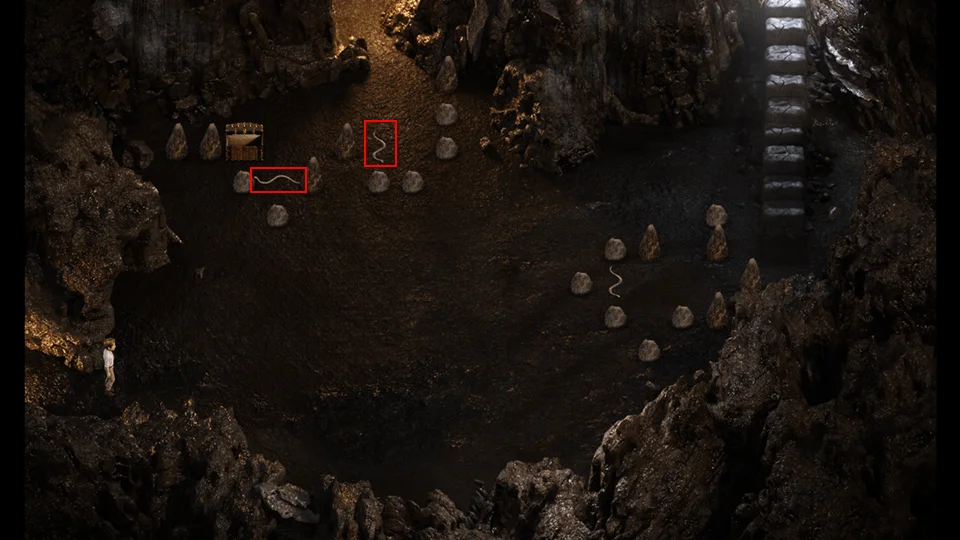
- Go to Caverns 2 – 4.
- Go to the right side of the middle snake to draw the left snake to the middle.
- Push far left rock right 1.
- Open the chest with the Pirate Key.
- Receive a Tikpak Tablet.
- You must have Fast Run on to do this part
- Click on the spot behind the stalagmite by the stairs.
- Go down by the next stalagmite to draw the snake into the alcove.
- Push the rock against the opening.
- Go up the stairs.

- Open the chest with a Chest Key.
- Pick up Kama Sutra – Diana Seat & Shift.
- Pick the Philweed Plant.
- Go to Caverns 3 – 2.
- Now that we have the Spike Boots we can pick up the key in the corner.
- Deposit your Philweed Plant in the backroom of Squallmart.
- Go to the Library.
- Show Diana the Tikpak Tablet.
- Go to the Mansion.
- Scene with Sofia.
- Receive Sofia’s second heart.
- Go to the Library.
- Receive text message (and picture) from Alia
- Receive Adventurer Outfit.
- Time to test it out.
- Go into the Library backyard.
- Pick up the Chest Key by the flying insect.
- Now you won’t get stung, and lose the awareness buff from Pricia.
- Go to Estero Park.
- Take the Teleporter.
- With our new gear we can do a couple of things here.
- Break the Jar with your Pickaxe.
- Receive a Grand Talisman.
- We can also walk right past that bug that has been blocking our way.
- Scene with Clare.
- Receive Clare’s third heart.
- Go to Janet’s Home.
- Go to Janet’s Bedroom.
- Receive Janet’s Dirty Panties.
- Janet Solo Scene.
- Receive Janet’s third heart.
- Go to Estero Key.
- Scene with Alia as Naomi watches.
- Receive Love Potion.
- Go to Janet’s Home
- Go to Kaley’s Room.
- Go to Squallmart.
Purchase Soy Sauce ($20).
You can now purchase the Prayer of Remote Offering ($30,000), Recipe Chest ($1,900) purchase required to see. This will allow you to craft anywhere. Pick up your cut of the potion sales if you need money to purchase.

In the future if you need to Go to the Shrine you can use Offering Prayer from your inventory instead.
- Go to Janet’s Home.
- Scene with Naomi.
- Earn Naomi’s fifth heart.
- Go to the Library.
- Receive Satellite Phone.
The Satellite Phone allows you to interact with Diana instead of having to see her. The Automatic talisman selling should NOT be enabled. It sells as soon as you loot. This will be a problem if you need talismans for crafting, and you will.
- Go to Estero Key.
- Go to Janet’s Home.
- Go around to the back door.
- Scene with Kaley.
- Go to the Cemetery.
- Receive Whip.
- Go to Estero Park.
- Use the Teleporter.
- Use the Whip to get the Old Musket.
- Open your inventory.
- Examine the Old Musket.
- Pry it open with the Small Screwdriver.
- Receive Gunpowder.
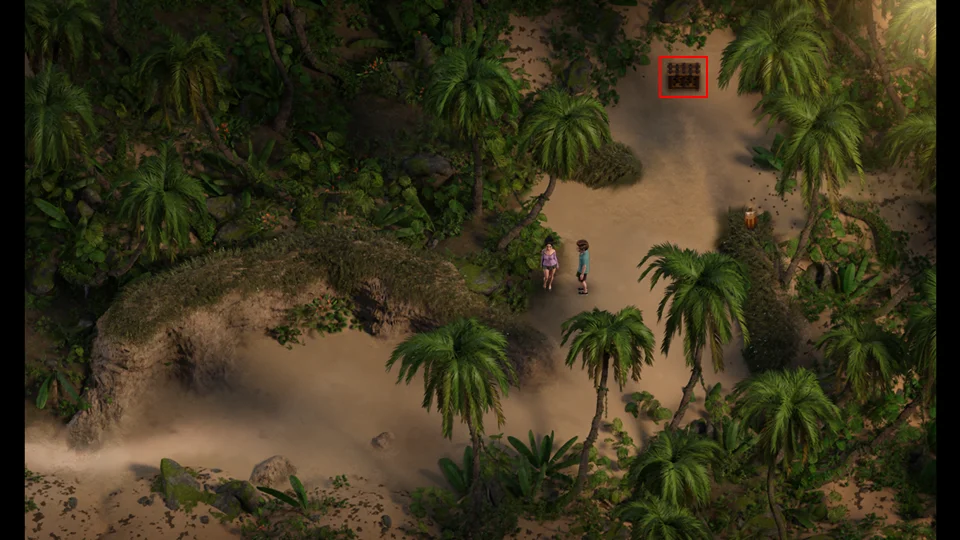
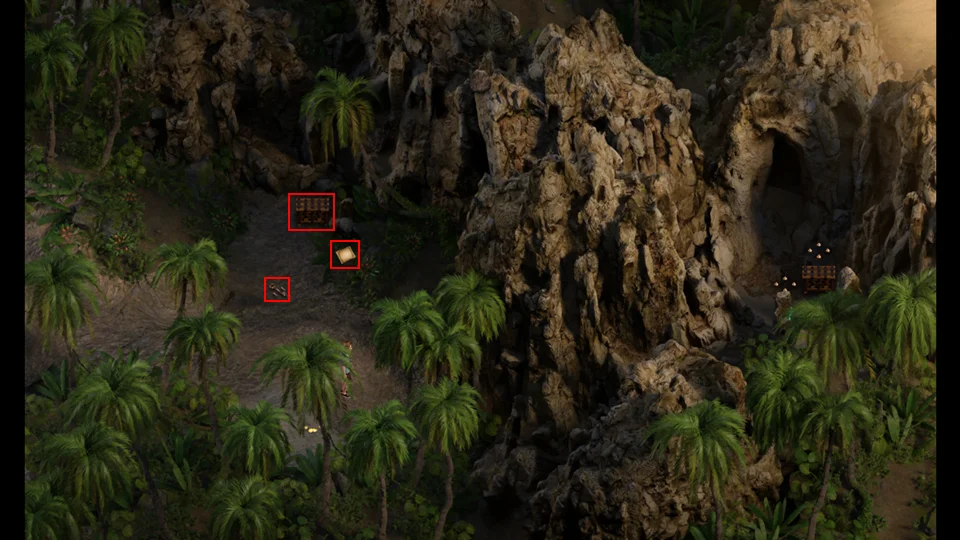
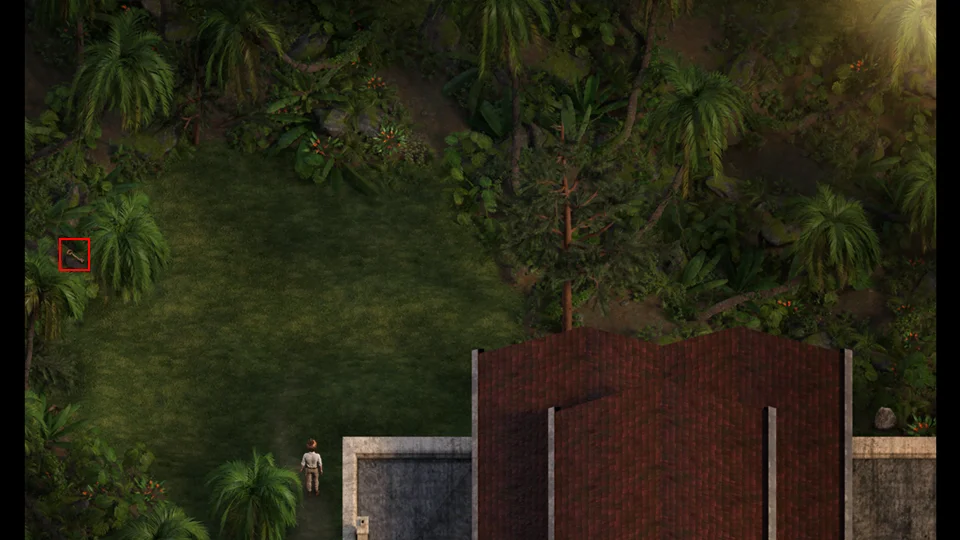
- Go to Deep Jungle 3 – 2.
- Pick up the Tomb Key Segment.
- Use the Whip to reach the orange spark.
- Receive Diana’s Profile.
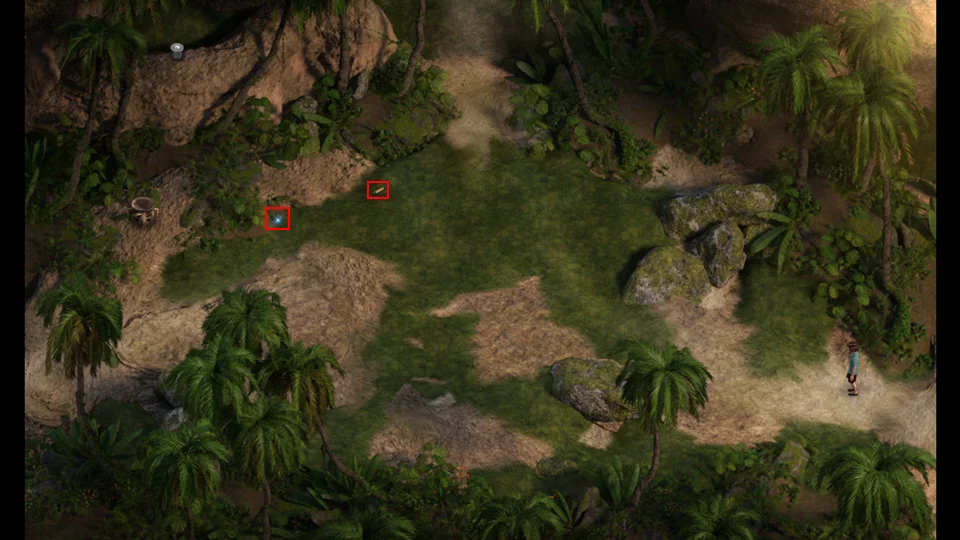
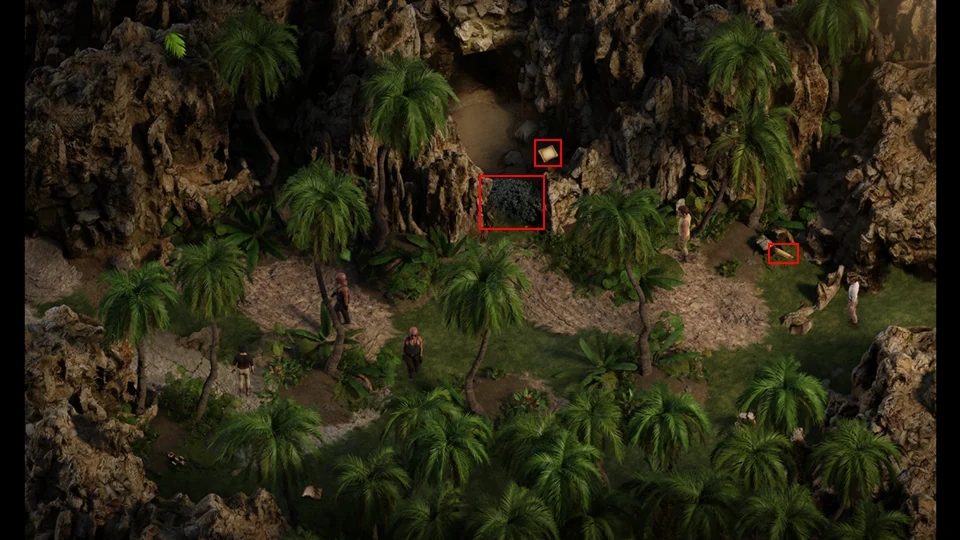
- Go to Deep Jungle 3 – 3.
- Pick the Jasmine.
- Pick the Philweed Plant.
- Read the crafting recipe (Rope Ladder)
- Click on the sparkle
- Receive Old Bullet.
- Click on the weak ground and use your Pickaxe.
- Receive White Sand.
- Open the chest with a Chest Key.
- Pick up Kama Sutra – Pricia Deep Throat.
- Go to Estero State Park 2 – 4
- Pick up the Floppin’ Fish.
- Open the chest with a Chest Key.
- Pick up Kama Sutra – Kaley Sixty Nine.
- Go to Estero State Park 3 – 3
- Use the Whip to get the Philweed.
- Go to Squallmart and deposit the Philweed.
- Go to the Bait Shop.
- Purchase Finding Bigger Fish ($3,000)
- Purchase Heavy Pink Plug ($300)
You now have all of the lures you need to catch everything Jim wants. I recommend frequently stopping at the Beach to see what fish are available to catch from now on.
- Go to the Lighthouse.
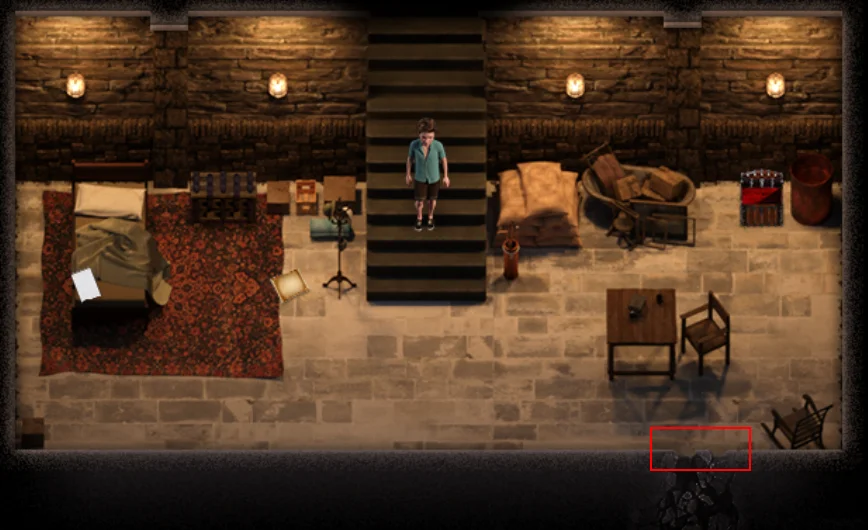
- Go downstairs to the old fort.
- Use the Gunpowder with the cannon that is blocking your way.
- So west (Left) into the new area.
- Pick up the Crypt Key.
- Pick up the Old Map.
- Treasure Map for Estero State Park 5 – 1 Chest Key.
- Read the book.


- Read the crafting recipe (Jasmine Massage Oil).
- Go to the Cemetery.
- Open the Crypt with the Crypt Key.
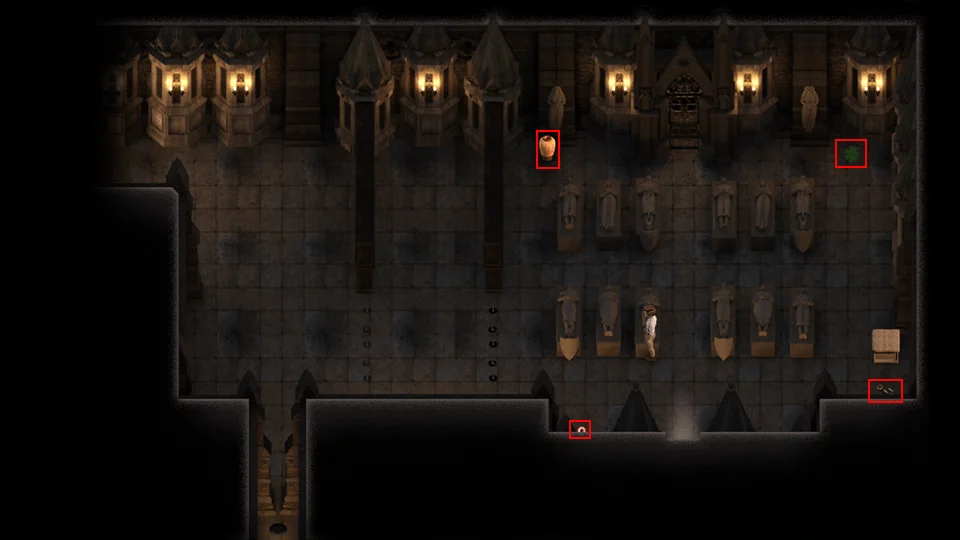
- Pick up the Eye of Caulli.
- Pick up the Broken Key.
- Pick up the Rosa Moss.
- Break the Jar with your Pickaxe.
- Receive Gold Talisman.
- Go to Shrine.
- Craft Jasmine Massage Oil: Jasmine, Rosa Moss, Love Potion, and Basic Container.
- Receive Jasmine Massage Oil.
- Go to Parlor.
- Give the Jasmine Massage Oil to Pricia.
- Scene with Pricia.
- Receive Pricia’s fourth heart.
- Go to Estero Park.
- Pick up Machete.
- Go to Deep Jungle 3 – 3.
Use the Machete on the thorn bush to the north. Scene with Clare and Diana.
The Walkthrough – Part 9
- Go to Caverns 1 – 3.
- Open your Inventory.
- Use the Satellite Phone.
- Talk to Diana.
- Go to Deep Jungle 3 – 3.
- Go to Estero State Park 2 – 1.
- Use your Whip to get the Chest Key.
- Use the Machete on the thorn bushes to get to the sparkle.
- Click on the sparkle.
- Receive Tikpak Artifact.
- Go to Caverns 1 – 3.
- Use the Tikpak Artifact on the Tikpak puzzle.
- Pick up the Tikpak Artifact.
- Click where the Cockroach disappeared.
- Receive a Cockroach.
- Click on the orange sparkle
- Receive Tasha’s Profile.
- Go Home.
- Receive Clare’s phone number and Clare’s fourth heart.
- Go to the Mansion.
- Since the gate is closed click on the sparkle to get inside.
- Talk to Sofia.
- Give the Tikpak Artifact to Sofia.
- Scene with Sofia.
- Receive Sofia’s third heart.
- Go to Squallmart.
- Emily needs a Lab Rat.
Purchase ten (10) Basic Containers ($300×10). Now we can just buy them, instead of having to find them.
- Purchase Plastic Wrap ($100)
- Go to the Shrine.
- Craft a Rat Trap.
- Receive Rat Trap.
- Go to Estero State Park 2 – 3.
- Receive Rat in a Trap.
- Use the Machete on the thorn bush to get the orange spark.
- Receive Clare’s Profile.
- Go to Estero State Park 1 – 1.
- Break the Jar with your Pickaxe.
- Receive a Grand Talisman.
- Go to Deep Jungle 2 – 3.
- Light the Torch with your Lighter.
- Open the chest with a Chest Key.
- Receive Kama Sutra – Clare Motorboat.
- Go to Squallmart.
- Talk to Emily.
- Give Emily the Rat in a Trap.
- Receive Bancrot’s Serum.
- Go to the Doctor’s Office.
- Scene with Jessica.
- Receive Intelligence Boost.
- Go to Squallmart.
- Receive Satellite Phone call from Diana.
- Talk to Michael.
- Purchase Sliver Ore ($1,000)
- Purchase Multivitamins ($110)
- Purchase Cleaning Oil ($3,000)
- Purchase a Love Potion ($2,000) if you don’t have one in your inventory.
- Go to the Library.
- Go around to the front of the Library and use the Library Key on the door.
- Go to the Shrine.
- Craft a Loaded Musket: Cleaning Oil, Old Bullet, Old Musket, and Silver Ore.
- Receive a Loaded Musket.
- Go to Caverns 2 – 4.
- Pick up the Chest Key.
- Go to Estero State Park 2 – 3.
- Now that you’ve scared the Jaguar away you can go north (Up).
- Receive picture of Diana.
- Pick up Gunpowder.
- Pick up Broken Key.
- Jessica’s Profile.
- Pick up Pirate Medallion.
- Pick up Motion Detection Camera.
- Go to Squallmart.
- Give Michael the Motion Detection Camera.
- Go inside Squallmart.
- Receive Alia’s fifth heart.
- Go to the Full Mast bar.
- Scene with Alia, Naomi and Tasha.
- Go to Janet’s Home.
- Go to Janet’s Bedroom.
- Scene with Janet.
- Go to the Lighthouse.
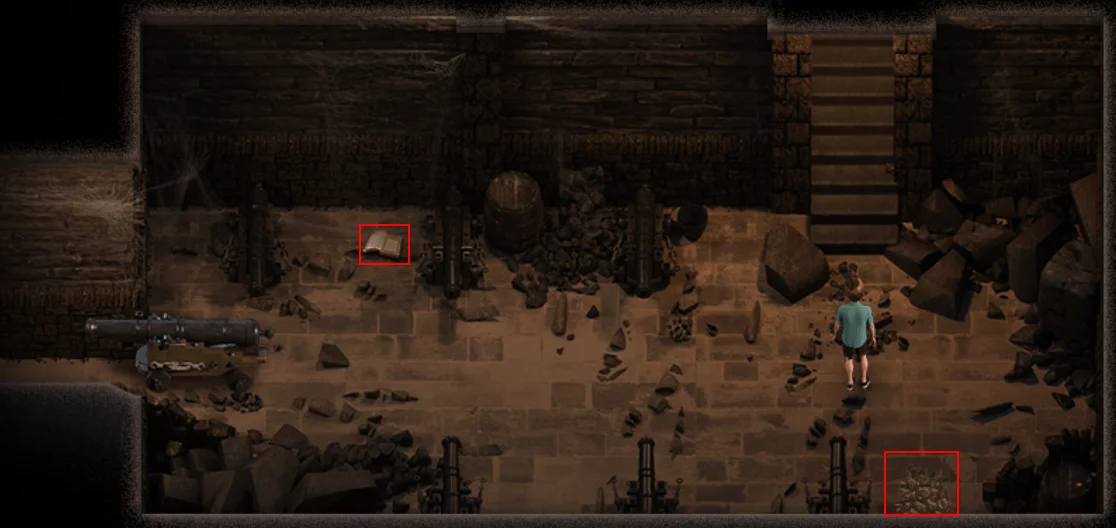
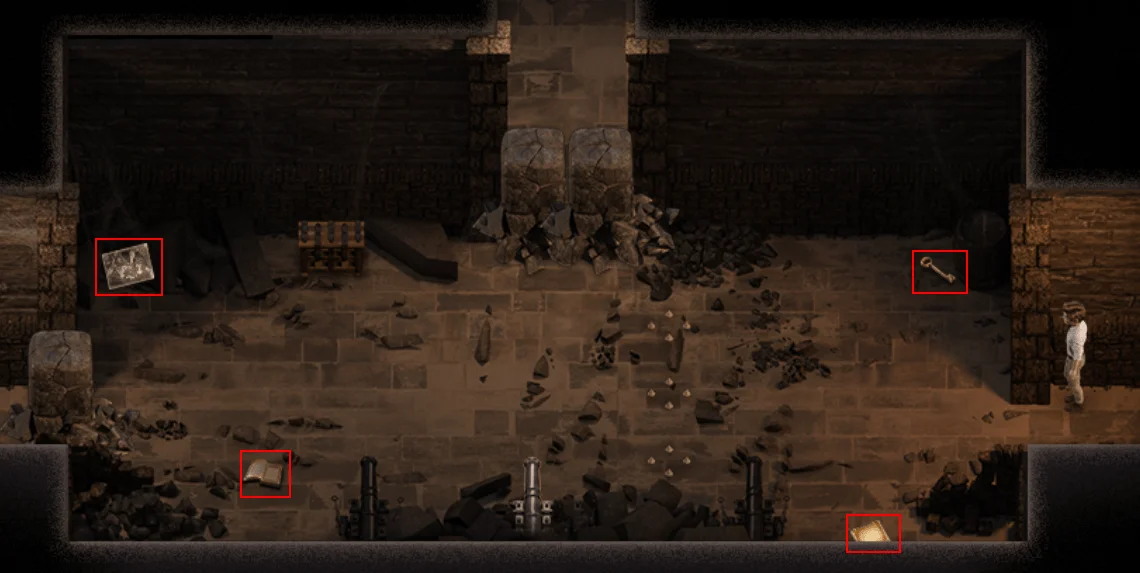
- Go to the second room in the Fort.

- Use the Gunpowder in the middle cannon.
- Go north (Up) into the new area.
- Pick up the Broken Key.
- Open the chest with a Chest Key.
- Pick up Kama Sutra – Pricia On Top.
- Read the book by the cross.


- Pick up the Gothic Chest Key.
- Read the book in the corner.

- Go to the Church.
- Go through the right door in Madalyn’s chamber.
- Open the Gothic Chest with the Gothic Chest Key.
- Scene with Madalyn.
- Earn Madalyn’s third heart.
- Go to the Library.
- Receive a Satellite Phone call from Diana.
- Go to Squallmart.
- Emily needs a dehumidifier.
- Purchase a Love Potion ($2,000) if you have used the one you had.
- Go to the Bait Shop.
- Purchase the Broken Dehumidifier for $5,000.
- Go to Estero Park.
- Take the Teleporter.
- Go to Deep Jungle 2 – 3.
- Follow the Goons west (Left) into the newly opened area.
- Pick up the Bamboo.
You have to wait until no one is looking at the cave to click on the bushes to cut through them. If you get caught you get tossed back to Deep Jungle 2 – 3 and can try again.
- Read the crafting recipe (Dehumidifier).
- Go into the cave.
- Scene with Diana.
- Earn Diana’s fifth heart.
- Go to Estero Park.
- Go to Estero State Park 4 – 1.
- Go to the Full Mast bar.
- Scene with Clare and Tasha.
- Earn Tasha’s fifth heart.
- Go to park entrance.
- Take the Teleporter.
- Go to Deep Jungle 2 – 3.
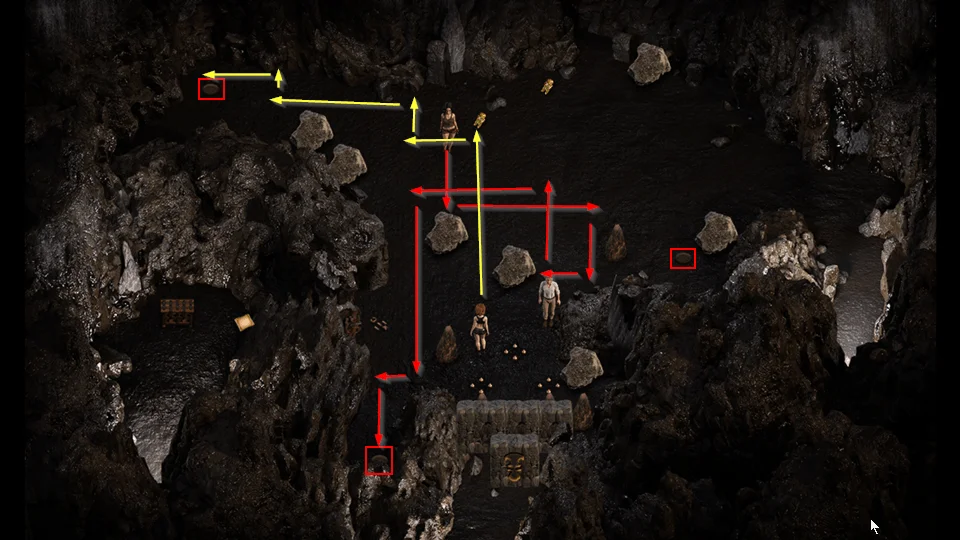
You have to get the women onto a pressure pad. When you talk to them the walk in the opposite direction about three squares. The instructions below are how many times you need to talk to them to get them to move onto a pressure pad. When they are both in place you stand on the third pad.
- DianaDown 1
- Right 2
- Down 1
- Left 1
- Up 1
- Left 2
- Down 3
- Left 1
You’ll pick up the Broken Key when you move Diana into position.
- Down 1
- ClareUp 3
- Left 1
- Up 1
- Left 2
- Up 1
- Left 1

- Collect the Gold.
- Step on the Pressure Pad.
- A new Pressure Pad shows on the lower level.
- Open the Chest with a Chest Key.
- Pick up Kama Sutra – Kaley ♥♥♥♥♥ Sex.
- Go to Deep Jungle 2 – 2.
Read book. Won’t be here if you picked up the profile at the Bar.

- Pick up Broken Key.
- Pick up Clover Leaf.
- Go to Squallmart.

- Purchase Silver Ore ($1,000).
- Go to the Shrine.
- Craft a Dehumidifier: Broken Dehumidifier, Small Screwdriver, Silver Ore, and a Gold Talisman.
- Receive Dehumidifier.
- Go to Squallmart.
- Talk to Emily.
- Give the Dehumidifier to Emily.
- Emily needs some time.
- Let’s hunt down those profiles we’ve been seeing hints for.
- Go to Estero Park.
- Go west (Left)
- Go north (Up)
- Pick up Alia’s Profile.
The Walkthrough – Part 10
- Go to the Cave.
- Go to Caverns 5 – 3.
- Open the chest with a Chest Key.
- Pick up Kama Sutra – Emly Let’s Plow.
- Use your Pickaxe on the weak ground.
- Receive a Chest Key.
- Pick up the Chest Key.
- Go to Caverns 2 – 2.
- Activate the pressure plate.
- Pick up Janet’s Profile.
- Go to Caverns 2 – 3.
- Step on the pressure plate.
- Go to Caverns 2 – 4.
- Step on the pressure plate.
- Pick up Chest Key.
- Let’s go see if Emily is done.
- Go to Squallmart.
- Scene with Emily.
- Go to the Doctor’s Office.
- Receive Nitroglycerin x 3.
- Jessica needs some Aloe.
- Go to the Shrine.
Craft as many Rock Bombs as you can: Basic Container, Jade Talisman, Silver Talisman, and Nitroglycerin.
Remember that you can now purchase Basic Containers as Squallmart.
- Go to the park entrance.
- Use the Teleporter.
- Go to Caverns 1 – 2.
- Read the crafting recipe (Tomb Key).
- Go to the Parlor.
- Receive Shea Butter.
- Go the Estero Park.
- Use the Teleporter.
- Go to Deep Jungle 2 – 3.
- Use a rock bomb on the rocks to the north.
- Go North to the newly open area.
- Pick up the Tomb Key Segment.
- Read the crafting recipe (King’s Shovel)
- Use Pickaxe on weak ground.
- Receive Chest Key.
- Pick up the Aloe Plant.
- Pick up Clover Leaf.
- Read book. Book will not be here if you have Alia’s Profile.

- Go to the Shrine.
- Craft Aloe Lotion: Aloe Plant, Shea Butter, Ginseng Plant, and a Basic Container.
- Receive Aloe Lotion.
- Go to the Doctor’s Office.
- Talk to Jessica.
- Give Jessica the Aloe Lotion.
- Go to Janet’s Home.
- Go upstairs.
- Scene with Alia and Kaley.
- Receive Kaley’s fifth heart.
- Go to the Mansion.
- Scene with Sofia.
- Go to the Library.
- Go to the Parlor.
- Scene with Jessica and Pricia.
- Earn Jessica’s fifth heart.
- Go to Squallmart.
- Go to Janet’s Home.
- Receive text message (and picture) from Janet.
- Scene with Janet.
- Earn Janet’s fourth heart.
- Go to the Full Mast Bar.
- Receive Old Bullet.
- Open Inventory.
- Select the Musket.
- Receive Loaded Musket.
- Go to Deep Jungle 2 – 2.
- Go west (Left).
- Pick up the Aloe Plant.
- Click on the sparkle.
- Receive Grand Talisman.
- Click on the Bird.
- Pick up the Feather.
- Pick up the Broken Key.
- Pick up the Fan Palm Leaf.
- Pick the Philweed Plant.
- Pick up the Tomb Key Segment.
- Go to the Teleporter.
- Go to the Shrine.
- Craft a Pirate Key: Pirate Medallion, Grand Talisman, and two Broken Keys.
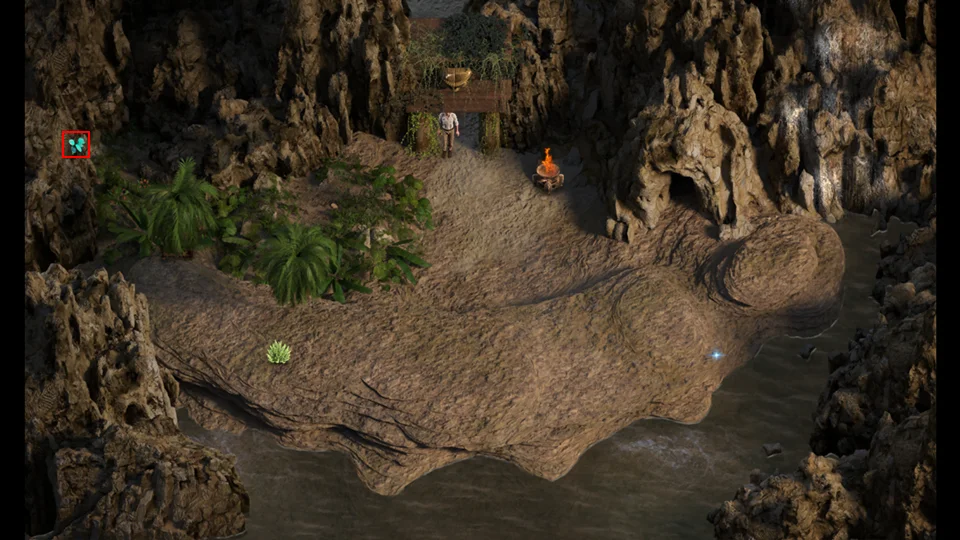
- Go to the Pirate Ship, Caverns 2 – 1.
- Open the Pirate Chest with the Pirate Key.
- Receive Tikpak Artifact.
- Go the the Shrine.
- Craft a Tomb Key: Tomb Key Segment x 3 and a Tikpak Artifact.
- Receive Tomb Key.
- Go back to Tasha, Estero State Park 1 – 1.
- Open the Tomb with the Tomb Key.
- Receive Tikpak Tomb Photo.
- Go back to the Tomb, Estero State Park 1 – 1.
- Open the chest with a Chest Key.
- Pick up Kama Sutra – Diana ♥♥♥♥♥ Sex.
- Pick up Tiny Rope.
- Pick up Broken Key.
- Go to the Full Mast Bar.
- Go to the Women’s Room.
- Receive a Cockroach.
- Go to the Men’s Room.
- Talk to Richard.
- Give Richard the Aloe Plant.
- Receive 2 Broken Keys.
- Go to the Doctor’s Office
- Go to the MRI room (left door).
- Pick up the Gaffer Tape.
- Pick up the Plastic Wrap.
- Go to the Shrine.
- Craft a Rat Trap: Plastic Wrap, Gaffer Tape, Roach, and Basic Container.
- Receive a Rat Trap.
- Go to the Doctor’s Office.
- Talk to Jessica.
- Give Jessica the Rat Trap.
- Scene with Emily, Jessica, and Kaley.
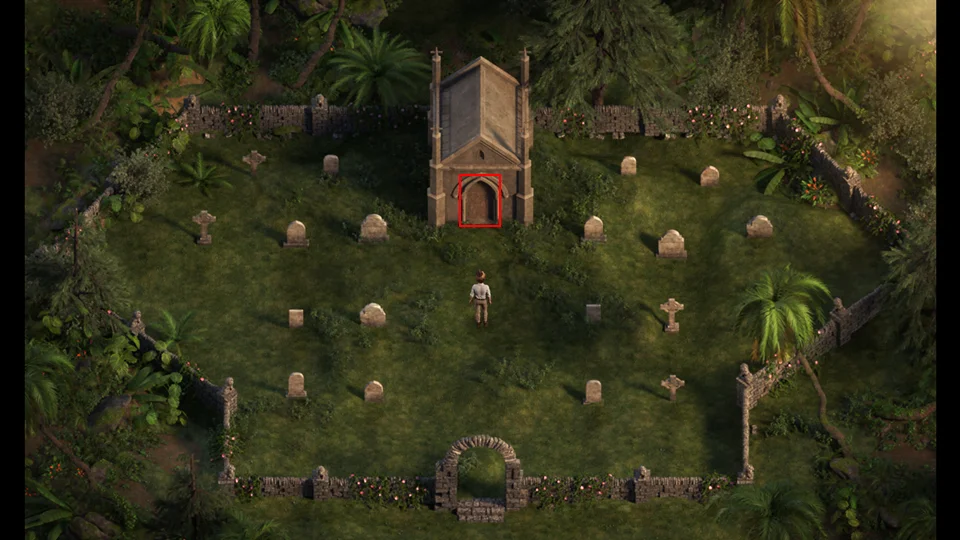
- Go to the Church.
- Go to the Crypt through the church.
- Scene with Madalyn.
- Receive Madalyn’s fourth heart.
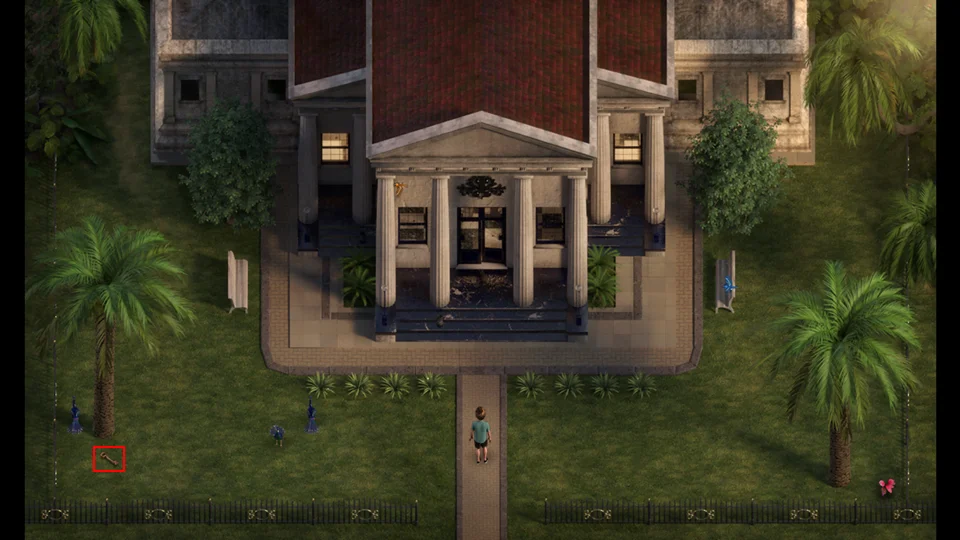
- Go to the Mansion.
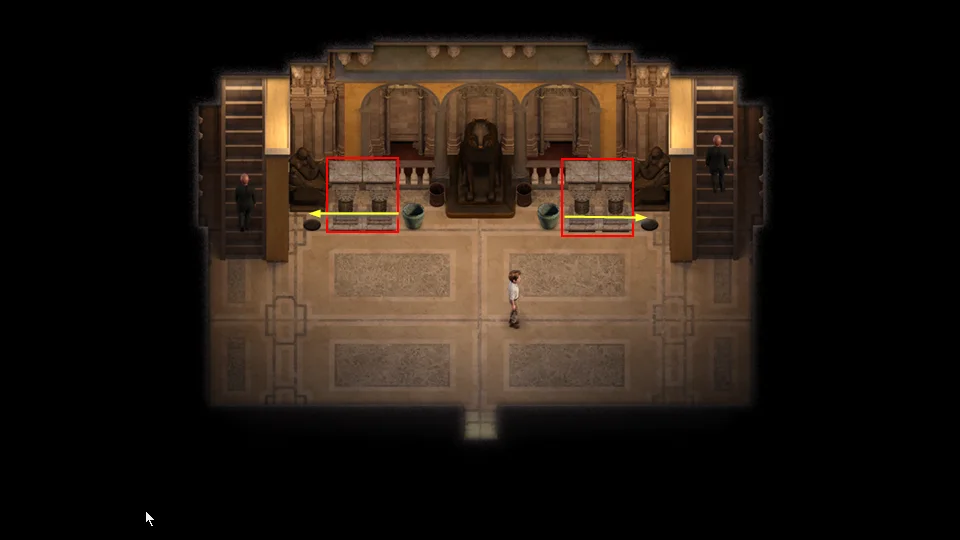
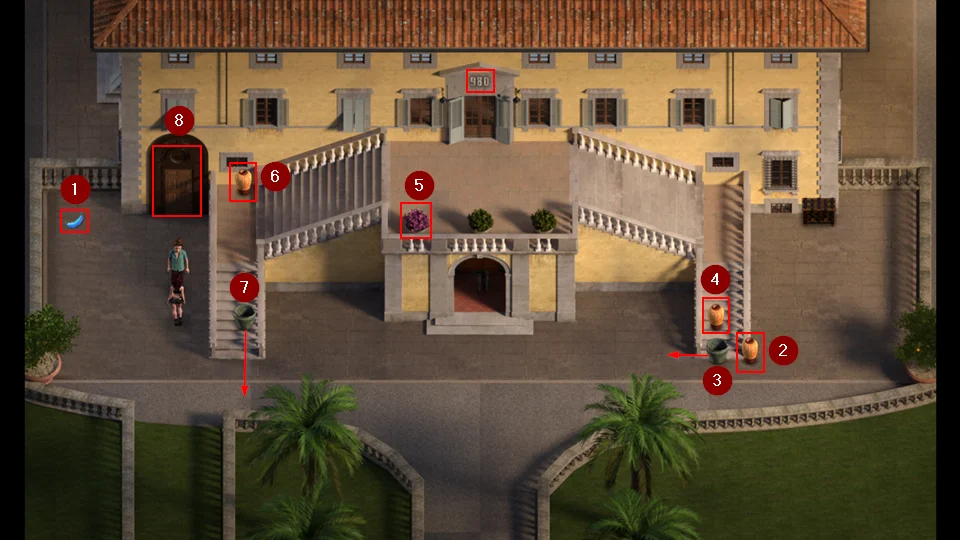
- When the guards aren’t looking, destroy the four columns with your Pickaxe.
- Then push the two green pots onto the pressure plates.
- Pick up the Hidden Key.
- Go out the door.
- Open the chest with a Chest Key.
- Pick up Kama Sutra – Jessica Drink It Up.
- Open the door on the left with the Hidden Key.
- Click on the Security.
- Disarm it with the House Number, 980.
- Go downstairs.
- Scene with Clare.
- Earn Clare’s fifth heart.
- Pick up Super Guide.
- Pick up Tasha’s Clothes.
- Pick up Eye of Caulli.
- Pick up Tiny Rope.
- Exit Mansion.
- Go to Doctor’s Office.
- Scene with Janet.
- Receive Janet’s phone number.
- Go to the Full Mast Bar.
- Talk to Tasha.
- Give Tasha’s Clothes to Tasha.
- Go to the Library.
- Click on the face on the wall.
- Use Eye of Caulli.
- Click on the face on the wall again.
- Use Eye of Caulli.
- Go down into the new area.
Read book. Book will not be here if you have picked up Tasha’s Profile.

Pick up Caulli’s Coin. (This coin respawns here when you use the one in your inventory)
Pick up Old Map. Map will not be here if you already picked up Chest Key. (Sorry, don’t know which one)
- Pick up sparkle.
- Receive False Talisman.
- Read craft recipe (Royal Talisman)
- Pick up sparkle.
- Receive False Talisman.
- Pick up Tiny Rope.
- Pick up sparkle.
- Receive False Talisman.
- Use your Pickaxe on the weak ground.
- Receive a Chest Key.
- Pick up all of the Gold Ore piles.
- Go to the Doctor’s Office.
- Talk to Pricia.
- Go to the Parlor.
- Talk to Pricia.
- Go to Estero Park. (Have to do this to find Joey)
- Go to the Shrine.
- Craft a Royal Talisman: Grand Talisman x 3 and Caulli’s Coin.
- You can craft any you need – Grand Talismans: Gold Ore x 3 and a False Talisman.
- Go to the Parlor.
- Talk to Pricia.
- Give Pricia the Royal Talisman.
- Scene with Pricia.
- Receive Awareness Boost and Pricia’s fifth heart.
- Go to Squallmart.
- Purchase Knot Tying Guide ($5,000).
- Exit Squallmart.
- Go the the Lighthouse.
- Go to the Shrine.
- Craft a Rope Ladder: Tiny Rope x 3 and the Knot Tying Guide.
- Receive Rope Ladder.
- Go to the park entrance.
- Use the Teleporter.
- Go to Deep Jungle 3 – 3.
- Go to Deep Jungle 2 – 1.
- Pick the Aloe Plant.
- Try to go down the cliff.
- Use the Rope Ladder.
- Scene with Diana.
- Receive Diana’s sixth heart.
- Pick up Broken Camera.
- Squash the scorpion.
- Receive Scorpion Venom.
- Pick up the Broken Key.
- Light the torch with your Lighter.
- Pick the Poison Thorns.
- Go east (Right).
- Pick up the Broken Key.
- Go into the Cave.
- Open the chest with a Chest Key.
- Pick up Kama Sutra – Clare Reverse on Top.
- Read the crafting recipe (Deadly Whip).
- Go to the Mansion.
- Go to the Treasure Room in the basement.
- Pick up the Dart.
- Go back upstairs.
- Scene with Clare and Sofia.
The Walkthrough – Part 11
- Go to the Shrine.
- Craft a Blow Dart: Dart, Scorpion Venom, Bamboo, and a Feather.
- Receive Blow Dart.
- Go to the park entrance.
- Use the Teleporter.
- Talk to Michael.
- Give the Blow Dart to Michael.
- Click on the sparkle.
- Receive Memory Card.
- Pick up the Deer Meat.
- Go to Squallmart.
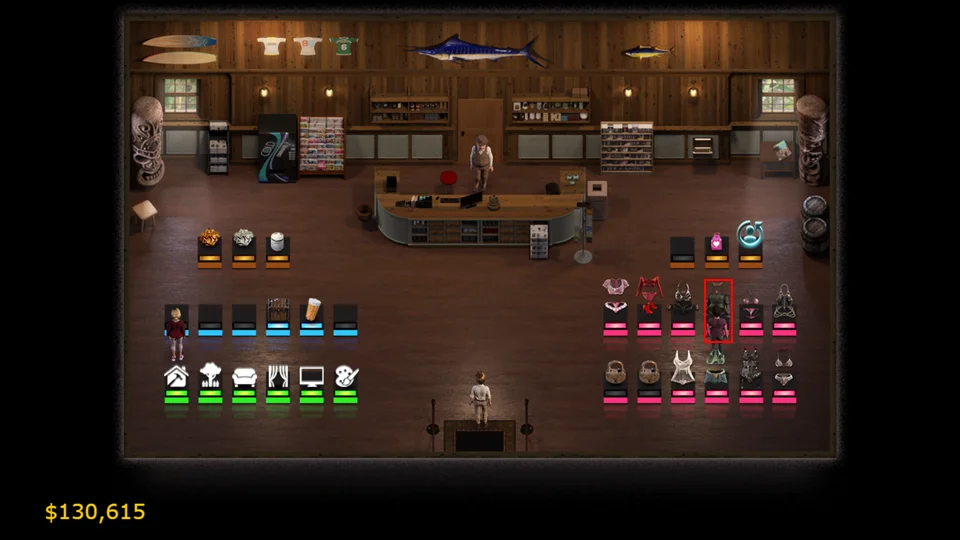
Purchase the Fashion Nerd For Emily ($400).
You can purchase the other available outfits now if you would like, and have the money.
- Exotic Dancer for Alia ($400)
- Angel Wrap for Naomi ($400)
- Torn Up for Tasha ($400)
- Red Dragon for Pricia ($400)
- Pretty Pink for Kaley ($400)
- Sexy Business for Jessica ($400)
- Naughty Nighty for Diana ($400)
- Green Fantasy for Clare ($400)
- Angel in White for Janet ($400)
- Sinful Desire for Madalyn ($400)
- Michievous Mistress for Sofia ($400)
After a woman has six hearts, you have their profile, and have purchased their alternative outfit, you can upgrade the profile by purchasing their Bonus Profile for $1,000. This allows you to view them clothed, nude, or in the alternative outfit you bought when you bring up their profile on your phone.
- Go to Estero Key.
- Talk to Emily.
- Give Emily the Broken Camera.
- Give Emily the Memory Card.
- Pick up Bumpy Candle.
- Pick up Broken Key.
- Go to Alia’s Room.
- Talk to Emily.
- Scene with Emily.
- Go to the Lighthouse.
- Receive photo of Emily.
- Go to Squallmart.
- Receive Emily’s fifth heart.
- Go to the Church.
- Talk to Madalyn.
- Scene with Madalyn.
- Go to the Full Mast Bar.
- Go to Squallmart.

- Purchase Shoe Glue ($40)
- Go to Estero Park.
Search the park until you locate a Royal Talisman or three Grand Talismans. If you have three Grand Talismans you can pick up Caulli’s Coin in the basement of the Library to craft a Royal Talisman.
- Go to the Shrine.
- Craft a Deadly Whip: Whip, Royal Talisman, Poison Thorns, and Shoe Glue.
- Receive Deadly Whip.
- The Deadly Whip will allow you to kill some Cave Viper snakes.
- Go to Caverns 2 – 4.
- Whip the two snakes by the chest by clicking on either snake.
- Move the rocks so you can get to the room to the north (Up).
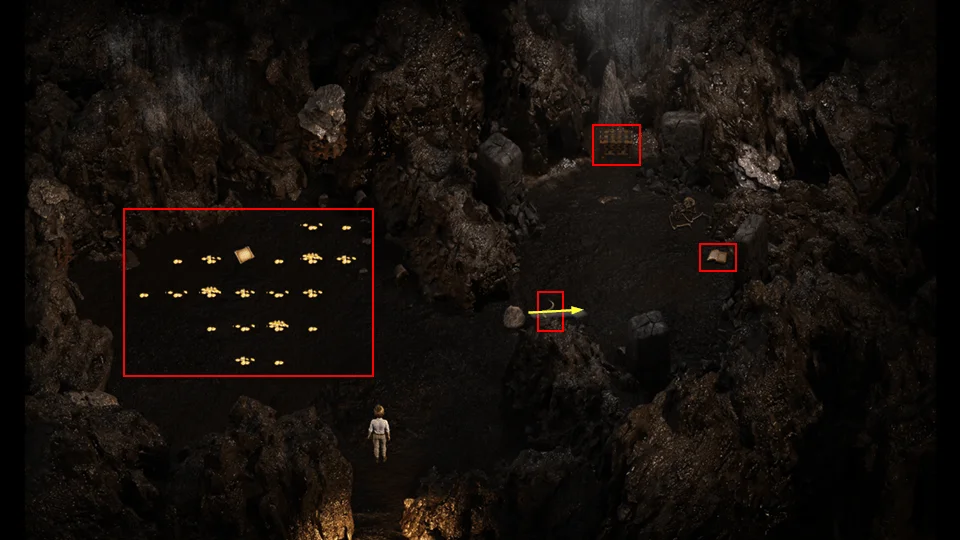
- Whip the snake.
- Push the rock into the room so that you can enter.
- Open the chest with a Chest Key.
- Pick up Kama Sutra – Janet ♥♥♥♥♥ Play.
- Read the book.


- Pick up all of the coins.
- Read the crafting recipe (Golden Teddy).
- Go to Caverns 2 – 3.
- Scene with Alia and Tasha.
- Receive Alia’s sixth heart.
- Go to Janet’s Home.
- Go to Janet’s Bedroom.
- Scene with Kaley.
- Earn Kaley’s sixth heart.
- Go to Estero Key.
- Go into the House.
- Go to the Doctor’s Office.
- Go to the Church.
- Go to the sewers under the Church.
- Kill the snake with your whip.
- Move the rocks to you can get to the new area.
- Pick up the Teddy Bear.
- Use your Pickaxe on the weak ground.
- Receive a Chest Key.
- If you do not have a Gold Ore in your inventory, go to Squallmart.

- Purchase Gold Ore ($4,000).
- Go to the Shrine.
- Craft a Golden Teddy: Bumpy Candle, Teddy Bear, Gold Ore, and White Sand.
- Receive a Golden Teddy.
- Craft a couple of Chest Keys: Broken Key x 4
- Receive Chest Key.
- Go to the Doctor’s Office.
- Talk to Ash.
- Give Ash the Golden Teddy.
- Go to Estero Park.
- Follow Michael to the west (Left).
- Talk to Michael.
- Receive Grappling Hook.
- Go to the park entrance.
- Use the Teleporter.
- Go to Deep Jungle 2 – 3.
- Use the Grappling Hook to reach the Fan Palm Leaf.
- Go to Deep Jungle 2 – 2.
- Use the Grappling Hook to reach the Fan Palm Leaf.
- Go to Deep Jungle 2 – 1.
- Pick up the Broken Key.
- Click on the bird so that it will move out of the way.
- Use the Grappling Hook to climb the north (Up) cliff.
- Use your Pickaxe on the weak ground.
- Receive Mysterious Key.
- Pick up the Clover Leaf.
- Pick up the Philweed.
This is another timing puzzle. You have to grab the Fan Palm Leaf when the Jaguar is facing the other way.
- Go back to Michael and Ash.
- Talk to Michael.
- Give Michael the Fan Palm Leaves.
- Go to the Mansion.
- Go in the upstairs door.
- Go to Squallmart.
- Go to the Lighthouse.
- Talk to Albert.
- Have you shown Mr. Garner the interior?
- Use the Grappling Hook to get the Cockroach.
- Go inside the Lighthouse.
- Mr. Garner should see the view from up top.Go upstairs.
- Go to the Library.
- Scene with Madalyn.
- It looks like Emily’s equipment is leaking. Better go check it out.
- Go to the Doctor’s Office.
- Talk to the Receptionist.
- See Doctor Jessica for $140Scene with Jessica.
- Receive Intelligence Boost!
- You now have the maximum Intelligence and Awareness boosts.
- Go to Estero Key.
- Go in the House.
- Scene with Janet and Naomi.
- Receive Janet’s fifth heart.
- Go to Alia’s secret spot.
- Talk to Sam.
- Leave Estero Key.
- Go to the Mansion Basement.
- Just walk and get caught by the camera, there isn’t anything to get.
- Exit the Mansion.
- Scene with Sofia.
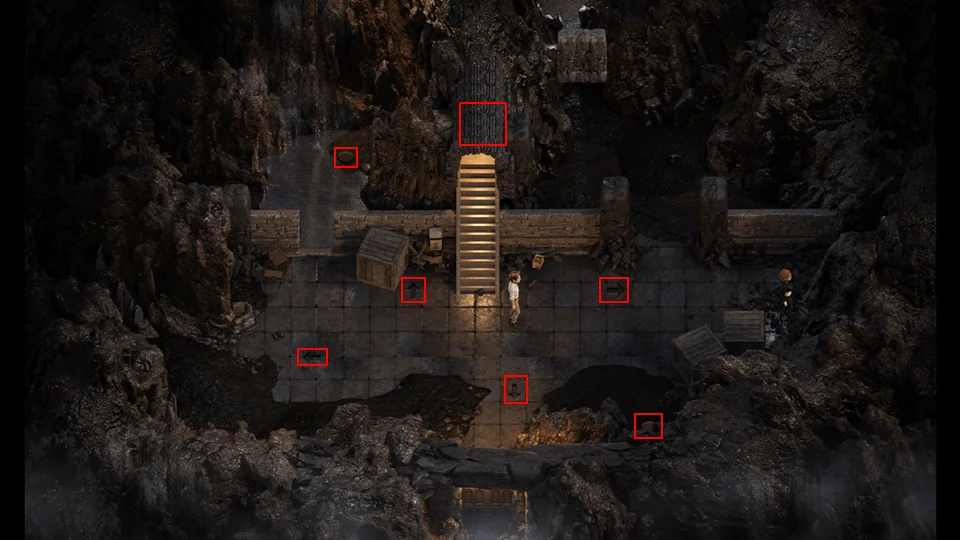
For this puzzle you use the arrows on the ground to control Clare. When you step on an arrow she will continue walking in that direction until she hits something or you use another arrow. You need to move her onto the pressure pad to the right of the door. Once she is on the pressure pad, walk through the tunnel to the other pressure pad by the water. You will pick up a cockroach as you walk through the tunnel.
- Follow Clare.
- Talk to Clare.
- Scene with Clare, Diana, and Naomi.
- Go to Caverns 2 – 4.
- Receive Naomi’s sixth heart.
- Go to the Cemetery.
- Enter Crypt.
- Go to the Madalyn’s chambers.
- Use the right door.
- Scene with Madalyn.
- Earn Madalyn’s fifth heart.
- Go to Estero Park.
- Go west (Left)
- Talk to Ash.
- Go to Estero State Park 4 – 4.
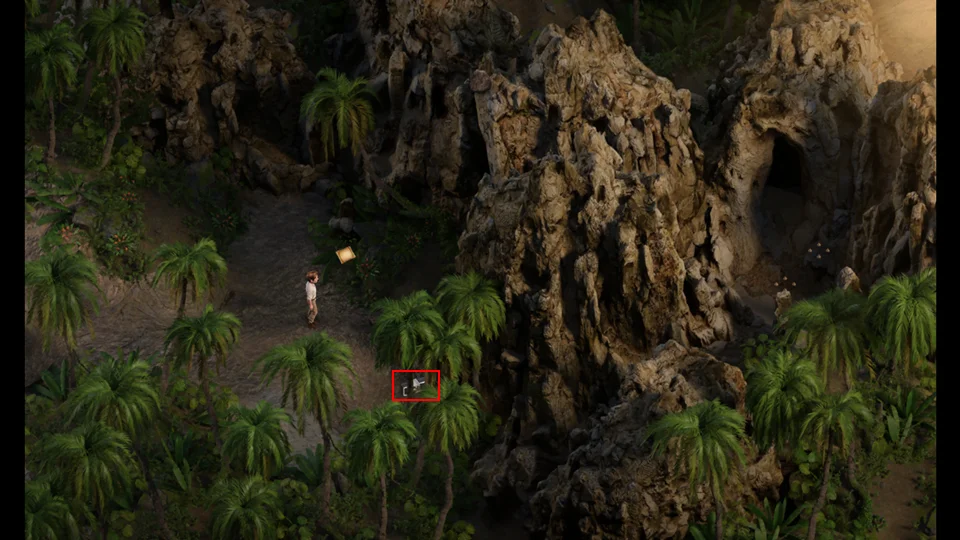
- Pick up the Boombox.
- Take the Boombox to Ash, Estero State Park 5 – 2.
- Talk to Ash.
- Give the Boombox to Ash.
- Receive a Chest Key.
- Go to the Mansion.
- Go in the upper door.
- Go upstairs.
- Read the crafting recipe (Metal Ladder)
- Use your Pickaxe on the weak wall.
- There is a short piece where the security system to the left shuts down.
- Use your Pickaxe on the weak wall two (2) more times until the key disappers.
- Go downstairs using one of the two right stairs.
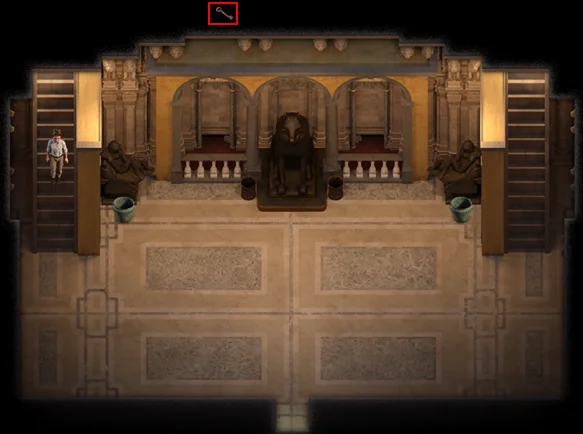
- Use your Grappling Hook to get the Chest Key.
- Go back upstairs.
- Go west (Left) into the new area.
- Go downstairs.
- Scene with Sofia.
- Receive Sofia’s fourth heart.
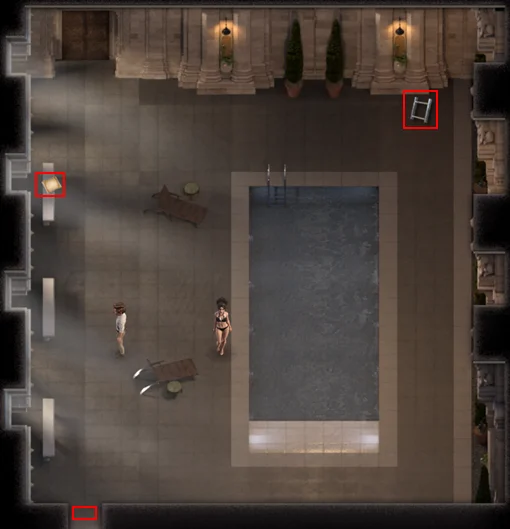
- Read the crafting recipe (Hacking Tool)
- Pick up the Ladder Segment.
- Exit through the south (Down) door.
The Walkthrough – Part 12
- Go to the Lighthouse.
- Go downstairs.
- Go to Squallmart.
- Go back into Squallmart.
- Purchase the Goggles ($30,000).
- Go to the Library.
- Talk to Emily.
- Go to the Parlor.
If you don’t have them, gather the ingredients to craft Jasmine Massage Oil: Basic Container, Love Potion, Jasmine, and Rosa Moss. If you need a Love Potion you can purchase it from Albert at the Lighthouse. Once you have the ingredients go the the Shrine and craft the oil.
- Go to the Parlor.
- Talk to Emily.
- Give Emily the Jasmine Massage Oil.
- Scene with Emily and Pricia.
You can now sell all of your plants in bulk by using the grey container. Selling in bulk will also sell all of your Love Potions and Jasmine.
- Go to the Library.
- Talk to Emily.
- Earn Emily’s sixth heart.
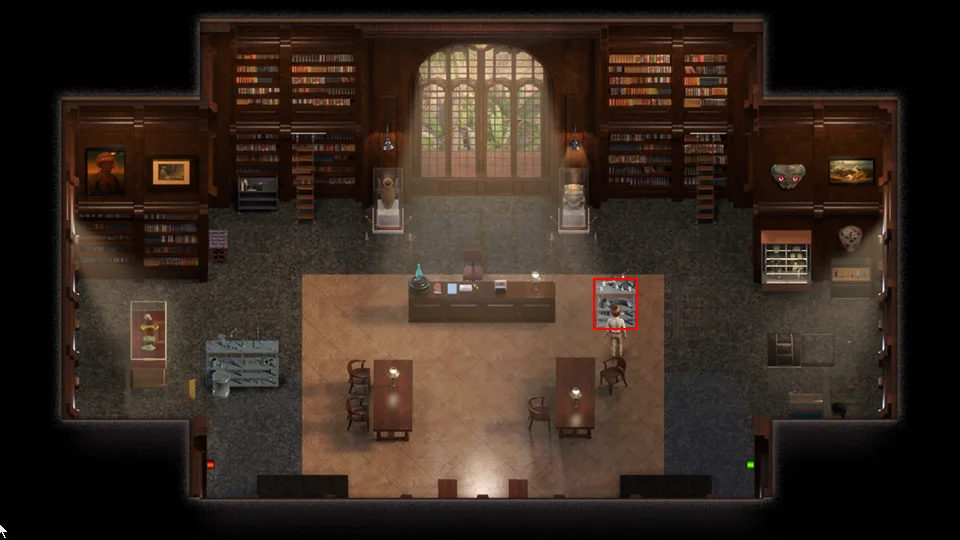
You can now purchase Love Potions in bulk. The more you buy the cheaper they are. Click on the grey stand to the right of the desk to purchase potions.
- Go to the Mansion.
- Enter through the left door.
- Go down into the Treasure Room.
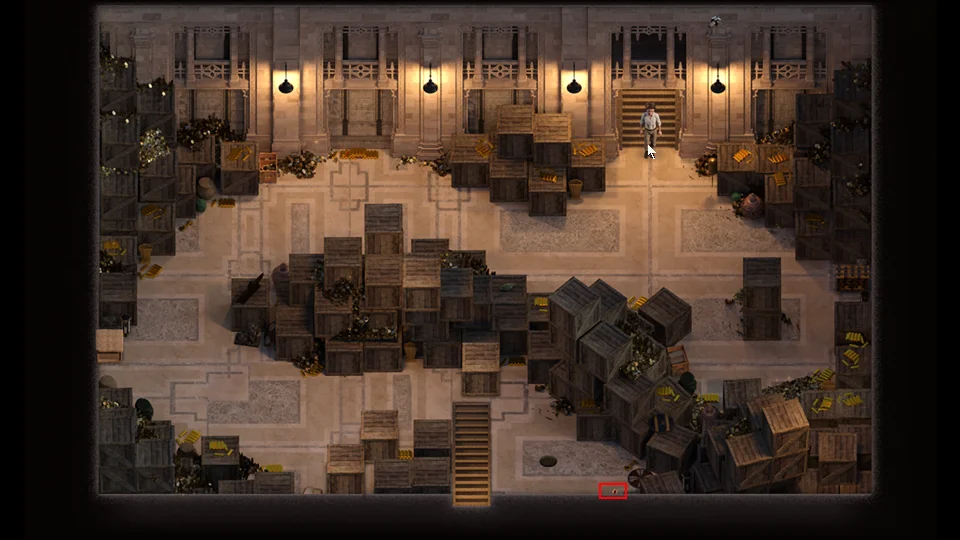
- Grab the Cockroach by the stairs down.
- Go to Janet’s Home.
- Enter the house.
- Use a Cockroach.
- Go upstairs.
- Use a Cockroach.
- Go to Janet’s Bedroom.
- Use a Cockroach.
- Go to the Lighthouse.
- Talk to Albert.
- Go to the Mansion.
- Follow Sofia into the Mansion.
- Go to the left door.
- Scene with Janet and Kaley.
- Go to Janet’s Home.
- Receive a call from Diana.
- Receive a call from Janet.
- Janet wants a few things from her home.
- Enter Janet’s Home.
- Go to the Bathroom.
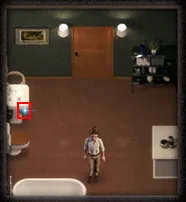
- Click on the sparkle.
- Receive a Toothbrush.
- Go to Janet’s Bedroom.
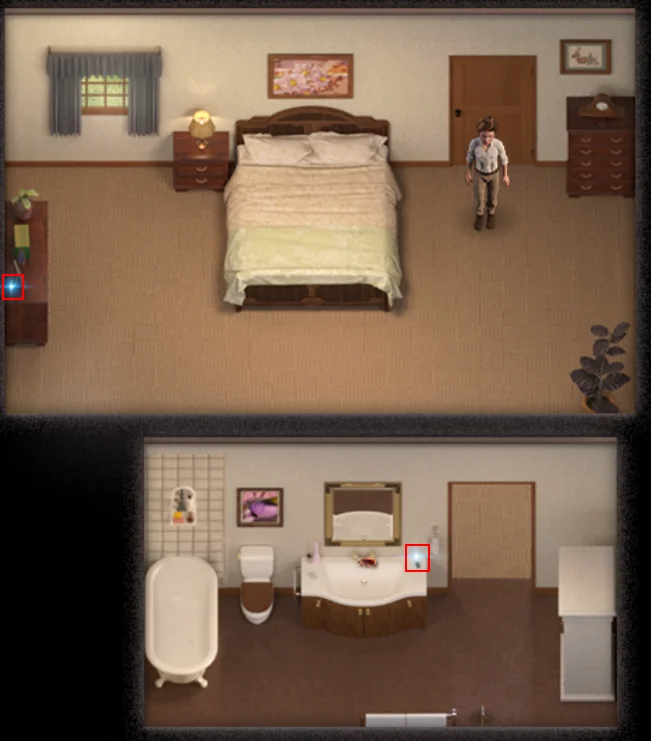
- Click on the sparkle on the dresser.
- Receive Janet’s Clothes.
- Click on the sparkle in the Bathroom.
- Receive a Toothbrush.
- Go to the Mansion.
- Go to the pool.
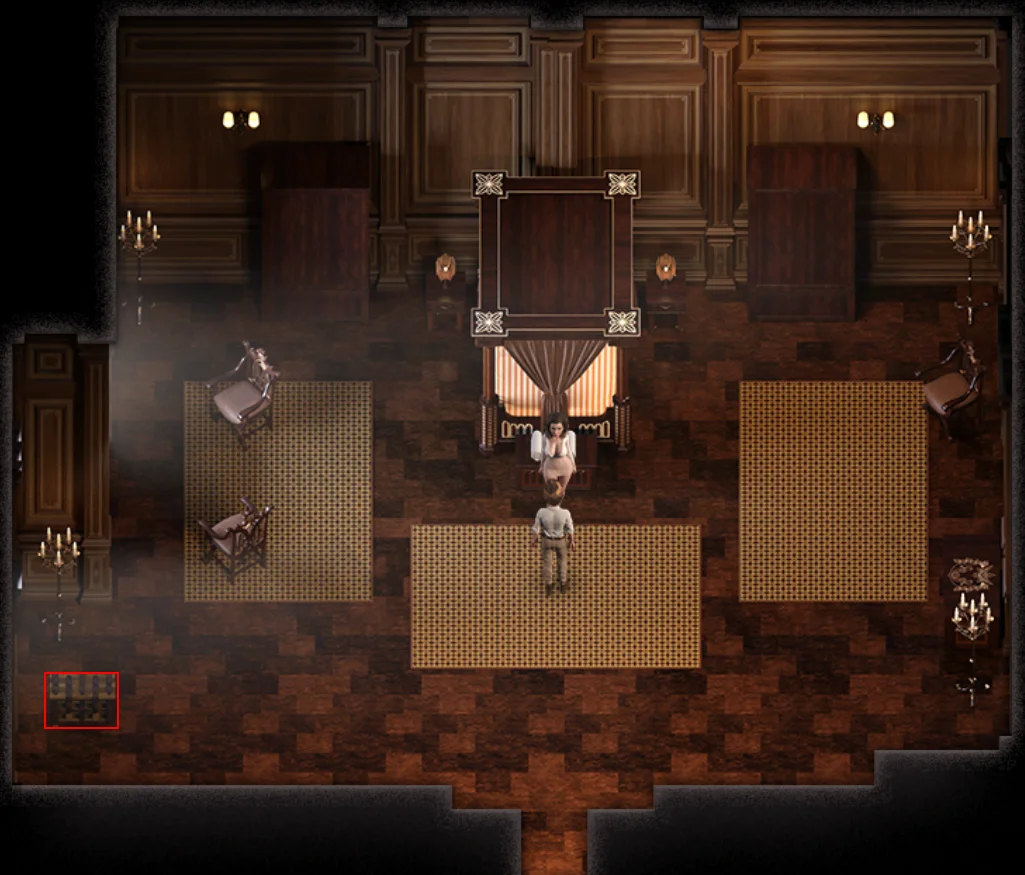
- Open the chest with a Chest Key.
- Pick up Kama Sutra – Tasha Anal Sex.
- Exit into the hall.
- Go east (Right).
- Open the door.
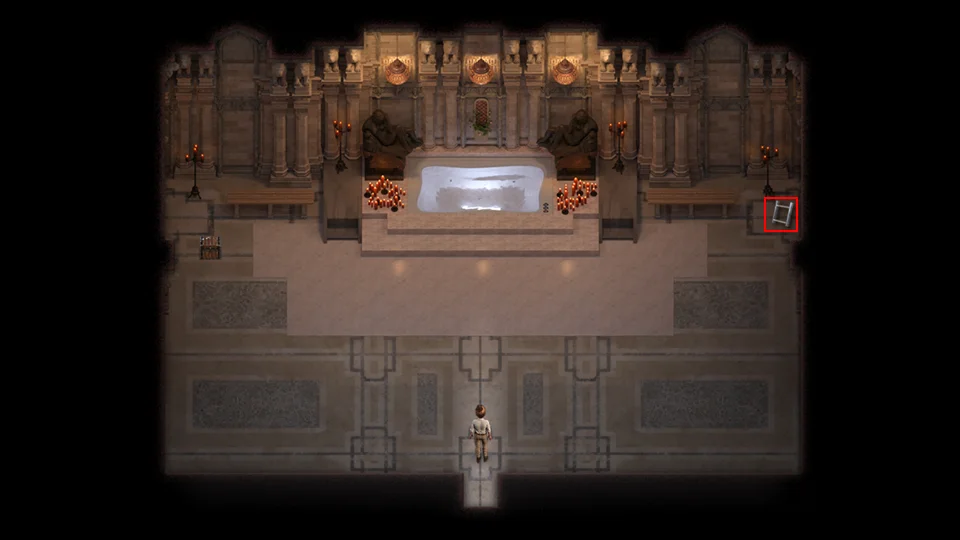
- Pick up the Ladder Segment.
- Go to the Storage Room on the first floor where you access the basement.
- Scene with Kaley and Sofia.
- Go to the Lighthouse.
- Go to the second fort room.
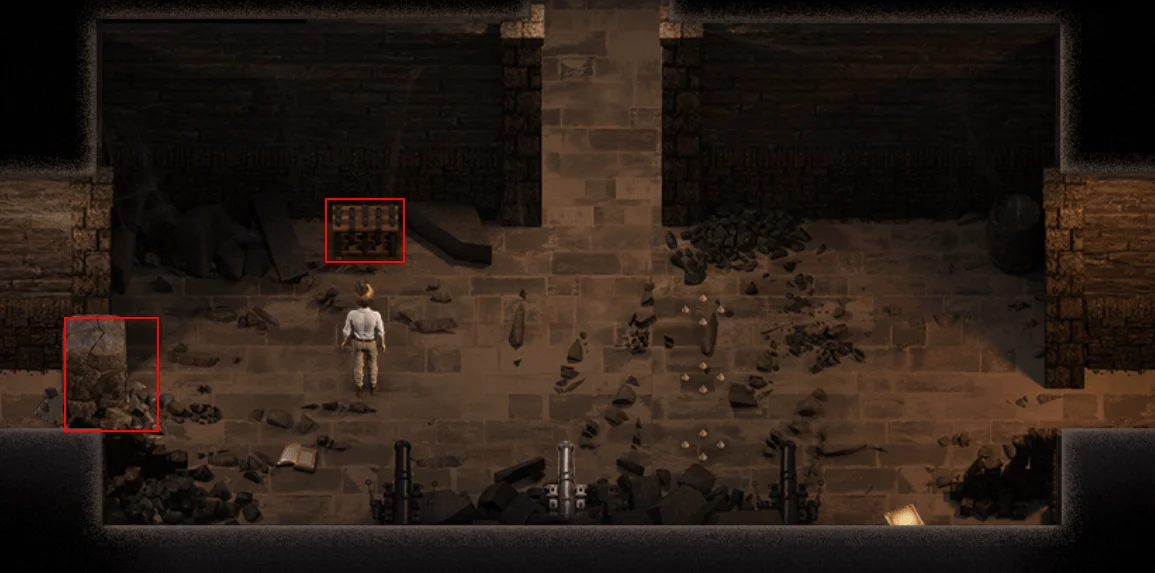
- Open the chest with a Chest Key.
- Pick up Kama Sutra – Jessica ♥♥♥♥♥ Sex.
- Use a Rock Bomb on the column blocking the path west (Left).
- Go into the new area.
- Open the chest with a Chest Key.
- Pick up Kama Sutra – Clare Face ♥♥♥♥.
- Read the book.


- Go through the north (Up) door.
- Use the Mysterious Key.
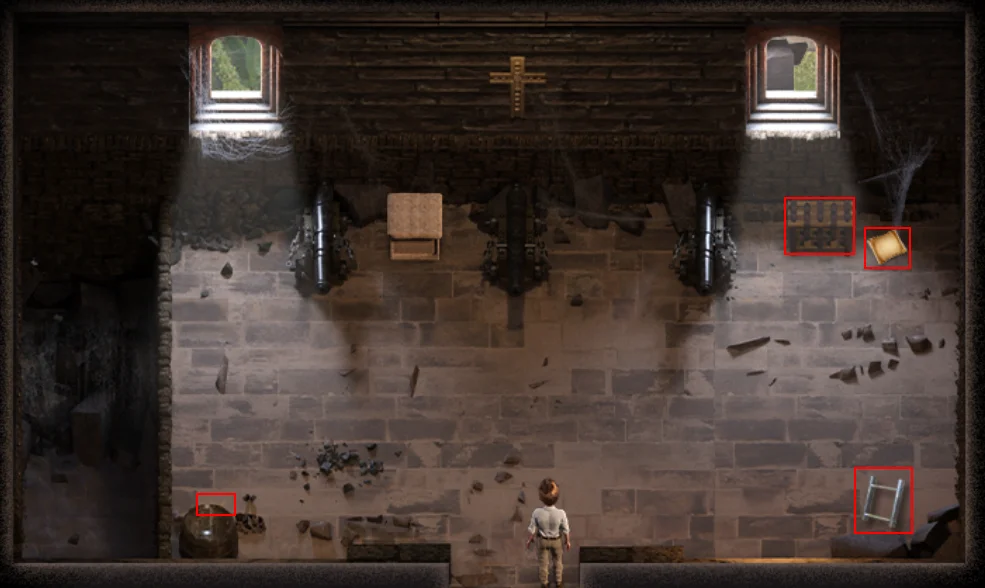
- Pick up the Ladder Segment.
- Read the crafting recipe (Penetrating Oil).
- Open the chest with a Chest Key.
- Pick up Kama Sutra – Madalyn Boobs & Butt.
- Click on the orange sparkle by the barrel.
- Receive Madalyn’s Profile.
- Go to Squallmart.
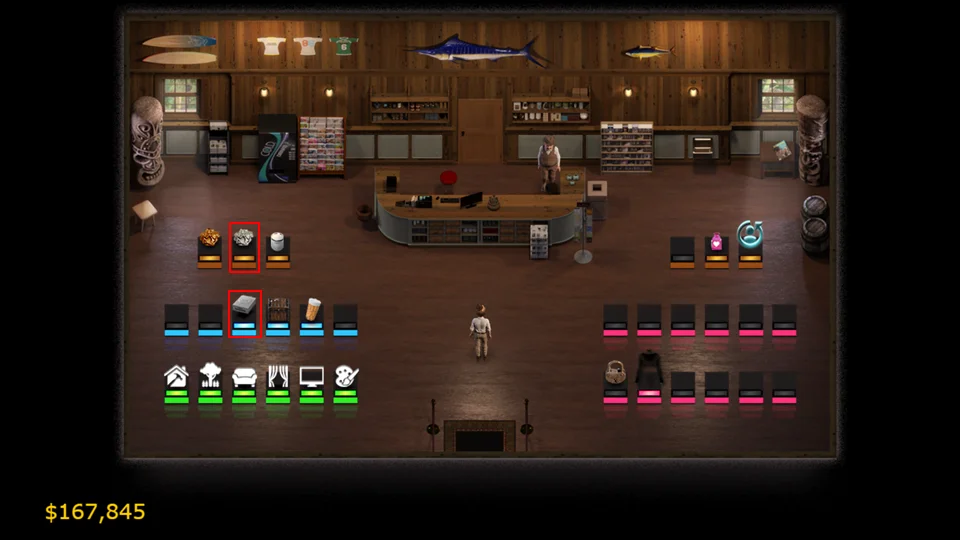
- Purchase the Encryption Scanner ($43,000).
- Purchase Silver Ore ($1,000).
- Go to the Shrine.
- Craft a Metal Ladder: Ladder Segment x 3 and Silver Ore.
- Receive Metal Ladder.
- Go to Deep Jungle 1 – 3.
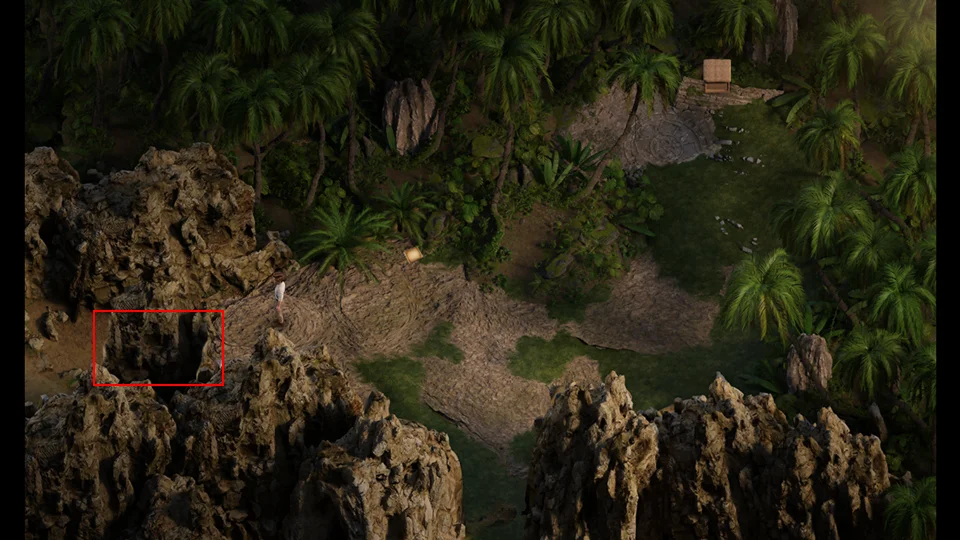
Use the Metal Ladder to cross the gap. You now have to make it back to town using the fewest steps possible. And, oh by the way, the fast travel teleporter isn’t working.
- East (Right)
- South (Down)
- South (Down)
- West (Left)
- South (Down)
- South (Down)
- East (Right)
- South (Down)
- Into the cave (East / Right)
- West (Left)
- South (Down)
- East (Right)
- East (Right)
- South (Down)
- Scene Clare, Diana, and Jessica.
- Go to the Mansion.
- Talk to Sofia
- Receive Storage Key.
- Receive Janet’s sixth heart.
- Scene with Janet.
- Go to the Spa room where you picked up the Ladder Segment.
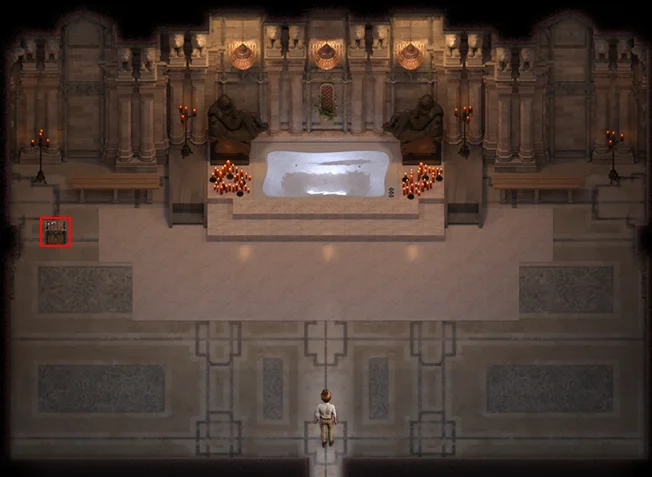
- Open the storage chest with the Storage Key.
- Receive Viper Antivenom x 3.
You cannot use your whip to kill these snakes. If you get bit by a snake and have Antivenom the snake will disappear. Once you run out of Antivenom you will have to retry what you were trying to do.
- Go to Estero Park.
- Go west (Left).
- Talk to Pricia.
- Scene with Janet and Pricia.
- Go to Estero State Park 4 – 2.
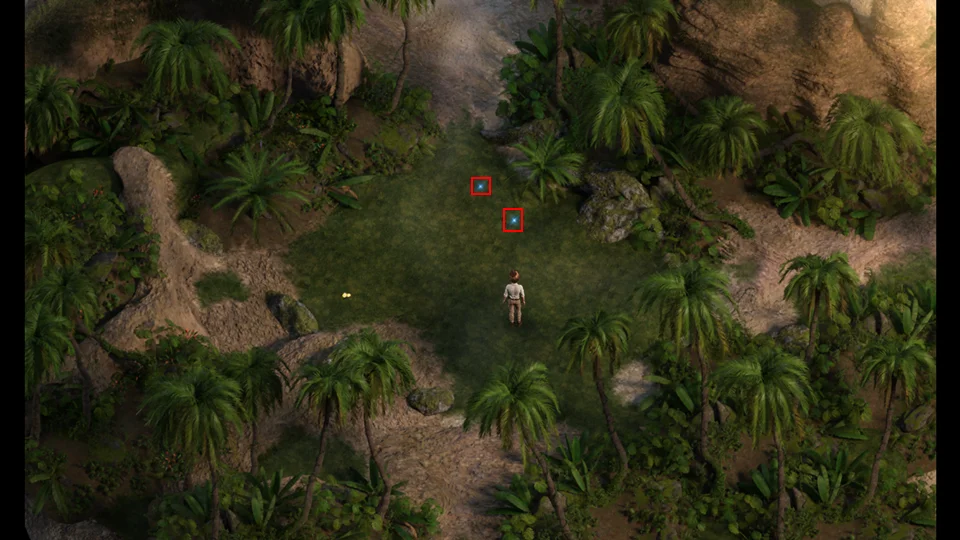
- Click on the sparkles.
- Receive Key Card and Old Bullet.
- Open your inventory and select the Old Bullet.
- Receive Loaded Musket.
- Go to the park entrance.
- Use the Teleporter.
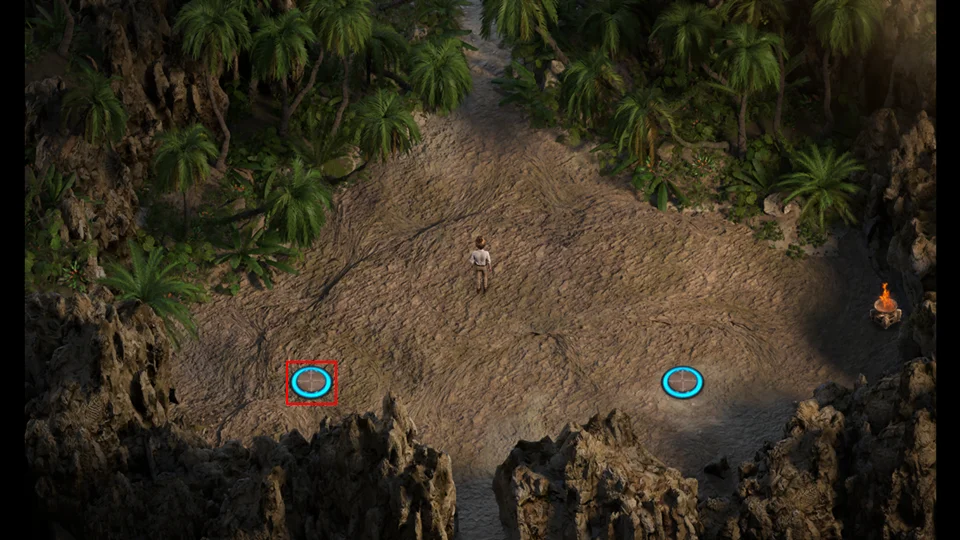
A new Teleporter has appeared to the left of the original Teleporter. The new Teleporter will take you to the outside of the Casula Temple where you were bitten by the viper. Use the new Teleporter.
- Pick up the Philweed Plant.
- Pick up the Sulphuric Acid.
- Go to Deep Jungle 1 – 1.
- Go east (Right).
- Go back to the Casula Temple entrance.
Now you can’t use your whip on these snakes you need to either outsmart them, or avoid them. While you have the antivenom you don’t want to use it if you don’t need it. Fortunately they aren’t as fast as the other snakes. Saving the game will reset the snakes.
- You need to lure the left snake down between the two stalagmites.
- Pick up the King’s Shovel Handle.
- Pick up the Clover Leaf.
The second snake is on a path and you just have to move when the snake is out of the way. The snake will not vary from its path. Watch the path it takes and time your move accordingly.
- Pick up the Crowbar.
- Open the Temple door with the Crowbar.
- Light the Dry Wood with your Lighter.
- Receive Fly Ash.
- Chase the mouse to the large center area. This will attract the snake.
- Go to where the snake was and pick the Philweed.
- Read the crafting recipe (Mystical Gas Mask)
- Go to the Library.
- Scene with Diana and Emily.
- Go to the Full Mast Bar.
- Go to the Cemetery.
- Scene with Alia, Kaley, Madalyn, and Tasha.
- Tasha’s sixth heart.
- Go to the Mansion.
- Go inside the Mansion using the middle lower door.
- Follow Sofia east (Right).
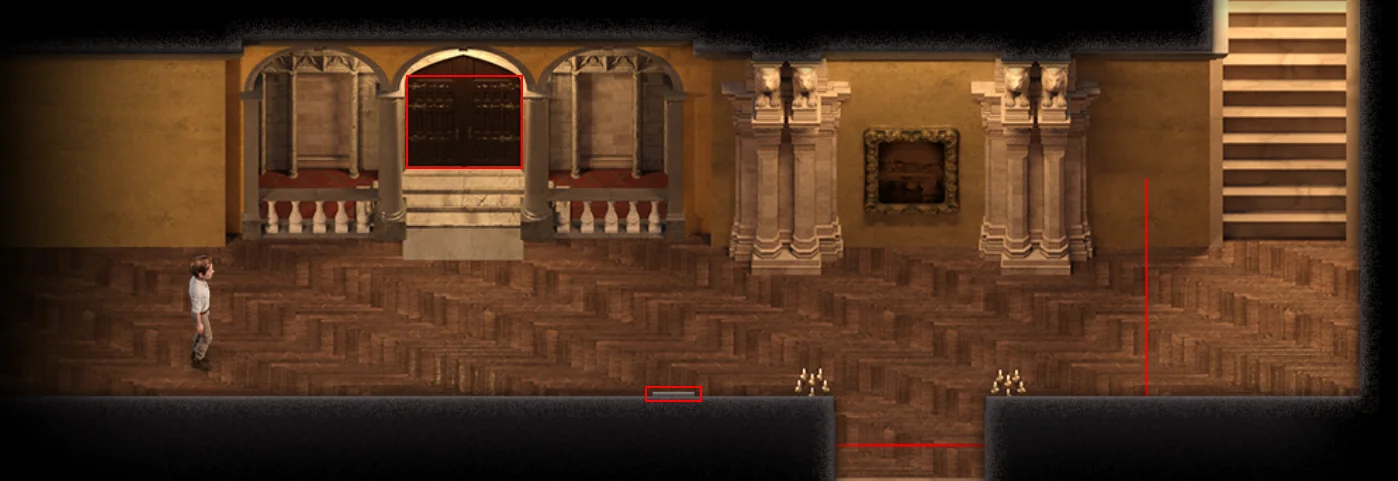
- Use the Crowbar on the security card reader.
- Receive System BIOS.
- Go north (Up) through the door.
- Receive Sofia’s phone number.
The Walkthrough – Part 13
- Exit the Mansion to the street.
- Re-enter the Mansion.
- Enter the Mansion.
- Follow Duncan east (Right).
- Go to the Full Staff Bar.
- Receive ID Card Writer.
- Go to the Shrine.
- Craft a Hacking Tool: Key Card, ID Card Writer, System BIOS, and Encryption Scanner.
- Receive a Hacking Tool.
- Craft a Four Leaf Clover: Clover Leaf x 4
- Receive a Four Leaf Clover.
- Go to where Ash is in the Park (Estero State Park 5 – 2).
- Talk to Ash.
- Go to Estero State Park 3 – 2.
- Scene with Clare.
- Receive Clare’s sixth heart.
- Go to Squallmart.
- Go to the Mansion.
- Go to the Pool.
- Talk to Naomi.
- Scene with Janet, Naomi, and Sofia.
- Go out the south (Down) door.
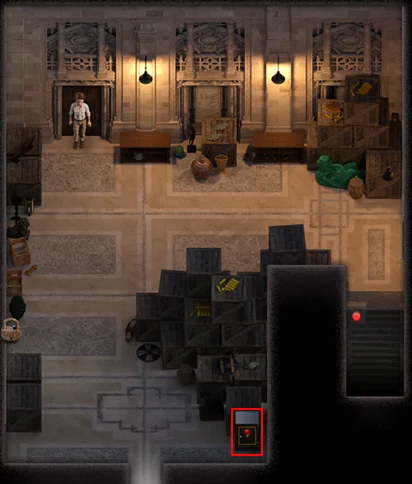
- Let’s try out our Hacking Tool on the safe.
- Receive Talisman of the Gods.
- Go to the Parlor.
- Talk to Pricia.
- Give Pricia the Talisman of the Gods.
- Earn Pricia’s sixth heart.
- Go to the Doctor’s Office.
- Go into the Examination room.
- Talk to Emily.
- Scene with Emily and Jessica.
- Let’s try our hacking tool on the locked door.
- Go into the new area.
- Click on the white sparkles.
- Receive Nitroglycerin.
- Receive Soap.
- Click on the black area to the right by the lamp.
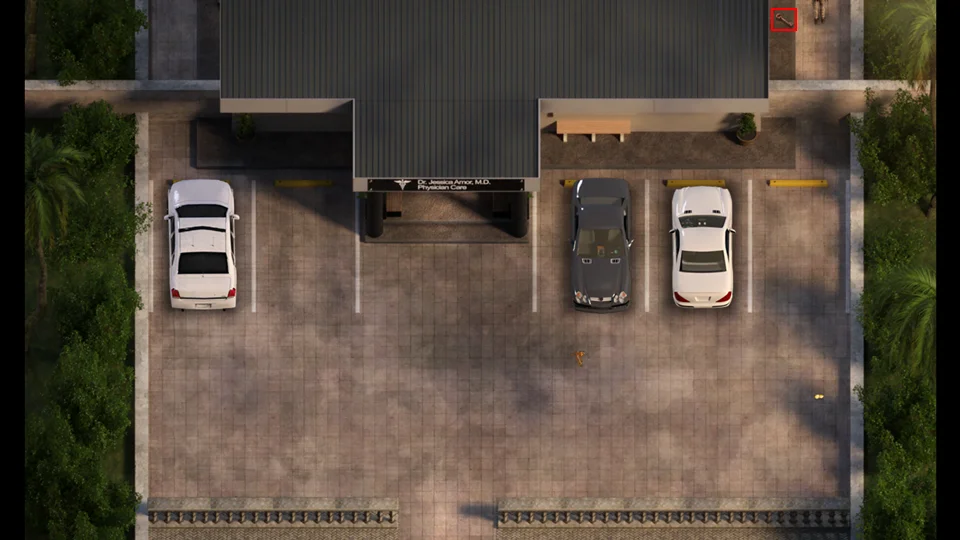
- You’ll get outside so that you can pick up the Chest Key.
- Click on the roof to get back into the building.
- You’re going to have to wait until after you finish the story to get the keys for the lockers.
- Go to the Shrine.
- Craft a Rock Bomb: Nitroglycerin, Basic Container, Silver Talisman, and Jade Talisman
- Receive a Rock Bomb.
- Go to Squallmart.
- Emily wants you to find Alia.
- Go to Estero Key.
- Go to the Church.
- Go to the Sewers under the Church.
- Go to Lost Underground 3 – 2.
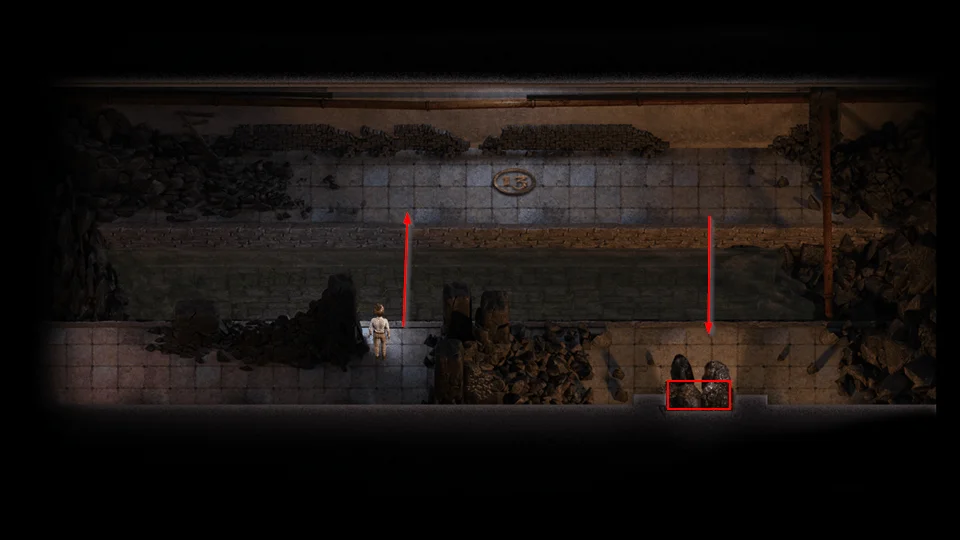
Use the Metal Ladder to bypass the blockage by going to the side with the 13 on it and then coming back on the other side of the blockage.
- Use the Rock Bomb on the rocks in the doorway.
- Go into the new area.
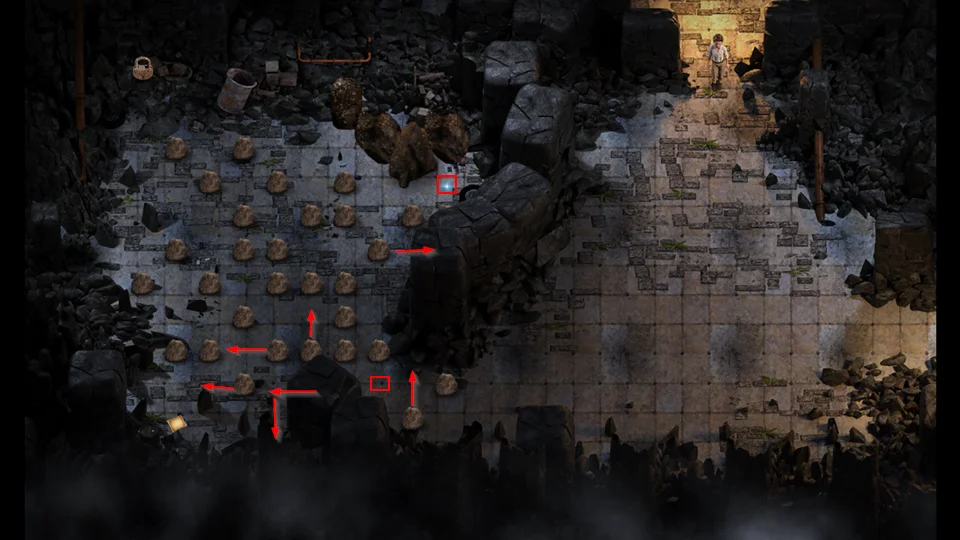
- Move the second rock up 1.
- Walk to the empty space.
- Walk left until you push a rock.
- Push the rock where you are standing up 1.
- Push the rock to your left, left 1.
- Push the rock below it left 1.
- Read the crafting recipe ???
- When you read the crafting recipe some of the rocks will disappear.
- Move the one rock to the right 1.
- Click on the sparkle.
- Use the Crowbar.
- Go east (Right)
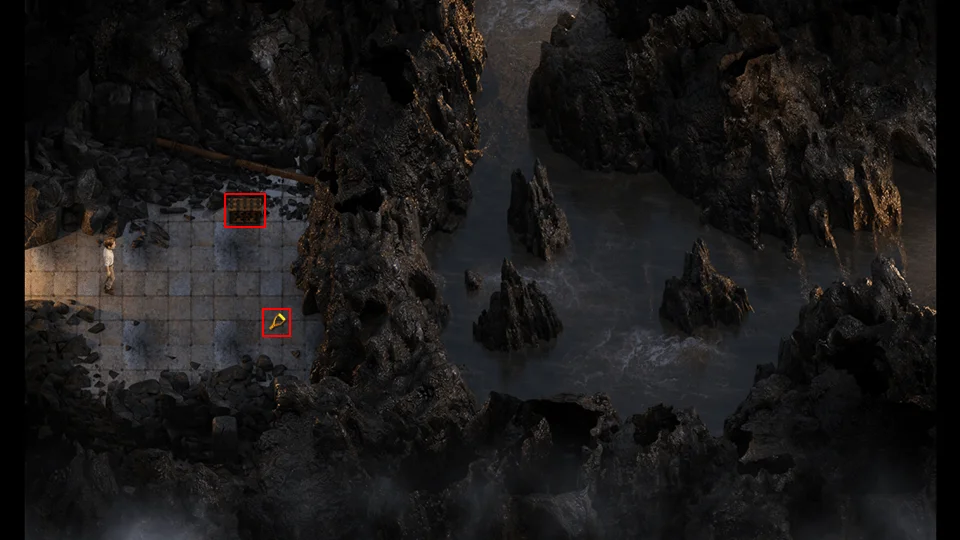
- Pick up God’s Shovel Handle.
- Open chest with Chest Key.
- Pick up – Kama Sutra – Sofia Snack Time.
- Go back up to the Church.
- Scene with Madalyn.
- Earn Madalyn’s sixth heart.
- Exit the Church to the street.
- Diana calls you on the Satellite Phone.
- Go to the Full Mast Bar.
- Go to Squallmart.
- Go to Estero Park.
- Scene with Clare, Diana, and Tasha.
- Go to the west (Left) with Clare.
These snakes are on a path and won’t chase you. You just need to time your moves so you don’t cross their path.
- Go up to the upper right corner.
- Go left to line up with the open column.
- Go down three pillars.
You next move will be to the pressure pad and it has to be timed for when the snake won’t be there.
Back to where you were before the pressure pad.
Then to the end of the last column on the left. There is a brief crossing the first snakes path, but you should be able to easily miss it.
- Then time your move to the bottom left corner.
- You should hear a click and rocks falling.
- Walk up and activate the pressure plate.
- All of the snakes will disappear.
- Move up the wall to break the Jar with your Pickaxe.
- Receive a Talisman of the Gods.
- Return to the entrance and then go east (Right) to where Diana and Tasha went.
- Same thing as the room with Clare. These snakes are on a path and won’t chase you.
- Walk up to the base of the large pillar.
- Time your run to the wall.
- Go along the wall until you are above the pressure plate.
- Activate the pressure plate.
- Return up to the wall.
- Walk across to the large pillar to on the right side of the door.
- You can walk down the center of the right hand path.
- Line yourself up with the pressure pad.
- When the coast is clear run down and activate the pressure pad.
- All of the snakes will disappear.
- Break the Jar.
- Click on the back of the middle column on the far right.
- You should hear a click and rocks falling.
- Receive a Talisman of the Gods.
- Go to Casual Temple 2 – 2.
- Pick up the Chest Key.
- Go to the Mansion.
- Receive Alia’s Phone
- Go to the Library.
- Scene with Alia, Emily, Janet, and Kaley.
- Go to the Parlor.
- Go to Estero Park.
- Scene with Jessica and Pricia.

- Activate the pressure pads in this order.
- Bottom Right
- Top Left
- Bottom Left
- Top Right
- The wall blocking the key will go away.
- I was able to just run up the middle and pick up the Temple Key Segment.
- The snakes in the center portion go away.
- Receive Nitroglycerin.
- Go to the Shrine.
- Craft a Rock Bomb: Jade Talisman, Silver Talisman, Nitroglycerin, and a Basic Container.
- Receive a Rock Bomb.
- Go to Squallmart.
- Go to the Church.
- Talk to Janet.
- Scene with Janet and Madalyn.
- Go to the Mansion.
The Walkthrough – Part 14
- Go to Estero Key.
- Go into the House.
- Go into Sam and Naomi’s Bedroom.
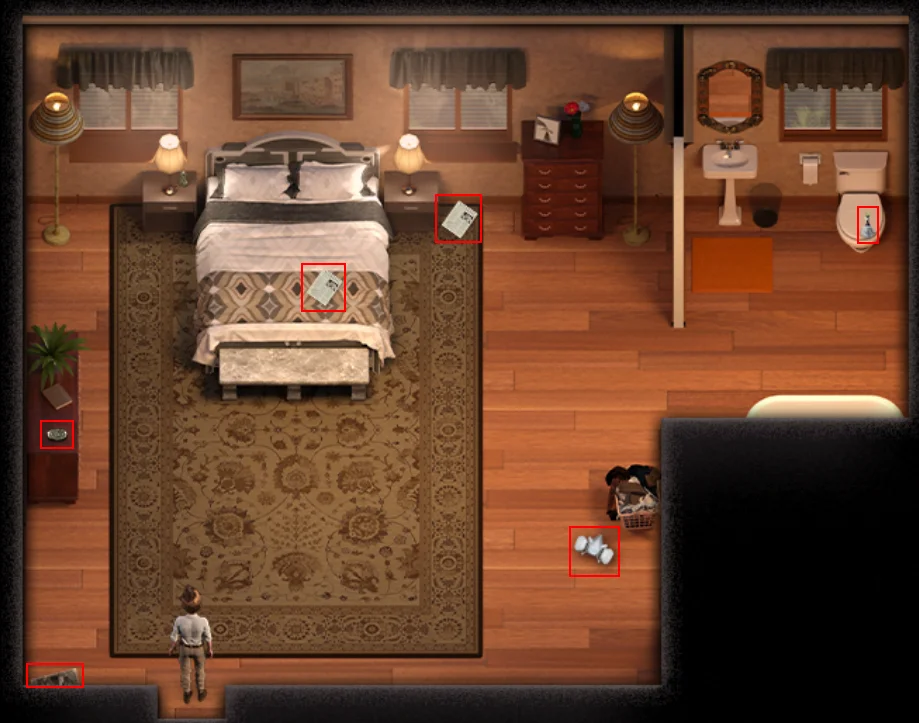
- Pick up Painter’s Mask.
- Pick up Nail Polish Remover.
- Read newspapers.


- Pick up Pirate Medallion.
- Pick up Old Map. Map will not be here if you already picked up the Chest Key it is for.
- Go to the Shrine.
- Craft a Mystical Gas Mask: Painter’s Mask, Fly Ash, Super Goggles, and a Grand Talisman.
If you don’t have a Grand Talisman you can either craft one, Gold Ore x 3 and a False Talisman, or hunt the Jungle for one.
- Receive a Mystical Gas Mask.
- Go to the Library.
- Go into the Library Basement.
- Enter the green gas.
- Use your Mystical Gas Mask.
- Open the chest with a Chest Key.
- Pick up Kama Sutra – Madalyn Bite Job.
- Use the Metal Ladder to cross to the other side.
- Click on the orange sparkle.
- Receive Sofia’s Profile.
- Use the Metal Ladder again to cross to the other side.
- Use your Pickaxe on the weak area of the floor.
- Receive King’s Shovel Head.
- Cross back to the other side.
- Go east (Right).
- Open the chest with a Chest Key.
- Pick up Kama Sutra – Diana Anal Sex.
- Cross to the other side.
- Light the torch with your Lighter.
- Cross back to the other side.
- Go west (Left).
- Go south (down), into the light.
- Go upstairs.
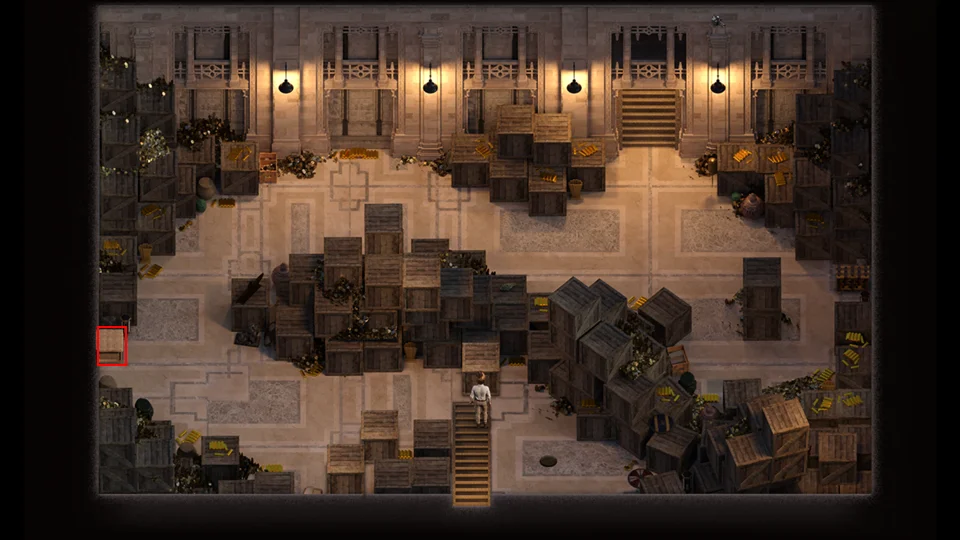
- Use the Crowbar on the crate.
- Receive Grand Talisman.
- Go upstairs.
- Use the north (Up) door.
- Use the north (Up) door.
- Scene with Alia, Naomi, and Sofia.
- Receive Sofia’s fifth heart.
- Exit the room.
- Go west (Left).
- Go east (Right).
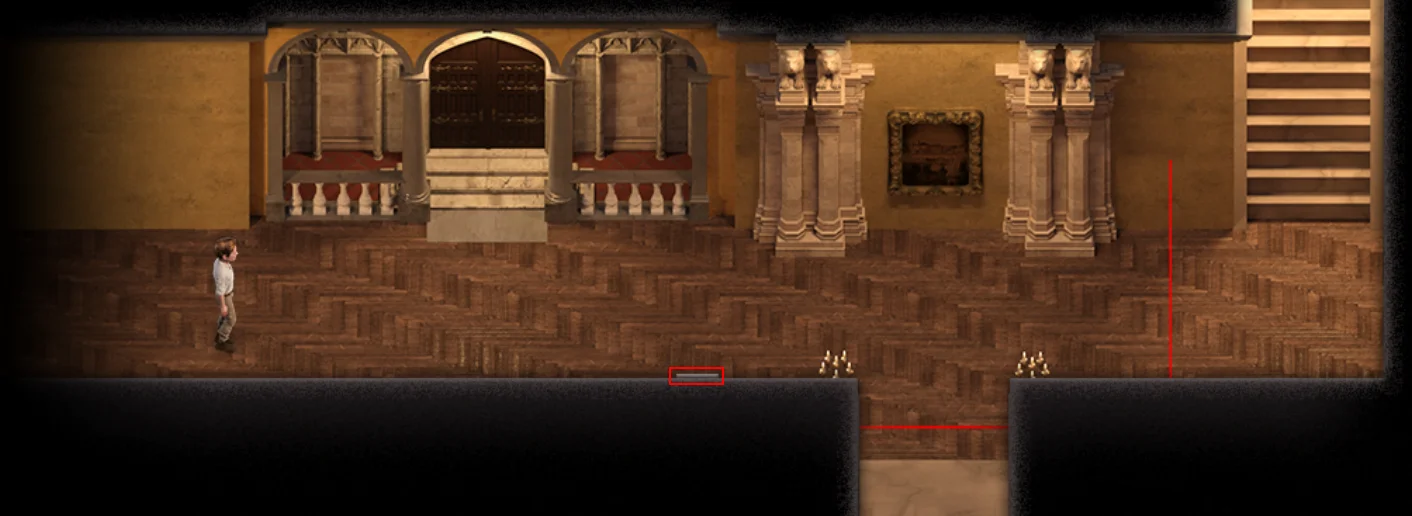
- Use the Hacking Tool on the security card reader.
- Go upstairs.

- Go in the hole in the wall.
- Use your Pickaxe on the weak area of the wall.
- Go downstairs.
- Go downstairs.
- Open the chest with a Chest Key.
- Pick up Kama Sutra – Janet ♥♥♥♥♥ Sex.
- Open the two supply chests.
- Receive Viper Antivenom.
- Go to Estero Key.
- Go to Squallmart.
- Go to Janet’s Home.
- Go to the Full Mast Bar.
- Go to Estero Park.
- Scene with Clare, Diana, and Kaley.
Push Clare, Diana, and Kaley up to the pressure pads at the top. Then stand on the remaining pressure plate.
The puzzle gets easier every time you reset it by leaving the room.
All of the rocks and the snakes on top will disappear when all four pressure pads are activated.
- Go to the Lighthouse.
- Scene with Janet.
- Go to Estero Park.
- Use the Teleporter.
- Use the other Teleporter to return to the Temple.
- Go to Casula Temple 2 – 2.
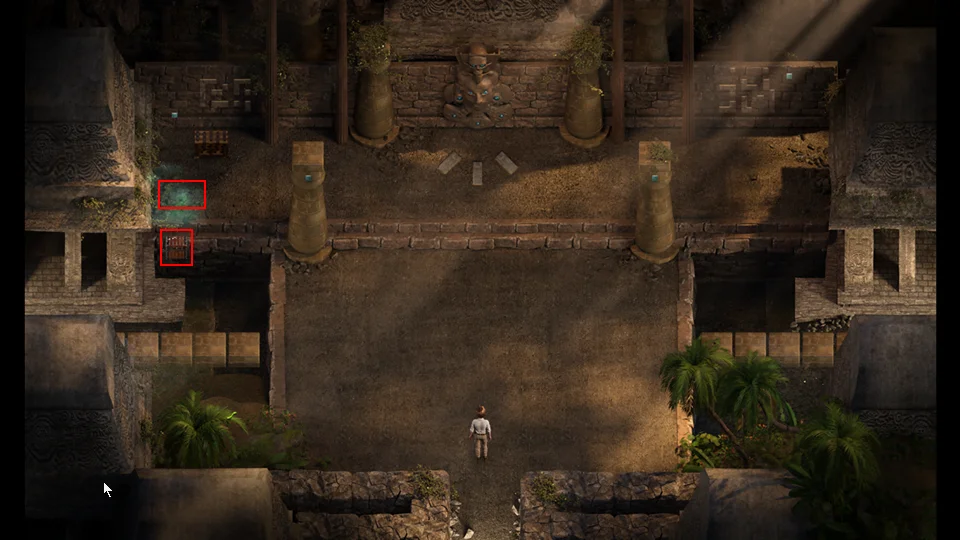
- Go to the green gas.
- Use your Mystical Gas Mask.
- Open the Supply Crate.
- Receive Viper Antivenom.
- Go to Casula Temple 1 – 3.
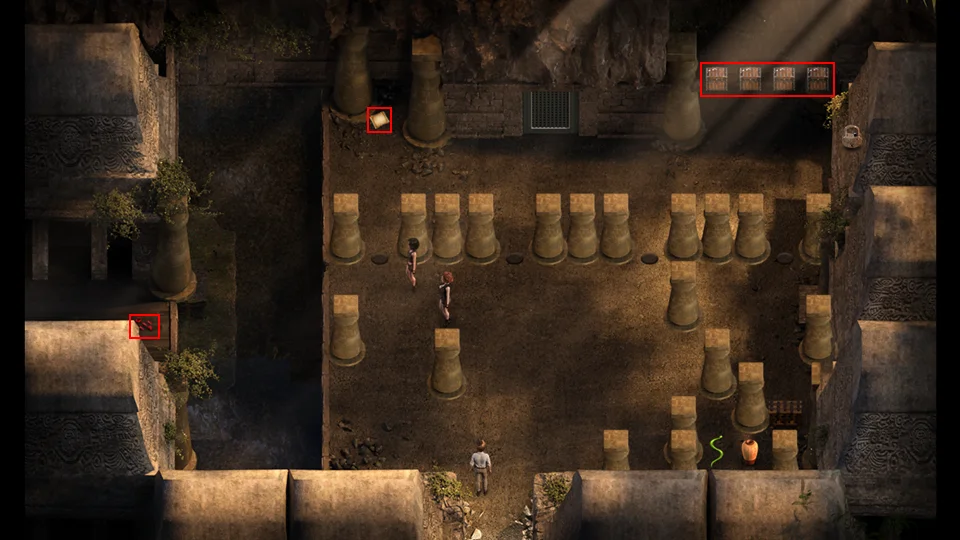
- Use your Whip to get the Temple Key Segment.
- Read the crafting recipe (Nitroglycerin).
Open the Supply Chests. You’ll notice that the cost is exactly what they sell for and you can open them multiple times. So, if you sold your talismans previously and still have the money you can buy them back if you need them. The last chest you will receive a Rock Bomb for the Nitroglycerin, so you don’t need a Jade Talisman, Silver Talisman, and Basic Container to craft them any more, just come here and pick one up.
- First chest costs $12,000 to open.
- Receive Grand Talisman.
- Second chest costs $36,000 to open.
- Receive Royal Talisman.
- Third chest costs $144,000 to open.
- Receive Talisman of the Gods.
- Fourth chest costs a Nitroglycerin to open.
The Walkthrough – Part 15
Go to Casula Temple 2 – 3.
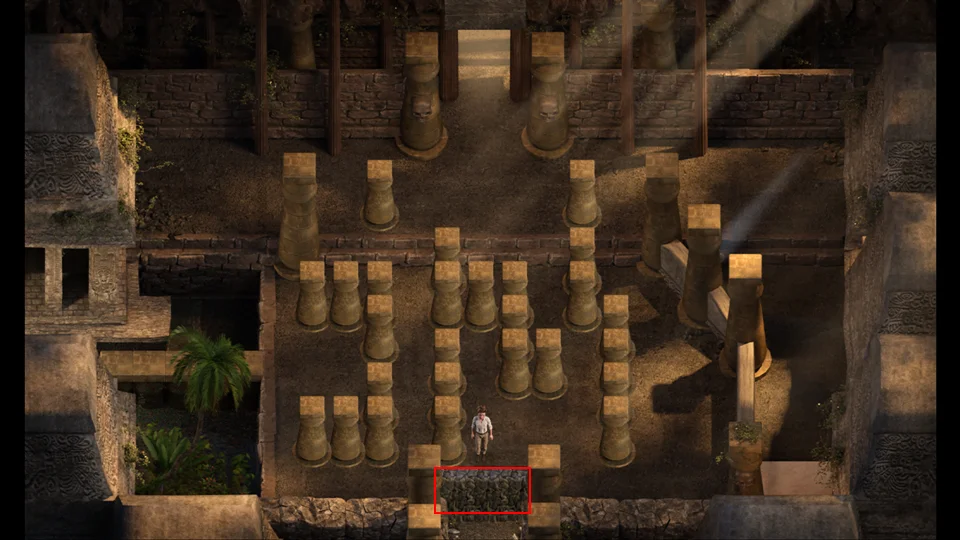
- Use a Rock Bomb to destroy the rock wall to the south (Down)
- Go into the new area.
- These are all path snakes, so we just need to outsmart or avoid them.
- While avoiding the snake patrolling the the top, move the far right rock down 3.
- Trap the left snake by pushing the third rock in the middle to the left when the snake is up top.
- Push the center rock down 1 when the bottom snake is on the left side.
- Push the right rock right 1.
- Go down and push the rock to the left when the snake is up.
- Pick up the Temple Key Segment.
- The center snakes will disappear with most of the rocks.
- You can get to the supply chests on the sides by sliding the top rock to the outside one.
- Next push the center rock over to line up with the chest.
- Then push it down.
- The snake moves fast, so if you trap it on the inside, towards the center, you will need to reset.
- If you trap the snake on the outside push the rock towards the snake so that you can get to the chest.
- Each chest contains a Viper Antivenom, which you shouldn’t need, but is here if you need it.
- Break the Jars on the left and right with your Pickaxe.
- Receive Talisman of the Gods.
- Receive Stone Talisman.
- Read the book. The book will not be here if you picked up the Chest Key at the Casula Temple entrance (Deep Jungle 1 – 2).

- Pick up the Gold Coins in the room.
- Exit the Temple.
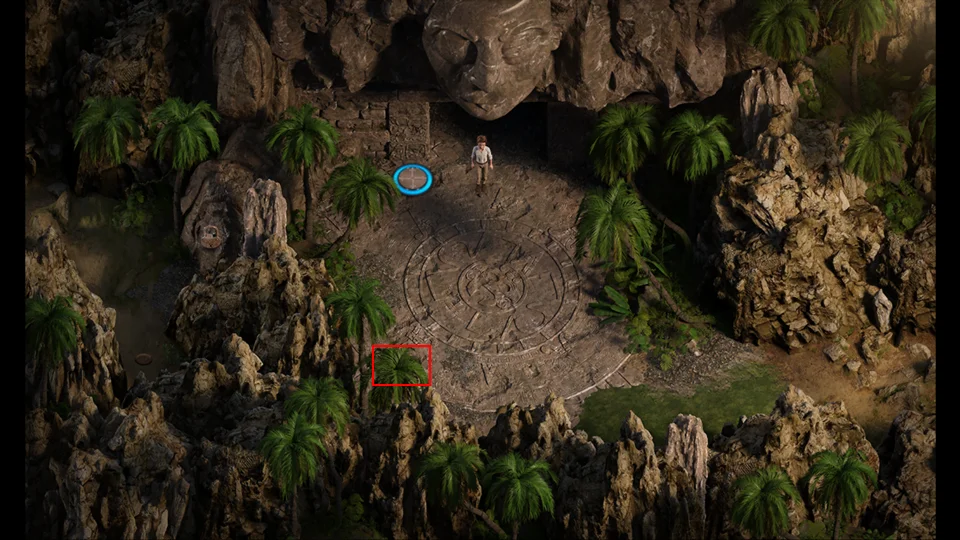
- Click on the ground under the palm tree and break the weak ground with your Pickaxe.
- Receive a Chest Key.
- Go to the Full Mast Bar.
- Talk to Albert.
- Receive Nitric Acid.
- Go to the Shrine.
- Craft Nitroglycerin: Soap, Nitric Acid, Sulphuric Acid, and a Basic Container.
- Receive Nitroglycerin x 2.
- Go to the Doctor’s Office.
- Go to the Break Room (right door).
- Talk to Jessica.
- Give her the Nitroglycerin.
- Talk to Jessica.
- Scene with Jessica.
- Receive Jessica’s sixth heart.
- Go to Estero Park.
- Take the Teleporter.
- Take the Temple Teleporter.
- Go to Casula Temple 1 – 3.

- Open the supply chest that requires Nitroglycerin to open.
- Receive a Rock Bomb.
- Go to Casula Temple 2 – 1.
- Click on the southwest wall.
- Use a Rock Bomb to destroy the rock wall to the south (Down).
- Go south (Down) to the new area.
- This puzzle looks hard, but is very easy. Walk on the cockroaches to get to the key.
- Once you get the key all of the rocks disappear and you can use your Pickaxe on the Jars.
- Use the cockroach path to get to the supply chests. Each chest contains a Viper Antivenom.
- Now you have all four parts of the Temple key.
- Go to the Shrine and craft the Temple Key: Temple Key Part x 4.
- Receive Temple Key.
- Return to the Temple.
- Go to Casual Temple 1 – 3.
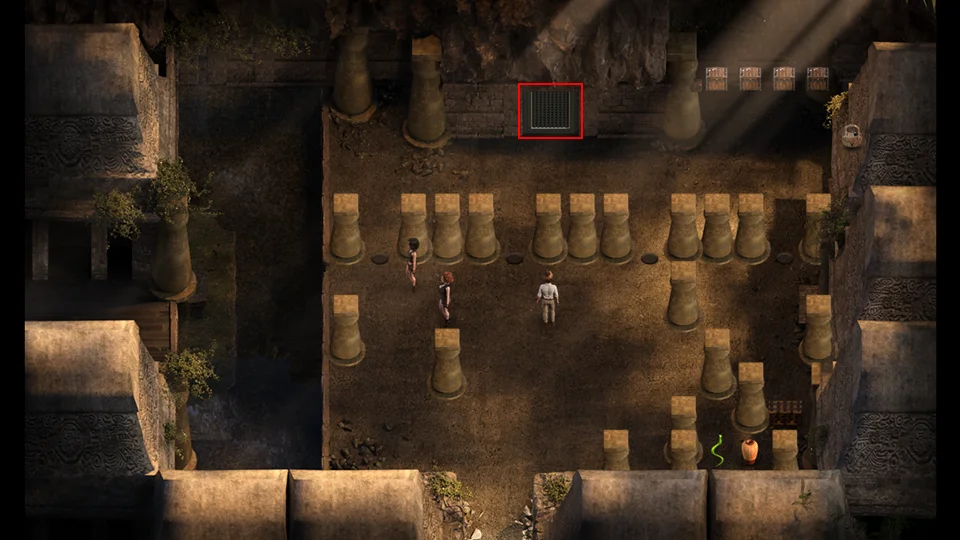
- Open the door with the Temple Key.
- Take the path to the new area.
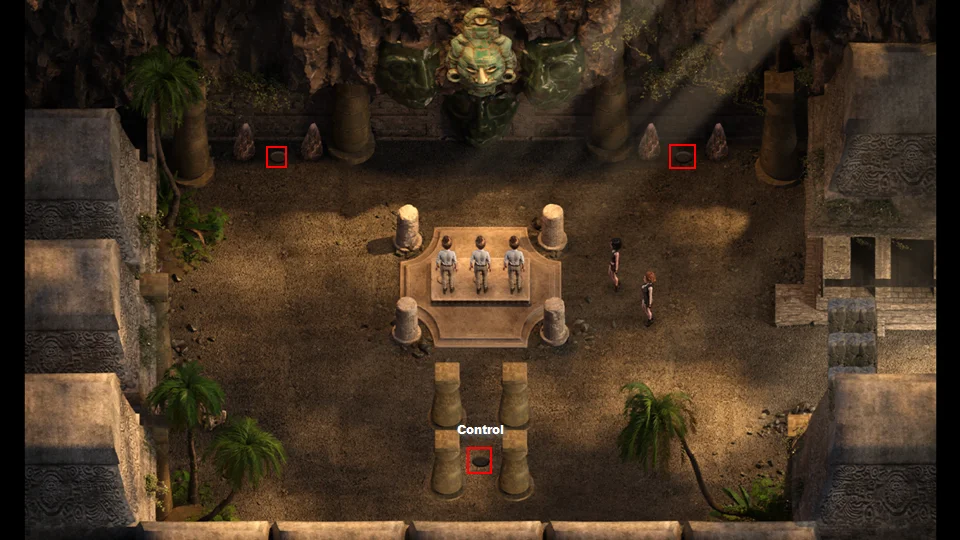
You turn into three images. You control the center image. You will notice that your clones will face the same direction you face. When you stand on the control button they will move in that direction. They will stop moving when you step off the button. You have to guide them to the two pressure pads.You might want to change the move speed to normal for this.
- Go to Janet’s Home.
- Talk to Janet.
- Go to Estero Key.
- Talk to Naomi.
- Go to the Mansion.
- Go in the top door.
- Go to Estero Park.
- Scene with Janet, Naomi, and Sofia.
- Go to the Mansion.
- Go to Estero Key.
- Go into the house.
- Go to Squallmart.
- Talk to Alia
- Go to Estero Park.
Stop picking up the $5 and $100 gold coin piles you find. You’ll want to have a lot of them laying around when you craft the Gold Compass.
- Talk to Ash.
- Go to Estero State Park 4 – 4.
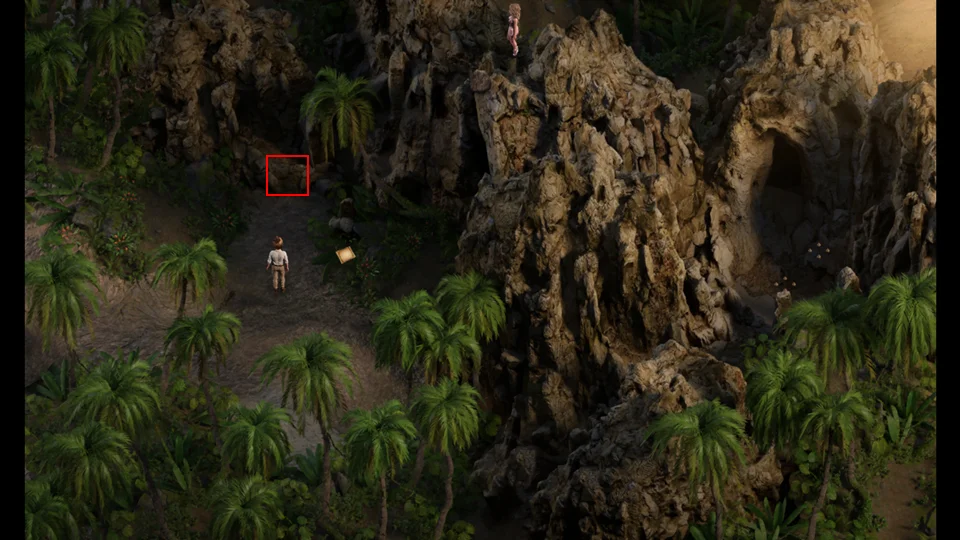
- Use your Grappling Hook to climb up.
- Click on Kaley and use your Metal Ladder to walk across.
- Go right back to were Kaley was standing.
- Pick up Kama Sutra – Clare Anal Sex.
- Go to Estero State Park 4 – 3.

- Open chest with Chest Key
- Pick up Kama Sutra – Pricia Face Sitting
- Go Home.
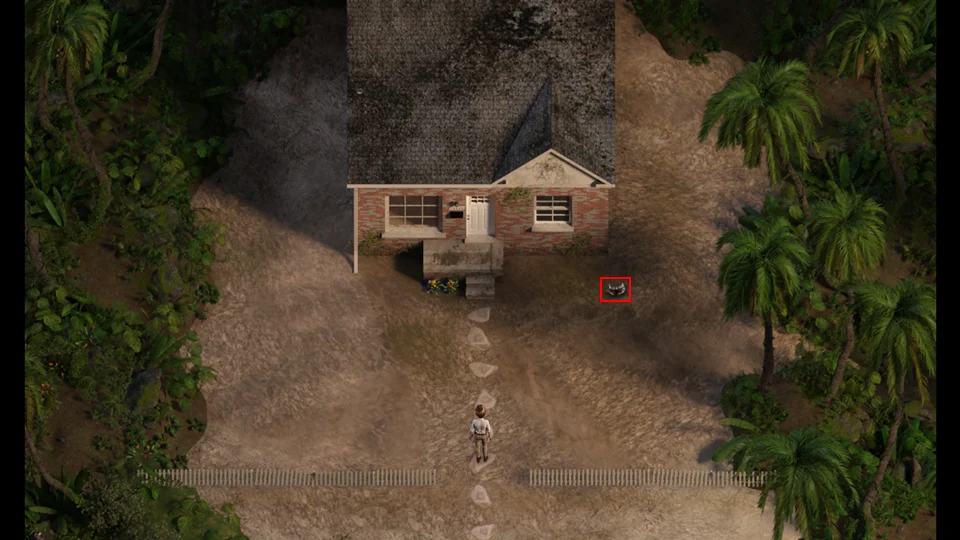
- Pick up Tasha’s Shorts.
- Go inside.
- Go to the Full Mast Bar.
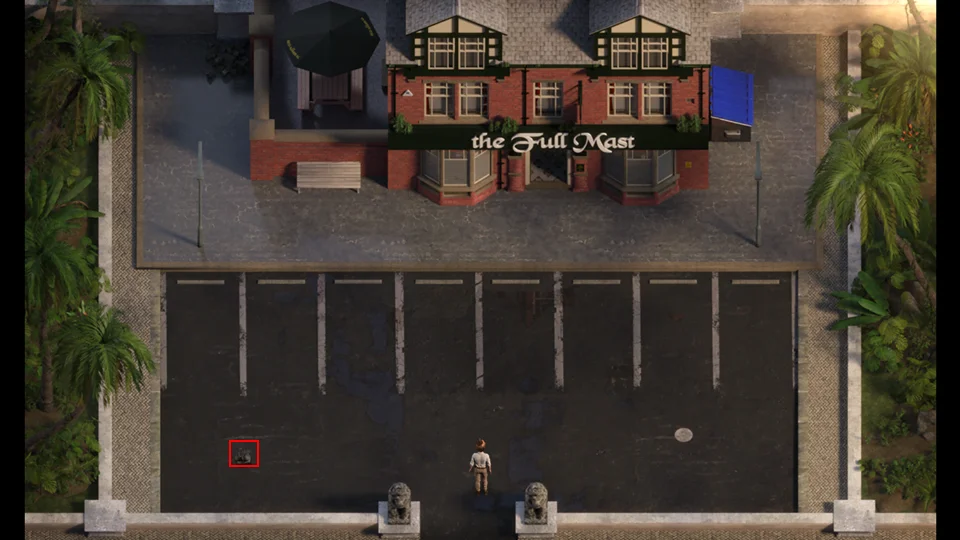
- Pick up Tasha’s Top.
- Go inside.
- Go to the Women’s Restroom.
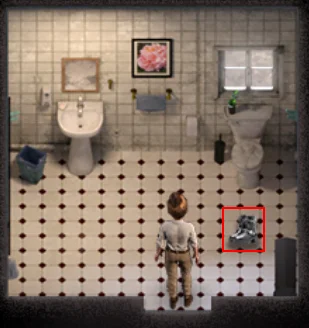
- Pick up Tasha’s Boots.
- Go Home.
- Go inside and give Tasha her clothes.
- Go to the Doctor’s Office.
- Scene with Alia, Emily, Jessica, Kaley, Pricia, and Tasha.
- Go to the Mansion.
- Go in the center door on the bottom.
- Go to the third floor in the back
- Use your Pickaxe on the weak floor in the area between the two doors.
- Receive a Chest Key.
- Enter the left door.
- Scene with Sofia.
- Earn Sofia’s sixth heart.
- All hearts now collected.
- Go to Janet’s Home.
- Go to Squallmart.
- Talk to Alia.
- Go to Squallmart.
- Go inside.
- Scene with Pricia and Jessica along with Valerie and Katherine.
- Go outside.

- Collect the Transmission Fluid.
- If you have an Aloe Plant go to the Shrine.
- If you need an Aloe Plant go to Deep Jungle 1 – 3 or Deep Jungle 2 – 1 and then go to the Shrine.
- Craft Penetrating Oil: Nail Polish Remover, Aloe Plant, Transmission Fluid, and a Basic Container.
- Receive Penetrating Oil.
- Go to the Cemetery.
- Enter the Crypt.
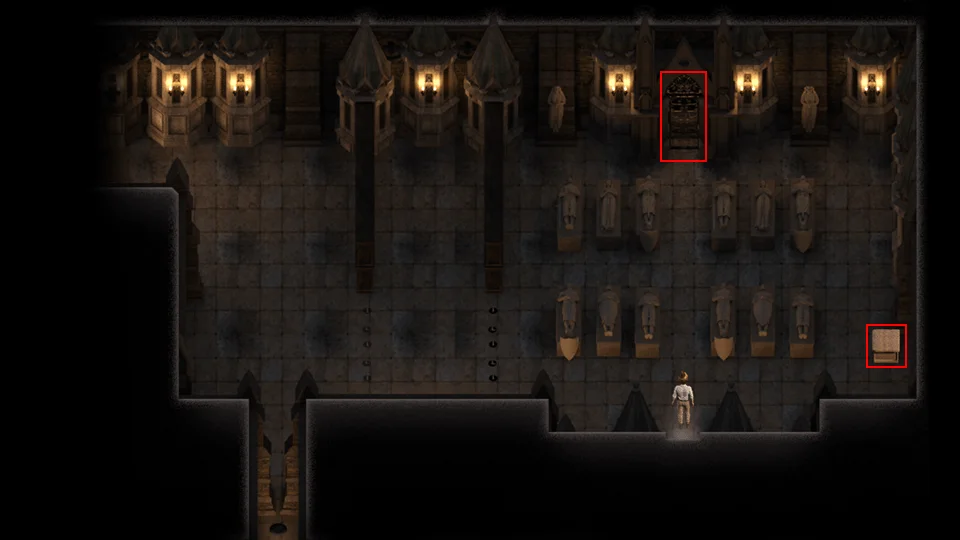
- Use your Crowbar on the crate.
- Receive King’s Shovel Shaft.
- Open the door, use the Penetrating Oil.
- Scene with Janet and Madalyn.
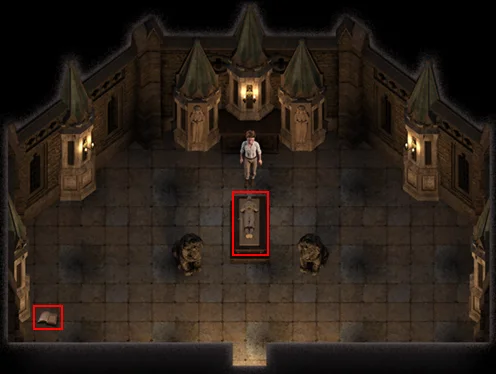
- Read the book.


- Open the casket.
- Use the Crowbar.
- Receive Priest’s Compass.
If you have Caulli’s Coin go to the Shrine and craft the King’s Shovel: King’s Shovel Head, King’s Shovel Shaft, King’s Shovel Handle, and Caulli’s Coin.
- Go to the Lighthouse.
- Go into the Fort.
- Go into the rooms and Click on the flashing blue dots.
- The only one that is not obvious is in the room with the Cross and the cannon.
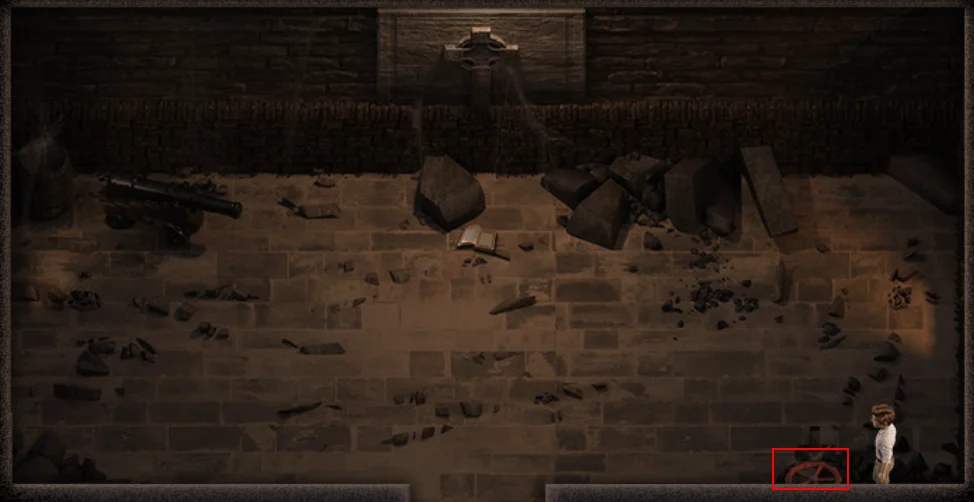
- Return to the group.
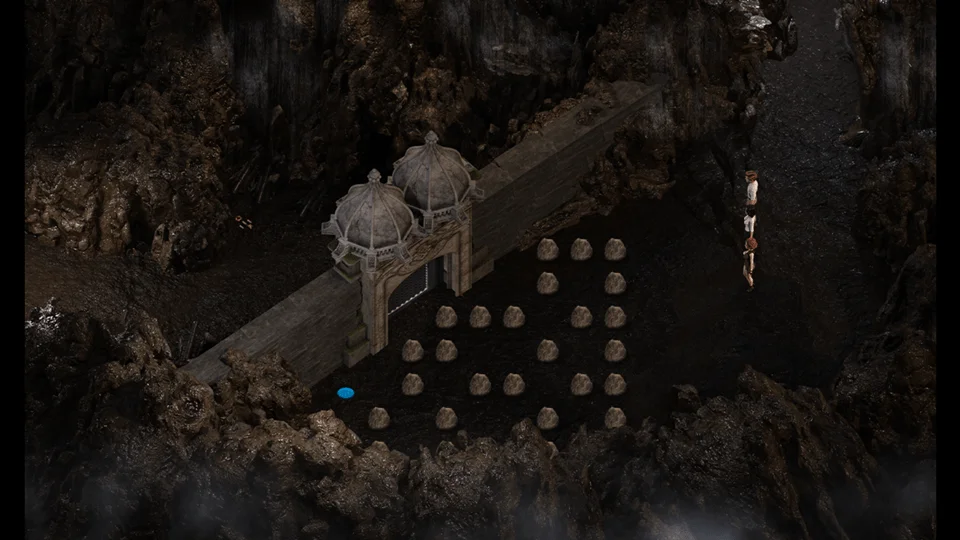
The rock puzzle gets easier each time you leave the room. Push the rocks to try to get to the blue circle. If you fail leave the room and come back and there will be fewer rocks.
- Open the door with the Priest’s Compass.
- Scene with Alia, Clare, Diana, Janice, and Kaley.
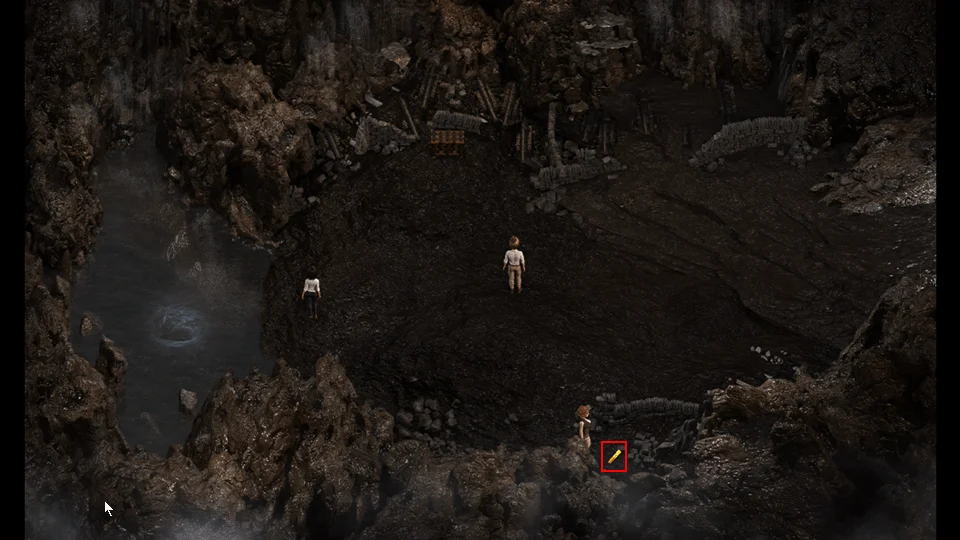
- Pick up God’s Shovel Shaft.
- Go back and check on the girls.
- Scene with Alia, Clare, Diana, Jessica, Kaley, Madalyn, and Sofia.
- Go upstairs.
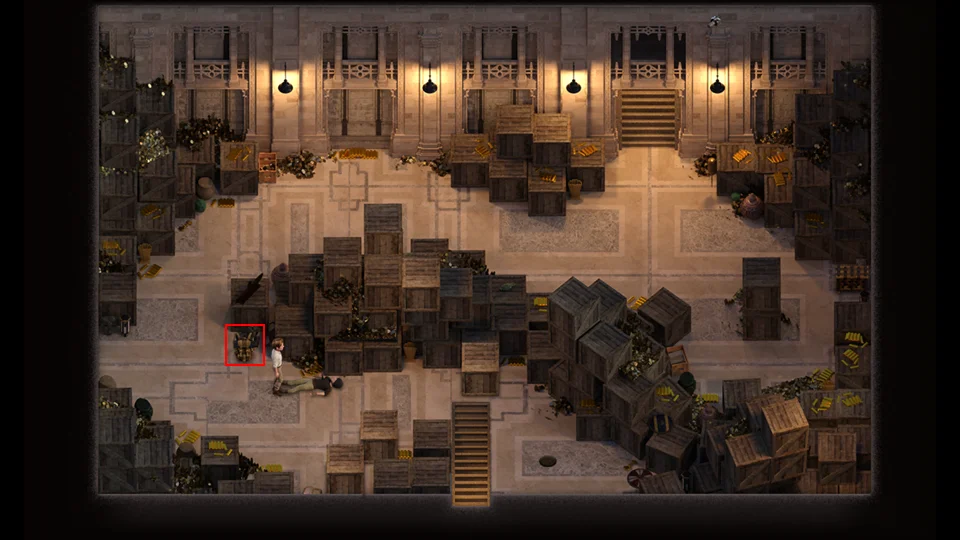
- Search Joey’s backpack.
- Receive a Rock Bomb.
- Go downstairs.
- Scene with Evie.
- Go to Janet’s Home.
- Go to the Doctor’s Office.
- Go to the Mansion.
- Enter via the lower center door.
- Go to the Beach.
- Scene with Alia, Clare, Diana, Emily, Janet, Jessica, Kaley, Naomi, Pricia, Sofia, Tasha
- The main story line is now complete.
Empty Pocket – Extras
After you finish the main story you will lose the Soul Crystal, and Evie’s help. The Soul Crystal is replaced with the Empty Pocket.

The bottom of the screen will show you what you’re missing.
Hearts – Should be 72/72 when you complete the story.
Pages – Kamasutra pages, five per woman, four solo and one threesome.
Booty Calls – You must have a solo booty call with each woman, threesome doesn’t count.
Extras – Things you find or buy.
- Photo – Dr. Jessica Amor
- Photo – Mother Superior
- Photo – Diana & The Jade Talisman
- Photo – Sofia Leaving the Library
- Photo – Clare Hunting for Treasure
- Naomi’s Profile (Estero State Park 4 – 1)
- Photo – Naomi on the Beach
- Photo – Emily Took by Surprise
- Pricia’s Massage Oil Flyer
- Photo – Tasha’s Rage
- Emily’s Profile (Caverns 4 – 2)
- Photo – Alia and Naomi
- Photo – Tipsy Janet
- Pricia’s Profile (Full Mast Bar Overflow area)
- Photo – Kaley on the Beach
- Photo – Naomi’s Selfie
- Photo – Janet in the Hot Tub
- Photo – Pricia & Naomi
- Kaley’s Profile (Estero State Park 1 – 2)
- Photo – Jessica’s Glazed Ass
- Photo – Emily’s Cute Butt
- Photo – Tasha’s ♥♥♥♥♥
- Photo – Alia’s ♥♥♥♥♥
- Diana’s Profile (Deep Jungle 3 – 2)
- Tasha’s Profile (Caverns 1 – 3)
- Clare’s Profile (Estero State Park 2 – 3)
- Photo – Diana the Explorer
- Jessica’s Profile (Estero State Park 1 – 3)
- Alia’s Profile (Estero State Park 4 – 2)
- Janet’s Profile (Caverns 2 – 5)
- Photo – Janet in White
- Diana’s Bonus Profile
- Photo – Naughty Emily
- Alia’s Bonus Profile
- Kaley’s Bonus Profile
- Naomi’s Bonus Profile
- Emily Bonus Profile
- Madalyn’s Profile (Fort behind Mysterious Key Door)
- Janet’s Bonus Profile
- Tasha’s Bonus Profile
- Clare’s Bonus Profile
- Pricia’s Bonus Profile
- Madalyn’s Bonus Profile
- Sofia’s Profile (Lost Underground 1 – 3)
- Jessica’s Bonus Profile
- Sofia’s Bonus Profile
- Photo Madalyn’s ♥♥♥♥♥ (Lost Underground 4 – 2)
- Photo – Pricia & Jessica (Doctor’s Office Locker 1)
- Photo – Jessica in College (Doctor’s Office Locker 3)
- Photo – Nadia’s Treasure (Caverns 2 – 1 Whirlpool)
- Photo – Mother & Daughter (Mansion 3rd floor Locked Bedroom)
- Photo – Tasha in the Jungle (Mansion 2nd floor Locked Bedroom)
- Photo – Diana on Your Bed (Below Fountain of Youth)
- Photo – Evie’s Ass (Complete 20 Ancient Puzzles)
- Photo – Evie on the Shrine (Complete 30 Ancient Puzzles)
- Photo – Evie Spots a Storm (Complete 40 Ancient Puzzles)
- Evie’s Profile (Complete 49 Ancient Puzzles)
- Topless Evie (Guy in Squallmart Parking Lot)
- Evie’s Nude Profile (Limbo / Evie’s Profile required)
- Photo – Succubus Madalyn (Must have 59 extras and have crafted ???)
Outfits – Each woman has their own outfit available for purchase from Squallmart.
Treatments – Jessica has seven different treatments for you.
- Scorpion Sting
- Green Ginseng
- Red Ginseng
- Maca
- Emily’s Love Potion
- Bancroft’s Love Potion
- Emily’s Equipment Leak
Massages – Pricia has six different massages for you, one for every talisman above Stone.
- Jade Talisman
- Silver Talisman
- Green Ginseng or Gold Talisman
- Grand Talisman
- Royal Talisman
- Talisman of the Gods
Post Story – Part 1
Do yourself a huge favor and don’t sell and of your talismans that are higher than Gold Talismans. You will need ten (10) Talismans of the Gods to craft the final Kama Sutra scrolls.
The Post Story section will get you the rest of the Kamasutra pages and most of the extras.
Go to the Boat Dock.
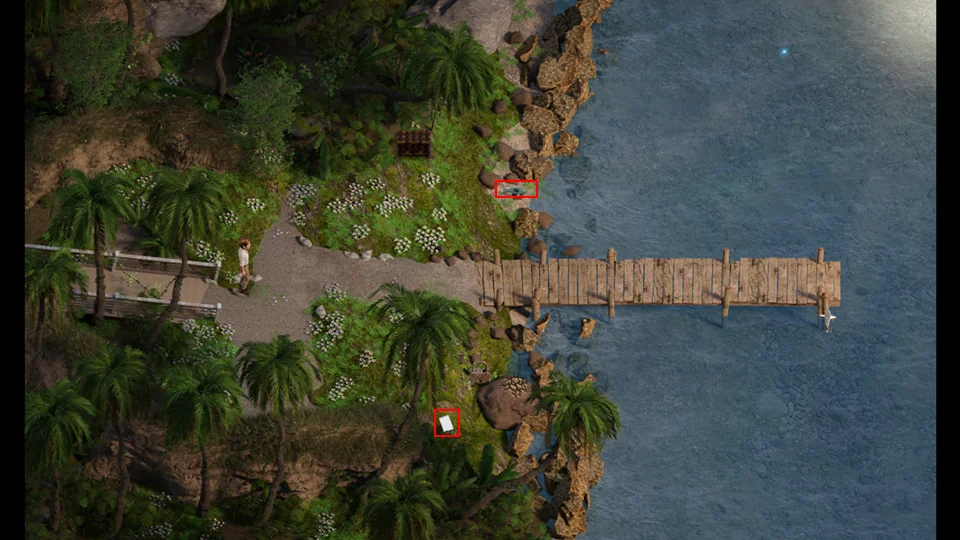
- Pick up the Floppin’ Fish.
- Are the fish getting bigger?
- Read the note.

- The next Tuna you catch will give you a Chest Key.
- Let’s go get some money.
- Go to the Mansion.
- Enter the lower left door.
- Go to the Treasure Room.
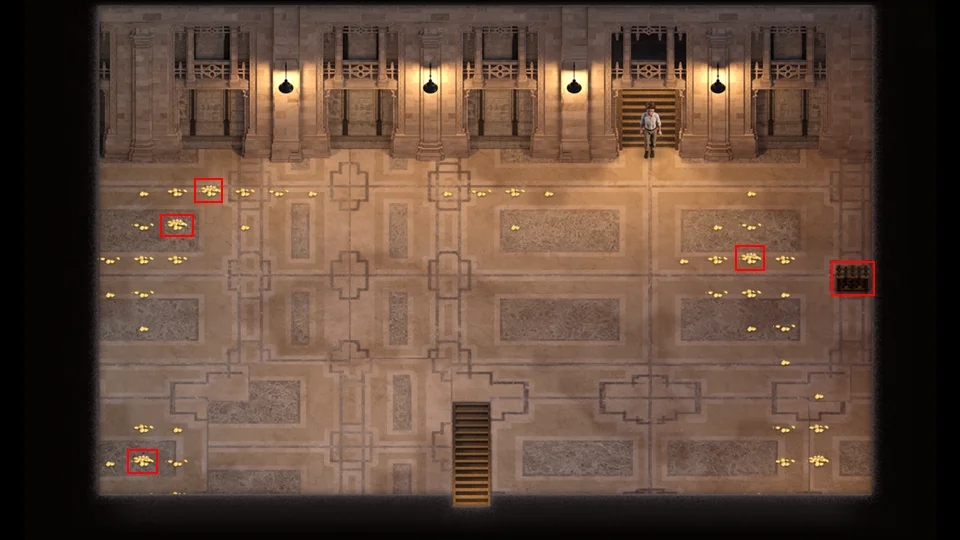
- Open the chest with a Chest Key.
- Pick up Kama Sutra – Janet Blowjob.
- Pick up all of the 9,000 Gold piles. We’ll be back for the rest one we have the Golden Compass.
- Go to Estero Park.
- Take the Teleporters to Casula Temple.
- Go to Casula Temple 1 – 3.
You can either avoid the snakes or, if you have a Viper Antivenom in your inventory, let the snake on the left bite you so it goes away. Once it bites you, it won’t be there the next time you come.
- You will need a Viper Antivenom to get to the Jar.
- Inside the Jar is a Talisman of the Gods.
- Open the chest with a Chest Key.
- Pick up Kama Sutra – Sofia ♥♥♥♥♥ Sex.
- Go to Casula Temple 1 – 2.
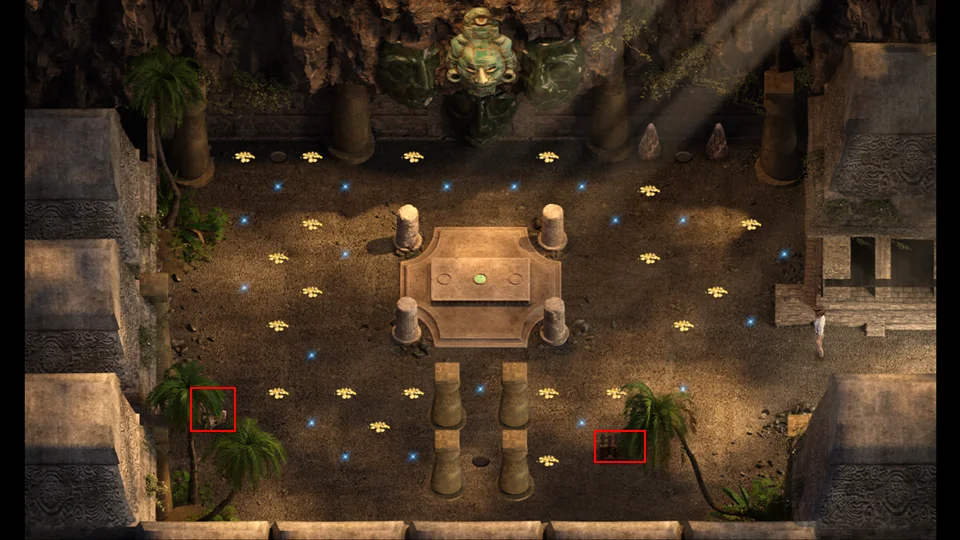
- Open the chest with a Chest Key.
- Pick up Kama Sutra – Naomi Anal Sex.
- Light the Torch with your Lighter.
- Pick up the Gold Piles.
- You can pick up the sparkles or leave them as we’re going to have to come back.
- Go to Casula Temple 1 – 1.
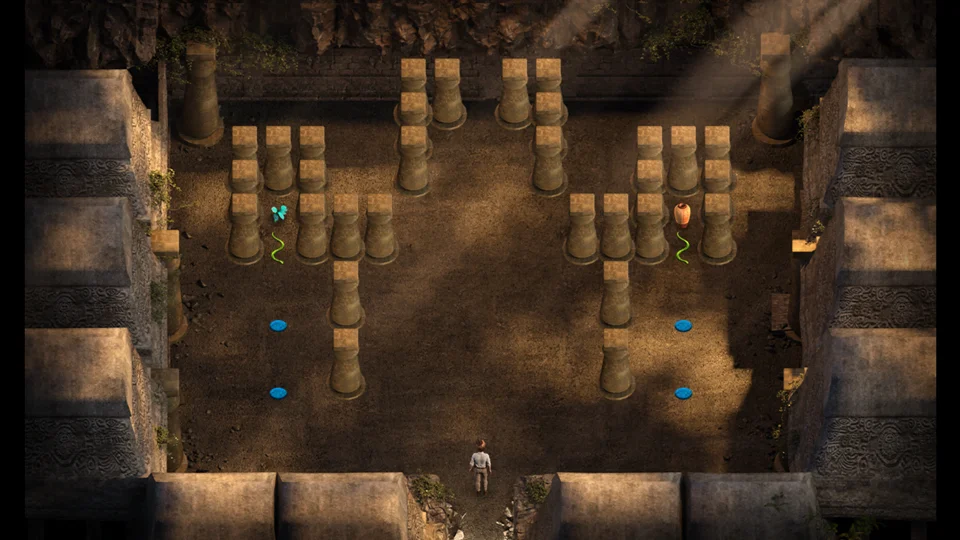
- This will cost you two Viper Anitvenom.
- Pick the Philweed Plant.
- Break the Jar.
- Receive a Talisman of the Gods.
- Go to Casula Temple 3 – 2.
You can pick if you want to play with the snake or use a Viper Antivenom for this. If you’re going to play with the snake you’re going to want it in the location shown.
- Pick up the Chest Key.
- Go to Estero State Park 1 – 1.
- Enter the tomb.
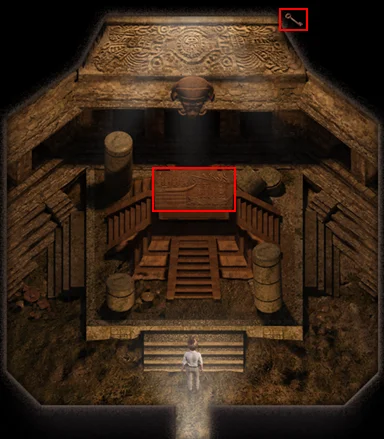
- Use the Grappling Hook to get the Chest Key.
- Use the Crowbar to open the casket.
- Receive a Talisman of the Gods.
- Go to the Mansion.
- Enter through the lower left door.
- Go downstairs to the Treasure Room.
- Go downstairs.
- Go south (Down).
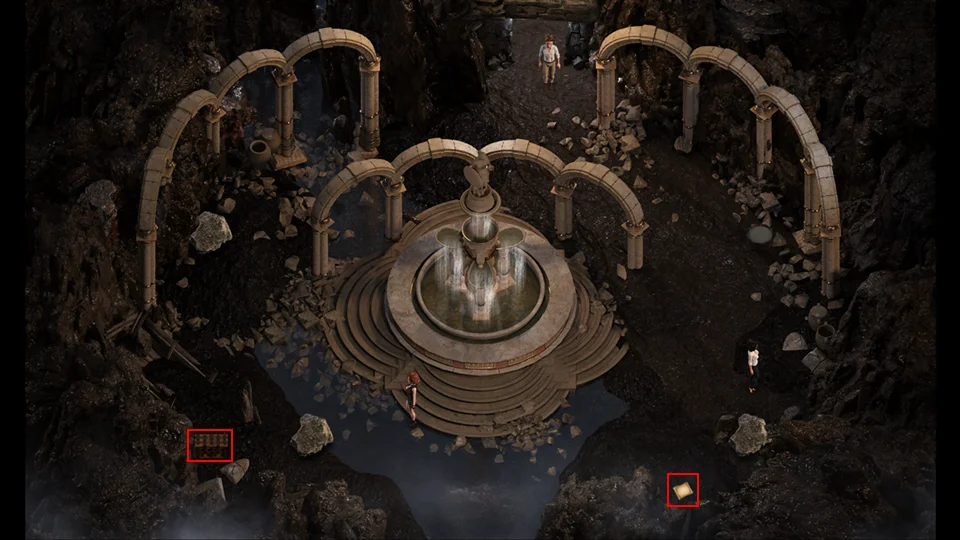
- Read the crafting recipe (God’s Shovel)
- Open the chest with a Chest Key.
- Pick up Kama Sutra – Emily Anal Sex.
- Go north (Up)
- Go north (Up)
- Cross to the other side.
- Go west (Left) through the gas.
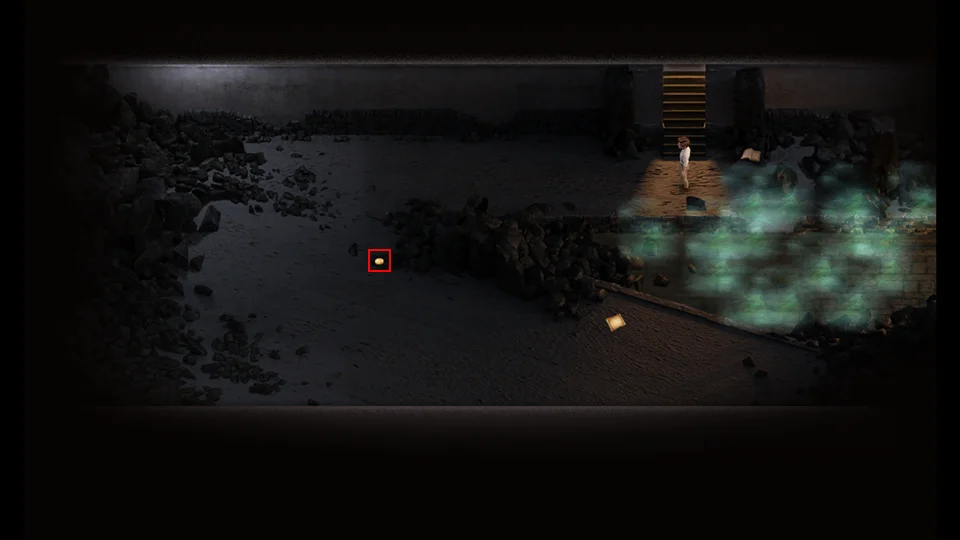
- If you need Caulli’s Coin you can pick it up here.
- You can only have one in inventory. If you use it you can come back here to pick up another.
- Go upstairs.
- Pick up God’s Shovel Head.
- Read book. Book will not be here if you picked up the Mansion third floor Chest Key.
- Pick up Broken Key.

We have all of the pieces of God’s Shovel, with the possible exception of a Talisman of the Gods. If you sold all of your Talismans of the Gods you will either have to find one in the world or wait until we come across another one.
- Go to the Shrine.
- Craft God’s Shovel: God’s Shove Shaft, God’s Shovel Handle, God’s Shovel Head, and a Talisman of the Gods.
- Receive God’s Shovel.
- Craft a Pirate Key: Pirate Medallion, Grand Talisman, Broken Key x 2.
- Receive a Pirate Key.
- Turn the rest of your Broken Keys into Chest Keys.
- Go to the Full Mast Bar.
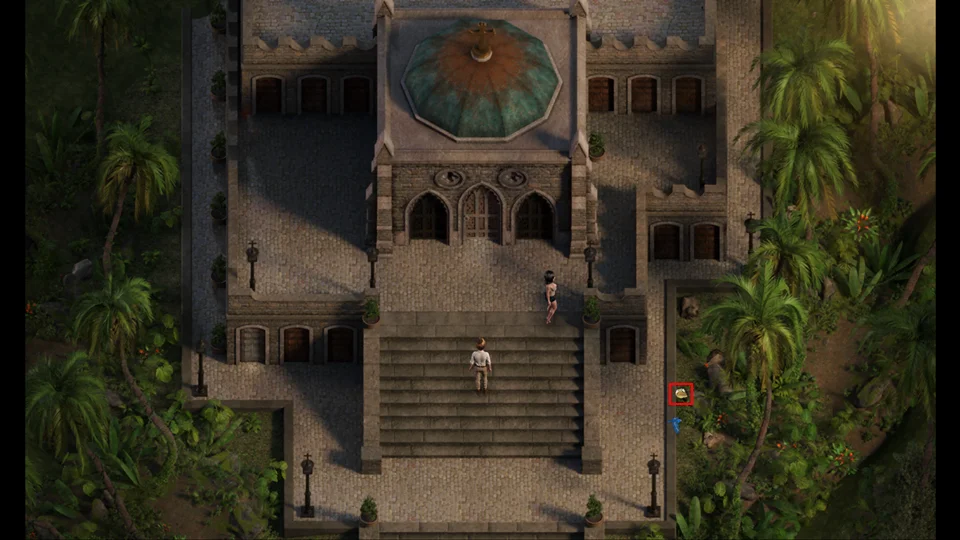
- Pick up the Compass Piece.
- Go to Madalyn’s Chambers.
- Scene with Madalyn, Pricia, and Tasha.
- Go to the sewers under the Church.
- Go east (Right)
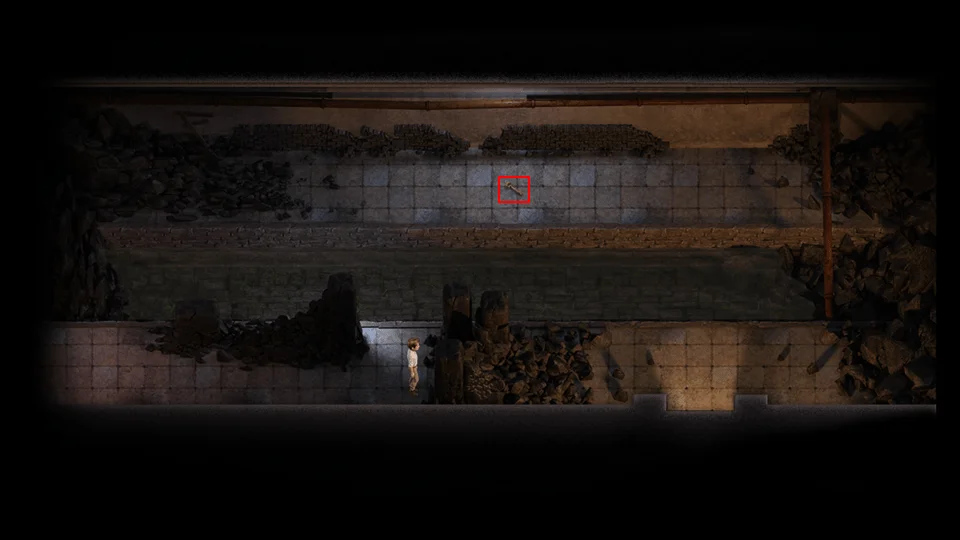
- Pick up the Chest Key.
- Go south (Down)
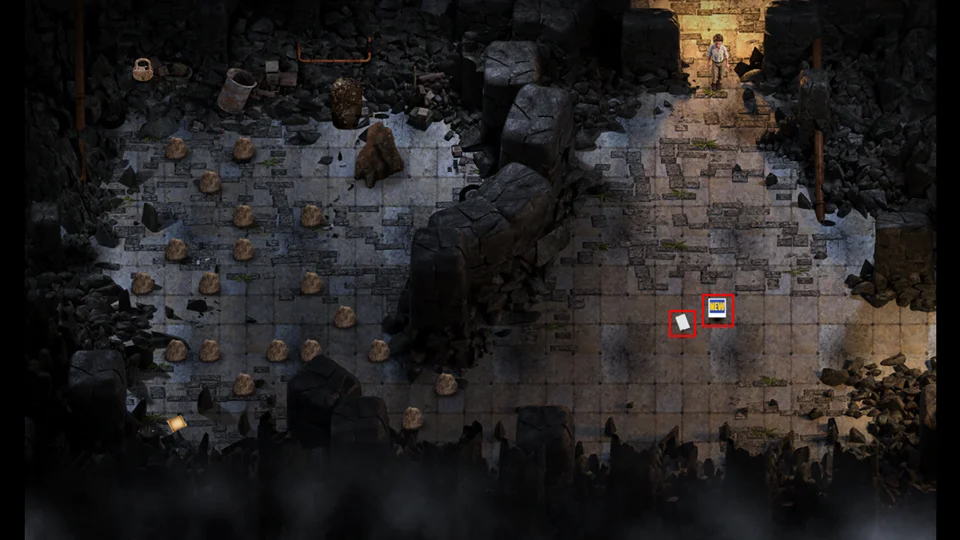
- Pick up the Photo: Madalyn’s ♥♥♥♥♥
- Read the note.

- Go to the Mansion
- Enter in the lower left door.
- Pick up Tasha’s Key.
- Open the Lock.
- Pick up Torn Page – Orange
- Go to the Full Mast Bar.
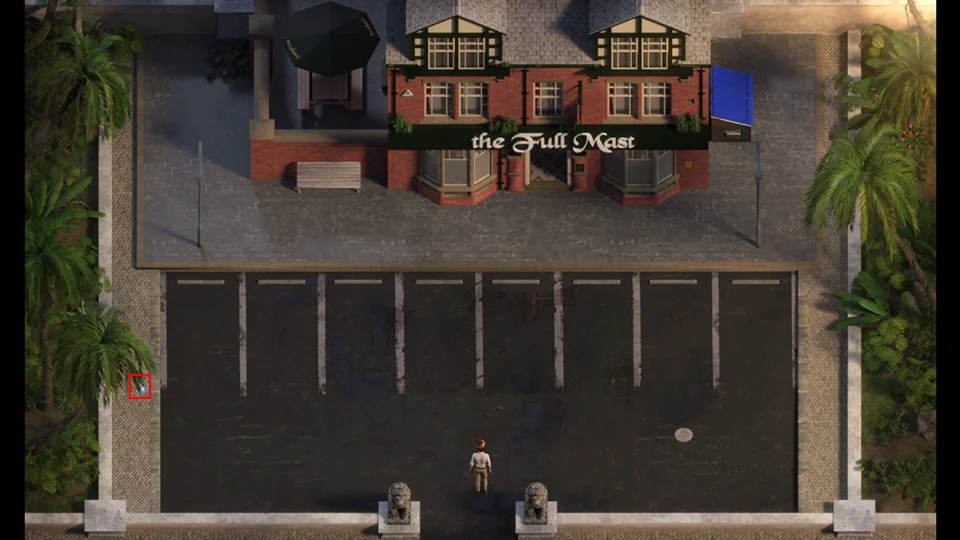
- Pick up the Locker key in the parking lot.
- Talk to Tasha.
- Give Tasha her key.
- Receive Death Doll.
- Go to Squallmart.
- Pick up the Compass Piece

- Buy the Flippers ($150,000)
- You can now also purchase Nitroglycerin ($200,000), Chest Keys ($1,000,000), Ancient Temple Keys ($700,000).
- Go to the Boat Dock.
- Click on the sparkle in the water.
- Use the Flippers.
- Receive Essence of Key.
- Open the chest with a Chest Key.
- Pick up Kama Sutra – Jessica Anal.
- Open the Lock.
- Pick up Torn Page – Purple.
- Use your Pickaxe on the weak ground.
- Receive Limestone.
- Go to Estero Park.
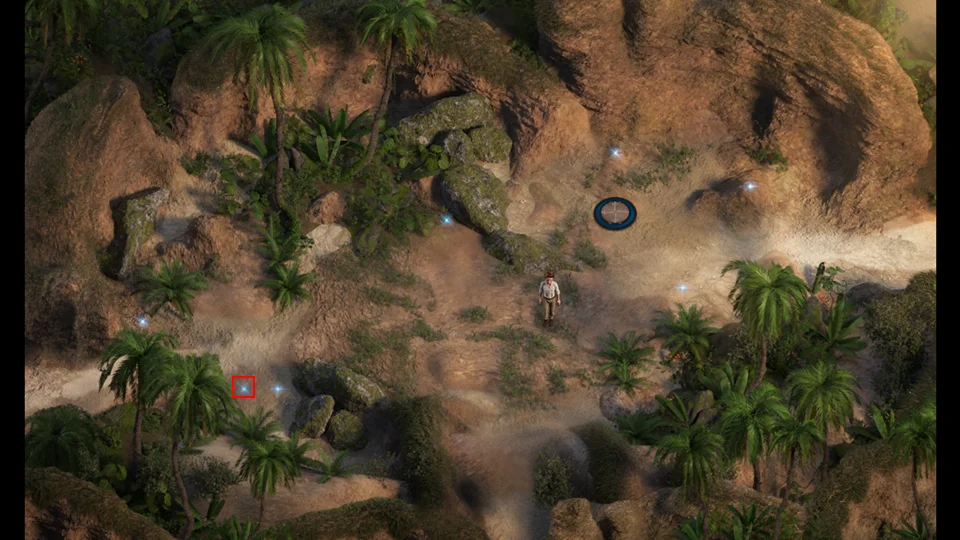
- If you haven’t already, pick up the Locker Key.
- Take the Teleporter.
- Go south (Down).
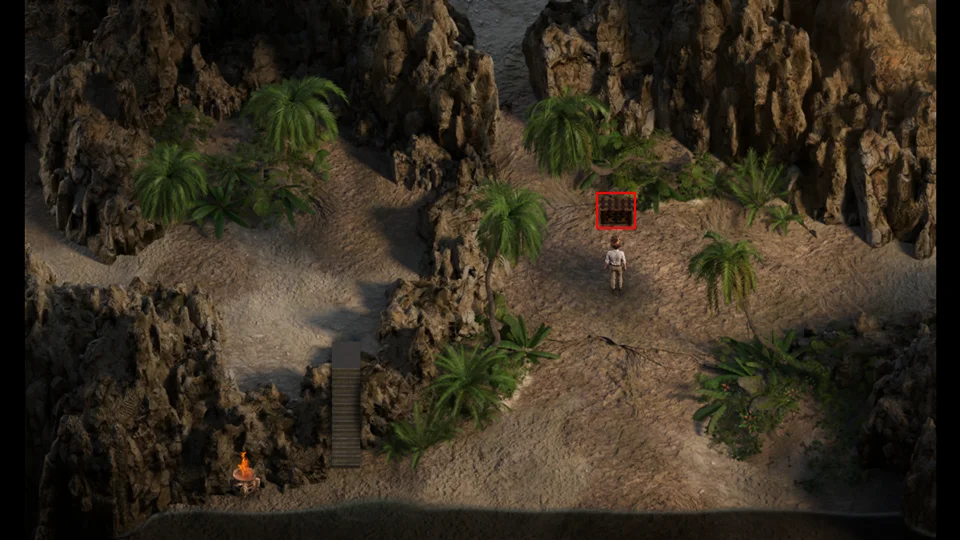
- Open the chest with a Chest Key.
- Pick up Kama Sutra – Alia Cowgirl.
- Go east (Right).
- Go east (Right).
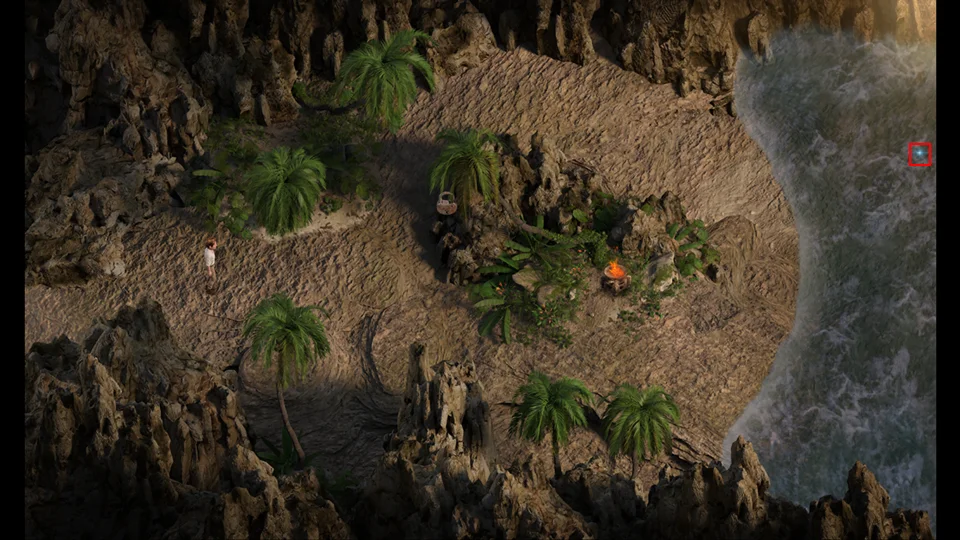
- Open the Lock.
- Pick up Torn Page – Blue.
- Click on the sparkle in the water.
- Use the Flippers.
- Receive Essence of Key.
- Go west (Left).
- Go north (Up).

- Open the crate with the Crowbar.
- Receive a Chest Key.
- Go to Deep Jungle 1 – 3.
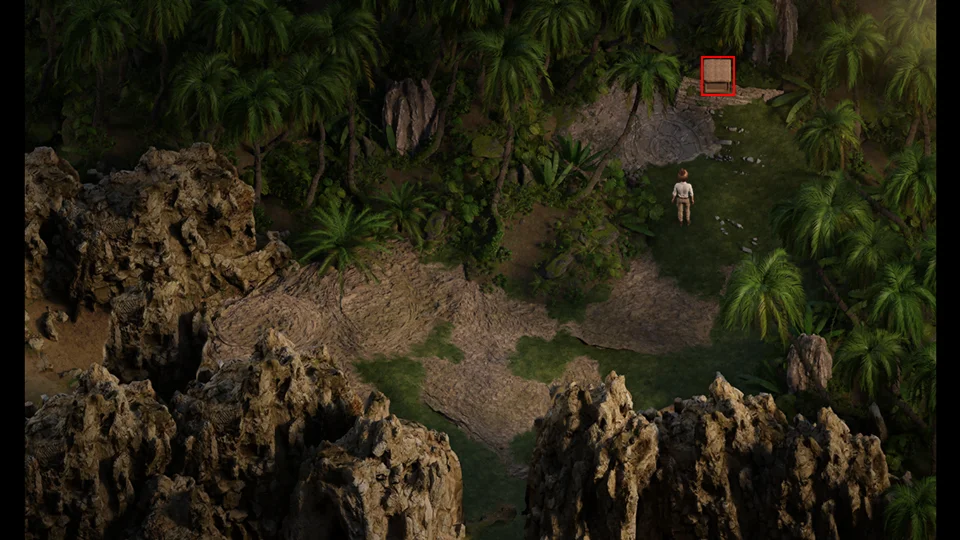
- Open the crate with the Crowbar.
- Receive a Grand Talisman.
- Go to Estero Key.
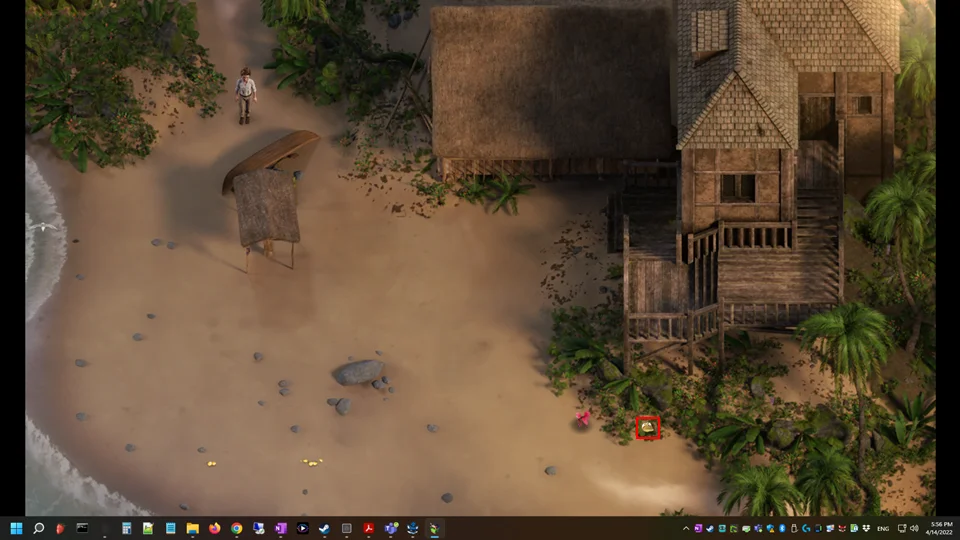
- Pick up the Compass Piece.
- Go to the Lighthouse.
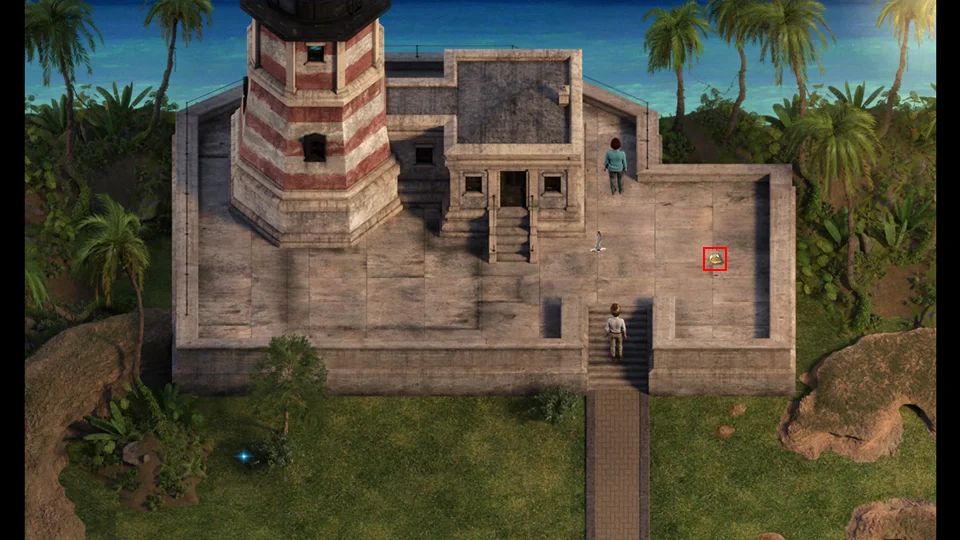
- Pick up the last Compass Piece.
- Go to the Shrine.
- Craft the Golden Compass: Compass Piece x 4.
- Receive Golden Compass.
Now you can start picking up the Gold Coins you find. Instead of picking up coins you will receive a Gold Talisman for each coin pile. This is why we picked up the $9,000 coin piles as they would turn into $4,000 Gold Talismans.
Locker Key 1 – Estero Park Entrance
Locker Key 2 – Cemetery
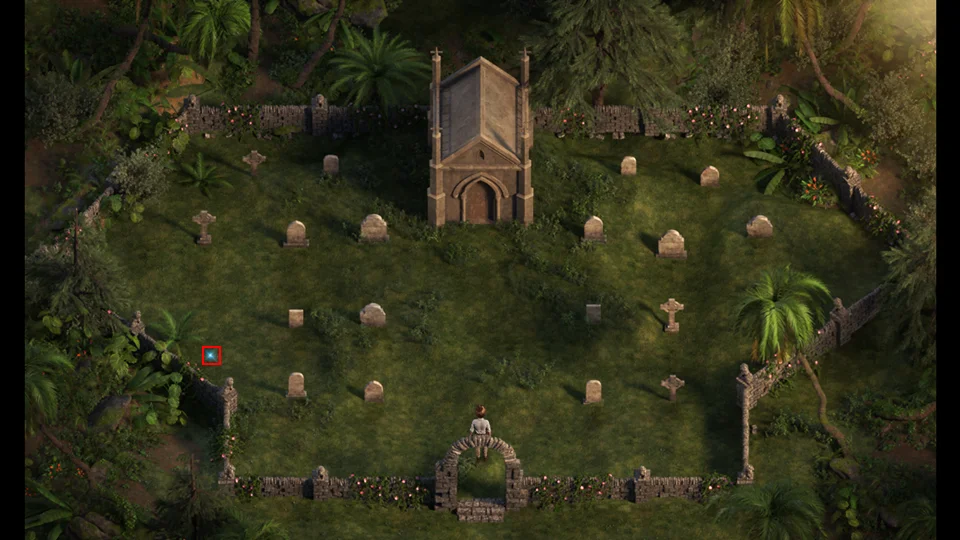
Locker Key 3 – Full Mast Bar
Locker Key 4 – Beach

The Lockers are in the Doctor’s Office Break Room.
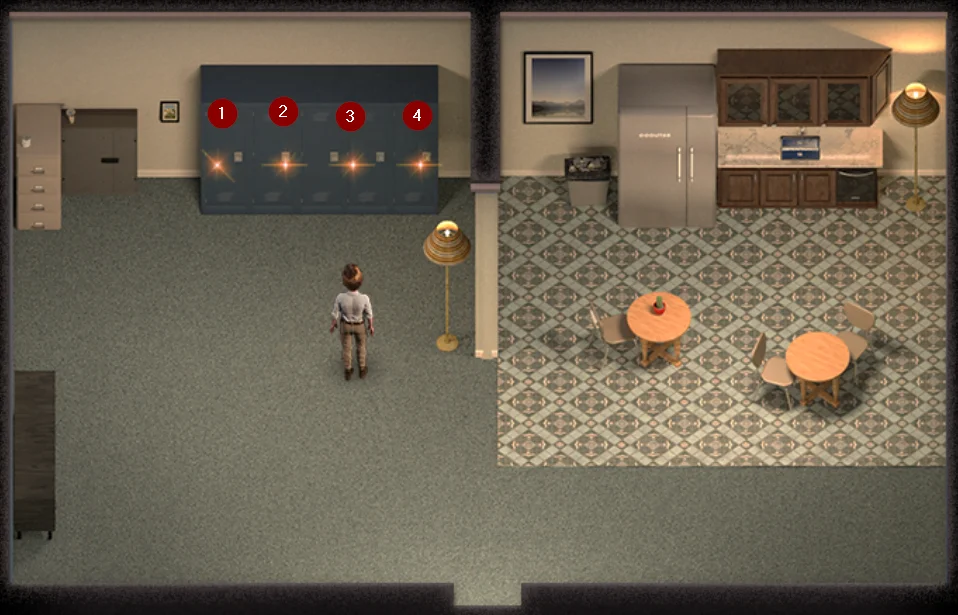
- Locker 1: Photo: Pricia & Jessica
- Locker 2: Chest Key
- Locker 3: Photo: Jessica in College
- Locker 4: King’s Offering Chip
Post Story – Part 2
- Go to the Casula Temple 3 – 2.
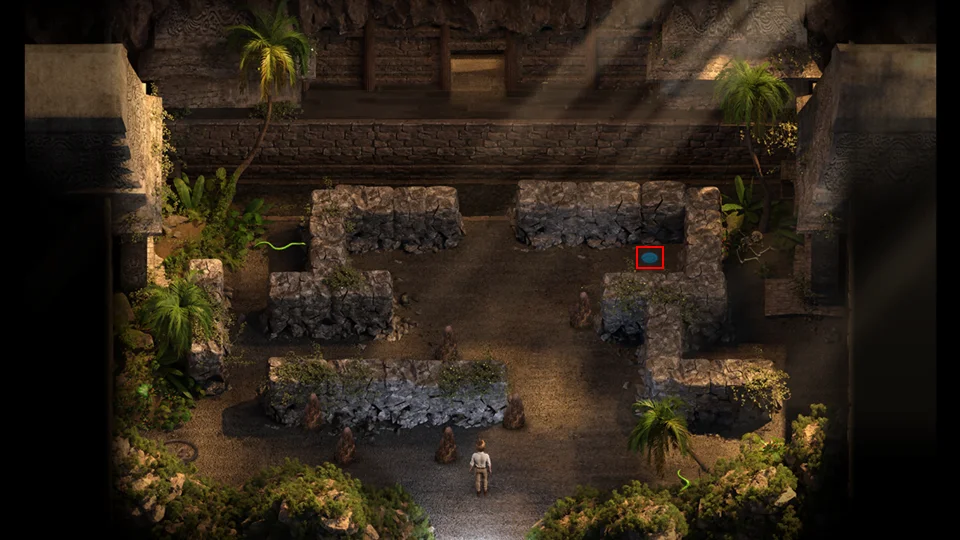
- Step on the pad.
- Pick up Kama Sutra – Pricia Anal.
- Go to Casula Temple 2 – 2.
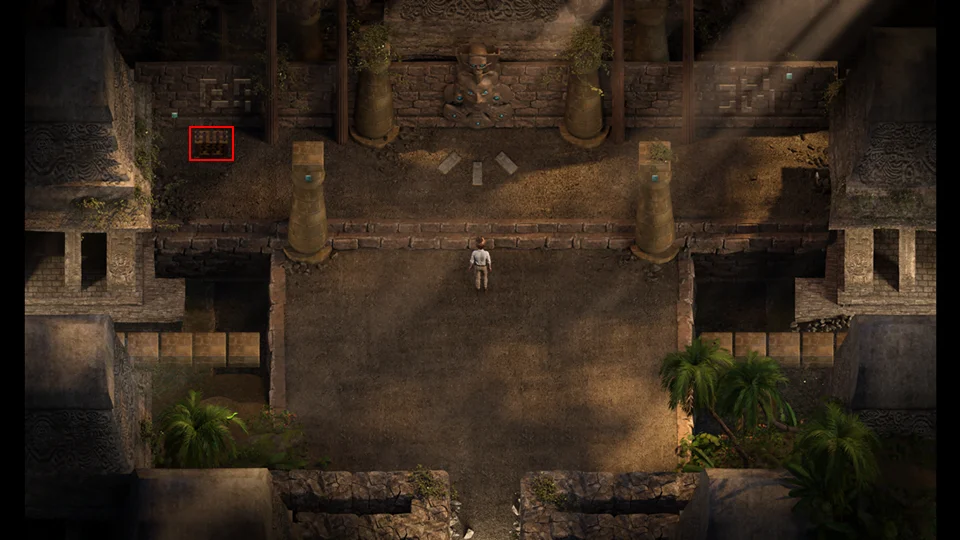
- Open the chest with a Chest Key.
- Pick up Kama Sutra – Sofia Legjob.
- Go to Casula Temple 1 – 3.
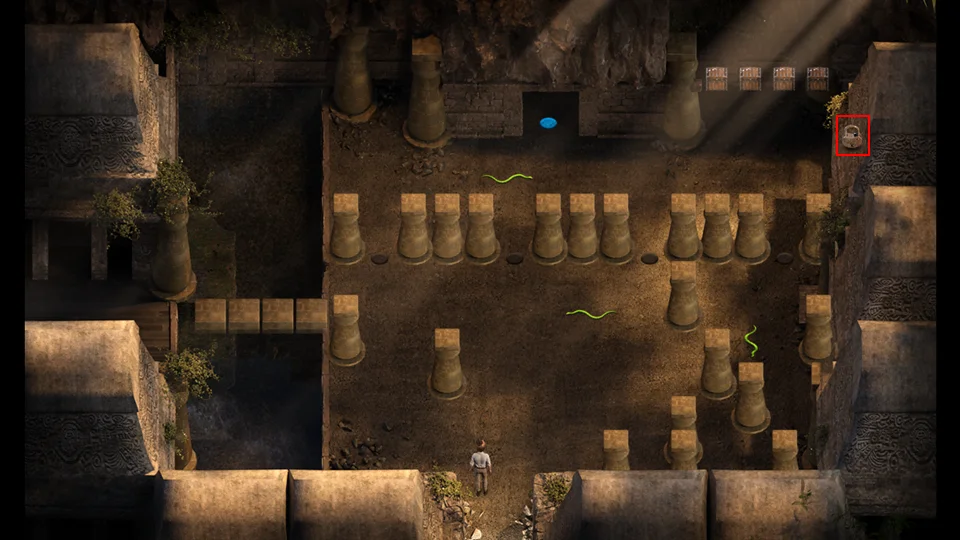
- Open the Lock.
- Pick up Torn Page – Red.
- Avoiding the snakes go west (Left).
Pick up the sparkles if you haven’t already. They are all Grand and Royal Talismans.
- Step on the green pad.
- Use the King’s Offering Chip.
- Scene with Madalyn.
- Pick up the Skeleton Key.
- Go to Deep Jungle 2 – 2 and enter the cave.
- Take the cave to Caverns 2 – 2.
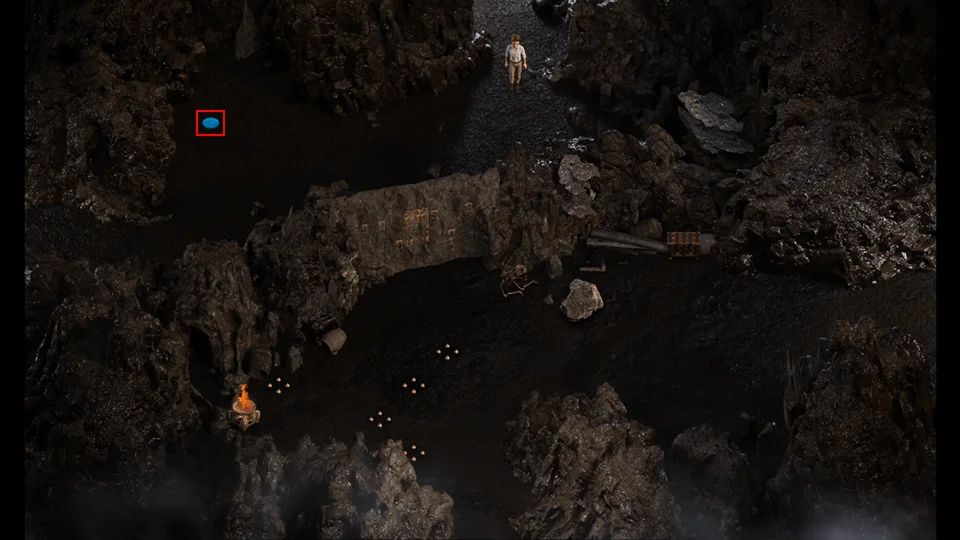
- Step on the pressure pad.
- Pick up Kama Sutra – Kaley Anal
- Go west (Left)
Dive into the Whirlpool with your Flippers. You only have 60 seconds, but you can go back if you need.
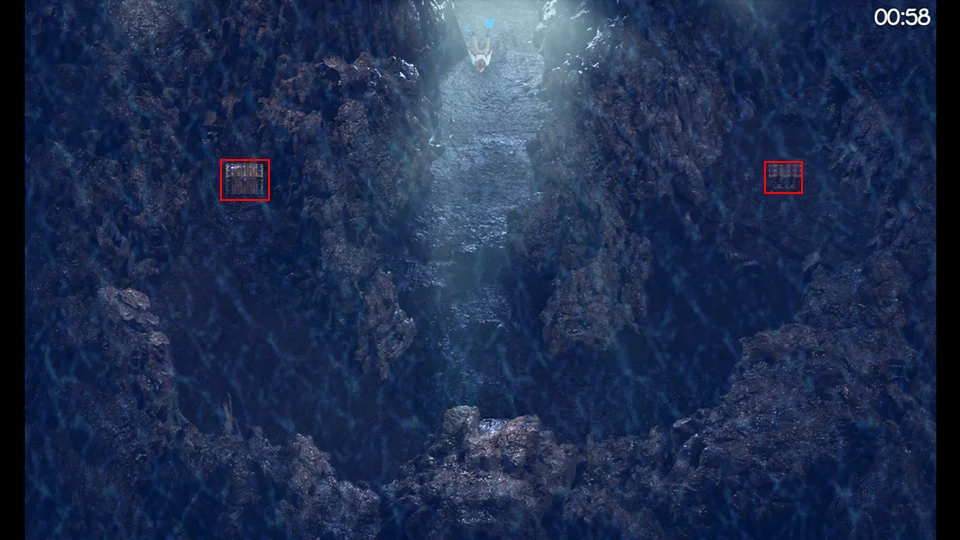
- Open the Pirate Chest with the Pirate Key.
- Receive Photo: Nadia’s Treasure.
- Open the chest with a Chest Key.
- Pick up Kama Sutra – Janet Anal.
- Go to Caverns 1 – 4.
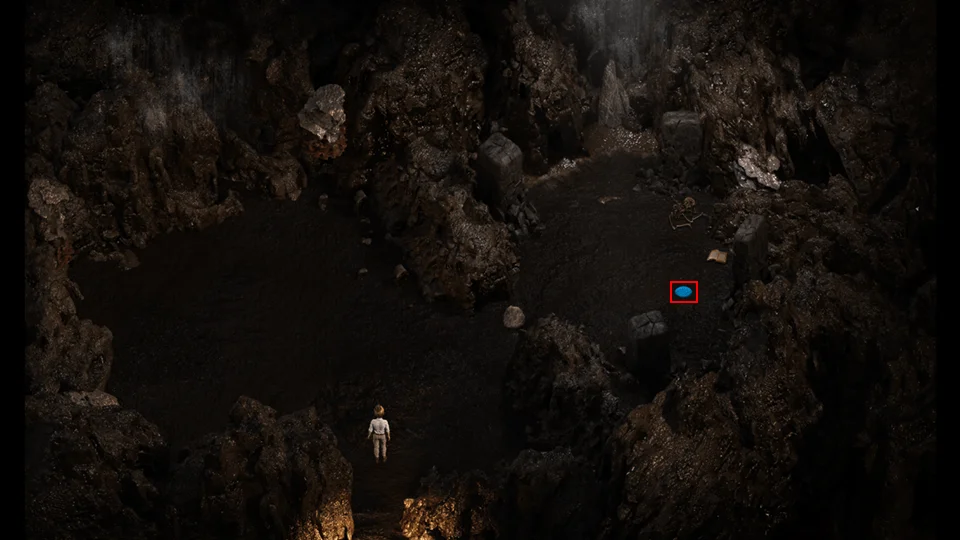
- Step on the plate.
- Receive a Talisman of the Gods.
- Go to Caverns 2 – 2.
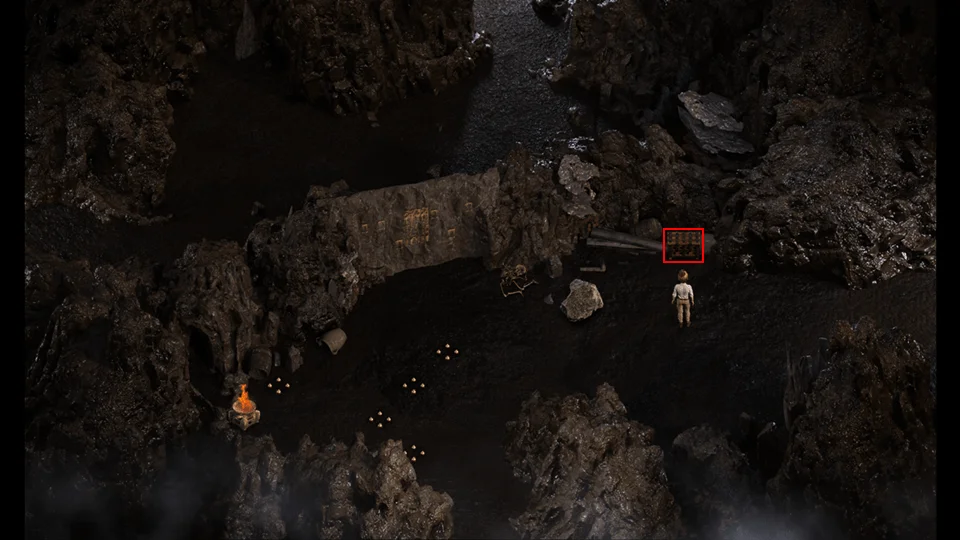
- Open the Chest with a Chest Key.
- Pick up Kama Sutra – Kaley Mutal Masturbation.
- Go to the Shrine.
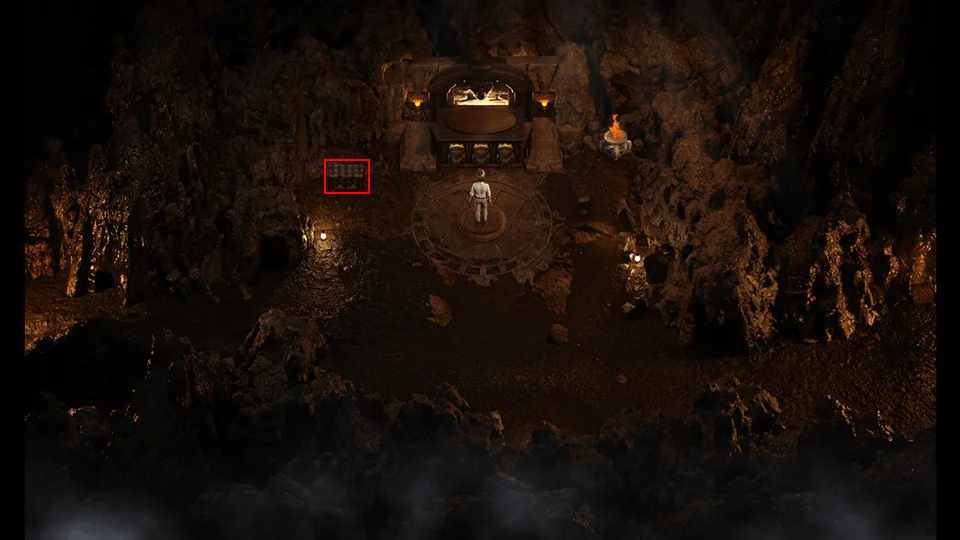
- Open the chest with a Chest Key.
- Pick up Kama Sutra – Emily Butt n’ Muff Munch.
- Go to the Mansion.
- Go to the third floor.
- Talk to the guard at the door.
- He needs a bedroom key. The crafting recipe for a Bedroom Key is: Maca Plant, Aloe Plant, Jaguar Hair, and Essence of Key.
- Go to the Treasure Room in the basement.
Pick up all the gold piles you left behind. Make sure you get the ones that are partially hidden by the bottom wall.
- Go to Estero Park.
- Take the Teleporter.
- Take the Temple Teleporter.
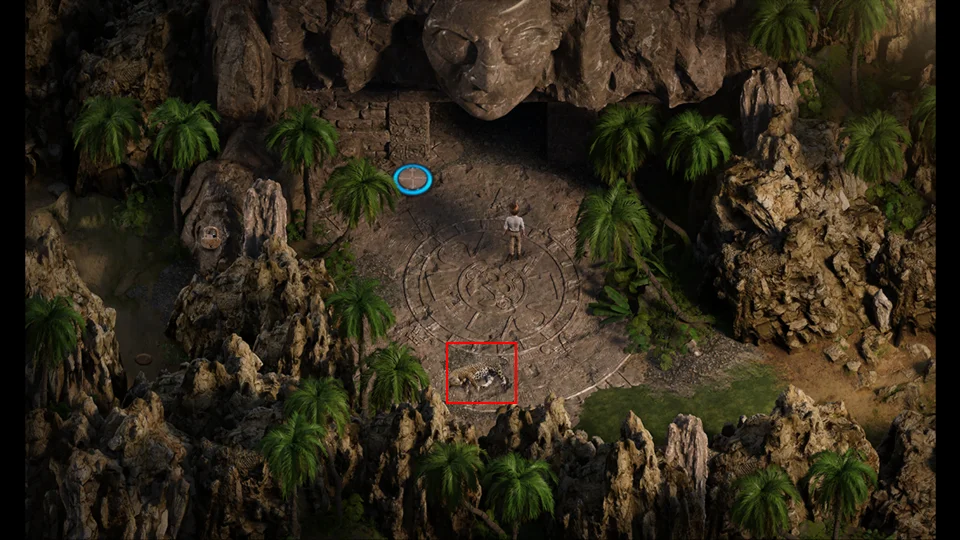
- Click on the Jaguar.
- Pluck a hair from the jaguar.If you don’t have an Aloe Plant in your inventory go to Deep Jungle 1 – 3 or Deep Jungle 2 – 1 to get one.
- If you don’t have a Maca Plant in your inventory go to Estero State Park 3 – 3 to get one.
- Go to the Shrine.
- Craft the Bedroom Key: Maca Plant, Aloe Plant, Jaguar Hair, and Essence of Key.
- Receive Bedroom Key.
- Craft a Chest Key: Broken Key x 4
- Receive a Chest Key.
- Go to the Mansion.
- Go to the Third Floor.
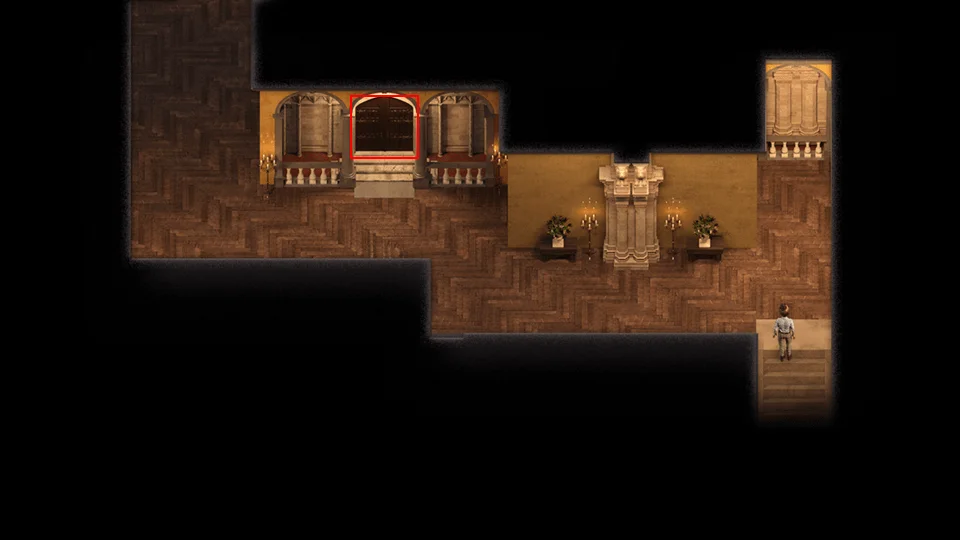
- Open the door with the Bedroom Key.
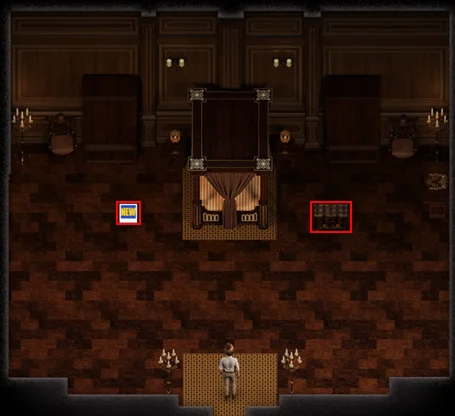
- Pick up the New sign.
- Receive Photo: Mother & Daughter.
- Open chest with Chest Key.
- Pick up Kama Sutra – Madalyn Anal Sex.
- Go to the Church.
- Go through the right door.
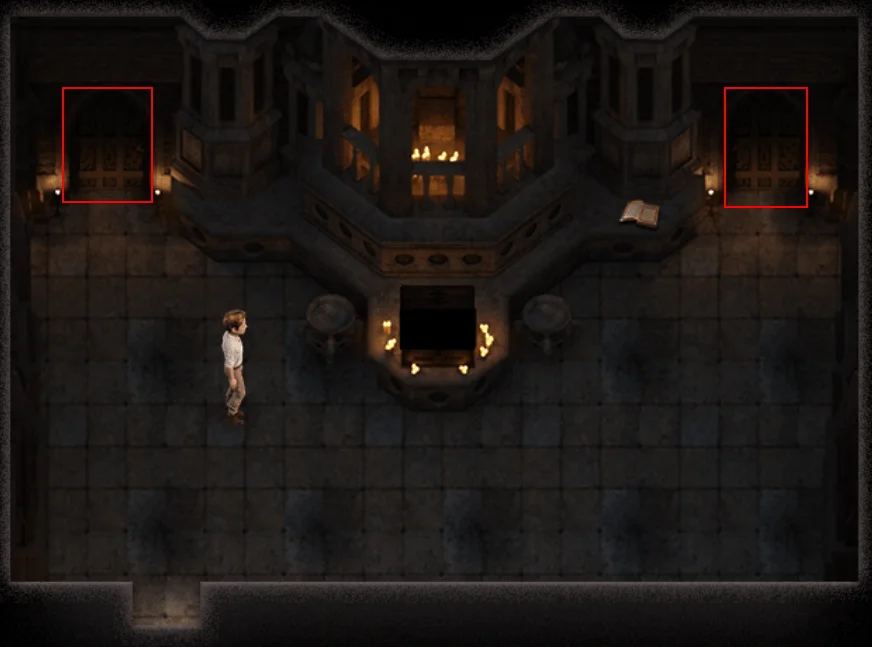
- Open either door with the Skeleton Key.
- Go into the new room.
- Light the torch with your Lighter.
- Click on the lock.
- Pick up the Torn Page – Yellow.
- Open the chest with a Chest Key.
- Pick up Kama Sutra – Sofia Anal.
- Go to the Lighthouse.
- Turn off the four valves.
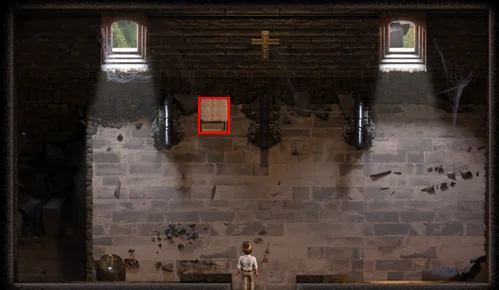
- Before you jump down use your Crowbar on the crate.
- Receive Grand Talisman.
- Go down.

- Pick up the Broken Key.
- Go to Lost Underground 4 – 4.
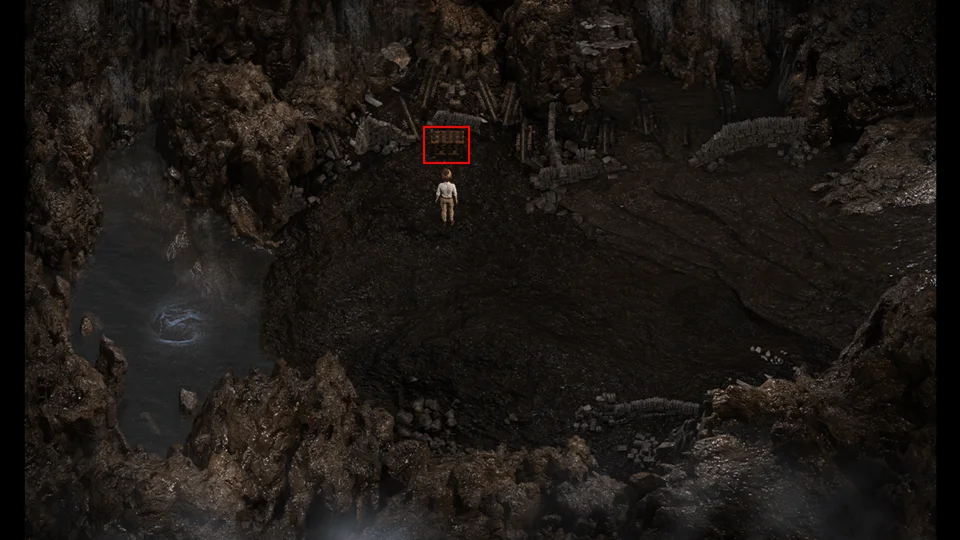
- Open the chest with a Chest Key.
- Pick up Kama Sutra – Alia Anal Sex.
- Go to Janet’s Home.
- Go to backyard.
- Talk to either character.
- Janet wants you to clear the algae from the hot tub.
- Go to the Lighthouse.
- Talk to Albert.
- You need Chlorine from a pool, Limestone near the ocean, a plant that smells nice, and a basic container.
- Go to the Mansion.
- Go to the Pool.
- Click on the pool to collect water.
- Receive Chlorine.
- Go to Deep Jungle 1 – 1.
- Go east (Right)
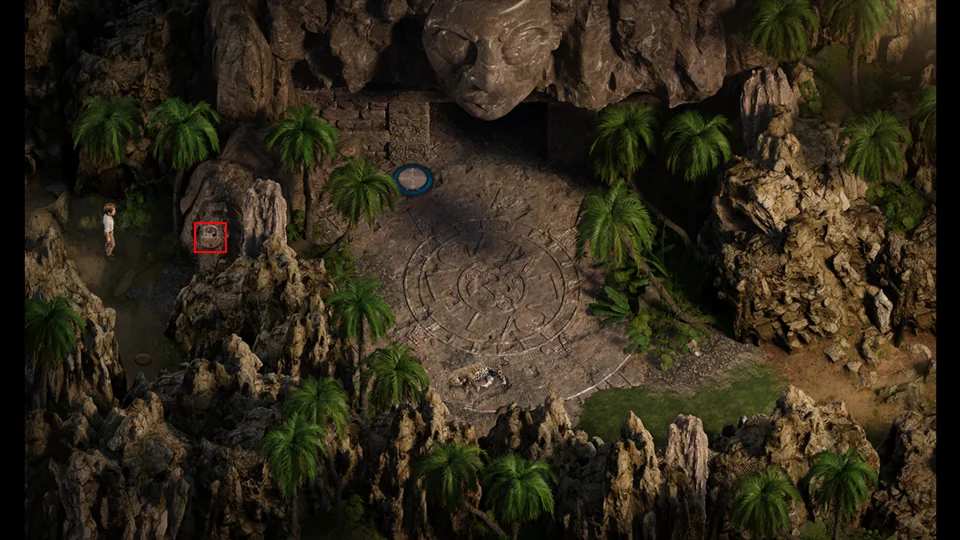
- Open the Lock.
- Pick up Torn Page – Blue.
- Go to Casula Temple 2 – 1.
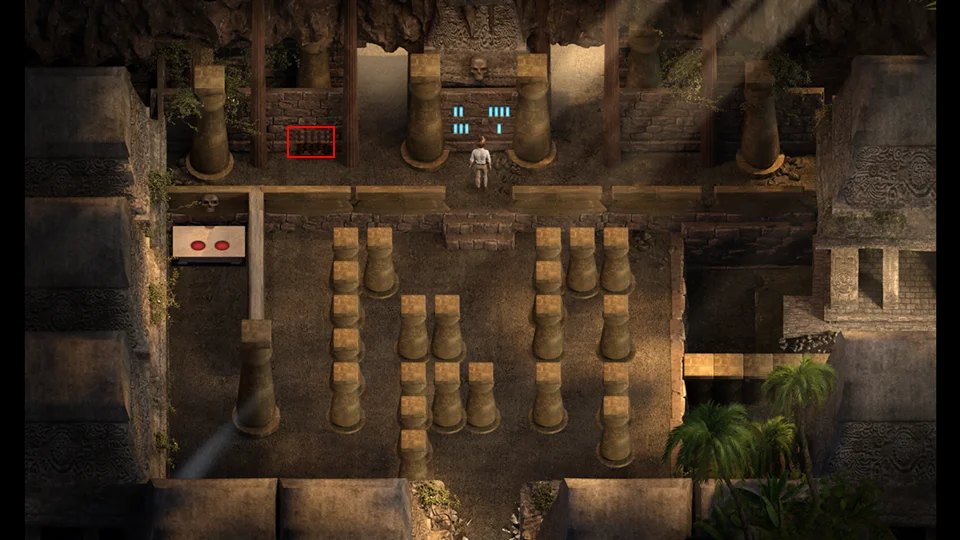
- Open chest with Chest Key.
- Pick up Kama Sutra – Madalyn Piledrive.
- Go to Deep Jungle 1 – 2.
- Click on the Jaguar.
- Pluck a hair from the jaguar. Receive Jaguar Hair.
- Scene with Evie.
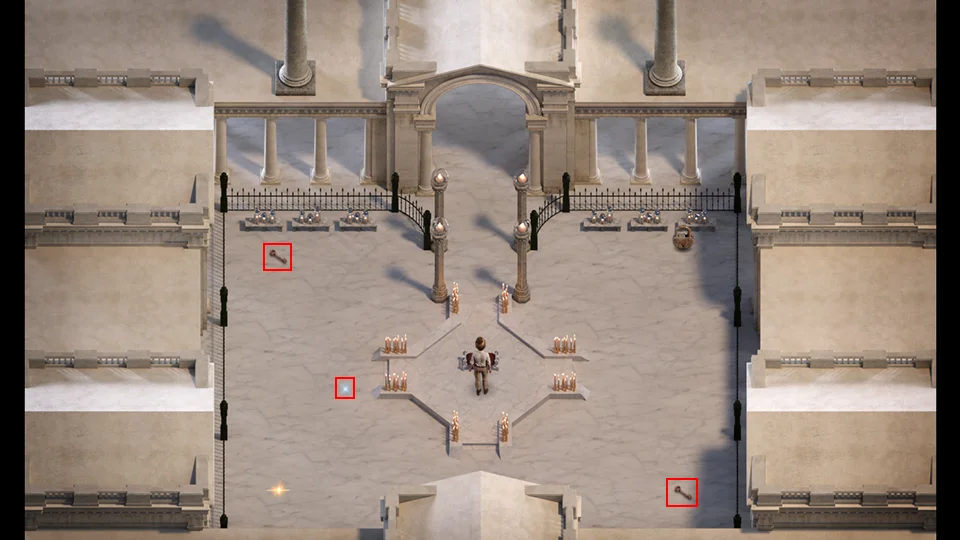
- Pick up Chest Keys
- Click on sparkle.
- Receive White Hair Strand.
- Go north (Up) and you will return to the park entrance.
- If you don’t have an Aloe Plant in your inventory go to Deep Jungle 1 – 3 or Deep Jungle 2 – 1 to get one.
- If you don’t have a Maca Plant in your inventory go to Estero State Park 3 – 3 to get one.
- Go to the Shrine.
- Kraft a Bedroom Key: Maca Plant, Aloe Plant, Jaguar Hair, and Essence of Key.
- Go to the Mansion.
- Go to the second floor.
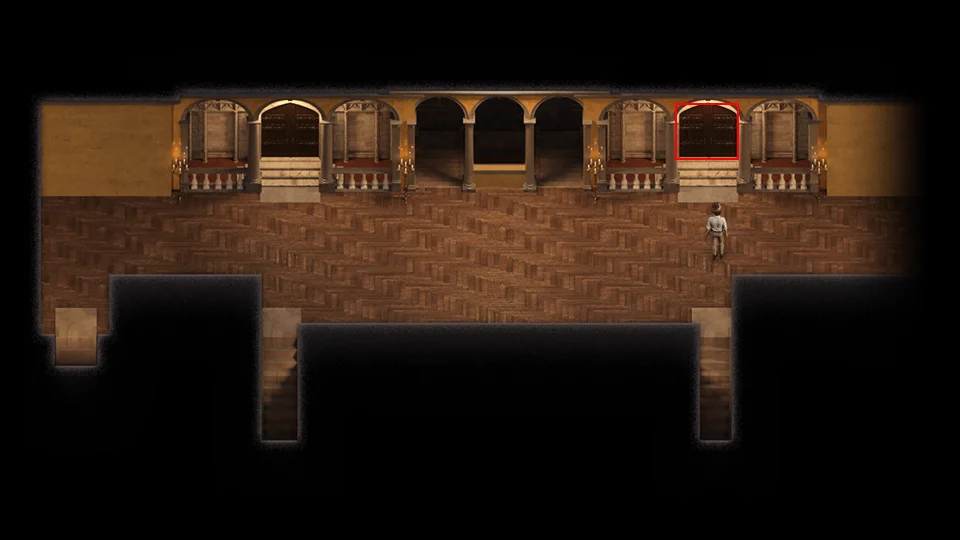
Open the door on the right, next to where Janet and Kaley were staying, using the Bedroom Key.
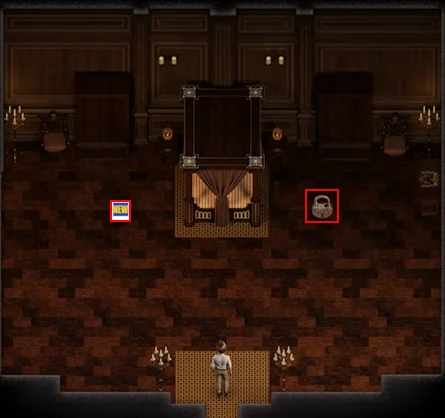
- Pick up the New sign.
- Receive Photo: Tasha in the Jungle.
- Click on the lock.
- Pick up Torn Page – Green.
- Go to the Lighthouse
- Go to Albert’s Room.
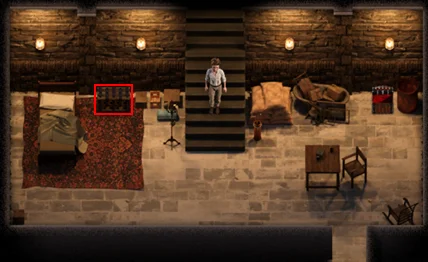
- Open the chest with a Chest Key.
- Pick up Kama Sutra – Alia ♥♥♥♥ Play.
- Go to the Church.
- Go to the Sewers.
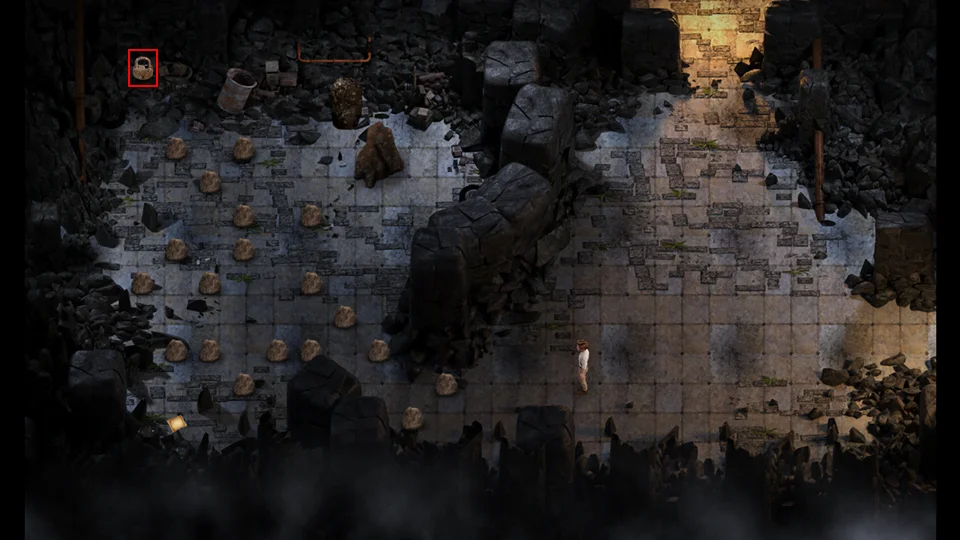
- Open the Lock
- Pick up Torn Page – Orange.
Post Story – Part 3
- Go to the Shrine.
- Craft Algae Shock: Basic Container, Chlorine, Limestone, Jasmine.
- Craft a Chest Key: Broken Key x 4. If you don’t have four (4) Broken keys you will need to buy a Chest Key from Squallmart $1,000,000.
- Receive Algae Shock.
- Go to Janet’s Home.
- Go to the backyard.

- Go to the Hot Tub.
- Use the Algae Shock.
- Scene with Janet and Naomi.
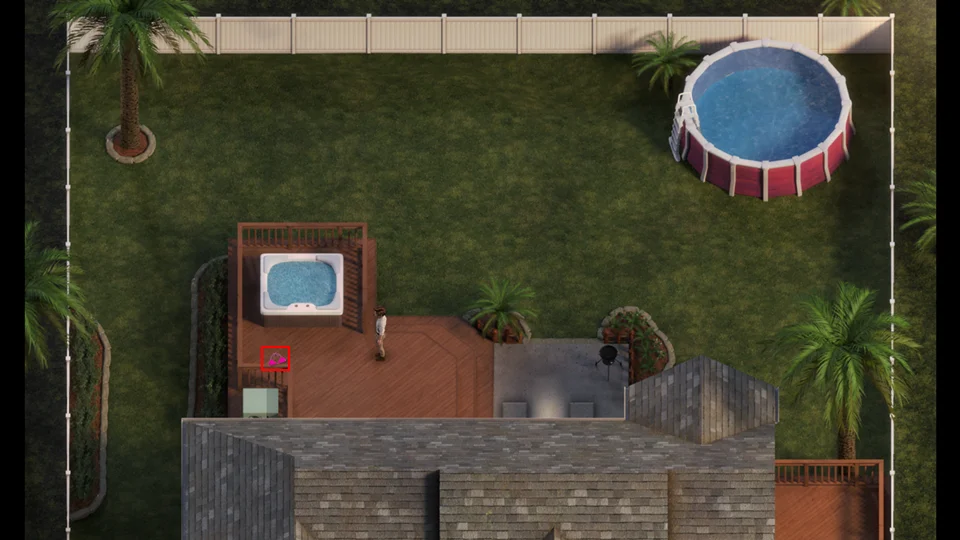
- Pick up the Bikini Top.
- Go to the Crypt.
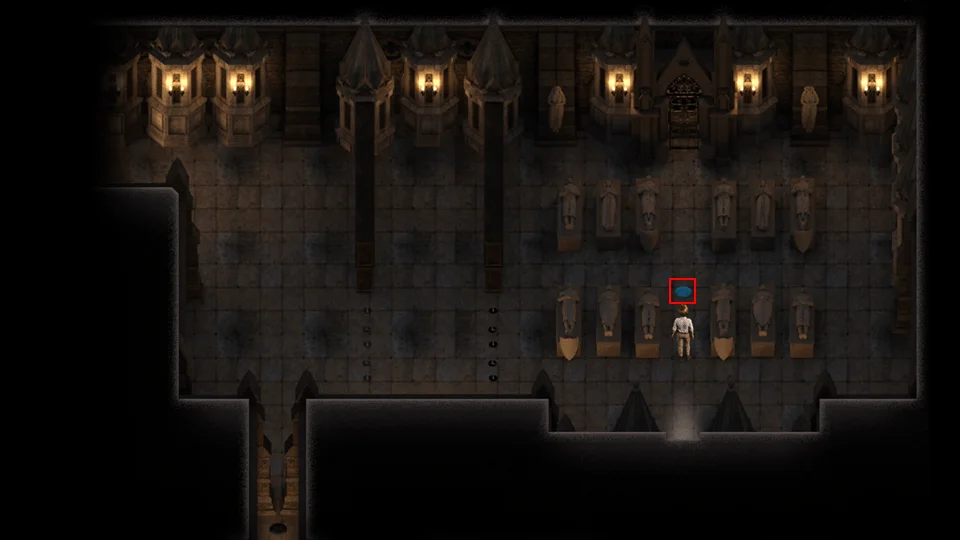
This pressure pad will not be here if you didn’t already access the pressure pads at the Estero Park Entrance, the Beach, and the Mansion.
- Step on the pressure pad.
- Pick up the Chest Key.
- Go to the L shaped room by the crypt.
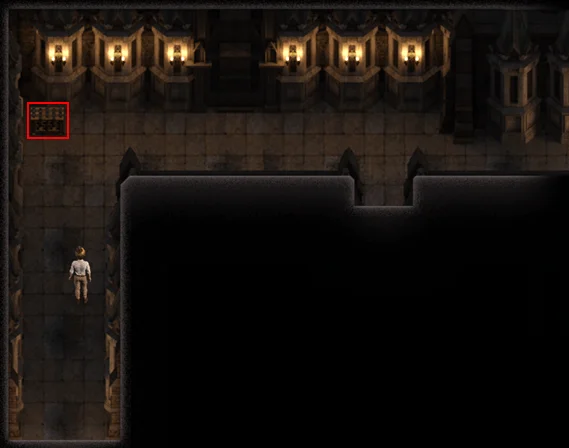
- Open the chest with a Chest Key.
- Pick up Kama Sutra – Diana Facetime & Footjob.
- Go south (Down)
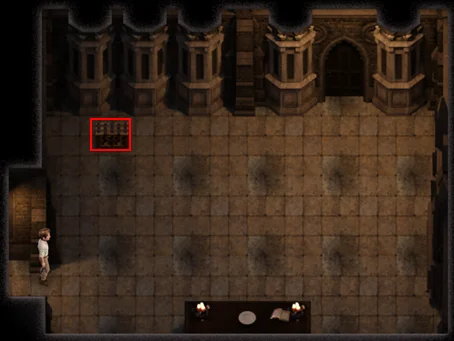
- Open the chest with a Chest Key.
- Pick up Kama Sutra – Emily Face ♥♥♥♥.
- Go to the Deep Jungle 2 – 3.
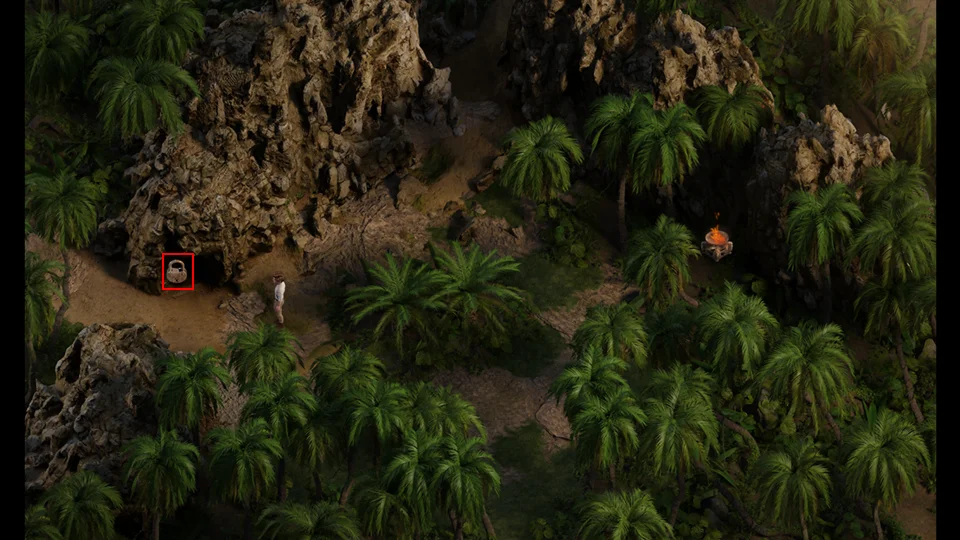
- Click on the Lock.
- Pick up Torn Page – Purple.
- Go to the Mansion.
- Go to Sofia’s Bedroom.
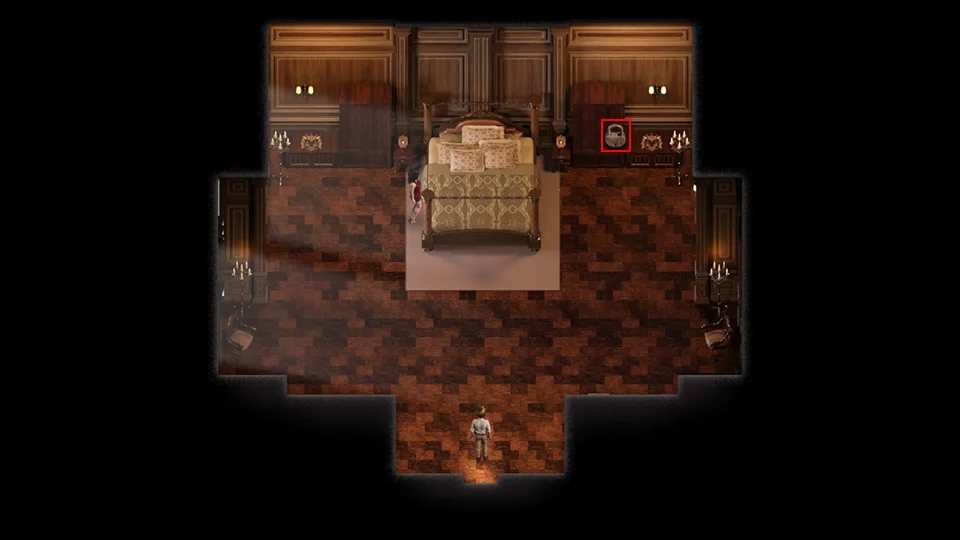
- Click on the Lock.
- Pick up Torn Page – Green.
- Go to Squallmart.
- Purchase Nitroglycerin ($200,000).
- You can either craft a Rock Bomb or go to Casula Temple 3-3 and use the far right chest.
- Go to the Mansion.
- Go to the Fountain of Youth.
- Use the Rock Bomb on the lower right rock.
- Go down the stairs.
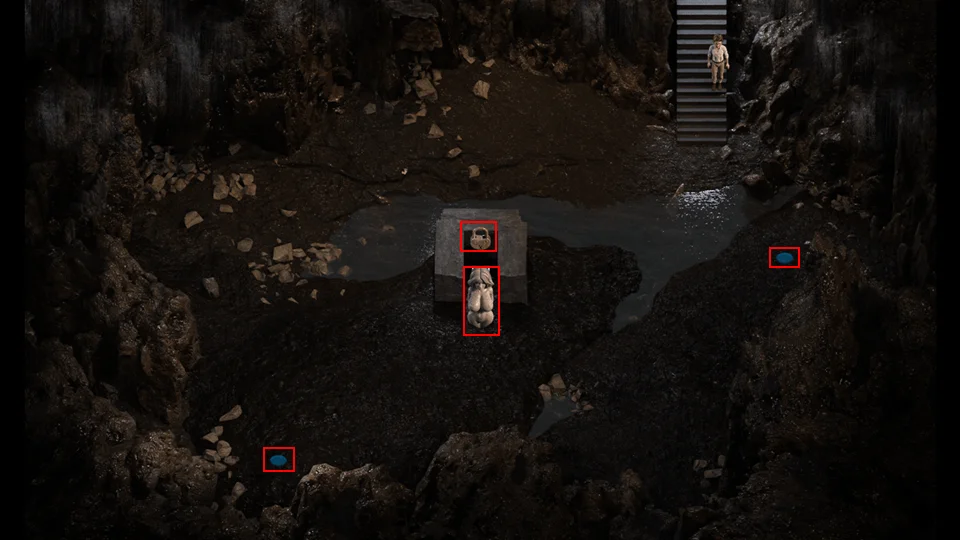
- Click on the Statue.
- Use the Bikini Top.
- Pick up the New sign.
- Receive Photo: Diana on Your Bed.
- Click on the Lock.
- Pick up Torn Page – Red.
- Step on the blue plates.
- Receive Talisman of the Gods.
- Go to the Pirate Ship (Caverns 1 – 2)
- Go into the whirlpool and stay under for over 60 seconds.
- Scene with Evie.
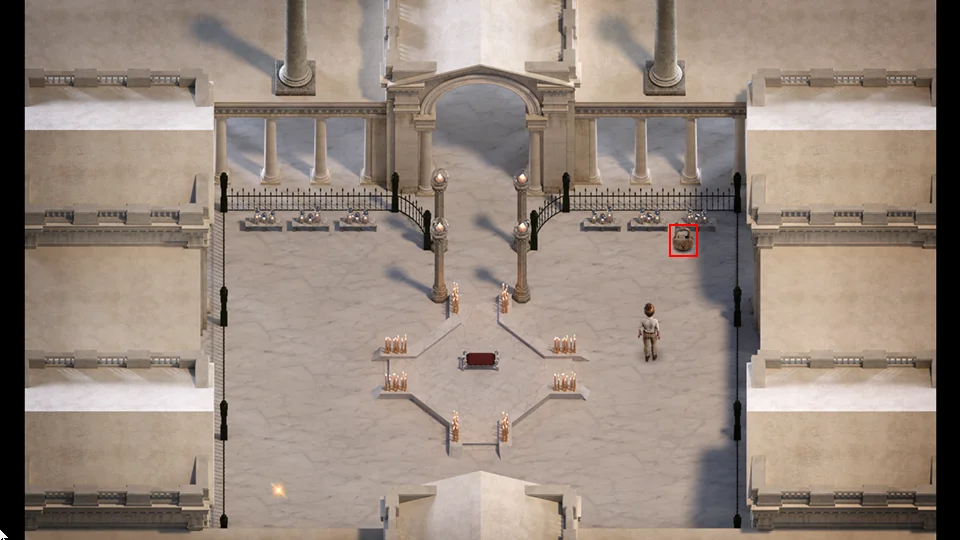
- Click on the sparkle.
- Receive White Hair.
- Open the Lock.
- Pick up Torn Yellow Page.
- Crafting time.
- Go to the Shrine.
- Craft Kama Sutra – Janet & Jessica Threesome: Torn Page – Blue x 2, Talisman of the Gods x 2
- Craft Kama Sutra – Diana & Clare Threesome: Torn Page – Purple x 2, Talisman of the Gods x 2
- Craft Kama Sutra – Naomi & Pricia Threesome: Torn Page – Red x 2, Talisman of the Gods x 2
- Craft Kama Sutra – Madalyn & Sofia Threesome: Torn Page – Green x 2, Talisman of the Gods x 2
- Craft Kama Sutra – Alia & Tahsa Threesome: Torn Page – Orange x 2, Talisman of the Gods x 2
- Craft Kama Sutra – Emily & Kaley Threesome: Torn Page – Yellow x 2, Talisman of the Gods x 2
Go to the Ancient Temple and complete puzzles 12, 25, 28, and 34. Those are all of the puzzles that depend on either the amount of money in your pocket or the safe and those that require you have a Talisman in inventory to unlock. Go to the Ancient Temple Block Push Puzzles section if you need assistance.
Now that we’ve got that out of the way. Sell all of your talismans. You will need to go to Casula Temple 1 – 3 if you need another Rock Bomb, or search for a Jade and Silver talisman to craft. Otherwise you can enable Automatic talisman selling on the Satellite Phone. With Automatic talisman selling enabled all talismans you find will be sold as soon as you acquire them. This does not apply to the talismans you earn from the Ancient Puzzles.
- Time to spruce up the old homestead for some booty calls.
- Go to Squallmart.
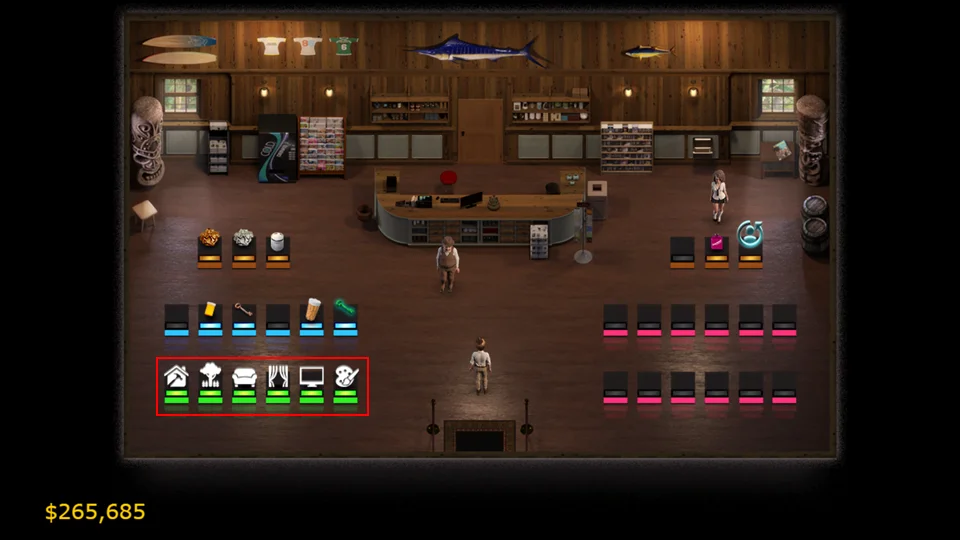
I’ll be working left to right. After you purchase some of the items upgrades or variations will become available. Leave the million dollar options for last, you don’t need any of them for any of the women.
Renovation Services:
- Basic Renovation Package ($20,000)
- Roofing Job ($10,000)
- Fancy Walkway ($60,000)
- Fancy Fence ($70,000)
- Bonus Room ($10,000)
Gardening:
- Garden Plants ($200)
- Pink Flowers ($200)
- Palm Trees ($4,000)
- Yard Statues ($275,000)
- Exotic Birds (1,000,000)
Furniture:
- Discount Sofa ($1,000)
- Table ($200)
- Recliner ($4,700)
- End Table ($4,000)
Decoration:
- Living Room Rug ($1,200)
- Green Curtains ($2,500)
- Houseplant ($400)
- Shutters ($7,000)
Entertainment:
- Basic TV ($1,500)
- Home Speaker System ($11,000)
- The other options are not available until you build the Bonus Room ($10,000) in the Renovation Services section.
Artwork:
- Jade Face Ornament ($25,000)
- Jade Figure Ornament ($25,000)
- Painting ($100,000)
- Woman Statue ($1,000,000)
- Jade Statue ($1,000,000)
Buy some things to fix up your Home so that you can call girls over and they will actually come in. Right now this is all you have to spend your money on, so you might as well spend it all.
Go home and call each woman and perform one act that is not a threesome to get the 12 Booty Calls. As soon as you go downstairs you can call the next woman.
- Go to Estero Park
- Click on the sparkle.
- Receive Attic Key.
- You most likely also need the Bonus Room added to your home, and I have found it in different places.
- Go to the Full Mast Bar.
- Go upstairs.
- Open the chest in the center of the attic with the Attic Key.
- Receive a Dart Board. The Dart Board is required as part of the all home upgrades to unlock Ancient Puzzle 47.
- If you check your Bonus Room you will see it installed.
- Go to Squallmart.
- Purchase Multivitamins until you have 99 in your inventory. This will get you the Max Dosage achievement and Multivitamins won’t be available to purchase.
Post Story – Part 4
At this point you should have all of the Hearts, Pages, Booty Calls, Outfits, Treatments, and Massages. All you need to work on is your extras.
Unfortunately this means you need to finish up those things we put on hold: Catch all of the fish for Jim, purchase all of the upgrades for your house, craft any items you may be missing (Silver and Gold talismans most likely, plus ??? which we’ll worry about once everything else is done), complete all of the Ancient Puzzles.
Catch all of the fish for Jim: See the fishing section on what size you need for each fish. I recommend that you complete the fishing with the three lures I recommended you purchase before you purchase all of the lures from the Bait Shop as it makes fishing a bit more complicated.
Purchase the house upgrades: See the Treasure Spawns section for a loop that will get you about $200,000 every five minutes.
- Ancient Puzzles: See the sections for solutions to each puzzle.
- After you have completed the above continue reading.
- Go to Squallmart.
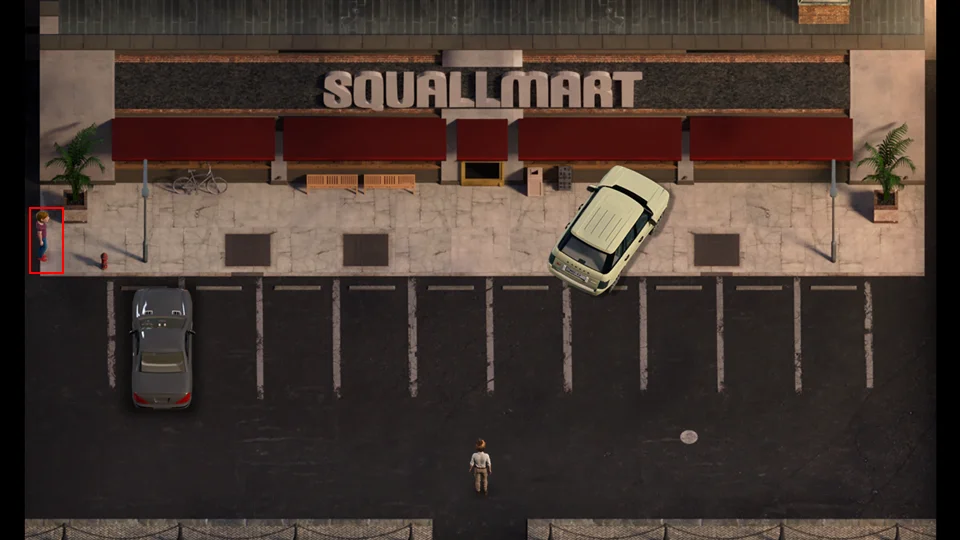
- Talk to the guy in the Squallmart parking lot.
He offers you a Topless Evie for $200,000. This is Extra number 58. I don’t know what the trigger for this guy to appear is. The only time I had him show before the end of the story was when I initially played. While writing this guide he has only appeared after the story is over making the purchase useless.
- Go inside Squallmart.
- Purchase Nitroglycerin ($200,000).
- You need to turn this into a Rock Bomb, either by crafting or using the chest in Casula Temple 1-3.
- Take your Rock Bomb to the Fountain of Youth.
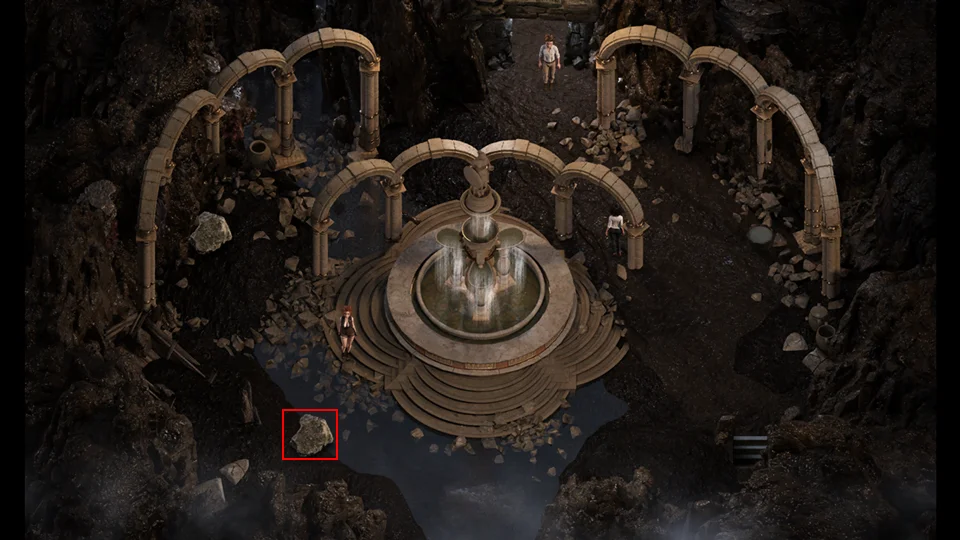
- Blow up the boulder in the back.
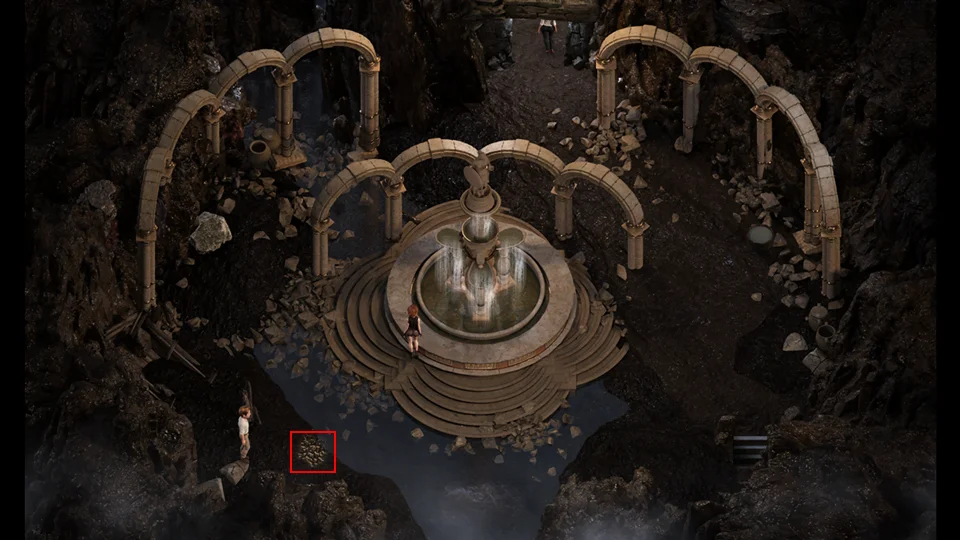
- Hit the weak area with your Pickaxe.
- You get cold and wet. Diana and Clare tell you to get upstairs and dry off. That’s all this does, you can beat on it all day and the scene repeats.
- However, it is the start of what we need to do.
- Go north (Up) into the area where you and Clare were held.
- Go north (Up) again, into the sewers.
- Go east (Right) and jump into the water.
- Scene with Evie.
- Pick up orange sparkle.
- Receive Evie’s Nude Profile.
- Pick up white sparkle.
- Receive White Hair Strand.
Craft the ???: Death Doll and White Hair Strand x3.
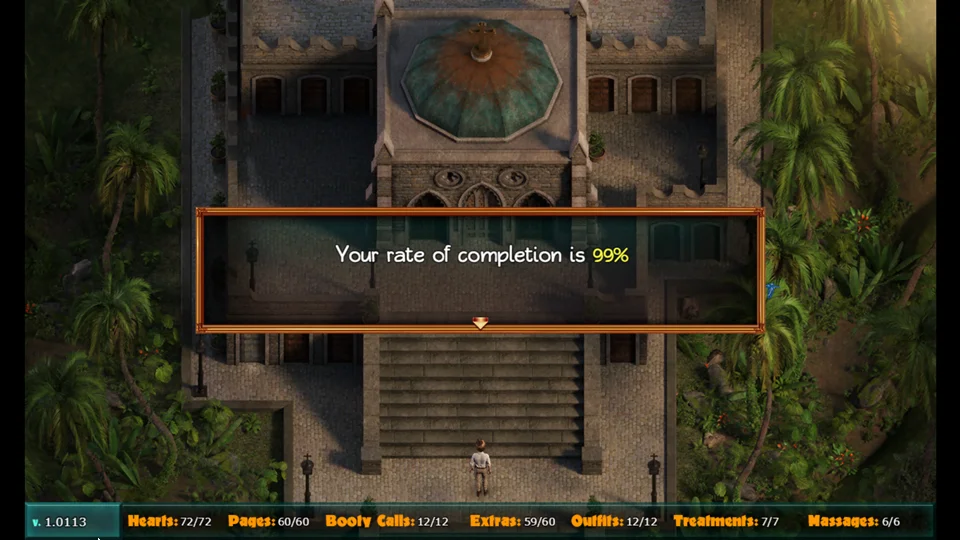
- You should have everything except the last extra.
- Go to the Church.
- Go into the Chapel.
- Madalyn will appear and give you the last extra.
Crafting Guide
To craft the ??? item, you’ll need two main components: a Death Doll and three White Hair Strands. This is a post-story item, meaning you can’t create it until after you’ve completed the main storyline.
Death Doll
You’ll get the Death Doll as a quest reward from Tasha after helping her find the Bar Key.
White Hair Strands
To get all three White Hair Strands, you must die in three different ways. Each time you die, a teleporter will activate, making it easier to return to that location later. Two of these deaths are straightforward, but the third (hypothermia) is less obvious.
- Death #1: Mauling by a Jaguar Pull the jaguar’s hairs a second time while it’s sleeping to be mauled. This will trigger a scene with Evie. Afterward, a sparkle will appear, which you can pick up for your first White Hair Strand. A teleporter to the Temple entrance will also be activated.
- Death #2: Drowning With Flippers (available from Squallmart for $150,000), enter the whirlpool near the pirate ship. A timer will appear in the top-right corner. To die, you must stay underwater for more than 60 seconds. You’ll get a scene with Evie and a White Hair Strand. While you’re down there, you’ll also find a pirate chest and a regular chest, so remember to bring keys! A teleporter will activate, allowing you to reach the pirate ship from the Estero Park entrance.
- Death #3: Hypothermia This one is a bit tricky. You’ll need a Rock Bomb. Go to the Fountain of Youth in the Mansion basement and use the Rock Bomb on the middle rock. This reveals a weak patch of ground. Use your Pickaxe on this spot, but don’t expect to find anything; Clare and Diana will just warn you about hypothermia. To actually die, take the same path you used to escape before: go north into the basement room where you were held captive with Clare, then north into the sewers, east, and finally jump into the water. When you reach the end, you’ll die and get a scene with Evie, followed by your final White Hair Strand. A teleporter will activate, connecting the Mansion’s gate to the holding cell area.
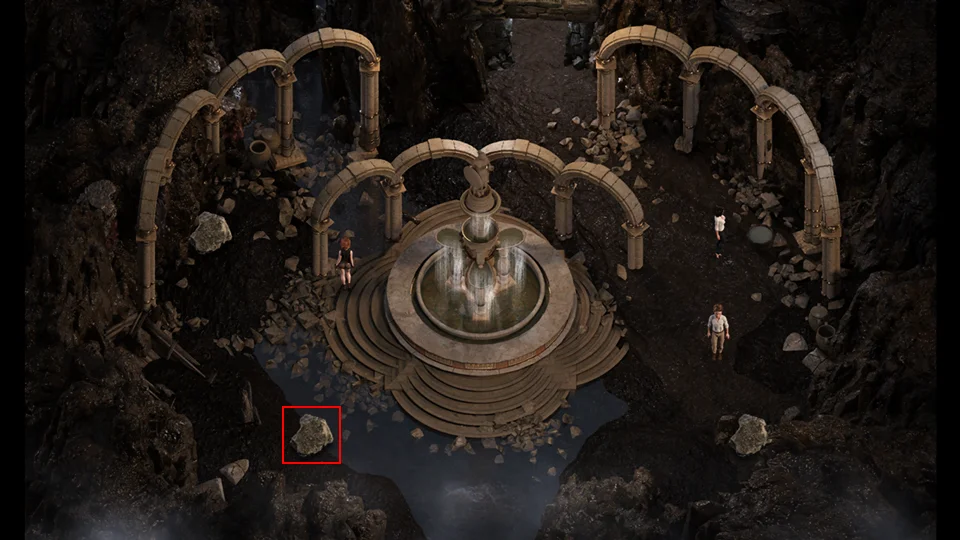
Final Steps
Once you have all three White Hair Strands and the Death Doll, go to the Shrine to combine them. After crafting the ??? item, you’ll receive a message that a secret is waiting for you at the Church. To collect this secret, you must have every item except the final Bonus Item. This will unlock scene 118 and give you 100% completion.
Crafting Recipes – Part 1
Crafting parts 1 and 2 is a listing of all of the recipes in alphabetical order by crafted item name.
Here are the recipes that will show in the crafting chest, if you’re missing any items for the Craftsman acheivement.
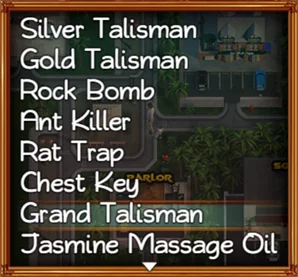
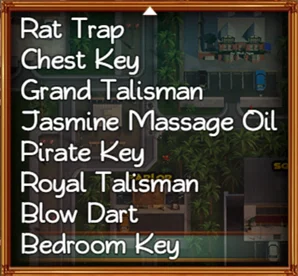
| Item | Part 1 | Part 2 | Part 3 | Part 4 | Location |
| [???] | Death Doll | White Hair Strand | White Hair Strand | White Hair Strand | Church (Sewers) Lost Underground 4-2 |
| Algae Shock | Aloe Plant | Chlorine | Limestone | Jasmine | Albert (Lighthouse) |
| Aloe Lotion | Aloe Plant | Shea Butter | Ginseng Plant | Basic Container | Lighthouse |
| Ant Killer | Fossilized Algae | Quartz Estero State Part 4-1 | Alumina | Rusty Key | Estero State Park 2 – 2 |
| Bedroom Key | Maca Plant | Aloe Plant | Jaguar Hair | Essence of Key | Mansion (3rd Floor Guard) |
| Blow Dart | Dart | Scorpion Venom | Bamboo | Feather | Estero Park |
| Camera Repair | Broken Camera Library | Camera Base Doctor’s Office (MRI Room) | Small Screwdriver Caverns 5 4 Squallmart Backroom | Loose Screws Doctor’s Office (MRI Room) | Estero State Park 5 1 |
| Chest Key | Broken Key | Broken Key | Broken Key | Broken Key | Church (Room east of Madalyn) |
| Concrete | Stone Talisman | Fly Ash | White Sand | Dolomite | Estero State Park 3 – 3 |
| Deadly Whip | Whip | Royal Talisman | Poison Thorns | Shoe Glue | Caverns 1 1 upper |
| Dehumidifier | Broken Dehumidifier | Small Screwdriver | Silver Ore | Gold Talisman | Deep Jungle 2 2 |
| Four Leaf Clover | Clover Leaf | Clover Leaf | Clover Leaf | Clover Leaf | N/A |
| God’s Shovel | God’s Shovel Shaft | God’s Shove Handle | God’s Shovel Head | Talisman of the Gods | Mansion (Fountain of Youth) |
| Gold Compass | Compass Piece | Compass Piece | Compass Piece | Compass Piece | N/A |
| Gold Talisman | Stone Talisman | Stone Talisman | Stone Talisman | Gold Ore | Estero State Park 4 – 3 |
| Golden Teddy | Bumpy Candle | Teddy Bear | Gold Ore | White Sand Deep Jungle 3 3 | Caverns 1 4 |
| Grand Talisman | Gold Ore | Gold Ore | Gold Ore | False Talisman Caverns 2 | Caverns |
| Hacking Tool | Key Card | ID Card Writer | System BIOS | Encryption Scanner | Mansion (Pool) |
| Jade Shovel | Jade Talisman | Shovel Handle Parlor (Backyard) | Shovel Shaft Estero State Park 5-2 | Shovel Blade Squallmart $80 | Caverns 3 4 |
| Jasmine Massage Oil | Jasmine | Rosa Moss | Basic Container | Love Potion | Light House |
Crafting Recipes – Part 2
| Item | Part 1 | Part 2 | Part 3 | Part | Location |
| Kamasutra Alla & Tasha Threesome | Torn Page Orange Mansion (Storage Room) | Torn Page – Orange Lost Underground 4-2 | Talisman of the Gods | Talisman of the Gods | N/A |
| Kamasutra Diana & Clare Threesome | forn Page Purple Boat Dock | Torn Page Purple Deep Jungle 2-3 | Talisman the Gods | Talisman of the Gods | N/A |
| Kamasutra Emity & Kaley Threesome | forn Page Vellow Church (Skoleton Key) | Torn Page Yellow Limbo (Evie) | Talisman the Gods | Talsman of the Gods | N/A |
| Kamasutra Janet & Jessice Threesome | Torn Page Blue Estero State Park 2-4 | Torn Page Blue Deep Jungle 1-2 Lower Level | Talisman the Gods | Talisman of the Gods | N/A |
| Kamasutra Madalyn Soña Threesome | Torn Page Green Mansion (Locked Bedroom) | Torn Page Green Mansion (Sofia’s Bedroom) | Talisman the Gods | Talisman of the Gods | N/A |
| Kamasutra Naomi & Pricla Threesome | Torn Page Red Casula Temple 1-3 | Torn Page * Red Mansion (Fountain of Youth) | Talisman the Gods | Talisman of the Gods | N/A |
| King’s Shovel | King’s Shovel Head Lost Underground 1-3 | King’s Shovel Shaft | King’s Shovel Handle | Caull’s Coin | Deep Jungle 1-3 |
| Loaded Musket | Old Musket | Old Bullet | Cleaning on | Siver Ore | Caverns 2-4 |
| Metal Ladder | Ladder Segment | Ladder Segment | Ladder Segment | Siver Ore | Mansion (2nd Floor) |
| Mystical Gas Mask | Painter’s Mask | Ry Ash | Super Goggles | Grand Talisman | Casula Temple 2 2 |
| Nitroglycerin | Soap | Nitric Acid | Suiphuric Acd | Basic Container | Casula Temple 3 |
| Penetrating Oil | Nall Polish Remover | Aloe Plant | Transmission Fluid | Basic Container | Lighthouse (Mysterious Key Required) |
| Pickaxe | Wrench Grip Caverns 1-3 | Gaffer Tape Estero State Park 5-2 | Grappling Hook Previously Crafted | Pipe Wrench Squalimart | Estero State Park 3 2 |
| Plate Key | vate Medalion | Grand Tallsman | Broken Key | Brokm Key | Church (Sewers) Lost Underground 3-1 |
| Pvate Shovel | Prate Medalion | Cursed Shovel | Jade Talsman | Gold Talisman | Caverns 3 – 2 |
| Rat Trap | Plastic Wrap | Gaffer Tape Estero State Park 2-1 Estero Key Attic Church Sewers | Roach | Basic Container | The Full Mast Bar |
| Rock Bomb | Nitroglycerin | Basic Container | Jade Tallsman | Siver Talisman | Estero State Park 4 – 4 |
| Rope Ladder | Knot Tying Guide | Tiny Rope | Tiny Rope | Tiny Rope | Deep Jungle 3 – 3 |
| Royal Talisman | Grand Tallsman | Grand Tallsman | Grand Talisman | Caull’s Coin | Library Basement |
| Siver Talisman | Stone | Stone Tallsman | Stone Talisman | Siver Ore | The Parlor (Backyard) |
| Stompin’ Boots | Leather Gloves Pricta (Ginseng Quest) | Damaged Boots Lighthouse (Albert’s Room) | Shoelaces Janet’s Bathroom | Shoe Glue Squalimart | The Full Mast Bar (Men’s Room) |
| Switt Showel | Alloy Shovel Head | Carbon Shovel Shaft Full Mast (Attic) | Ultra Shovel Handle Estero State Park 3-2 | Siver Talisman | Light House (Albert’s Room) |
| Tomb Key | Tomb Key Segment | Tomb Key Segment | Tomb Key Segment | Tikpak Artifact | Caverns 2 – 1 |
Gold Compass
After the Priest’s Compass is destroyed you will be able to find the four pieces of it. You can reassemble it at the Shrine by putting in all four pieces and you will receive a Gold Compass which replaces your Metal Detector. With the Gold Compass equipped you will find Gold Talismans when you pick up gold coins. You do not want to do this until after you clear out the Casula Temple and Sofia’s Treasure room.
Here are where the four pieces land.
Compass Piece 1 – Estero Key

Compass Piece 2 – Church
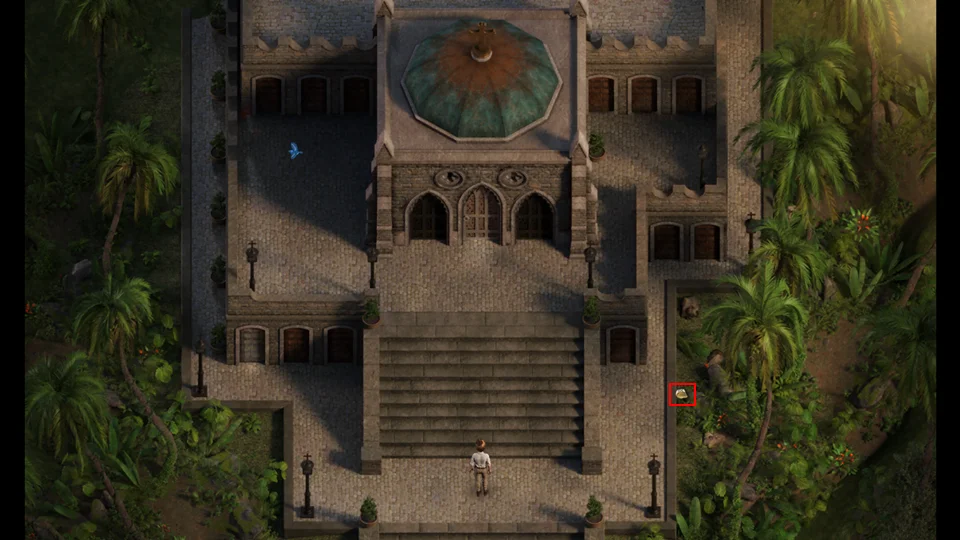
Compass Piece 3 – Squallmart
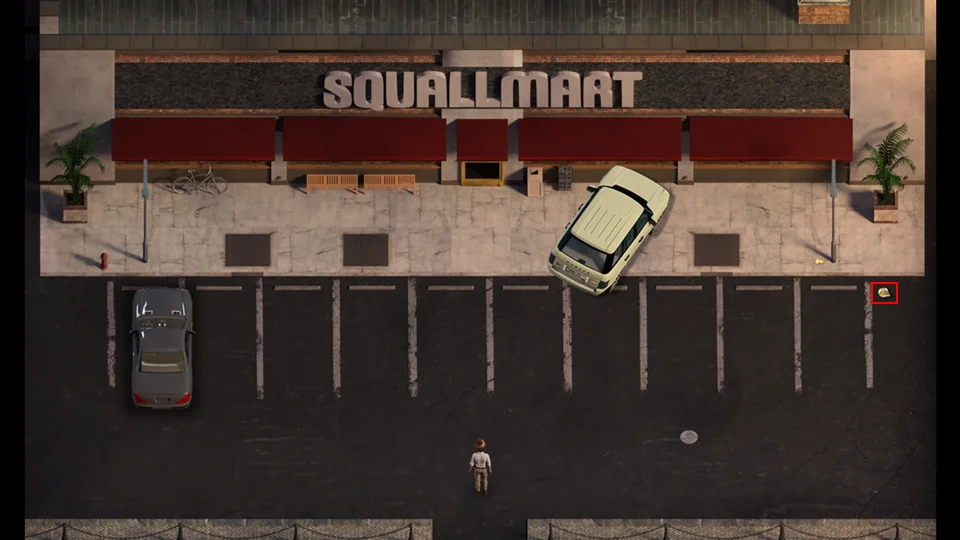
Compass Piece 4 – Lighthouse

The compass has some of the features that the Priest’s Compass had, without that little minor draw back. After you have assembled the Gold Compass you will see a flashing blue button the size of a pressure pad at the park entrance.
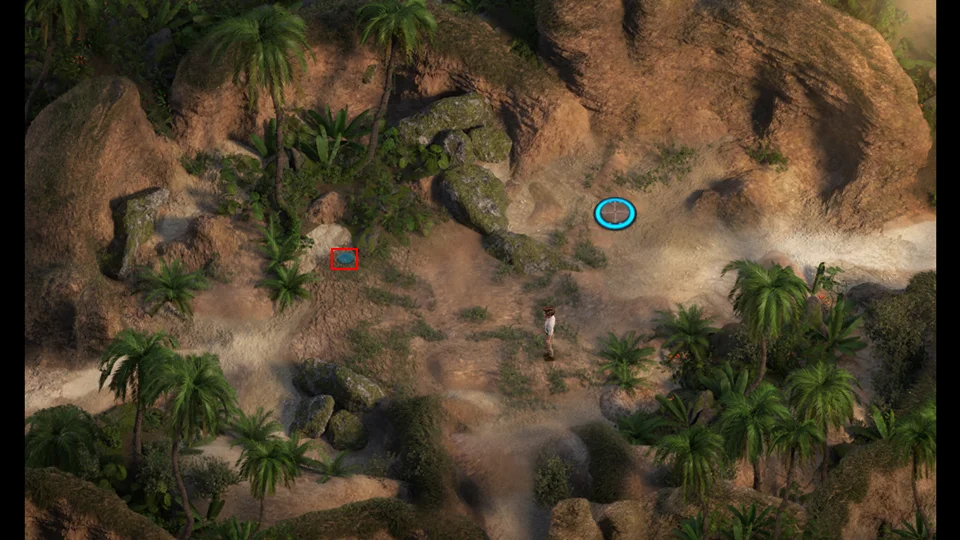
- When you step on the pad a riddle is reveiled.
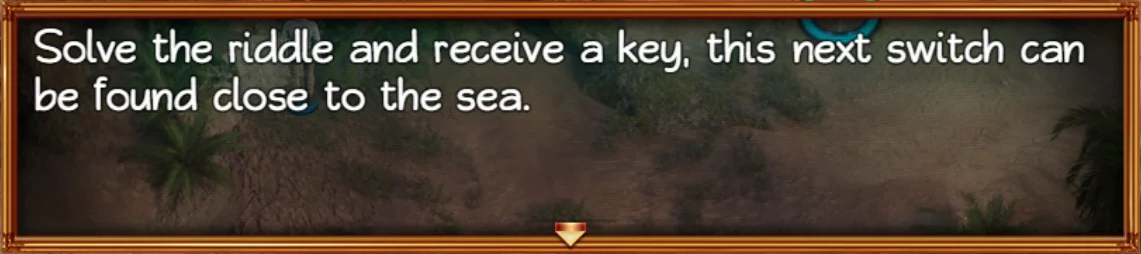
- Go to the Beach.

- Step on the pad.
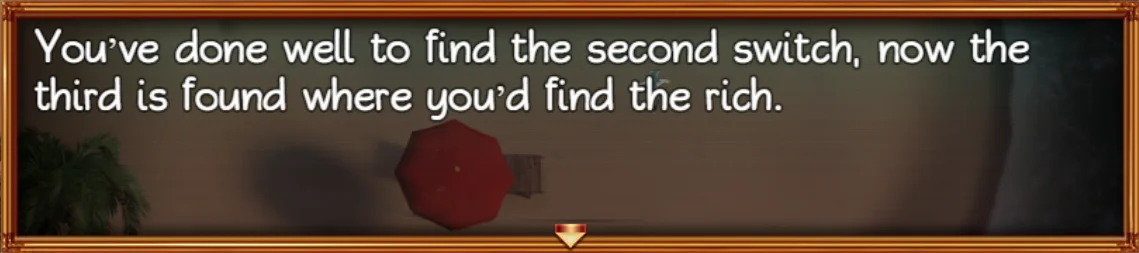
- Go to the Mansion.
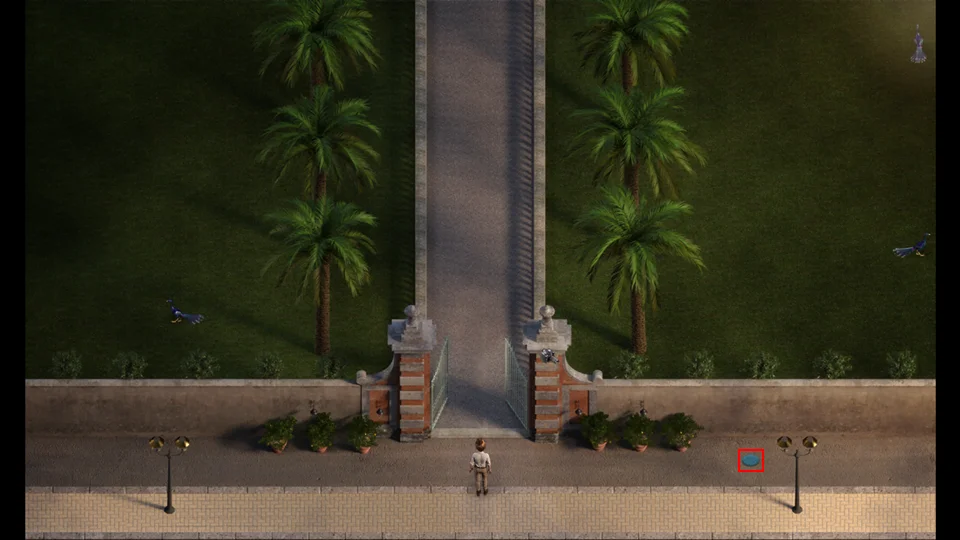
- Step on the pad.

- Go to the Fountain of Youth under the Mansion.
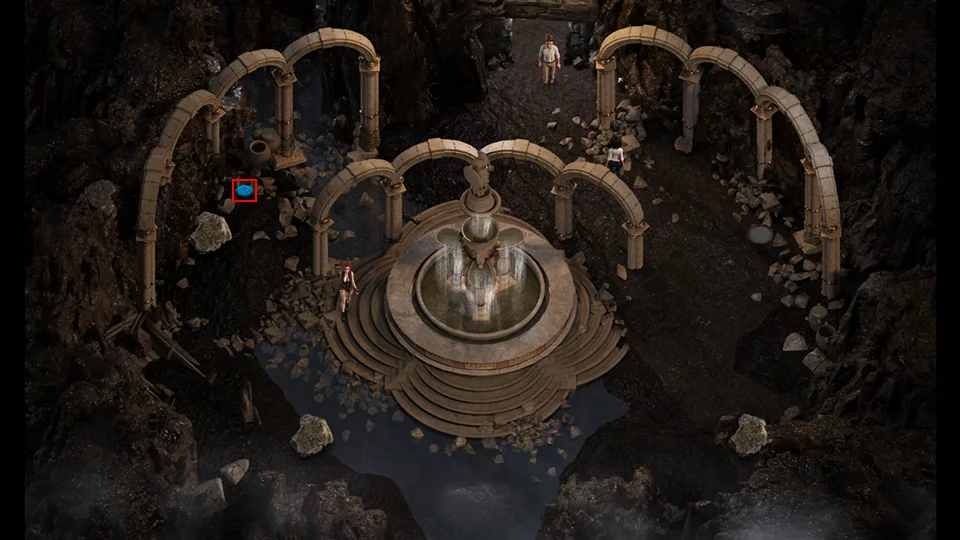
- Step on the pad.
- Receive a Talisman of the Gods.
- Go to the Church.
- Use the right door in Madalyn’s chamber.
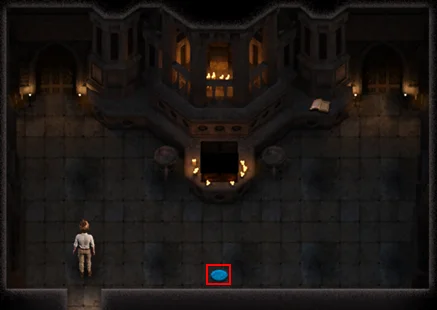
- Step on the pad.
- Receive a Talisman of the Gods.
- Go to the Crypt.
- Step on the pad.
- Pick up the Chest Key.
- Go to the Parlor.
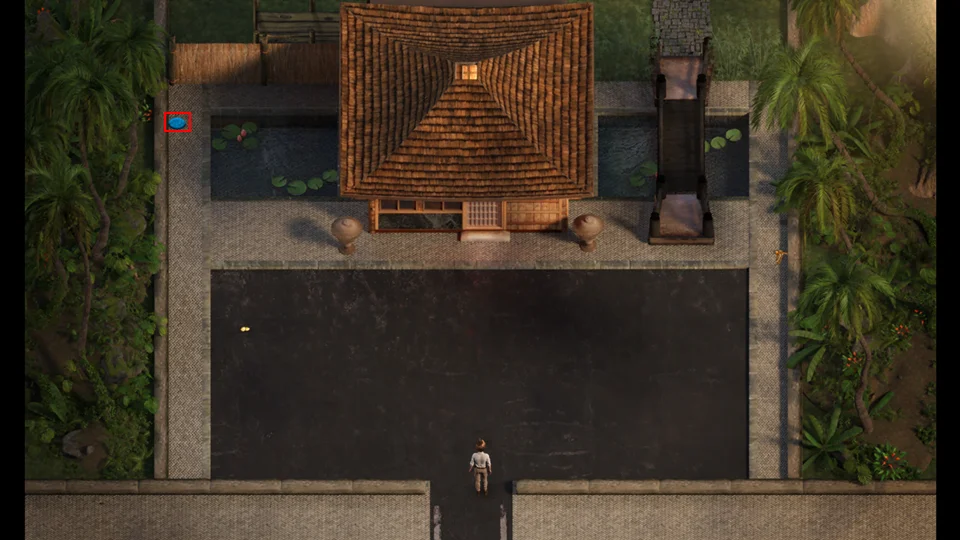
- Step on the pad.
- Receive Talisman of the Gods.
- Go to Estero State Park 4 – 1.
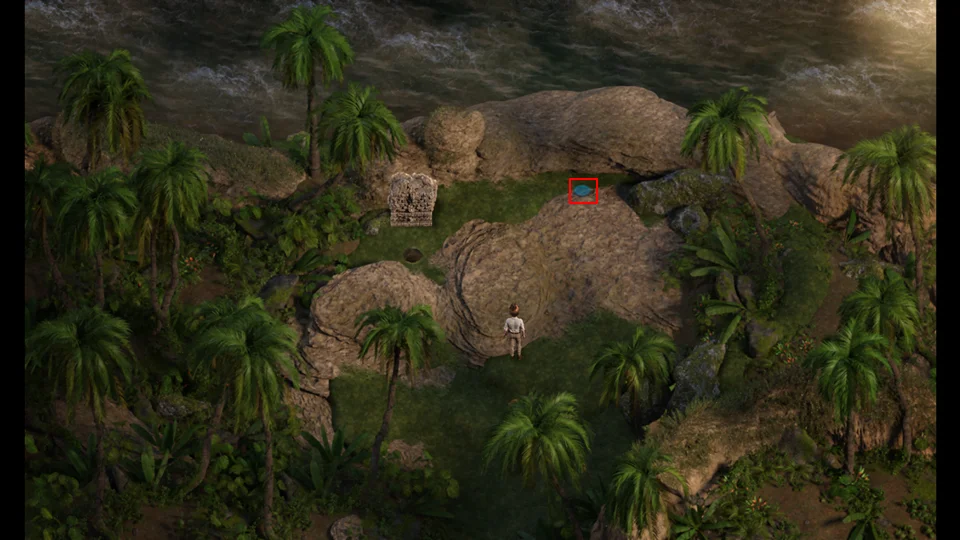
- Step on the pad.
- Receive Talisman of the Gods.
- Go to Deep Jungle 1 – 1
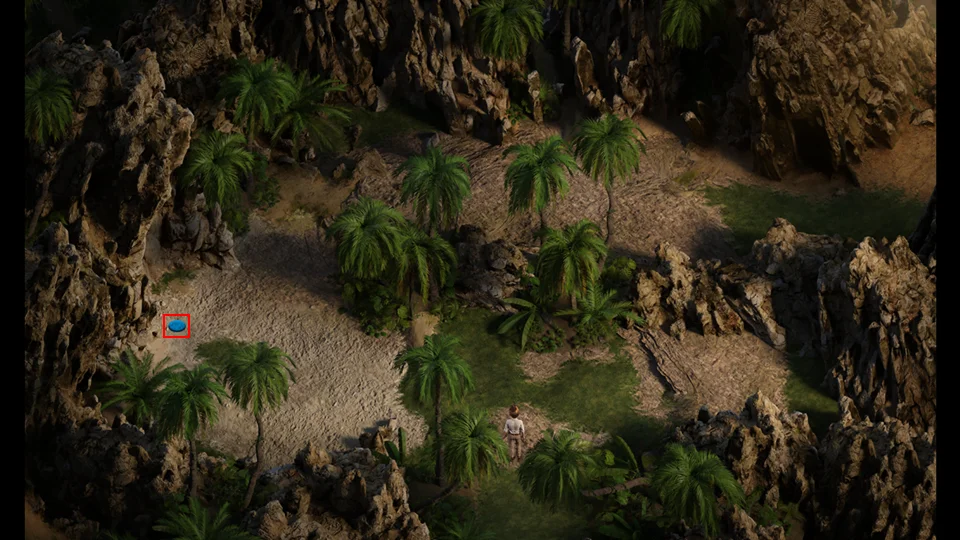
- Stand on the plate.
- Receive Talisman of the Gods.
- Go east (Right)
- Step on the plate.
- Receive Talisman of the Gods.
- Go to Deep Jungle 2 – 2.
- Enter the Cave.
- Go south (Down).
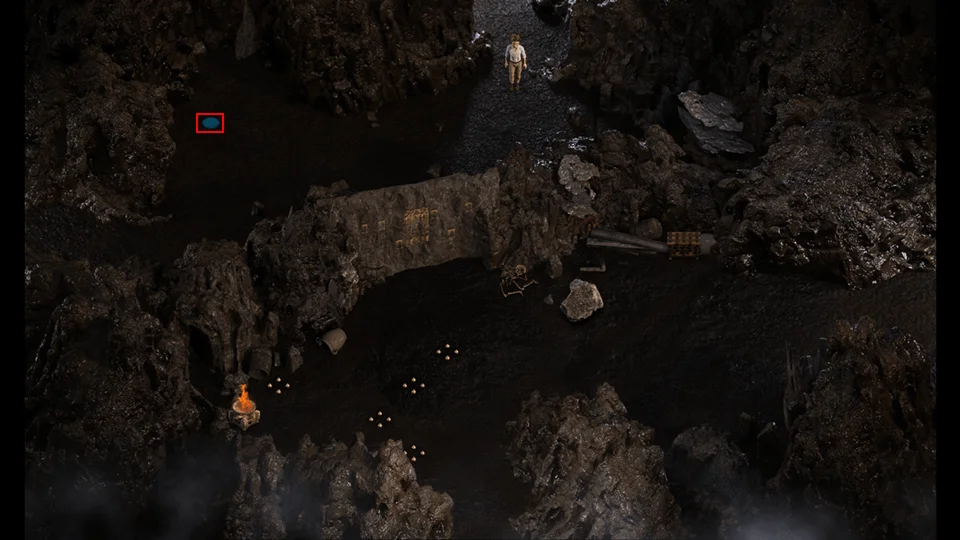
- Step on the plate.
- Pick up Kama Sutra – Kaley Anal.
Plants & Locations
This guide won’t cover the initial discovery of plants. Instead, it focuses on the later stages of the game when you’ll be collecting plants for fun and profit. Most plants – such as Aloe, Ginseng, and Red Ginseng – are limited to one in your inventory at a time. Maca also follows this rule after you collect the initial samples. You can test this by leaving plants on the ground; you’ll notice they spawn all over the place.
However, the moment you pick one up, all the others will disappear. The only exceptions are Philweed, which only appears in specific, non-respawning locations, and Jasmine and Rosa Moss, which will continue to respawn and can be held in greater quantities.
| Plant | Image | Locations | Notes |
|---|---|---|---|
| Aloe |  | Deep Jungle 1–3 Deep Jungle 2–1 | You can only hold one in your inventory. Sells to Pricia for $2,000. |
| Ginseng |  | Found commonly all over Cape Verda | You can only hold one in your inventory. Sells to Pricia for $250. |
| Jasmine |  | Only found at Deep Jungle 2–3 | One of the few plants that respawn and can be carried in quantities greater than one. Sells for $1,500, but only in the gray container (Pricia won’t buy it). |
| Maca |  | Estero State Park 3–3 | You can initially find two plants, but after that, you can only hold one in your inventory. Sells to Pricia for $1,000. |
| Red Ginseng |  | Fairly common all over Cape Verda | You can only hold one in your inventory. Sells to Pricia for $600. |
| Rosa Moss |  | Caverns 1–3 | There are three spawn locations. You can hold more than one in your inventory, but the respawn rate is much slower than Jasmine. |
| Philweed |  | Only specific locations | Philweed does not respawn and is only found in specific locations. There are a total of 11 Philweed locations, which is just enough to fill the stock in the backroom of Squallmart. |
Philweed
Philweed does not respawn and is only found in specific locations. There are a total of 11 Philweed locations, which is just enough to fill the stock in the backroom of Squallmart.
- Estero State Park 4–1
- Estero State Park 3–3
- Estero State Park 2–2
- Estero State Park 1–2
- Estero State Park 2–4
- Estero State Park 4–4 (area reached from Caverns 2–4)
- Deep Jungle 3–3
- Estero State Park 3–3 (Whip required)
- Deep Jungle 2–1
- Deep Jungle 1–1 (Grappling Hook required to reach this location)
- Deep Jungle 1–2
- Casula Temple 2–2 (Metal Ladder required to reach this location)
- Casula Temple 1–1 (Viper Antivenom required)
Treasure Spawns
To get to 100% you will need to purchase everything for your house, so you’re going to need cash. Here are, from my experience, the spawn rates of different locations.
- Low spawns will usually only have one treasure, sparkle or gold pile, and frequently will have none.
- Medium spawns will usually have two or three treasures, but not as frequently.
- High spawns will almost always have something and usually multiples.
Estero State Park
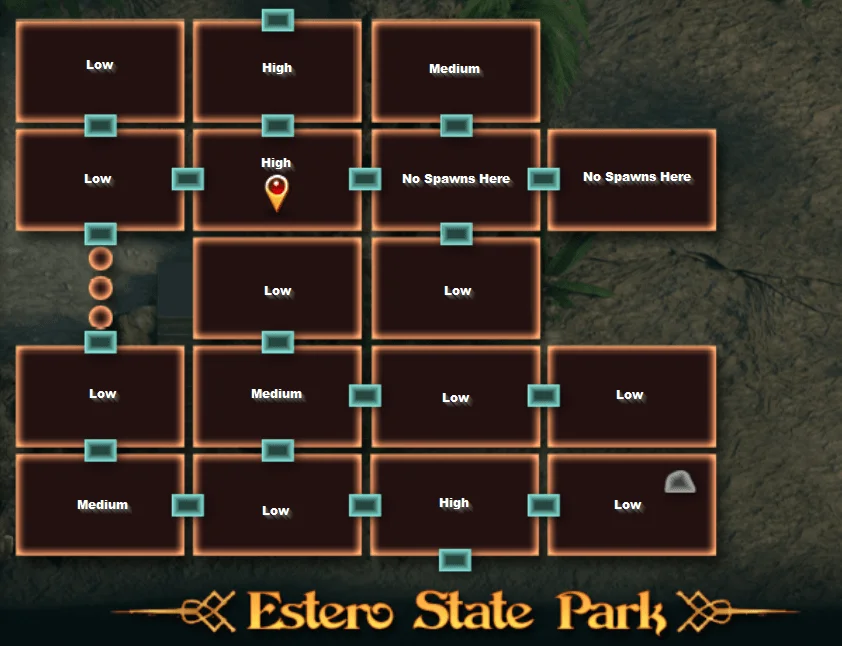
The best three locations in Ester State Park are the teleporter locations and the area under the top teleporter.
Deep Jungle
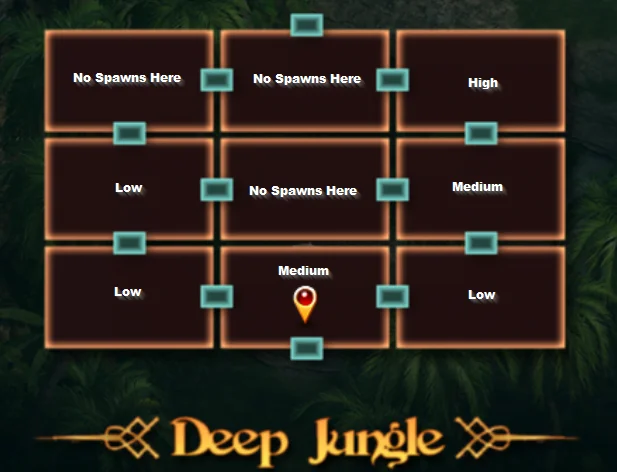
The best location in the Deep Jungle is the upper right (1 – 3) where you find the Aloe. I put the area under it as a medium due to the Jasmine Plant spawns that you can sell, if you use the bulk option, to Pricia.
While you can find some sparkle spawns and plants in town it isn’t an efficient way to earn money.
This is the path I recommend for maximum treasure.


To give you an idea of how productive this route is, I ran five, five minute runs. Each circuit takes about 30 seconds. Here are the results of those test runs. I only found one Talisman of the Gods in run 2. You should be able to clear $2,000,000 an hour with this route.
These runs were done with end of game gear: Gold Compass, Super Guide, God’s Shovel with move speed set to Fast.
| Run | Plants | Number of Talismans | Sell Price of Talismans |
| 1 | $17,000 | 68 Talismans | $192,050 |
| 2 | $12,500 | 76 Talismans | $293,870* |
| 3 | $11,000 | 82 Talismans | $174,020 |
| 4 | $17,000 | 64 Talismans | $218,230 |
| 5 | $11,250 | 76 Talismans | $230,670 |
Talismans
You can only carry 99 talismans of each type. When you’re getting close to this limit sell the talismans of that type as any talismans found after 99 are discarded.
Silver, Gold, Grand, and Royal talismans can be crafted.
Stone Talisman
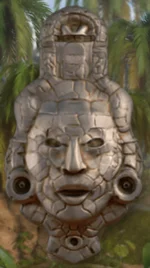
Sell Value: $10
Jade Talisman
Sell Value: $140
Silver Talisman
Sell Value: $1,000
Gold Talisman
Sell Value: $4,000
Grand Talisman
Sell Value: $12,000
Royal Talisman
Sell Value: $36,000
Talisman of the Gods
Sell Value: $144,000
Treasure Maps
Map 1 – Estero State Park 5 – 1
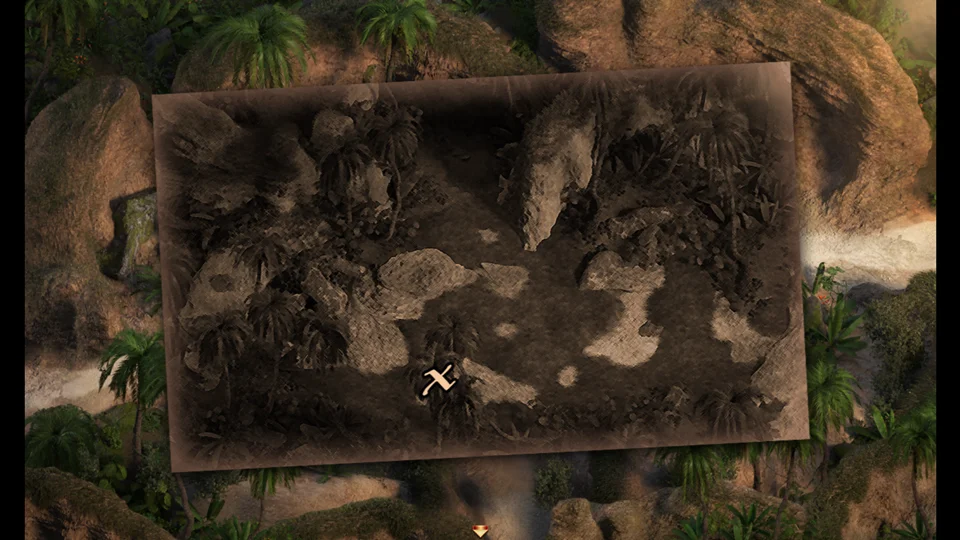
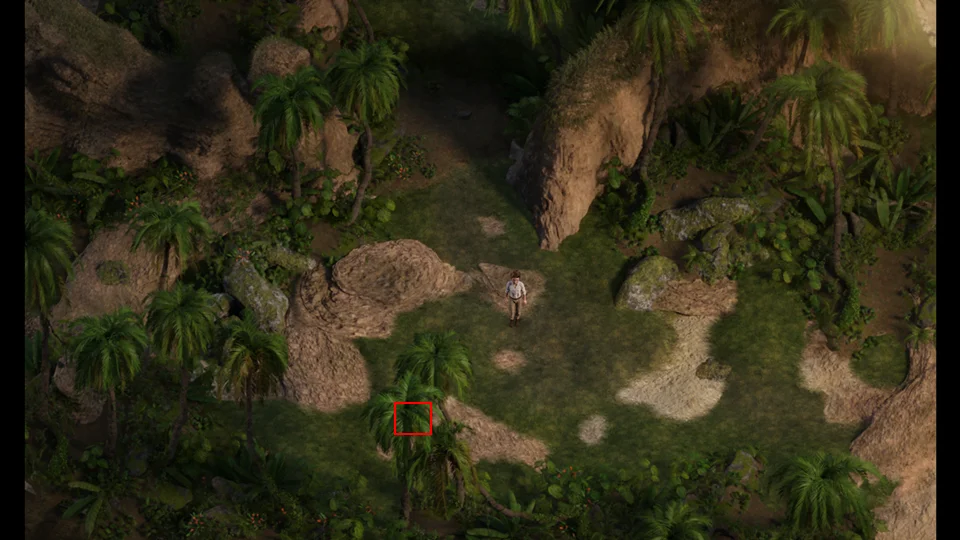
- Use your Pickaxe on the weak ground.
- Receive a Chest Key.
Map 2 – Deep Jungle 1 – 3
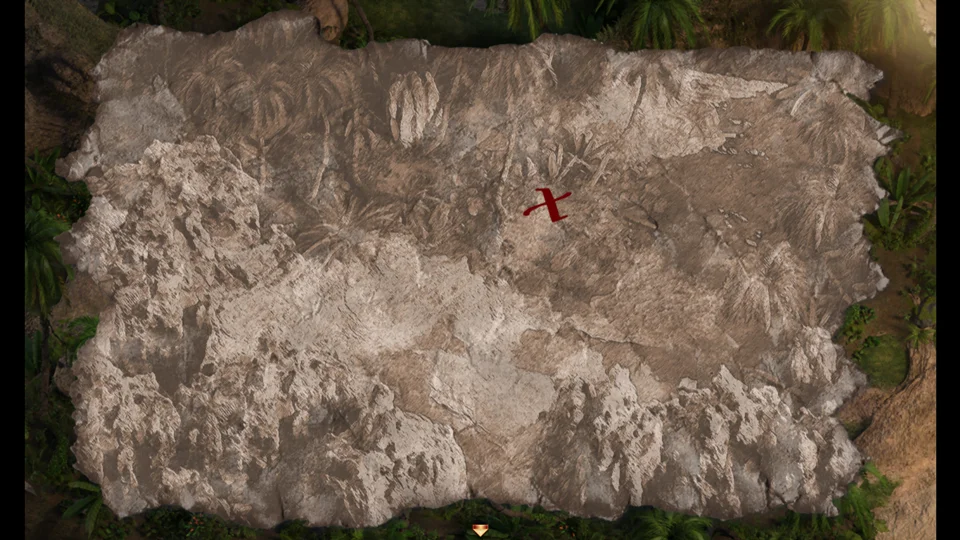
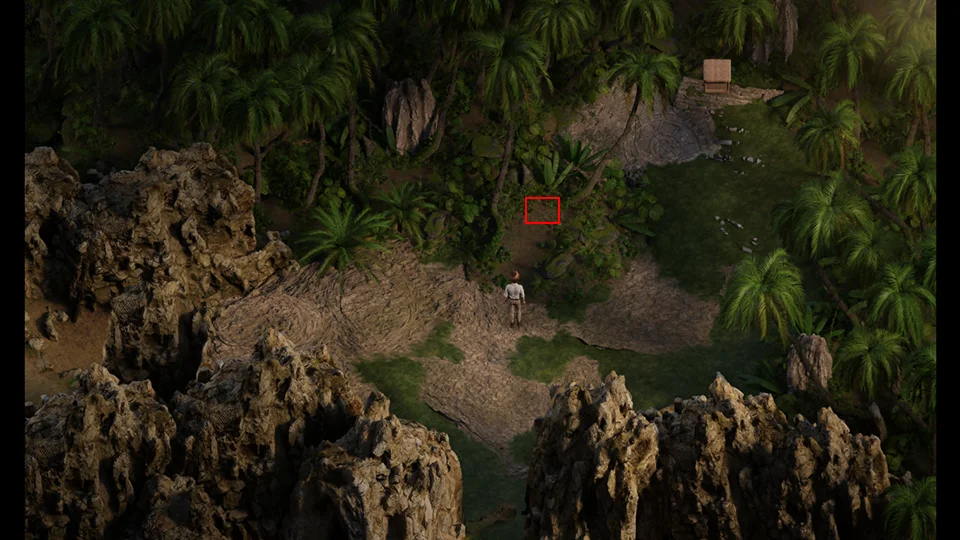
- Use your Pickaxe on the weak ground.
- Receive a Chest Key.
Map 3 – Basement of the Library.
If you’re doing this post game you will need to access this area from the Mansion.
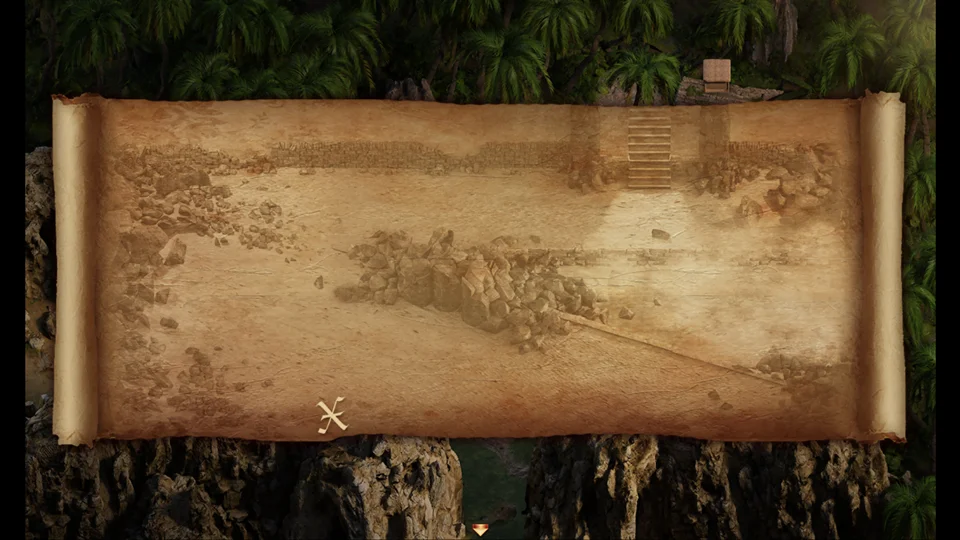
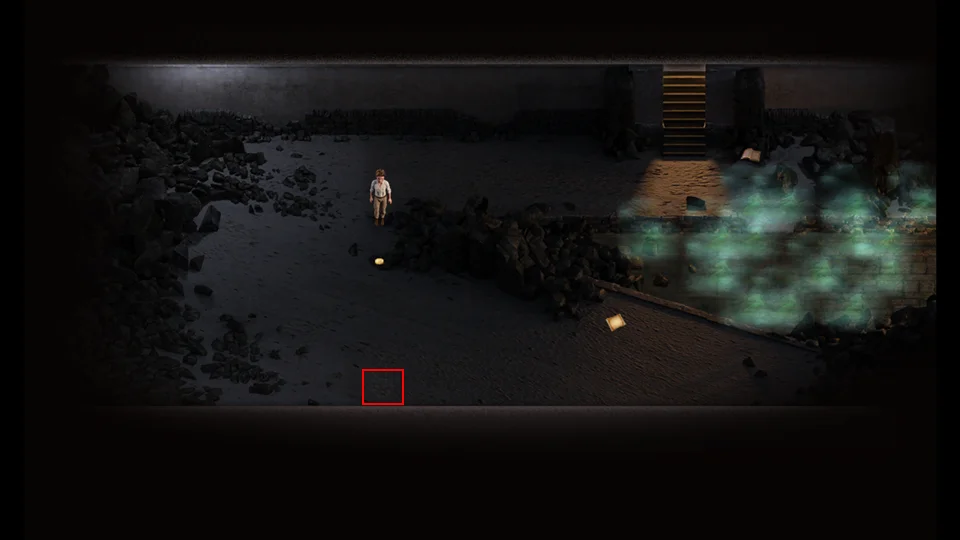
- Use your Pickaxe on the weak ground.
- Receive a Chest Key.
Booty Calls
You have to fix up your home so that women are willing to come inside. Each girl has their own set of standards and if you don’t meet those standards they will turn around and walk away.
You can purchase the Vitamins at Squallmart.
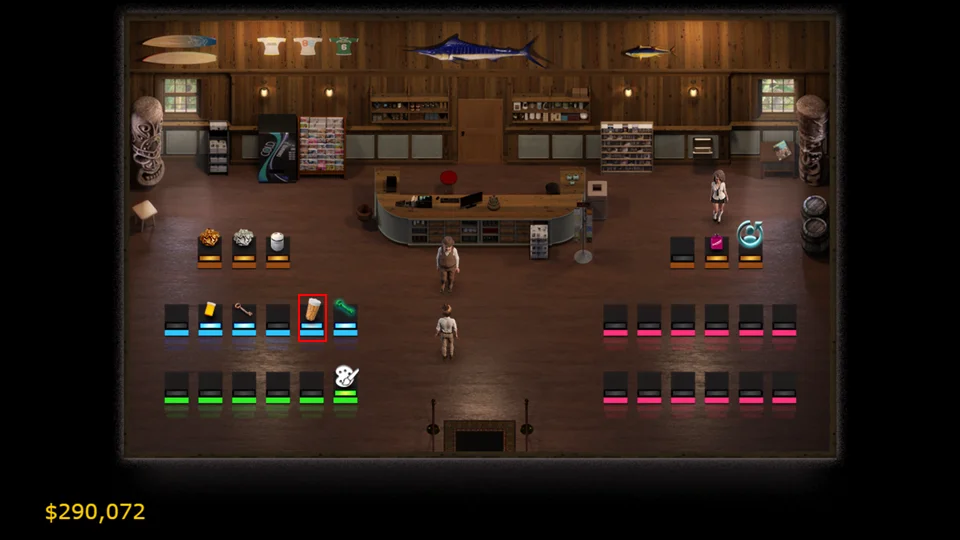
If you have a woman’s phone number you can call her over for a Booty Call. You must have a Kama Sutra page for them otherwise nothing happens.
After the woman arrives you take her upstairs to your room.
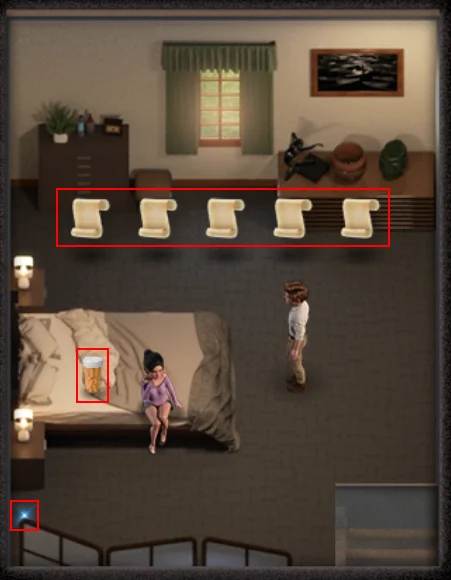
The Kama Sutra pages you have collected for her are at the top. Each woman has four solo pages and one threesome page.
Next to the woman are your vitamins. The sparkle in the lower left is their alternative outfit and will not be there if you have not purchased it.
| Name | Act 1 | Act 2 | Act 3 | Act 4 | Act 5 |
| Alia | Foolin’ Around Estero Key | ♥♥♥♥ Play Lighthouse (Albert’s Room) | Cowgirl Estero State Park 2 | Anal Sex Lost Underground 4 – 4 (Chest by Whirlpool) | Alia & Tasha Threesome |
| Clare | Motorboat Deep Jungle 2 3 | Face ♥♥♥♥ Lighthouse (Fort) | Reverse on Top Caverns 2 (Upper Level) | Anal Sex Estero State Park 4 4 | Diana & Clare Threesome |
| Diana | Facetime & Footjob Church (L Shaped Room) | Seat & Shift Estero State Park 4 4 (Upper) | ♥♥♥♥ Sex Estero State Park 1 1 (Tomb) | Anal Sex Lost Underground 1 – 4 | Diana & Clare Threesome |
| Emily | Butt n’ Muff Munch Shrine | Face ♥♥♥♥ Church (Right of Madalyn) | Let’s Plow Caverns 5 3 | Anal Sex Fountain of Youth | Emily & Kaley Threesome |
| Janet | Blowjob Mansion (Treasure Room) | ♥♥♥♥ Play Caverns 1 4 | ♥♥♥♥ Sex Mansion (Dining Room) | Anal Sex Caverns 2 1 (Underwater) | Janet & Jessica Threesome |
| Jessica | Heart Checkup Full Mast Bar (Overflow) | Drink It Up Mansion (Outside) | ♥♥♥♥ Sex Lighthouse (Fort) | Anal Sex Boat Dock | Janet & Jessica Threesome |
| Kaley | Mutual Masturbation Caverns 2 2 | Sixty Nine Estero State Park 2 4 | ♥♥♥♥ Sex Caverns 2 2 (Upper) | Anal Sex Caverns 2 2 (Upper / Gold Compass Required) | Emily & Kaley Threesome |
| Madalyn | Boobs & Butt Lighthouse (Fort Mysterious Room) | Bite Job Lost Underground 1-3 | Piledrive Casula Temple 2 -1 | Anal Sex Mansion (3rd Floor Bedroom) | Sofia & Madalyn Threesome |
| Naomi | Blowjob Church (Chapel) | Tit ♥♥♥♥ Full Mast Bar (Attic) | Doggy Style Estero State Park 2 1 | Anal Sex Casula Temple 1 2 | Naomi & Pricia Threesome |
| Pricia | Face Sitting Estero State Park 4 -3 | Deep Throat Deep Jungle 3 3 | On Top Lighthouse (Fort) | Anal Sex Casula Temple 3 2 (Gold Compass Required) | Naomi & Pricia Threesome |
| Sofia | Legjob Casula Temple 2 – 2 | Snack Time Lost Underground 4 3 | ♥♥♥♥ Sex Casula Temple 1 -3 | Anal Sex Church (Skeleton Key) | Sofia & Madalyn Threesome |
| Tasha | Strip Tease Estero State Park 5 -1 | Mustacheless Ride Estero State Park 4-4 | Blowjob Estero State Park 3 3 | Anal Sex Mansion (Janet and Kaley’s room) | Alia & Tasha Threesome |
Fishing
Jim runs the Bait Shop. Jim will give you specifications for fish to catch and will pay you a bounty for catching the fish. If you have already caught a fish that meets the qualifications you will not need to find and catch a second one.
To fish click on the water and select a lure. There are three fish to catch at any one time. Saving your game will get you some new fish, as will leaving the area and coming back.
Fishing lures come in two levels, the base level and the heavy level. The heavy lures will give you a better chance of catching a larger fish. You can catch all the fish you need with three lures: Heavy Natural Jig (Hammerhead Shark, Seaperch, Rockfish), Heavy Green Squid (Marlin, Rockfish, Seaperch, Tuna), and Heavy Pink Plug (Great White Shark).
Here are the fishes’ preferred lures. This doesn’t mean that they won’t hit another lure, just that they are more likely to go after this one. Rockfish and Seaperch aren’t very picky. The green squid lure works for everything except the Great White Shark and Hammerhead Shark.
| Fish | Lure |
| Great White Shark | Pink Plug |
| Hammerhead Shark | Natural Jig |
| Marlin | Green Squid |
| Rockfish | Green Jig |
| Seaperch | Natural Plug |
| Tuna | Pink Squid |
If you cast directly on top of a fish it will swim away from the lure. you want to cast close to, but not on a fish.
Here are the fish types and weights that you will need to catch to collect all of Jim’s bounties.
| Fish Type | Fish Weight |
| Seaperch | 5 Pounds |
| Rockfish | 28 Pounds |
| Tuna | 105 Pounds |
| Hammerhead Shark | 1,000 Pounds |
| Marlin | 1,000 Pounds |
| Great White | 3,000 Pounds |
Here are the bounties that you will collect. If you’ve already caught a fish that meets the requirements the bounty will be paid, you don’t have to catch it again. So, you could catch fish that meet or exceed the fish in the chart above and collect all of the bounties.
| # | Fish | Weight | Reward |
| 1. | Seaperch | Any | $30 |
| 2. | Rockfish | Any | $60 |
| 3. | Tuna | Any | $100 |
| 4. | Seaperch | 3lb | $120 |
| 5. | Rockfish | 6lb | $150 |
| 6. | Tuna | 40lb | $300 |
| 7. | Hammerhead Shark | Any | $1,000 |
| 8. | Marlin | 50lb | $1,400 |
| 9. | Seaperch | 5lb | $1,700 |
| 10. | Rockfish | 28lb | $2,500 |
| 11. | Tuna | 80lb | $4,000 |
| 12. | Hammerhead Shark | 600lb | $7,000 |
| 13. | Marlin | 300lb | $10,000 |
| 14. | Great White Shark | 500lb | $14,000 |
| 15. | Tuna | 105lb | $15,000 |
| 16. | Hammerhead Shark | 1,000lb | $25,000 |
| 17. | Marlin | 600lb | $40,000 |
| 18. | Great White Shark | 2,000lb | $60,000 |
| 19. | Marlin | 1,000lb | $80,000 |
| 20. | Great White Shark (Bruce) | 3,000lb | $100,000 |
Trivia time. Bruce was the name of the mechanical shark in Jaws.
After you have caught all of the fish and collected all of the bounties purchase any lures you are missing to unlock Puzzle 35 in the Ancient Temple. You must have all of the lures in your inventory to unlock the puzzle. So, if you lost one fishing you will need to purchase it again to unlock.
Locker Keys
Locker Key 1 – Estero Park Entrance
Locker Key 2 – Cemetery
Locker Key 3 – Full Mast Bar
Locker Key 4 – Beach
The Lockers are in the Doctor’s Office Break Room.
- Locker 1: Photo: Pricia & Jessica
- Locker 2: Chest Key
- Locker 3: Photo: Jessica in College
- Locker 4: King’s Offering Chip
Ancient Temple Puzzle Solutions
These are “Bonus” puzzles that will reward you with Talismans. No keys are required to open the chests, you just have to get to them.
You’ll want to do puzzle 12, 25, 28, and 34 first. All of the them are dependent on something that can change, cash on hand, talisman in inventory. or money in the Squallmart vault. After you have crafted all of the Kamasutra pages and done those four puzzles you can set your talismans to auto sell using the Satellite Phone.
When a puzzle is locked by must currently meet the lock requirements. So if the requirement is to have a Gold Talisman you have to have a Gold Talisman in your inventory for the puzzle to be available.
Here are the basic things that you will be dealing with for these puzzles.
| Image | Description |
|---|---|
 | Slider – Once pushed will continue in that direction until it hits something. |
 | Push Block – Will move one space at a time when pushed. |
 | Bomb – Used to blow up the yellow spinning blocks. |
 | Blow Me – Blow them up, because that’s the only way you’re getting rid of these blocks. |
 | Flasher – These come in two flavors, red and blue, when you touch the flasher all of the blocks with that color will disappear. |
 | Color Block – The center moves up and down. The color indicates the Flasher that will make it go away. |
 | Snakes – All of the snakes in the Ancient Temple puzzle are chasers and will try to get to you. They all move faster than you, so you have to block them. |
If you’re going to try attempting the puzzles on your own I recommend that you work backwards. Look at the exit and see what you need to do to clear the exit. Normally there are either Blow Me blocks or blocks that will be cleared by a Flasher. Next look to see how to collect the number of Bombs needed or how to get to the Flashers to clear the associated blocks. This strategy will benefit you greatly in the later puzzles where you don’t need to use everything to get to the chest.
Ancient Temple: Puzzles 1 – 10
Puzzle 1 – Earn 2 total hearts to unlock
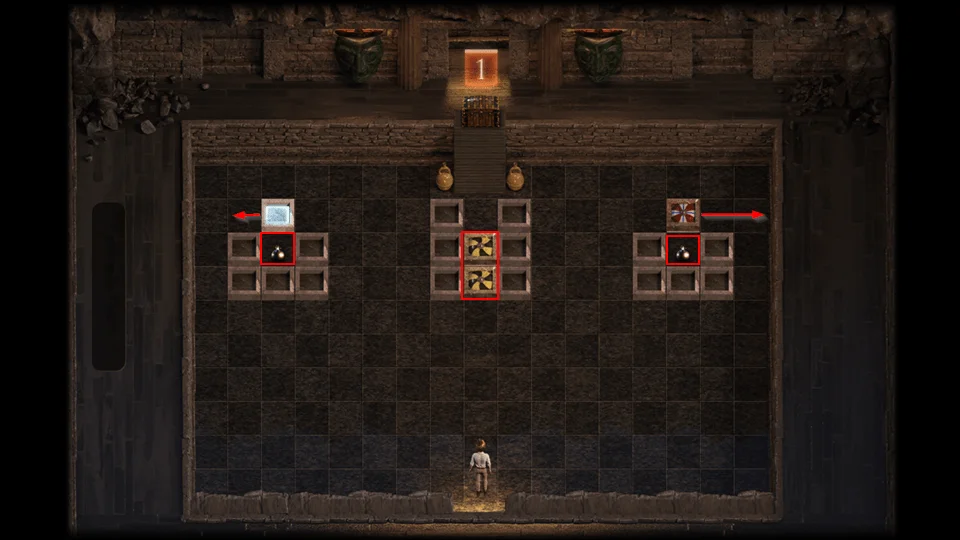
- This one is easy and there are many ways to solve it.
- Push the Slider right.
- Grab the Bomb.
- Push the Push Block Left.
- Grab the Bomb.
- Blow up the two Blow Me blocks
- Open the chest.
- Receive a Jade Talisman.
Puzzle 2 – Find 2 total kamasutra pages to unlock
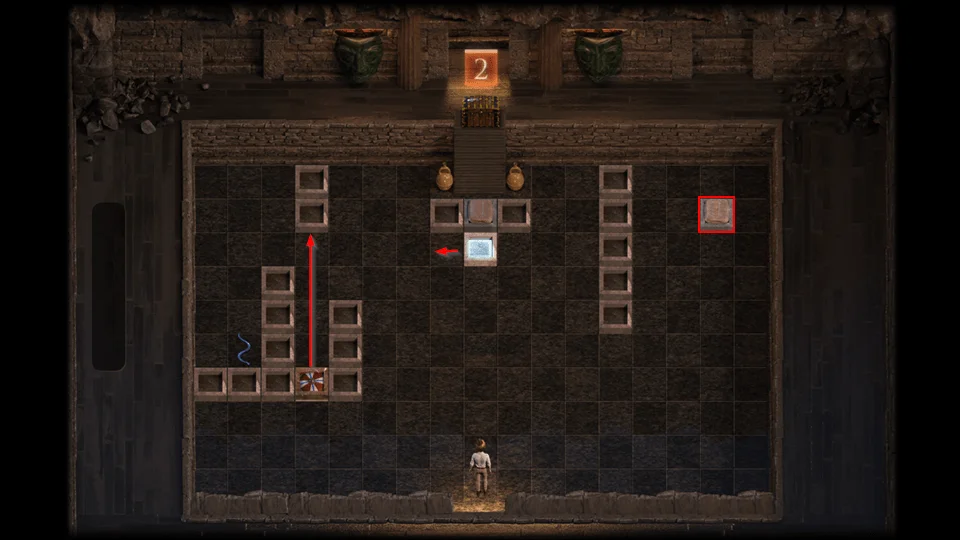
- Push the Slider up to block in the snake.
- Move the Push Block left one.
- Click on the Flasher.
- Open the chest.
- Receive a Jade Talisman.
Puzzle 3 – Earn 5 total hearts to unlock
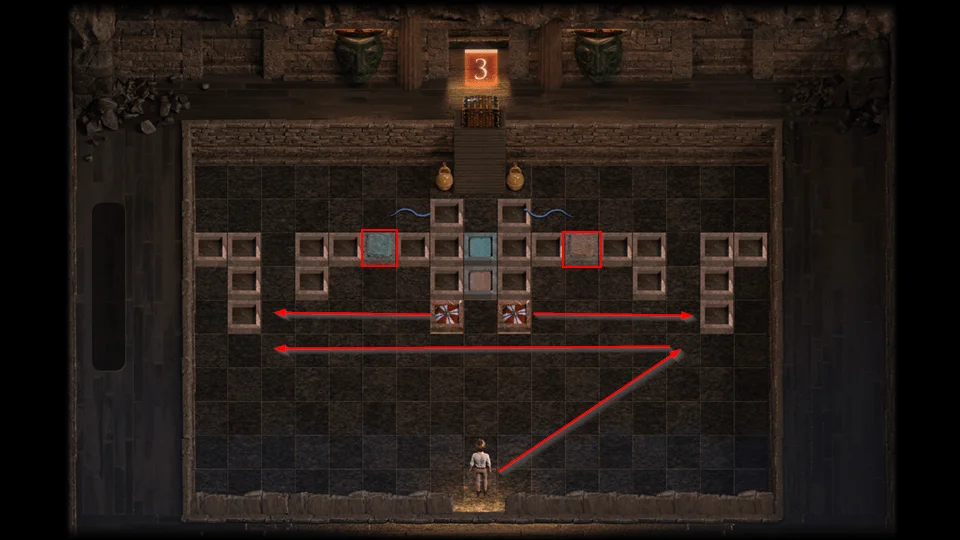
- Push the right Slider right
- Push the left Slider left.
- Stand under each of the Sliders to draw the snakes to you.
- Press the Blue Flasher.
- Press the Red Flasher.
- Open the chest.
- Receive a Jade Talisman.
Puzzle 4 – Buy 2 total outfits to unlock
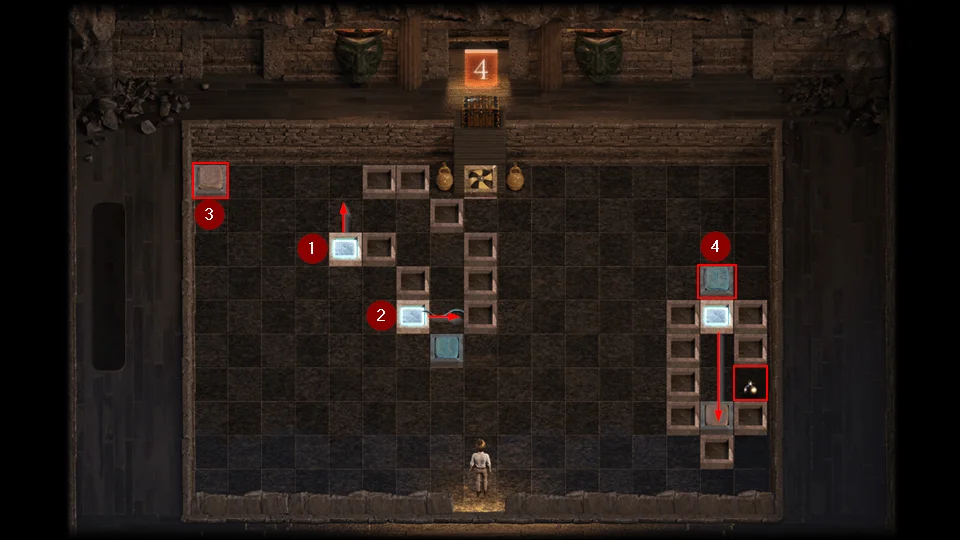
- Push the far left Push Block up 1, this will draw the snake up.
- Push the middle Push Block right 1, this will seal in the snake.
- Press the Red Flasher.
- Press the Blue Flasher.
- Move the Push Block down to where the Red Block was.
- Grab the Bomb.
- Blow up the Blow Me block.
- Open the chest.
- Receive a Silver Talisman.
Puzzle 5: Earn 2 booty calls to unlock
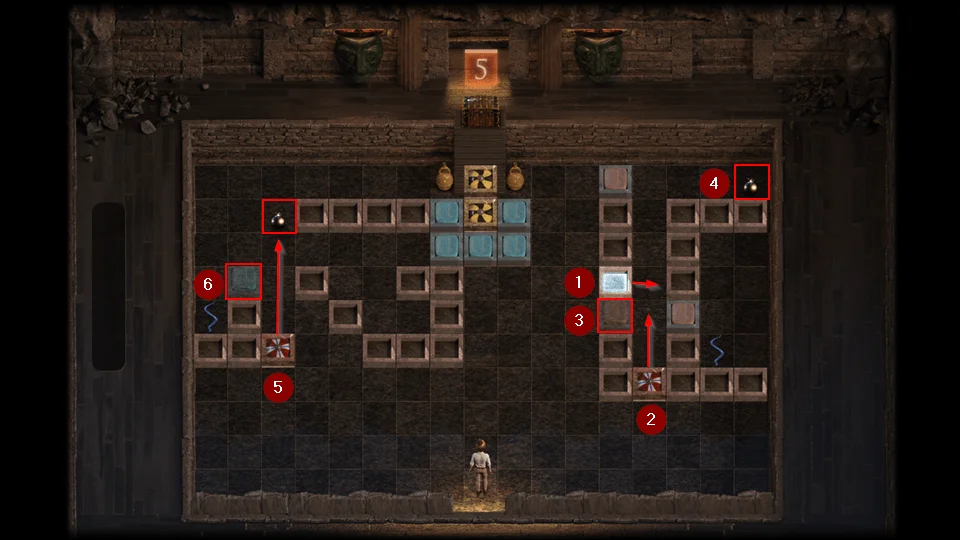
- Move the Push Block Right.
- Push the Right Slider up.
- Press the Red Flasher.
- Pick up the Bomb.
- Push the Left Slider up.
- Push the Blue Flasher.
- Pick up the second Bomb.
- Slowly walk around so that the snake gets into the lowest level.
- Open the chest.
- Receive a Silver Talisman.
Puzzle 6 – Build the Jade Shovel to unlock
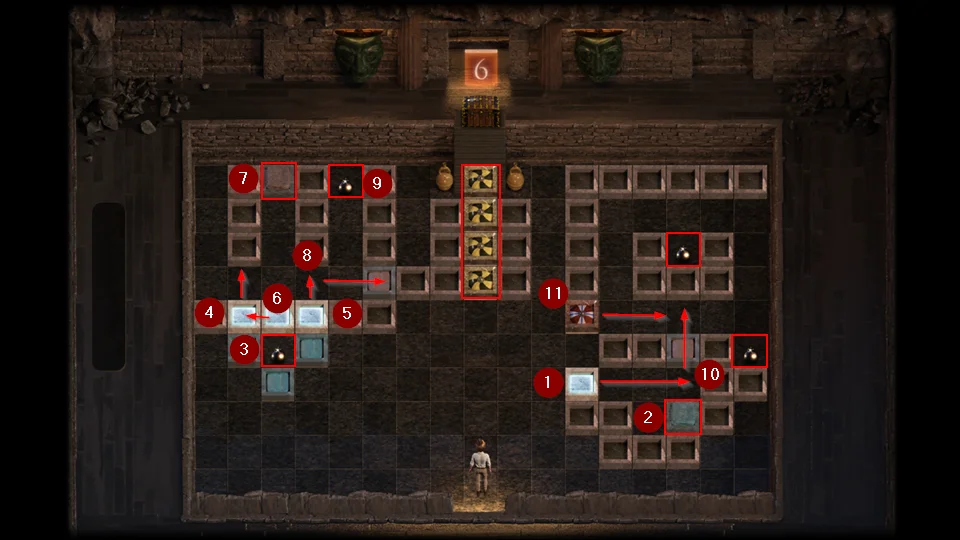
- Move the right Push Block 3 to the right.
- Push the Blue Flasher.
- Pick up the lower left Bomb.
- Move the left Push Block up 1.
- Move the right Push Block up 1.
- Move the middle Push Block to the left 1.
- Press the Red Flasher.
- Move the right Push Block right 2 to where the Red Block was.
- Pick up the upper left Bomb.
- Move the right Push Block up 2.
- Move the Slider to the right.
- Pick up the last two Bombs.
- Blow up all of the Blow Me blocks.
- Open the chest.
- Receive a Silver Talisman.
Puzzle 7 – Catch a Sea Perch to unlock
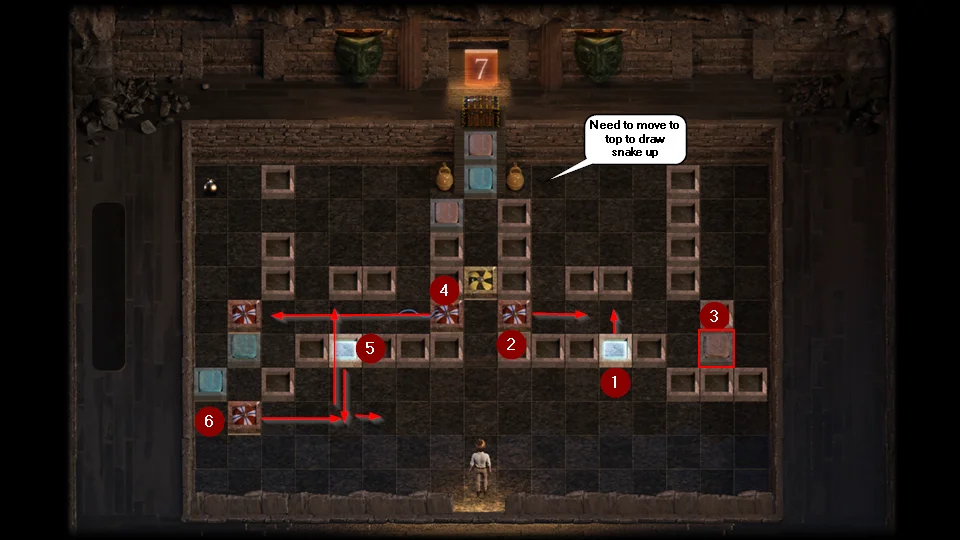
- Move right Push Block up 1.
- Push Slider Right.
- Push the Red Flasher.
- Move to the top by the stairs to draw the snake up.
- Push the Slider left.
- Move the Push Block down 2 and then right 1.
- Push the Slider right into the Push Block.
- Push the Slider up.

- Push the Blue Flasher.
- Push the Slider Up.
- Move the Push Block left 4 and then up 6 against the slider.
- Pick up the Bomb.
- Blow up the Blow Me block.
- IMPORTANT
- Click on the chest.
- If you do not click on the chest the snake will get you.
- Receive Silver Talisman.
Puzzle 8 – Find 4 total kamasutra pages to unlock

- Move the left Push Block right 1.
- Push the left Slider up.
- Push the Red Flasher.
- Move the left Push Block right 5.
- Push the right Slider up.
- Now you need to move to the far upper right to draw the snake up.
- Move the right Push Block right 3.
- Collect the Bombs.
- Blow up the Blow Mes.
- Open the chest.
- Receive a Silver Talisman.
Puzzle 9 – Light 4 torches to unlock
- Move the left Push Block up 1.
- Move the Push Block that was next to it right 3.
- Pick up the Bomb.
- Move the last Push Block in the group left 5, then down 4, then left 3 to position it under the Blow Me block.
- Blow up the Blow Me block.
- Push the slider down.
- Press the Red Flasher.
- Pick up the top Bomb.
- Pick up the bottom Bomb.
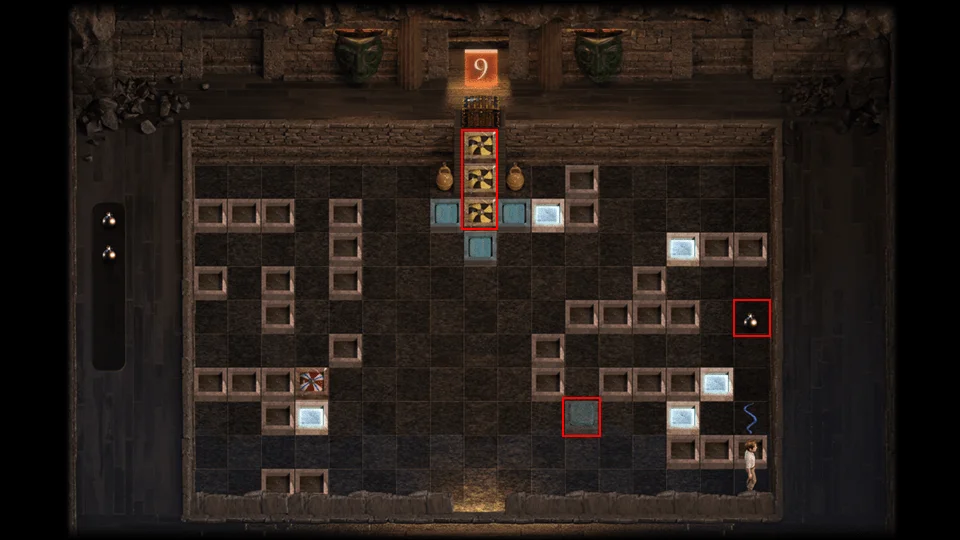
- Move to the bottom right corner to draw the snake down.
- Press the Blue Flasher.
- Now we are going exploit one of the snake’s weaknesses. Snakes won’t chase you until you are in a space that they can see. Part two of this is that you don’t have to move to a square to interact with things.
- Stand on the left side of the Bomb and pick it up. As long as you don’t move into the far right row the snake will not chase you.
- Now blow up the three Blow Me blocks.
- Open the chest.
- Receive a Gold Talisman.
Puzzle 10 – Buy 4 total outfits to unlock
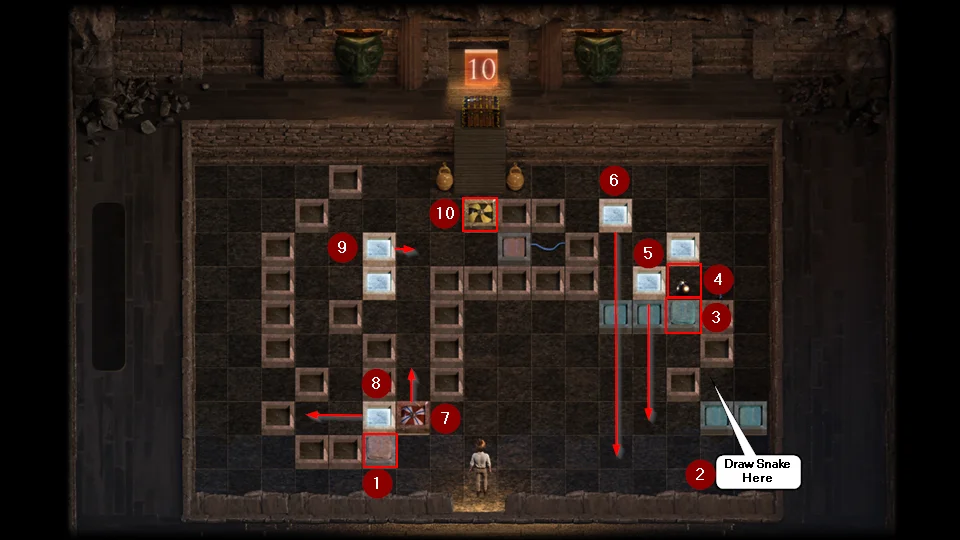
- Press the Red Flasher.
- Technically you can push the spinner up before the snake gets all the way down, but the timing is tricky, so this is a longer but more sure way.
- Draw the right snake down to the bottom.
- Press the Blue Flasher.
- Pick up the Bomb.
- Move the Push Block that is left of the Bomb down 4.
- Move the upper Push Block down 7.
- Click on the bottom of the Slider to move it up. If you click on it, it should move up one square before the snake arrives. If you click below and then try to push it won’t work. If it doesn’t move up move the snake back up and try again.
- Move the Push Block that was next to the Slider left 2.
- Move the top Push Block right 1. This will trap the snake.
- Blow up the Blow Me block.
- Open the chest.
- Receive a Gold Talisman.
Ancient Temple: Puzzles 11 – 20
Puzzle 11 – Find 7 total kamasutra pages to unlock

The first four moves are all on the lower left Slider.
- Push the Slider up.
- Push the Slider left.
- Push the Slider down.
- Push the Slider left, this will block in the snake on the lower end.
- Press the Blue Flasher.
- Press the Red Flasher.
- Pick up the Bomb.
- Blow up the Blow Me block from the bottom.
- Push the left Slider Left.
- Move the Push Block up 2.
- Push the right Slider left.
- Move to the Bombs to draw the Snake up.
- Push the lower left Slider up sealing in the Snake.
- Pick up the two Bombs.
- Blow up the two Blow Me blocks.
- Open the chest.
- Receive a Gold Talisman.
Puzzle 12 – Hold $6000 or more to unlock
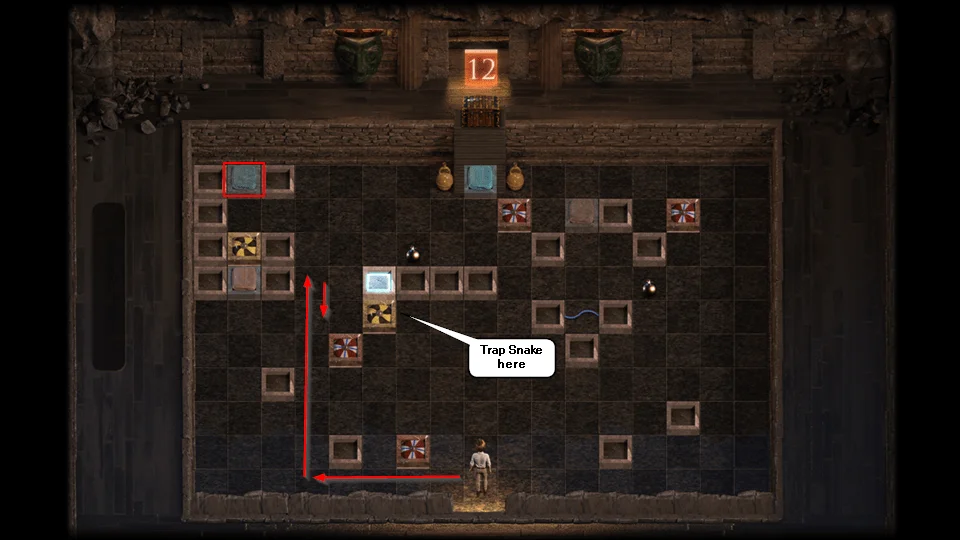
This is the first puzzle designed to make you over think the solution. There are a lot of elements that are there to distract you from how easy this puzzle is.
- Walk up to the Push Block to draw the Snake up.
- Walk down to the Blow Me block to trap the Snake under the ledge.
- Push the Blue Flasher.
- Open the chest.
- Receive a Gold Talisman.
Puzzle 13 – Build the Swift Shovel to unlock
- Pick up the Bomb.
- Move left Push Block up 2 and then right 3.
- Stand to the left and blow up the Blow Me block on top of the two right Bombs.
- Pick up the two Bombs.
- Push the Blue Flasher.
- Move the Push Block right 1.
- Push the upper left Slider to the right.
- Blow up the Blow Me block below the second Slider.
- Push the Slide up.
- Pick up the Bomb by the exit.
- Blow up the Blow Me by the two Bombs.
- Pick up the two Bombs.
- Blow up the three Blow Mes by the Red Flasher.
- Push the Red Flasher.
- Open the chest.
- Receive a Gold Talisman.
Puzzle 14 – Find 8 total kamasutra pages to unlock
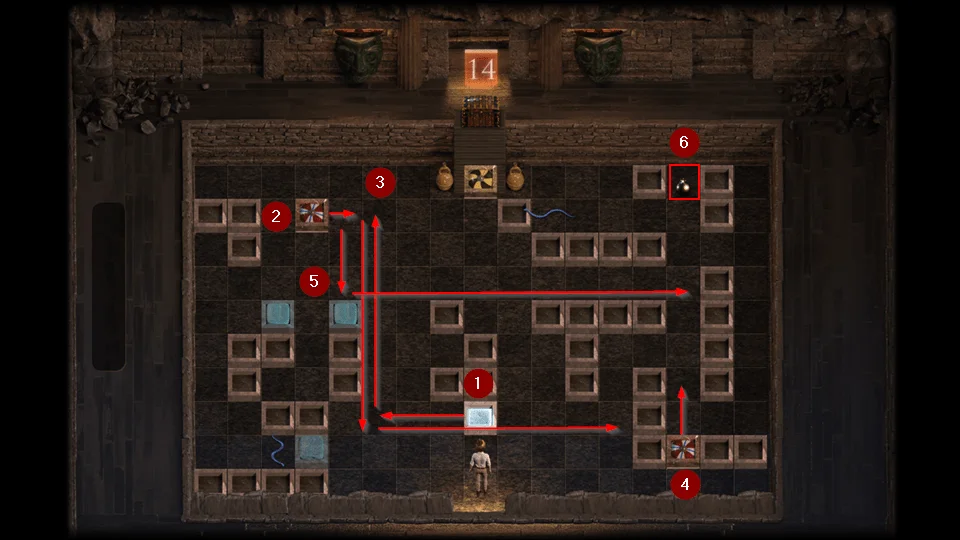
- Move the Push Block left 3 and then up 6.
- Push the Slider right and then down.
- Move the Push Block down 6 and then right 7.
- Now you may need to do this next piece a couple of times as it requires timing. Stand to the left of the lower Slider. Move right and push the Slider up.
- You want the slider to move two spaces before it hits the snake, as here. I found that using the arrow key to move right and clicking the Slider achieved the desired result most of the time.
- Push the upper Slider to the right.
- Pick up the Bomb.
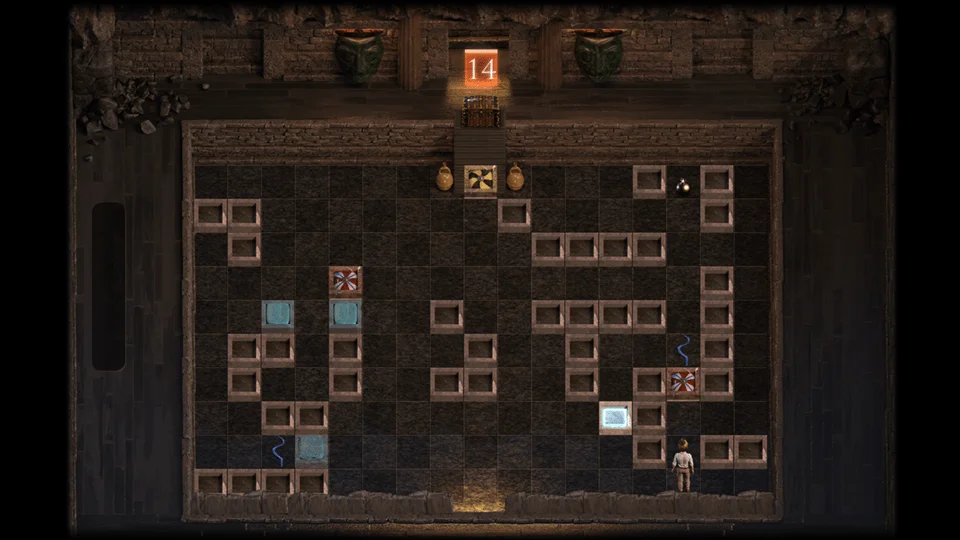
- Blow up the Blow Me block.
- Open the chest.
- Receive a Gold Talisman.
Puzzle 15 – Buy 5 total outfits to unlock
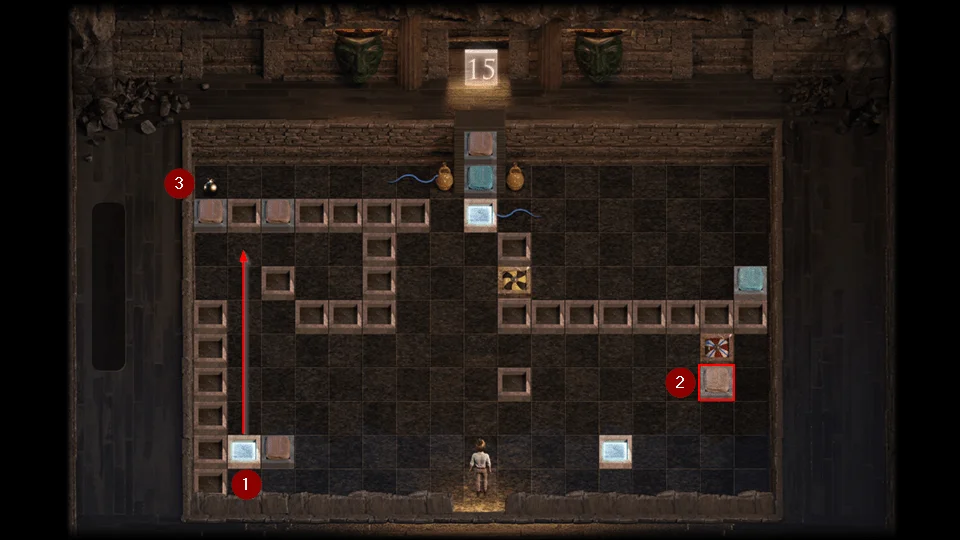
This puzzle starts off easy and ends up with a bit of work.
- Move the left Push Block up 6.
- Push the Red Flasher.
- Pick up the Bomb.
Now the work begins you want the slider in the empty red square. You have to move the Push Block one square past where you want the Slider.
When the Slider is in place you will move the Push Block to the left of the stationary block. It should look like the image below.
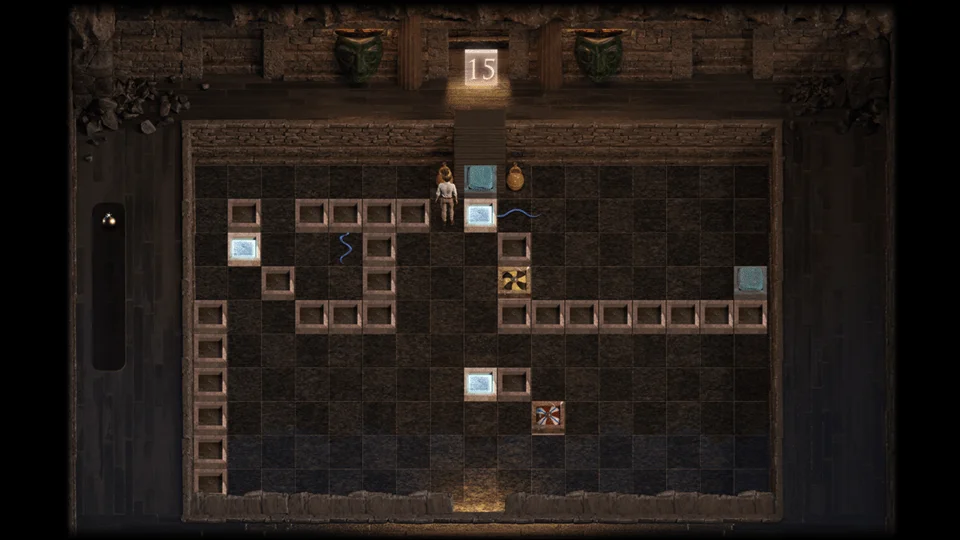
- Move up to the top Push Block to draw the Snake.
- Blow up the Blow Me block.
- Get behind the Slider block to draw the Snake down.
- Get behind the Push block to draw the Snake closer.
- Back behind the Slider to draw the Snake down again.
- Move the Push Block up 1 to block the Snake in.
- Push the Blue Flasher.
- Move the Push Block by the exit left 1.
- Open the chest.
- Receive a Gold Talisman.
Puzzle 16 – Light 6 torches to unlock
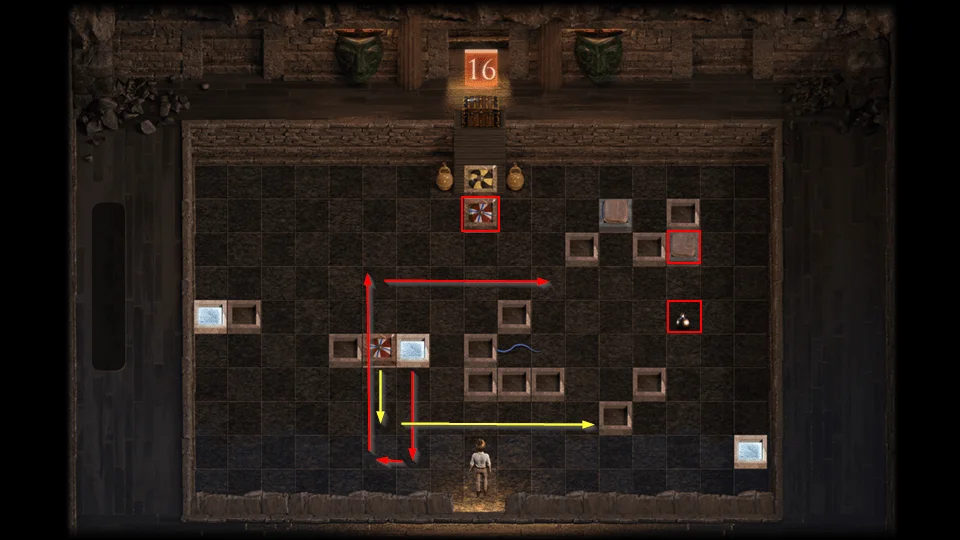
- Move the Push Block down 3 and then left 1.
- Push the Slider down and then right.
- Move the Push Block up 5 and then right 5.
- Walk around the top and then stand to the right of the Red Flasher.
- Push the Red Flasher.
- Step up on to draw the Snake up.
- Pick up the Bomb.
- Walk around the outside.
- Kick the Slider by the exit either way.
- Blow up the Blow Me block.
- Open the chest.
- Receive a Gold Talisman.
Puzzle 17 – Find 11 total kamasutra pages to unlock
- Pick up the upper left Bomb.
- Blow up the Blow Me by the two Bombs.
- Pick up the first Bomb.
- Pick up the second Bomb.
- Move the Push Block up 7.
- Draw the left Snake up to the area you just created.
- Push the Slider down.
- Blow up the lower right Blow Me block.
- Draw the Snake down to you.
- Move the left Push Block up 1.
- Move the right Push Block right 1.
- Pick up the Bomb.
- Blow up the Blow Me block.
- Press the Red Flasher.
- Draw the lower left Snake up to the trap area.
- Press the Blue Flasher.
- Push the top Slider to the left.
- Blow up the Blow Me block.
- Open the chest.
- Receive a Gold Talisman.
Puzzle 18 – Earn 25 total hearts to unlock
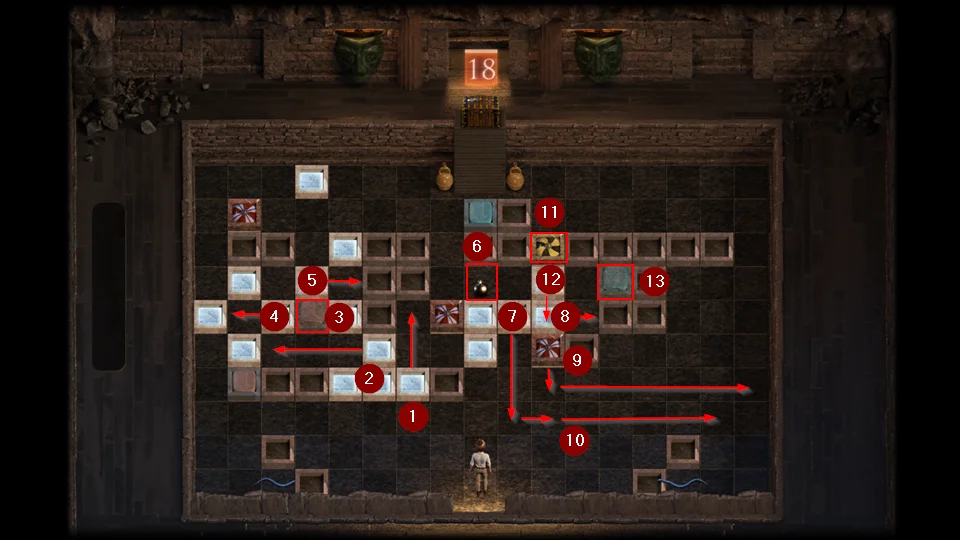
- Move the bottom right Push Block up 2.
- Move the upper center Push Block left 3.
- Press the Red Flasher.
- Move the Push Block to the left of the Red Flasher left 1.
- Move the Push Block above the Red Flasher right 1.
- Pick up the Bomb.
- Move the center Push Block down 3 and right 1.
- Move the Push Block above the Slider right 1.
- Move the Slider down and then right.
- Move the Push block on the bottom right 5.
- Blow up the Blow Me block.
- Move the Push Block down 1.
- Press the Blue Flasher.
- Open the chest.
- Receive a Gold Talisman.
Puzzle 19 – Buy 7 total outfits to unlock
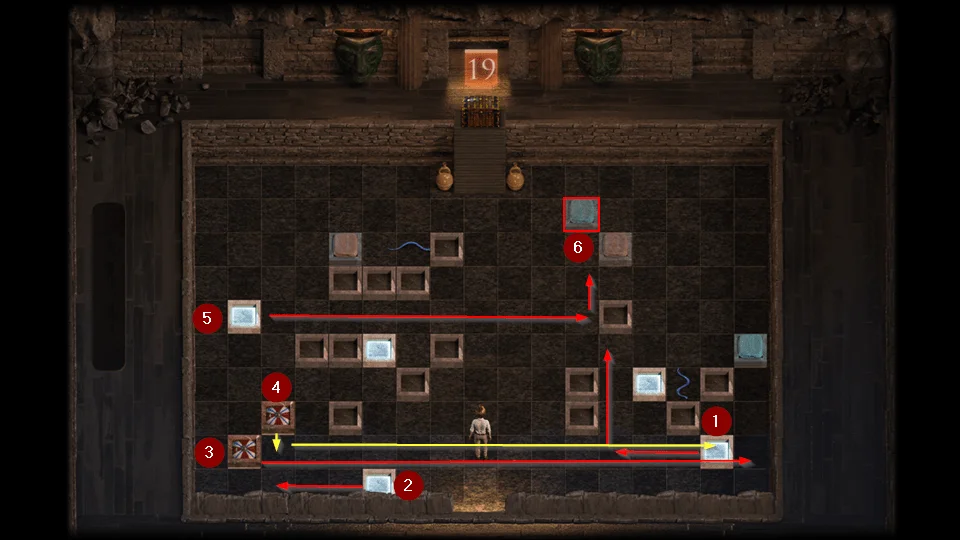
- Move the far right Push Block left 3 and then up 3.
- Move the bottom Push Block left 3.
- Push the lowest Slider right.
- Push the upper Slider down and then right.
- Move the upper left Push Block right 10 and up 1.
- Stand below the Blue Flasher and push it.

- Move middle Push Block right 1.
- Move lower Push Block right 1.
- Go to the bottom right corner to draw right Snake down.
- Push Red Flasher.
- Move top Push Block left 3, down 1, and then left 1.
- Draw left Snake down.
- Open open the chest.
- Receive Gold Talisman.
Puzzle 20 – Build the Pirate Shovel to unlock
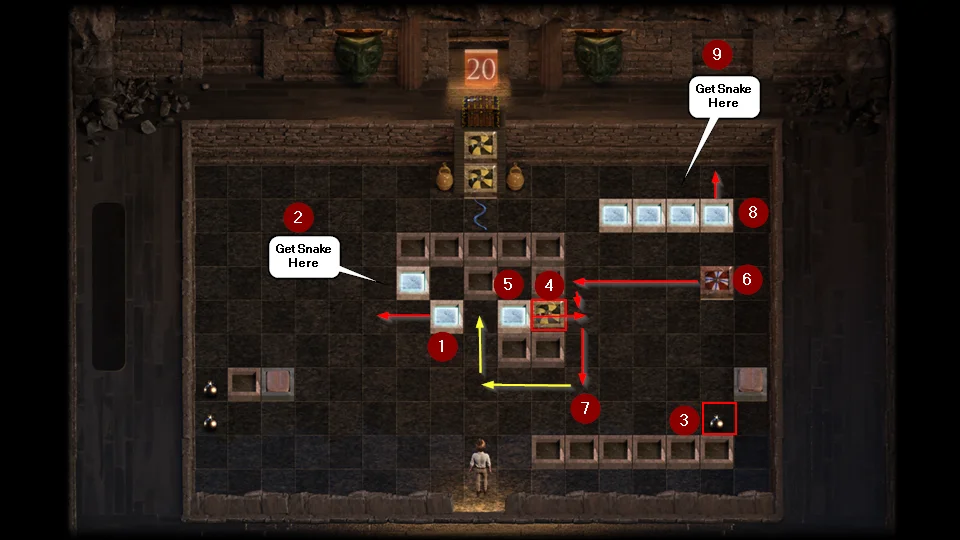
- Move lower left Push Block left 2.
- Lure Snake to the top of the block you just moved.
- Pick up the Bomb.
- Blow up the Blow Me block.
- Move the lower right Push Block right 2 and then down 2.
- Push the Slider left and then down.
- Move the lowest Push Block left 3 and then up 2.
- Move the upper right Push Block up 1.
- Move to the upper right corner to lure the Snake up.
- Pick up the Bombs.
- Blow up the Blow Me blocks.
- Open the chest.
- Receive Gold Talisman.
- Completing 20 Puzzles will open the top chest.
- Receive Photo: Evie’s Ass.
Ancient Temple: Puzzles 21 – 30
Puzzle 21 – Catch a Hammerhead to unlock

- Pick up the top Bomb.
- Pick up the right Bomb.
- Blow up the top Blow Me block.
- Blow up the bottom Blow Me block.
- Move the Push Block in the center right 4 and down 2.
- Push the Slider down, left, and then up.
- Move the Push Block you move previously left 3 and up 3.
- Move the upper right Push Block left 1, up 1, left 3, and down 1.
- Press the Red Flasher.
- Open the chest.
- Receive a Gold Talisman.
Puzzle 22 – Find 16 total kamasutra pages to unlock

- Pick up right Bomb.
- Move top Push Block left 4, down 4, left 3.
- Lure left Snake to bottom.
- Pick up left Bomb.
- Push lower Slider down.
- Move bottom right Push Block right 1 and up 2.

- Push top Slider up and then right.
- Move upper Push Block down 2, left 2, and up 1.
- Press the Red Flasher.
- Move the Push Block under the Blue Flasher left 1.
- Lure right Snake down.
- Move upper right Push Block up one.
- Blow up two Blow Me blocks.
- Open the chest.
- Receive a Gold Talisman.
Puzzle 23 – Earn 35 total hearts to unlock
- Pick up the lowest Bomb.
- Push the lowest Slider left.
- Blow up the lowest Blow Me block.
- Move the lowest Push Block right 2.
- Push the highest Slider down and then left.
- Move the lowest Push Block right 2.
- Go to the bottom left corner to draw the Snake down.

- Pick up left Bomb.
- Move Push Block down 1, right 5, down 4, and right 4.
- Push middle Slider down and then right.
- Lure the middle Snake to the right Push Block.
- Pick up the Bomb.
- Blow up the bottom Blow Me block.
- Push the Red Flasher.
- Blow up the upper Blow Me block.
- Press the Blue Flasher.
- Push the upper Slider up.
- Open the chest.
- Receive a Gold Talisman.
Puzzle 24 – Light 9 torches to unlock
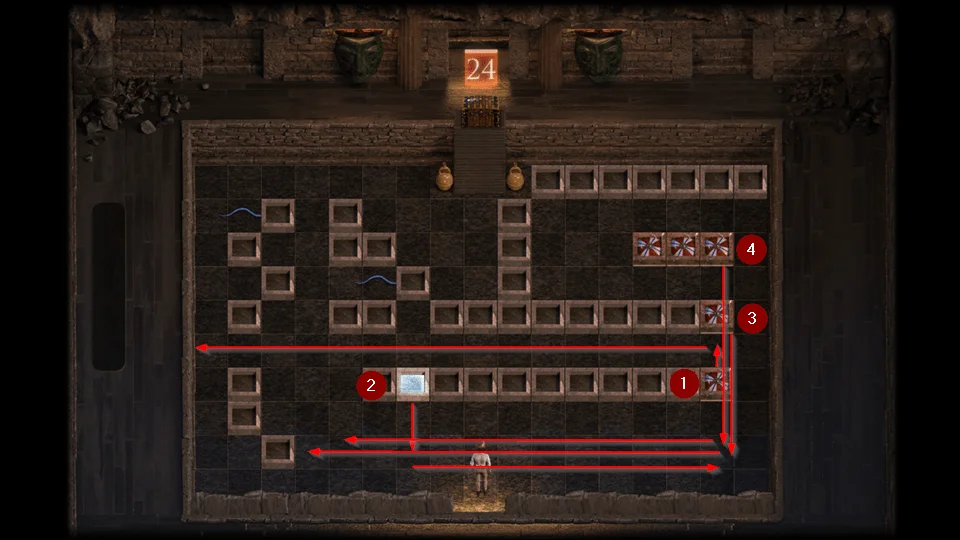
- Push lowest Slider up and then left.
- Move Push Block down 2 and then right 9.
- Push lowest right Slider down and then left.
- Push upper right Slider down and then left.

- Push upper right Slider down and then right.
- Push upper Slider down, right, down, and then left.
- Move the Push Block up 1.
- Move behind the three sliders to draw the right Snake down.
- This part is a quick move and you may get bitten a few times before you succeed.
- You need to quickly go up to draw the Snake to you and then back down behind the Push Block to trap it. I arrowed up to drawn the Snake then mouse clicked under the Push Block.
- Push the lowest right Slider up.
- Go to the bottom left corner to draw the left Snake down.
- Open the chest.
- Receive a Gold Talisman.
Puzzle 25 – Hold a Grand talisman to unlock
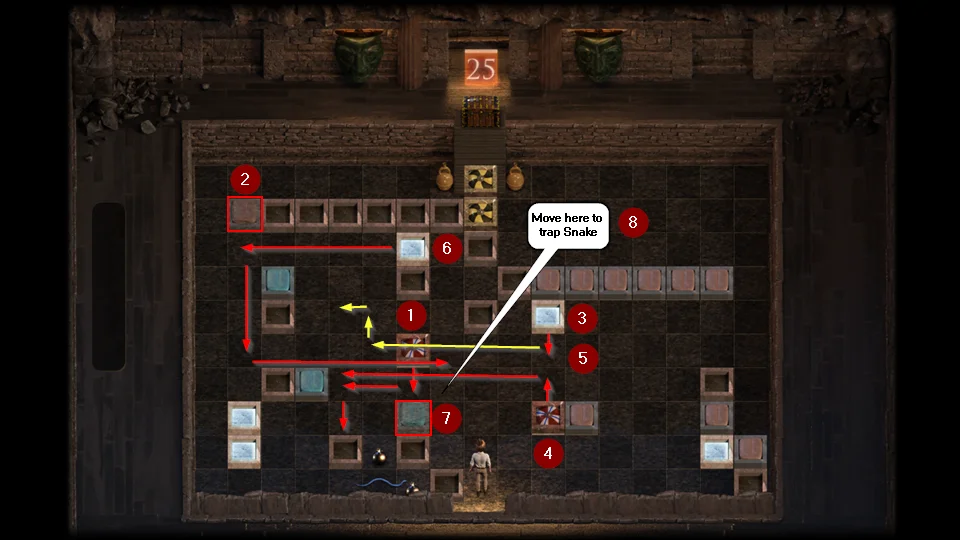
- Move the upper left Slider down,left, and down again.
- Press the Red Flasher
- Move the Push Block in the center of the screen down 1.
- Push the lower right Slider up and then left.
- Move the Push Block that you just used with the Slider left 5, up 1, and left 1.
- Move the upper Push Block left 5, down 3, and right 4.
- Push the Blue Flasher
- Move up one square to trap the snake.
- Pick up Bombs.
- Blow up Blow Me blocks.
- Open the chest.
- Receive a Grand Talisman.
Puzzle 26 – Buy 8 total outfits to unlock
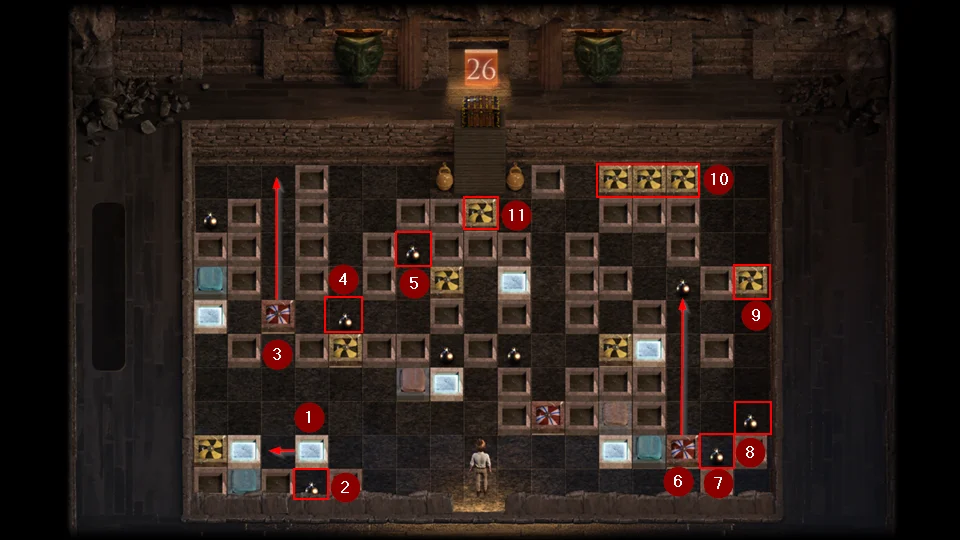
- Move the middle Push Block above the Bomb left 1.
- Pick up the Bomb.
- Push the left Slider up.
- Pick up the Bomb.
- pick up the other Bomb.
- Push the lower right Slider up.
- Pick up the Bomb.
- Pick up the other Bomb.
- Blow up the Blow Me block.
- Blow up the three Blow Me blocks.
- Blow up the Blow Me block that is blocking the exit.
- Open the chest.
- Receive a Grand Talisman.
Puzzle 27 – Find 20 total kamasutra pages to unlock
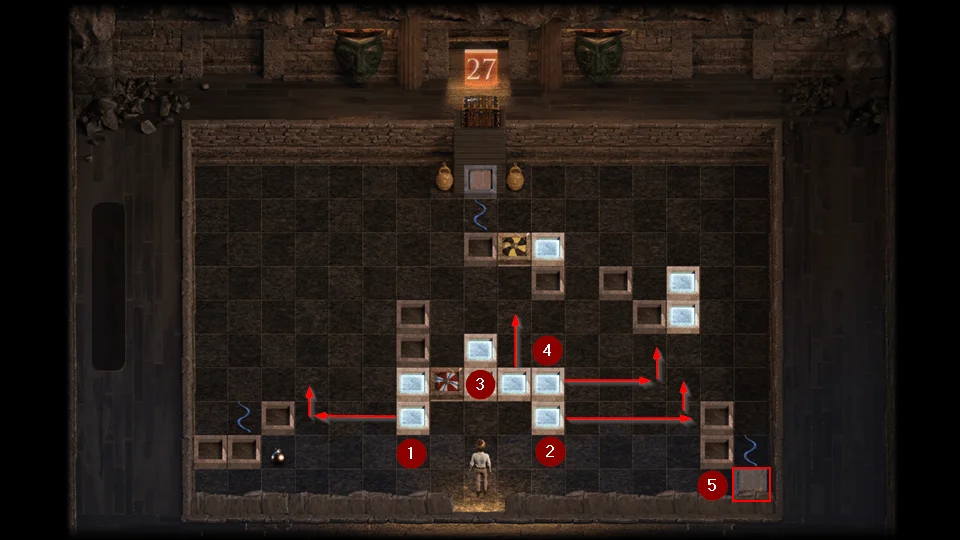
- Move bottom left Push Block left 3 and then up 1.
- Move bottom right Push Block right 4 and then up 1.
- Move the Push Block one in from the end up 2.
- Move the end Push Block right 3 and then up 1.
- Push the Red Flasher.
- Open the chest.
- Receive a Grand Talisman.
Puzzle 28 – Hold $25,000 or more in the Squalmart safe
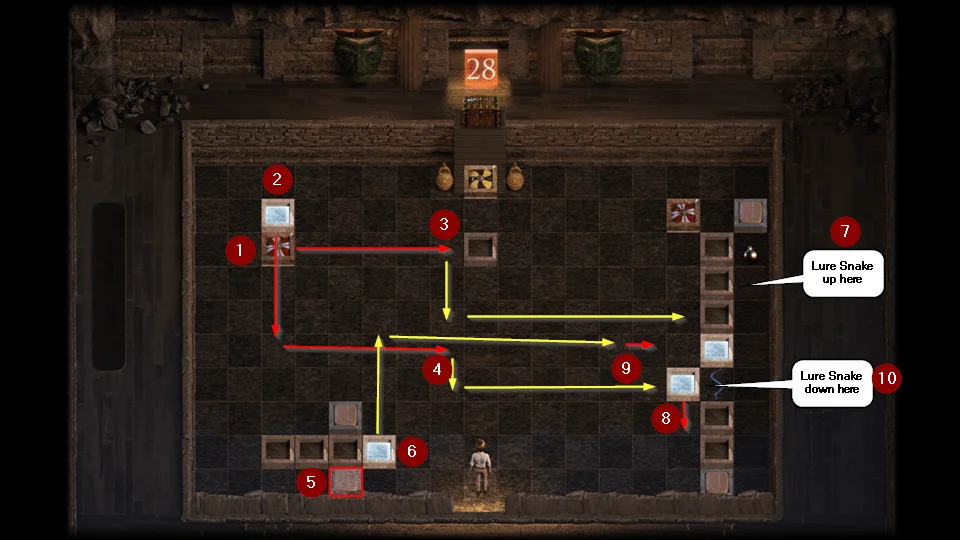
- Push the left Slider right.
- Move the Push Block that was above the Slider down 4 then right 5.
- Push the left Slider down then right.
- Move the Push Block that was used to redirect the Slider down 1 and right 6.
- Push the Red Flasher.
- Move the lower left Push Block up 3 and then right 7.
- Draw the Snake up to the Bomb.
- Move the bottom right Push Block down 1.
- Move the upper left Push Block right 1.
- Lure the Snake into the area you just created.
- Pick up the Bomb.
- Blow up the Blow Me block.
- Open the chest.
- Receive a Grand Talisman.
Puzzle 29 – Obtain 24 or more Extras to unlock
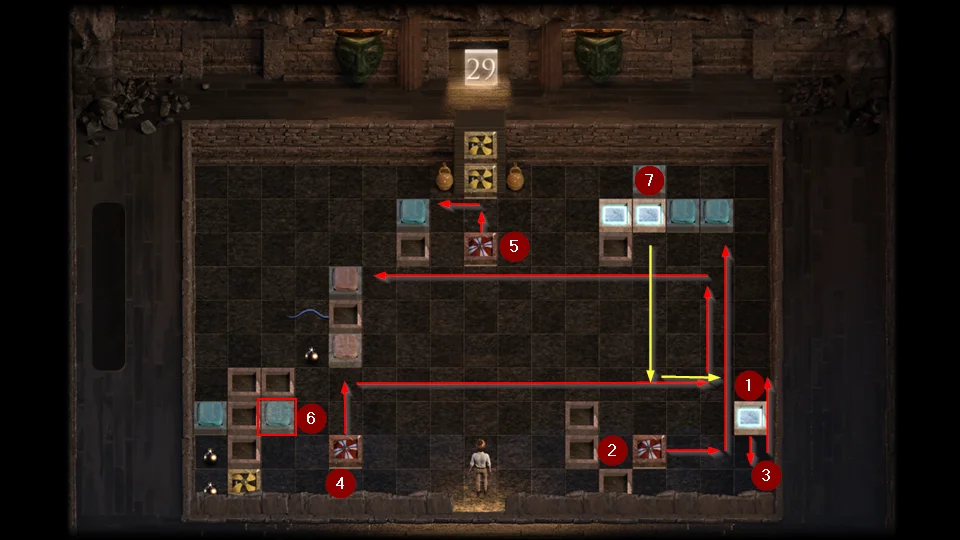
- Move lower right Push Block down 1.
- Push bottom right Slider right and then up.
- Move lower right Push Block up 2.
- Push lower left Slider up, right, up and then left.
- Push upper Slider up and then left.
- Push the Blue Flasher.
- Move upper right Push Block down 5 and then right 2.

- Push the Red Flasher.
- Pick up the Bomb.
- Push the right Slider down and then left.
- Move the lower left Push Block up 1 and left 12.
- Blow up the bottom Blow Me block.
- Pick up the two Bombs.
- Blow up the top Blow Me blocks.
- Open the chest.
- Receive a Grand Talisman.
Puzzle 30 – Earn 49 total hearts to unlock
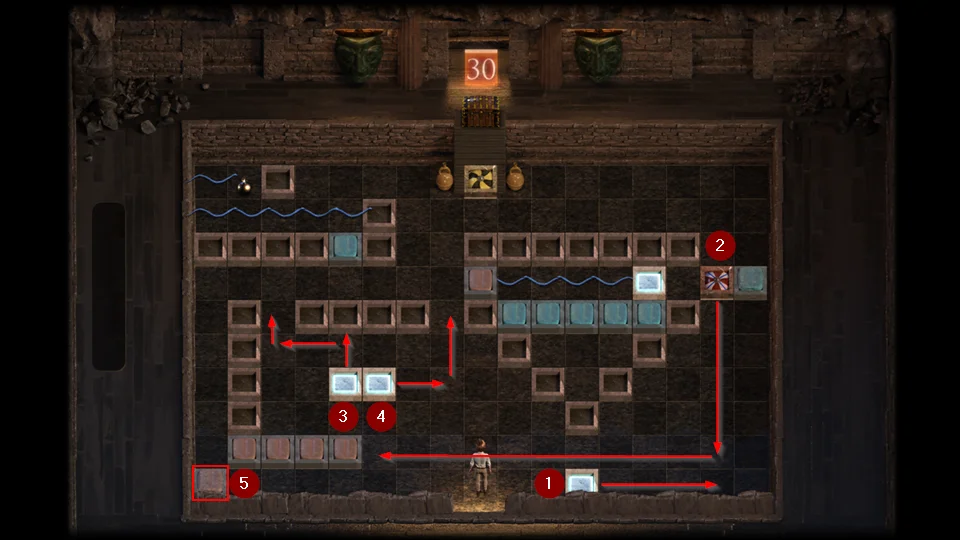
- Move bottom Push Block right 4.
- Push Slider down and then left.
- Move the left Push Block up 1, left 2, and up 1.
- Move the right Push Block right 2 and up 2.
- Push the Red Flasher.

- Push the slider left.
- Walk down to the lower left corner to draw the Snakes down.
- Push the Blue Flasher.
- Walk around the bottom to move the middle Push Block up 1.
- Move the left Push Block up 1.
- Pick up the Bomb.
- Blow up the Blow Me block.
- Open the chest.
- Receive a Grand Talisman.
- Completing 30 puzzles unlocks the middle chest.
- Open the chest.
- Receive Photo: Evie on the Shrine.
Ancient Temple: Puzzles 31 – 40
Puzzle 31 – Catch a Great White Shark to unlock
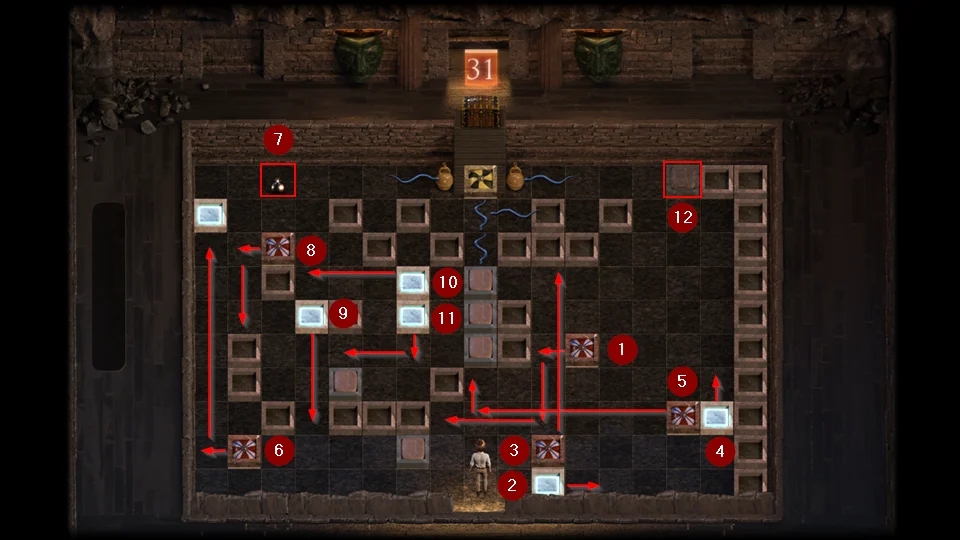
- Push the upper slider on the right hand side left, down, and then left.
- Move the bottom Push Block right 1.
- Push the Slider that was on top of the Push Block up.
- Move the far right Push Block up 1.
- Push the Slider left then up.
- Push the lower left Slider left and then up.
- Pick up the Bomb.
- Push the upper left Slider left and then down.
- Move the Push Block second from the left down 3.
- Move the Push Block on top of the other Push Block left 3.
- Move the Push Block that was on the bottom down 1 and left 2.
- Push the Red Flasher.
- Blow up the Blow Me block.
- Open the chest.
- Receive a Grand Talisman.
Puzzle 32 – Find 25 total kamasutra pages to unlock
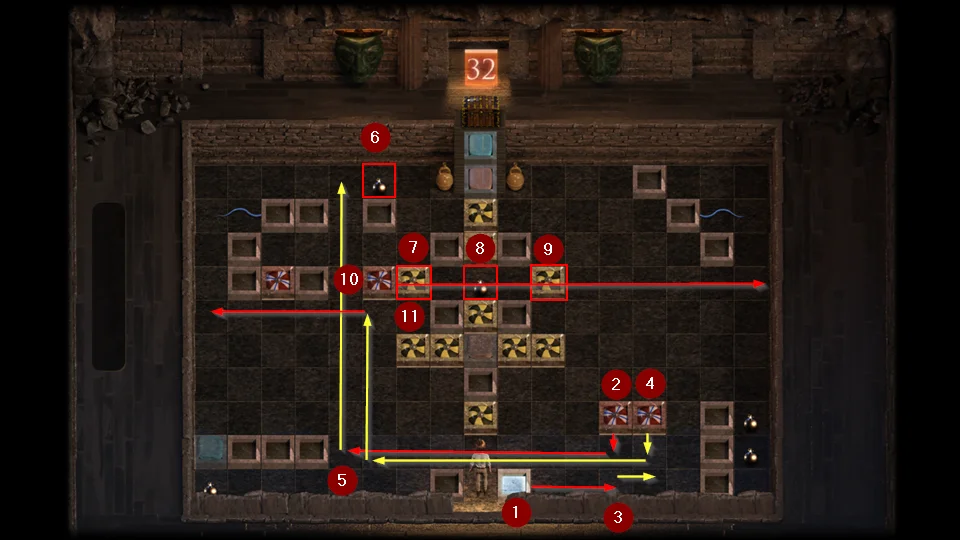
- Move the Push Block right 3.
- Push the lower left Slider down and then left.
- Move the Push Block right 1.
- Push the lower right Slider down, left, and then up.
- Push the bottom Slider up.
- Pick up the top Bomb.
- Blow up the Blow Me by the Slider.
- Pick up the Bomb.
- Blow up the Blow Me that is to the right of the Bomb.
- Push the top right Slider right.
- Push the Slider that is below the Slider you just moved left.
- Pick up the remaining Bombs.
- Blow up one of the three Blow Me blocks by the Red Flasher so that you can access it.
- Press the Red Flasher.
- Press the Blue Flasher.
- Blow up the top Blow Me block that is blocking the exit.
- Open the chest.
- Receive a Grand Talisman.
Puzzle 33 – Earn 52 total hearts to unlock
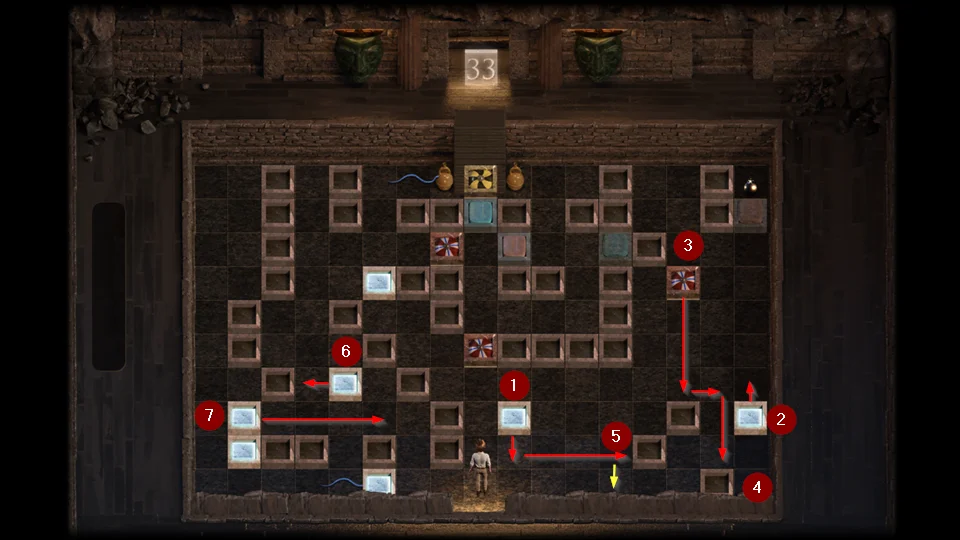
- Move second Push Block from right down 1 and right 3.
- Move far right Push Block up 1.
- Push far right Slider down, right, and down.
- Move to lower right corner to lure Snake to you.
- push second Push Block from right down 1.
- Move the second from the top Push Block left 1.
- Move the top left Push Block right 4.

- Go on the left hand side and move the left Push Block up 1 and right 3.
- Move bottom left Push Block right 4.
- Move top Push Block up 2.
- Push top Slider right.
- Push middle Slider up.
- Push the Red Flasher.
- Pick up the Bomb.
- Push the Blue Flasher.
- Push the top Slider left.
- Blow up the Blow Me block.
- Open the chest.
- Receive a Grand Talisman.
Puzzle 34 – Hold a Royal Talisman to unlock
Note: This is the last puzzle unlocked by a Talisman.
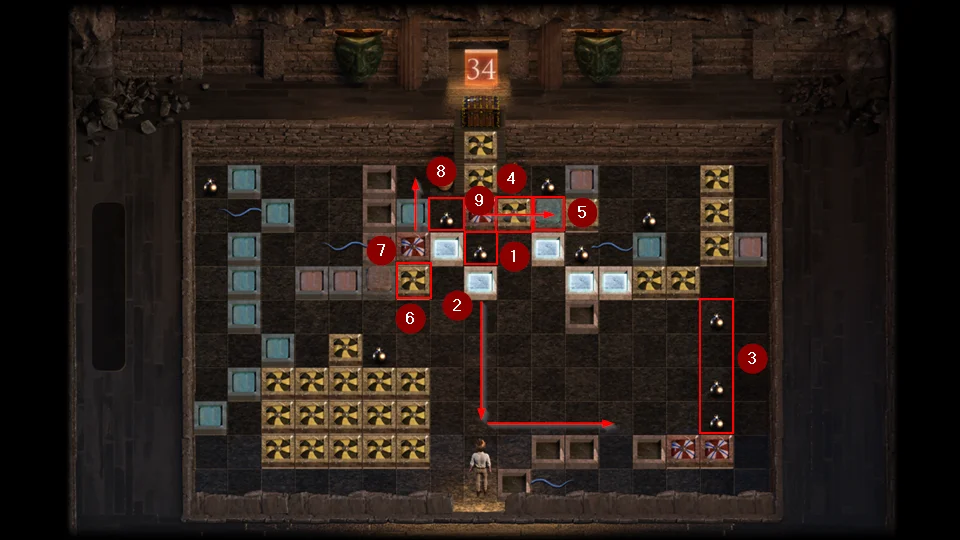
- Collect Bomb below chest.
- Move Push Block below Bomb down 4 then right 4.
- Pick up the three Bombs.
- Blow up the Blow Me block next to the Blue Flasher.
- Push the Blue Flasher.
- Blow up the Blow Me block below the left Slider.
- Push the left Slider up.
- Pick up the Bomb to the left of the Slider.
- Push the Slider right.
- Blow up the two Blow Me blocks blocking the exit.
- Open the chest.
- Receive a Grand Talisman.
Puzzle 35 – Buy every lure from the Bait Shop to unlock
- Pick up middle Bomb.
- Move lower right Push Block right 2 and then up 1.
- Move second from right Push Block up 1.
- Move Push Block next to Slider down 2.
- Push the Blue Flasher.
- Lure Snake up.
- Pick up lower left Bomb.
- Move top left Push Block left 2 then down 2.
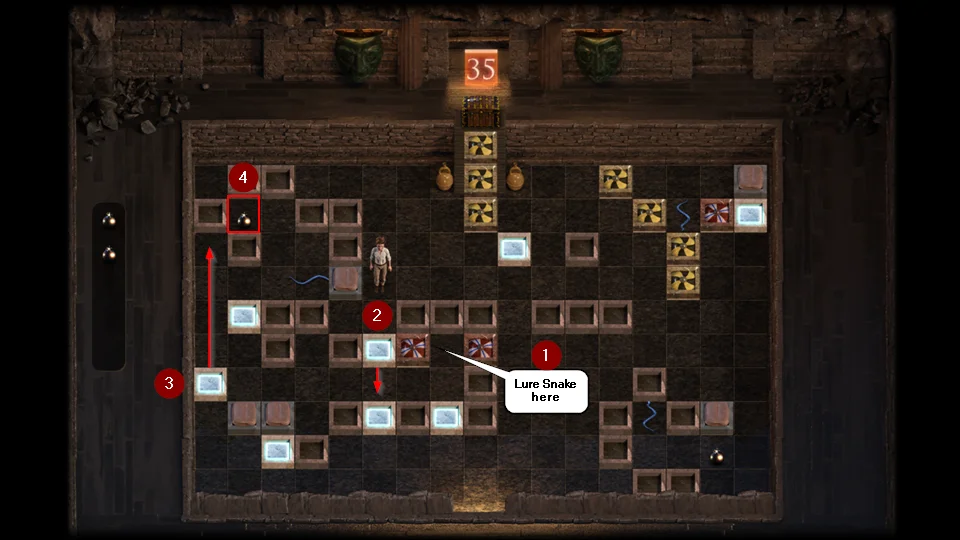
- Lure Snake between the Sliders.
- Move the Push Block to the left of the Slider down 1 to trap the left Snake.
- Move the far left Push Block up 4.
- Pick up the Bomb.
- Blow up the three Blow Me blocks at the exit.
- Open the chest.
- Receive a Grand Talisman.
Puzzle 36 – Obtain 29 or more Extras to unlock
- Push left Slider right.
- Push Blue Flasher.
- Pick up all three Bombs.
- Blow up the two Blow Me blocks stacked together.
- Push left Slider up.
- Push the Red Flasher.
- Blow up the Blow Me blocking the exit.
- Open the chest.
- Receive a Grand Talisman.
Puzzle 37 – Find 30 total kamasutra pages to unlock
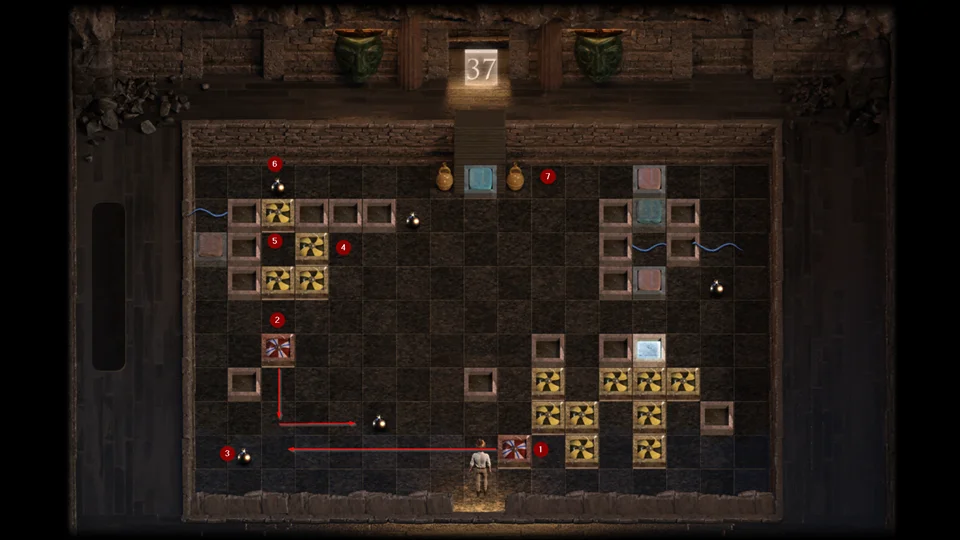
- Push lower Slider left.
- Push upper Slider down and then right.
- Pick up Bombs by Sliders.
- Blow up the top right Blow Me block.
- Blow up the Blow Me block under the Bomb.
- Pick up the Bomb.
- Push the right Slider up.
- Move to the right of the exit to draw the left Snake up.
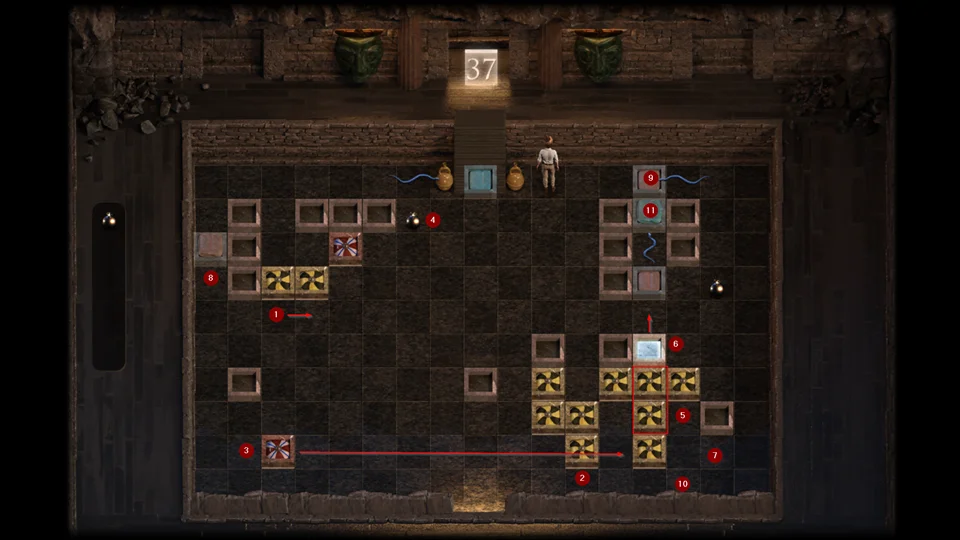
- Move under the upper right Blow Me block to trap the left Snake.
- Blow up the lower left Blow Me block.
- Push the lower Slider right.
- Pick up the remaining Bombs. Make sure you stay below the top bomb and left of the right bomb.
- Blow up the two Blow Me blocks under the Push Block.
- Move the Push Block up 1.
- Draw the Snake into the area you created.
- Push the Red Flasher.
- Move to the block right of the top of the Blue Flasher to lure the Snakes up.
- Move to the bottom to lure the Snakes into the trap.
- Push the Blue Flasher.
- Open the chest.
- Receive a Grand Talisman.
Puzzle 38 – Receive 7 unique treatments from Jessica to unlock
This is my least favorite puzzle of the lot as it relies on you moving quickly enough to avoid the Snake.
- Trap the Snake in the indention.
- Pick up the Bomb.
- Move up just above the line to draw the Snake to you. I did this with an arrow key move.
- Move to the bottom of the column. As soon as you move up.
- Move to the right of the column. Has to be right next to the column.
If your timing was perfect the Snake will be trapped on the other side of the column. If not you have to continue until you get it right.
- Blow up the Blow Me block.
- Open the chest.
- Receive a Grand Talisman.
Puzzle 39 – Earn 62 total hearts to unlock
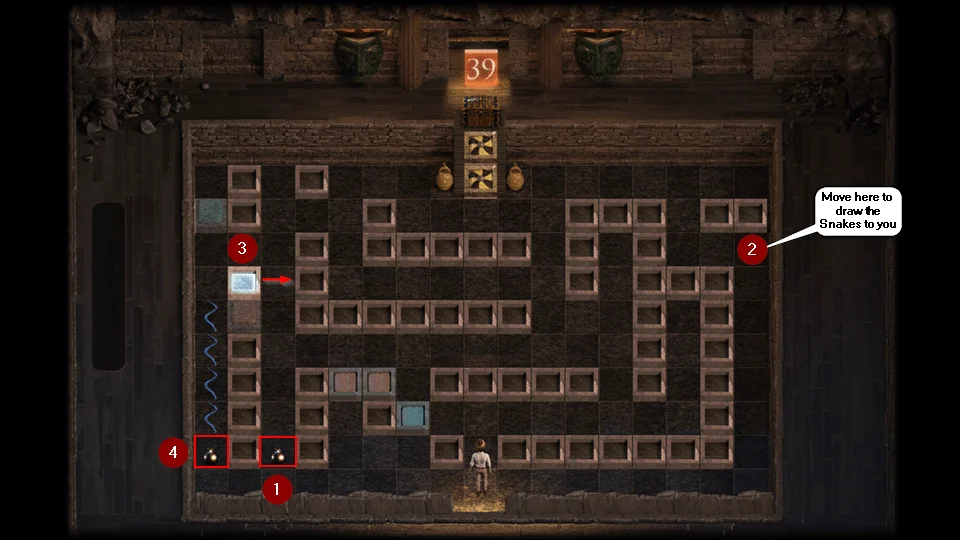
After the last puzzle this one is a breeze.
- Pick up the right Bomb.
- Move to under the far right block to draw the Snakes to you. You want three Snakes in the closest trap and one Snake will go into the smaller trap. You may have to go up and down a few times to get the Snakes where they belong.
- Move the Push Block right 1.
- Pick up the Bomb.
- Blow up the two Blow Me blocks.
- Open the chest.
- Receive a Grand Talisman.
Puzzle 40 – Collect all character profiles to unlock
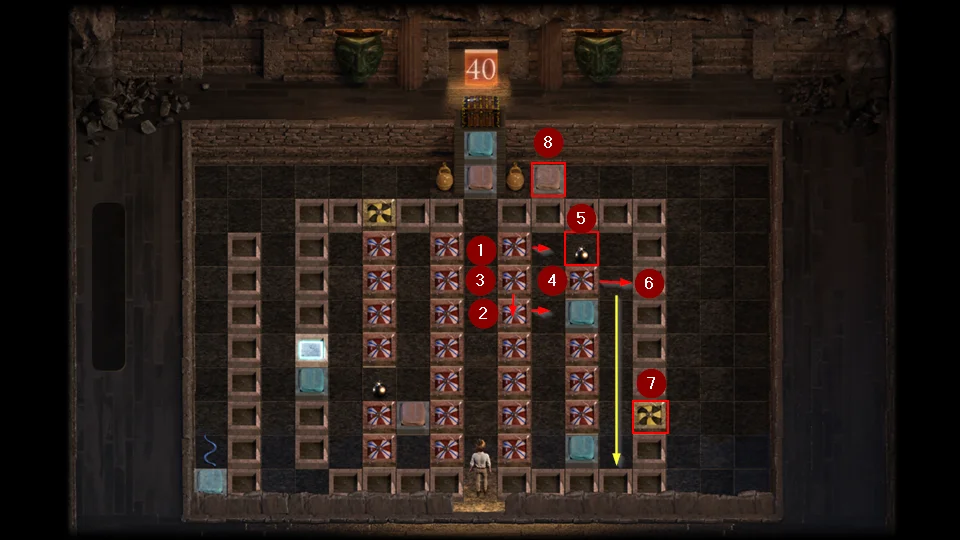
- Move to the top of the row and then back down to the bottom to trap the Snake.
- Push the top right Slider right.
- Push the third right Slider right.
- Push the second right Slider down.
- Push the top Slider in the far right column right.
- Pick up the Bomb.
- Push the Slider that you moved to get to the Bomb down.
- Blow up the Blow Me block.
- Lure the Snake to the next row and then to the bottom L to trap.
- Push the Red Flasher.
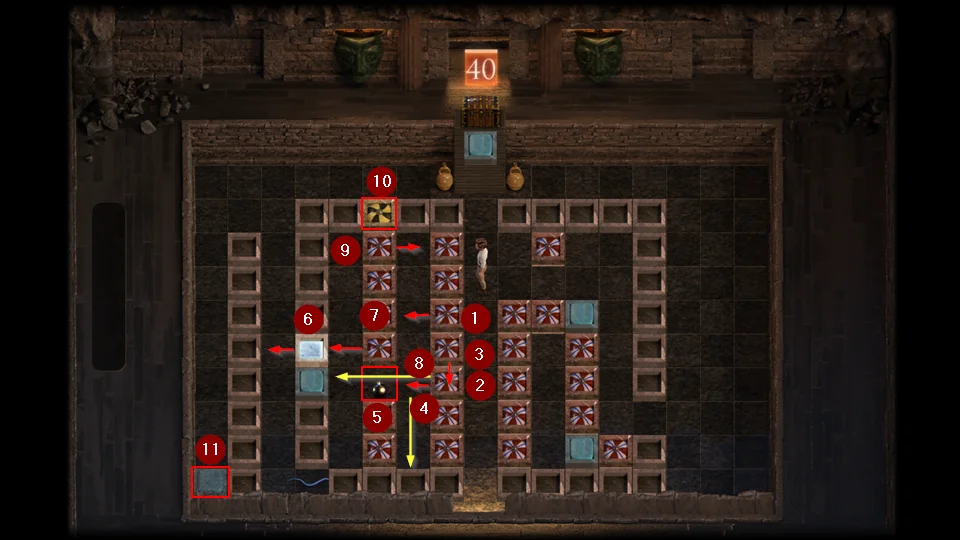
- Push the third left Slider left.
- Push the fifth left Slider left.
- Push the fourth left Slider down.
- Push the fifth left Slider down.
- Pick up the Bomb.
- Move the Push Block left 1.
- Push the fourth Slider in the first column left.
- Push Slider that was fourth left.
- Push the top Slider in the first column right.
- Blow up the Blow Me block.
- Push the Blue Flasher.
- Open the chest.
- Receive a Grand Talisman.
Ancient Temple: Puzzles 41 – 48
- After completing 40 puzzles you can open the last chest.
- Pick up Photo: Evie Spots a Storm.
Puzzle 41 – Find 32 total kamasutra pages to unlock
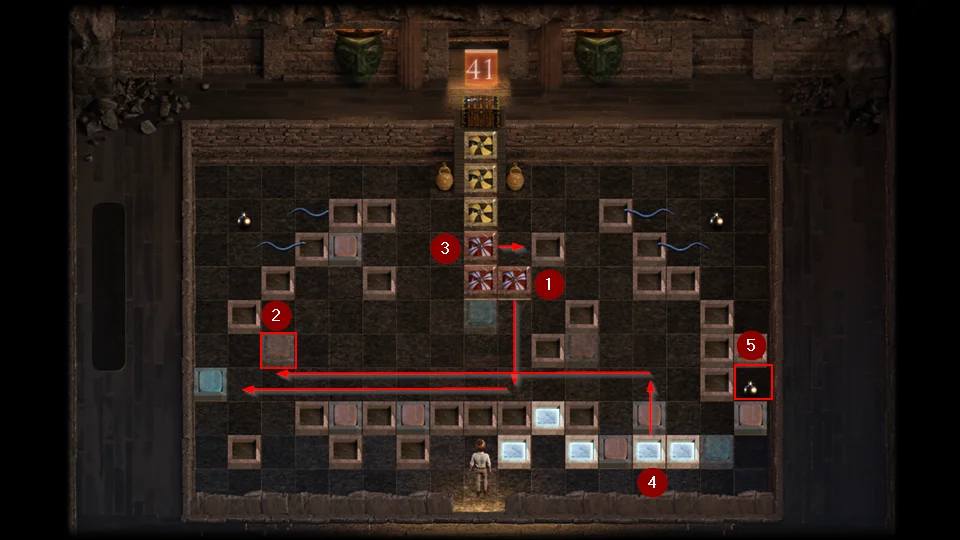
- Push right Slider down and then left.
- Press Red Flasher.
- Push top Slider right.
- Move second from right Push Block up 2 and left 11.
- Pick up the lower right Bomb.

- Move far right Push Block up 1, left 2, up 2.
- Move bottom right Push Block right 2 and up 2.
- Move the last Push Block on the bottom right 3 and up 1.
- Move to far left corner to draw left Snakes down. Then move right to trap them.
- Push left Slider up.
- Push Blue Flasher.
- Pick up left Bomb.
- Go up to upper left corner to drawn right Snakes to middle.
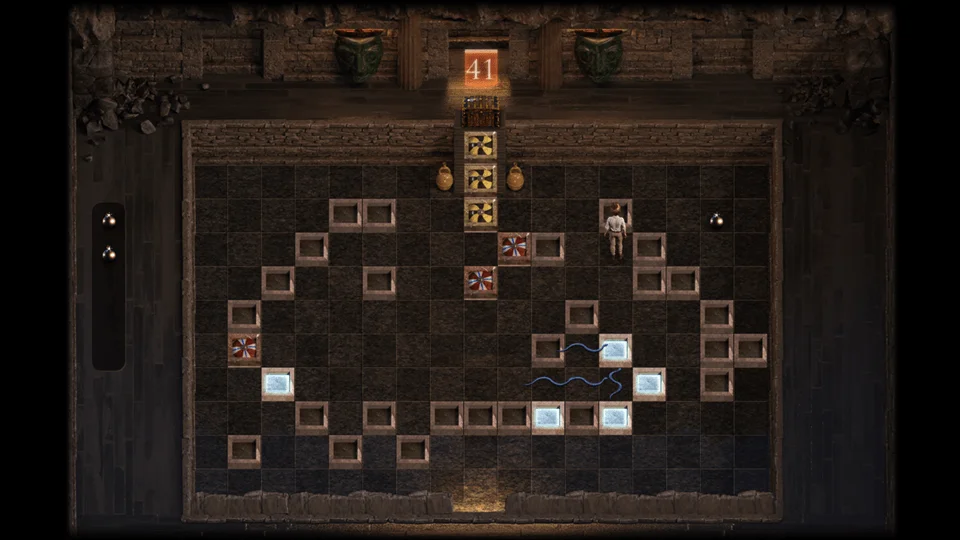
- This is how you want the Snakes.
- Pick up the last Bomb.
- Blow up the three Blow Me blocks.
- Open the chest.
- Receive a Grand Talisman.
Puzzle 42 – Earn 64 total hearts to unlock
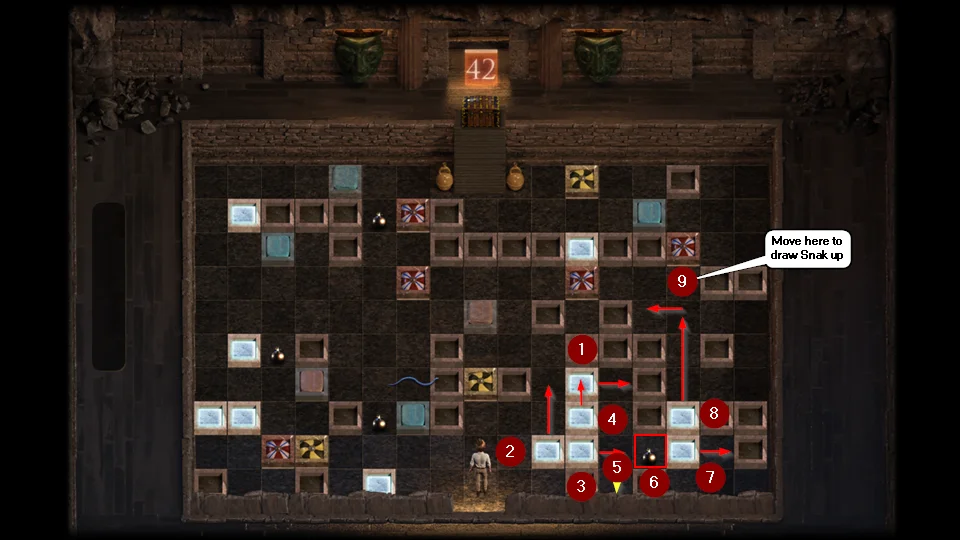
- Move the top Push Block in the L shaped formation right 1.
- Move the bottom left Push Block in the L shaped formation up 2.
- Move the bottom right Push Block in the L shaped formation right 1.
- Move the middle Push Block in the L shaped formation up 1.
- Move the Push Block that you moved next to the Bomb down 1.
- Pick up the Bomb.
- Move the Push Block to the right of the Bomb right 1.
- Move the Push Block that was on top of the Push Block you just moved up 3 and left 1.
- Stand under the Slider to draw the Snake up.

- Pick up the lower Bomb.
- Push the Slider to the left of the Snake up.
- Move the Push Block to the left of the left Bomb up 2 and right 8.
- Pick up the top Bomb.
- Push the Blue Flasher.
- Push the second Slider from the right, left.
- Move the Push Block that was able the Slider up 1.
- Push the right Slider up and left.
- Blow up the Blow Me block.
- Open the chest.
- Receive a Grand Talisman.
Puzzle 43 – Obtain 36 or more Extras to unlock
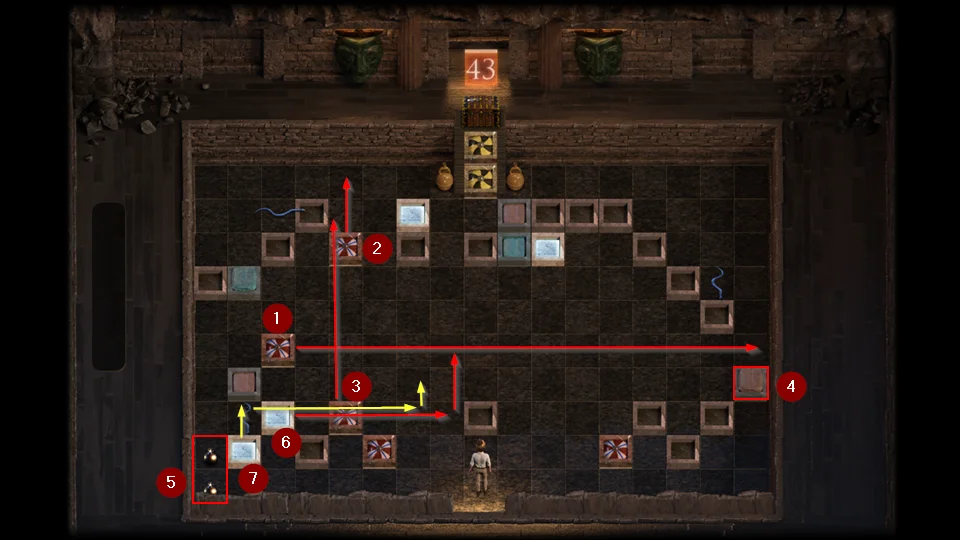
- Push the far left Slider right.
- Push the top Slider up.
- Push the now left Slider up.
- Push the Red Flasher from the bottom.
- Step up where the Red Flasher was and then right back down. Again I arrowed up and clicked under the right solid block. This will trap the Snake inside the U of the three blocks.
- Pick up the Bombs.
- Move the second from the left Push Block right 5 then up 2.
- Move the left Push Block up 1, right 5, then up 1.
- Blow up the two Blow Me blocks.
- Open the chest.
- Receive a Grand Talisman.
Puzzle 44 – Catch at least a 1000lb Marlin to unlock
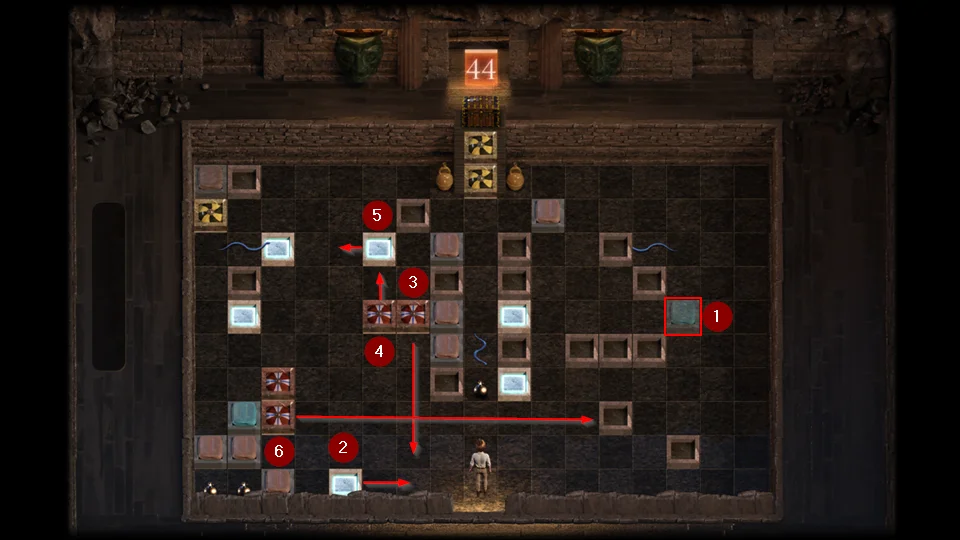
- Push Blue Flasher from left side.
- Move bottom Push Block right 2.
- Push right Slider down.
- Push upper Slider up.
- Move upper right Push Block left 1.
- Push bottom Slider right.
- Push bottom Slider right.
- Push Slider in the row above up.
- Draw the right Snake down into the area you created.
- Move to the right of the Exit to draw up the center Snake.
- Move the top right Push Block left 1.
- Pick up the Bomb.
- Move the right Push Block left 1.
- Push the left Slider right.
- Move the left Push Block right 2 and up 2.
- Moe the new left Push Block up 1.
- Blow up the Blow Me block.
- Push the Red Flasher.
- Move up and down the first three spots on the left to get the two Snakes together.
- Collect the Bombs.
- Move bottom of the left Slider to the second Slider on the right.
- This will hold the two left Snakes in the trap.
- Blow up the two Blow Me blocks.
- Open the chest.
- Receive a Royal Talisman.
Puzzle 45 – Craft a Four Leaf Clover to unlock
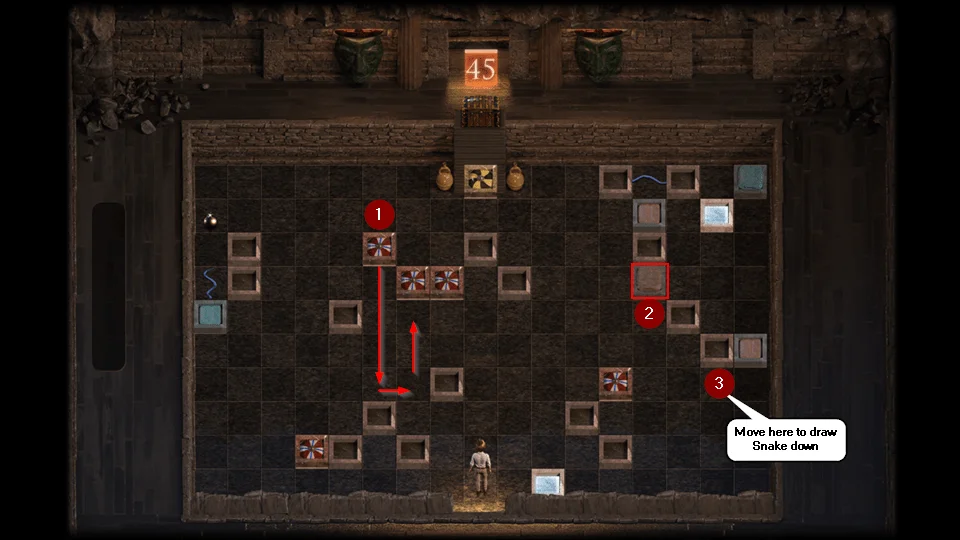
- Push upper Slider down, right, and up.
- Push the Red Flasher from the bottom.
- Stand below the far right block to draw the Snake down.

- Stand by the top of the three Sliders to draw the right Snake over, then move down one to trap it.
- Push the Blue Flasher.
- Move the right Push Block left 13 and down 3.
- Move next to the upper Push Block to draw the left Snake into the trap.
- Pick up the Bomb.
- Blow up the Blow Me block.
- Open the chest.
- Receive a Royal Talisman.
Puzzle 46 – Run Jim at the bait shop out of money to unlock
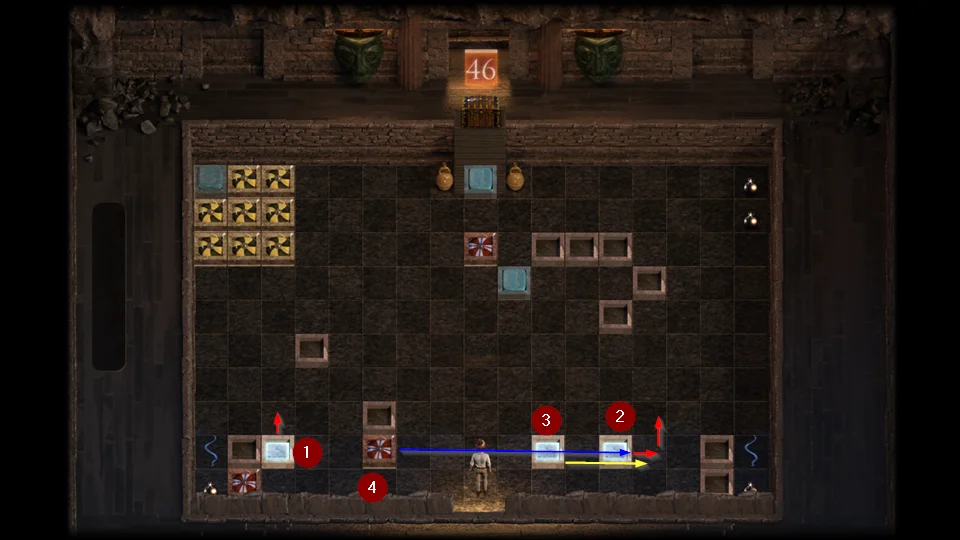
- Move left Push Block up 1.
- Move right Push Block right 1 and up 1.
- Move bottom Push Block right 3.
- Push middle Slider right.
- Push the right Slider down.
- Move the top right Push Block right 1.
- Move down to the bottom to trap the Snake.
- Move to the square diagonal of the fixed blocks.
- Pick up the top Bombs.
- Pick up the bottom Bomb.
- Push the top Slider left.
- Blow up the bottom right Blow Me block.
- Blow up the top right Blow Me block and the one to its left.
- Press the Blue Flasher and then move into the Corner.
- Open the chest.
- Receive a Royal Talisman.
Puzzle 47 – Get all home upgrades to unlock
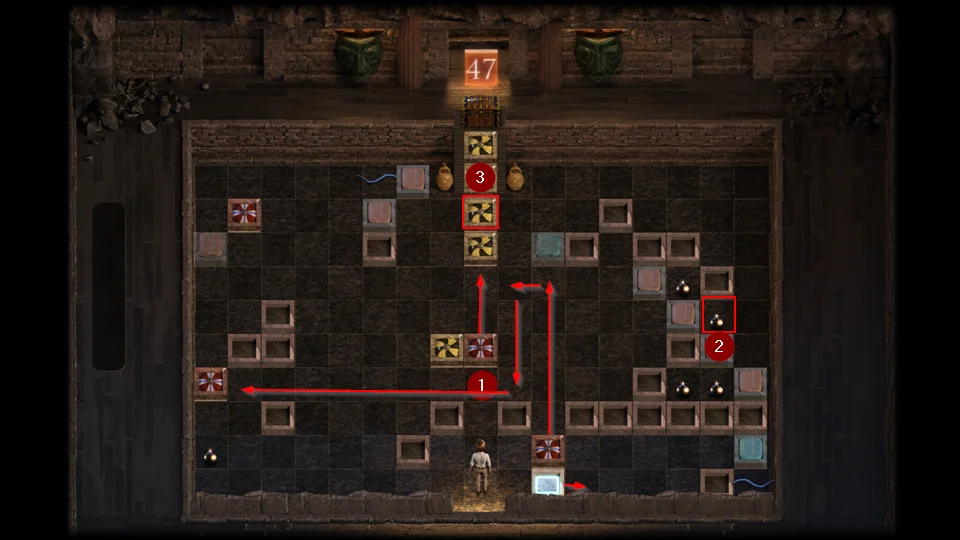
- Push Slider in front of you up.
- Pick up the upper Bomb on the right side.
- Blow up the Blow Me block third from the top.
- Move the bottom Push Block right 1.
- Push lowest Slider up, left, down, left.

- Line up under the top Snake. Click under the block to the right of the Slider you just move and then quickly in the space under the Slider. This is one of those beat the Snake puzzles I loathe.
- Pick up the lower left Bomb.
- Push the left Slider up.
- Push the top Slider right.
- Push the Red Flasher.

- Another beat the Snake move. Get in the top row, aligned with the Snake and click on the square behind the Slider.
- Move across through the opening you cleared and stand behind the Slider.
- Pick up the top Bomb.
- Click on the square opposite where the Bomb was.
- Blow up the two Blow Me blocks by the exit.
- Open the chest.
- Receive a Royal Talisman.
Puzzle 48 – Finish all other puzzles to unlock
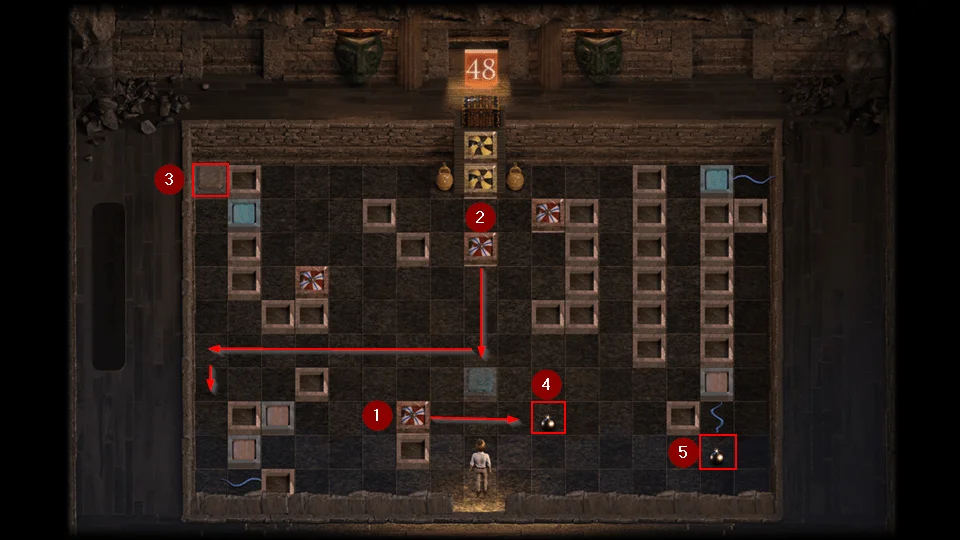
- Push the bottom Slider Right.
- Push the Slider under the Blow Me blocks down and left. Another timing move. You need to push the block down as soon as you get on top of it to block the Snake. I got right next to it and arrowed over and clicked on the block.
- Push the Red Flasher.
- Pick up the left Bomb.
- Pick up the right Bomb. If you pick it up from the top you won’t pull the bottom Snake.
- Blow up the two Blow Me blocks at the exit.
- Open the chest.
- Receive a Royal Talisman.
Ancient Temple: Puzzle 49
Puzzle 49 – Take the Teleporter after finishing puzzles 1 – 48
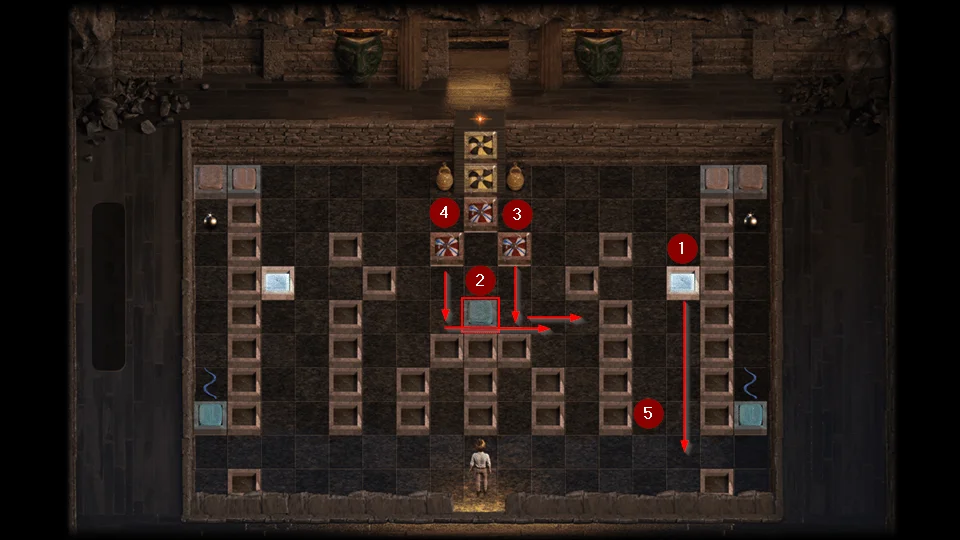
- Move the right Push Block down 5.
- Push the Blue Flasher.
- Push the right Slider down and right.
- Push the left Slider down and right.
- This is a peek move. Move down so the Snake sees you and then right back up.

- Pick up the left Bomb.
- Push the Red Flasher.
- Move the left Push Block down 5 then right 4.
- Stand on top of the right Bomb to draw the right Snake up.
- Move the right Push Block down 1.
- Stand beside the left Push Block to draw the right Snake.
- Pick up the right Bomb.
- Push the Slider under the Blow Me blocks out of the way.
- Blow up the Blow Me blocks.
- Pick up Evie’s Profile.
- The end.
| Treasure of Nadia Guides | |
|---|---|
| Cheats (Mod) | Puzzle Solutions |
| Plants Guide | Crafting Recipes |
| Broken Keys | Chests & Keys |