Table of Contents Show
Map of chest key/kamasutra locations in Treasure of Nadia.
Locations Part #1
| Key # | Map Name | Map Square | Location on Screen | Kamasutra |
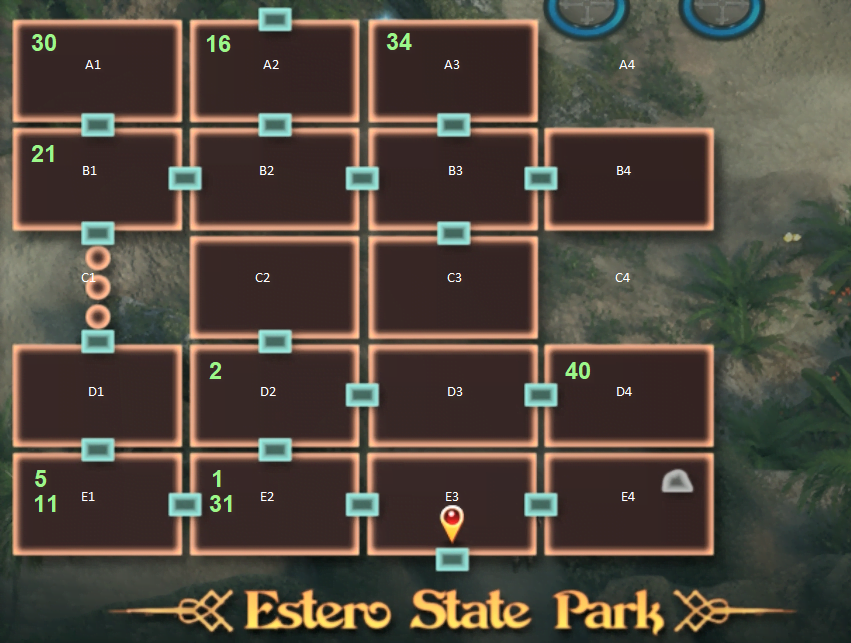
| 1 | Estero State Park | E2 | Right | Alia 1 |
| 2 | Estero State Park | D2 | Left | Naomi 1 |
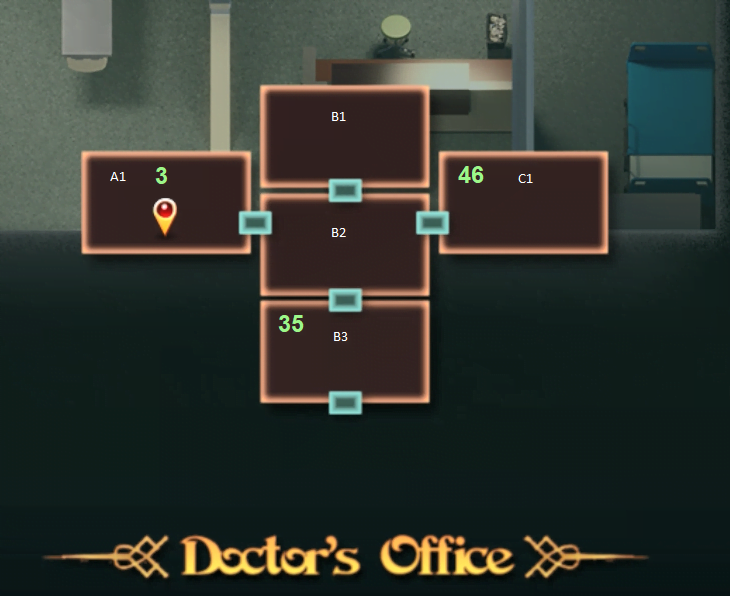
| 3 | Doctor’s Office | A1 | Center | Emily 1 |
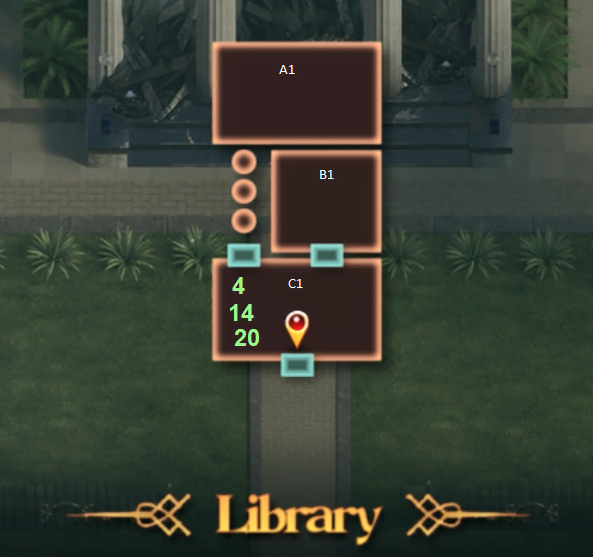
| 4 | Library | C1 | Break vase on right | Naomi 2 |
| 5 | Estero State Park | E1 | (No key required) | Tasha 1 |
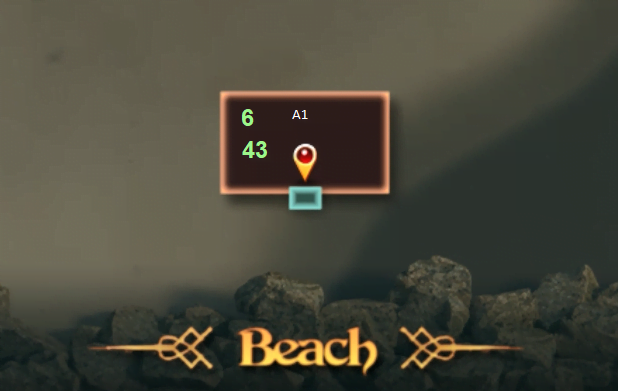
| 6 | Beach | A1 | Bottom left behind palm tree | Alia 2 |
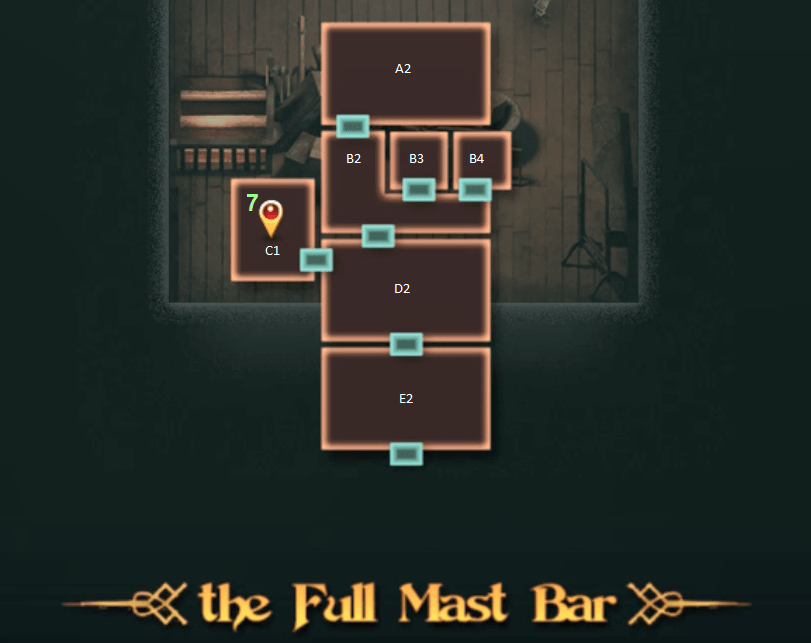
| 7 | Full Mast Bar | C1 | Bottom Left | Pricia 1 |
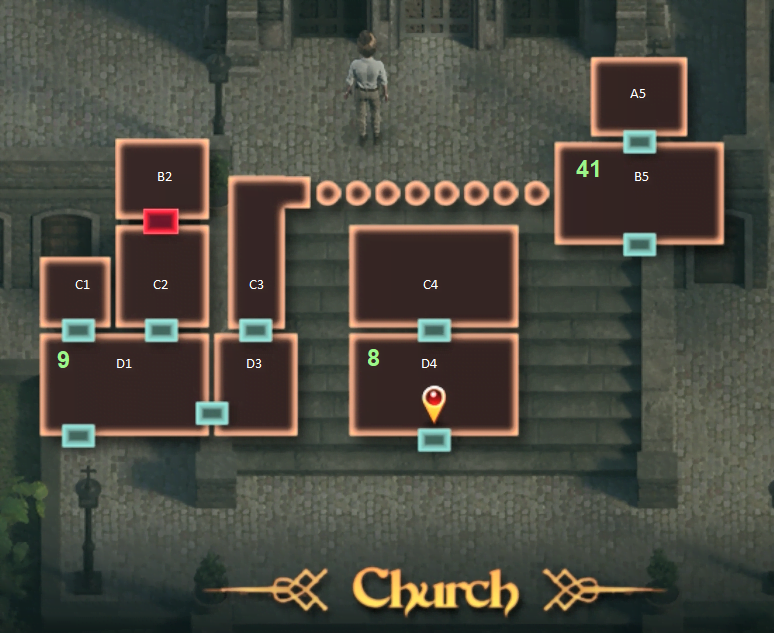
| 8 | Church | D4 | Top Right | Emily 2 |
| 9 | Church | D1 | Left | Tasha 2 |
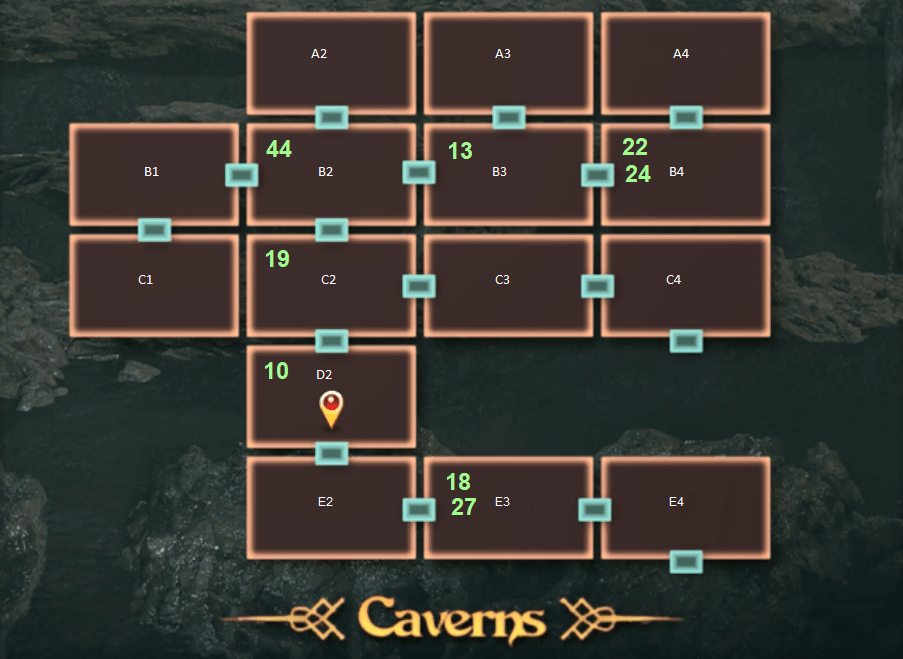
| 10 | Caverns | D2 | Center | Kaley 1 |
| 11 | Estero State Park | E1 | Pickaxe bottom center behind tree | Naomi 3 |
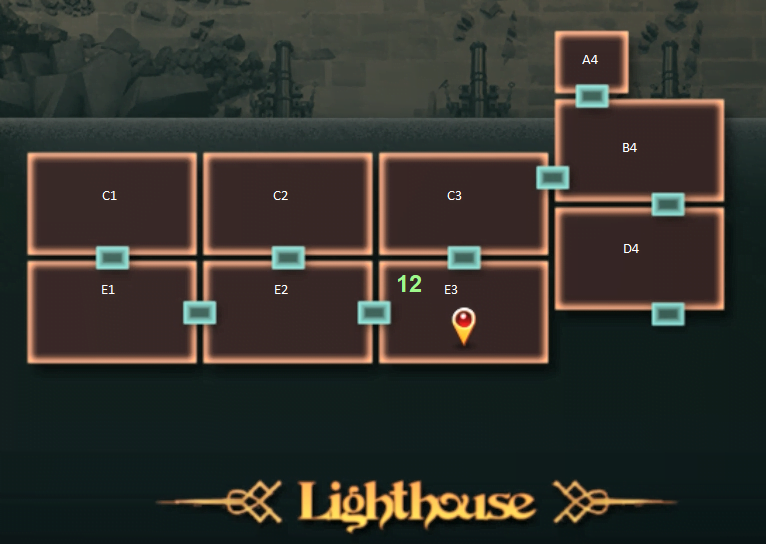
| 12 | Light House | E3 | Pickaxe bottom right | Jessica 1 |
| 13 | Caverns | B3 | Bottom Center | Tasha 3 |
| 14 | Library | C1 | Bottom left | Alia 3 |
| 15 | N/A | N/A | 4 x broken keys | Diana 1 |
| 16 | Estero State Park | A2 | Break vase right side | Jessica 2 |
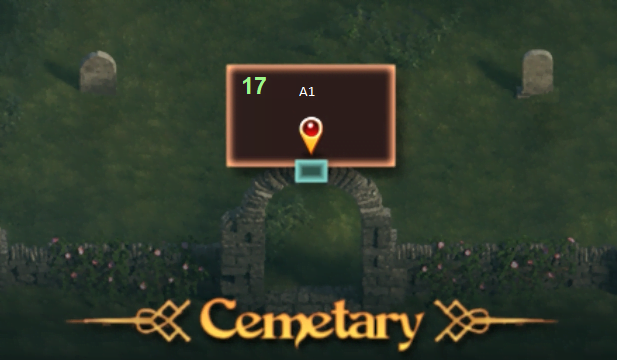
| 17 | Cemetery | A1 | Pickaxe right side behind tree | Emily 3 |
| 18 | Caverns | E3 | Bottom Right | Kaley 2 |
| 19 | Caverns | C2 | Left | Diana 2 |
| 20 | Library | A1 | Left side | Pricia 2 |
| 21 | Estero State Park | B1 | Top Right with whip | Jessica 3 |
| 22 | Caverns | B4 | Bottom Center | Clare 1 |
| 23 | N/A | N/A | 4 x Broken Keys | Pricia 3 |
| 24 | Caverns | B4 | Top (have to step on 3 pressure plates) | Kaley 3 |
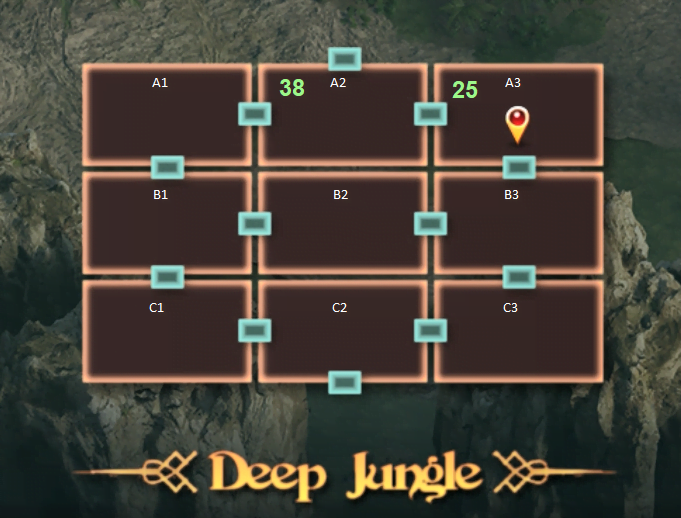
| 25 | Deep Jungle | A3 | Pickaxe between palm trees | Clare 2 |
| 26 | N/A | N/A | 4 x Broken Keys | Diana 3 |
| 27 | Caverns | E3 | Bottom Left Pickaxe | Janet 1 |
| 28 | N/A | N/A | 4 x Broken Keys | Clare 3 |
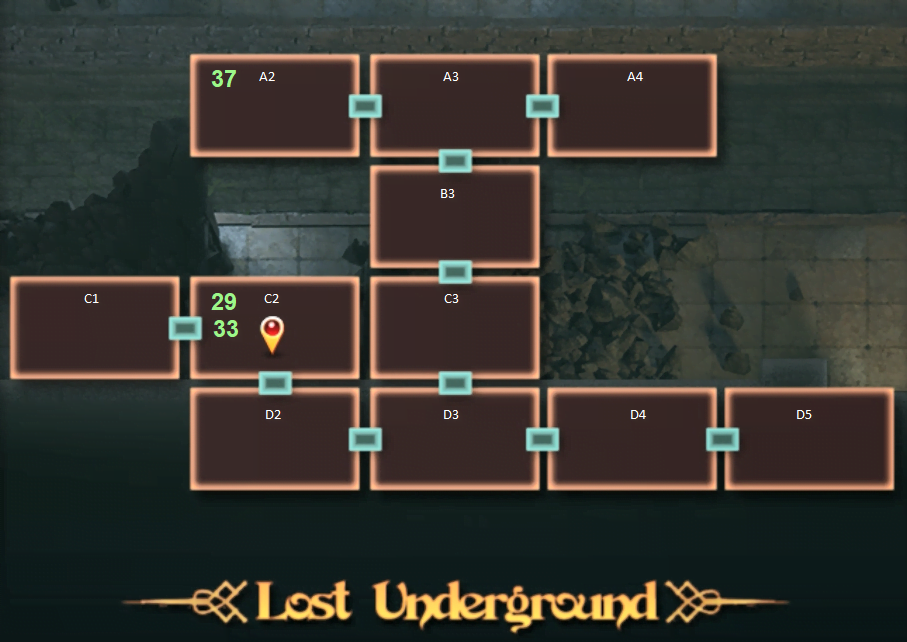
| 29 | Lost Underground | C2 | Pickaxe Bottom Middle | Janet 2 |
| 30 | Estero State Park | A1 | Top grappling hook | Madalyn 1 |
Locations Part #2
| Key # | Map Name | Map Square | Location on Screen | Kamasutra |
| 31 | Estero State Park | E2 | Give Ash Boom Box | Diana 4 |
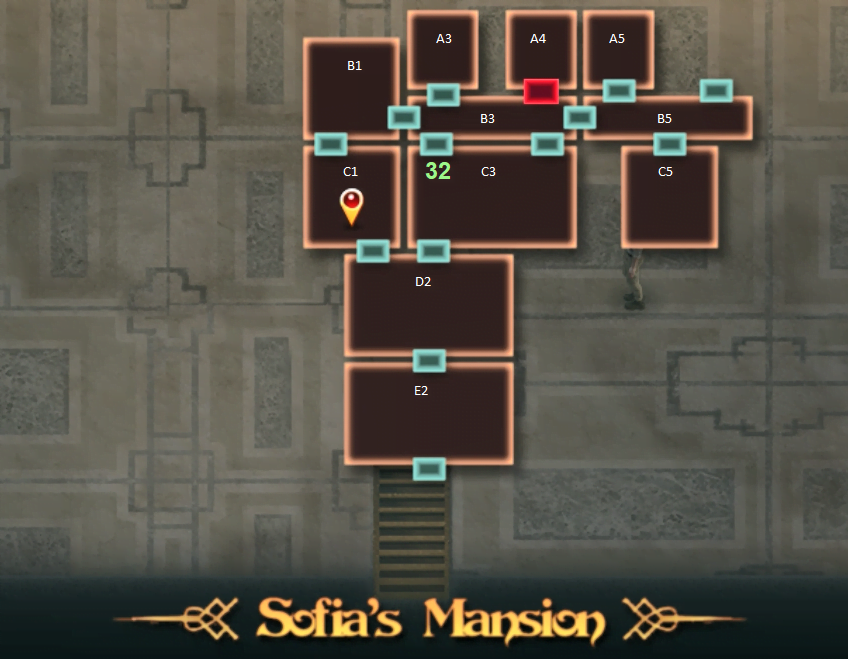
| 32 | Sophia’s Mansion | C3 | Top grappling hook | Tasha 4 |
| 33 | Lost Underground | C2 | Top Middle | Madalyn 2 |
| 34 | Estero State Park | A3 | Middle use crowbar on box | Sophia 1 |
| 35 | Doctor’s Office | B3 | Go outside through C1 | Janet 3 |
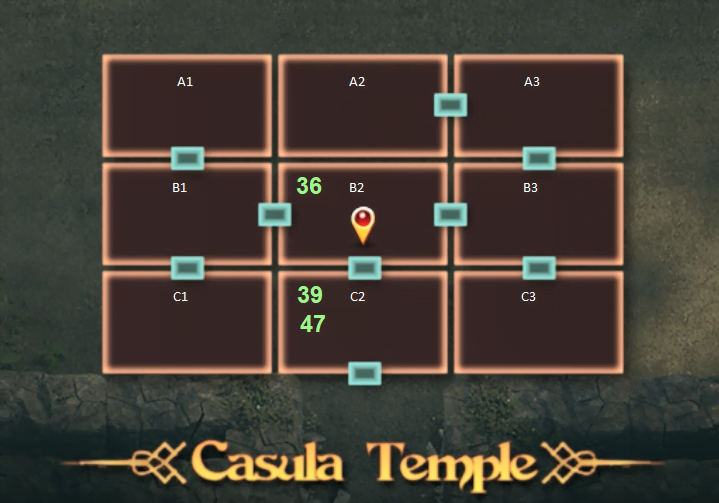
| 36 | Casula Temple | B2 | Middle | Sophia 2 |
| 37 | Lost Underground | A2 | Pickaxe Bottom | Madalyn 3 |
| 38 | Deep Jungle | A2 | Pickaxe Bottom | Sophia 3 |
| 39 | Casula Temple | C2 | Bottom Left | Naomi 4 |
| 40 | Estero State Park | D4 | Top (Grapple, then ladder) | Clare 4 |
| 41 | Church | B5 | Middle (Hit 4 Blue Pressure Pads) | Alia 4 |
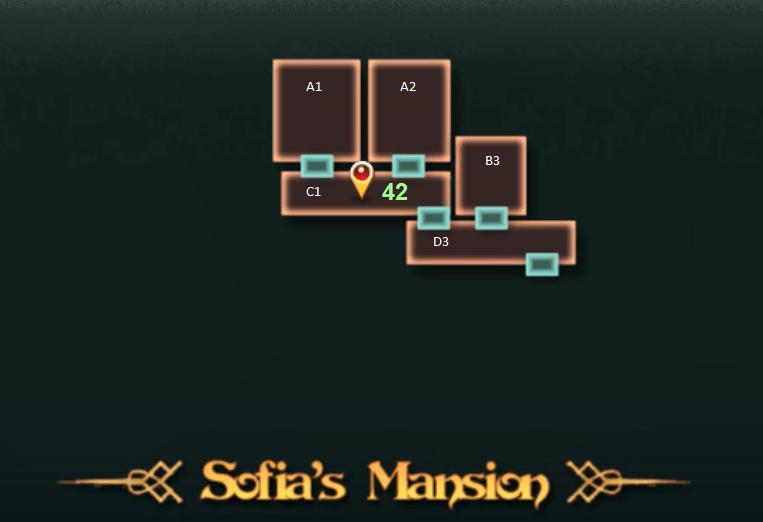
| 42 | Sophia’s Mansion Up | C1 | Pickaxe Top | Emily 4 |
| 43 | Beach | A1 | Catch Tuna | Jessica 4 |
| 44 | Caverns | B2 | Top blue Pressure Pad | Kaley 4 |
| 45 | Evie Limbo | A1 | Top Left | Janet 4 |
| 46 | Doctor’s Office | C1 | Second Locker | Pricia 4 |
| 47 | Casula Temple | C2 | Blue Pressure Pad | Sofia 4 |
| 48 | Evie Limbo | A1 | Bottom Right | Madalyn 4 |
| 49 | N/A | N/A | Craft (2 Blue torn pages, 2 Talisman of the gods) | Janet & Jessica 5 |
| 50 | N/A | N/A | Craft (2 Purple torn pages, 2 Talisman of the gods) | Diane & Clare 5 |
| 51 | N/A | N/A | Craft (2 Yellow torn pages, 2 Talisman of the gods) | Emily & Kaley 5 |
| 52 | N/A | N/A | Craft (2 Red torn pages, 2 Talisman of the gods) | Naomi & Tricia 5 |
| 53 | N/A | N/A | Craft (2 Orange torn pages, 2 Talisman of the gods) | Alia & Tasha 5 |
Beach
Casula Temple
Caverns
Cemetery
Church
Deep Jungle
Doctor’s Office
Estero State Park
Full Mast Bar
Library
Light House
Lost Underground
Sophia’s Mansion
