A complete guide with early game tips and strategies to survive and dominate in Zombieville USA 3D!
Zombieville USA 3D: Complete Guide
Useful tips and tricks for better zombie killing and higher scores in Zombieville USA 3D.
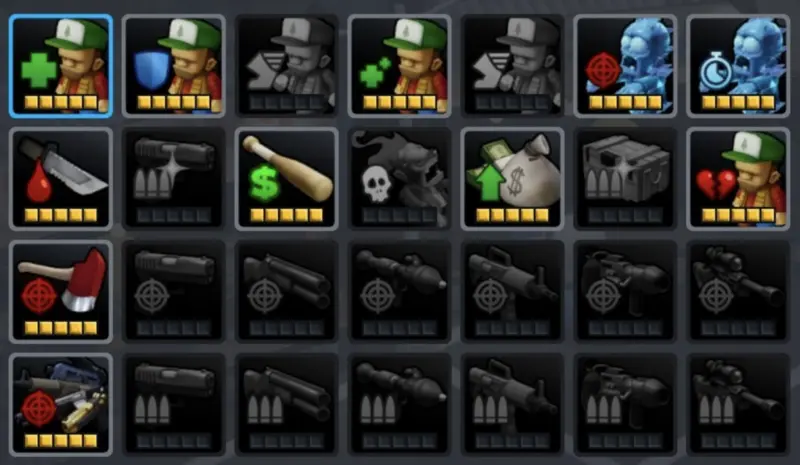
Weapon Perks
| Perk | Effect |
|---|---|
| Overload | Deals 3x damage, but spends ammo from all weapons. |
| Mobile | Sprinting consumes no stamina. |
| Shocking | Briefly shocks enemies and deals 25% more damage. |
| Ambusher | Deals 3x damage when not striking from the front. |
| Protective | Will rescue you from death once, even if holstered. |
| Piercing | Shots penetrate targets. |
| Freezing | Adds freezing effect. |
| Cursebreaker | Deals 3x damage to cursed zombies. |
| Burning | Sets enemies on fire. |
| Wildcard | Scales with the highest weapon perks, regardless of type. |
| Lethal | Has a 10% chance to instantly kill enemies. |
| Powerful | Deals 50% more damage. |
| Corrupted | Infinite ammo, but consumes health to fire. |
| Siphon | Recovers health on hit. |
| Crushing | Deals 2.5x damage to heavies, has increased knockback. |
| Volatile | Causes enemies to explode. |
| Robber | Kills with this weapon drop 100% more money. |
Getting Started
Upgrade Daddy Warbucks First
You’re going to be spending a lot of money. Perk upgrades go up in price with every purchase. No matter your playstyle, no matter what you prefer, you might as well get a head start on the money grind. Get used to unupgraded play for a bit and max out Daddy Warbucks before you spend money on any other perks. Grave Robber also boosts your income, but it’s counterproductive making money this way before you have the necessary perks to make melee weapons reliable.
Health and Defense Extend Your Runs
Zombieville 3D is endless, and you’ll be trading up for higher tier weapons (and eventually modded ones) the entire time as the difficulty rises, health pools grow out of control, zombies speed up, and ammo runs dry. This means your starting weapons aren’t particularly important. Buy the medkit early on, and prioritize Radioactive and Body Armor perk levels. With a high enough Radioactive level you’ll worry less about managing medkits in your loadout.
Base Gameplay Strategies
These gameplay tips assume you don’t have perks or upgrades. There will be plenty of time later to explore the most busted endgame builds, and the right perks will completely break this game in half, but everyone has to grind to get there. Hopefully this can help that process along.
Pick a Direction to Move In, and Stick With It
You don’t want to double back on streets you’ve already been through when you’re out of ammo and looking for the next chest. It’s easier to focus on progressing in one direction, covering the map in large sweeps, than to memorize the route you’ve taken and turns you haven’t taken already.
The Closest Zombie Is the Most Dangerous Zombie
Unless it’s a spitter, a zombie has to come up and touch you to deal damage… obviously. That means you want to prioritize enemies to buy yourself the most time in between now and a zombie touching you. Take out the closest zombies first, then the zombies in your path, and take out any spitters that you see along the way.
Medkits are Love, Medkits are Life
Again, Zombieville 3D is endless. The game only stops when you die. No matter how great you are, the cold hard fact remains: zombies will eventually outscale you, and you will inevitably get touched by one. The more you can heal your wounds, the farther you are from death. Without any perks, medkits are the only thing that can undo damage taken, so any you find on the field are valuable, valuable pickups.
Stay In the Open Whenever Possible
Now that Zombieville’s gone top-down, an individual zombie can’t threaten as much of your mobility as before. There’s not a whole lot zombies can really do to you until you’re surrounded, so try to spend as little time pressed up against a wall or an obstacle as you can get away with to avoid closing off escape routes, Don’t make a dive for items in tight or closed off spots like graveyards, backyards, parks, and alleyways without the firepower to keep zombies away in such a cramped space.
Save Your Sprints
Zombieville is a game of resource management, and far and away the most precious (besides your health) is your sprint bar. At base level, the charge is just too slow to afford using it just to get around. Hold on to your sprint bar and prioritize it for running away from zombies or squeezing through tight spaces faster. In any other situation, you have time to walk away from threats.
Use Your Ammo
If you’re a cautious player, you might spend more time than you need to making sure you’re wasting as few shots as possible while racing to the next chest, just to stay topped up on all four weapon slots. It’s not the best use of your time. Even at your unluckiest, there’s a lot of time between emptying one gun and emptying the rest of them. Your highest priority is avoiding damage, so don’t be afraid of picking off a lone zombie with a piercing or explosive weapon, especially if that zombie is getting in your way.
Tips and Tricks
Autofire
Autofire was added in an early update by popular request. It saves you a lot of button presses and makes using semi-auto weapons slightly more consistent, since you won’t have to time your trigger pulls with the rate of fire.
Be warned, though, there are a few disparities between playing with and without autofire. A few of the fastest semi-auto weapons such as the Scout, Phantom, and Survival Knife have a lower rate of fire cap while autofire is active. You can toggle this option at any time, so if you really want to squeeze a little more DPS out of these cheap early-game pistols, you may want to consider playing without autofire.
Weapon Juggling
Sometimes the game is generous and gives you a lot of great weapons, sometimes even more than you can hold. You could empty out a weapon before picking up the new one, but that’s time you aren’t spending finding another chest. There’s a way to drag extra weapons along with you.
Players drop weapons a short distance behind where they’re standing. Picking up and dropping a weapon also resets its despawn timer. You can exploit this by facing away from the direction you want to go, then switching the new weapon with an offhand weapon over and over as you slowly inch along the road.
Moving and Aiming
If you’re backpedaling or strafing while you aim and shoot, you’ll walk slower. When you move in the direction you’re shooting, though, you don’t suffer this penalty. Take advantage of this to eke out a little extra movement in between shots. To avoid the movement penalty entirely, controller players can opt not to aim with the right stick at all, and keyboard/mouse players can move using the right mouse button.
Building a Wall
Zombies are solid. Because they can’t walk through each other, you can take advantage of stuns to create distance between you and a crowd by freezing anyone in the front. This can get important when dealing with runners and the unstoppable cursed zombies at higher levels. Zombie spit goes wherever it wants, though, only stopped by environmental walls and their own max range.
Death By Physics
The physics in this game are mostly reserved for flinging props and zombie gibs around, but every once in a while it affects your game as well. Solid props such as roadblocks and grills have a bad habit of flinging zombies that come in contact with them, and the now airborne zombies will happily use that boost to go straight to you. If they land on each other’s heads, they’ll even crowdsurf their way past everyone by walking right on top of each other. Zombies walking over a whole crowd you’re currently dealing with is one of the few things that can pose a threat to you in the endgame.
Smoothly Operating
Smooth Operator is the hardest achievement to get. Everything else is more of a progression milestone, while Smooth Operator presents the only significant gameplay challenge besides Wolf of Z Street. Here are some tips to earn it.
Play on 1x. You won’t have time to even see 250 zombies before Infection Level 11 on the faster speeds.
You can earn Smooth Operator with minimal upgrades, but since you can’t take any damage, all health/defense upgrades are off the table. Aim for upgrading Sprinter, Generalist, and Boom, Headshot first. Sprinter will allow you to reposition away from tricky zombie spawns and keep the time spent in a tight corner at a minimum. Generalist is just a quick and cheap way to make every weapon more effective at once. Boom, Headshot helps weaker guns to pull weight as zombies outscale them and can potentially save a lot of time and ammo on cursed zombies.
Sell every melee weapon. Sell the Scout. Getting in melee range is a risk you shouldn’t be taking if your goal is to take zero damage. Don’t even think about it.
Keep your eyes on your character always. Every now and again the game will spawn a zombie or two within biting distance, and you’ll only have the time it spends digging out of the ground to kill it or get away. They’ll even spawn underneath corpses and pickups, so keep your eyes and ears sharp before a zombie bites you out of nowhere on Infection Level 10.
Try to avoid going into closed off spaces. Zombies will cut off your path and there’s no guarantee the weapon in that chest was worth giving up your positioning for. You’ll find enough weapons to make it out on the street.
AFK Farming
Perks and weapon upgrades are expensive in this game. Here’s how to farm cash AFK!
Both Flame Edge and Mageblade are viable weapons due to their dual Melee and Elemental type.
The main mechanic behind this build is the interaction between life-steal and elemental stuns. Elemental stuns prevent non-cursed zombies from attacking you and give you time to heal up. This is especially important in later rounds as it prevents you from being overwhelmed by damage and allows you to tank through cursed zombies. Additionally, cash drops scale as rounds progress, so surviving is key!
Don’t have enough money for the full build? Here are the most important perks.
- Vampire – Your most consistent source of health regeneration.
- Grave Robber – For increased cash generation from melee kills.
- Daddy Warbucks – For increased cash generation.
- Body Armor – Reduces damage taken, allowing you to survive longer.
- Ninja – Increases the effectiveness of melee weapons, enabling you to survive longer.
The Location
Where you choose to AFK is an important factor in mitigating damage. Mobs should only be able to attack you from the front, preventing you from being overwhelmed. Mobs should also spawn close to your location, allowing you to sustain life-steal in later rounds as cursed zombies scale in their damage. If zombies spawn too far and take too long to walk into your attack range, your healing will not be able to keep up.
There are several locations in the game that meet these criteria. Personally, my favorite one is a small alcove in the southwest corner of the map.
Since zombies can only spawn within a limited range of the character, and most of the area around this position is inaccessible, zombies spawn very close in front of the character. This ensures that there’s always plenty of zombies to life-steal from, allowing you to effectively tank damage.
How do I get there?
Since this game does not provide a mini-map and is extremely confusing to navigate, hopefully these landmarks serve as an indicator that you are in the right area. In general, try to travel southwest as much as possible.
Landmark 1: If you are at this store, travel south on the main road to the right.
Landmark 2: If you are in this small neighborhood, travel west along the main road.
