Table of Contents Show
It’s the basics of operating a carrier from where the tutorial leaves you.
I’ve made this guide for people who are new to the game and want to know how to really get started from stuff like being able to resupply and keep up the fight to not pull hair out with the lack of information floating about.
This guide seems pretty rough will you update it more and iron it out?
Maybe depends on how i feel and i will try to add more information to it over time.
Will you go over Drones and how to use them?
I might at a later date because it’s more fun to understand that system yourself then be told what are it’s limits.
I don’t understand how to get started what should i do?
Launch your carrier, pick an island to square up with and give him what he has coming!.
you can always quickly go over to your map and see it’s strength (the shields are like a challenge level).
Enjoy my rough guide and leave helpful info in the comments!
Happy Hunting Commanders!
Repairing
Repairing the ship
So when your ship has taken damage system will stop working and you’ll need to stop your boat from ending in the deep sea. You can only repair one system at a time so pick what is the most important.
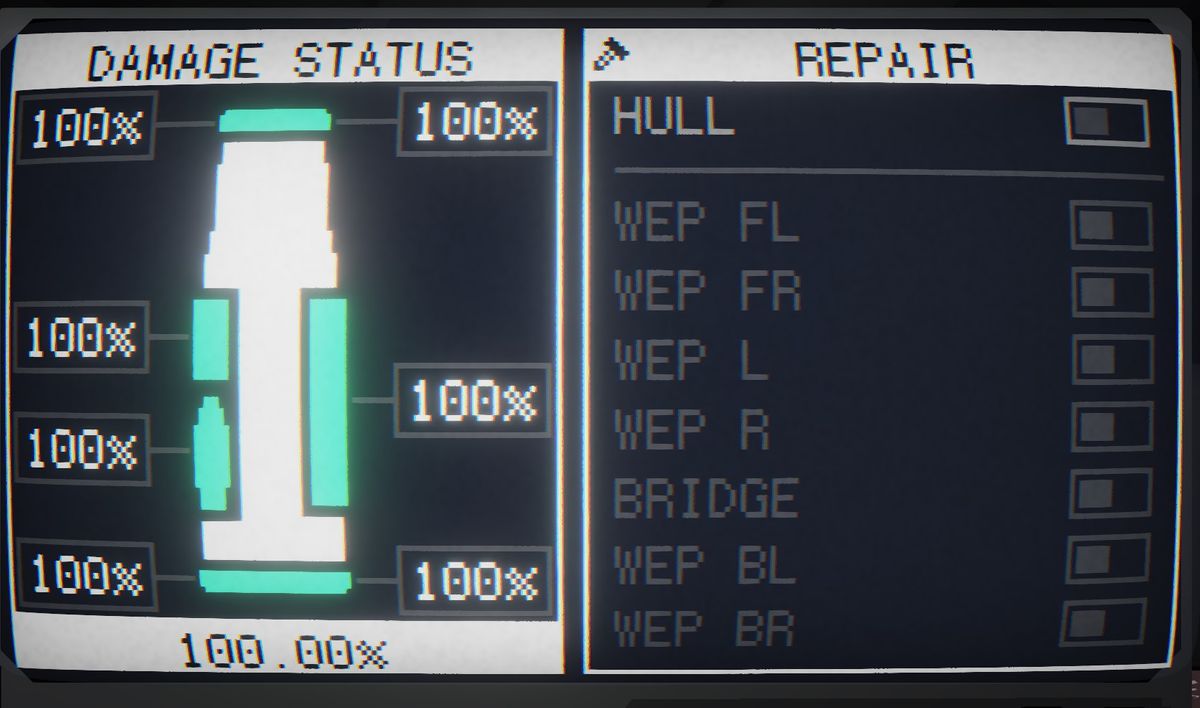
- Hull: The hull can take the biggest hits but takes the longest to repair.
- Wep FL: not sure but i think it’s for CIWS defences
- Wep FR: CIWS again i think
- Wep L: Your cruise missile and gun
- Wep R: AA Launchers and something else?
- Bridge: Your Controls and you
- Wep BL: Torpedoes Left
- Wep BR: Torpedoes Right
The Weapons

The Carrier has three offensive weapons to speak of the cannon/gun (160mm shells), the Cruise Missile and Torpedoes.
Cannon/Gun
This is really your main murder boy so lets give it a few pros and cons
Ammo: 160mm
Pros
- it fires off 5 rounds per salvo (shooting)
- It takes 160mm ammo good area of effect. (meaty)
- can’t be shoot down or really intercepted.
Cons
- Limited Fire angle
- long time to rearm fully
- Limited range 6km-6.5km max
Personally i use it a lot for cleaning up turrets and a groups when i don’t want to waste cruise missiles.
The Cruise Missile
My personally favourite robot remover and you know the deal, pros and cons
Ammo: Cruise Missile
Pros
- Chain-able missiles (it’s a bit buggy but a lot of fun)
- 15km-20km range max (achievement fun)
- large splash radius
Cons
- Can be shot down by CWIS Guns
- Tracking can be funky and can lead to misses
- Limit of 6 shots before reload
I personally don’t have a lot of bad to say about the cruise missiles I enjoy them but hate fighting ships with them because of the CWIS.
The Torpedo
Ammo: Torpedoes (normal)
Ammo: Torpedoes noise *
Ammo: Torpedoes countermeasure **
The unsung hero of naval power, The torpedoes are very useful because of how they can knockout ships without yourself being detected. Also are located on the rear of the Carrier.
So lets go over controls.
In the display of the radar you can see a red line, That line is the torpedo line and works off the barring given at the bottom number display on the weapons panel. The display number panel above this the fuse before the torpedo is live and tracking whatever is in front of it. This is the point of noise makes to fake being a ship and making torpedoes fired at you useless.
Unlike the main gun and missiles you have to put the torpedoes into the tube (with a button). This can be done with the use of the far right panel that broken up with L1 and R1 along with L2 and R2 (left and right sides of the boat). Finally the buttons of torpedoes. the grey Top is Torp load the one under is noise maker and im sure i don’t have to tell you what the red one does.
Torpedo Types
* Noise Torpedoes are used to divert enemy torpedoes but making a radar signal.
** Countermeasure will emit a sound (doesn’t show up on radar) that will blind torpedoes.
Pros
- Great for ambushes
- Large Range (haven’t tested a lot)
- can sink ships in 1-2 torpedoes
Cons
- No leading can lead to misses
- Can be tricked by noise maker
- Hard to use in the start
That covers the Basics of the Weapons.
The Defences

Anti Air(Far Left Panel)
When it comes to the anti air they will lock up aircraft and only really need you to fire the missiles with the click of the grey buttons under the toggles.
The Screens above will show you how much ammo you have in each the Strength of the lock on hitting the target.
CIWS(Right side of the Left Panel)
Fully Automatic don’t have to really worry about, it will shoot down aircraft and missiles that get to close to you but unlike the Anti Air it has a limited range. Just turn them on and leave them on really (turn them off if you want to keep power for something else).
Counter Measures Switch
(Top right switch by the tv)
Used to blind the sonar of enemy torpedoesJust a switch to pop out Countermeasures for IR locked missiles and other lock on weapons. changed info.
helpful panic button really.
Logi
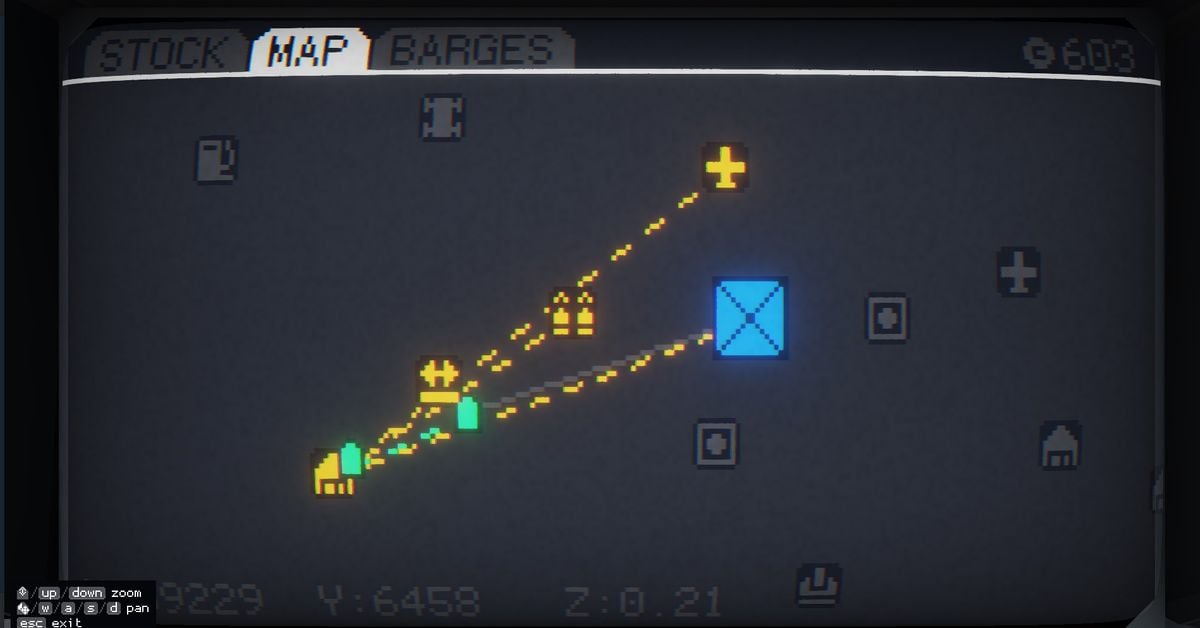
Lets understand how this works
- Green dotted line = barge attached to
- Little green icon = barge itself
- yellow dotted line = warehouse attached to
- blue box with X = you
Now simply put, You attach a barge to a warehouse but click and dragging from the barge to the warehouse nothing more (can have more then one barge to a warehouse). After that you then click and drag from the warehouse to the factory and that will make the barge understand that the warehouse will want whatever is being stored and made at the factory in it’s storage.
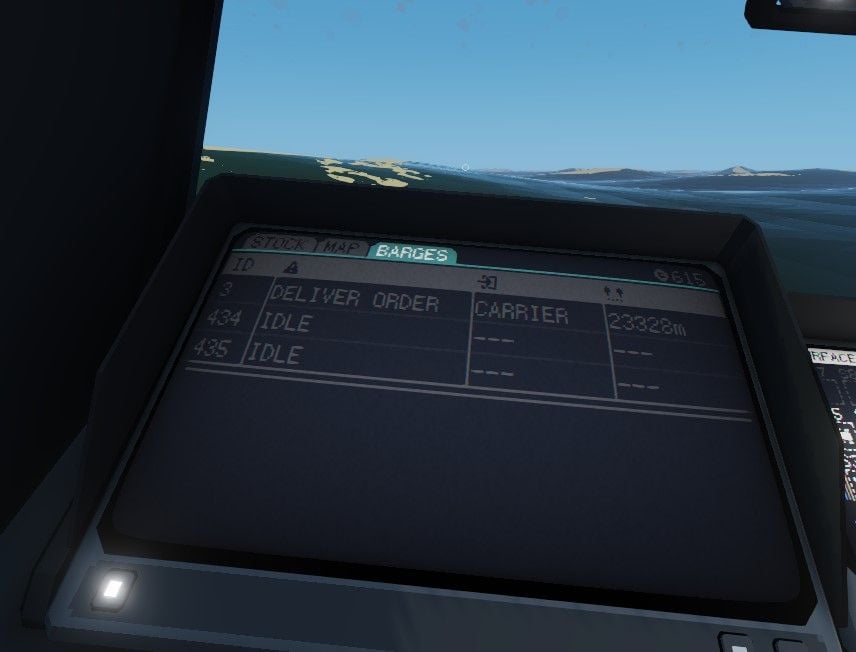
Barges
Don’t Try attach them too anything but a warehouse < (mistake) When attaching a barge you will click and drag it to one factory and one warehouse, they’ll automatically transport requests from warehouse to what the warehouse it attached too. they’re going to ferry equipment and ammo between the warehouse and whatever it’s attached too. they get very annoyed when you try to make them do anything else.
Helpful tip if your barge isn’t transporting to your carrier and sitting idle unlink the warehouse to the carrier then relink it.
The barge tab is very helpful in understand what the barges you have are doing and how your requests are coming along.
Warehouses
So when it comes to Logi this is it, your going to be attaching factories to the warehouse you want it to go too. this is done but click dragging the warehouse onto the factory, giving it a dotted line.
Factories
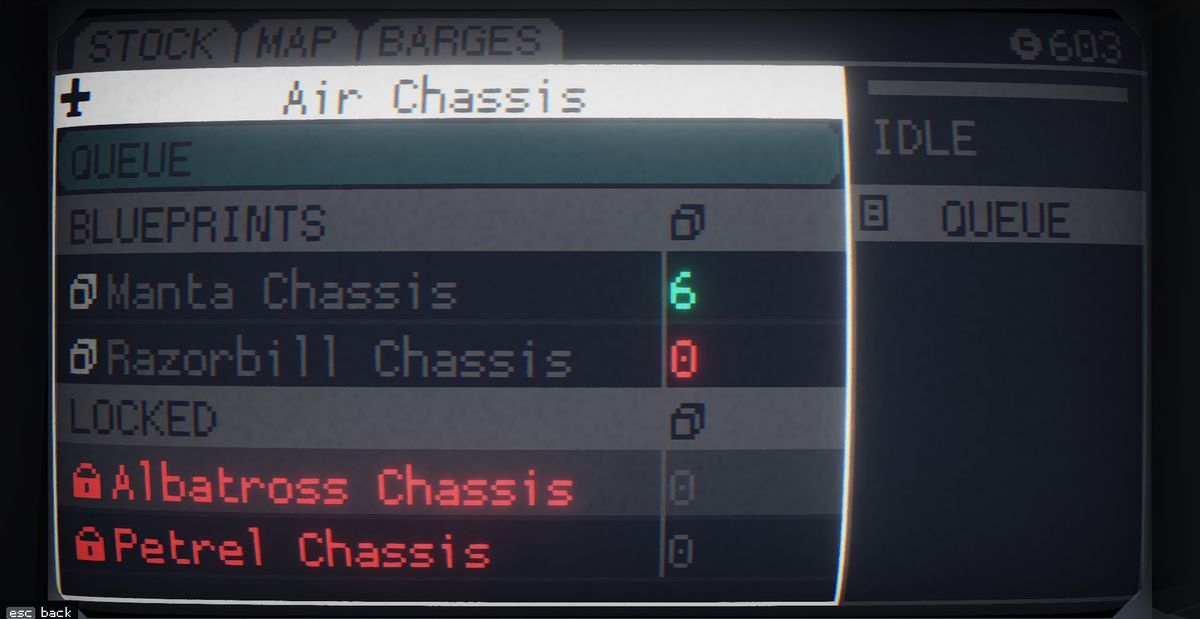
- So in the top right you can see the money you have from taking land and killing robots.
- You also have how much is already in storage under the blueprints tab at the factory and what you can craft at the factory.
- finally you have the queue that is what has been paid for and is being crated there.
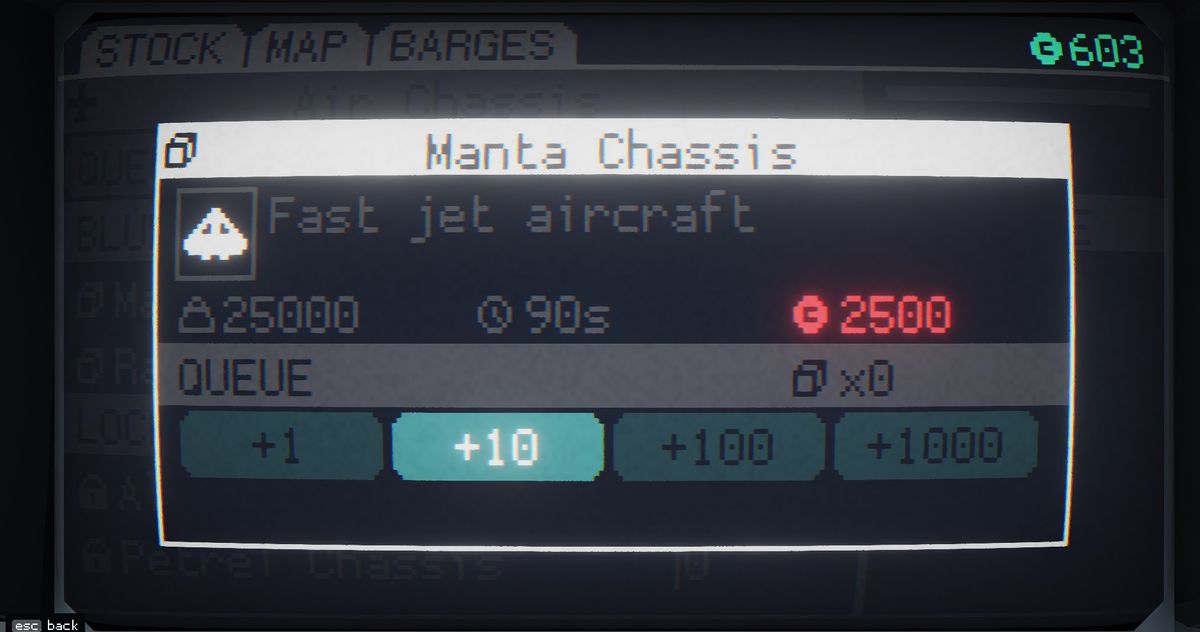
In this image you can see the price of the blueprint but understand once you’ve clicked on the plus or anything, it will take it out of your cash and start making it.
Stock Tab
it’s very simple to understand but always double cheek it because sometime you can make a request and not have the supplies so the barges will be trying to for fill your order without anything happening because it won’t stop requesting the supplies.