Table of Contents Show
A guide to playing on the Pillars map in the game Nebulous: Fleet Command.
Welcome To Pillars
Pillars is currently the most popular multiplayer map in Nebulous. You’ll be seeing it frequently so it’s a good idea to get familiar with the map, how it plays, and what kind of strategies you’ll be seeing. My name is PuppyFromHell#8516 on the official Nebulous Discord server, and this document will brief you on everything you need to know to survive and make meaningful contributions to your team’s victory while navigating Pillars.
Geography
Pillars is a medium sized battlespace (approximately 25 kilometers in diameter) with a large amount of rocks and asteroids that provide both radar and weapons cover. The asteroids are located in a central box roughly 11.5 kilometers wide, 9.5 kilometers long, and 12 kilometers tall. It is asymmetrical, with the cover roughly located in the lower diagonal half of the battlespace, providing a small cover advantage to the blue team. The map is divided into rough quarters by five tall pillars of rock. There is a central plateau located at the bottom of the map that separates the cover-rich top battlespace from the empty battlespace below. Further asteroids dot the map between the pillars that provide cover when transitioning between them.
Control Gamemode
While there are other game modes besides Control, it tends to be the most popular. For that reason this guide will only cover the Control gamemode. The Control gamemode is played by capturing and holding control over points scattered across the map. Each point a team controls contributes 2 points to the team’s overall score every 10 seconds. For example, if a team controlled 4 points then every 10 seconds they would get 8 points towards their total. The first team to reach the agreed upon number of points is the winner, which on Pillars is usually 1000 points. It takes one minute to capture a point regardless of how many ships are present on it. The presence of an enemy ship will stop progress towards capturing the point (an action called “contesting”), however if one team has a combat capable ship on a point and the other team has a harmless ship on the same point then the point will not be contested and will go to the team with the combat capable ship.
Naming Map Locations
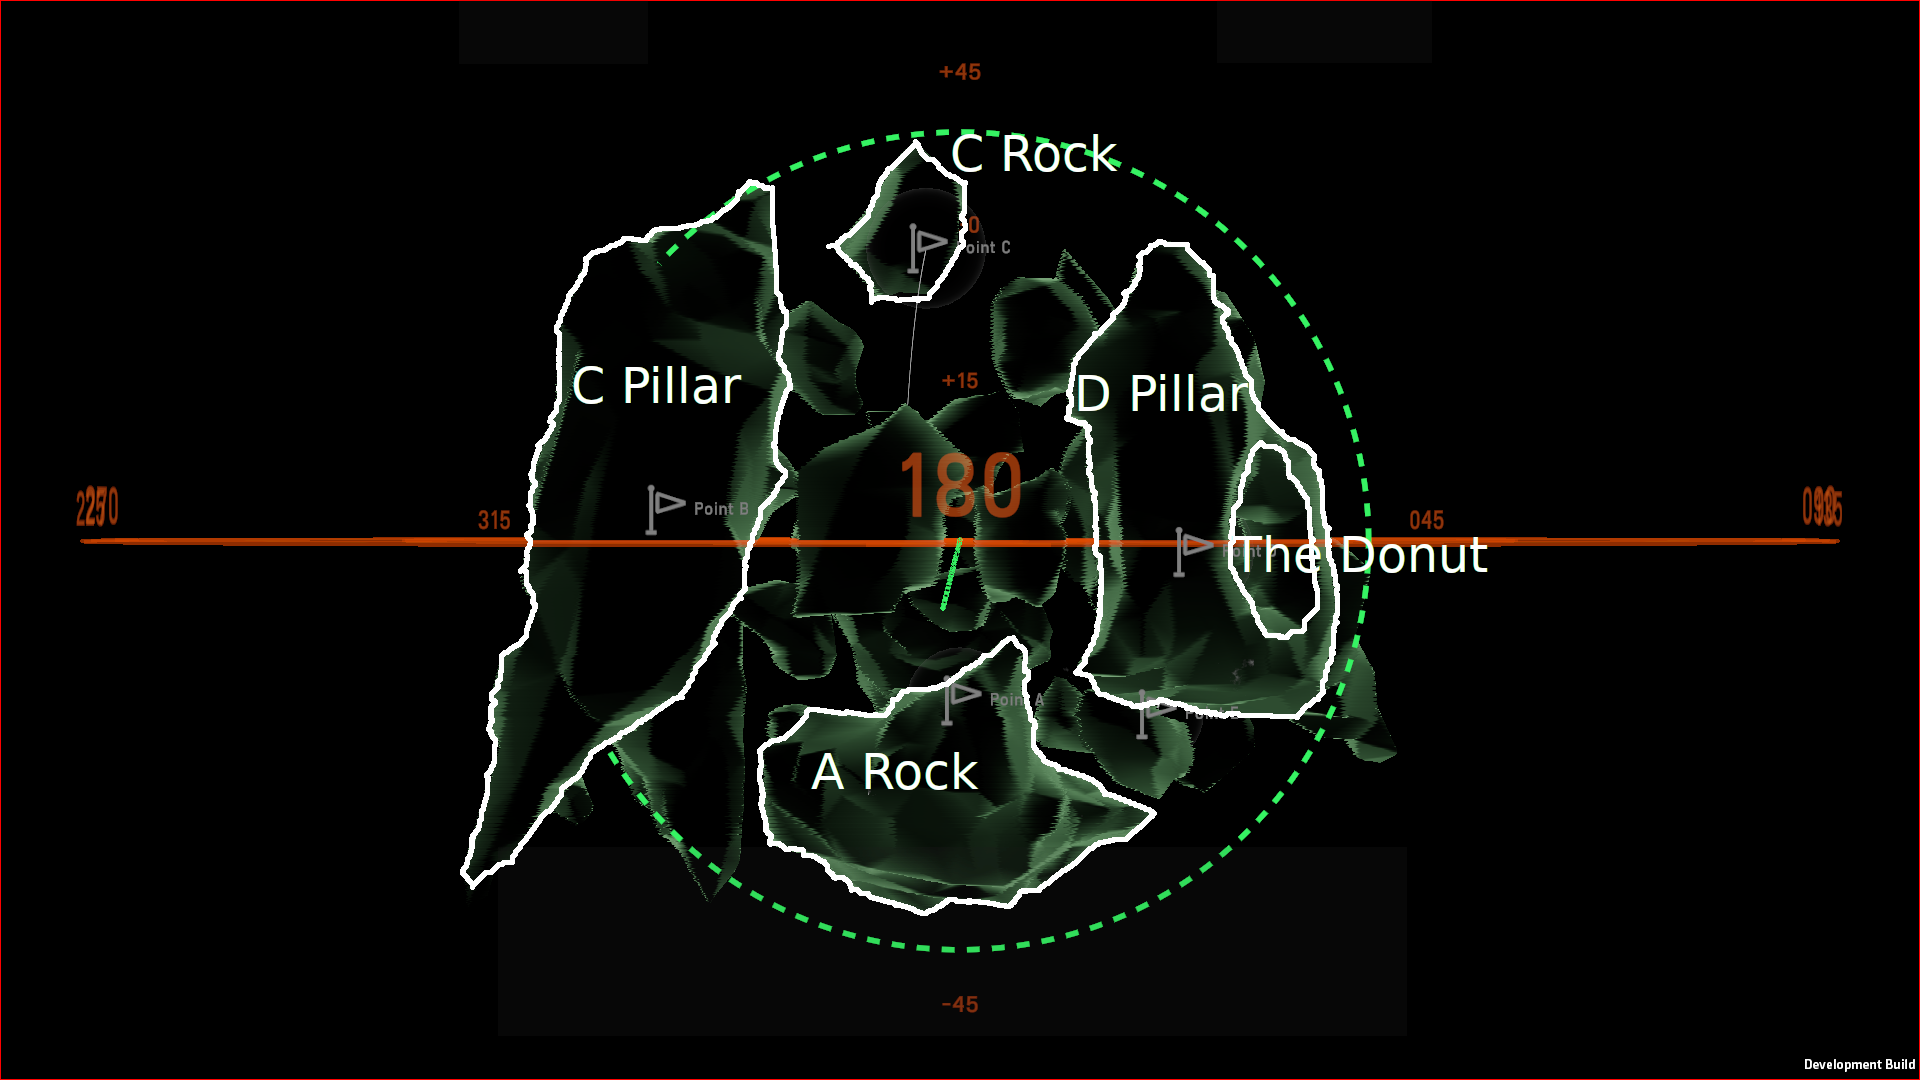
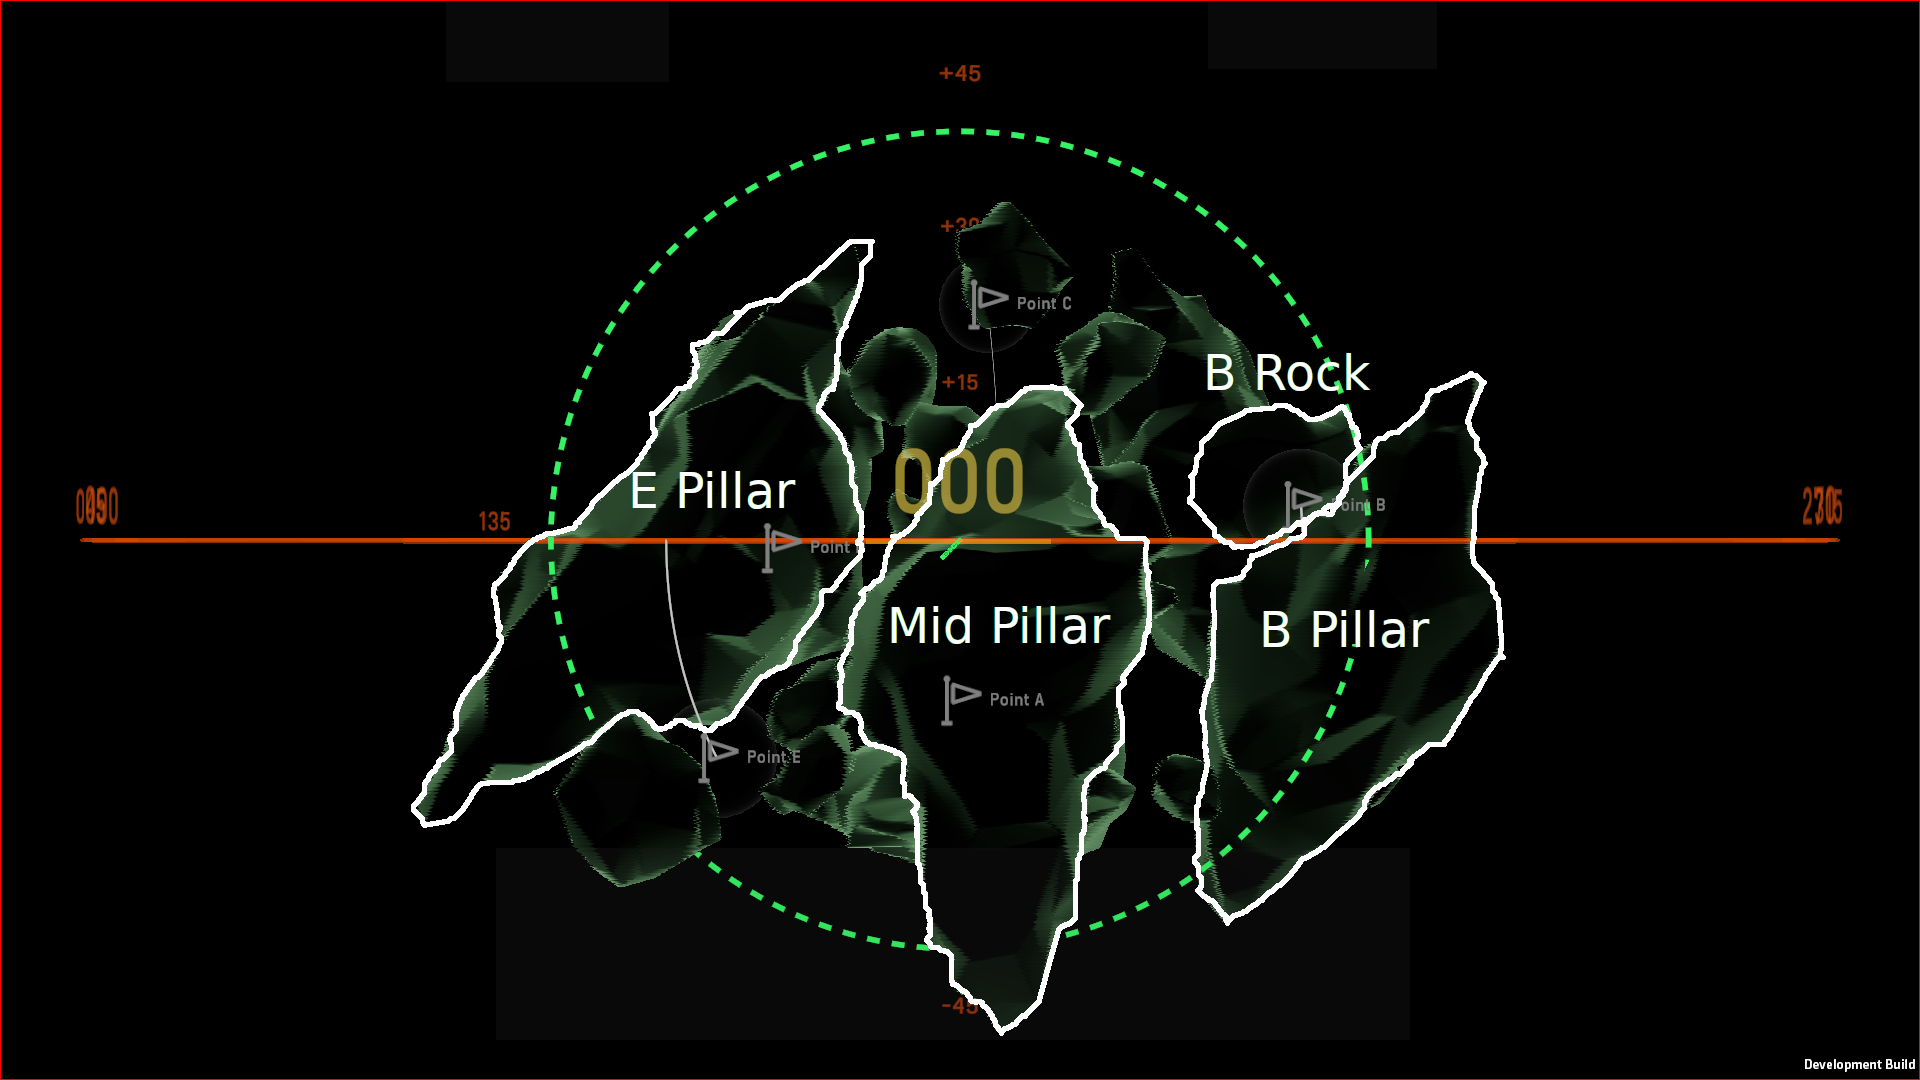
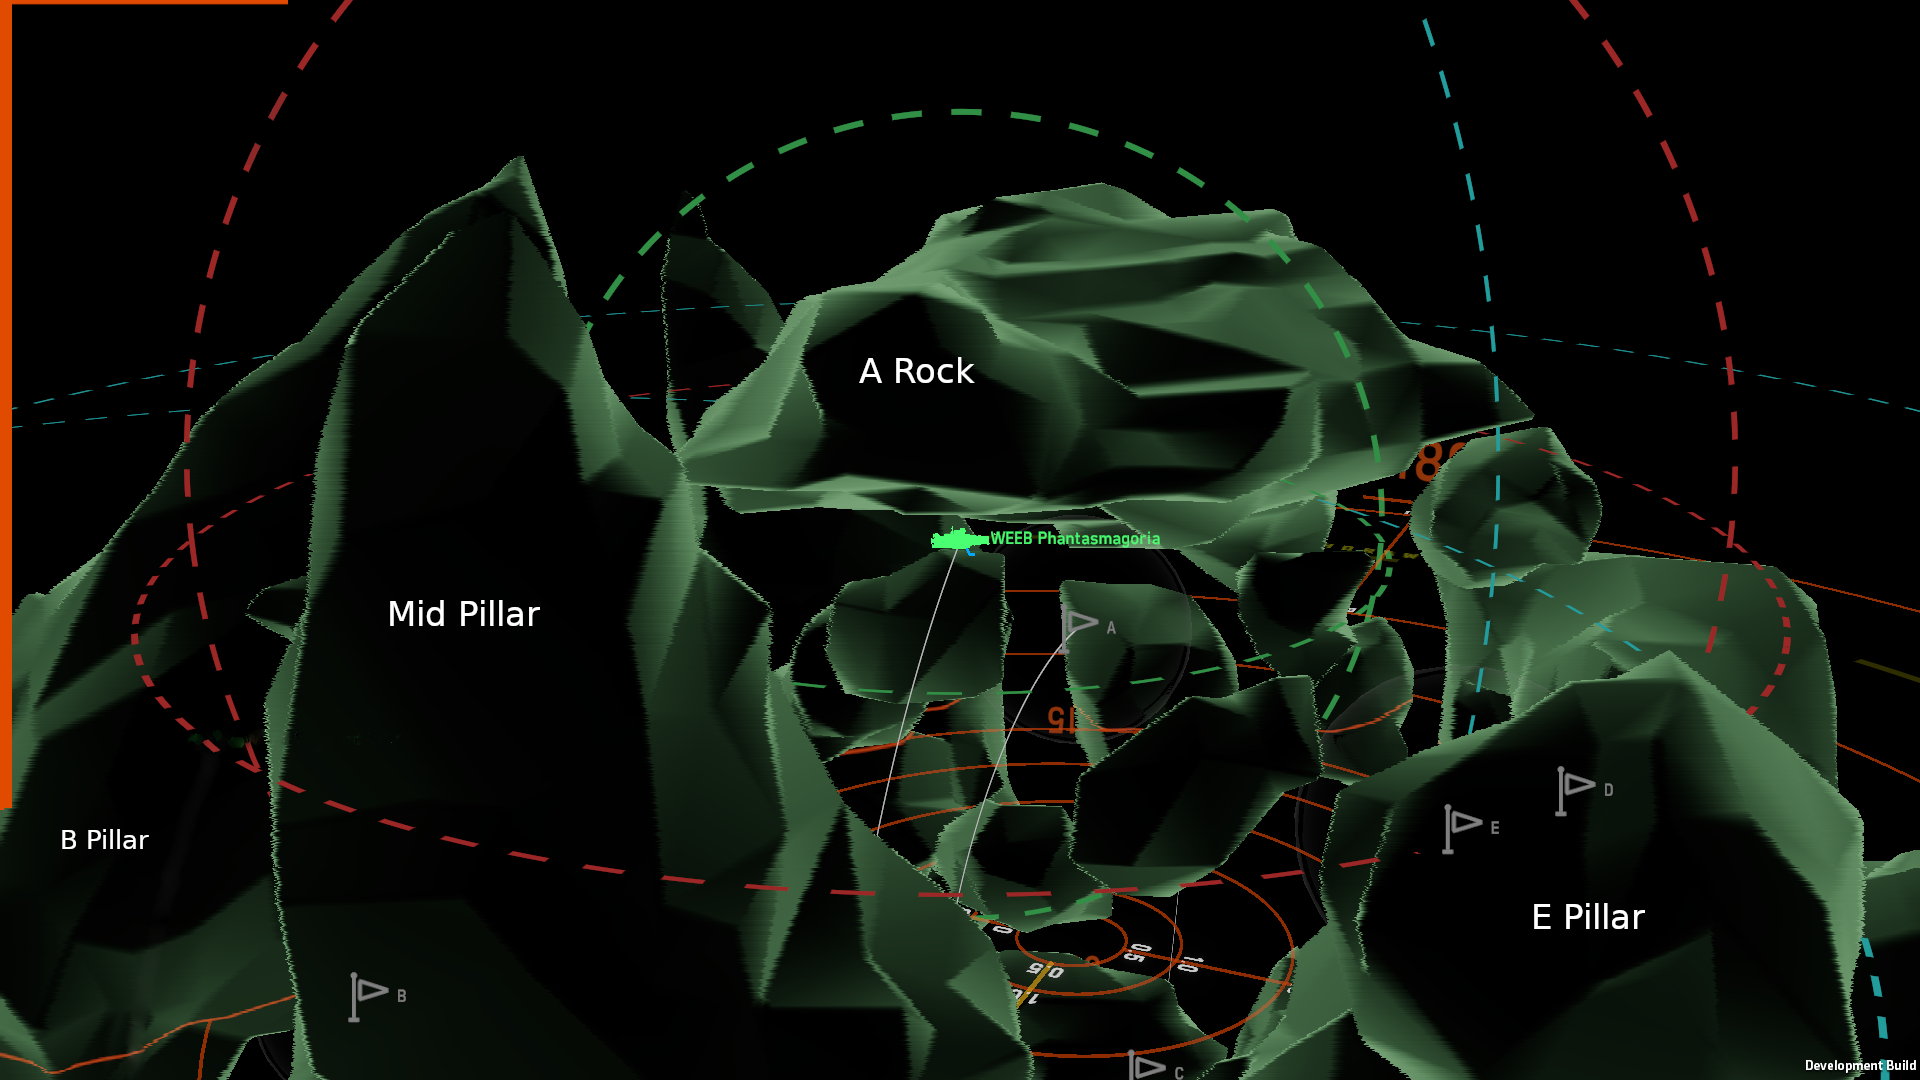
There are 5 capture points on Pillars and their existence has led to some common parlance to describe map features regardless of game mode. On the blue team side are the C and D capture points. The rock directly above C is usually referred to as the “C rock”. The pillar directly to the left of C is usually referred to as “C pillar”. The hole that the D point is located inside of is referred to as the “donut” while the entire pillar containing D is referred to as “D pillar”. On the red team side are the B and E capture points. The rock and pillar that are touching B point are referred to as “B rock” and “B pillar”. The pillar directly above the E point is referred to as “E pillar”. The pillar directly in between E and B points is referred to as the “mid pillar”. In the center of the map is A point, and the rock plateau that it sits on is referred to as “A rock”. The area of space directly below the A rock is collectively referred to as “sub-A”. Below are diagrams indicating the discussed map names:
Deployment: Blue Team
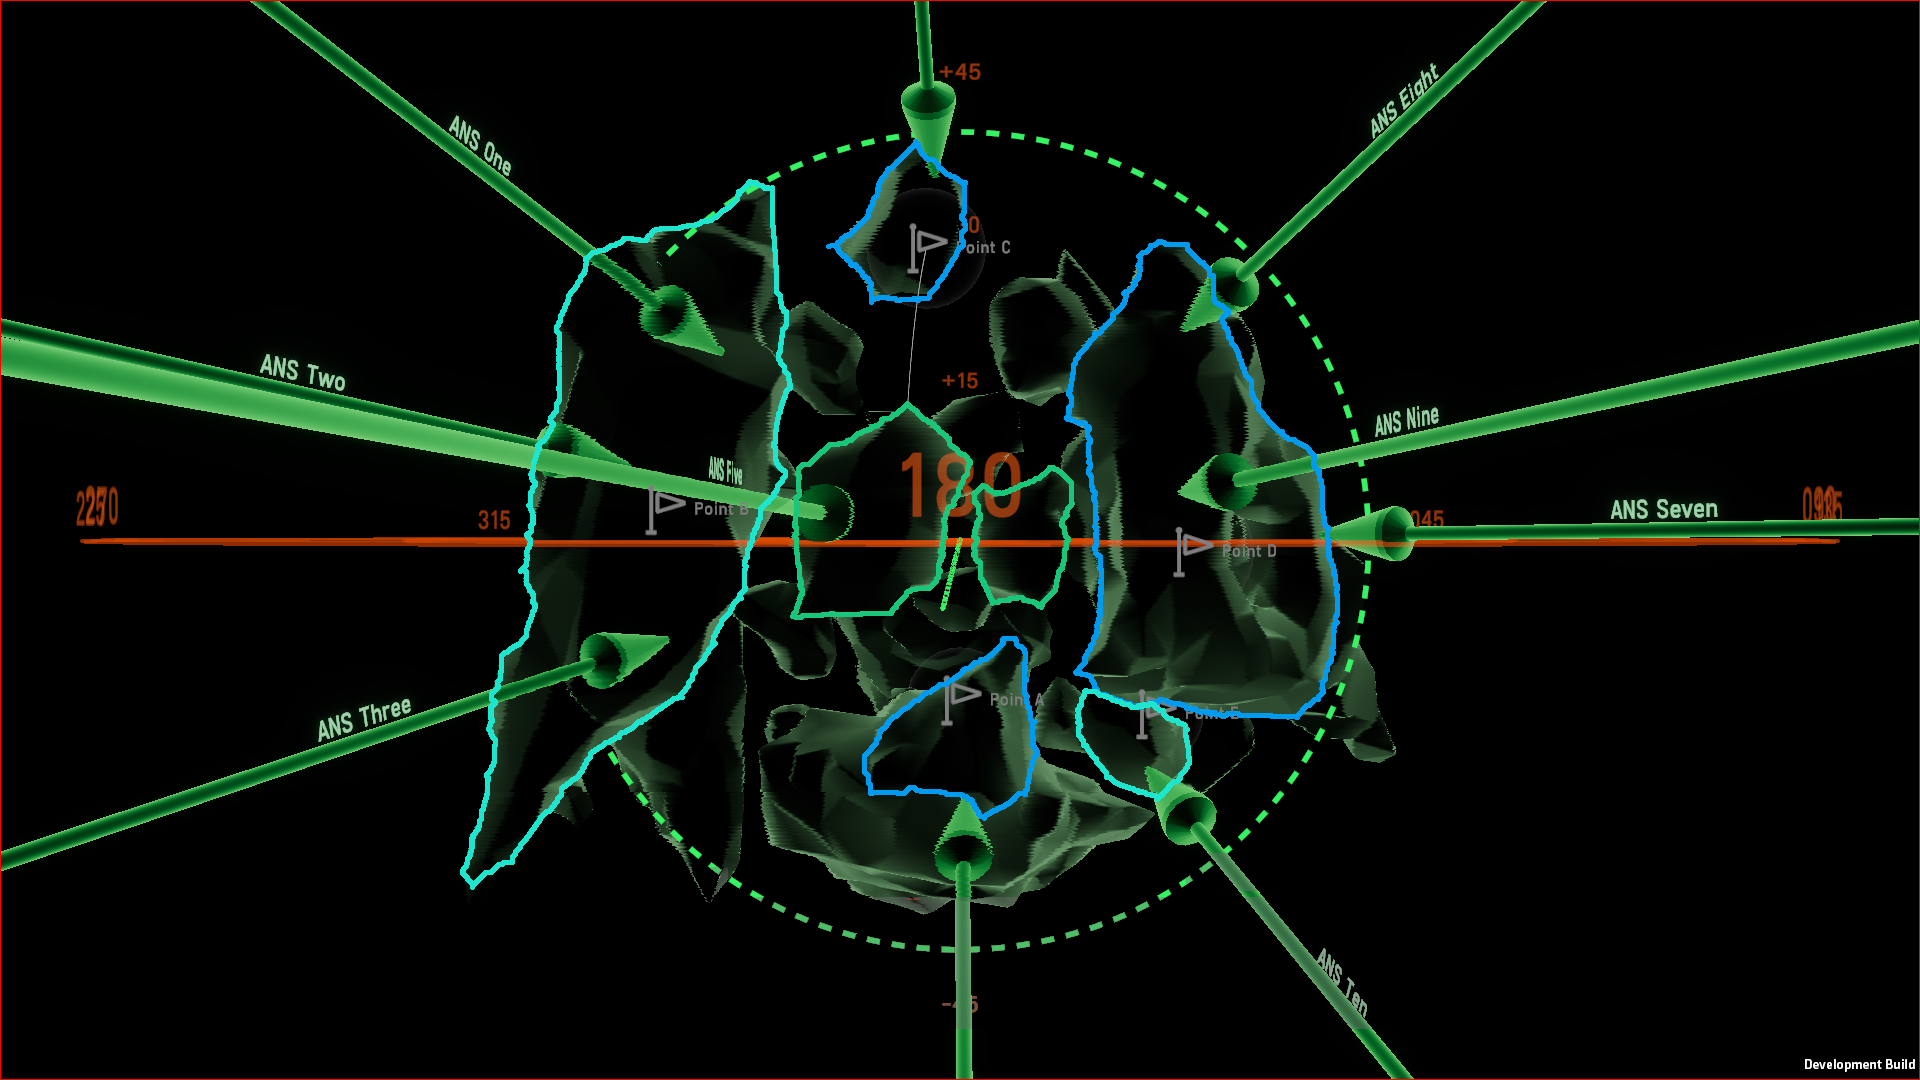
Deployment happens on opposite sides of the map. Blue team deploys into two pillars with large amounts of cover in between them. The diagram below demonstrates and highlights some possible deployment locations on the blue team. These locations will generally leave ships with rocky cover between them and the opposing team, making it difficult for the opposing team to determine their starting location and movements. Primary deployment zones are highlighted in blue. These are zones that have high tactical and strategic importance by virtue of being near capture points. Secondary deployment zones are highlighted in cyan. These zones put ships in position to stage attacks on key points or to defend already captured points. Tertiary zones are highlighted in green. These are useful for specific strategies but are generally less desirable than the other zones. Of specific note is the ease of deployment to the sub-A location. A ship can deploy so they are hidden in the primary deployment zone on the A rock and quickly move down below it without being seen.
Deployment: Red Team
Red team deploys into three pillars with little cover between them, and almost no cover towards the top of the map. The primary, secondary, and tertiary deployment zones are highlighted in the diagram below. Of note is the relatively small amount of direct cover on the capture points. Because of this the secondary deployment zones are where most of the ships should deploy. The tertiary zone on the red side is useful to hide support ships where they are capable of aiding either of the two capture points. This side also has the ability to deploy hidden ships to the sub-A location. Deploying on either side of the mid pillar will hide ships from the other side and let them quickly move below the A rock.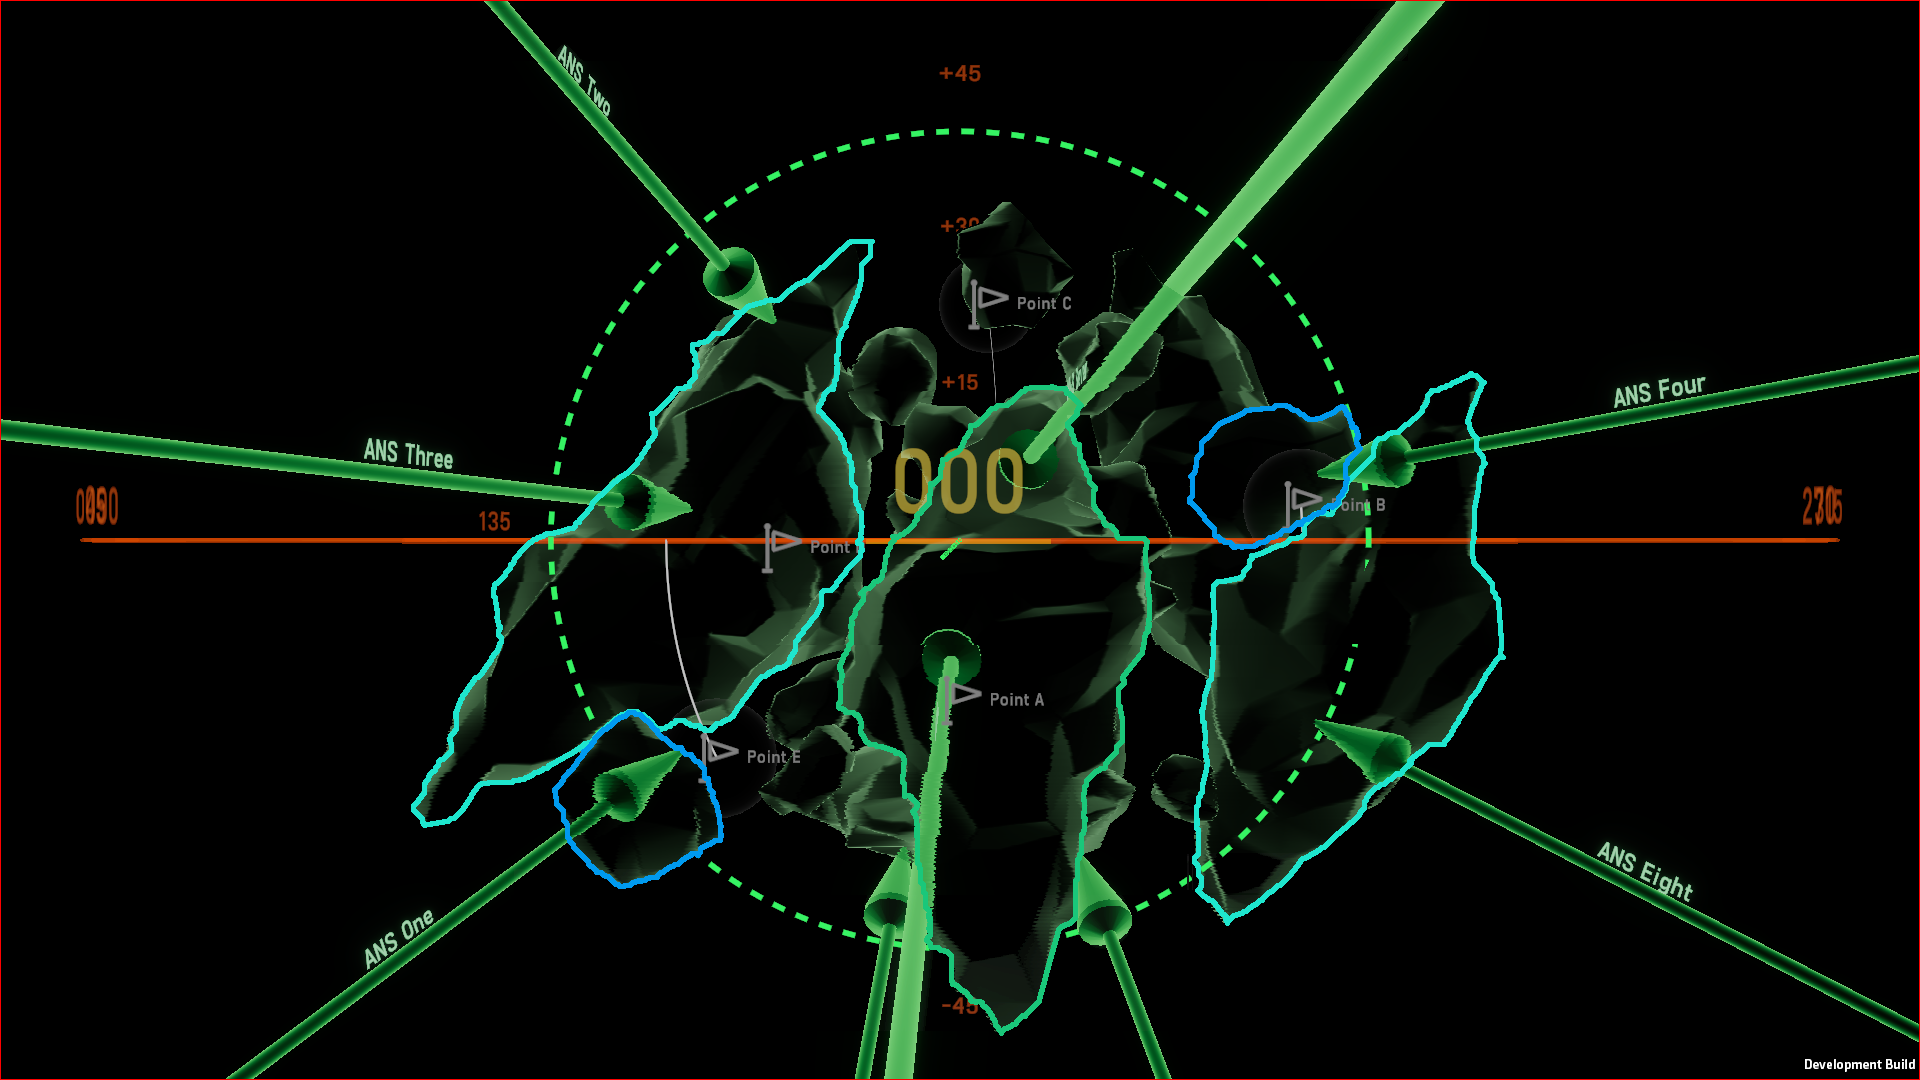
Sightlines and Ranges
If a ship is spotted then it is certain to come under fire soon after. For this reason it is important to know where the common sightlines are on the map and avoid them unless it is certain there is no enemy within range to spot a ship. The only cover is in the center of the map, so all positions outside of that cover can be considered fully visible if a radar is in range.
The below visualization demonstrates how a ship (the green solomon) with a spyglass radar positioned just over the C pillar can have a large amount of vision into the red team deployment zone above the B pillar. The blue highlighted areas are areas where the ship has vision into. The blue ship is relatively safe as it can hide behind the C pillar, but any ships it spots on the red side will be a long way from cover. Note that the green solomon by the C rock is equipped with a parallax radar, and cannot see all the way to the red team’s deployment zone.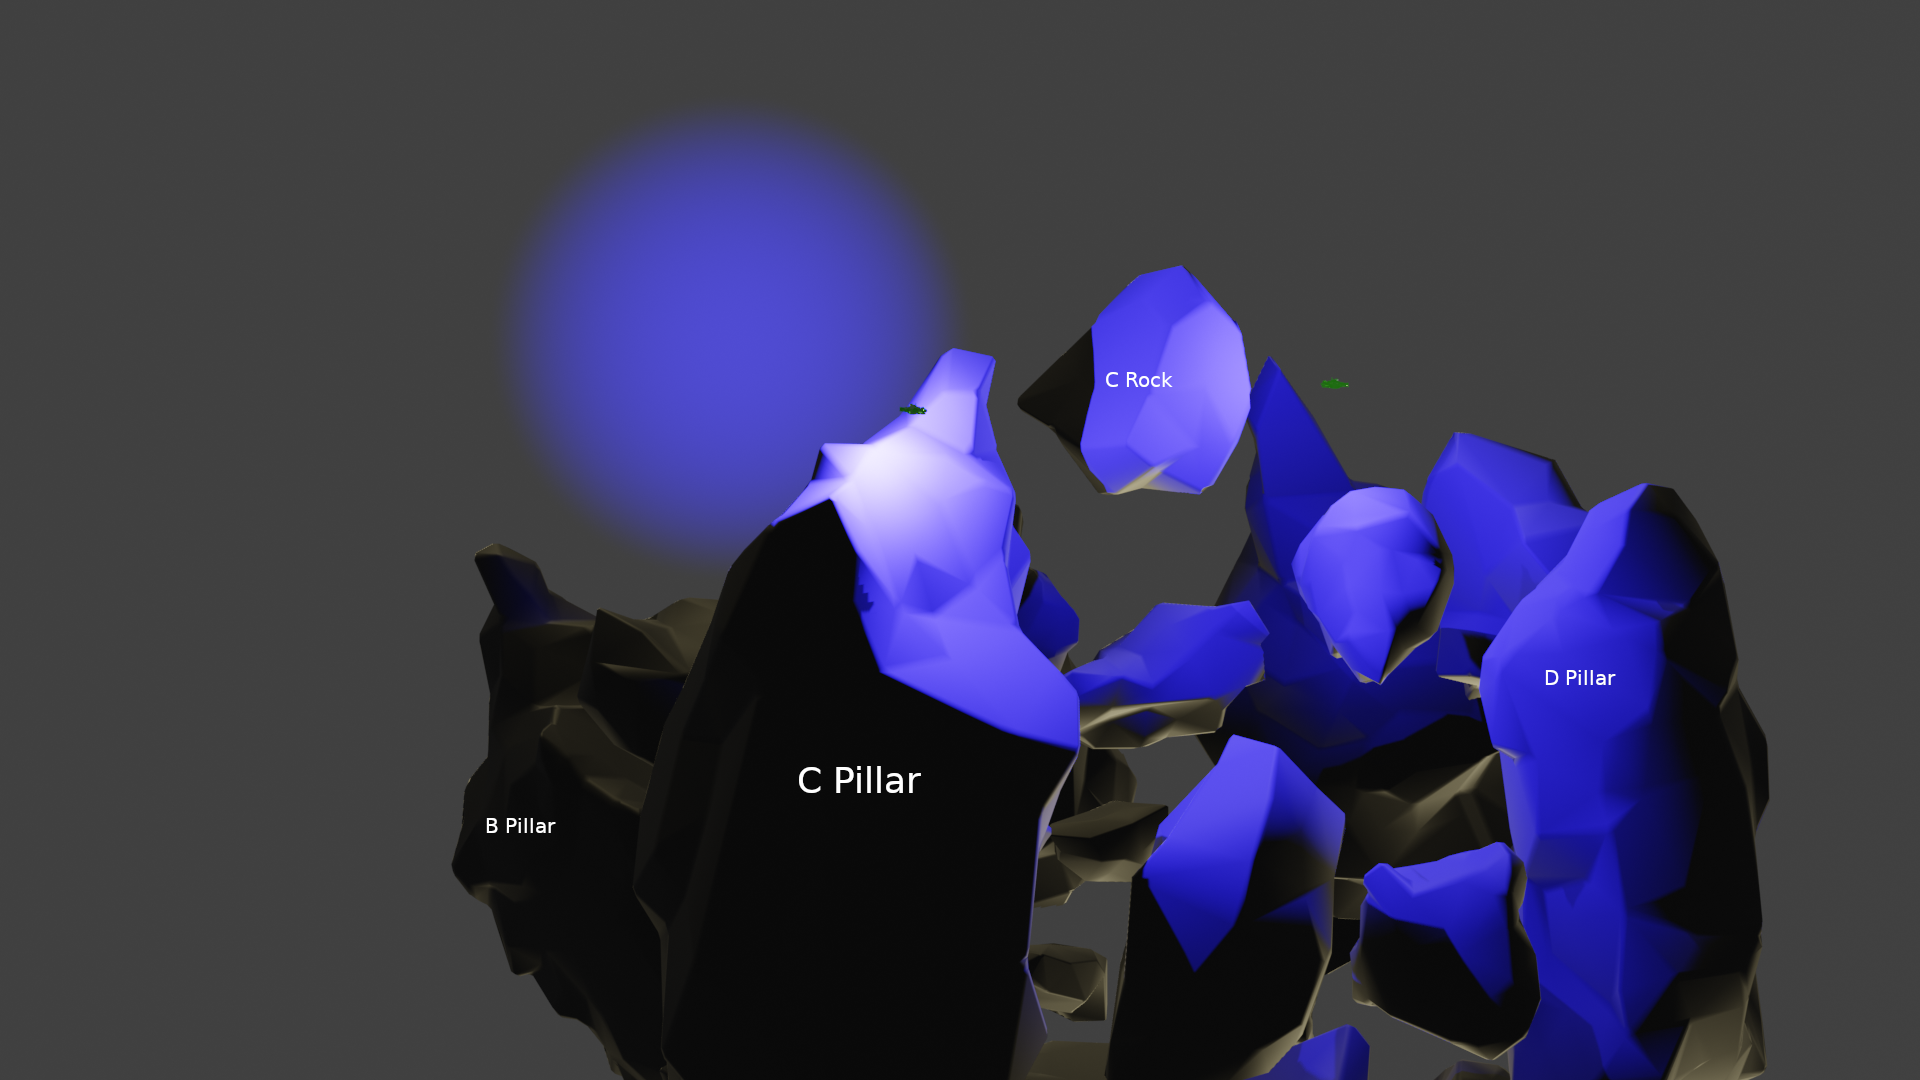
Point A is approximately 6.5 kilometers from all four points and all four points have clear views of point A. That distance is just outside of the range of destroyers equipped with spinal beam cannons making them excellent units to attack the A point from any angle. The below diagram demonstrates that at each point, there is a location that has vision over the A rock with the smallest radar range of 9.5 kilometers. Vision from each point below is represented by a different color: magenta from point B; yellow from point C; blue from point E; red from point D. All four colors are visibly mixing at A rock indicating each point has vision over it.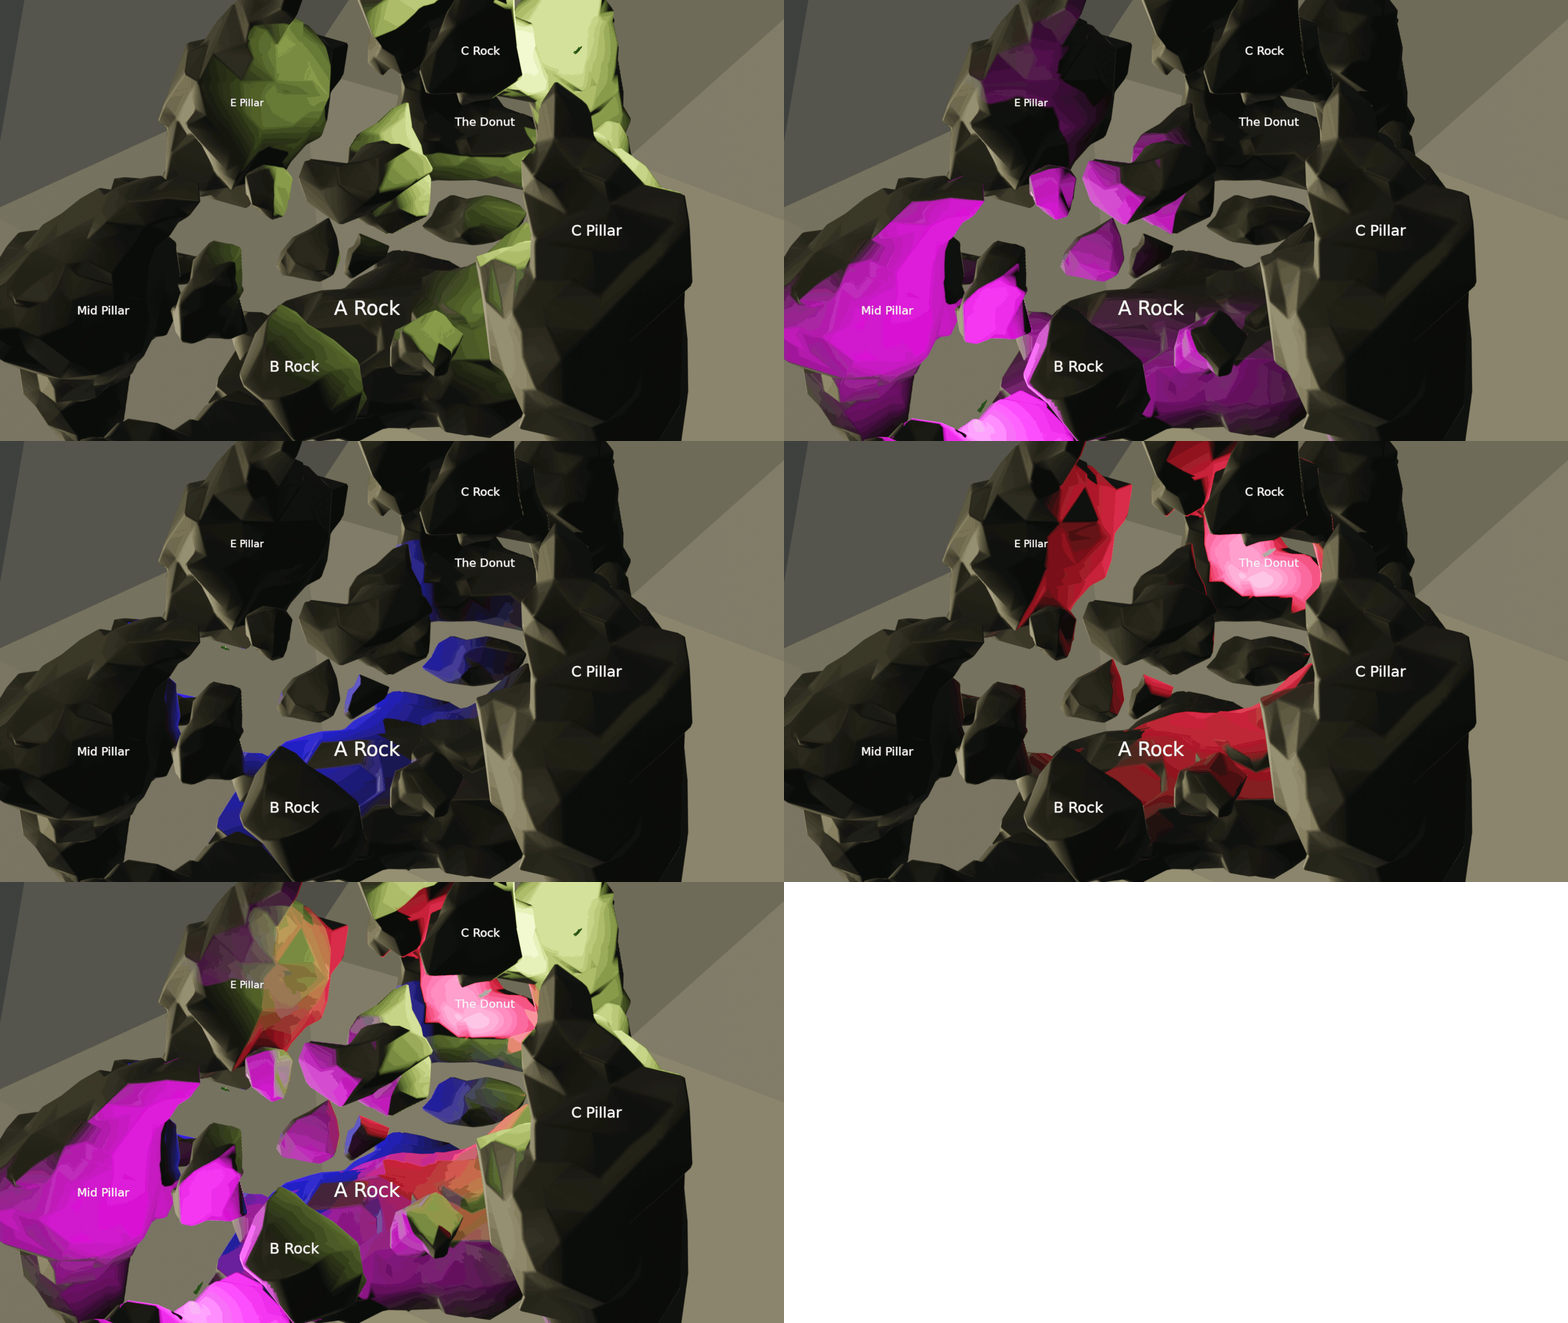
The bottoms of points E and D are separated by approximately 10 kilometers. A parallax is not enough to detect ships at the opposing point from that distance, but a Spyglass will do the job nicely. In the below visualization the two white solomons are displayed below D pillar and E pillar in different radar configurations. When both have a parallax radar neither is reflecting the light from the other, representing that neither ship can see the other with their radar. When both have a spyglass they both reflect vision. When only one has a spyglass it is shown that it can see the other ship, but the other ship cannot see it.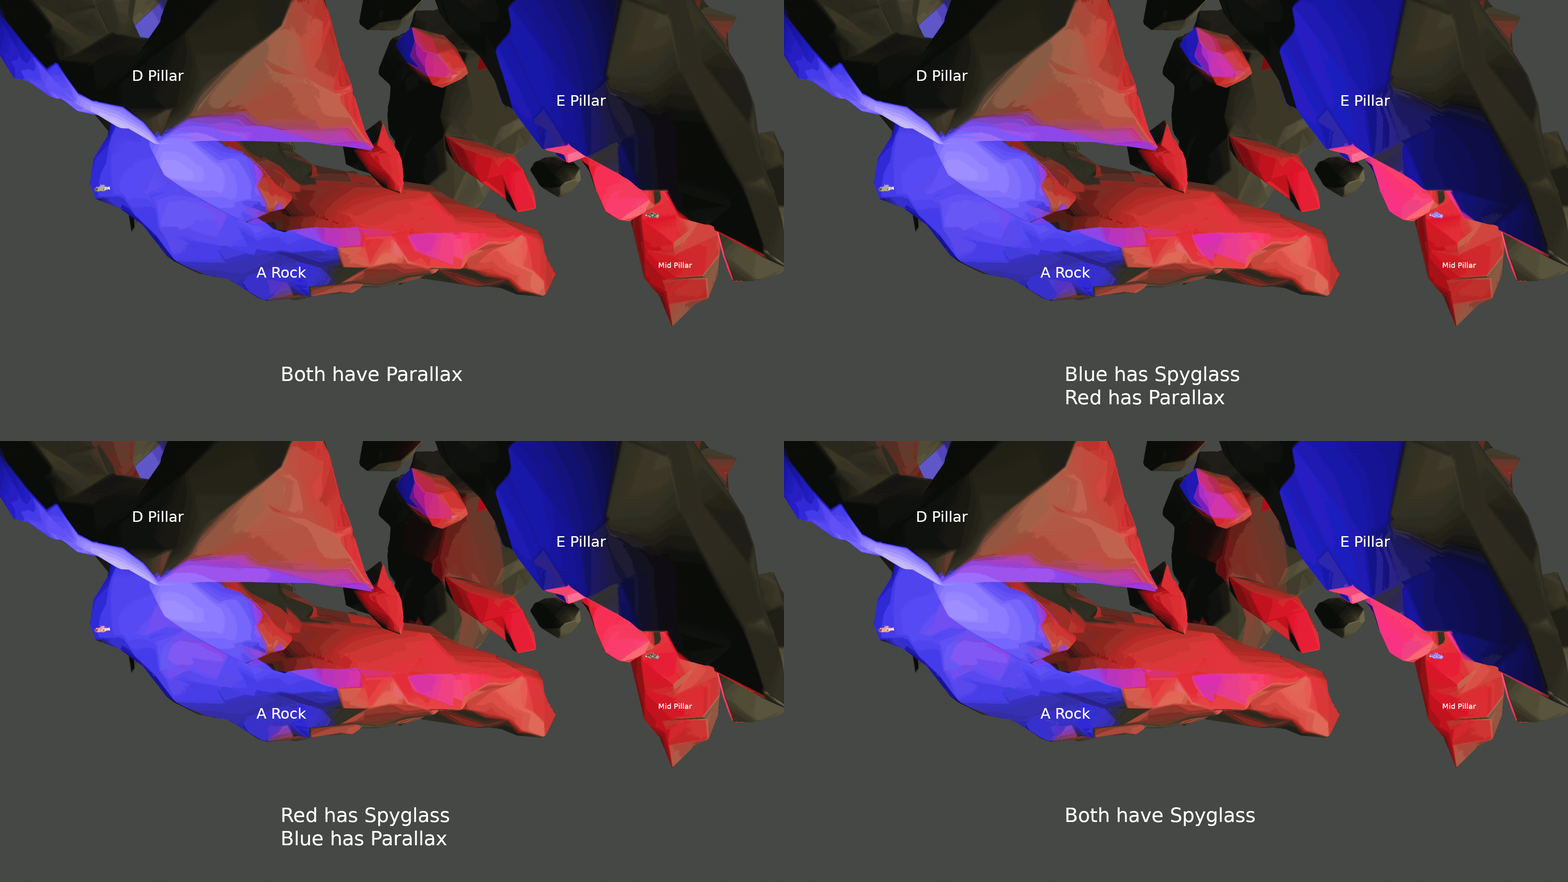
The last point to note is that there are small rocks scattered throughout the map, most significantly on the blue team’s side. It is possible to cross the gaps between these rocks while only being exposed to enemy radar for a few seconds. Keep note of enemy positions and time ship crossings when they cannot see the gap. There is also rocky cover between both pairs of natural points, allowing a fleet to position itself halfway or almost halfway between the points. This allows a single fleet to cover both points as long as the enemy only attacks one point at a time.
The First Five Minutes
The first five minutes of any game of Nebulous set the tone for the rest of the match. The first five minutes include deployment, possibly some form of opening action, capturing points, and setting up plans for the rest of the match. The primary goal for all players in the first five minutes is to survive.
Capture Points
Notice that each team starts with two points within quick reach of their deploy zones. These are referred to as the “natural points” for the team because they can be captured almost immediately once ships are deployed. The team that captures both of their natural points first gives themself a significant advantage. They will always have a lead on points and will always win the game unless the other team takes an aggressive action. This can either be trying to capture the A point or trying to capture one of the opposing team’s natural points. The A point is located, as previously mentioned, approximately 6.5 kilometers from all the other points and does not have any significant cover which makes it difficult to capture alone and unsupported. It is relatively common to see the A point go uncaptured and all of the action to occur around the natural points because the natural points have rocky cover that can be used to evade weapons fire.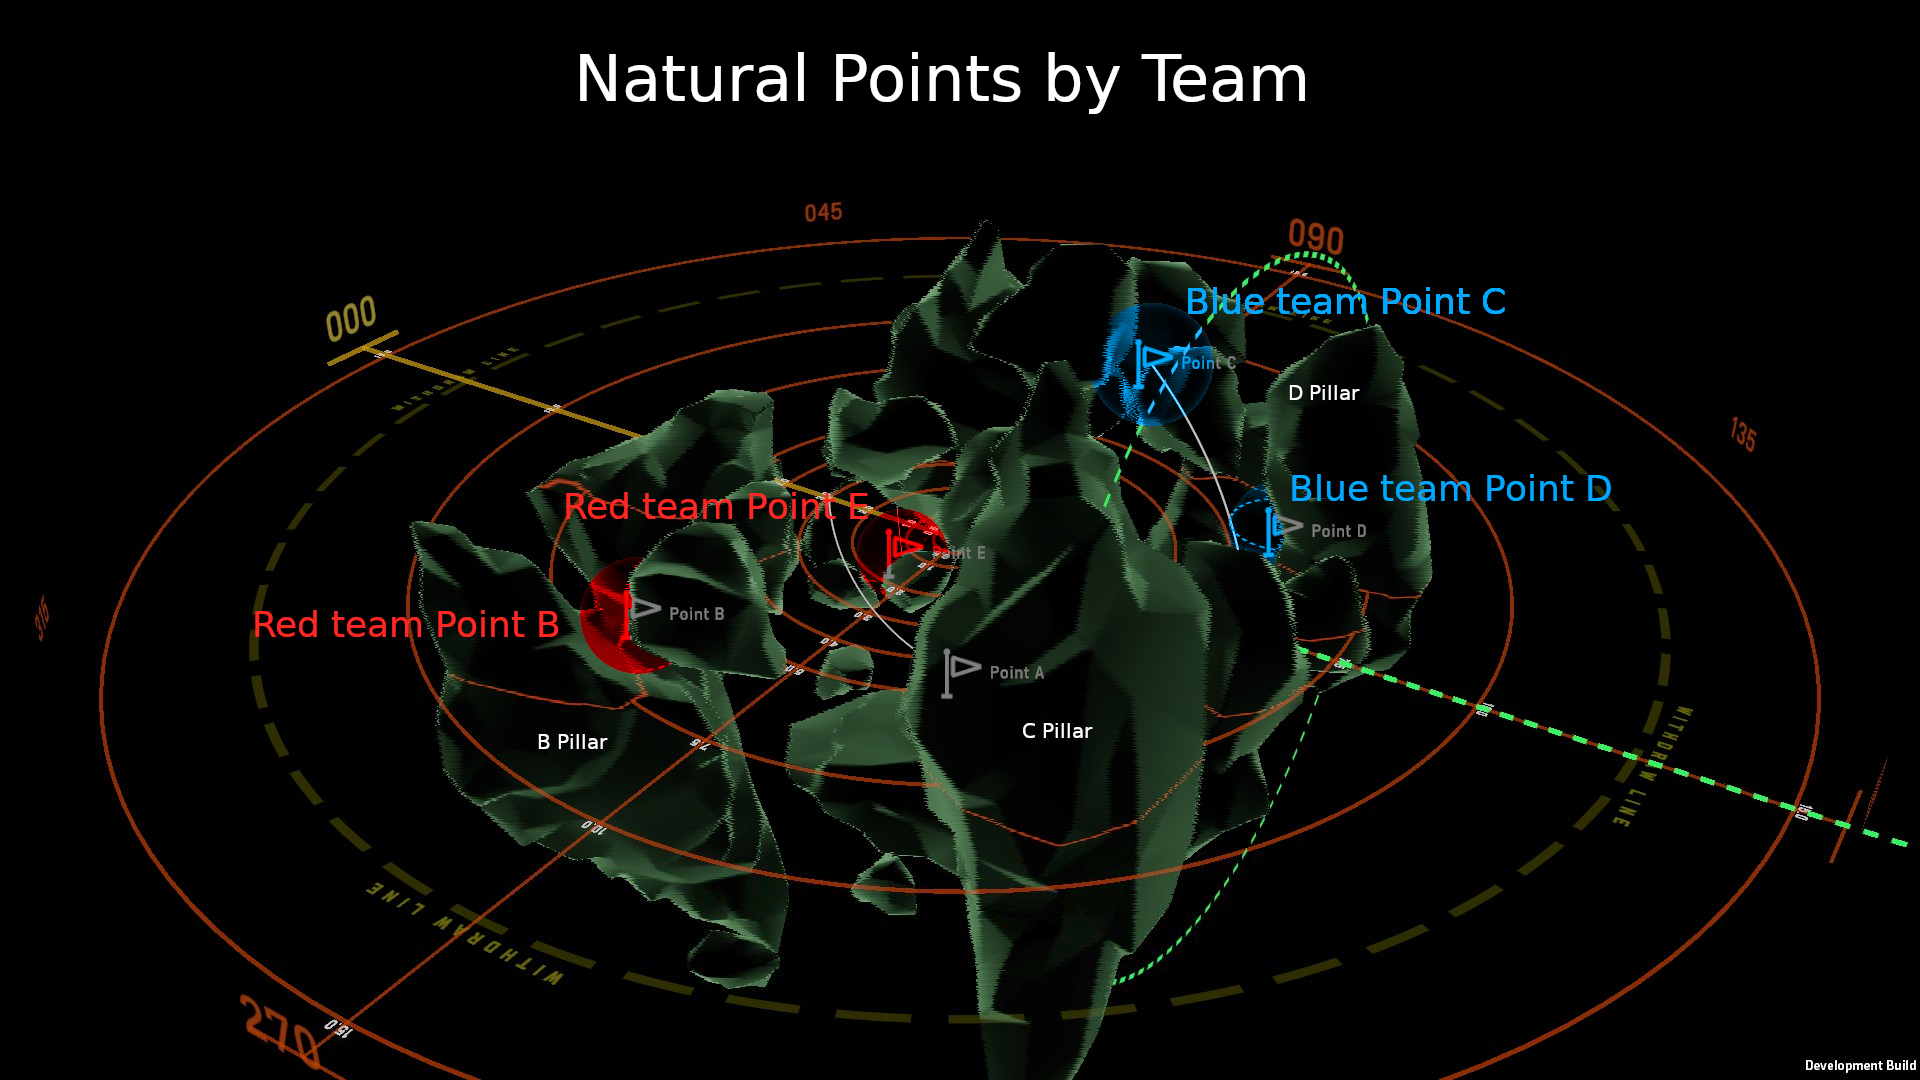
Deployment
Deploying to the correct location is important to ensure no time is wasted on repositioning. The ships in Nebulous are slow and it is important not to waste the first five minutes fixing a bad deployment. Some general guidelines:
- Both of the natural points should be deployed to so they can be captured as soon as possible.
- Deploy the main force with a teammate, as deploying alone is dangerous and a fleet can easily be destroyed without support (this is also referred to as deathballing).
- Deploy behind rocks to avoid giving the enemy any intel about the deployment formation.
Communicating with the rest of the team is critical to ensure a positive outcome for the team. Discuss the plan, ask where the gaps are that need to be filled, and fill them.
Opening Action
The primary goal of the first five minutes is to survive. There is usually some opening action in the form of early missile strikes that can catch out unaware players and destroy their ships quickly. When a point is being captured an announcement is made to the enemy team. Consequently the enemy team is aware of the location of at least one ship, and can send a missile strike to kill it. This makes capture points uniquely dangerous early in the game. Defending against these missile strikes requires point defense and radar tracks on the incoming missiles. You and your team should set up so that the capturing ship either has point defense and radar to see incoming missiles at least 3 kilometers out, or set up so that the capturing ship has screening ships that can spot and kill incoming missiles. You can also avoid the capture points if the rest of the team has them covered, in which case the likelihood of being killed by an early missile strike is low.
The Rest of the Game
Once both natural points are captured by each team the game transitions into long-term planning and execution. This generally takes the form of scouting out the enemy fleet to learn their composition and disposition, followed by a plan of attack with a mind that the objective is to capture points and not chase every enemy ship off the board. Both sides will be maneuvering their fleets to attack weak points, pick off scouts, and force their opponent away from control points.
The team who captured their points last will be behind in points and must take offensive action to capture a third point. This is dangerous, as the defending team will know this and have a rough idea of where the attacking team is coming from. It is important at this point to move ships so there is radar coverage of the map. This will provide valuable information on which point the enemy will attempt to capture. Ensure ships are in a concealed location that provides a line of fire towards that point and wait to repel any attacks. If you must make an offensive strike, attack under the cover of radar jamming and try firing a few missiles at the point of attack to flush out any defenders. An important thing to remember is not to rush! Even when your team is down in control points, winning takes a while. It may be worthwhile at the end of the game to sacrifice fleets to capture control points, but, early on, preserving one’s forces and taking a good fight is more valuable than capturing a point that can’t be held.
Aside from this general advice, there are several common strategies and tactics for both offense and defense that will be covered in a separate appendix.
Acknowledgements
Thank you to HopefulMonster, Weeble, Nop, Meta, and Wall1ce for reading, contributing, and helping with this guide.
Appendix A – Specific Tactics and Strategies
While Nebulous is a game that allows for many successful strategies and tactics, there are some strategies that are common to the Pillars map. These are popular and their successful implementation and defense will be reviewed here.
Beam Ambush
The A rock provides cover from almost the entire top of the map. As such it is popular to deploy a fleet of beam destroyers under the A rock. They can make their way undetected under the rock to attack either E or D point, and they can also appear along the sides of the A rock to attack ships that are trying to capture A. For the attackers, the execution is straightforward. The beam destroyers need blankets and at least one focused particle accelerator on each ship. Hugging the bottom of the A rock (often made easier by flipping the map) as close as possible helps to avoid detection, while pre-aiming the beams at the target point using the hold heading command allows them to start firing as soon as possible.
For the defenders the job is more difficult. The core of a good defense against beam ambushes is knowing that they are coming. A single scout with a Spyglass deployed far under the A rock is enough to be aware of a coming fleet of beam ships. From here, the goal is to stay out of their 5-6 kilometer range. They can be engaged or ignored, as long as their presence is known. It is also a good idea to predict their intended attack point and engage them from a different angle so that their beams cannot get on target in time. An effective strategy is to counter-ambush the beam ships with another beam destroyer fleet. The same principle of not being seen applies on defense just as it applies on offense.
It is possible, though more difficult, to execute the beam ambush with a beam battleship instead of beam destroyers. This gives much more staying power as compared to the destroyers. However, a battleship is vulnerable when it is on its own. Stealth is even more important because a battleship caught in the open draws fire from the entire team and cannot maneuver fast enough to escape. Jammers are not strong enough to hide the battleship from sensors so rocks must be used to hide. Usually, beam battleships are better suited for counter-ambush tactics rather than offensive pushes because of their low speed and increased visibility.
Rush A
If the A point can be captured early the capturing team will be at a significant advantage for the rest of the game. An early A point capture applies significant pressure on the opposing team to retake the A point or capture other opposing points. This strategy revolves around a corvette equipped with a whiplash drive. This ship can be on the A point in a minute and a half, and can have it captured in under three minutes with perfect play. Against many teams this is faster than they can capture their natural points, making this an effective strategy to secure a significant points advantage. Fortunately for the defenders, a single corvette is easy to kill. Missiles are the premier defense for killing the corvette as they can be on target significantly faster than a ship’s guns and they do damage faster than guns. A light cruiser with 250mm RPF guns can also be effective if it is well deployed, however they more often cripple the corvette instead of killing it outright and the corvette must be killed to stop the capture progress. An interesting counter is also to send a defending corvette to the A point. This will contest the point and stop progress for long enough to bring further weaponry to bear. This option should be strongly considered if playing the Red side, as it has a shorter path from deployment to A and generally fewer attacking options against Blue positions, making it important to put Blue under pressure early, and at the cost of a single corvette, well worth the price
Rush B
This strategy is only able to be executed by the blue team. It requires at least two fleets with combined firepower containing cannons, beams, and a good point defense network to protect against missiles. Deploy under C pillar and immediately move at flank speed towards B pillar. Use EWAR to protect the ships from being spotted on approach. This is a fast push that can surprise lone fleets capturing B point. After destroying the enemy in detail, capture point B and collapse onto point A. Unless the red team guesses well and has already deployed everything to B point, their only safe response is to abandon B point and begin pushing hard to D point to equalize the number of captured points. Retreating ships from B point can kite the advancing blue team forces and any ships with 450mm cannons stationed in E point can deliver enfilade fire on the blue team push. If the retreat goes well, the blue team will be slightly ahead in captured points, but will have taken a beating to get there. If it goes poorly, the red team will have lost an entire fleet. This is a very strong push.
Appendix B – Hidden Capital Ships and Where to Find Them
A primer by @WeebleKeneeble#1450 and friends.
Axfords and Solomons are not able to utilize the great power of blanket jammers to hide themselves as well as smaller ships, as such the best way to achieve “stealth” with large ships is to hide them behind rocks. The Pillars map offers quite a few great places but some spots provide excellent cover to a point where ships will waltz within a thousand meters of you and never know you are there. Here are a few common areas for you to use and to check if you are trying to hide or find a cap ship.
A rock cutout
If red team deploys low by E you will notice that there is a very specific cutout on the A rock, this spot can even shield you from being seen by other fleets sneaking under the A rock and makes an excellent staging area to defend E or A with very little movement needed to come out of cover. Inversely If blue team rushes sub A they can stage in this cutout to assault deep into red controlled E point very early in the game.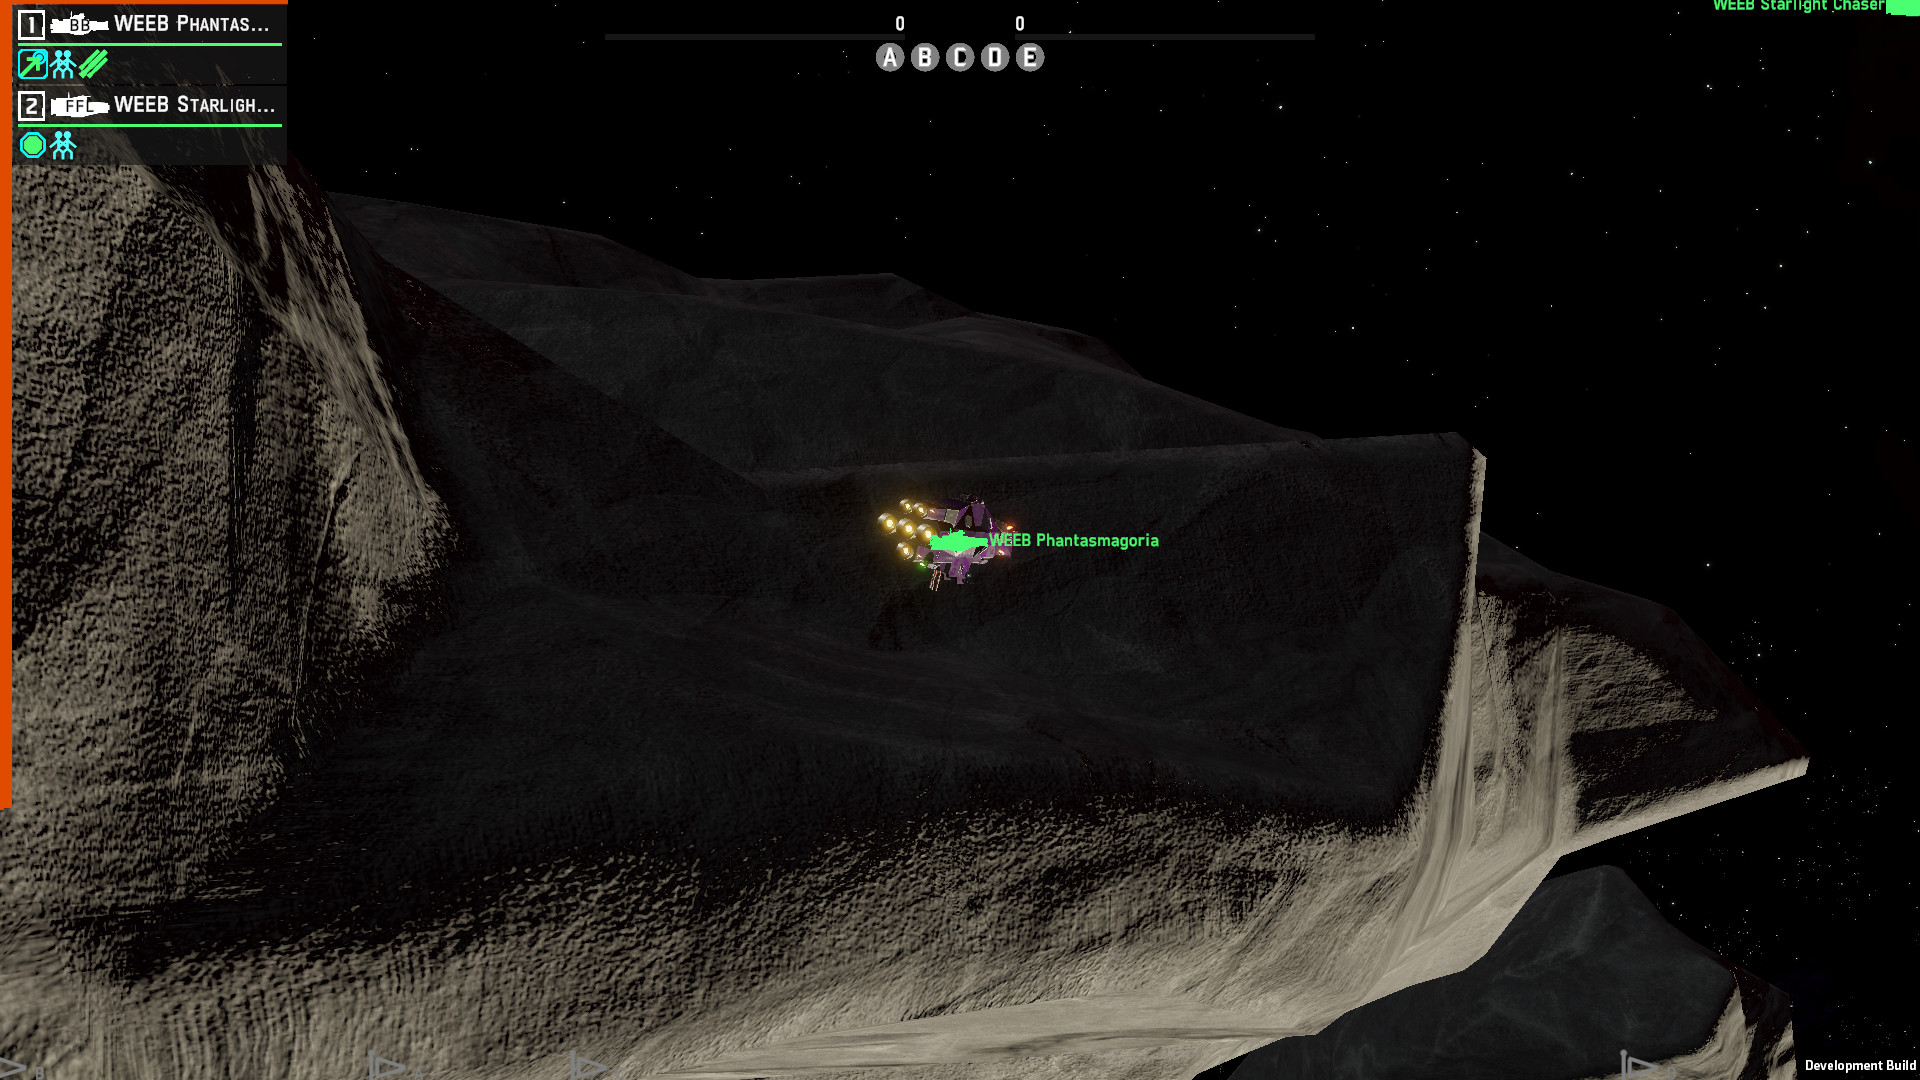
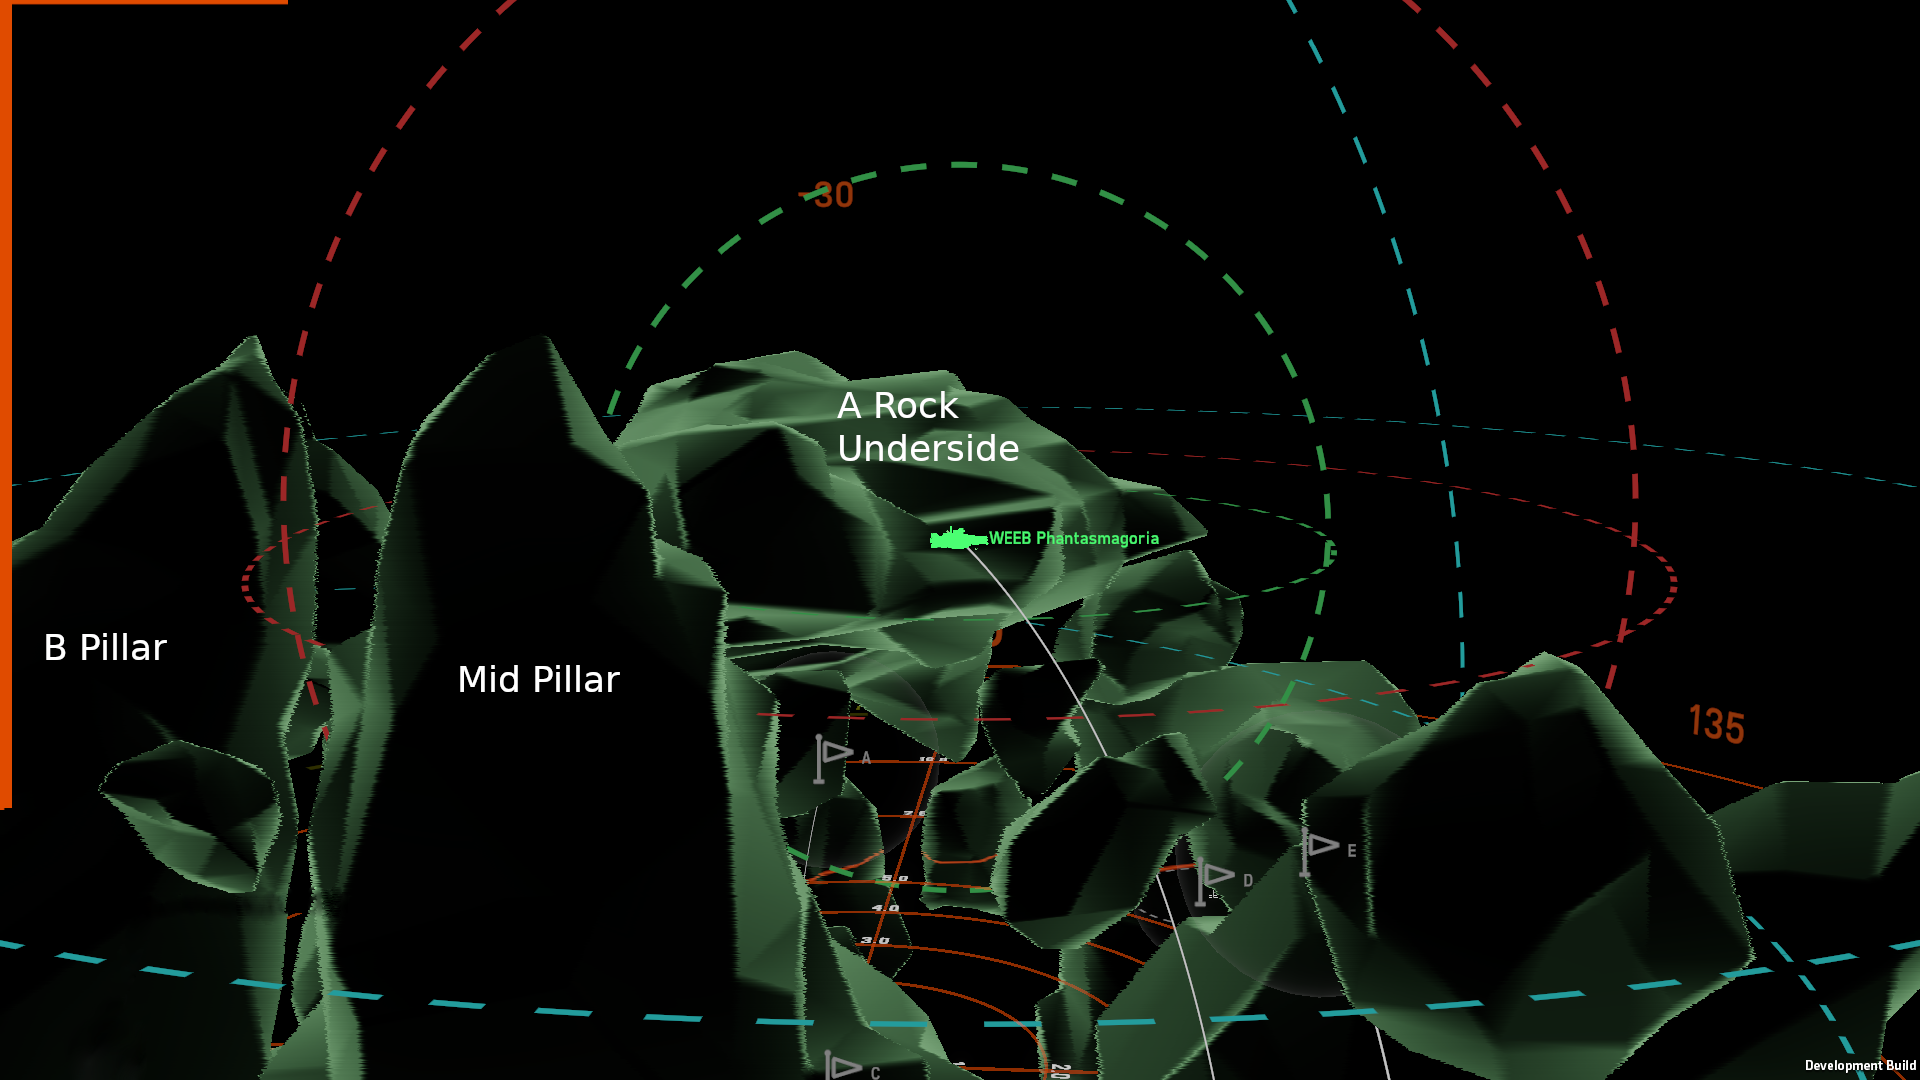
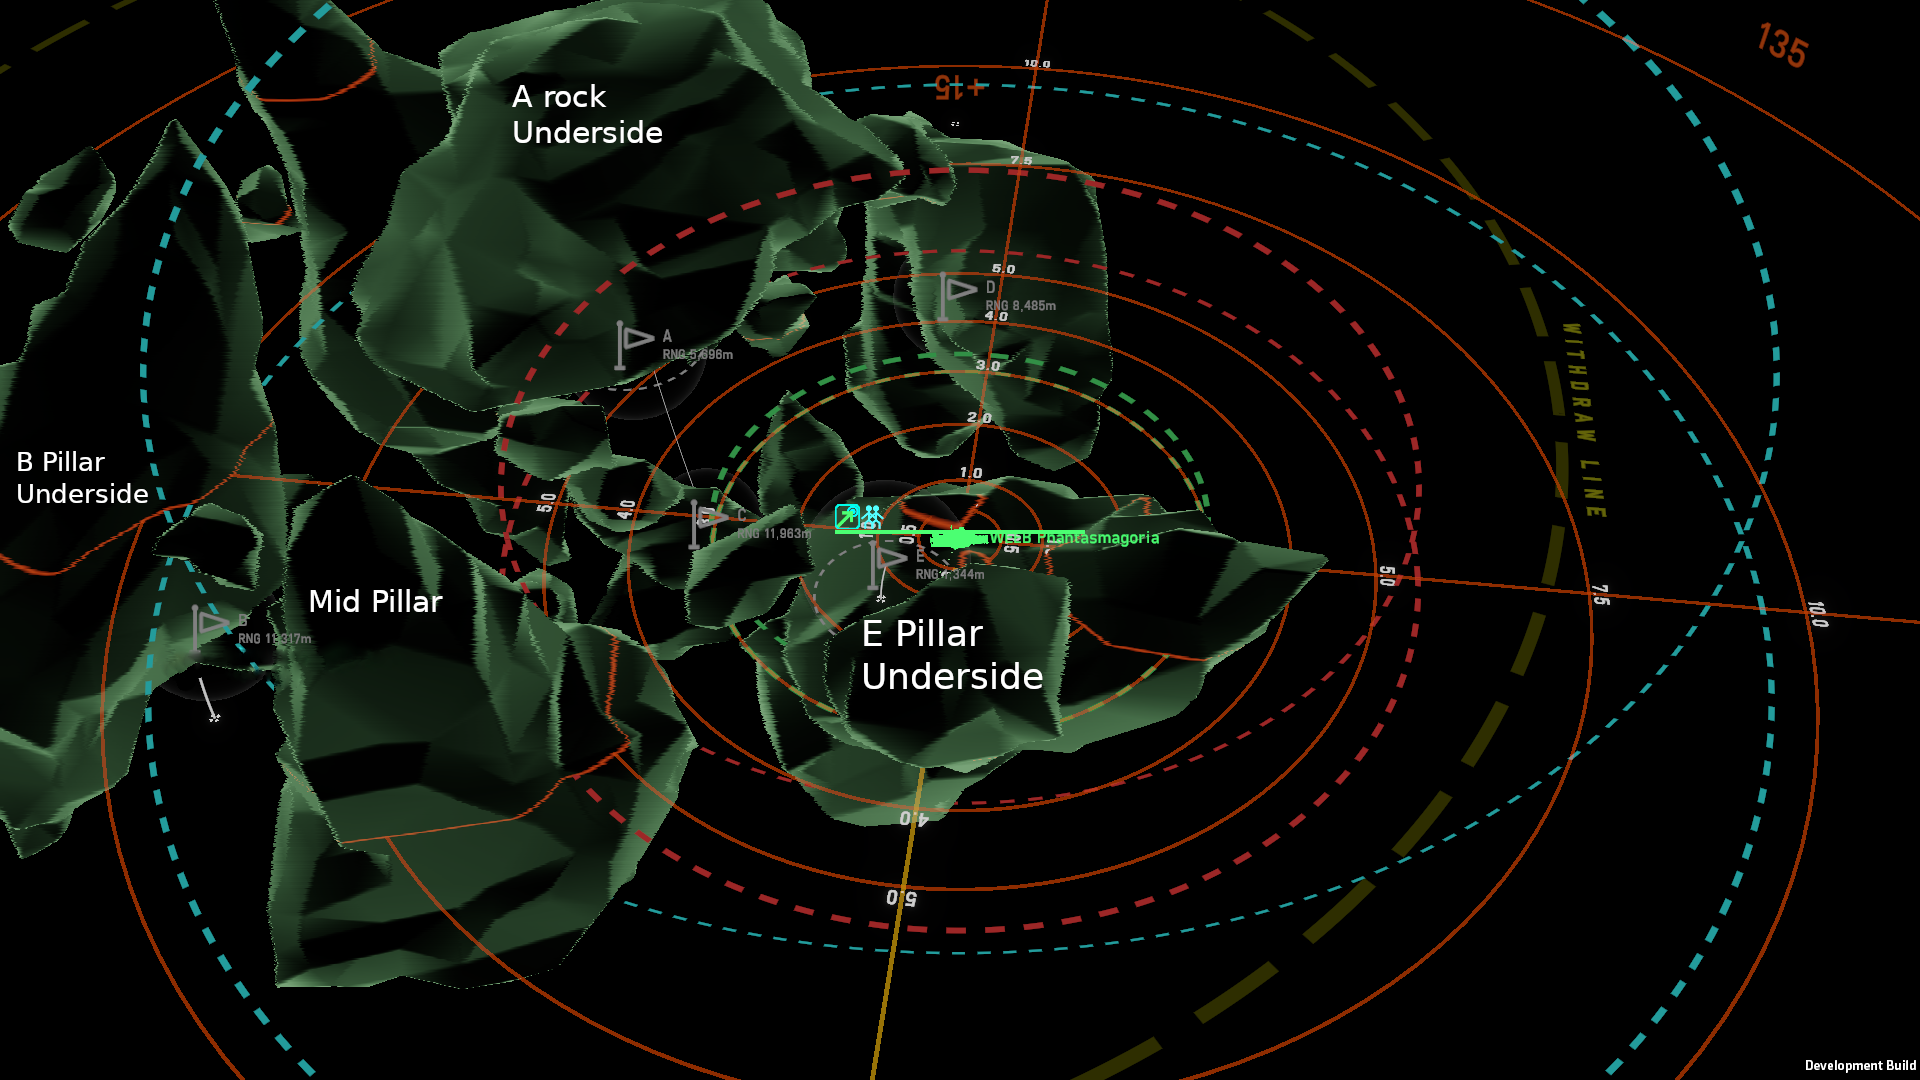
The E pillar tooth
A red team hiding spot becomes apparent if you flip the map and look at the bottom of the E pillar. You will notice a molar tooth shaped valley that doesn’t seem very deep but in fact can fully hide a Solomon and act as a great beam ambush site for those early aggressive pushes to E from the blue team. This also allows one to sneak from inside field to outside field quickly to shift where you can focus your weapons.
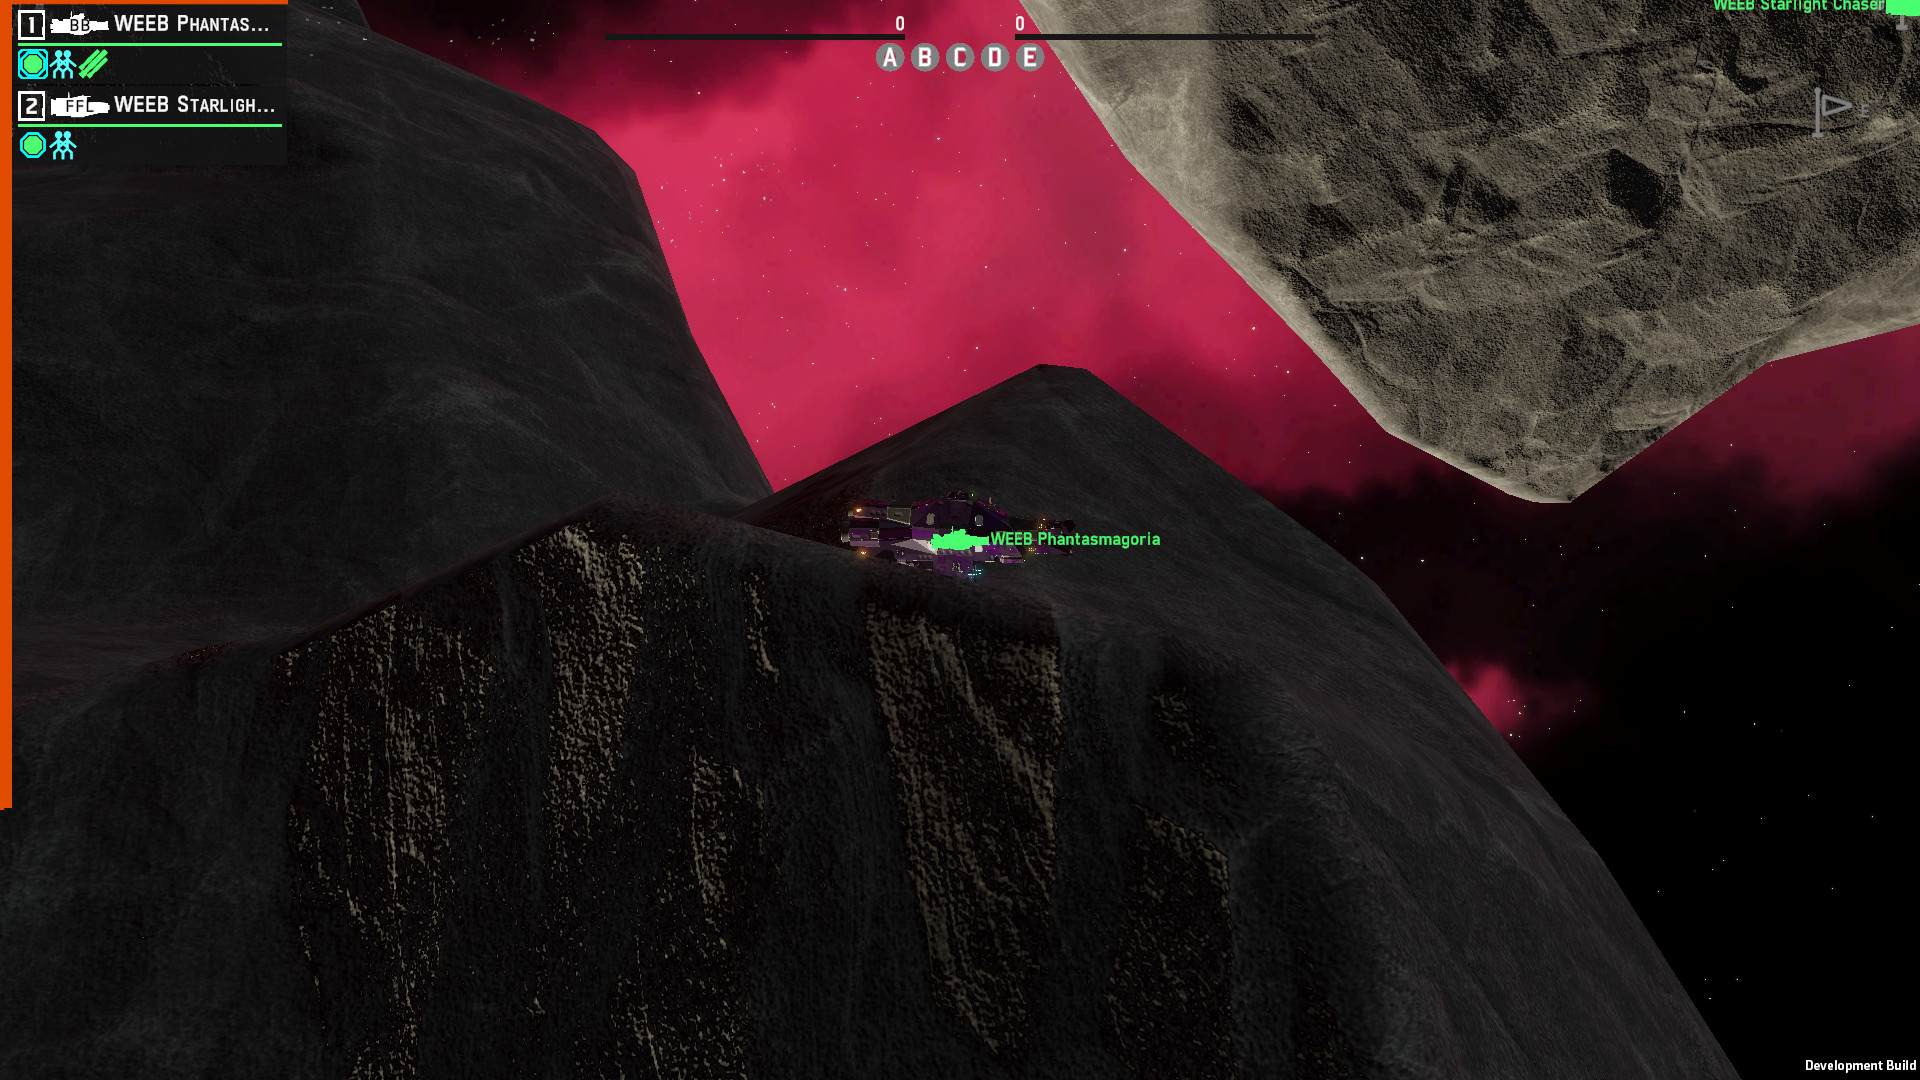
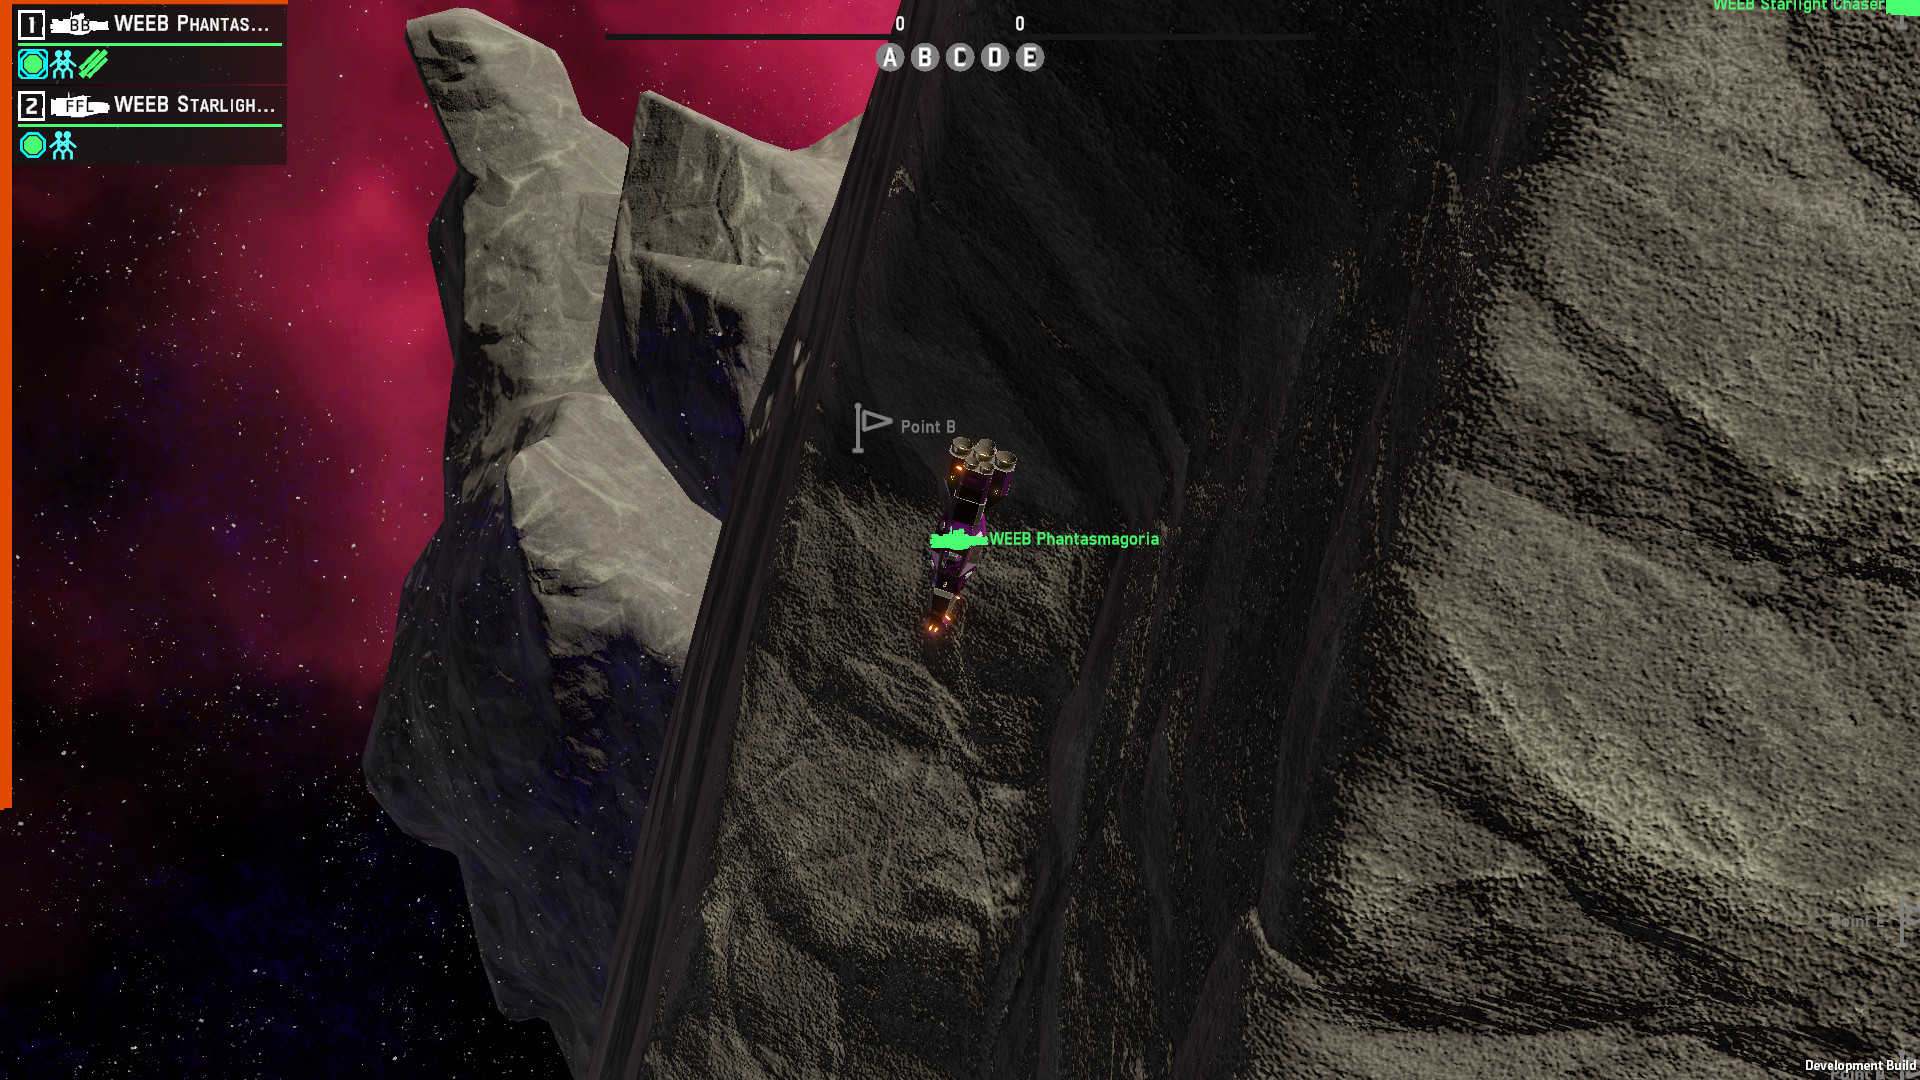
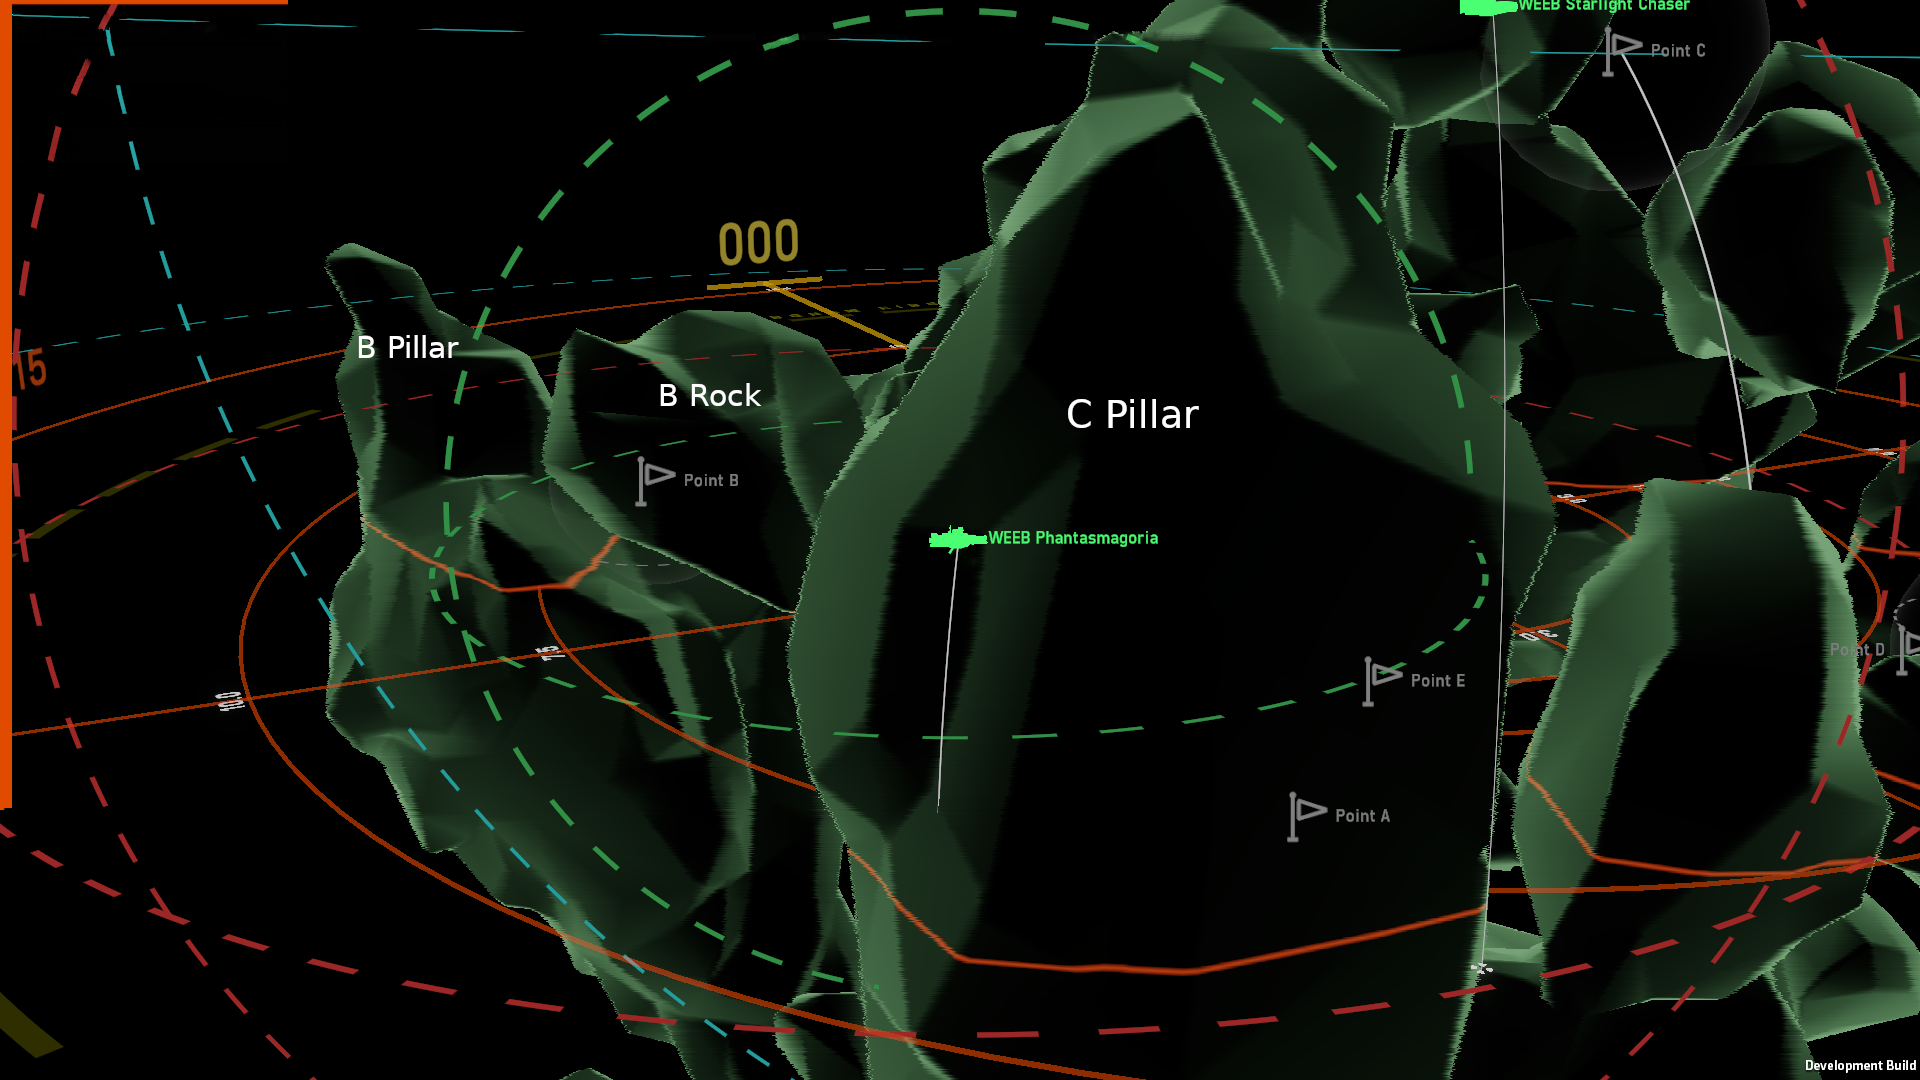
C pillar ridge
On the upper center of the C pillar there is a ridge on the outside. This is along the path of a common attack vector the red team will use to flank allied long range fleets staged on C cap. Hiding an ambush vessel here can lead to some great counter flank payoffs and opens momentum for you to push to B soon after. Beware that this ridge is not the safest hiding spot and your ship can be spotted if the red team has a spotter high and wide, use with caution.
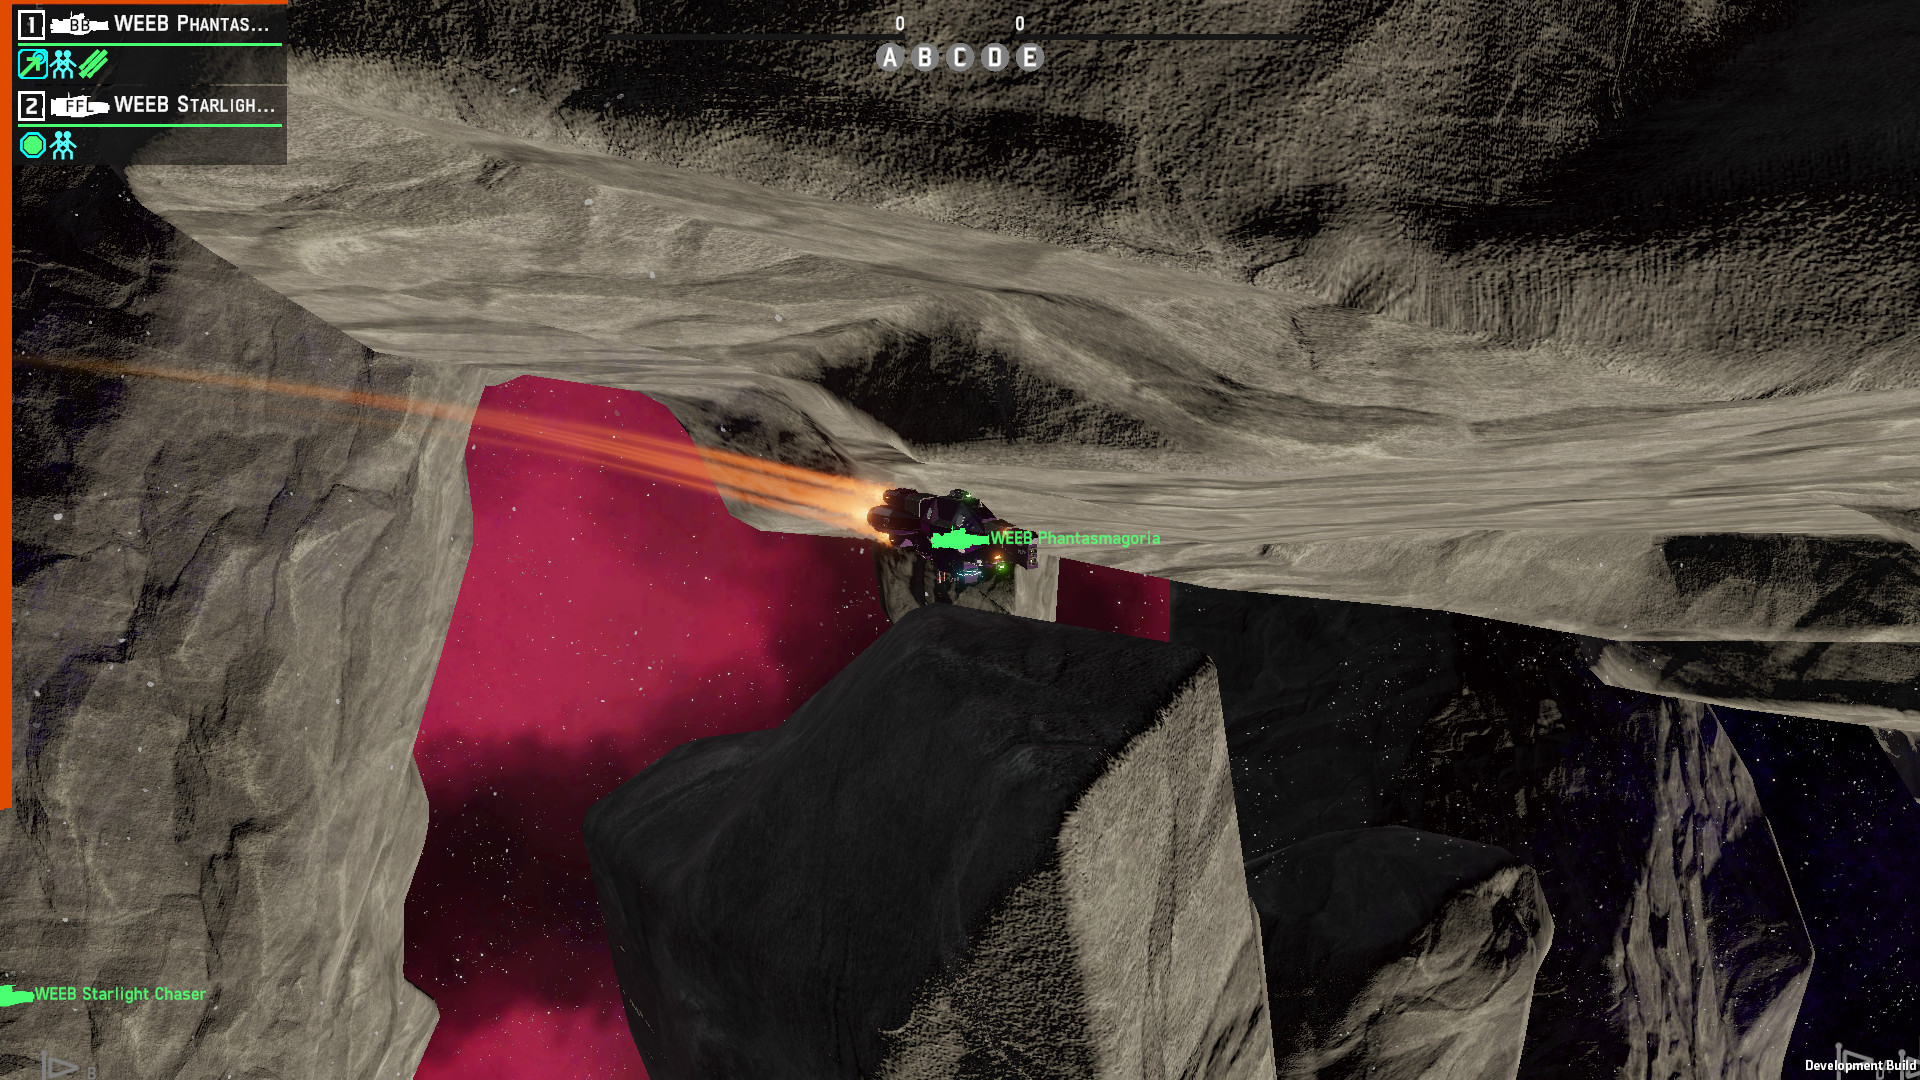
A rock sandwich
A more special case hiding spot that is safer to use after the opening attacks of the game has been decided. In front of Mid Pillar is a nice asteroid that sits barely above A rock and provides great cover that you can shove a ship between. The reason this is unsafe is that any fleets that are doing an aggressive early E push or are doing a sub A assault can find themselves in a perfect location to ambush that position. This location should be used if the enemy has dominant control of the high map and you want to be in a very hard to remove location to control not only the lower map but also provide attack vectors into both D and B.
Appendix C – Monster’s Thoughts on Composition and Roles
By @Hopeful-Monster#9212
In general when we talk about fleets we talk about the need to specialize, but ultimately this is a team game, and as far as team composition goes, it’s important to think about balance. There are two main considerations of balance, one straightforward, the other, less so.
Balance of Damage
It’s important to make sure a composition has a balance of damage so that you can engage efficiently against the enemy. A team entirely focused on killing light ships will eventually get overrun and eliminated by heavy capital ships that they cannot destroy. Likewise, a team that has only anti-capital weaponry will get outflanked and outmaneuvered by swarms of light ships that can capture points quickly. The dynamics of this are fairly straightforward so I won’t elaborate on them here.
Balance of Roles
While killing ships is important, since most games are Control, the real goal is to dominate space and objectives. To this end there are 3 main roles that players can perform in a fleet.
Pushing
Think of this as the center of gravity of a fleet. This role is often held by capital ships as they move into an area and demand that you either fight them or cede ground. They tend to play in the middle of the map and fight to control the main lines of movement for enemy fleets.
Good Qualities To Have
- Tankiness
- Anti-Capital Weaponry
- Strong PD
Typical Drawbacks
- Slow
- Vulnerable to EWAR suppression
Main Examples
- Most battleship builds
- Cannon heavy cruisers
Where to Play?
Play around points A and C. Try to maintain open sightlines to bring weapons to bear and not get surprised by cornering cruise missiles.
Flanking/Ambushing
This role aims to sneak caps behind enemy lines, set up ambushes, and generally nip at the edges of the enemy’s formation. A fast flanking fleet can scout to counter an enemy’s jamming screen, or pull the screen away, leaving their pushing ships vulnerable. An ambush fleet can pop out and turn the tide of a big push or can send forces to rearguard to protect control points.
Good Qualities to Have
- Speed
- Burst Damage
Typical Drawbacks
- Fragile
- Usually short range
Main Examples
- Beam fleets
- Torpedo fleets
- Cannon light cruisers
Where to Play? Play on the flanks (including high/low edges). Stay hidden/occluded until you are ready to fight.
Screening
This a broad category for identifying the enemy’s movements, denying vision, covering capitals from being ambushed. Scouts fall into this as well as scout hunters. Will generally play near the main push, but can roam around the map to wherever the fight is. These fleets tend to be very strong in the late game as they can split up and contest many points simultaneously.
Good Qualities to Have
- Speed
- Stealth (either natively or through EWAR)
- Flexible damage types
Typical Drawbacks
- Lack of sustained damage
- Fragile
Main Examples
- Frig Blob
- EWAR support fleets
- Submarines
Where to Play?
Start in the middle of the map, then go wherever your team asks for help.
A Note On Missile Fleets
Sharp eyes may notice that pure missile builds (e.g. Yub Nub, 3K Missile Vauxhall, 3K Missile Axford) don’t really fit into any of these roles. Their closest analogue would be flanking/ambush, but there’s an important distinction. As the only indirect fire weapons in the game, missile boats have the luxury of hiding behind rocks while they attack their opponents. But this is a double edged sword, as they have limited staying power and no map presence. Missile fleets work best with strong teammates who can find and bind enemy fleets and break up the enemy’s PD net. Compositions that overly rely on missile dumps are an “all-in” play; you’ll either kill your opponents outright, or you’ll lose because you have no way to contest objectives.
Non-Standard Play
If you’re lacking in one of the above elements, the game gets a lot harder. For example, a fleet of 4 battleships will have real trouble moving around the map in the late game, and without spotting support will struggle to chase down sneaky back-cappers. Likewise, a fleet lacking in tankiness or anti-capital weaponry might struggle to push the enemy off of control points and win direct fights.
You’ll note that some fleet builds can fill multiple roles, while others are more specialized. Some fleets possess elements of a role, but lack others (e.g old railguns were great at controlling space and could melt capital ships, but were not very tanky; beam destroyers have high alpha damage, but aren’t extremely fast). You’ll learn the strengths and weaknesses of your fleet as you play. As a rule though, the more you’re allowed to play your role, the better. For example, sending cannon heavy cruisers on a stealth mission at the flanks might seem powerful, but they’ll be slow to get there and will be at a disadvantage when it comes to scouting. Even if they make it to their position, the fight might be over by the time they arrive. Playing in the middle of the field behind a good scout screen could get them in the fight much earlier.
That said, sometimes you’ll have to do things outside of the standard. Having no heavy capitals makes contesting A almost impossible, so your team will have to play flanks, cap the edges and try to pull apart the opponent bit by bit. Conversely, a composition with all heavies and no screen may force everyone to deploy on one side to better manage vision. Start with this standard and let experience teach you when to deviate.
