Table of Contents Show
Praey for the Gods Complete Survival Guide
MOVEMENT
In Praey for the Gods you control your character in a fairly standard and recognisable way, using the [W][A][S][D] keys to move around, [SHIFT] to sprint and [SPACE] to jump. You can use equipped items with [LMB] and climb on objects, enemies or the environment using [RMB].
DIFFICULTY SETTINGS
When you start a New Game, you will be able to select from four different difficulties, Easy, Normal, Hard and Legendary. The way difficulty affects your game is as follows:
– The amount of damage done by enemies is increased/decreased
– The amount of damage taken whilst ragdolled
– On higher difficulties you will drown when running out of stamina whilst swimming
– tbc
HEALTH AND STAMINA MANAGEMENT
Two of the most important things to be aware of whilst playing the game is your character’s Health and Stamina gauges. Your Health is represented with the red circle that follows your character around, which will lower as you take damage. If it is depleted fully, you will die and restart from the last Auto Save or Manual Save. Your Stamina is represented by the white circle around the Health gauge, and will deplete when you are either climbing, sprinting or using the Sail Cloth. Your Stamina usage rate and regeneration is also affected by how full your hunger and sleep gauges are. Depending on your Resistances; which are covered in the next section, you may receive various bonuses to your Stamina Regeneration wait and rate. Small arrow icons next to the Health and Stamina gauges indicate a boost to your rate of Stamina Regeneration. Whilst having + icons there indicates a decrease to the amount of wait time before your Stamina begins to regenerate.
HUNGER RES, EXHAUSTION RES AND COLD RES
Other than your Health and Stamina, you also have three other “needs” to take note of, your Hunger Res, Exhaustion Res and Cold Res. All of these should be fairly self-explanatory:
– You maintain your Hunger Resistance by eating various items that you can collect or gather in the environment, the best items for regaining your Hunger Res is cooked animal meat. Your Stamina Regeneration will be faster the fuller your Hunger Res.
– You maintain your Exhaustion Resistance by sleeping on bed rolls, by either using ones found in the environment at camps or by using a Bed Roll item. Exhaustion Res dictates the wait time before your Stamina begins to regenerate. Your Exhaustion Res is depleted whilst performing exhausting actions such as Sprinting, Jumping and using the Sail Cloth.
– You maintain your Cold Resistance by standing near sources of heat, which will usually be campfires but can also be lit torches or braziers. Swimming in icy water and being out in the open in high winds will reduce your Cold Res, and it reduces over time anyway when you are away from a source of heat. Some enemies can also reduce your Cold Res with certain attacks. You can upgrade your clothing to increase your Cold Res. If your Cold Res is low, it will affect your ability to aim with Bows. If your Cold Res is completely reduced, you will begin to take Health damage from the frigid conditions.
TAKING DAMAGE
When you are hit with heavy damage, your character will often be knocked down into a ragdoll state, the amount of damage you took impacts how long you will be stuck in this state, though you can mash the Dodge/Sprint keys to stand up faster. You can still take damage whilst ragdolled, but it is much less than normal, though the amount of damage you take in this state is increased on higher difficulties.
ATTACKING “SIGILS”
Bosses can not be damaged like any normal enemy, and your Melee Weapons will not be able to inflict any direct damage to them. Instead, you will have to locate “Sigils” that can be found all over their bodies. These can be interacted with as you climb on them to “attack”, each Sigil needs to be attacked three times. When you fully complete a Sigil, you will get a small amount of Stamina restored. Sigils can also be found occassionally in the environment and are used to interact with various environmental puzzles.
Note – I am unsure what to call the objects that you interact with to affect various objects in the environments or to damage the bosses, as I have no idea what to call them (perhaps “switches”?) I will be using “Sigils” as this was the name used for the weakpoints in Team Ico’s “Shadow of the Colossus”, which this game is of course inspired by.
Using Your Equipment
MELEE WEAPONS
Melee Weapons are generally used to fight off the various smaller foes that you will encounter in the game, and won’t have any effect on larger foes. They can also be used to break boxes to gather items, but your fists can do this too, and they don’t have a durability to manage. Some Melee Weapons have multiple uses, the Torch can be lit on fire and carried as a source of warmth, whereas Axes can be used to chop down trees to collect Wood.
BOWS
Bows are your only form of ranged attack and can be used to fight smaller foes in the environment, but they are also frequently used in environmental puzzles out in the world or even in boss fights. Hold [LMB] whilst a bow is equipped to ready an arrow and circular reticule will appear. Because the arrow will drop as it travels through the air, you will often need to aim a bit high to hit your target, using the bottom of the reticule is useful for this. The reticule will become larger and your shots less accurate if you are moving, so stand still whenever you are firing off a shot. Arrows can also be lit on fire to deal more damage or to assist in environmental puzzles/bosses, to do this, ready an arrow with [LMB] and stand near an open flame, the tip of your arrow should catch fire, and then you can fire it like any normal arrow.
SAIL CLOTH
The Sail Cloth is collected soon after you defeat the first boss of the game, and can be used to glide over long distances or stop you from taking damage after a long fall. The Sail Cloth can be upgraded to perform better, and is used by pressing [SPACE] whilst airborne. Whilst using the Sail Cloth however, you will be using Stamina, so make sure to leave enough stamina to glide whatever distance is required if you are using it as a method of escape or traversal.
GRAPPLING HOOKS
Grappling Hooks can be used to quickly travel to any stone surface within your range, or to grapple to specifically placed grapple points. When you are aiming at something that you can grapple to, a spinning white reticule will appear. When aiming at a grapple point, this reticule will appear but it will be green instead of white. Grapple points can be found throughout the environment and also on bosses, allowing for a faster climb up them.
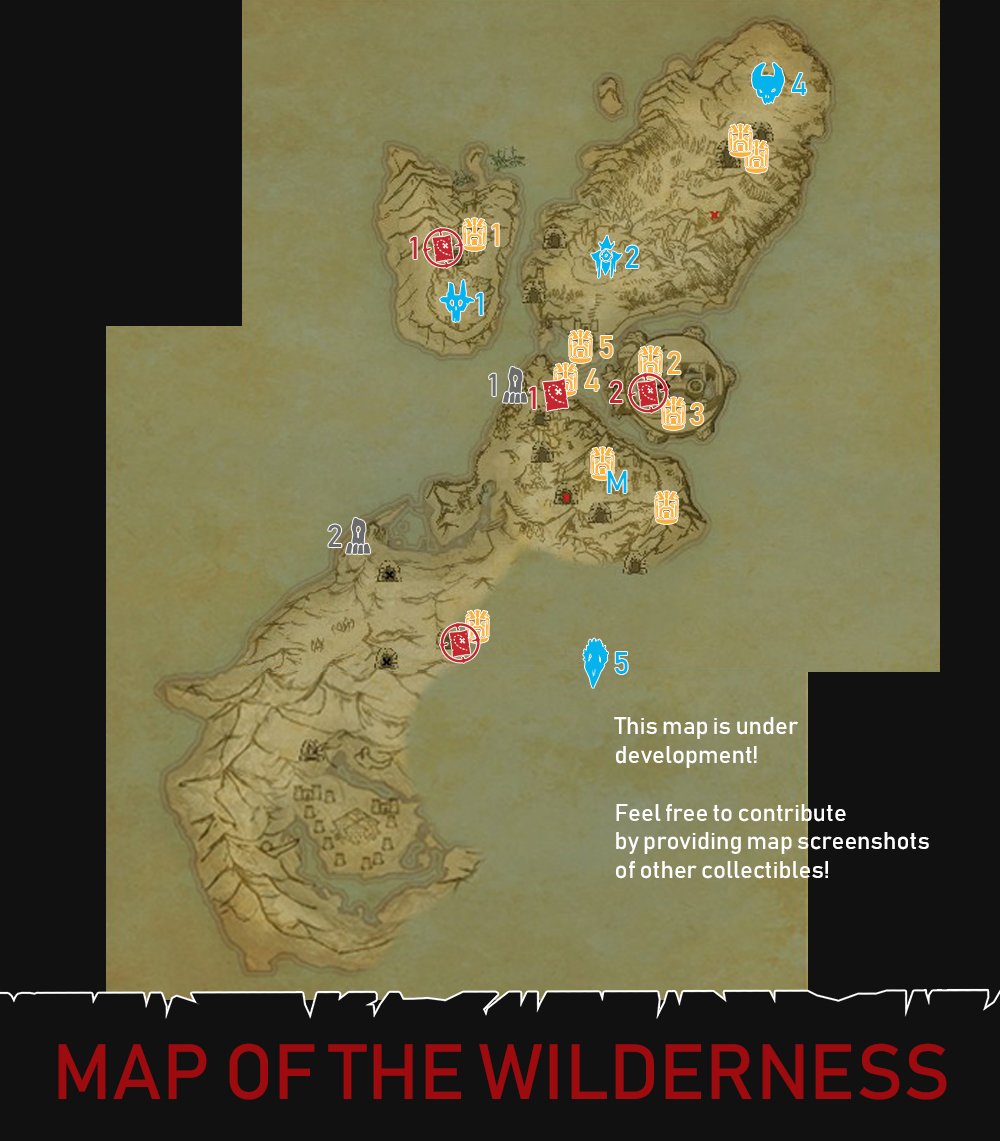
Map of the Wilderness
How to Beat The Tower
SIGILS: All located around the middle of the Tower’s visible body
GRAPPLE POINTS: Several around the middle of its body, can be used to reduce climbing time from the various points of the Tower’s body that are safe to stand on when it is immobile.
ITEMS REQUIRED: None
Once you enter its arena, “The Tower” will dramatically surface from the lake, be ready to run as soon as control is given back to you, as whilst it is immobile, it will frequently fire off energy blasts at you. These blasts are highly damaging and move very quickly, but dont track once they have been fired, so you should be able to avoid them if sprinting/dodging directly away once it is fired. You can see when you are being targeted when the light shining from the Tower’s mouth is shining on you.
Sometimes the Tower will also spin its head around in a circle, spewing out a putrid-looking black fog, which also spawns many small blue orbs that travel towards your position. They will damage you on contact, so try to keep away from them. There is only really one way to get up onto the Tower and defeat it. You have to run around the circular arena and step on three pressure plates to raise several orbs from the ground. Keep still on the pressure plate and the Tower will fire at you, directly hitting and lighting up the orb that you just raised. Do this for all three orbs around the arena, and you will be able to activate the large pressure plate at the back of the arena, with will briefly stun the Tower, causing it to fall down with its mouth in the water.
Use your Sail Cloth to try and glide over as much of the freezing cold water as you can, then swim over to the Tower. You can climb up onto it here, and as you do it will raise back up into the air, allowing you to climb down and reach its three sigils. They are moslty around the middle area of The Tower and are not hard to find, if you have trouble, jump down onto the protruding spike-platforms (which you can stand on, allowing you to restore your stamina), you can usually see the sigils from these platforms. The Tower will shake periodically as you climb it, and will shake every time you attack a sigil. It can still perform its black fog attack whilst you are climbing on it, and the blue orbs will float down towards you and stick to its fur, which can be a hazard whilst climbing. If one is coming towards you, either drop down to a lower platform or leap forwards away from it to avoid taking the damage.
Once you have attacked all three sigils three times each, the Tower will be defeated and a cutscene will play, after which you will be taken back to the Temple.
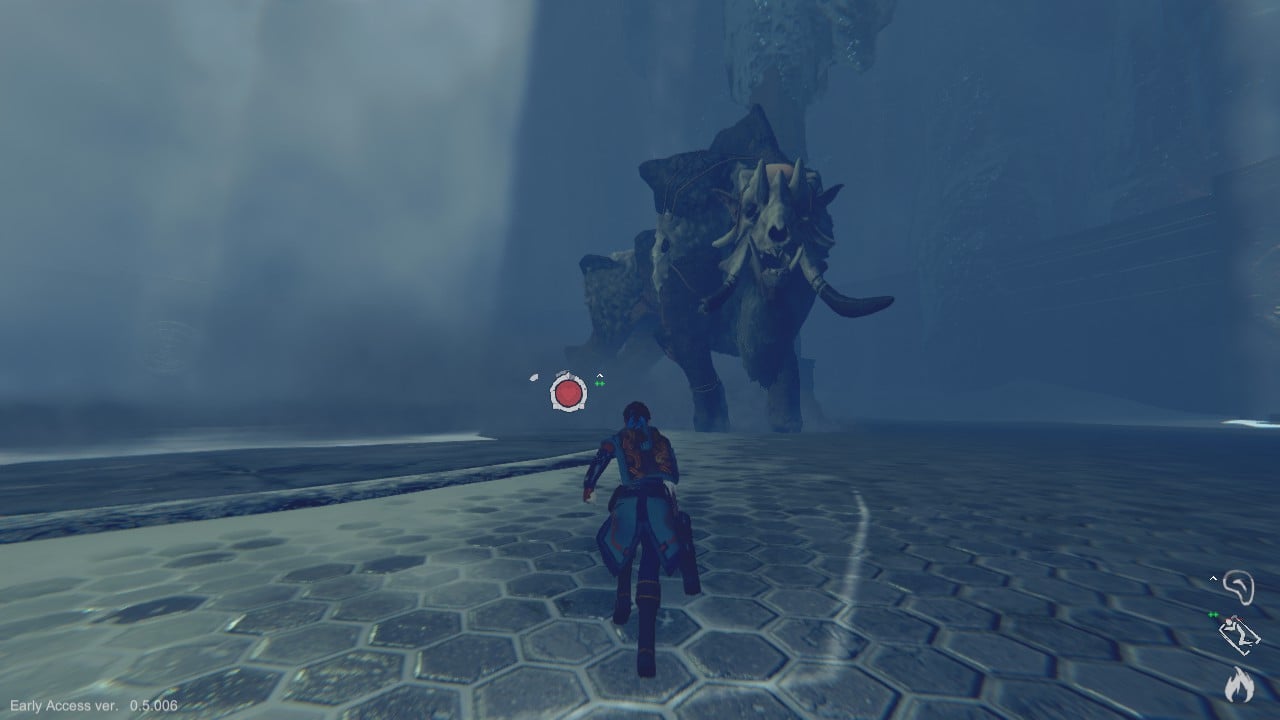
How to Beat The Boar
SIGILS: Chest. Rear Leg (Left), Shoulder (Right), Top of Head
GRAPPLE POINTS: None
ITEMS REQUIRED: None
“The Boar” is found deep within a cave that you’ll need to use a Grappling Hook to access. Approach the massive stone door at the entrance and stand on the pressure plate to open it, enter through the opening and continue through into the large and open cave. You’ll reach an area with another pressure plate which activates two counter-weights, which also open the gate on the other side of an abyss. You’ll need to grapple onto the top of one of these counter-weights whilst it is high up and the gate is still open, then use the Sail Cloth to travel under the gate, once you do, a cutscene will play and the boss battle will begin.
The Boar will move around the arena, either attempting to trample you or rear up on its hind legs and stomp you into the dust. It will also roar periodicially, shaking the arena and dislodging icicles from the ceiling. These will be telegraphed by a small shaft of light before they impact the ground, dealing a large amount of damage if they hit you directly, or simply knocking you down if you are too close. Of note in the arena is an Ornate Bow and three Explosive Arrows left up high on the surrounding walls of the arena, near the furthest lit up pressure plate, these will be no help against the Boar itself, but may come in handy fighting other enemies in the outside wilderness.
To get onto the Boar itself to attack its Sigils, you will need to run to the large stone objects at either side of its massive arena. Both of these have a pressure plate in front of them, these are visually identical to the one that you used to stun The Tower boss, previously. Standing on the pressure plates will cause the Boar to get in position to charge. About half way into this charge, the Boar will be locked into it, at this point you will want to run off of the pressure plate and roll away to avoid being hit by the Boar’s charge, as this will deal a lot of damage and leave you ragdolled, reducing the amount of time you have to get onto the Boar itself. Once the boar has fallen, you can climb onto it, shortly after which it will get back up. You should try and climb to the top or side of the Boar as fast as you can, as you will not be able to climb or move on its belly/chest whilst it is upright, as you cannot climb whilst completely upside-down.
Once you are climbing on the Boar itself, it will not offer a great deal in terms of resistance and will only attempt to shake you off for a short time after each attack on a Sigil. You climbed onto the Boar from its left side, so you’ll want to first climb along its left side to its rear left leg, where you can find and attack the first Sigil. The next Sigil can be found on its front right shoulder, to get there you’ll need to travel over the top of the Boar. This is a decently safe place to stand and recover your stamina before climbing down onto its other side. Make your way to its front right shoulder and attack the Sigil there three times, once you’ve done this, drop off of the Boar and repeat the same actions as earlier to get it to charge at you. Every time the Boar is knocked down like this, you will get a chance to attack the Sigil on its chest a single time, after which it will hastily stand up.
You will need to repeat baiting out the Boar’s charging attack until all of the pressure plate structures have shattered. Once they are, the glowing cracked bone at the top of the Boar’s skull will have been shattered by the impact, causing it to go into a rage as a short cutscene plays. After this cutscene, the Boar will be running around the arena much more aggressively than before, and the icicles will be falling from the ceiling continuously. In its more aggressive state, you need only stand on the area of the shattered pressure plate to bait the Boar into a charge, do this and you will once again be able to either climb onto it to attack the newly revealed Sigil on its head, or attack the one on its chest. Once you have attacked all of the Boar’s four sigils three times each, it will be defeated and a cutscene will play.
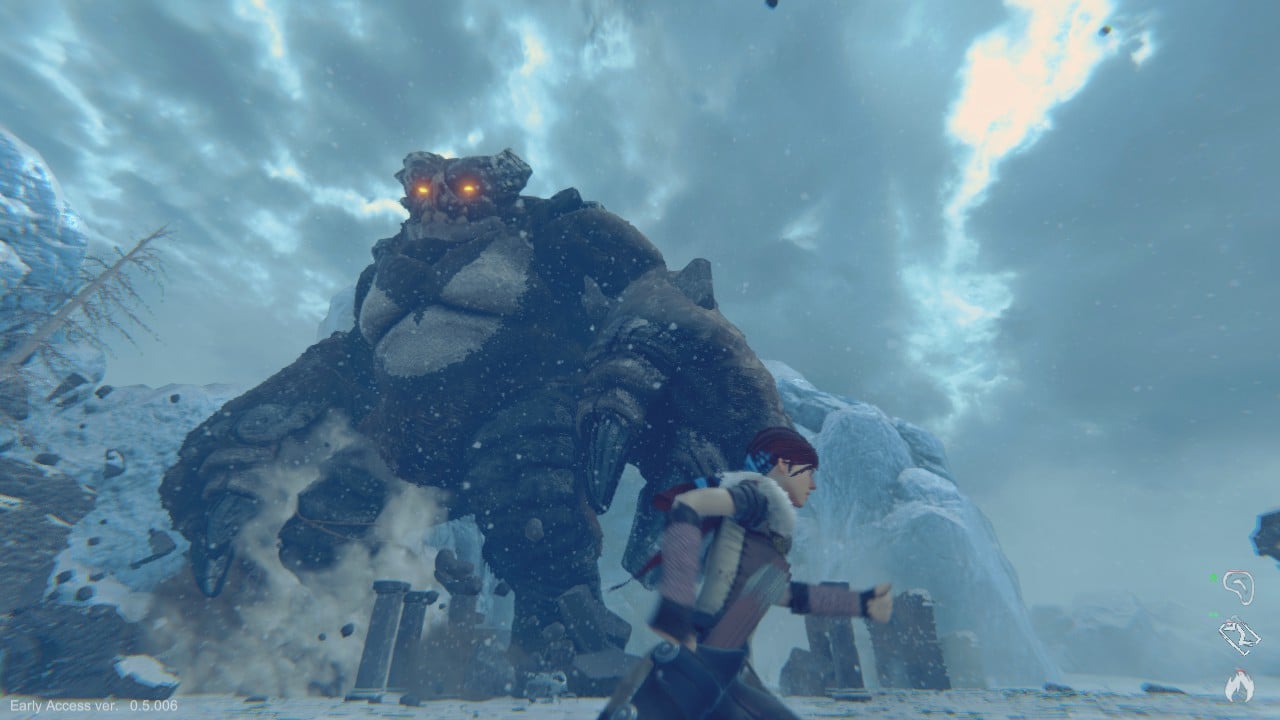
How to Beat The Yeti
SIGILS: Top of Head, Arm (Left), Arm (Right)
GRAPPLE POINTS: Upper Back (Left)
ITEMS REQUIRED: None – Bow, Wooden Arrows and Grappling Hook highly recommended
When you approach its arena, the Yeti will crash through the massive stone structure to the left, sending rubble and particle effects flying, and throwing you right into the battle. There are a lot of ways to get onto the Yeti. The most difficult way to do this is to bait out its fist slam attack, in which it will brings its fist down hard onto the ground, creating a highly damaging area-of-effect shockwave. If you position yourself just right to avoid the damage, it is possible to grab onto its arm and climb up it from there, but is extremely difficult to do so as it will only remain close to the ground for about a second, because of how damaging the attack itself is, this isn’t really the best way to go about getting onto the boss. The Yeti also has a Grapple Point on its left shoulder that you can grapple to if you manage to get up on a tall enough stone structure before it is destroyed by the boss.
The safest and most reliable way to get onto the boss is to lead it to the deep snow that borders the arena, and bait out its stomp attack. Lead it onto the deep snow and when it is a good way into it, you’ll want to run around its feed to tempt it into performing this attack, be careful though, as the force of its feet impacting the ground as it moves is enough to knock you down or damage you if you are too close. Once the Yeti stomps on the deep snow, its foot will sink down into it for a moment, allowing you to reach the climbable area on the back of its leg. Ensure you have a good amount of stamina, then jump up onto this and climb up towards the base of its back. There is a rocky protrusion there that you can stand on to regain stamina, but you won’t be able to stand there for long or climb up its back, as it will reach behind itself and grab you between its fingers. Don’t worry though, as long as you have a Bow and a few arrows – this is exactly what we want to happen. The Yeti will hold you up high above it and open its mouth ready to drop and swallow you whole. You can equip and use your bow from this position, with this you’ll want to aim for either one of its glowing orange eyes and fire an arrow into it, doing so will cause the Yeti to reel in pain for a moment and drop you, landing you onto its back. If you don’t manage to hit it in the eye however, you will be killed instantly as it drops you into its mouth, devoured whole.
From here, you are in a great position to go and attack the Sigil positioned on the top of the Yeti’s head. This is a fairly simple one to attack, and the Yeti will attempt to shake you off each time you do so. Once you’ve attacked it three times, you can stand on the Yeti’s shoulders to regain your stamina (use the Grapple Point on its left shoulder to get back on should you fall), before moving down to each of its arms, where the final two Sigils are located. Be careful though, because the Yeti has an extremely damaging attack that will kill you outright if you are caught by it when climbing its arms. If you stay on its arm for too long, it will raise its other arm above you before swatting you after a few moments. The only way to avoid this is to get off of the arm and to safety, or to attack the Sigil once, which should only be attempted if you are there just before or as it begins the attack animation – otherwise you will not have enough time to attack the Sigil before you are splatted. If you manage to attack the Sigil, the Yeti will be staggered and try to shake you off, cancelling its attack.
Once you have attacked the Sigils on both of its arms, you will have defeated the Yeti and a cutscene will play, before you are transported back to the Temple.
How to Beat The Crowdragon
How to Beat The Crowdragon
SIGILS: Tail, Chest, Left Wing, Right Wing
GRAPPLE POINTS: Tail x2, Chest
ITEMS REQUIRED: Bow, Arrows
The Crowdragon will dramatically make its entrance as you enter its arena, flying high up in the sky. Once you regain control of your character, you’ll be able to explore the huge arena that you find yourself in.There are three circular structures to be found here, two of which are fully raised up when you start the battle. Be careful as you move around the arena and try to spend as much time as you can in the air and gliding to each location, as there are many enemies which will attack you if you get too close to the areas in which they are hidden, including Wraiths and groups of Ice Soldiers. The Crowdragon itself will also attack you periodically by flying overhead and spewing out explosive fireballs. Watch for the glow on the ground to avoid where they will impact, be especially careful when fighting other enemies that you aren’t hit by the Crowdragon’s attacks!
To get onto the Crowdragon, you’ll need to climb up both of these and attack the Sigil at the top of each three times, once you have done this, the main structure will be raised up and have the Magical Fire lit at several points. Stand on the tallest point of the structure and ready your Bow, light the arrow with the Magical Fire, and aim up at the Crowdragon. It will dive towards you and charge up a highly damaging energy blast, before it does, you’ll need to fire the arrow at its head, it will explode in impressive fashion and bring the Crowdragon crashing down to the ground behind you. As soon as you can, jump down and run over to the fallen giant. The first Sigil you’ll want to attack is on the flat top of its tail. Jump onto it and you should be able to attack at least once before the Crowdragon manages to get back up. It will shake as it does, but will shortly take flight once again. If you are still on the ground as it does so, there are Grapple Points on both its tail and chest to still allow you to get onto it.
Contrasting to much of the other bosses that you’ve defeated up to this point, the Crowdragon will not actively try to shake you off of it, but you will still need to tap [RMB] to cling on as the sheer movement and flapping of its wings will force you to hang on tighter. Once in flight, you can attack the sigil on its tail the remaining amount of times needed, then you will be able to continue to climb up the length of its tail and upwards to its body. You wont need to hang onto the Crowdragon whilst traversing it all the time, as there are many instances where the area you need to be walking on will be flat enough for you to just walk, allowing you to regain your stamina as you do so, which is highly recommended: don’t sprint! There is a second Sigil located on the chest of the Crowdragon, it can be accessed whenever the creature is flying on its side, as you can’t climb whilst directly upside-down, though ignore it for now, as there is an easier way of getting to it. Continue onwards to its back. The remaining two Sigils are found on either wing of the creature, and are the most difficult ones to get to, as you will have to hold on tight whenever it flaps its wings – which is frequently.
If you are beginning to seriously run out of stamina whilst climbing on the Crowdragon and wont be able to let go and walk on it, make sure to jump off of it before your stamina completely expires, as you will need to use your Sail Cloth to glide down to the ground, at least when nearing it, so you dont take a huge amount of fall damage. You’ll want to do this after attacking both of the Sigils on its wings three times, as the one on its chest can be a pain to get to. Use the Magic Fire to knock the Crowdragon out of the sky again, and run past the tail to its body further along. It will get itself back up, shortly after which it will once again take flight. As it does this, use your Grappling Hook on the Grapple Point located on its underside, which will leave you right next to the final Sigil. As it takes flight, you will be left upside-down, so will need to hang on tight until the Crowdragon flies on its side as it turns. When it does this you are free to climb and attack the final Sigil.
Once you have done this, the Crowdragon will fall to the ground, defeated. Assuming you have defeated all five bosses in order as well, this will also be the end of your “story” in the current Early Access version of Praey for the Gods. You can still explore the wilderness after this, and complete any puzzles that you might have left over!
Collectibles
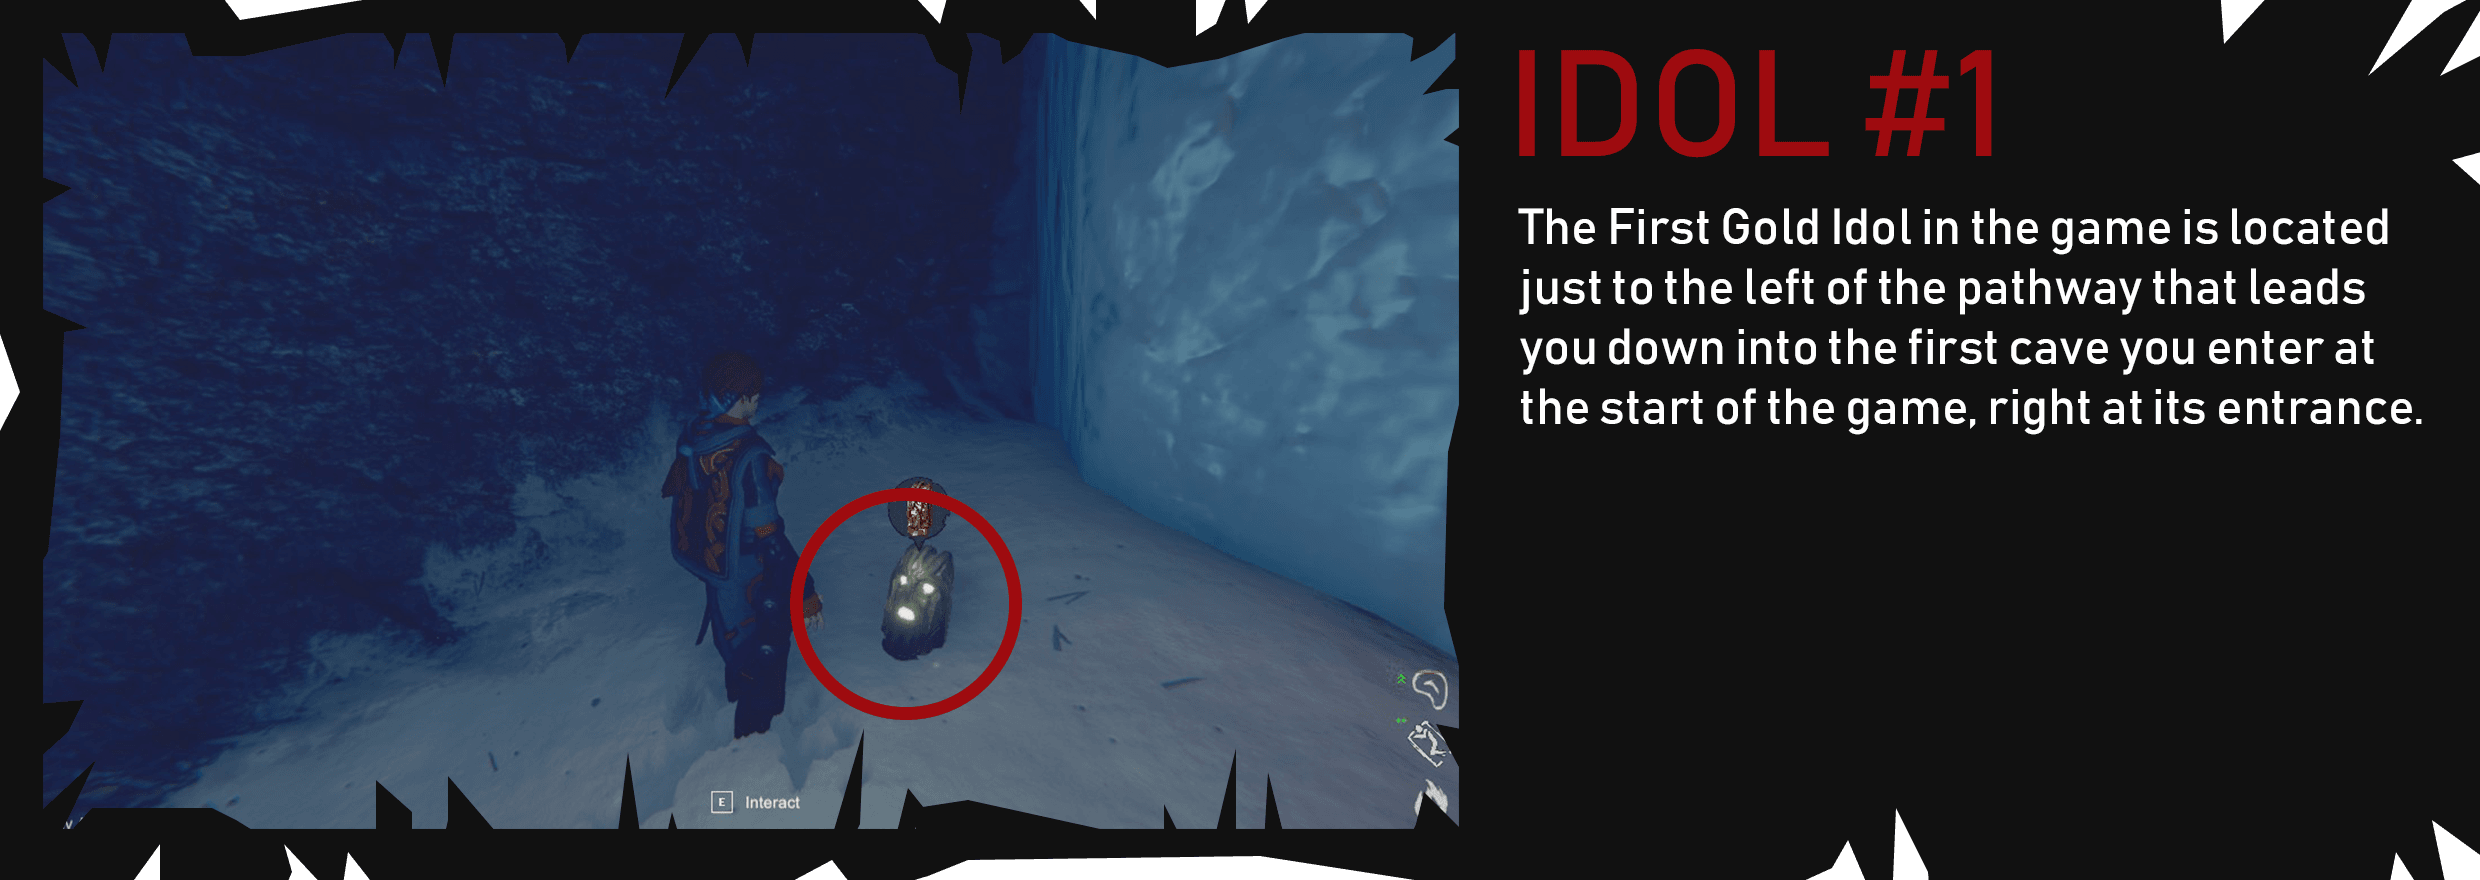
There are three kinds of collectibles in Praey for the Gods, Map Points. Treasure Maps and Gold Idols. These types of collectible can be found all over the open world. Map Points when collected, will reveal an area of your map and are most often found in caves. Treasure Maps will place a red X on your map indicating an area of interest, and Gold Idols will upgrade your Stamina Gauge once you have collected enough of them (3 per upgrade). This section of the guide will document the various collectibles as I discover them, and will hopefully be complete soon.
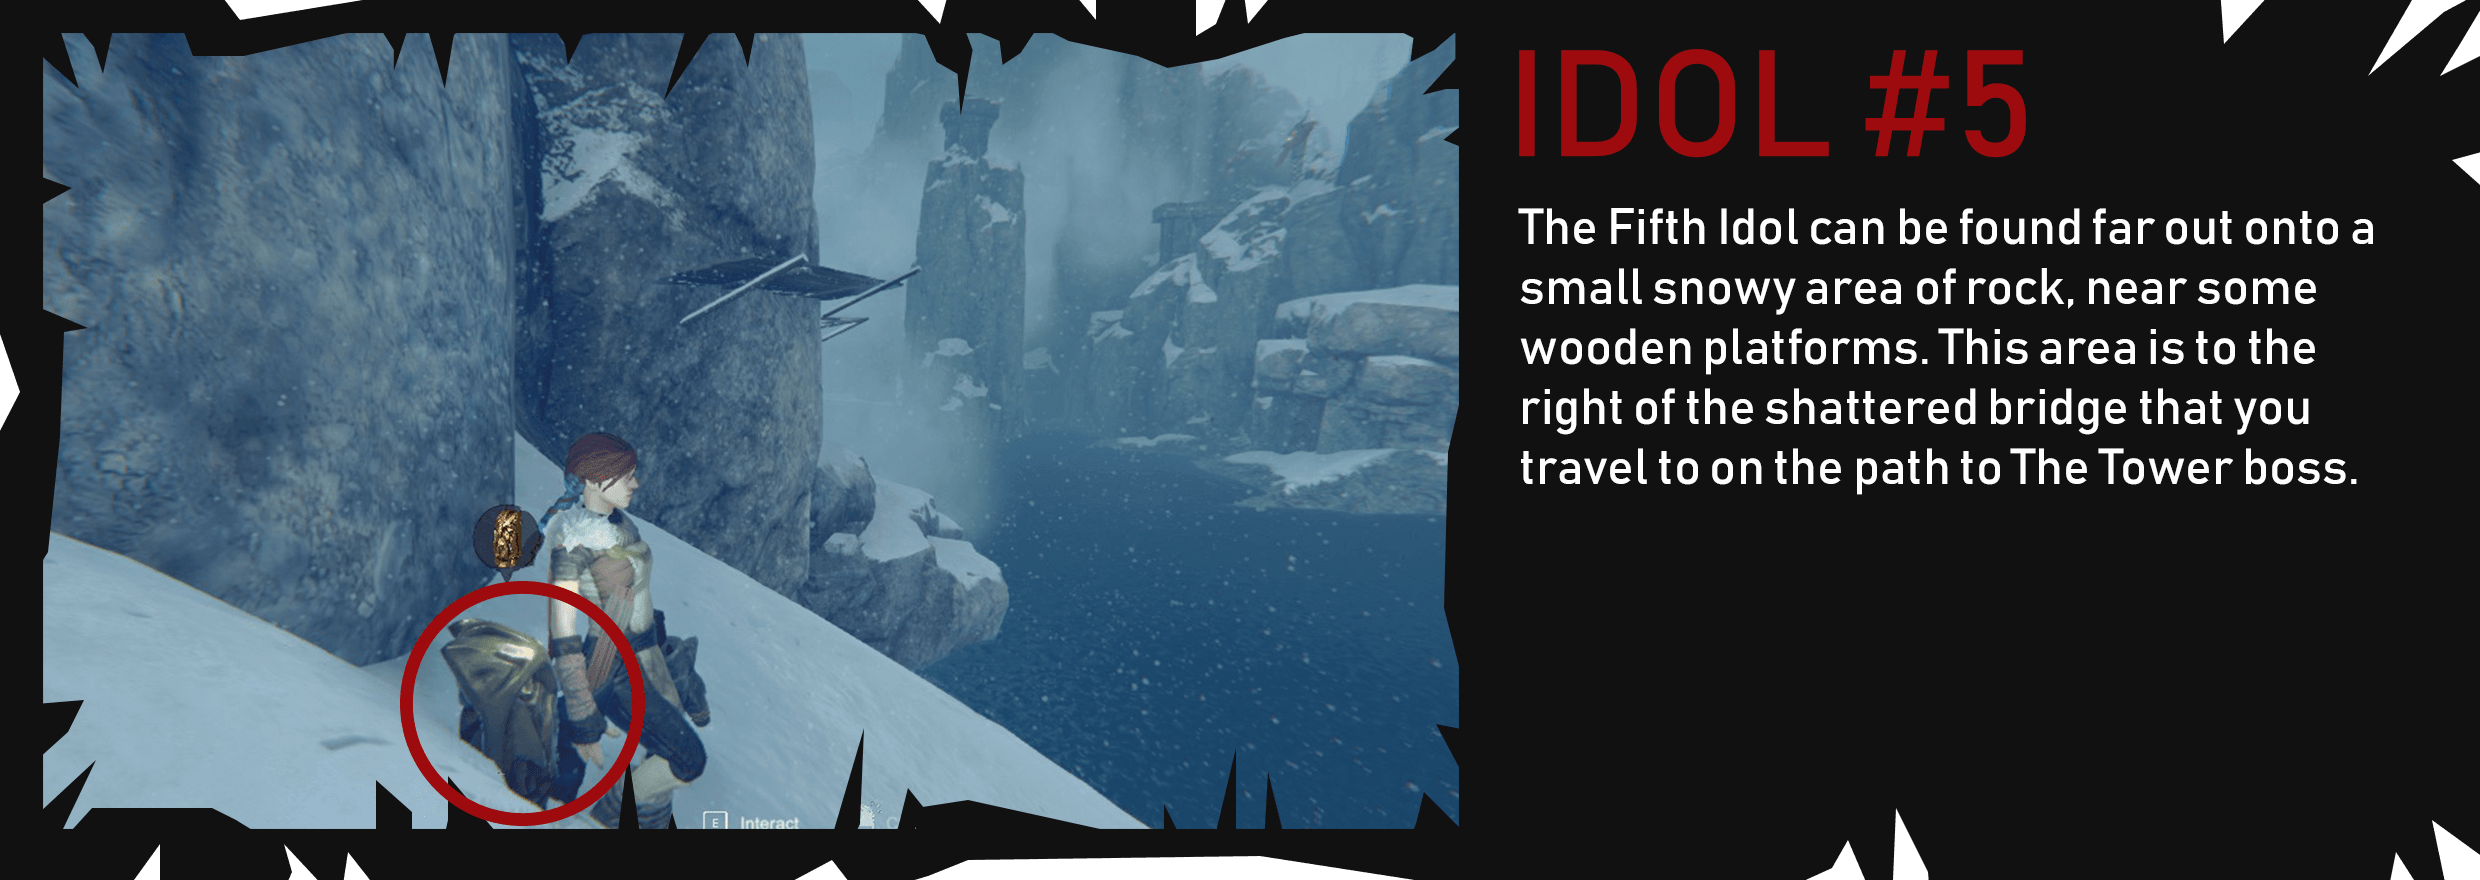
GOLD IDOLS

MAP POINTS
Map Point #1
Hard to miss, the first Map Point can be found on the icy wall above the first Grapple Point that you grapple to using your Grappling Hook.
Map Point #2
The second Map Point can be found on the wall just outside the Temple. Once you collect the Sail Cloth, it will be at the base of the stairs in front of you, to the left side.