Table of Contents Show
Stellar Bay Quest Guide
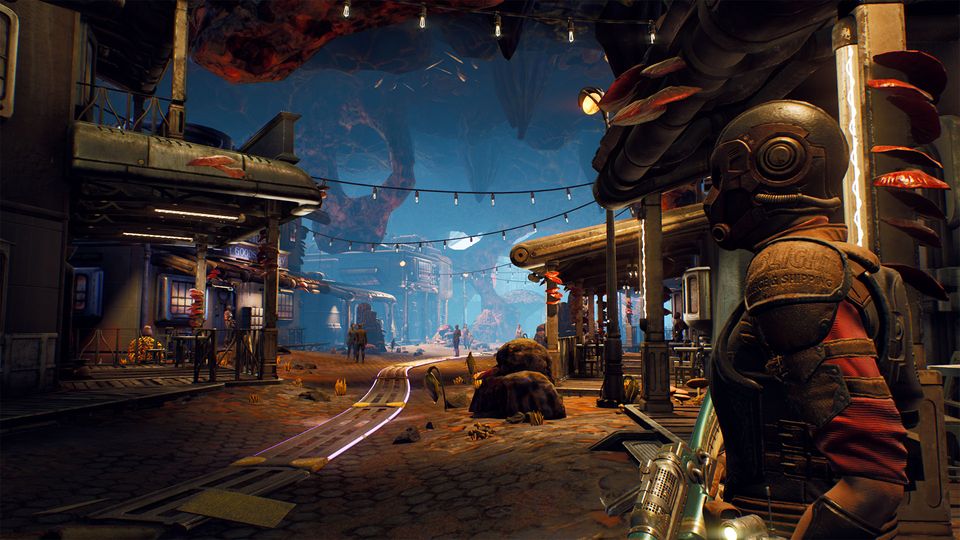
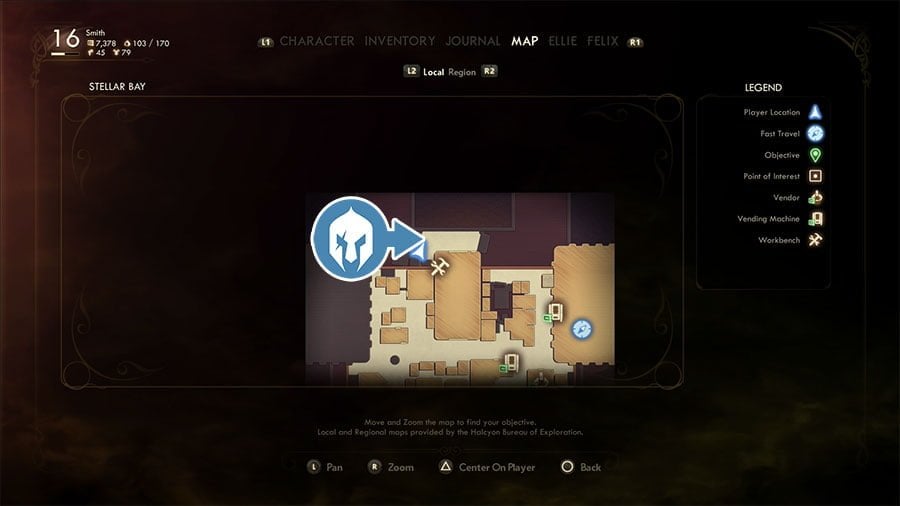
Stellar Bay is one of the Locations in The Outer Worlds. Stellar Bay is a settlement on Monarch. It has become a dangerous zone due to unforseen events.. Locations are defined by their individual and varied biomes spread around the Halcyon System. Planets and other celestial figures house the inhabitable regions in The Outer Worlds. Stellar Bay has the following services:
- Vending Machine
- Workbench
- Zeng’s Emporium
- Sebastian Adam’s Wildlife Emporium
Radio Free Monarch Walkthrough
This quest is obtained when you complete Passage to Anywhere by obtaining the Stellar Bay Navkey and talking to Welles, or if you travel to Monarch and land. Once you get to Stellar Bay, you’ll be greeted by Grimm, who will explain that it’s very rare for them to get visitors. He will ask for your name and you will gain Monarch Stellar Industries Reputation (3%). Grimm offers to give you your own entry code. He also says The Board has been lying about Monarch, and mentions you should talk to Mr. Sanjar, and as you for a favor – he wants you to check with Celia if his poster has arrived. Accept and this begins the quest The Grimm Tomorrow.
Speak with Nyoka at The Yacht Club to gain the Passion Pills quest so that she sobers up. This gives you 14,400XP. While you’re here, you can talk to Maguire and get a free drink 1x Zero Gee Brew. He will also explain that 10 years ago, Marauders broke into the executive compound and slaughtered everyone, making the board abandon the place. The incident is called “Amber Heights”. Head to the 2F and talk to Caleb Herrick to gain 1x Glacier Water, and he tells you that they are on strike. You can offer to mediate with Velma on their behalf – this gives you the quest Herric’s Handiwork.
You can head over to Sanjar’s office and talk to Celia Robbins, who will confess she is buying uneeded items from Sebastian to get to talk to him. You can offer to talk to him on her behalf and get the task Flowers for Sebastian.
You can also speak to Sanjar Nandi, he will say Hiram is out at Devil’s Peak. Sanjar will confide that the 10 years of isolation have been hard on Monarch, and they want to get back into the mainstream. He will reveal a plan to get MSI back into The Board. Ask him about it and you’ll obtain the quest BOLT with His Name (Faction Quest). You can also learn more about the planet, that used to be called Terra 1, and the reform that Sanjar and MSI tried to achieve to give more humane working conditions for everyone within.
Complete Passion Pills
Make your way to Abigail Edwards, the medic located in a small building on the left side of the Stellar Bay map. You can ask her for Caffenoid supplements, and then have to reveal who they are for. You can lie (20) or say they are for Nyoka, or private. Abigail will reval that Nyoka’s allotment is exhausted due to her non-participation in their health scheme. She mentions Dr. Williams manage the town allotments from an upstairs terminal. You can persuade (35), ask about Dr. Williams, or Intimidate (55) to get your way. Persuade her, and she’ll reveal she has a key to the supply room, that is upstairs. You can ask about Dr. Williams and you’ll obtain an optional objective of searching his body at the graveyard.
You can go upstairs and hack (55) the terminal to login as Williams to increase Nyoka’s allotment. You can also pick your way into the supply room, or get Dispensary Supply Room Key from Dr. Williams corpse or by pickpocketing Abigail.
Return to Nyoka
Make your way back to Nyoka. You can explore near the tavern first and meet Talmadge Kerr, who will be shuoting someone has been killed inside the apartments. Go into the building to unlock the quest The Stainless Steel Rat.
Once you’re back to Nyoka, you’ll get 21000xp for the step and 28000xp for completing passion pills, plus 14400xp for completing Radio Free Monarch step. Accept Nyoka’s offer to come with you and she will join you as your last Companion.
Head to Fallbrook
Make your way to Fallbrook, visiting Amber Heights for several quests in the process. Talk to Mortimer Bell near the entrance and, if you’re doing Space-Crime Continuum, ask him where to find Catherine Malin, and you’ll gain Sublight Salvage & Shipping reputation.
Devil’s Peak Summit
Head northwest of Fallbrook to find Devil’s Peak Station. Once you arrive at Devil’s Peak Summit speak with Joy Voivode regarding the relay tower she is guarding. If you have the quest Signal Point in Space or Radio Free Monarch, it will update with a note that you may be able to convince the C3 mercenary company to help you.
They are down the hill a short ways. You can Persuade (20) them not to kill you if you said you emerged from the tunnel, and then you can ask them to help you clear the Marauders from the Station. Additionally, if you inquire further about their boss you will obtain the Task: Mandibles of Doom.
If you complete this Task then you can convince the C3 mercenaries to help you attack the Marauders if you can get the main gate open. As you approach the station, you can meet Joy Voivode, who cautions you the station is overtaken by Marauders.
Head the entrance of the Devils’ Peak Station and defeat the Marauders there. There are a lot so be careful. If you have a minute head northeast and loot the Unique Weapon: Hammer of Olympus at Sundered Rock. Then head up the ramp and head into Devil’s Peak Station.
Devil’s Peak Station
Defeat the Marauders inside and then speak to the man via the Intercom, whom you will find out Hiram. If Nyoka is in your party he will recognize her. Hiram will ask you to wipe out the Marauders in exchange for double the going rate. He doesn’t want his broadcasting equipment destroyed. There is a Lockpicking (55) door nearby that has some loot inside, so consider picking it if you can. Then double back and head up the elevator that is now open.
You’ll need to kill all the Marauders here. If you finished the Mandibles of Doom task and convinced the C3 mercenaries to help you, they will help you wipe out the Marauders. Use the Intercom to open the door and speak to Hiram Blythe. You’ll gain 2,500 Bit Cartridges. Ask him about the Information Broker and you’ll gain an Achievement/Trophy and 16000 XP.
You can talk to Hiram to learn more about The Board, the Chairman, Sanjar, Graham and the overall system.
Hiram will ask you to jump start the tower by heading outside and flipping a switch. There is a terminal on the way that you can read some backstory about the Station if you wish. Once you flip the switch a ship will crash land nearby and Graham and Sanjar will argue over what to do with it, and the Faction Quest: Canid’s Cradle will trigger. You’ll gain 3800xp and 14400xp.
Return to Phineas Welles at his Lab to collect your reward of 2500 Bit Cartridges, 36640 XP and you’ll gain a Nav Key to Byzantium. This will trigger the quest The City and the Stars.
Your decisions about Monarch leadership will impact the game’s Endings.
A Family Matter Walkthrough
You can begin this quest by talking to Agnes Needham in Stellar Bay, Monarch. Agnes is by the town’s south-east exit, visibly shaken and calling for help. Hear her out and offer to find her son to being the quest.
Head South from Stellar Bay and follow the east road. It will take you to Amber Heights. Upon entering, you will meet Rose, and you can ask her about the Iconoclasts, the faction that leads the town. She will tell you that their town is a community, and there are no jobs, no corporation and no paychecks involved. You can ask about the leaders, Graham and Zora. You can also ask abut Tucker, and she will point you to a nearby structure. There’s a vending machine nearby and Bronson, the quartermaster, who will give you the task Odd Jobs.
Head up the hill and go into a residence on the left to meet Tucker Needham. Introduce yourself, and then you can mention your surprise that this grown man is the “little boy” that ran away. You’ll earn 7500xp
Explain to him that she made it sound as if he was a boy in danger, and he’ll say she has been overprotective all her life, and he is ready to live his life without her protection. You can persuade (55) or intimidate (55) to expedite things and get him to go back, or you can ask him what he wants to do about it. The last option will have him tell you to report that he is dead. You can express your concern about what that will do to Agnes, and then either ask for something that would prove a body, or reject the proposition.
If you persuade him to go back, you’ll get 7500xp and can return to Stellar Bay to see things play out. You’ll find his mother is still condescending to him, and you can help him by saying he’s a grown man. You’ll get 7500xp. If you stick around and talk to them some more you’ll see Tucker is standing up for himself. You’ll receive 625 Bit Cartridge, Monarch Stellar Industries Reputation and 15000xp. If you tell Agnes he is dead and give him the proof you’ll gain the same amount of XP and Bits but won’t get the Reputation.
Herrick’s Handiwork Walkthrough
You can meet Caleb Herrick at the second floor of The Yacht’s Club in Stellar Bay, Monarch. He will give you 1x Glacier Water and invite you to celebrate with them. They are on strike due to poor working conditions, and would like you to mediate a resolution with Velma. Accept to begin the quest, then ask him about how he is managing to learn about his bit stash, and possible blackmail.
Velma Ballard can be found at the warehouse, the large building in the middle of Stellar Bay. Talk to her and ask about Braxton to get the quest The Secret People.
You can find Velma’s terminal on the 2nd floor and use Hack (55) to access her files. You will learn she has been siphoning money from her operating budget into a personal account. Her office also has a lockbox that contains Signed Tossball Poster, that you need for The Grimm Tomorrow – but you can get this item without stealing it by doing Braxon’s quest for Velma. If you need the key for it you can Pickpocket Velma.
Go back to Velma and confront her, but she will say she has earned it by working twice as much as everyone else. You can intimidate (20) or mention that Caleb says the same thing. She will agree to give Caleb a rise. You’ll get 11,250xp
Return to Herrick and tell him he’s getting his raise, you’ll get 11250xp for the step at 15000xp for completing the quest. You’ll also get 625 Bit Cartridge and Monarch Stellar Industries Reputation up.
If you kill Velma you will Botch the quest and it cannot be completed.
Passion Pills Walkthrough
Speak with Nyoka in Stellar Bay on Monarch to gain this quest.
Make your way to Abigail Edwards, the medic located in a small building on the left side of the Stellar Bay map. You can ask her for Caffenoid supplements, and then have to reveal who they are for. You can lie (20) or say they are for Nyoka, or private. Abigail will reval that Nyoka’s allotment is exhausted due to her non-participation in their health scheme. She mentions Dr. Williams manage the town allotments from an upstairs terminal. You can persuade (35), ask about Dr. Williams, or Intimidate (55) to get your way. Persuade her, and she’ll reveal she has a key to the supply room, that is upstairs. You can ask about Dr. Williams and you’ll obtain an optional objective of searching his body at the graveyard.
You can go upstairs and hack (55) the terminal to login as Williams to increase Nyoka’s allotment. Note that you can’t do this if you have a Below Average Intelligence because you cannot spell Nyoka correctly, and thus can’t find her entry.
You can also pick your way into the supply room, or get Dispensary Supply Room Key from Dr. Williams corpse or by pickpocketing Abigail.
If you hacked the terminal, return to Abigail and ask her to look again, she will then give you the dose. You’ll get 21,000xp
Make your way back to Nyoka. You can explore near the tavern first and meet Talmadge Kerr, who will be shouting someone has been killed inside the apartments. Go into the building to unlock the quest The Stainless Steel Rat.
Once you’re back to Nyoka, you’ll get 21000xp for the step and 28000xp for completing passion pills, plus 14400xp for completing Radio Free Monarch step. Accept Nyoka’s offer to come with you and she will join you as your last Companion.
The Grimm Tomorrow Walkthrough
Speak with Grimm when you first land at the Stellar Bay Landing Pad and offer to help him to gain this quest. Find Celia Robbins in Sanjar’s office, and ask her about the poster. She will say you must talk to Velma, and warns you that her patience is thin. You’ll get 5000xp.
Talk to Velma Ballard at the warehouse, and she will say that she got a better offer from Nell from the betting house. Velma has not given the poster to Nell yet, and it’s locked in her office until she receives payment. You’ll get 5200xp and can ask further about the situation. Asking to work out a deal brings three options: Intimidate (50), persuade (30) and Bribe for 834 bits. Persuade her, and she will say to help with Braxton (The Secret People quest) and then you can talk. Note that you can steal the poster from the bin in her office if you want.
You can head over the Left Field Tossball betting and talk to Nell about it You can lie (55) to her to get her to give up on the poster, or ask if you could trade. She will reveal that she lost a jersey shipment, so she would be willing to part with the poster if you get the jerseys for her.
You can come back to Velma after completing The Secret People and Persuade (20) to obtain the Signed Tossball Poster and 5200xp.
Return to Grimm at the landing pad area and give him the poster. You’ll receive 14000xp, 625 Bit Cartridge, Pro Tossball Blocker and Monarch Stellar Industries Reputation.
The Secret People Walkthrough
You will get this quest by talking to Velma Ballard at the warehouse in Stellar Bay, Monarch. She will mention Braxton has been skipping work and is likely using drugs, and ask you to look into it. Accept to begin the quest.
Head to the apartments on the southern portion of Stellar Bay and go to the second floor. You’ll meet Laura, and you can ask her about Braxton. She will initially deny any knowledge then say that she’s after his stash. She will reveal that he’s delivering to a family that has fallen sick in a house in the ruins south of the town. Alternatively you can read an “Out for Deliveries” note to the left of Laura. You’ll get 4500xp and an updated objective.
Leave Monarch and head south toward a bridge. You’ll have to fight several Raptidon in this area. Eventually you’ll come by a house with some nice plants on the front, this is Mather Residence. Head inside, and you’ll discover this 3-floor building is inhabited by many. You’ll first meet Edgar Mather, who will welcome you in and invite you to join for dinner if you accept his hospitality without mentioning Braxton. Nearby, Levi Mather and Martha Mather can also be talked to. If you mention Braxton, none of them know him. Upstairs, you can meet Lizzie Mather, who will ask you if you have “Rocket Candies”. You can lie (1) and she will mention someone else used to bring the candies. Apparently Martha and Edgar got into an argument with Braxton over the deliveries.
You can also read Levi Mather’s Poetry Journal in his room for some insight. On the third floor, there’s a locked door that can be opened with Mather House Key (pickpocketed or looted from Edgar) or lockpicked. Open this door to find a headless corpse within, which has been dismembered and likely prepared for “dinner”. Loot the body to obtain Braxton Hecht’s Work ID and obtain 4500xp.
Head downstairs and Edgar will stop you, realizing you are aware of the truth. You can Lie (35) that you’ll send more meals his way, resolving the conflict for 4500xp. Alternatively you can intiate combat or be rude to them, and kill them all for 4500xp. Your companions will likely approve of killing them.
You can also unlock the 2F door to exit the house without ever having to talk to Edgar.
Once you’re out, you can head back to Velma to report your findings, but while you’re here, you are near an objective for BOLT with His Name so check on it first if you haven’t done so yet.
Return to Velma and giver her Braxton Hecht’s Work ID, you’ll get 4500xp for the step and 15000xp for the quest, 625 Bit Cartridge and Monarch Stellar Industries Reputation.
Now that you’ve completed this quest, you can Persuade (20) Velma to give you the poster for The Grimm Tomorrow.
The Stainless Steel Rat Walkthrough
Go near the large building on the bottom center of the Stellar Bay map, and you will find Talmadge Kerr, who will be shouting someone has been killed inside the apartments. Go into the building to unlock the quest The Stainless Steel Rat.
You can examine the apartment and note a Hastily-Packed Suitcase, as well as a Tossball Betting Slip. This will give you 5625xp and update the objectives.
Head over to Left Field Tossball Betting, that is located northwest in town, and talk to Nell. Ask her about it and she will reveal the victim is named Isaac, and that Elijah and other grunts were pushing him around. They can be found loitering in the alley behind The Yacht Club. You’ll get 5625xp and your quest will update.
Make your way around and take a narrow alley to find Elijah and his group of thugs. You can accuse him of the murder outright, and he’ll say Isaac had it coming, and you have no proof. You can Intimidate (55) or try to leave. They will attack you if you leave. If you pass the first intimidation check, a second one (35) will appear. Pass it and you’ll get 5600xp for forcing them to leave the town.
Make your way to Sanjar Nandi at his office and inform him of what has transpired. You’ll get a further 5625xp, and 15000xp for completing the quest. You’ll also get Monarch Stellar Industries Reputation for running them out of town, and 625 Bit Cartridge. You’ll get the same reward for killing them.
BOLT with His Name Walkthrough
Speak to Sanjar Nandi, at Stellar Bay in Monarch to begin this quest. Sanjar will confide that the 10 years of isolation have been hard on Monarch, and they want to get back into the mainstream. He will reveal a plan to get MSI back into the board. Ask him about it and he’ll share details of his two-phase plan that begins with proper defenses for the planet. You can also learn more about the planet, that used to be called Terra 1, and the reform that Sanjar and MSI tried to achieve to give more humane working conditions for everyone within.
Head out into Monarch Wilderness and make your way to the objective building by a large bridge. There’s a Raptidon Behemoth here, and you can loot an Iconoclast corpse for ARMS Building Key and Leaded Armor.
Go inside the ARMS building and you can loot several items including Purpleberry Liqueur, Stogie Slims, Adreno, Spectrum Vodka and Light Ammo by a terminal. Read the report within to learn that Sanjar is bad with jingles and slogans, and instead includes numbers and statistics in his report. In addition, he completes work instead of delegating it – not a desired trait for promotion. You can use Hack (20) to read the files of Graham Bryant, who is apparently “subversive”. Lastly there’s Dora Erickson, who is recommended for the promotion thanks to her delegation skills. It is now obvious why Sanjar wants you to delete the terminal contents – do it or not it’s your call! (5625xp for deleting)
Go upstairs and approach a locked door, someone will talk to you via intercom. This is Huxley who is stuck and needs help unlocking the door. This gives you 5625xp. Say you want into the room as well and Hux will comment that his friend had a key. This is the key you picked up earlier, but you can use this time to ask some questions about the Iconoclasts.
You can also ask Huxley to open the door from inside, it takes Perception, or Engineering (35), Intimidate (55) or Persuade (55). The door will open and Huxley will come out and you’ll get Iconoclasts reputation. You can ask her for a reward, and obtain some Iconoclast reputation. Inside the room, loot Mag-Pick, Ammo and Bit Cartridge and the BOLT-52 Cartridge.
Return to Sanjar and tell him you saw the review. He will mention he even gave a kidney to the company in order to improve his chances of being promoted. You can encourage him for the part he plays now.
Give him the BOLT-52 and you’ll get 5625 and 15000xp , MSI Elite Helmet, 3000 Bit Cartridge and Monarch Stellar Industries Reputation. He reveals the plan is to blackmail the board into letting them back to the table. Sanjar will reveal he believes another corporation is operating illegally within Monarch, granting you the quest Errors Unseen. He will tell you Catherine is likely supplying them from Fallbrook. He wants you to infiltrate the secret facility and bring back evidence – be it an item or staff.
Errors Unseen Walkthrough
Talk to Sanjar after completing BOLT with His Name. He reveals the plan is to blackmail the board into letting them back to the table. Sanjar will reveal he believes another corporation is operating illegally within Monarch, granting you the quest Errors Unseen. He will tell you Catherine is likely supplying them from Fallbrook. He wants you to infiltrate the secret facility and bring back evidence – be it an item or staff.
Head to Fallbrook, south of Stellar Bay, and calk to Catherine Malin. She will say “maybe” one of her teams were hired for a drop-off and have gone missing, and offer to pay you handsomely if you find them. You can also get this information by pickpocketing her keycard and using her terminal.
Head north from Fallbrook and you will find the Drop-off point along the road. The road is a dead end – there will be two Mantiqueen and several Mantisaur on the way. You’ll meet Weston Sloan by the broken bridge heading north. The drop point is on the lower level under the broken bridge – this unlocks the location “Blown Bridge”. Inspect the loader to gain 5625xp and then follow the trace of blood west toward the Smuggler Tunnel.
Within the tunnel, beware of several electric traps and mines, and make your way to Arthur. You can use medical (40) to have a look at his wounds, and some Sublight Salvage & Shipping reputation. You can then ask him what happened, or reveal Catherine told you to come. He will say there ambushed by Marauders, who seemed to know where the meeting would take place. He’ll tell you which way they went, and you can get 5625xp for this step.
The Marauders headed West from this location, up a hill past some Mantisaur and Mantiswarm. You will arrive at UDL Lab location. The Marauders have a group of scientists rounded up, and promptly kill them. Defeat the Marauder and Canid enemies. Inside the building, several more Marauders await alongside their Ringleader. You can pick up UDL Lab Weapons Terminal Keycard from a table on the second floor, where you kill the ringleader. Access the terminal on the other room of the second floor and transfer files to external tape to bring evidence of UDL’s Lorem Ipsum project. Gain 5625xp and UDL Research Data quest item.
You can bring the UDL Lab Weapons Terminal Key Card to the 1st floor and interact with a terminal. You can unlock the weapon they have been developing with Hack (55) or answer: Protect the Chairman, answer: Berate him relentlessly to defend the Chairman’s honor, answer: Arrest your spouse and admit your children to a reeducation program. You can now pick up Gloop Gun, a Science Weapon part of the Weapons From the Void Quest.
Go northwest and you’ll come to a closed Gate. Unlock it with the nearby terminal to make access easier in the future. Go North toward Stellar Bay and you’ll come across a Marauder Camp. Kill them and then talk to Lenora Talley, who is a prisoner here. This will unlock her as a vendor near Fallbrook.
Return to Stellar Bay and talk to Sanjar Nandi at his office. Ask him what the reformations are, and he will reveal he is planning to reformat the board, but slowly and from within. Nyoka expresses concern about what will happen to Amber Heights and Fallbrook.
If you give Sanjar the data, the quest will complete, giving you 15000xp, 2188 Bit Cartridge, MSI Elite Armor and Monarch Stellar Industries Reputation.
Return to Catherine Malin at Fallbrook and tell her about Arthur in the cave – you’ll get SunLight Salvage & Shipping Reputation.
Flowers for Sebastian Walkthrough
You will obtain this quest by walking into Sanjar’s office in Stellar Bay, Monarch, and asking Celia Robbins about her conversation. She will reveal she is buying lots of unnecessary materials from a vendor just to get to speak to him. Offer to ask him out on her behalf to begin the quest.
Go out the back door and you can find Sebastian Adams leaning on a wall in the courtyard. You can tell her that Celia likes him, but he will think she just wants a discount. You can Persuade (30) or bribe him for 838 bits. Sebastian will say once his shift ends they can go somewhere nice, you’ll get 6750xp. Or you can Lie (20) to him and tell him business is moving into own, and you’ll gain 6750 XP and he’ll go out with her.
Before you go, ask Sebastian about Mr. Pickett, and you’ll learn Sebastian gave him directions to see a large mantiqueen. Ask where and Sebastian will ask you to check on Mr. Pickett, granting you the task Mr. Pickett’s Biggest Game.
Return to Celia with the good news, and you’ll get 16000xp, 375 Bit Cartridge and Monarch Stellar Industries reputation.
Mr. Pickett’s Biggest Game Walkthrough
Talk to Sebastian Adams in the courtyard behind Sanjar’s office in Stellar Bay, Monarch. You come here for the “Flowers for Sebastian” task, and can learn about his sales and ask Sebastian about Mr. Pickett. You’ll learn Sebastian gave him directions to see a large mantiqueen. Ask where and Sebastian will ask you to check on Mr. Pickett, granting you the task Mr. Pickett’s Biggest Game.
Go South from Stellar Bay’s South Ruins exit and past Amber Heights to find an area with Mantisaur enemies before arriving at Fallbrook. There’s a sleeping Mantiqueen that you must defeat and loot to obtain Mr. Pickett’s Journal. This will give you 6725xp and update your quest to return to Sebastian. Just north of this location, you can find a Mega Raptidon, and defeat it to unlock the trophy The Harder They Fall. Investigate past the mega enemy and you’ll find a cave with Elroy Booth. Talk to him and he’ll leave the cave later.
Return to Sebastian at Stellar Bay, and give him Mr. Picket’s Journal back. You’ll gain Monarch Stellar Industries Reputation and 6750xp,
Completing the quest grants 9000xp and 375 Bit Cartridge.