Table of Contents Show
Naval Action is a hardcore, realistic, and beautifully detailed naval combat sandbox immersing players into the experience of the most beautiful period of naval history – when sailing ships ruled the seas.
Other Naval Action Guides:
- Naval Action: Tips for Beginners
- Naval Action: Beginners Guide
- Naval Action: How to Command Your Fleet
Naval Action: Rear Admiral
Overview
| Ship | BR | Crew | Speed | Turn | Sa | Str. | A | M | [C] | [M] | [L] | BC | SC | DS | TG | Sl | Ca |
| Victory | 900 | 850 | 10.57 | 2.14 | 200 | 11500 | 75 | 113 | 2455 | 2392 | 2286 | 4 | 2 | 16,15,15,7 | 53 | 10 | 425 |
| Santissima Trinidad | 900 | 1050 | 10.81 | 2.03 | 230 | 11400 | 75 | 113 | 3220 | 2982 | 2844 | 2 | 4 | 17,17,18,17 | 69 | 10 | 450 |
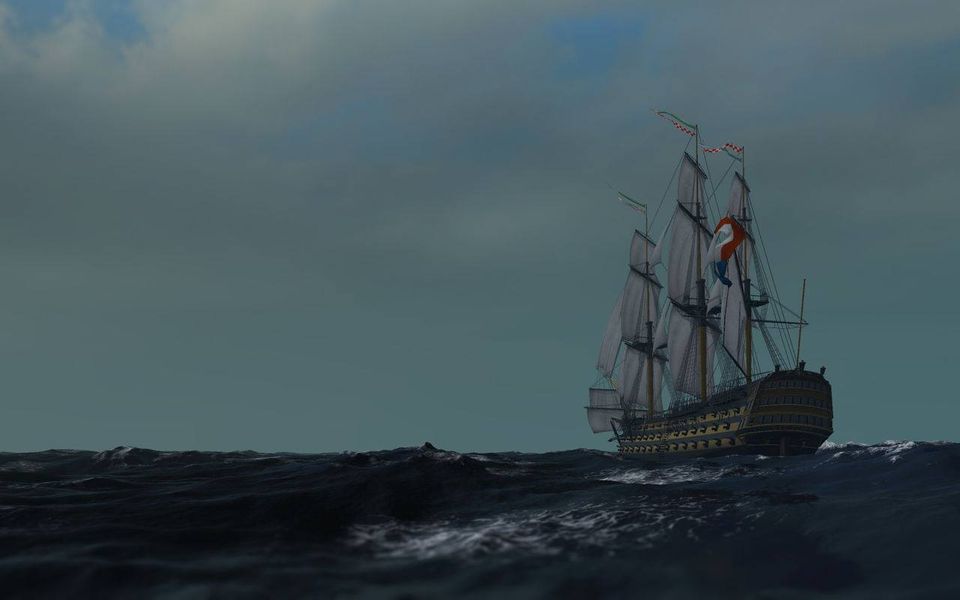
Victory
Congratulations on your promotion to Rear Admiral (presumably!). Once you’ve come so far in Naval Action that you are considering sailing a first-rate ship of the line, you probably don’t need this guide quite as much anymore! Nevertheless, it’s still useful to consider the differences between your two options available at this rank; the Victory and the Santisima Trinidad (below).
The Victory, like the second-rate Pavel, has three dedicated gundecks. Her total gun count is increased mainly as a result of her greater size and the inclusion of a greater number of guns on her weatherdeck, rather than the 4 on the quarterdeck of the Pavel. Packing 53 guns a broadside makes the Victory the second most lethal ship in the game in terms of firepower. They are also very heavy guns; 42, 24 and 12 pounders from lowest gundeck to uppermost. Her weatherdeck carries either 12 pound cannons or 42 pound carronades and like the other large ships, this is the only place she can carry carronades. She carries four bow chasers and two stern chasers.
Obviously, not much more needs to be said about her firepower other than that it is completely enormous. Her damage output per broadside is roughly 25% higher than the Pavel, for instance. This enormous capability for destroying her enemies makes her perfectly suited for her designed role as serving in the line of battle. For this purpose she has also got the highest armour and structure in the game, making her the most difficult target to sink in the game.
All this of course predictably comes at the expense of her speed and maneuverability. Only the awkward Mortar Brig is slower than the Victory only the gigantic Santisima Trinidad (below) is slower at turning. Together with her poor sailing profile, this makes the Victory tremendously difficult to sail satisfactorily. Essentially, she is one of the two obvious choices for best ship for serving in the line of battle, but is very poor at performing any other role. Even more so than the previous ships in the guide, it is vital to sail in a group or squadron of ships, or at least with a more nimble escort that can protect your vulnerable stern, particularly as the Victory has a durability value of 1; sink once and its gone forever. However, if you do manage to wield her successfully in battle, she will tear apart any enemy ship.
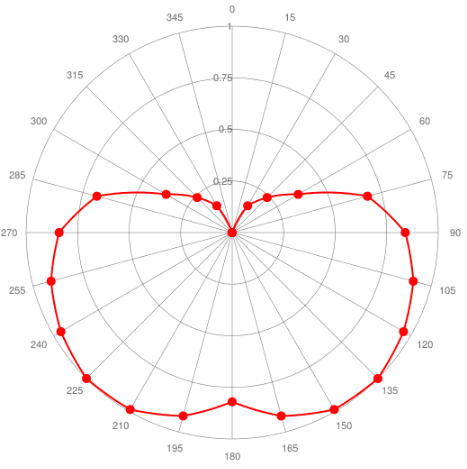
Here is her sailing profile. The wind blows from top to bottom. The numbers on the perimeter are hence degrees relative the wind at which she can sail. The value between 0 and 1 for each point is that fraction of her total speed that she can reach at each point. The Victory is as poor as or worse than the other lineships in every respect. Her already low top speed is negatively augmented by her weak sailing profile. She is comfortable on a bread reach, as all square-rigged ships, but loses speed anywhere else. Unlike the third-rates, she does not perform relatively well on a beam reach. She also loses speed much more rapidly when sailing upwind. Tacking (changing direction through the wind) in the Victory is a major undertaking and in fact performing any form of maneuver takes time, concentration and planning. Again, this is the prime reason that she should never sail without a decently sized squadron or group of escorts.
Santisima Trinidad
The Santisima Trinidad is the leviathan of Naval Action. No other ship is as large or carries as many guns as her. Historically she carried more guns than any other ship of the line and this remains true in Naval Action. The reason for this is that her size and construction permitted filling her weatherdeck entirely with guns to an extent not otherwise done during the age of sail.
So let’s start with her weaponry – she carries 69 guns on each broadside. These guns are equivalent in size to the Victory, and like the Victory she can substitute her weather deck 12 pounders for 42 pound carronades. Carrying more of equally heavy weapons makes her incredibly more powerful than the Victory. Her damage per broadside is roughly 33% higher than the Victory’s. Bear in mind that the Victory is the second most powerful ship in the game – so the Santisima Trinidad outguns everything, and outguns them by far. The size of her guns, just as with the Victory, also permits her to engage at a greater range than many other ships. There is little else to say about her weaponry – it is by far the most powerful in the game and she will destroy any ship foolish enough to engage her broadside-to-broadside. She carries two bow chasers and four stern chasers.
Her structure is only very slightly lower than the Victory and her armour remains equally thick. This means that she will perform equally well in the line of battle, being capable of taking as much enemy fire as even the Victory. Together with the Victory then, she is the strongest lineship in the game. Both her firepower and structure are designed around her role as sailing in the line of battle exchanging fire with the enemy’s line.
However, as with other large lineships, her speed and maneuverability are compromised. This is more true for the Santisima Trinidad than any other ship in the game. She represents the breaking point of the trade-off between strength and firepower on the one hand, and sailing performance on the other. Although her top speed is nominally slightly higher than the Victory’s, her sailing profile reveals that she performs less well on many points of sail compared to the other ships of the line.
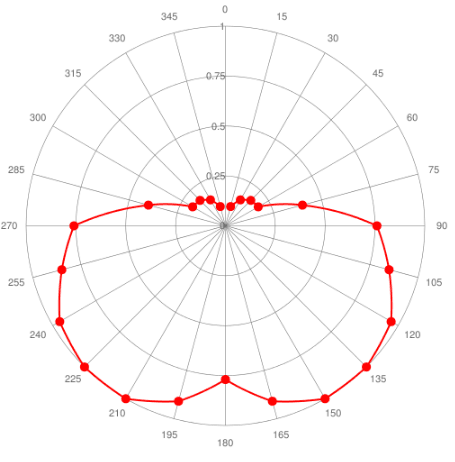
Here is her sailing profile. The wind blows from top to bottom. The numbers around the chart are therefore degrees relative the wind at which she can sail. The value between 0 and 1 is that fraction of her top speed that she can reach at each point of sail. Immediately apparent from her sailing profile is her non-performance anywhere more upwind than a beam reach. She will very quickly slow to very low speeds as soon as she turns anywhere near the wind. More so than the other ships of the line, she will also perform poorly on a beam reach as well as running with the wind directly astern. Together with her low turning rate this makes the Santisima Trinidad the hands-down most difficult vessel to sail.