Table of Contents Show
In this guide, I will talk about the all features of the Portal 2 editor. I am writing this for the purpose that I did not find those same guides that describe all the items in the editor.
Portal 2 Guide to the all in-game level editor features
The guide will have a detailed description, supported by screenshots from the game, but designed for beginners. Therefore, I will only talk about the simplest editing methods.
Introductory part. Navigating the Editor

Of course, it’s easy to enter the editor. Game Start > Community Test Chambers > Create Test Chambers >New Test Chamber.
Just before you start creating masterpieces, you should go through the editor
It is also possible at random, but it is long and often difficult.
Camera position
Let’s start with the camera, it can be moved, rotated, zoomed in / out.
This is very easy to do with the mouse.
To move the camera to another location, hold down the right mouse button (RMB) anywhere on the screen and move in any direction


To rotate the camera, hold the middle mouse button (MMB) anywhere on the screen and move it in any direction. I paying attention to the fact that the rotation depends on the position of the cursor and the direction of the cursor movement.


With zoom in / zoom out, everything is easier, just rotate the mouse wheel.
Forward is an “in”. Back – out
Selection
Now about the shape of the room where there is a puzzle. Before shaping the camera, you must first select an area.
To select a cell of the room, click once on this cell with the left mouse button (LMB).
To select the entire surface, double-click the left mouse button (LMB).

To select several cells, hold down the left mouse button (LMB) and move in any direction of the part that should be selected. I pay your attention to the fact that this selection is distributed in the form of a rectangle.
Also, this method is suitable for selection in a size.

Now the selected area can be extended, for this, at the edge of the selected area, hold down the LMB and move in the direction indicated by the dotted line and only in it. in this way, projections and recesses can be created. As long as you hold LMB, the previous position of the surface will be highlighted with a dotted line.

As for the size.
Here you can see “balls” in two corners, they are needed to increase / decrease the selection area

When moving down, a depression will appear, but with it, the area inside the selection will drop.
Moving to the other side Forward/Back/Left/Right moves the area inside the selection.
When moving up, there is an elevation and rise of the area inside the selection
If the selection is in the air, then will be only movement.
If you press RMB on the selected area. you can see two buttons.
 If flatness:
Pull Surface, Raises the selected surface by 1
Push Surface, Lowers the surface by 1.
 If size:
Fill. Completely fills the selection area.
Void. Completely deletes everything from the selected area
Functionality, Setting, Building.
Oddly enough, this section is dedicated to the little things for a little explanation.
There are three buttons in the top left corner.
File, Edit, Help.
 The File button is needed to configure the editor
New chamber. create a chamber from scratch, on top of a new one, while deleting the current chamber if it is not saved.
Open. Open one of the existing maps in the editor.
Save and save as. saves this map.
Cooperative puzzle. If the checkbox is not checked, then the map is intended for one player; if it is checked, then the map is intended for two players.
Switch to game view. Needed to quickly return to the test mode when exiting the editor.
Rebuild. Builds a chamber once again.
Publish. When you decide to publish your masterpiece, click on this button and follow the instructions.
Exit editor. Needed to exit the game menu.
 The Edit button is needed to change actions.
Undo. Undoes the last action.
Redo. Returns the Undoesed action.
Select all. Selects all map.
 Help button. Request help from Steam resources.
About the buttons at the top center.
Build and play the puzzle. starts to building the puzzle. After the build is complete, it goes into test mode.
The rest of the buttons are described above.
Now the “items” panel on the left. All available editor elements are collected here.
To place Elements on the map, select an object, click LMB. The puzzle element is selected, now we select the place where the object will be placed and press LMB again, if you press RMB, the element will be deleted. If an element needs to be deleted, right-click on the object and click the “delete item” button.
Part 1. Test elements
I will go into detail about each element of the puzzles. If you need it. The information will be detailed about all the elements. To save time, I divided them into their own categories. Some items may be in two categories.
Required elements
There are only three such elements.
Enter door, exit door and large observation room.
These elements are present in every puzzle and cannot be added or deleted.
The exit door is open by default, but it can be closed and now have to activated by the connected activator with it to open.
All these elements taking the space around and behind the wall. It is marked with a dotted line.
Surfaces
The material from which the walls, floor and ceiling of the cell are built.
There are 2 types of surfaces in total.
White and black.
Portals can be placed on white surfaces.
Portals cannot be placed on black surfaces.
To change the surface type, right-click on the selected surface and click “portalable”, if checked, portals can be placed, and vice versa.

Buttons
Puzzle element that serves to activate other elements.
All blue button elements (except the pedestal button) turn orange when they are active.
To connect a button to another object. We press the RMB button and the “connect to …” button and point at the object without forgetting to press the LMB. As a hint, there will be a blue glow indicating compatibility.
To delete a connection, click the “Remove connection” button and select with what.
There are 4 types of buttons in total.
 Pedestal button.
To activate the button, you need to stand in front of the button and press the use key. The default is the letter “E”.
When activated, the timer sound becomes audible. The button can be pressed again at any time, when pressed, the timer starts from the beginning
You can customize the button in the editor.
By default, the button timer is set to 3 seconds.
When you press RMB, we see the settings.
Pressing the up arrow increases the time, pressing the down arrow increases the time.
The maximum possible time is 30 seconds.
Minimum 3 seconds.
If after 3 seconds to lower the time, then it will go to infinity. That is, the button will be pressed once and for all, and it is no longer possible to press such a button again.
Displaying a connect to another element will be noticed with a timer. If time is infinite, then there will be no timer
You can also change the position of the button. If you highlight the button, you can see the slider (Or what is it?), and if you move it with the left mouse button pressed, you can change the direction of the button.
 Weighted button. To activate, stand on the button or place a cube or sphere on it. This button has no function other than on or off.
 Cube button. You can only activate it by placing a cube on it. Functions are similar to the previous one.
 Sphere button. Can only be activated by placing a sphere on it. Functions are similar to the previous one.
Any weighted button can be turned into any other and vice versa, Right click on the button, Button type. And choose the one you want.
Weighted cubes (and sphere)
These puzzle pieces are needed to activate the buttons.
All types of cubes can activate a weighted button and cube button.
In turn, the sphere can activate the sphere button.
To take the cube, you need to stand in front of it and press the use key. To release it, press the use key again.
All blue/pink cube elements will glow orange when placed on a button.
Each type of cube comes with an appropriate dropper.

By default, cubes are accompanied by dropper who give out a new cube if it is destroyed.
We disassemble the dropper
By RMB we see the settings
Cube type. Choice of produced cube.
Auto-drop first cube. If the check mark is checked, the cube will be dropped out immediately. If not, then the cube will be dropped only after pressing the connected button with the dispenser.
Auto-respawn cube. If there is a check mark, then a new cube will be dropped automatically after destroyed. If not, then the cube after destruction will be issued only after pressing the connected button.
Please note that one dropper cannot drop 2 cubes. when dropping a second cube, the first one will be destroyed automatically.
Dropper enabled. If not check mark, then there will be no dropper, only the cube will remain. The same will happen when deleting the selected dropper. If you delete the cube, the dropper also will be deleted.
Now about the cubes themselves. Regular cube. Can be placed on weighted button and cube button.
 Companion Cube. The same regular cube, but with pink elements and a heart in the middle. Can be used as the only cube in the puzzle to take with you. (If anything, this is a trick from Portal 1)
 Sphere (I call it ball). It’s not a cube, but it can be placed on a weighted button and a sphere button. Its peculiarity is that it can roll. (because of this, it is easy to lose it)


Franken cube. This is a cube that can move forward if placed on the bottom face. If you turn it over, it will try to roll over, but to no avail. If the player places it on the button, it will lie motionless. (This cube cannot stand on a button by itself)
 Discouragment redirection cube or reflection cube. Able to change the laser direction.
If you place it in the editor without a dropper, you can choose the direction in which it reflects the laser.
Lasers
The puzzle element is a red beam.
He can pass through glass and portals
Hitting the laser will cause the player to take damage and move back a little. Taking too much laser damage will cause the player to die.
These are elements related to lasers.
More details about each element.
 Laser emitter. Emits a laser beam. it can be moved using the slider. It can also be turned on and off with the button. And choose whether it will be enabled first.
 Laser catcher. It is similar to a button. It is activated when a laser hits it. Can be moved using the slider.

 Laser reley. Another type of laser catcher. Able to pass a laser through itself. Can be moved using the slider.

 Discouragment redirection cube. More details in the previous section.
Fields
These are elements that prohibit passage
When crossing such fields, different things happen.
When placing fields, they are automatically fixed on the opposite side.
The fields are divided into two types. Laser field. The player cannot cross this field. After crossing this field, the player will die. Through this field, you can safely transfer cubes and set up portals.


Material emansipation grill or Fizzler. The player can safely pass through this field. However, this field annihilates (destroys) any cube. Also, portals cannot be placed through this field, when crossing the field, already placed portals will disappear. The same fields at the exit from the chamber
Fields can be turned on and off. And switch to another type.
The feilds can be moved and flipped with the slider and enlarged with the other arrow.
Panels
Auxiliary elements.
Always taking a space in wall or floor.
Although they are not visible, but when activated, they are laid out.
In the editor, they are indicated by a dotted line.
 Steirs. when deployed, it allows you to climb higher.
Flip panel. When actived, the surface type changes from white to black and vice versa.

 Angled and glass panels. Deploy from the wall at a given angle. At the angled panel, you can select surface type. Portals and gels cannot be placed on the glass panel.
On all panels, you can change the direction using the slider. For angled panels, you can choose the angle.
Platforms
Sort of movable panels.
Piston platform. Something like an elevator. When activated, it moves to another preset position. In the editor, this is set by two sliders. The triangle around the initial position of the platform is the position to which the platform will move when activated. If the platform is not connected to anything, it will be activated when the player will stays on it, and deactivated when the player leaves it. The maximum height of the platform is 4. The minimum travel distance is 1.
Track platform. It moves along the rails. The rails can be stretched in four directions using the arrows. If you choose the horizontal/vertical direction, you will only be able to stretch the rails in two directions. The slider changes the direction of the platform. The length of the rail is not limited.
From the settings on the RMB. Reil oscillate. If the check mark is selected, the platform will move back and forth when activated, and stop at the same place when deactivated.
If the check mark is not used, then the platform will stop when it reaches the other side. When deactivated, the platform will return to its original position. Also, from this moment on, the direction of the rail can be only one.
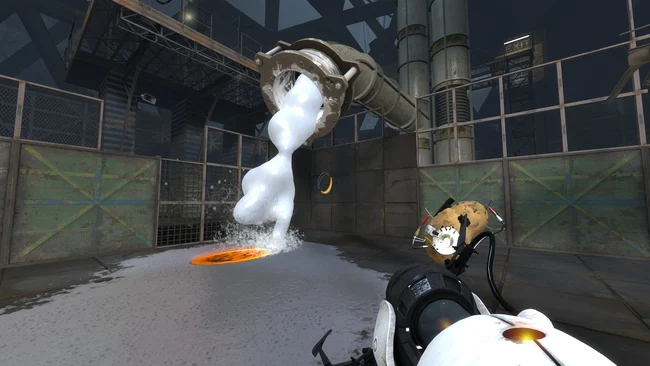
Gels
A liquid substance that coats a surface, changing its physical properties.
Development of properties from the color of the gel.
By default, the dropper is attached to the gels.
We disassemble the dropper 

In the editor, it can be placed not only on the ceiling, but also on the wall. In such cases, you can choose where the gel will drip.
all of this will be highlighted.

The dropper can regulate gel flow. Flow tipes doesn’t have dropper power.
The dropper has a definition of the maximum amount of available gel.
You can choose the gel type. If you turn off the dropper, then there will already be a puddle of this gel on the map.
 Allow streaks. If there is a check mark, then when spraying the gel through the portal from the wall to the floor, you will see that the gel spreads in a strip. If the cheak mark is not, then under the same conditions the gel will remain a puddle and will not flow further
Now about the gels themselves. Repulsion or bounce gel, blue colour gel. Any item will bounce off of it. The player will bounce off this understanding if they jump. The default is “Ctrl”. Cubes smeared with this gel will bounce off anything, literally any surface.
 Propulsion or speed gel, orange colour gel. Makes surfaces slippery. In such cases, objects will slide. A player moving on this surface will accelerate, but it will be difficult for him to fit into turns and brake. Cubes lubricated with this gel will slip, especially seen on those prone to danger.

 Conversion gel. White gel. If a black surface is smeared with such a gel, then portals can be placed on it. Cubes lubricated with such a gel have no properties.
 Water or cleansing gel. Colorless liquid. Washes the surface from other gels. Weighted cubes can be washed with water.
Other elements
Tractor beam
If a player, object or gel notices a funnel action on the field, they will fly on this field. If the funnel is blue, then the direction will be from the field generator, if orange, then to the generator. Beams can go through portals.
When connecting a funnel with a button, you should select a function, change active state, or change polarity.
Hard light bridge
It is a solid object that can be walked on. at the same time, a bridge of light automatically spawns on the opposite side and can pass through portals. It is generated by a special lamp that can be turned off. Portals can be placed through them. In the editor, you can change the direction of the bridge using the slider.
Aerial faith panel
When a player or object is placed on this lane, it will push it to another location as a target. The target can be anywhere except when the panel is on a wall or ceiling. If the target is on the bar itself, it will bounce vertically upwards.


In the editor, you can select the place of the fall and the height of the flight using the round slider.
Dangers
Elements that pose a deadly danger.
Laser Field. More details in the chapter “Fields”.
Deadly goo
Deadly goo. If the player hits it, it kills. The cubes that got into the mucus were destroyed. A minimum depth of 1 is required to place this element. This hazard cannot be eliminated.

Turrets


The funniest and most talkative. The turret stays in place in rest mode and waits. Once the player enters the turret’s line of sight, it will go into shooting mode and begin shooting at them, quickly killing them unless the player moves out of view or destroys the turret.
When the player leaves the turret’s line of sight, it will search for the player, in the searching mode, the turret will immediately begin to shoot when the player returns to the sight. If the turret does not find a player, it will return to rest mode.
The turret can be taken, after which it will panic search for the player and ask to put it. After the player releases the turret, it will go into searching mode.
The turret can be destroyed. It can be turned over, then it will shoot all its ammunition and turn off forever. The turret can be submerged in goo and destroyed by going through the emansipation grill. Can be burned with a laser. Spray with repellent gel. Open a portal under the turret, etc. (Turrets cannot walk)
In the editor, you can rotate the turret as needed. The turret’s sight is marked in red.
Barriers
These are thin barriers.
All types of barriers transmit light.
The player and objects cannot pass through obstacles.
Barriers cannot be broken
Glass. A type of barrier that does not allow anything but a laser to pass through.
Grating. This barrier can pass through portals, lasers, turret bullets, gels, tractor beams, and hard light bridges.
To select the barrier type, take the glass, right-click and select the barrier type. You can also use the sliders to select the direction and size of the obstacle. The expansion of the obstacle extends in a rectangle. Neighboring obstacles of the same type are organically combined, you can create complex structures.
If the turret sees you through the glass, it will aim but not fire.
However, turrets blocked by a light bridge will not pay attention to the player.
Lighting
Only three lighting elements
Needed for room lighting.
Without these elements, the map will be too dark.
The more lighting elements, the more light.
Large observation room. This is a required element. starts lighting up the camera after the player enters the map. can be only one.
Observation room. It is a constant light source on the map. gives a lot of light.
IMPORTANT!!! Observation rooms take up space around and behind the wall. Therefore, you should not place other pieces of the puzzle near the observation rooms.


Light strip. An element that gives off a small amount of light. It can be used in places where it is impossible to place an observation room. Can be placed on floor and ceiling.
One cell can have a maximum of 4 strips. the slider changes direction and position.
Part 2. Connections, testing.
We still need to tell you, how to connect objects and how to change connections. And it is worth talking about the testing mode.
How to make connections
To link an object to another object. We click on the object with the RMB and the “connect to…” button and point to the object without forgetting to press the LMB. As a hint, there will be a blue glow indicating compatibility. However, you can only connect activators with objects.
If the object is inactive and not connected, the editor will let you know.
Once you bind a button or receiver to an object, by default it will become inactive and will be activated when the button is clicked. If the checkbox “Enabled from the beginning” is checked on the object, then when the button is pressed, the object will switch to an inactive state.

You can “remove connections”. The hint will be highlighted in orange.
You can connect several activators to 1 object, then the object will be activated when all activators are activated.
You can connect 1 activator with several objects, then when activated, all objects are activated.
Now about connections visibility. There are only three types. They can be selected using RMB.

Antline. This is the default value. An object link is indicated by a blue dotted outline that glows orange when activated.


Signage. The activator and the object have a symbol. If the symbols match, then the objects are connected.


“None”. The connection is not visible. You can only see the link in the editor as a straight line.

If you want to make two different types of connection.
For example, two types of buttons are associated with an exit door. We select one specific button and select the type of connection. If you select the connection type on the door, then all buttons will change the connection type to the selected one.
You can make any number of such connections. It is important to understand how to do this.
IMPORTANT!!! If there is a connection with the tractor beams, then the button assignment is selected. Change active state or changes polarity. When you connect two buttons to different purposes, they will perform their actions independently of the buttons of the other purpose. If there are multiple buttons for the same assignment, this will happen when all buttons for that assignment are enabled, regardless of the other assignment.
Test Mode
When you think you’re ready to win hearts with your masterpiece, it’s worth checking out the puzzle in action. Test mode is needed to check the validity of the map. If everything matches your idea, you can complete the work.
It is important to find the bugs of your chambers and fix them.
 Probably already forgotten reading all this, You must press the “Build and play puzzle” button at the top of the screen. The chamber building will begin. It’s worth the wait. After loading, you start from the entrance door.
 To exit the test mode, press “Esc” and “exit to editor”.
You can quickly go back by clicking the “switch to game view” button at the top of the screen.
 If you see such an inscription in the lower left corner. So you made changes in the editor and forgot to rebuild the map. (at the lowest change, you need to build the map again)
Press “Esc” and Rebuild to fix it.
When you enter the exit door, the map will start over again.
Also, the test will be restarted when the player dies.
Part 3. Co-op maps
If you want to make chamber for cooperative passage, in the upper left corner, click File and check the “Cooperative puzzle” mark. You can see that the enter door has changed.
 The test mode is also different. You alone control two robots through a split screen.
You can control only one robot at the same time. To switch between robots, you must press “R”. If one robot dies, it will return to the enter door.
The exit door will open if both robots are next to it.
To pass such chambers, you must pass with another player.
Publication
To publish the map in the upper left corner, click the file, publish.
After that camber building will begin. After building, you will be asked the name of the map, write a description, and agree to a workshop agreement. You can choose the publish visibility to community.
After completion, click “publish test chamber”.
After that, your work will appear in the Steam workshop.
Conclusion
This guide is not original. This is a translation of the Russian guide into English, but not perfect, which was performed by this person Matthew. And speсial thanks to you. You can help us improve our translation with useful criticism.
Link to the original guide https://steamcommunity.com/sharedfiles/filedetails/?id=2992539449