Table of Contents Show
Start with just a few workers and a single building in the middle of the wilderness. Explore your surroundings and harvest trees, crops, and minerals, then process them into increasingly valuable goods.
Invest in research to unlock automated machinery and logistics to optimize your transport networks & production chains, eventually discovering magic-powered systems that allow clever players to boost their efficiency to extreme levels.
Beginners Guide: Tips and Tricks
This guide aims to describe all current content.
Basic Tips
Some “ah-ha!” moments for things that are not immediately obvious:
General Stuff
- When viewing a recipe in the build menu, hover the cursor over the icon for the item to be built and you should get a short descriptions (these are not always useful). Hover over the icon at the right side and you will get other useful information, such as sell price and ingredients.
- Plan on making roads that are at least 2 lanes wide, and consider giving buildings an extra space between the door and the road. Carts cannot pass through each other, and will sit at the front (or side) of a building, potentially blocking traffic and causing a mess.
- Read through the tips that pop up at launch. That’s where you can find directions on moving units around, setting your hotbar keys, etc.
- Upgrading your base unlocks recipes, increases the number of inventory slots in the base, and increases the capacity of each inventory slot. (Example – at a level 5 base, you have 5 rows of 4 slots, each of which can hold 600 units.)
- Type “m” to get the move tool. You can use this to pick up a worker & place it wherever you wish. This is especially useful for moving carts all the way across your map, clearing traffic jams, or just getting a worker unstuck between another worker and its only path out of a dead end.
Forestry and Farm buildings
- You can choose which things your farm harvests. If you want to only produce one thing, go in and make sure it is the only “recipe” checked. You will want to de-select the “Auto-manage” box as well. This is useful early in the game when you may wish to output a single type of item onto a chute.
- Although the game will let you plant trees (once you build the box for them) in the area covered by a farm, you will not be able to harvest them. This includes fruit trees, which must be harvested by a “forester” building.
- A forestry building requires red coins to harvest regular trees, but not fruit trees.
- Water and fertilizer only affect the re-growth of crops on farms, not the harvest rate. You can increase the harvest rate by adding workers to your farm. (Click the building, then use the “+” button).
- You can place farms close together and overlap their areas.
Pastures
- Although you can produce Fertilizer using its own recipe at a pasture, don’t bother. It is a by-product of most of the other options and you will have plenty.
- Even if the fertilizer storage is full at a pasture, other items do not stop production. For example, the recipe for wool produces fertilizer as well. You will still generate wool if you’re not using your fertilizer quickly enough.
Issuing Commands to Workers
In order to issue a command to a worker (with the exception of Minecart) first select the worker using LMB.
Once selected, using RMB click+drag from the source to the destination that you want items transferred.
Todo
Describe different command options and how they work.
Chutes
Chutes can be very frustrating, as it is not obvious which items and buildings can use them successfully. They can be set and will work even on flat ground (no slope needed), and you can assign your workers to deposit their loads at the end. Please note that they cannot place items in the middle of the chute!
Because they are inexpensive to build, it is worth even short stretches to save your workers a walk. The farther from a building your resources are, the more beneficial it is to build them. You can use “r” when building a chute to change between straight and corner pieces. Although you can draw an entire line from start to finish, it doesn’t always end up where you want it.

Important note: Your workers will have to GO AROUND any chutes you build at the beginning of the game. You can eventually fix this (somewhat) by using ramps and scaffolding, but that demands resources that are scarce in the early game.
The graphic to the right shows a list of all items that can be used with a chute. (This only shows up if you try to make a worker put something onto a chute that doesn’t work.)
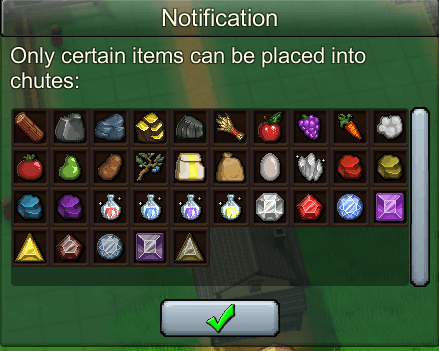
The following materials will flow down a chute, in order from the top left:
Wood, stone, iron ore, gold ore, coal, grain, apples, berries, carrots, cotton, tomato, pear, potato, herbs, flour, animal feed, eggs, mana shards, fire stone, air stone, water stone, earth stone, fire ether, water ether, earth ether, air ether, mana crystal, fire crystal, water crystal, earth crystal, air crystal, depleted fire crystal, depleted water crystal, depleted earth crystal, depleted air crystal.
Use this to your advantage – as soon as you have planks, for instance, you can harvest grain onto a chute & send it directly to your food market until you get a grain mill going.
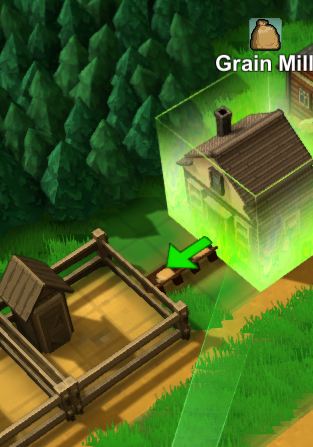
Note that flour and animal feed are the only early-game items that can be produced directly into a chute. This makes it possible to get some early production chains going without extra workers to shuttle materials around. In order to have a building output directly onto a chute (or conveyor belt, later) simply find the green arrow pointing away from the building (visible when you are placing it on the map, or when the building is selected).
Note: Although your workers cannot place items in the middle of a chute (only at the end), this is not the case for conveyor belts.
Material Management
Although a lot of recipes are listed on the official wiki, one thing I have noticed is that I may have a surplus of something (leather, for instance) and I want a quick reference to see how I could use that item. Of course, many things can be shipped directly to the general store or market, etc. & get purchased by your population, but higher-ranked goods sell for more and keep people happy longer.
In addition, some materials will be needed both for building and for recipes. In order to avoid running out of items, you may wish to have 2 or more buildings producing the same thing (especially in the early game). Deliver one to a barn for building only, and allow the other to provide resources for other recipes. For example, you need planks for a lot of things; in order to not run out the next time you want to build chutes or a barn, you could dedicate a forestry / lumber mill / barn setup to collect lumber. Feel free to filter the barn slots so you always have 2 stacks of planks and 2 stacks of stone bricks, or something like that.
Leather
A lot of the workshop leather recipes require cloth, and in the early game you may want to reserve your cloth for making conveyor belts. You can also use it to make books, but not a lot else. Books are more efficient at providing research than paper, so it is probably your best use. (4 paper for 10 knowledge, instead of 4 paper for 4 knowledge)
Fertilizer
It may seem like you have way more than you need, but you can use it to build farm tiles. These allow you to plant additional crops within the boundaries of a farm. You can also use the fertilization tool to directly apply to fields instead of supplying your farm with fertilizer.
Planning out your town
Resources in your way?
For 20 coins, you can remove any resource on the map (even crops planted on farm tiles). It isn’t a good idea to clear very much, but this gives you a way to send items down a chute through a forest, or get rid of a few rocks that are blocking a good place for your kitchen.

Avoid putting buildings too close together
Most buildings have a 3×3 footprint. However, there are disadvantages to putting them right next to each other. The carts you will use for most of your material transport cannot pass each other on a one-lane road. This means if a cart is waiting outside a building, the others have to re-route (sometimes a really long way) to get where they are going. You will need to balance efficiency of space with needing lots of rooms for carts to maneuver. Putting a space between your building and the road, such as seen at the right, is one option. This particular arrangement also allows workers access on all sides. That’s not necessary all the time, but you may find it useful for some buildings. It also allows for a chute or conveyor belt between buildings.

Chutes in your way?
Be thoughtful about when and where you use chutes in the early game, because workers have to go around them. The arrangement shown here was set up to harvest a huge stone quarry quite a distance from my base, but there is no traffic that needs to cross it. I extend the chute by a square or two every once in a while so my workers don’t have to move more than 1 or 2 spaces.

Houses
The only time it’s handy to have houses close to any of your production is at the beginning of the tutorial, when you’re hand-delivering items to every house. As soon as you set up a Food Market, this is no longer necessary. At the beginning of your game, then, long-range planning includes finding an area where you can clump all your houses together with your markets/stores in the center. Leave plenty of room for roads so your carts can deliver items to the stores, and if you can auto-feed the food market with some flour in your early game it helps a lot.
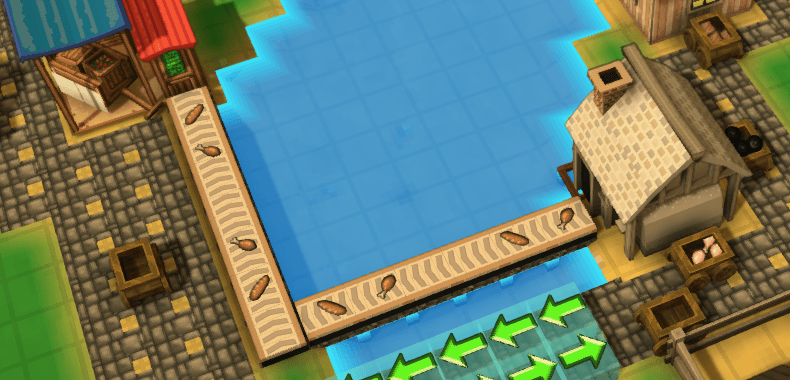
Water
Make good use of the bridges available! In the example shown, I put down bridge blocks and laid conveyor belts over it, but you can also build paths or roads, as shown at the bottom (I included one-way indicators there to try & prevent my carts from going all the way around the lake). In this case, I could make the kitchen directly feed the food market, reducing the congestion and dependency on carts for transport. It also allowed me to place conveyor belts in a place that wouldn’t block the routes the carts were taking.
Happiness
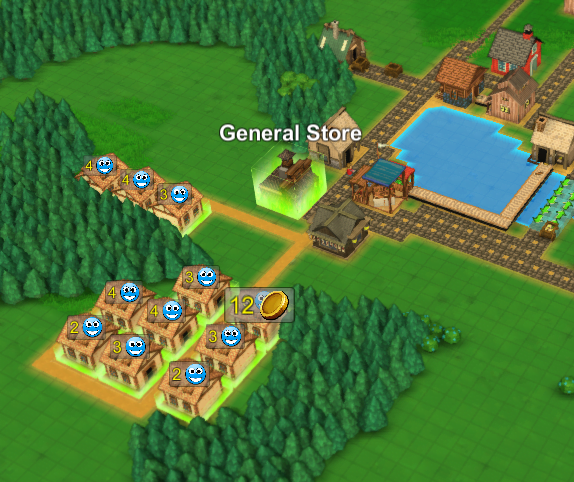
Be cautious when adding houses. Increasing a house’s level adds to the types of things they will buy, but adding a new house increases the number of items you need to provide to keep people happy. Adding a level 1 house increases your population by 2, but leveling a house up by 1 does the same. If you have the resources to increase your housing level, that should be your first step, as long as you have the ability to provide those items to your houses. Level 4 houses can purchase from specialty stores, but if you haven’t built one yet or produced the goods for it, you can’t increase happiness by upgrading your house. You can, however, increase your population without increasing the demands for food, goods, or medicines.

You get one “happy face” for each type of item a house has recently purchased. For example, the level 1 house represented here provides 4 happiness. Increasing the house to level 3 demands no more of the food resources, but can instead provide more happiness by allowing the residents to purchase items from the general store (row 2) and the apothecary (row 3). This allows you to earn more happiness without having to increase your food production. The second house is providing 6 happiness.

Although it is mentioned during the tutorial, it is worth noting that higher-level products provide happiness for longer than low-level. The bars underneath each item indicate to the player which items have been purchased, and as the bar decreases, how long it will be until that house needs to purchase a new item in that category to maintain happiness.
Lastly – the higher your Factory Town happiness level, the better the production boost to all your buildings!
Earning gold
You earn gold by selling goods to houses. There are many ways to deliver goods to houses for the workers to sell for gold and thus increase happiness. In the early game you can deliver goods directly to your houses.
As soon as you got a market, everything you send to it will get soaked up by the surounding houses within range of the market.
Goods value vs cost
| Item | Gold cost | Fuel cost | Sell price | Profit | Profit/Cost |
| Tier 1 | |||||
| Grain | 1 | – | 1 | 0 | – |
| Flour | 3 | 0 | 5 | 2 | 0.67 |
| Bread | 6 | 1 | 20 | 14 | 2.33 |
| Tier 2 | |||||
| Stone | 2 | – | 2 | 0 | – |
| Plank | 2 | – | 3 | 1 | 0.5 |
| Stone Brick | 8 | – | 10 | 2 | 0.25 |
| Iron Plate | 4 | 2 | 12 | 8 | 2 |
| Tier 3 | |||||
| Cloth | 4 | – | 10 | 6 | 1.5 |
| Outfits | 16 | 2 | 25 | 9 | 0.56 |
| Tier 4 | |||||
| Herb | 2 | – | 2 | 0 | – |
| Remedy | 5 | – | 8 | 3 | 1 |
| Health potion | 10 | 1 | 12 | 2 | 0.2 |
| Elixir | 22 | 9 | 30 | 8 | 0.36 |
| Tier 5 | |||||
| Enchanted book | 28 | 8 | 50 | 22 | 0.78 |
| Ward | 16 | 9 | 25 | 9 | 0.56 |
| Omnistone | 48 | 32 | 50 | 2 | 0.04 |
Keyboard Shortcuts
- Build menu – B
- Bulldozer/Remove tool – X
- Remove Resource Tool – B + T + R
- Flatten Terrain Tool – B + T + F
- Raise/Lower Terrain Tool – B + T + B
- Scaffold Block – B + B + B
- Scaffold Ramp – B + B + R
- Farm tile – B + B + F
- Chute – B + A + C
- Cloth conveyor – B + A + T
- Metal conveyor – B + A + B
- Magic conveyor – B + A + M
- Food Path – B + A + F
- Road – B + A + D
- Rail – B + A + R
- Farm – B + D + F
- Grain Mill – B + D + G
- House – B + D + E
- Silo – B + D + S
- Barn – B + D + B
- Lumber Mill – B + D + L
- Market – B + D + M
- Pasture – B + D + A
- Forge – B + D + R
- Stone Mason – B + D + T
- Workshop – B + D + W
Admin console
To enter the console press backslash or tilde or ö. depending on you keyboard layout.
Enter the admin mode:
admin
Leaves the admin mode
admin off
Adding or removing items
a ITEMNAME NUMBER – Adds a resource or item to the currently selected inventory.
r ITEMNAME NUMBER – Removes a resource or item to the currently selected inventory.
This unlocks all buildings. Building is free, and you can add and remove resources to buildings.
Add resource to a building:
a Wood 10
Remove resource from a building:
r Wood 10
Possible values for ITEMNAME (case sensitive)
| Value | Result |
|---|---|
| Basic Resources | |
| Gold | Gold Coin |
| RedCoin | Red Coin |
| BlueCoin | Blue Coin |
| PurpleCoin | Purple Coin |
| Grain | Grain |
| Herb | Herb |
| Wood | Wood |
| Stone | Stone |
| IronOre | Iron Ore |
| Coal | Coal |
| Water | Water |
| Processed Resources | |
| Flour | Flour |
| Bread | Bread |
| Remedy | Remedy |
| HealthPotion | Health Potion |
| Elixer | Elixier |
| AnimalFeed | Animal Feed |
| Wool | Wool |
| Leather | Leather |
| Fertilizer | Fertilizer |
| Cloth | Cloth |
| Outfit | Outfit |
| Plank | Plank |
| StoneSlab | Stone Brick |
| IronPlate | Iron Plate |
| ReinforcedPlank | Reinforced Plank |
| EnchantedIronPlate | Enchanted Iron |
| WoodWheel | Wood Wheel |
| IronWheel | Iron Wheel |
| Gear | Gear |
| RailTile | Rail |
| RailTileMagic | Magic Rail Tile |
| SteamPipe | Steam Pipe |
| ManaPipe | Mana Pipe |
| ConveyorBeltCloth | Cloth Conveyor Belt |
| ConveyorBelt | Metal Conveyor Belt |
| ConveyorBeltMagic | Magic Conveyor Belt |
| Mana | |
| Mana | Mana |
| GemRed | Fire Stone |
| GemYellow | Air Stone |
| GemAqua | Water Stone |
| GemPurple | Earth Stone |
| FireShard | Fire Shard |
| AirShard | Air Shard |
| WaterShard | Water Shard |
| EarthShard | Earth Shard |
| PurifiedMana | Mana Crystal |
| PurifiedFire | Fire Crystal |
| PurifiedAir | Air Crystal |
| PurifiedWater | Water Crystal |
| PurifiedEarth | Earth Crystal |
Credits:
Excellent guide. It only needs a bit of info on the types of colored coins and how to obtain them, gold and red are pretty obvious, after that I’m lost.