
Return to the Jail
Other Resident Evil 2 Guides:
- Resident Evil 2 – Leon’s Desk / Safe Codes and Lockers
- Resident Evil 2 – How to Unlock Secret Tofu Character
- Resident Evil 2 – Controls for PC/PS4/Xbox One
- Resident Evil 2 – Goddess Statue Puzzle Solutions
- Resident Evil 2 – Prison Switchboard Puzzle Solutions
- Resident Evil 2 – The King and Queen Electronic Parts Puzzle Solutions
- Resident Evil 2 – Chess Electronic Parts Puzzle Solutions
- Resident Evil 2 – Achievement Guide
Important: By this point, you should be ready to leave the Police Department. Your map should look pretty blue at this point, and only exclude the rooms locked by the Heart Key, which is not available in this story.
Now that you have both Power Panel Parts, it’s time to make the trek down to the Jail in the Parking Garage. Depending on if you’re currently being chased, and how well you cleared out the East Hall, there’s a couple of routes you can take. Heading back down the Library and to the first floor of the Main Hall is a fairly standard route if Mr. X isn’t trying to kill you, and you can stop at the Item Box along the way.
However, if you didn’t kill many of the zombies in the East Hall or barricade the windows, trying to get through the narrow corridors may prove challenging. You can bypass half of them by moving from the Clock Tower to the East Storage Room and onto the Roof by dropping down where the ladder broke. It’s rarely patrolled by Mr. X so it’s also a great way to sneak down without being spotted. From the Roof, head down the hall and take the Fire Exit to the East Hall, and dodge past any remaining zombies on the way to the Break Room.
Be sure to save at the Break Room, and put both of the Power Panel Parts in your inventory and ditch any other key items you haven’t been using – and you might want to keep that Magnum handy too. If there were zombies outside the Break Room, you can manipulate them into wandering away by running in and out of the safe room until they look the other way, then slowly walk by their turned backs.
Back down in the basement, remember that 3 zombie dogs have taken up residence in the Parking Garage. Instead of getting overwhelmed, you can take things slowly by peeking out from the doorway and sniping them with a few pistol shots, then retreating behind the door to repeat the process until all of them are dead.
Entering the Jail, head to where you left the dead body of Ben, and interact with the electronic panel on the wall. Place the two Power Panel Parts in it, then you’ll have to solve a little wire puzzle.
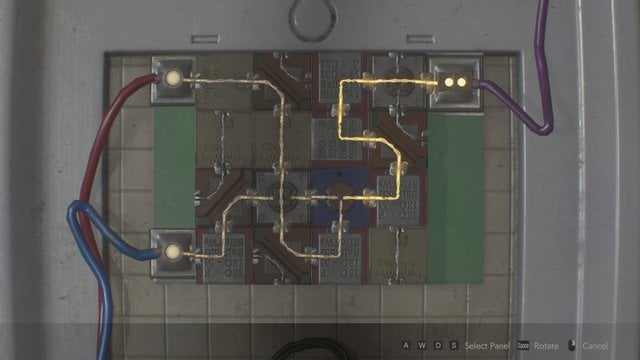
You want to connect two wires that start on the left side, and feed them into the output in the top right by rotating individual panel parts. The most important thing to note is that you need to combine the two inputs into a single wire so it can feed into the output – which only the blue T-shaped panel part can do. Angle the top input right then down into a U, while angling the bottom input up and right, and combine them by rotating the blue panel to that it forms a T, catching both inputs on the left and bottom, and outputting right. Then you can feed it up to the left and then right across to the output. See the image for a completed solution.
With the power panel active, the gate will finally open. You can check for Ben’s Memo File to finally get a name for your pursuer. You should also check behind the toilet to grab a First Aid Spray. Finally, check Ben’s body to obtain an Interview Transcript File and the Parking Garage Key Card. Seems the Umbrella corporation might be hiding something under the city.