Table of Contents Show
Wall World Achievement Guide 100%
Most 100% achievement guides will provide a list of all achievements with a short description how to get it, while that is great for most achievements, some achievements need more detail that other guides just do not provide.
Basic Achievements
These are achievements you will get while playing the game to finish, I would say these are unmissable unless you are trying to avoid them. As such, these do not require much information besides the description.
 Meet in the Middle
Navigate up or down and pass your first cloud barrier to spawn a wave of enemies.
 What Kind of Day Has It Been
Get defeated
 A Hard Way to Go
Pick up a key, found at the end of a mine, dig as far back to the right as you can, and mine upwards. then downwards.
 Long Time Coming
Pick up all 5 keys, I managed to get 6 somehow
 All the Bells Say
Collect three relics. Randomly generated in a mine, just mine out blocks till you find them, hard to miss this achievement.
 Get Some Then
Kill 500 enemies. Shoot them down.
 Endure and Survive
Survive for 20 minutes (First boss spawn)
 The Day the World Went Away
“Finish” the game by activating the core at the top of the world after collecting 5 keys.
 House of Enlightenment
Enter three rooms. There are a few types of rooms you can find while mining, there tend to be different and unique ones for Circuit boards (Free upgrades), Crypto Keys, Blueprints, and more. There are not doors despite the Achievement Icon. You will get this while playing.
Special Achievements
These achievements have a special requirement that makes them technically possible to miss, even so most of these should come with game play so long as you are entering each mine you pass.
 One Way Out
reach the bottom of the wall, you will see Pyramids in the background which means you are getting close.
 Stranger in a Strange Land
Find a special spot. Some mines will have 1 small room with some free resources and a dialog box. There is one rare one that has a PC gamer playing on his PC, just enter every mine you find, this should pop with normal play.
 Three Slaps
Build all 3 available structures. Unlock these structures with Relics from the mines and build 1 on any mine that does not already have a building on it. The three buildings are: Turret, Resource Harvester, Spider bot Repair Building
These are all automated and require no manual collection after placing, Resources teleport into your inventory, repairs are done remotely.
Note: Users report getting it after building any 3 buildings, and not one of each type. This may be a bug as I did not unlock it by placing three turrets.
Farming Achievements
There are 2 achievements that you would really need to farm for over multiple runs. and possibly after finishing the game.
 Force of Evil
Collect each weapon at least once, can be done across multiple runs. Read the bigger description below for more info.
 The Hope That Kills You
Purchase every upgrade. Read the bigger description below for more info.
Force of Evil
Use Every Weapon.
- Shotgun
- Bomb Launcher
- Stake Gun
- Cluster Bomb Launcher
- Rail gun
- Laser Machine Gun
- Singularity Gun
This one is rather simple. Start a run and visit every mine that has an anomaly, if you find a relic in a mine that only has 1 anomaly, leave the mine and move on.
You do NOT need to get every gun in the same run.
This achievement is clearly a bit buggy and the description unclear, the description says “use”, however I got the achievement when I collected a weapon.
Regardless, to ensure the game marks you as “using” a weapon you should get at least one kill with each weapon. As I mentioned, I actually got the achievement when collecting the Grenade launcher in my 20th run, so just picking it up should be fine. However, I had used it many times before I got the achievement. Realistically this one will be gotten with normal game play, but if you have a play style where you would ignore the end rooms later into a run (Which I was doing by my 20th round) you could easily miss this one.
The Hope That Kills You
Buy all upgrades
This was the last achievement I got, it requires you to purchase all upgrades from the main upgrades page, and all upgrades from the Blueprints/Secondary upgrades page. You will be required to collect a blueprint for each level of each secondary tool upgrade.
Since this guide was created, the game has been updated and blueprints are more common and easier to collect. You should be able to get at least 1 per run, however I believe it is still possible to not have one spawn.
Farming Blueprints quick tips
- Blueprints can spawn anywhere, but seem to have a higher chance to spawn in the last Biome either up or down (Unconfirmed)
- The blueprints in the last Biome will typically be in a large cavern at the very end of the mine much like when you find a weapon
- There tend to be only 2 mines in the last areas and both will be quite large
How I farmed the last few Blueprints
It took me 6 runs to get the last 4 blueprints after finishing the game. 2 of those runs had no blueprints, but as mentioned this was done before they were made more common.
it is recommended you farm mining efficiency in the first biome to mine the blocks later faster, once you get the permanent Torpedo Drilling unit, Seismic Generator, and Plasma drill spider bot upgrades to higher levels the first few mines will be super easy and fast to clear allowing you to get the first 3-4 efficiency upgrades in just 4-5 minutes. From there I would collect any weapons I could until I got the Laser Machine Gun, Rail Gun, or Stake Launcher which would allow me to easily take out any waves that spawned due to the piercing they had, since I was rushing the clouds I would get 1 “Hard” wave which was easy to take out with no upgrades on the weapons because of said piercing. The waves that spawn over time should be super easy and weak as those scale only with time.
If I was lucky enough to get the Drone or Turret relics, I would upgrade it as much as I could, and rush to the top or bottom of the wall, plop one down to take out the wave of enemies while I would collect a blueprint. (Or if the game wanted to disappoint me I would get a Circuit Board)
Max Upgrades
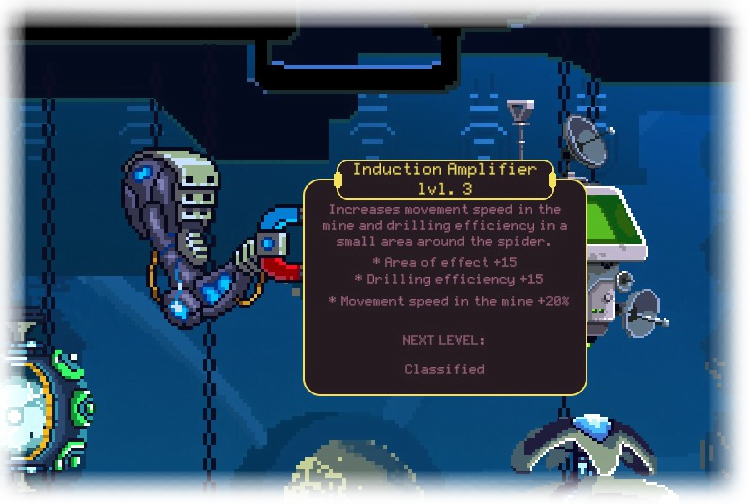
Most of the upgrades from both the main page, and the blueprints page have a maximum level of 4 except for 3 upgrades. If you are missing a blueprint to purchase the next upgrade, you can easily tell as when hovering over the upgrade as it will tell you “Next level: classified” As seen in the picture below.
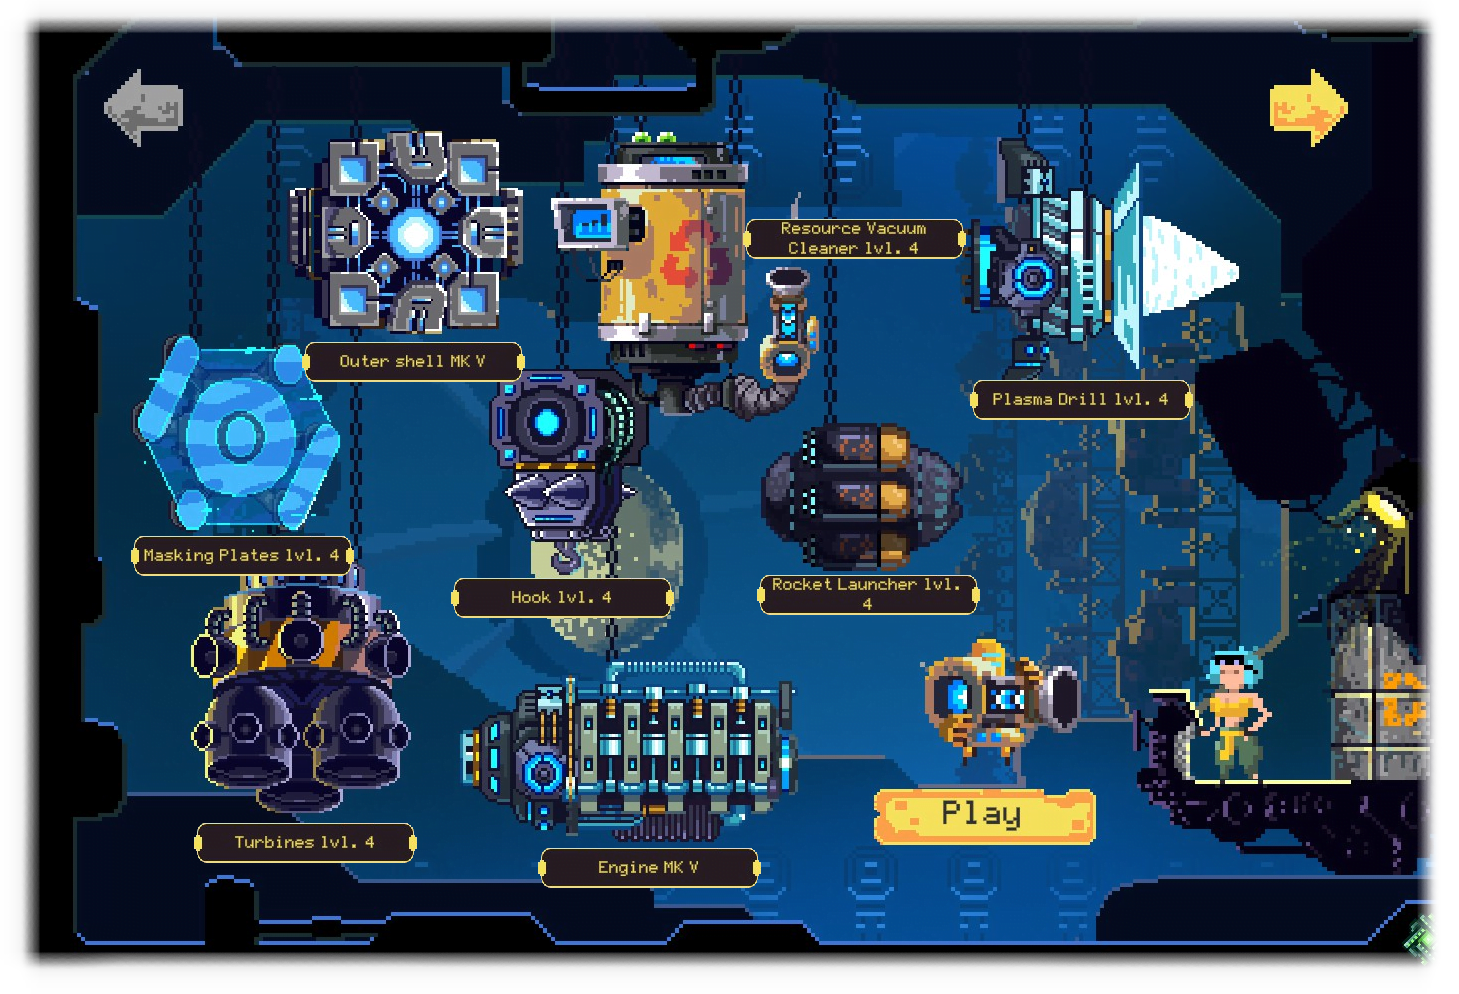
Main Page:
Click the image to enlarge it
| Upgrade | Max level |
| Outer Shell | 5 |
| Resources Vacuum | 4 |
| Plasma Drill | 4 |
| Masking Plates | 4 |
| Hook | 4 |
| Rocket Launcher | 4 |
| Turbines | 4 |
| Engine | 5 |
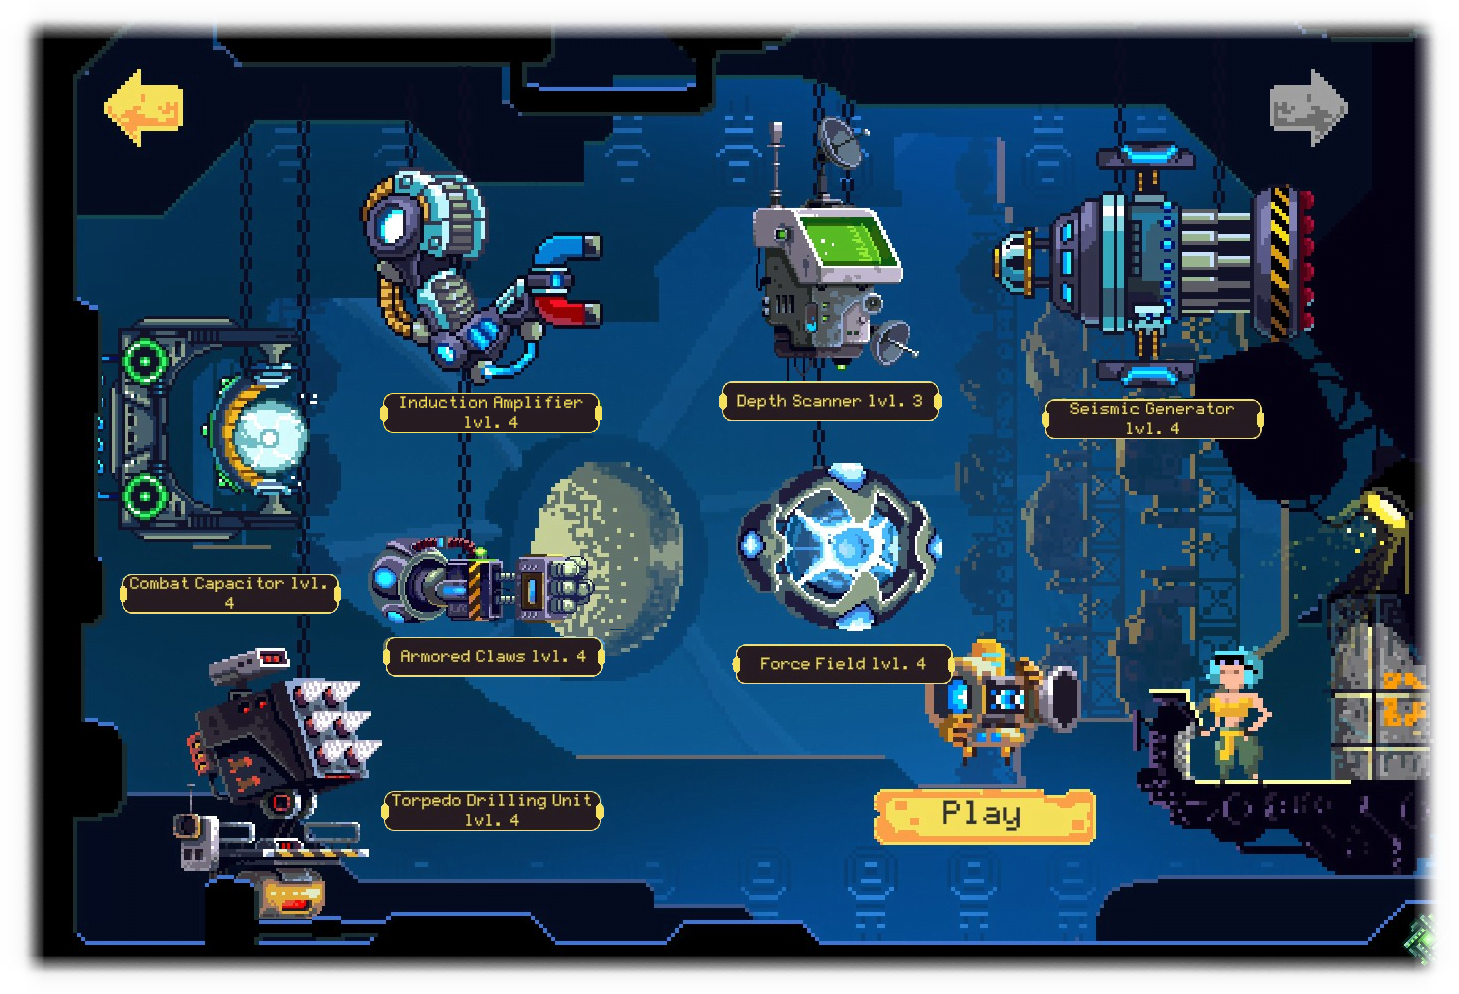
Blueprints:
Click the image to enlarge it
| Upgrade | Max level |
| Induction Amplifier | 4 |
| Depth Scanner | 3 |
| Seismic Generator | 4 |
| Combat Capacitor | 4 |
| Armored Claws | 4 |
| Force Field | 4 |
| Torpedo Drilling Unit | 4 |
Ending Remarks
Overall, this game should not take longer than 15 hours to 100%.
Most people tend to beat it around the 12 hour mark. It took me 19 hours to 100% and come up with the the contents of this guide. I left the game open by accident for another 8 hours. This game is well worth the $5 spent to purchase it at full price!
If you have any suggestions or think something needs to be changed, I would love to hear about it in the comments!


