
Table of Contents Show
This guide will help to explain the basics of integrated circuits, including what you need, the interfaces and programming.
Kit (IC Housing), Integrated Circuit (IC10) & Motherboard (IC Editor)
To do most things with integrated circuits you will need both a Kit (IC Housing), an Integrated Circuit (IC10) and a Computer with the Motherboard (IC Editor) inside it. All of these can be made in the Electronics Printer or the Fabricator. The purpose and usage of these things will be explained below.
Kit (IC Housing)
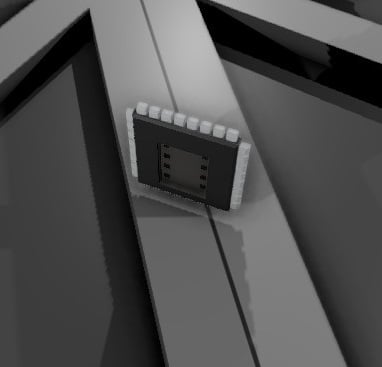
The Housing is the interface between the devices connected to your network and the script which is running on your IC. It has 6 Screws labelled 0 through 5 that can each be connected to a different device, the IC can both read and write to the devices that are connected.
The Housing requires power from the top and data from the bottom. It is possible to connect different networks to the power and data sides, but be aware that The IC can only interact with devices on the data side. A script can be written to or read from the IC from either side however ( It’s a good idea to use the data side as this may change in the future).
Integrated Circuit (IC10)

The Integrated Circuit or IC is the brains of the operation, it holds and runs the script that you have written (or downloaded). IC’s can currently only be used in two places, inside a housing or inside the hardsuit (not covered in this guide).
Motherboard (IC Editor)
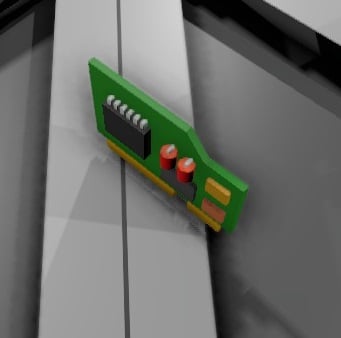
The IC Editor Motherboard is required to do any programming of the IC. The Motherboard should be inserted into a computer, with the computer connected to the same network as the Housing.
Computer Interface
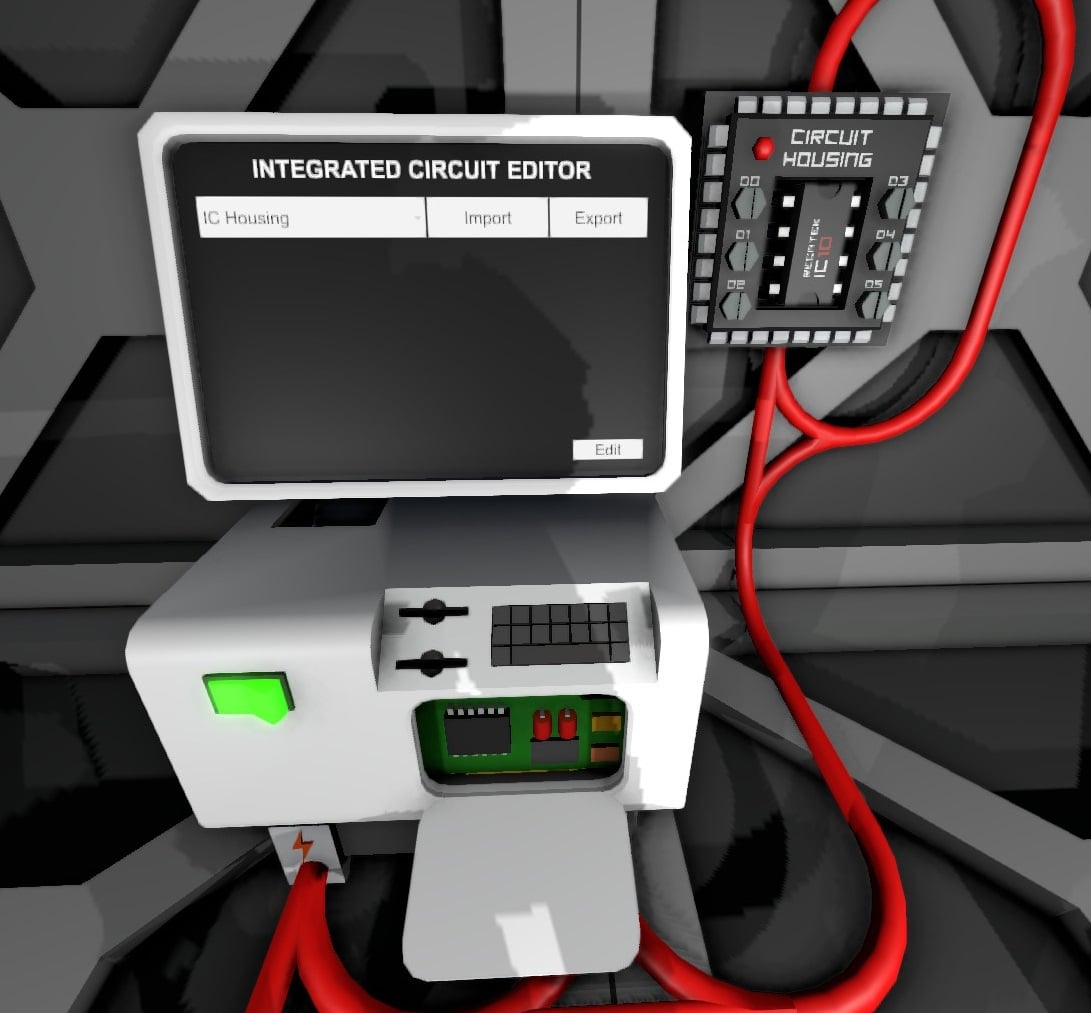
Once you are set up and ready to begin programming your IC you should have something like the image above. The computer interface is fairly simple, The top left is a dropdown list of all the Housings connected to the computer, you can select whichever one you wish to interact with here.
The Import button will pull the script currently on the IC in the selected housing into the editor, the Export button will write whatever script is in the editor onto the IC in the selected housing.
The Edit button will open up the script editing UI.
The Script Editing UI
This section will cover the script editing UI and writing scripts.
The UI
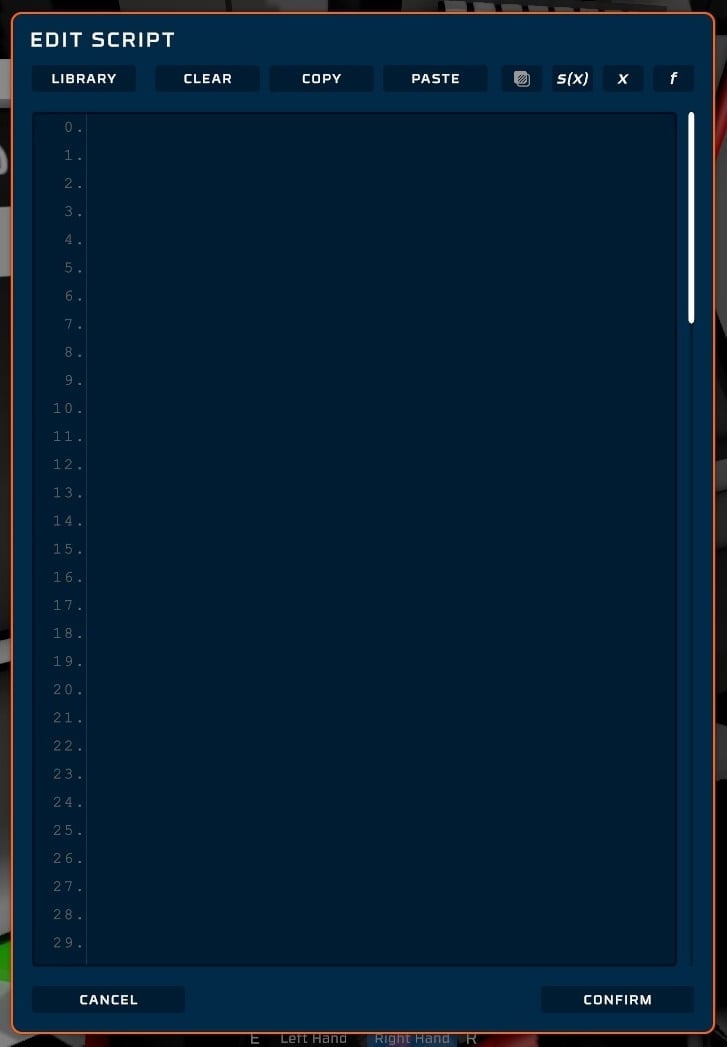
The Library button will open a window allowing you to save and load scripts you have written along with loading scripts you have subscribed to on the workshop. You can also publish a script you have written to the workshop so others can use it. Scripts saved to your library will be available in any save.
The Clear button will clear all of your script, as you might expect.
The Copy and Paste buttons will copy or paste your entire script, Using Ctrl+C and Ctrl+V will copy and paste selected areas as expected.
The next button is the transparency button, allowing you to toggle the transparency of the Script editing window. Unless you are trying to monitor something behind the UI I’d suggest using the non-transparent setting.
The s(x) x and f buttons will open the help windows for different sections of code, Slot variables, Device variables and Functions respectively.
The Confirm button will close the script editing window and save the current script to the computer, where it can be exported to an IC or edited again.
The Cancel button will close the script editing UI without saving the script.
Programming
This section will cover the main operations that an IC can carry out. Most of this is explained in the help sections (s(x), x & f) in the script editor UI, but should be more condensed here.
Basics
The language used by IC’s in Stationeers is based on MIPS, however you don’t need to know anything about that to create scripts in game.
The IC can utilise 16 registers and can be connected to up to 6 devices. Registers can be thought of as boxes in which a number is stored, for use later on. ‘Variable(s)’ is used specifically to refer to Device or Slot Variables (which are a property of a connected device), not registers (which are internal to the IC). The IC also has a ‘stack’ however that is not covered in this guide.
Registers are called r0 through r15, and will be referred to as r? in this guide. Similarly devices are called d0 through d5, referred to as d?. You can also read from and write to the housing itself using db. Numbers can sometimes be used in place of a register as the input to an instruction, I would suggest looking at the functions in the script editor’s help sections to decide whether you have to use a register or can choose between a number and a register.
The main types of instructions that the script can run are as follows:
Naming
- alias str d?/r?
- alias Sensor d0
alias NumberOfFish r3
This function will allow you to label devices and registers, once aliased you can refer to the device or register by the new name (str) that you have given it. When aliasing a device the screw in the housing will also be named allowing easier connection of devices.
- define str num
- define Kelvin 273.15
Define can be used if you wish to specify a number by using a word (currently str is red but still works)
Reading
- l r? d? var
The l, ls & lr functions will load a variable from a device and store it in a register. Device variables have to be loaded into a register before you can use them elsewhere in your script. For example; to read the temperature in a room you could do this:
- alias roomTemp r0
alias gasSensor d0
l roomTemp gasSensor Temperature
Note that in order to do this you would have had to use the alias instruction to rename the device and register before the load instruction. Which variable can be read/written can be found by looking at the device in the Stationpedia (F1) and also the s(x) & x help sections (slot variables and device variables respectively)
The ls & lr instruction function is a similar way but will read the contents of a slot or the reagents of a machine. You can use the Stationpedia (F1) to find which slots, reagents etc.
Writing
- s d? var r?
The s function will save a value to a specific variable on a device, for example; to turn an LED off:
- alias LED d2
s LED On 0
As with Reading, I would suggest using the Stationpedia (F1) or the s(x) & x help sections to find variables.
Math and Logic
- mul r? r? r?
- add Output 1 1 [Output will equal 2]
mul r6 2 r5 [multiplies r5 by 2, and stores it in r6]
This section covers a large group of instructions, however they are mostly all formatted in the same way, so one you understand one of them you should understand them all. The instructions consist of an output register (the leftmost register) and an amount of input registers. Some have no input such as rand and some have multiple such as max or nor.
Also included here would be set instruction, these allow setting a register to 1/0 upon certain conditions related to their inputs.
- slt r? r? r?
- sgt r2 r2 50 [if r2 is greater than 50, r2 is set to 1, otherwise r2 is set to 0]
Select can be a powerful command if used correctly, but it looks rather confusing at first.
- select r? r? r? r?
- select Output Switch InputB InputC
If ‘Switch’ is 1 then ‘Output’ will be equal to ‘InputB’, if ‘Switch’ is 0 then ‘Output’ will be equal to ‘InputC’.
Jumping
- j r?
- j 12 [jumps to line 12]
This instruction and related (jal, jr) allow the execution of the script to jump to a different line, the line can either be defined as it’s number or by the use of line labels. Line labels are a word followed by a colon (:) for example:
- Start:
j Start
Branching
- beq r? r? r?
This section also covers a large amount of instructions, and I would suggest looking through the in game help sections to determine what each individual one does.
Branching is an important part of most scripts since it allows execution of part of a script only when certain things happen. For example; to jump down two lines if apples is zero
- breqz apples 2
[this line is executed if apples does not equal zero]
[this line is executed either way]
This instruction would be used to skip a section of code if apples was zero, if apples is not zero the script will continue to the line below the branch instruction as if the instruction was not there. Branch instructions can also jump to line labels, as shown below:
- beq r1 39 Label
[code that is executed only if r1 does not equal 39]
Label:
Others
- yield
#Comments
The yield instruction will pause execution of the script until the next game tick (0.5s), this is important since other devices will not update until the next tick so using yield will improve the efficiency of your code. Since the IC can only carry out 128 instructions per tick it is normally a good idea to ensure that you are starting each tick in the same place.
# can be used to place comments in your code, to help you and anyone else who looks at it.
An Example
This section contains a simple example that shows what an IC can do.
- #Label device screws
alias Battery d0
alias LED d1
alias Display d2
#Label registers
alias BattPercent r0
alias BattLow r1
#Define constants
define WarningPercent 0.2
#Set Display to % Mode
s Display Mode 1
#Code to loop each tick
Start:
yield #Yield here to save space
#Read battery percentage
l BattPercent Battery Ratio
#Write to display
s Display Setting BattPercent
#Set 1 if battery lower than 0.2
slt BattLow BattPercent WarningPercent
#If battery not low jump, if low execute code
beqz BattLow Here
#Turn LED On
s LED On 1
#Jump to Start:
j Start
Here:
#Turn LED Off
s LED On 0
#Jump to Start:
j Start
This code is set up to read how charged a battery is and then display that on an LED Display, the code also utilises branching to turn an LED on if the percentage is less than 0.2, and turn it back off if it’s greater than 0.2
Without comments, or use of aliasing or jump labeling you can see how much can be done in a short space, but also how unintelligible it can be (please comment your code for the sake of your and others sanity):
- s d2 Mode 1
yield
l r0 d0 Ratio
s d2 Setting r0
slt r1 r0 0.2
beqz r1 8
s d1 On 1
j 1
s d1 On 0
j 1
I hope this has been helpful.
is it possabe to program streat to a batch reader or writer
Thank you, especially for the clear explanations each step, and then adding the steps together. This helped me make my first IC program, reducing 20 logic boards down to 2 IC10s.