Table of Contents Show
FOUNDRY: Optimized Layouts
This guide is published same day as EA launch because I had access to a preview build. I believe the maths hasn’t changed going into EA but if there’s stuff off, my apologies. I’ll probably be maintaining the guide for a bit and/or adding the more endgame stuff to it as I figure out how to neatly wrangle them.
Initial Research Bootstrap
I personally feel that 8/m science is the sweet spot for progressing fast through the game, as any more than that and you end up spending time building a ton of infrastructure for the next science pack while your research labs sit idle because you’ve researched everything from the previous tier, while less than 8/m and you end up waiting for research to finish.
Here’s a quick and dirty layout that’ll get the run through SP2 research supplying only plates and rods.
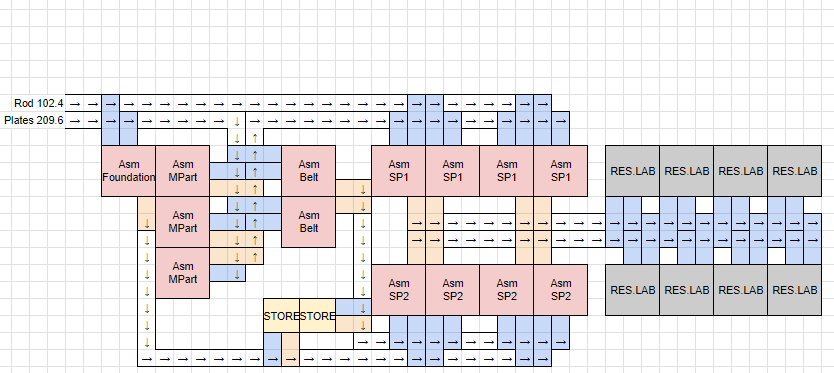
The SP1 portion of it can be built with a couple Machine Part assemblers feeding into the SP1 assemblers, but still it relies on unlocking 2nd lane loader early, so make that a priority. Likewise, the setup technically needs Conveyor 2 to feed plates fast enough for the full 8min/sec but this can be temporarily alleviated by having a 2nd Xenoferrite Plate belt feed the machine part assemblers while the first feeds the Foundation assembler. Upgrade the plates belt to tier 2 ASAP, the rest is fine being left as Conveyor 1 for a while.
You’ll also want to leave enough space above this setup, because it very conveniently segues into:
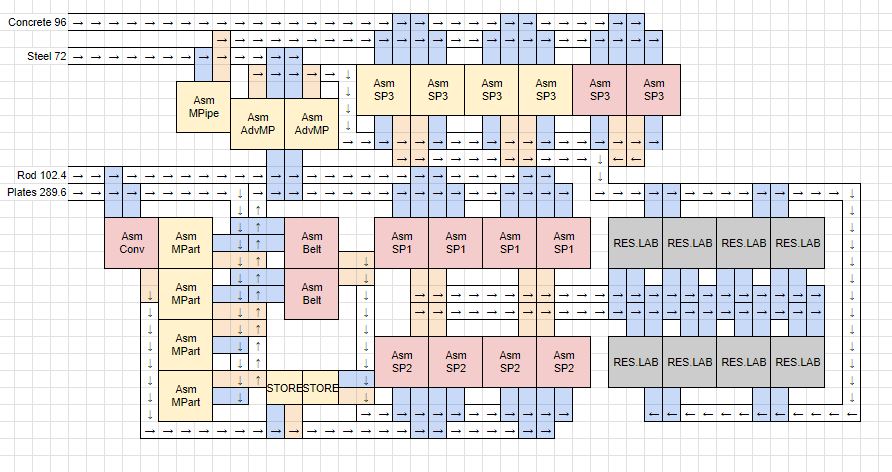
The upgraded setup is still relatively simple because it only requires adding a Steel and Concrete belt and it handles all the interim products within the layout itself to get through all SP3 research.
(references for mass producing Steel and Concrete are also part of this guide, look up the relevant sections)
This layout technically can be expanded to also add SP4, but usually by this time I’ve moved from the bootstrap to a more permanent, scale-able build that’ll allow going past 8/m. For what it’s worth, SP4 needs components that pretty much are made separately because they’re also used in a bunch of other things, so feeding a similar 4x Assembler 2 + 2x Assembler 1 setup as the SP3 row with those (circuits, cells, firmarlite bars) and then routing that back counter clockwise around the research labs will work.
God help you if you’re attempting to add SP5 to this lol, but it’s doable- first by upgrading the row of SP3/4 assemblers to 4x Assembler III (2x speed) to make room directly above the research labs so a 3rd outer belt can fit.
Effectively Mining Ore Patches with Drone Miners
Drone Miners in my experience tend to sit at 65-45/min output, depending on how far the drones have to travel to the ore, and this gradually depletes the ore voxels closest to the miners. Below 40/min the dropoff is so rapid that you’ll already be shifting the miners soon anyway, so it’s safe to assume 40/min is the practical bottom end of what a Drone Miner will output.
Therefore, it’s safe to assume that you’ll need 3-4 Drone Miners per Mk1 belt (160/min), and 6-8 per Mk2 belt (320/min), Or conversely with Mk2 Drone Miners which are exactly twice as fast, 3-4 per Mk2 belt and 6-8 per Mk3 belt (640/min).
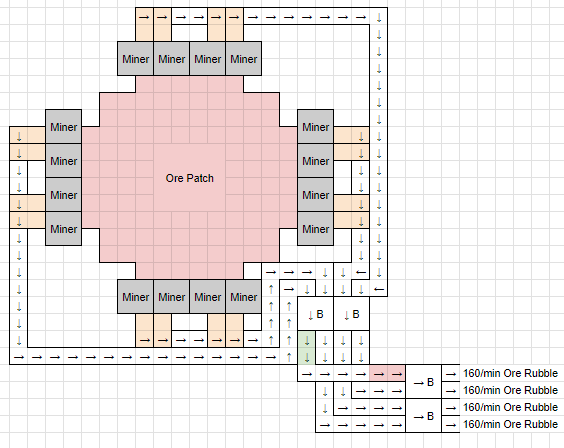
Except for the earliest part of a run prior to Burners for automated power, it’s probably always a better idea to ‘tap the entire node’, or to put drone miners on every side and then balancers on the belts. While it’s a little more work initially (and power draw), it’s going to end up less work in the long run because nothing is as annoying as the miners eating through one side of the patch and running out of ore in range and needing to move them. With miners on every side the ore patch will get depleted equally towards the center and rarely if ever actually need the miners moved rather than completely dismantled when the node runs out. This is doubly true of underground nodes – having to go back underground to move stuff around gets tedious, especially if it’s only half-dug-out and the existing stuff needs to be dismantled to avoid being destroyed by explosives.
This is true even if only using a single output belt or less- the balancers will ensure the node is being depleted 1/4 equally on each side.
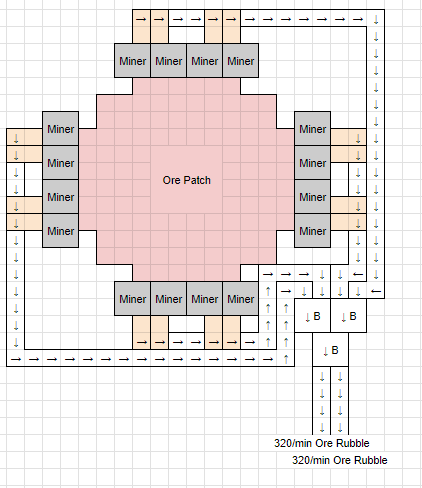
Alt with Mk1 miners into Mk2 belts or Mk2 miners into Mk3 belts. The belts in this case can actually potentially run through 8 miners apiece, although the point here is simply doing less work and not replacing stuff that doesn’t need to be replaced – just running the new tier of belts on the output (and one new balancer) is sufficient. Additionally having it separated in groups of four and then merged via a balancer ensures that the ore patch is depleted uniformly from all four sides.
Belt Production
(This is separate from the Conveyor assemblers used in SP2 in the bootstrap simply because you need a ton of conveyors, and adding the stuff to upgrade them to ramps/splitters/T2/T3 gets bloated)
Can be built from left to right in segments as stuff unlocks.
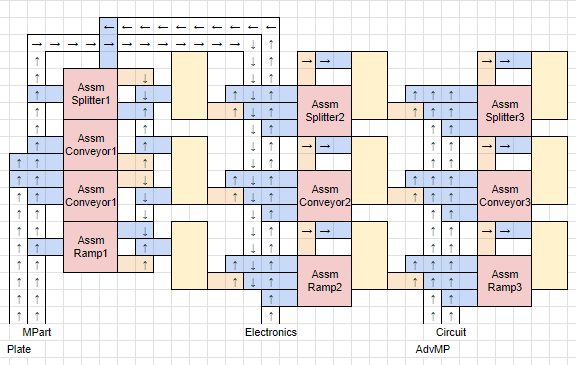
It’s pretty straightforward other than doubling up on the Conveyor I assembler since it’s needed for both upgrading itself, as well as feeding into ramp/splitter production.
Since Plate/Machine Part/Electronics are used for a ton of early buildings, this can be combined/integrated into a mall/hub producing them too. e.g. Smelters, Drone Miners, Assembler I, Small Power Poles, Wall Power Poles, Crusher I, etc
Prior to researching Logistic Container 2, you can just sub a belt going directly to the input of the next column.
T2 Xenoferrite/Technum Smelting
One of the earliest interesting parts of the game is how an additional process for the game’s basic smelting reduces the amount of raw resource needed by 1/3. That is, crushers to process ore rubble into ore before feeding them into smelters results in 50% more output for the same amount of ore rubble.
This does make the maths for filling up full belts a little complicated though. The easiest way to simplify this (just going off very basic maths/logic) is that with 50% more output, 2 full input belts of ore rubble should result in 3 full output belts of Xenoferrite Plates or Technum Rods.
The trick, then, is how to divide up the machinery to accomplish this without oversaturating belts and creating bottlenecks. Assuming T2 belts (which is around the same time you unlock crushers via Steel Smelting and then Ore Processing that makes this possible anyway), you can adopt this layout and machine count
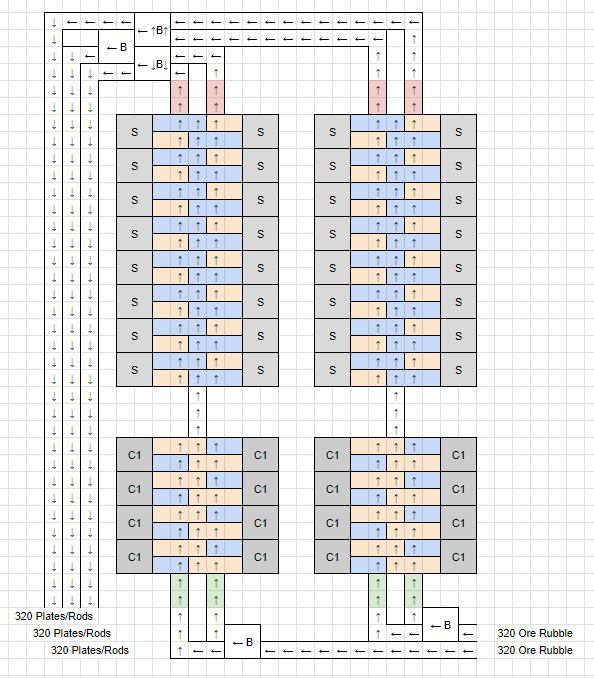
Pay special attention to the three balancers here; they’re what makes this setup work. Each of the four rows of 8 smelters is going to be picking 160/min processed ore and outputting 240/min. The four belts of 240/min product (total 960/min) can then be condensed into 3 belts of 320/min. The two initial balancers should be set so their output prioritize a full 320/min belt towards the outside belts, with the remainder 160 (240 + 240 – 320) then combining into a third full belt in the middle.
p.s. there’s obviously no need for the output belts to loop around to the left like in the diagram. I just have it this way because these are also my own personal reference for architectural shenanigans. Similarly, there’s no need to leave space in between the two columns, although you DO need at least once space between the Crushers and Smelters, or the raw Ore Rubble will end up on the output belts too.
T2 Xenoferrite/Technum Smelting (SP4/Conveyor III/Crusher II)
While teching to SP4 unlocks an in-line upgrade for belts and Crushers to effectively double the throughput of the above smelting Array, the sidegrade for Advanced Smelters is a little disappointing. Because they’re 3×3 (not even counting the increased height) vs the basic Smelter’s 2×2 for only 50% faster processing, tile-for-tile they produce less product per minute for more power and building cost, with maths that doesn’t play nice with full belts. Therefore in my opinion it’s better to just lengthen the row of smelters to 16 each.
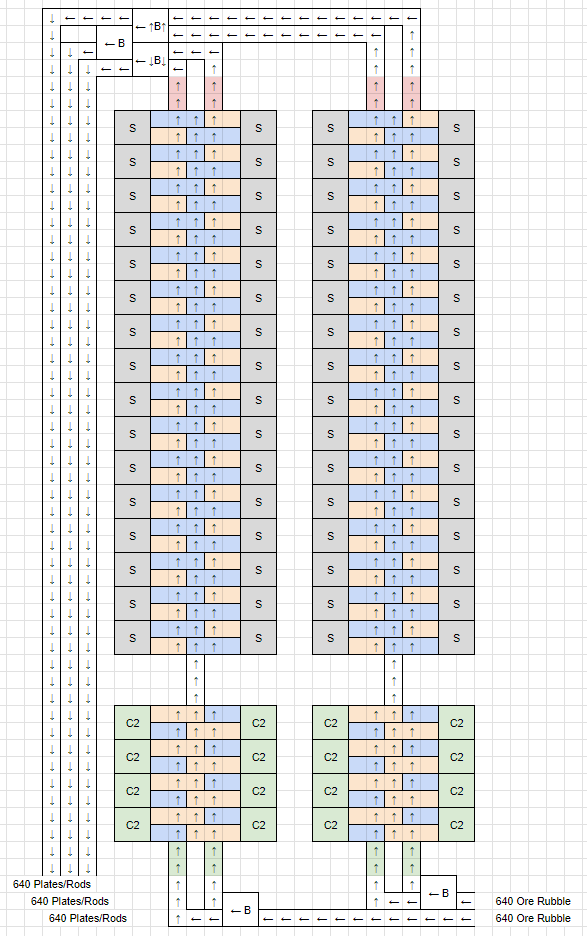
I would advise to only use Advanced Smelters where the game explicitly requires you to, i.e. recipes that aren’t available in the regular Smelters, like T2 Steel smelting. (which is totally worth as it doubles Steel output from the same amount of resources)
Anyway, the same principle with the belts apply here in their upgraded form. Two full 640/min belts should result in three full 640/min output belts, and each row of 16 smelters take 320/min and output 480/min, which can be condensed via the three Balancers on the outputs.
T2 Steel Smelting (SP4/Conveyor III/Crusher II)
Just to clarify, this is *not* the initial Steel smelting unlock. Later on in the tech tree with Advanced Smelters, another recipe for Advanced Ignium Ore Blend results in 2x the amount of Steel, but also requires Advanced Smelters to be used. As Steel is a massive, MASSIVE Xenoferrite drain, this upgrade is pretty much mandatory to reduce the amount of nodes to be tapped by half, especially before fracking.
I adopted this layout which has similar dimensions to the T2 Xeno/Technum Smelting above just so I can stack them interchangeably in the same footprint.
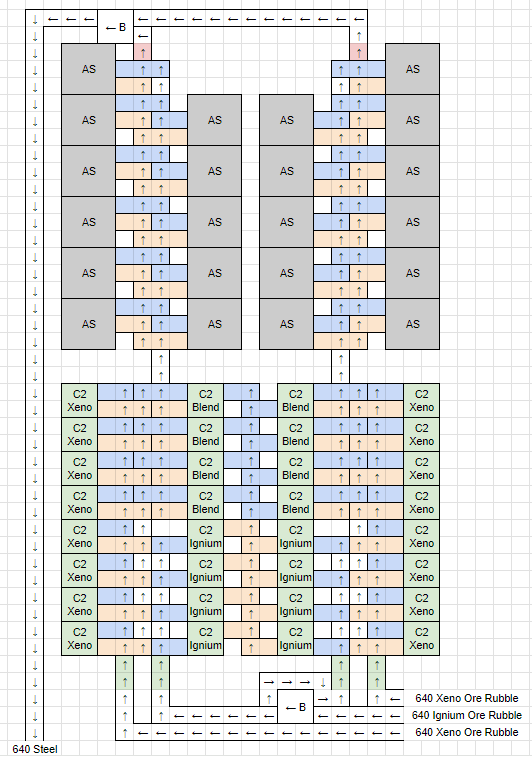
Pay careful attention to the configuration and number of Crusher IIs here. The Ignium Crushers share an output belt which feeds into both columns of Blend Crushers. Additionally, make sure the input Ignium Ore Rubble belts don’t accidentally feed into the Advanced Blend belts going to the smelters. There’s a 1-tile gap there for a reason!
Also just to clarify, there’s technically more Advanced Smelters here than necessary. Processing 320/min Blend for 640/min Steel requires 21.3333 Advanced Smelters, rather than 22. In this case the last Advanced Smelter in each array working 2/3 of the time is fine; not the end of the world and tripling the footprint with some absurd belt combination shenanigans just to cut one smelter from 33 to 32 really, really isn’t worth, lol
Concrete Production
Came up with this ultra-compact, tile-able layout with Crusher IIs and Conveyor IIs
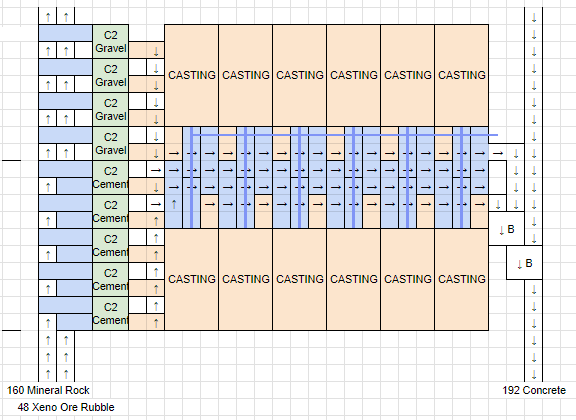
Sorry for the crap MSPaint of pipe representation here lol, still trying to figure out the best way to do this that doesn’t obstruct stuff below the pipe since this is in 3D. Hopefully the intention is clear enough at least.
Couple quick notes:
- Calibrated to 192/min output as that’s the amount required for 16/min Science.
- This uses 5 Cement Crusher IIs and 4 Gravel Crusher IIs, which technically is more than required. 12 Casting machines processing 192/min Concrete technically would need 3.2 Gravel Crusher IIs and 4.8 Cement Crusher IIs, but the simplification of having this layout tile indefinitely in an incredibly compact and understandable way otherwise is worth the slight space inefficiency tradeoff. In any case, after the system saturates and the last Cement/Gravel Crushers start cycling on/off, the system will draw exactly 160/min Mineral Rock per instance anyway.
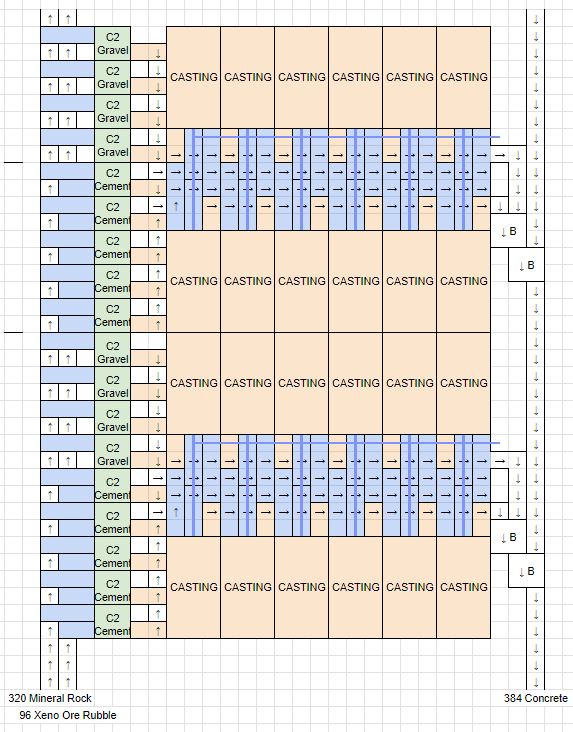
- When tiling this setup to expand, I prefer to keep the Concrete outputs separate in multiples of 192 for the aforementioned reason that the SP3 assemblers need that much per 16/min science. That is to say, even with Mk3 belts I’d only combine them to belts of 384 to neatly siphon to specific groups of assemblers rather than saturating full belts only to have funky maths on the receiving end again anyway.
- Pay special attention to how the last Cement crusher outputs. It goes downward towards a belt that snakes underneath some of the Casting Machine input loaders. Usually this kind of T-merge without a balancer should be avoided as it causes throughput issues, but this belt isn’t going to end up anywhere near full throughput anyway, so it’s fine.
- The Casting Machine can be oriented either direction, but I usually want its water intake pipes inwards, above the input loaders, just so this setup can be tiled without any space in between. On that note, since water is pretty much infinite in this game I didn’t really bother adding it to the diagram, but for completeness sake each set of 12 casting machines takes 960/min water.
example of tiling:
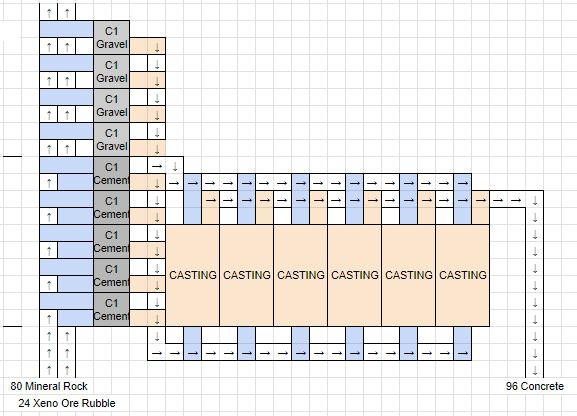
- Lastly, prior to SP4 and Crusher IIs, a preliminary version of this layout can be made with Crusher Is, except the output is only enough to feed 6 Casting Machines for 96 Concrete. However this is probably also generally going to be set up before Loader Lane 3 (SP3) is available, so a decision on how to juggle the input/output belts for the casting machines is necessary, which probably will require moving either the belts or the Casting machine after Loader Lane 3 is unlocked. I personally prefer to build the bottom row of Casting machines where they should be and just temporarily route Cement down below that row, then have Gravel occupy the belt (on Loader Lane 2 inputs) where Cement would have originally been. Reason for building this way is it makes upgrading to the version in the first image simply a quick switcharoo, as Crusher IIs can be upgraded in place of Crusher Is with a single click
Energy Cell Production
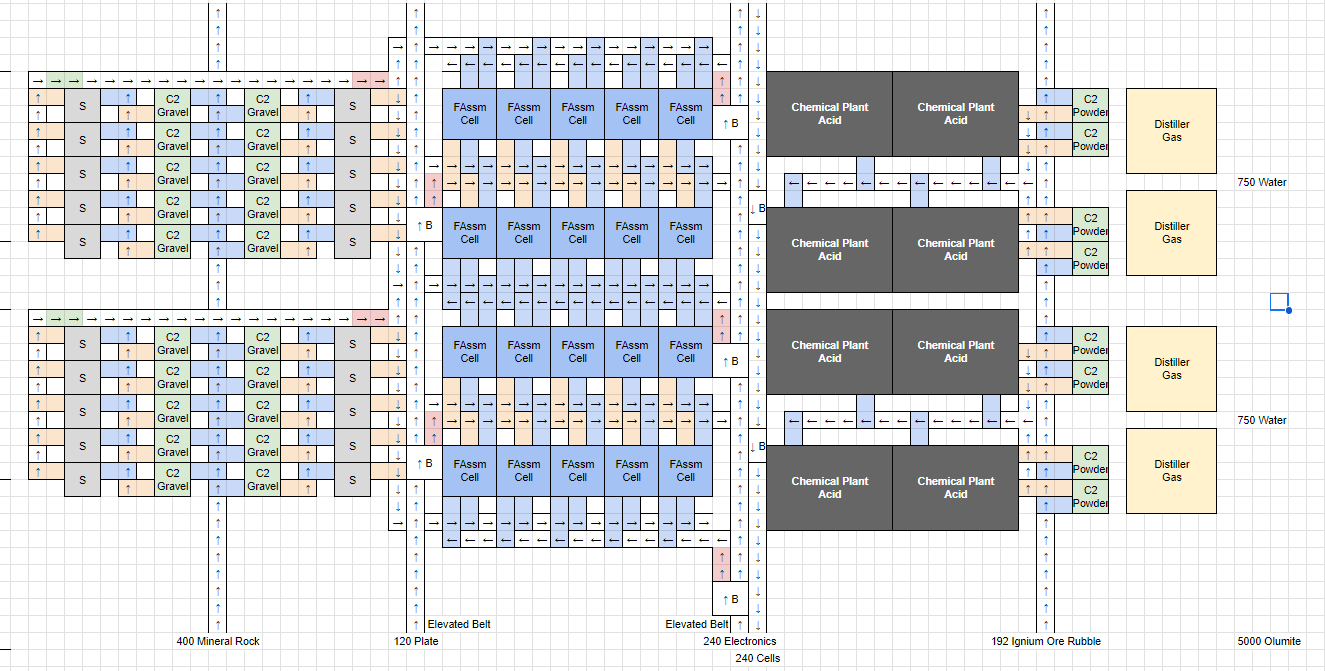
Okay, this section is definitely WIP while I figure out a better way to represent the layout in a diagram. Still, I’m putting what I have here in case some maniacs want to try to decipher exactly what’s going on, lol. Apologies. There are two elevated belts (the ones that feed Plates and Electronics) which are really hard to represent with these diagrams.

This layout takes 200 mineral rock, 60 plates, 120 electronics, 96 Ignium Ore Rubble and 5000 Olumite to spit out 120 cells, and is tileable. The Chem Plants are fed from the middle and the Acid gets piped on the outside (top/bottom of diagram) to the Fluid Assemblers. There’s a way to thread the Water/Gas pipe inputs into the Chem plants while also having the waste gas funnel without intersecting each other. Some pics from in-game incoming, I think.
Since multiple different things use cells, I picked 120 cells simply because it makes slightly more than the ~108 required for a neat chunk of SP/m with some leftover that can sit in a couple buffers for whatever intermittent draw there is. This layout can also potentially be tiled 16 times for a total output of 1920 (which fills 3 mk3 belts) when pushing to megabase status.This common denominator makes most of the maths neat, the layout is reasonably compressed, and most importantly, as mentioned, it tiles.
Super useful, thank you for that post.
what is the tool you used to draw those schematics ?